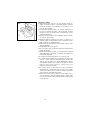
1
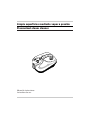
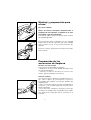
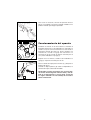
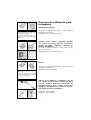
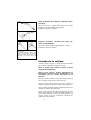
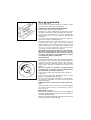
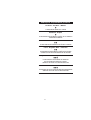
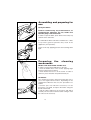
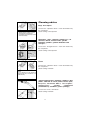
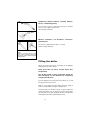
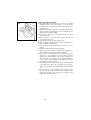
5793106200/03.05
Limpia superficies mediante vapor a presión
Pressurized steam cleaner
Manual de instrucciones
Instructions for use
ESPAÑOL
Distinguido cliente,
Alegrándonos por su elección, le agradecemos la confianza que nos ha dado.
Nuestros productos son el resultado de
minuciosos testes técnicos y de un estudio
profundizado.
Hemos preparado este manual de uso para
permitir utilizar de la manera mejor el producto
y para apreciar todas sus cualidades.
Estamos seguros que, siguiendo nuestras
sugerencias, podrá utilizarlo durante mucho
tiempo y con los mejores resultados.
Aprovechando la fuerza del vapor, Usted
contribuirà a reducir la contaminación
resultante de la dispersión de detergentes
químicos.
Este aparato aprovecha la potencia del vapor
como ayuda en las operaciones diarias de la
limpieza de la casa y en el ámbito del jardín,
hobby y bricolaje.
Ha sido estudiado para obtener la máxima
higiene de las superficies y del papel de
empapelar.
Por lo tanto una ayuda de gran valor para
las tareas domésticas de todos los días.
ADVERTENCIAS PARA LA ELIMINACIÓN CORRECTA DEL
PRODUCTO SEGÚN ESTABLECE LA DIRECTIVA EUROPEA
2002/96/CE.
Al final de su vida útil, el producto no debe eliminarse junto a los
desechos urbanos.
Puede entregarse a centros específicos de recogida diferenciada
dispuestos por las administraciones municipales, o a distribuidores
que facilitan este servicio. Eliminar por separado un electrodoméstico significa evitar posibles consecuencias negativas para el medio ambiente y la salud derivadas de una eliminación inadecuada y
permite reciclar los materiales que lo componen, obteniendo así un
ahorro importante de energía y recursos. Para subrayar la obligación de eliminar por separado los electrodomésticos, en el producto aparece un contenedor de basura móvil tachado.
2
Descripción
1
4
6
7
5
2
17
3
9
Accesorios
11
8
12
1. Regulador del flujo de vapor
(en los modelos donde está
previsto)
2. Interruptor general con luz
indicadora
3. Interruptor del generador de
vapor
4. Empuñadura
5. Tapón de la caldera
6. Luz indicadora generador de
vapor
7. Luz indicadora de encendido
del aparato.
17. Manómetro (en los modelos
donde está previsto)
10
14
16
15
13
3
8. Tubo flexible con empuñadura
(en algunos modelos extraìble)
9. Lanza
10. Cepillo triangular
11. Dos tubos rígidos de
prolongación
12. Cepillo para lanza
13. Trapo para el cepillo
alfombras/suelos y para el
cepillo triangular
14. Cepillo alfombras/suelos
15. Accesorio limpiacristales
16. Plancha (donde está previsto)
Advertencias
1)
2)
3)
4)
5)
6)
7)
8)
9)
10)
11)
12)
13)
14)
15)
16)
17)
18)
19)
20)
21)
22)
23)
24)
25)
Leer atentamente las instrucciones
El aparato en funcionamiento contiene vapor bajo presión: un uso indebido puede resultar peligroso. El aparato está destinado a un uso doméstico y al uso en el ámbito del jardín, hobby y bricolaje; se excluye cualquier utilización de tipo industrial. La sociedad productora rechaza cualquier responsabilidad por eventuales daños derivados por un uso impropio del producto.
No deje la plancha enchufada a la corriente sin vigilancia.
Desconectar siempre el enchufe antes de empezar a llenar el depósito de la caldera o antes de
seguir cualquier manutención o limpieza del propio aparato.
Antes del uso verificar que la tensión de la red corresponde con la que se indica en la placa de
datos colocada debajo del aparato.
Conectar el aparato a una toma de corriente con un alcance mínimo de 10 A y dotada de una toma de tierra eficaz.
No dirigir nunca el chorro de vapor hacia tomas de corriente o partes bajo tensión eléctrica: podrían dañarlas y exponerse a escargas eléctricas peligrosas.
No dirigir nunca el chorro de vapor hacia el aparato.
No tirar el cable de alimentación o del aparato para desconectar el enchufe de la toma de corriente.
No pasar el aparato sobre el cable eléctrico, a fin de evitar dañar el aislamiento.
No ponga el aparato en posición vertical.
NO ABRA EL TAPÓN DURANTE LA UTILIZACIÓN DEL APARATO Y ANTES DE QUE EL APARATO HAYA AGOTADO COMPLETAMENTE EL AGUA. Lo cual se produce cuando el vapor deja
de salir por la plancha o por los accesorios. Para añadir agua, extraiga la clavija, espere aproximadamente 15 minutos para evitar bruscos cambios de temperatura. Envuelva el tapón con el
trapo y desenrosque éste despacio para permitir que el vapor residual salga lentamente.
Antes de limpiar con el vapor objetos que funcionan con corriente eléctrica o aparatos electrodomésticos (horno eléctrico, frigorífico, campana extractora, etc.). Antes de todo desconectar
estos aparatos de la red eléctrica. Antes de volverlos a conectar, esperar a que todo esté perfectamente seco, ya que restos de agua podrían causar descargas eléctricas.
Evitar el contacto del vapor con la piel. La elevada temperatura puede causar graves quemaduras. No dirigir nunca el chorro de vapor hacia personas o animales, hacia objetos o superficies no
resistentes a tales temperaturas.
Para cambiar de lugar el aparato, agárrelo por la empuñadura específica; al contener una caldera, su
superficie se calienta durante la utilización. Las personas que padecen de determinadas patologías
de sensibilidad al calor tienen que tener especial cautela en el uso de este aparato.
No introducir ningún detergente en el depósito. Utilizar exclusivamente agua.
Si el aparato no se utiliza durante largos periodos, les aconsejamos que hagan evaporar toda el
agua antes de guardarlo.
Utilice sola y EXCLUSIVAMENTE la alfombrita apoya plancha suministrada en dotación; en caso
de pérdida (o si se estropea) utilice solamente el repuesto ORIGINAL.
No poner la plancha en posición vertical.
Mantener alejado el aparado del alcance de los niños o de personas que no estén en condiciones
de utilizarlo sin control.
Una vez se ha terminado de planchar, dejar enfriar la plancha antes de guardarlo.
No poner en funcionamiento el aparato que parezca defectuoso. Diríjase al Centro de Asistencia
autorizado.
En caso de accionamiento del limitador de la temperatura de seguridad, la plancha o el dispositivo deja de funcionar. Para volver a ponerlo en funcionamiento, diríjase a personal especializado.
No dejar el aparato expuesto a agentes atmosféricos (lluvia, hielo, sol, etc.)
Para efectuar reparaciones póngase en contacto con el Centro de Asistencia autorizado, para no
alterar la eficacia de su aparato y para garantizar la validez de la garantía.
Si el cable de alimentación está estropeado, el fabricante o su servicio de asistencia técnica, o en
cualquier caso, una persona con una cualificación similar deberá sustituirlo para eliminar cualquier riesgo.
CONSERVAR CUIDADOSAMENTE ESTAS INSTRUCCIONES
4
Montaje y preparación para
el uso
Uso de la caldera
Antes de iniciar cualquier manutención o
preparación del aparato, asegúrense de que
el enchufe esté desconectado.
Para abrir la caldera ejercer una presión sobre el tapón
de seguridad girándolo.
Les aconsejamos llenar el depósito con una cantidad
máxima de 1,5 litros de agua del grifo (una cantidad
mayor podría causar un mal funcionamiento del
aparato).
Enroscar el tapón, ejerciendo una presión enroscando
hasta el fondo.
Preparación de los
accesorios de limpieza
Modelos con tubo extraìble
Para conectar el tubo flexible a la máquina:
* introducir en la toma el tubo flexible apoyando hasta
oír el clic de introducción
* verificar si el tubo se introduce en la toma. Para
sacarlo, apretar el pulsador y tirar hacia sí.
Todos los modelos
Los accesorios para la limpieza se introducen en uno o
dos tubos rígidos de prolongación según las
necesidades. En cualquier caso hay que proceder del
siguiente modo:
* coger en una mano la pieza en la que irá introducido el
accesorio, y con el dedo pulgar de la misma mano
apretar el pulsador;
* con la otra mano, introducir el accesorio y hacer que
se deslice con cuidado sobre el pulsador hasta cuando
este último haya salido del orificio colocado en el
accesorio.
5
Para sacar un accesorio, efectuar la operación inversa.
Sacar con cuidado el accesorio teniendo cuidado en no
pellizcar el dedo que empuja el pulsador.
2
7
6
Funcionamiento del aparato
3
Introducir el enchufe en la toma eléctrica, encender el
interruptor general (2), la luz indicadora se enciende y la
caldera se pone en funcionamiento accionando el
interruptor general del vapor (3). En los modelos con
manómetro, cuando la aguja del manómetro se
encuentra en la zona verde, el aparato está listo para el
uso y la luz indicadora se apaga (7).
Esperar unos 15 minutos, cuando la luz indicadora se
apaga (7) el aparato está listo para el uso.
Para la salida del vapor pulse el botón (1) y después la
palanca (2) (fig. 5).
Cuando se deje la palanca (2) sobre la empuñadura, la
emisión del vapor acabará de inmediato.
2
1
NB:Cuando se utilice por primera vez, el aprato puede emanar durante algunos minutos humo y olor debido al recalentamiento y consecuente secado de
los sigilos utilizados en el ensamblaje de la caldera.
Airear la habitación.
6
Consejos de utilización para
la limpieza
Alfonbras y moquetas
Advertencias:
* verificar la resistencia de los tejidos y de los
colores en puntos escondidos
* se aconseja aspirar antes el polvo con un
aspirador o con una aspiradora para
alfombras
Advertencias
* testar siempre la
resistencia de los
tejidos o de los
colores en un punto
escondido
* se
aconseja
aspirar antes el polvo
con un aspirador
Accesorios: cepillo alfombras/suelos + trapo fijado con
los ganchos con muelle.
Regulación del vapor: posición central
Sillones, sofás, cojines, colchones, interior
del coche, persianas, paredes verticales,
muebles de jardín, templetes, sombrillas de
jardín y balancines.
Accesorios: cepillo triangular + trapo fijado con los
ganchos con muelle
Regulación del vapor: posición central
Suelos
Accesorios: cepillo alfombras/suelos + trapo fijado con
los ganchos con muelle
Regulación del vapor: máximo
Advertencias
* No se aconseja el uso sobre baldosas
de barro cocido tratado, sobre suelos
encerados o sobre parquet
Juntas de las baldosas, radiadores, persianas, jambas de las puertas, puntos de difícil
acceso, floreros, bicicletas, bicicletas de
montaña, motores de los coches, motos, herramientas de jardinería (cortadoras de hierba), juegos de niños (columpios).
Accesorios: lanza + cepillo
Regulación vapor: máximo
7
Baño (mampara de la ducha, sanitarios, pilas,
piscinas).
Accesorios: lanza + cepillo directamente en el tubo
flexible o en el tubo rígido de prolongación
Regulación del vapor: máximo
Espejos, ventanas, cristales del coche, galerías e invernaderos.
Accesorios: tubos rígidos de prolongación + rastrillo
Regulación del vapor: mínimo
Advertencias:
* cuando fuera hace frío, atención a los
cambios de temperatura, que podrían
romper los cristales. Éstos tienen que ser
calentados con un ligero chorro de
vapor.
Llenado de la caldera
Cuando el vapor se agota, se puede proceder al llenado
de la caldera, siguiendo el siguiente método:
Abrir el tapón sólo cuando el agua se haya
evaporado totalmente.
Hacer salir todo el vapor, utilizando el
interruptor colocado en la empuñadura o el
pulsador para la salida de vapor de la
plancha.
Apagar el aparato actuando sobre el interruptor general
(2) o sacando el enchufe de la toma eléctrica.
Esperar algún minuto antes de volver a llenar el
depósito para evitar repentinos cambios de temperatura.
Poner el trapo encima del tapón del depósito para evitar
repentinos cambios de temperatura.
Poner el trapo encima del tapón del depósito (6) para
abrirlo. Abrir despacio el tapón poniendo atención en
hacer salir lentamente el vapor que podría quedar en el
interior. Llenar de nuevo el depósito siguiendo las
explicaciones precedentes.
8
Uso de la plancha
(si es suministrada)
Para la puesta en funcionamiento de la caldera, seguir
las instrucciones dadas precedentemente.
Preparación del sistema de planchado
Para conectar la plancha con el aparato:
Introducir en la toma el dispositivo de la plancha, ejercer
una presión para hacer saltar el pulsador de extracción;
verificar que el dispositivo esté bien introducido
intentando sacarlo sin actuar sobre el pulsador de
extracción.
Para poner en funcionamiento el aparato, seguir las
instrucciones dadas precedentemente.
Cuando la plancha se utiliza por primera vez, se
aconseja hacer salir el vapor sobre un trapo durante
algún segundo, para eliminar posibles impurezas que
podrían depositarse en el interior de la plancha. Con
este fin, accionar el pulsador “petición de vapor”
colocado en la parte superior de la plancha.
NB:Cuando se utilice por primera vez, el aprato puede emanar durante algunos minutos humo y olor debido al recalentamiento y consecuente secado de
los sigilos utilizados en el ensamblaje de la caldera
y de la plancha. Airear la habitación.
Funcionamiento
Seleccione la temperatura deseada, girando el regulador
del termostato en uno de los sectores disponibles, de
acuerdo con el tipo de tejido que hay que planchar.
Antes de comenzar a planchar, espere a que se apague
la luz testigo “plancha en temperatura” puesta su la
plancha.
N.B.: la luce piloto se encenderá y apagará durante
el planchado, de acuerdo con las temperaturas
alcanzadas por la caldera y la plancha.
Para erogar el vapor, apriete el botón vapor situado en
la plancha.
Actuar sobre el regulador del flujo de vapor (1) para
obtener la cantidad de vapor deseada.
Nota: En el momento del encendido, es aconsejable tener situado el regulador en la posición de erogación
máxima del vapor.
ATENCIÓN: El tubo de conexión plancha-caldera puede calentarse.
La planche puede generar vapor incluso en posición vertical;
esto permite vaporizar los tejidos con facilidad para recobrar su
aspecto de nuevo.
Planchado en seco
Encienda sólo el interruptor general (2) y deje apagado el
interruptor del generador de vapor (3) que se encuentra en
la unidad central del aparato.
Antes de comenzar el planchado, aguarde hasta que la luz
testigo de la plancha se haya apagado.
9
A
Consejos útiles
✔ Tejidos de terciopelo, lana, etc., así como guantes, bolsas, etc.
podrán recuperar su aspecto y suavidad originales, pasando
lentamente la plancha a poca distancia de los mismos con el
vapor en funcionamiento.
✔ Las alfombras podrán quedar como nuevas, eliminando los
hoyos de los muebles apoyados sobre las mismas, haciendo
penetrar el vapor en donde el pelo está aplastado y luego
cepillando ligeramente.
✔ No apoye ni use la plancha sobre cremalleras, ganchos, anillas,
etc., para no rayar la suela.
✔ Mantenga limpia la superficie de la suela: con dicho fin, es
suficiente pasar un paño húmedo sobre la superficie fría. No
limpie el aparato con descalcificadores.
✔ Cuando deje de usar la plancha, espere siempre a que se enfríe
antes de guardarla.
✔ Guarde la plancha en un lugar seco.
✔ No es necesario vaciar el agua que queda en la caldera cuando
termine de planchar.
✔ Divida las prendas de acuerdo con la temperatura requerida
para el planchado, comenzando con aquéllas que requieren las
temperaturas más bajas.
✔ Los tejidos de seda se planchan en seco y sobre el revés.
✔ Los tejidos de lana, algodón y lino se planchan con vapor sobre
el revés, o sobre el derecho interponiendo una tela fina para
evitar el efecto de “brillos”. Los tejidos almidonados requieren
más humedad. Planche sobre el derecho del tejido los colores
blancos y claros y sobre el revés los colores oscuros y los
bordados, para hacerlos resaltar.
✔ Los tejidos de lino se planchan con vapor, vaporizando
abundantemente y planchando sobre el revés sólo los tejidos
oscuros, para evitar el efecto de “brillos”. Planche los dobleces
sobre el derecho, para darles más resalte.
✔ Cada vez que use el vapor (y cuando lo use por primera vez), o
si no ha utilizado el vapor por algunos minutos, apriete varias
veces el botón del vapor. Esto permitirá eliminar el agua fría del
circuito del vapor.
10
Tabla para un planchado perfecto
Acetato - Acrílico - Nailon
•
PLANCHADO EN SECO MUY LIGERO
Poliéster - Rayón
•
PLANCHADO EN SECO SOBRE EL REVÉS DE LA PRENDA A
TEMPERATURA MÍNIMA
Seda
••
PLANCHADO EN SECO SOBRE EL REVÉS DE LA PRENDA
Lana - Algodón Fino - Lino fino
••
PLANCHADO EN VAPOR SOBRE EL REVÉS DE LA PRENDA
USANDO UNA TELA DELGADA ENCIMA DE LOS TEJIDOS
Algodón - Lino fino - Tejidos almidonados
•••
PLANCHADO DE VAPOR SOBRE EL DERECHO
DE LAS PRENDAS BLANCAS O CLARAS Y
SOBRE EL REVÉS DE LAS PRENDAS OSCURAS
Lino
•••
PLANCHADO DE VAPOR VAPORIZANDO ABUNDANTEMENTE
SOBRE EL REVÉS DE LOS TEJIDOS OSCUROS
11
ENGLISH
Dear customer
Congratulations on your purchase and thank
for your confidence in our brand.
Our products represent the fruit of rigorous
testing and in-depth study.
We have prepared this user manual to
enable you to get the most out of the product.
We are sure that compliance with the
instructions will ensure the lenghty service life
of the appliance and your lasting satisfaction.
By exploiting the power of steam, it helps
reduce air pollution caused by the dispersion
of chemical detergents.
This appliance exploits the power of steam
to facilitate everyday cleaning in the home or
for gardening, hobbies and DIY.
It has been designed to improve the hygiene
of household surfaces and upholstery.
When fitted with an iron, this product
constitutes an efficient ironing system capable
of meeting all the family’s requirements.
Consequently, it represents a valuable
helping hand in everyday household tasks.
IMPORTANT INFORMATION FOR CORRECT DISPOSAL OF
THE PRODUCT IN ACCORDANCE WITH EC DIRECTIVE
2002/96/EC.
At the end of its working life, the product must not be disposed of
as urban waste.
It must be taken to a special local authority differentiated waste
collection centre or to a dealer providing this service.
Disposing of a household appliance separately avoids possible
negative consequences for the environment and health deriving
from inappropriate disposal and enables the constituent materials to be recovered to obtain significant savings in energy and
resources.As a reminder of the need to dispose of household
appliances separately, the product is marked with a crossed-out
wheeled dustbin.
12
Description
1
4
6
7
5
2
17
3
1. Steam flow regulator (where
this is one of the model’s
features)
2. Illuminated on/off switch
3. Steam generator switch
4. Handle
5. Filler cap
6. Steam generator light
7. Appliance operating light
17. Pressure gauge (where
this is one of the model’s
features)
9
Accessories
11
8
12
10
14
16
15
13
13
8. Flexible hose with handgrip
(some models are provided
with detachable hose)
9. Nozzle
10. Triangular brush
11. Two rigid extension tubes
12. Mini-brush for nozzle
13. Wash cloth for the carpet/floor
brush and for the triangular
brush
14. Carpet/floor brush
15. Window-cleaning squeegee
16. Iron (some models only)
Important
1)
2)
3)
4)
5)
6)
7)
8)
9)
10)
11)
12)
13)
14)
15)
16)
17)
18)
19)
20)
21)
22)
23)
24)
25)
Read the instructions carefully
The appliance contains pressurised steam. Incorrect or improper use could be dangerous. The
appliance is designed for household use or for gardening, hobbies or DIY. All types of industrial
use are excluded. The manufacturer declines all liability for damage deriving from improper use of
the product.
Do not leave the iron unattended when plugged in.
Always disconnect the plug before filling the boiler tank, or before carrying out any maintenance
Always unplug before filling the boiler tank, performing maintenance or cleaning the appliance.
Before use, make sure the mains voltage corresponds to the voltage indicated on the rating plate
on the bottom of the appliance.
Plug the appliance into an efficiently earthed socket with a minimum rating of 10 A.
Never direct the steam jet towards the socket or live parts: they could be damaged, with the risk of
dangerous electrical discharges.
Never direct the steam jet towards the appliance.
Never unplug the appliance by pulling the power cable or appliance itself.
To avoid damaging the insulation, do not run the appliance over the power cable.
Never place the appliance in a vertical position.
DO NOT OPEN THE CAP WHILE USING THE APPLIANCE OR BEFORE ALL THE WATER HAS
BEEN EXHAUSTED. THIS OCCURS WHEN STEAM IS NO LONGER DISCHARGED BY THE
IRON OR TOOLS. To add water, unplug and wait about 15 minutes to avoid sudden temperature
changes. Place the cloth over the cap and unscrew slowly to allow residual steam to escape
slowly.
Before steam cleaning electrically-powered objects or household appliances (electric oven, refrigerator, extractor fan, etc), unplug these appliances from the mains. Before plugging in again,
make sure they are perfectly dry as residual water could cause electrical discharges.
Avoid the steam coming into contact with the skin. The high temperature could cause serious
burns. Never direct the steam jet towards persons or animals or towards surfaces or objects with
could be damaged by high temperatures.
To move the appliance, hold it by the handgrip. As it contains a boiler, its surfaces become hot during use. Persons affected by particular pathologies causing abnormal sensitivity to heat should
take special care when using this appliance.
Do not add detergent to the tank. Use water only.
If not used for long periods, you are recommended to evaporate the water completely before putting the appliance away.
Use the iron mat provided ONLY. If it is lost or damaged, use only an ORIGINAL replacement.
Never place the iron in a vertical position.
Keep the appliance out of reach of children or persons not capable of using it without supervision.
After ironing, allow the plate of the iron to cool before putting away.
Do not use the appliance if it appears to be faulty. Contact the authorised surface centre.
If the temperature safety switch trips, the iron or device shuts down. To use again, contact specialist personnel.
Protect the appliance from atmospheric agents (rain, frost, sun, etc).
To repair contactan authorised service centre in order to avoid compromising the efficiency of your
appliance and guarantee the validity of the guarantee. For the same reasons, you are always recommended to use original spare parts.
If the supply cord is damaged, it must be replaced by the manufacturer, its service agent or similarly qualified persons in order to avoid a hazard.
KEEP THESE INSTRUCTIONS CAREFULLY
14
Assembling and preparing for
use
Using the boiler
Before commencing any maintenance, or
preparing the appliance for use, make sure
that the plug is disconnected.
In order to open the boiler, press down on the safety cap
and turn at the same time.
It is advisable to fill the tank with a maximum of 1,5 litres
of tap water (greater quantities may result in the
appliance’s poor operation).
Screw on the tap, applying pressure and screwing down
tight.
P repari ng the
accessories
cl eani ng
Models with detachable flexible hose
In order to connect the flexible hose to the unit:
* insert the flexible hose in the socket, applying slight
pressure until you hear it click in
* check whether the hose is in the socket. In order to
remove it, press the button and pull it towards you.
All models
The cleaning accessories must be inserted into one or
two of the rigid extension tubes, depending on the
requirements. Whetever the case, the procedure is as
follows:
* hold the part, into which the accessory is to be
inserted, in one hand, and press the button using the
thumb of that hand;
* with the other hand insert the accessory and slide it
carefully over the button until the button emerges from
the orifice on the accessory.
15
In order to disconnect the accessory, follow the reverse
procedure. Remove the accessory carefully, taking care
not to catch your finger which is holding the button down.
2
7
6
Operating the appliance
Plug the appliance in, turn on the on/off switch (2), the
light comes on and the boiler starts working, activating
the main steam switch (3).
3
Wait approx. 15 minutes; when the light (6) goes off the
appliance is ready for use.
Press the switch located on the handgrip of the flexible
hose in order to shoot the steam out of the accessories.
To produce steam, press the button (1) and then the
lever (2). When the lever (2) on the handgrip is released,
steam discharge ceases immediately.
2
1
N.B.: When used for the first time, the appliance may
give out smoke and an odour for several minutes.
This is caused by heating and subsequent drying of
the sealers used in assembling the boiler. You are recommended to ventilate the room.
16
Cleaning advice
Rugs and carpets
Warning:
* check the resistance of fabrics or colours in
places which can not be readily seen
* it is advisable to remove dust using a vacuum
cleaner before starting
Accessories: carpet/floor brush + wash cloth held on by
the snap hooks.
Steam setting: central position.
Armchairs, sofas, cushions, mattresses, car
interiors, blinds, vertical walls, garden
furniture, gazebos, garden umbrellas and
loungers.
Warning:
* check the resistance
of fabrics or colours in
places which can not be
readily seen
* it is advisable to
remove dust using a
vacuum cleaner before
starting
Accessories: triangular brush + wash cloth held on by
the snap hooks
Steam setting: central position
Floors
Accessories: carpet/floor brush + wash cloth held on by
the snap hooks
Steam setting: maximum
Warning:
* it is not advisable to use the appliance on
treated terra-cotta tiles, on waxed floors or on
woodblock flooring.
Joints between tiles, radiators, shutters, door
jambs, difficult to reach points, flower pots,
bicycles, mountain bikes, car engines,
m o t o rc yc le s,
g a rd e n
e q u ip me n t
(lawnmowers), children's games (swings)
Accessories: nozzle + mini-brush
Steam setting: maximum
17
Bathroom (shower cubicle, sanitary fittings,
basins, swimming pools)
Accessories: nozzle + mini-brush directly on flexible
hose or on the rigid extension tube
Steal setting: maximum
Mirrors, windows, car windows, verandas,
greenhouses
Accessories: rigid extension tubes + raclette
Steam setting: minimum
Warning
* when it is cold outside, take care to avoid
sudden changes in temperature which could
break the glass. The glass should be heated with
a slight jet of steam.
Filling the boiler
When the steam has run out, the boiler can be filled by
following the procedure below:
Only open the cap once all the water has
evaporated
Let all the steam escape, using the switch on
the handgrip, or the button for expelling
steam from the iron.
Turn the appliance off using the on/off switch (2), or pull
the plug out from the socket.
Wait for a few minutes before filling the tank again in
order to avoid sudden changes in temperature.
Place the cloth over the filler cap (5) to open it. Open the
cap slowly, taking care to allow any steam, which might
still be inside, to escape gradually. Fill the tank again by
following the procedure explained previously.
18
Using the iron
(if provided)
To operate the boiler, see the above instructions.
Setting up the ironing system
To connect the iron to the appliance:
Plug the iron into the socket and press until the release
button clicks.
Make sure the plug is fully inserted by attempting to
remove it without using the release button.
To turn on the appliance, follow the above instructions.
When the iron is started up for the first time, you are
recommended to discharge the steam onto a cloth for a
moment in order to eliminate possible impurities
deposited in the iron. Do this by pressing the "steam
required" button on top of the iron.
N.B.: When used for the first time, the appliance may
give out smoke and an odour for several minutes.
This is caused by heating and subsequent drying of
the sealers used in assembling the boiler. You are recommended to ventilate the room.
OPERATION
Select the required temperature by rotating the
thermostat knob to one of the marked sectors according
to the type of fabric to be ironed. Wait until the "iron at
temperature" indicator light goes out before beginning to
iron.
N.B.: the indicator light goes on and off during ironing according to the temperature of the iron.
To discharge steam, use the steam button on the iron.
Use the steam flow regulator (1) to obtain the required
quantity of steam.
N.B. When turning the iron on, you are recommended to rotate the knob into the maximum steam discharge position.
IMPORTANT: the tube connecting the iron to the boiler may become hot. The iron can also generate steam
in a vertical position, enabling fabrics to be easily restored by steaming.
Dry ironing
Turn on the main switch (2) only and leave the steam
generator switch (3) on the appliance control unit in the
off position.
Wait for the indicator light on the iron to go off before
starting to iron.
required quantity of steam.
19
A
Tips for perfect ironing.
✔ The original appearance and softness of velvet, wool or similar
materials as well as glove and bags etc. can be restored by
holding the iron a few cm above the fabric whilst pressing the
steam button (A).
✔ Carpets and rugs can be restored to new, eliminating the marks
made by furniture, by allowing the steam to penetrate into the
squashed pile and brushing lightly.
✔ Do not rest or use the iron on zips, hooks, rings etc to avoid
scratching the plate.
✔ Keep the surface of the plate clean: to clean, wipe the cold
surface with a damp cloth.
✔ Descaling products must not be used in the iron.
✔ After use, always wait until the iron is cold before putting away.
✔ Store the appliance in a dry place.
✔ After ironing, the water remaining in the boiler need not be
drained.
✔ Silk fabrics can be dry-ironed on the wrong side.
✔ .Divide garments according to required ironing temperature,
starting with those requiring the lowest temperatures.
✔ Wool, cotton and linen fabrics can be steam-ironed on the
wrong side, or on the right side over a fine cloth to avoid the
"shiny" effect. Starched fabrics require greater moisture. Iron
white and light coloured fabrics on the right side and dark
colours on the wrong side. Embroidery should also be ironed on
the wrong side to make it stand out.
✔ Linen fabrics can be steam ironed by steaming abundantly and
ironing dark fabrics only on the wrong side to avoid a "shiny"
effect. Iron cuffs and lapels on the right side to make them stand
out.
✔ Every time the iron is used (including for the first time) or if you
have not used the iron for several minutes: push the steam
button several times. This enables the cold water to be
eliminated from the steam circuit.
20
Perfect ironing table
Acetate - Acrylic - Nylon
•
DRY IRON, VERY LIGHTLY
Polyester - Rayon
•
DRY IRON ON REVERSE SIDE OF GARMENT
AT MINIMUM TEMPERATURE
Silk
••
DRY IRON ON REVERSE SIDE OF GARMENT
Wool - Fine Cotton - Fine Linen
••
STEAM IRON ON REVERSE SIDE OF GARMENT
PLACING A THIN CLOTH OVER THE FABRIC
Cotton - Fine Linen - Starched Articles
•••
STEAM IRON ON FRONT OF WHITE OR LIGHT
COLOURED GARMENTS, ON REVERSE SIDE
OF DARKER ARTICLES
Linen
•••
STEAM IRON WITH PLENTY OF STEAM ON
REVERSE SIDE OF DARK GARMENTS.
ELECTRICAL CONNECTION (UK ONLY)
A)
If your appliance comes fitted with a plug, it will incorporate a 13 Amp fuse. If it does not fit your socket, the plug
should be cut off from the mains lead, and an appropriate
plug fitted, as below.
WARNING: Very carefully dispose of the cut off plug after
removing the fuse: do not insert in a 13 Amp socket elsewhere in the house as this could cause a shock hazard.
With alternative plugs not incorporating a fuse, the circuit must be protected by a 15 Amp fuse.
B)
If the plug is a moulded-on type, the fuse cover must be
re-fitted when changing the fuse using a 13 Amp Asta
approved fuse to BS 1362. In the event of losing the fuse
cover, the plug must NOT be used until a replacement
fuse cover can be obtained from your nearest electrical
dealer. The colour of the correct replacement fuse cover
is that as marked on the base of the plug.
If your appliance is not fitted with a plug, please follow
the instructions provided below:
As the colours of the wires in the mains lead may not correspond with the coloured markings identifying the terminals in
your plug, proceed as follows:
The green and yellow wire must be connected to the terminal
in the plug marked with the letter E or the earth symbol
or coloured green or green and yellow.
The blue wire must be connected to the terminal marked with
the letter N or coloured black.
The brown wire must be connected to the terminal marked
with the letter L or coloured red.
WARNING - THIS APPLIANCE MUST BE EARTHED
IMPORTANT
The wires in the mains lead are coloured in accordance with
the following code:
E
Green and yellow:
Earth
Blue:
Neutral
L
N
Brown:
Live
21