1
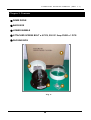
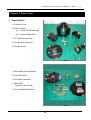
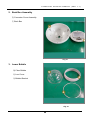
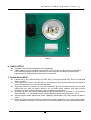
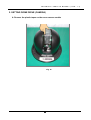
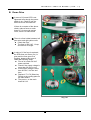
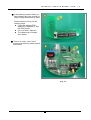
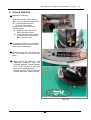
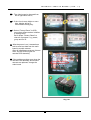
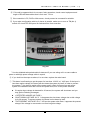
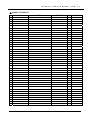
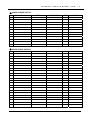
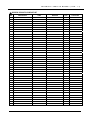
Superior Speed Dome
Technical Service Manual
Notice: Do not use or copy this manual without any permission from D-MAX
except for authorized distributors and customers. It has to remain confidential.
2
Table of Contents
CHAPTER 1.
Specifications
4
CHAPTER 2.
Contents
6
CHAPTER 3.
Parts Name
7
CHAPTER 4.
Installation
9
CHAPTER 5.
Installing Each Bracket
16
CHAPTER 6.
Check point & Maintenance of each parts
18
CHAPTER 7.
Trouble Shooting
24
CHAPTER 8.
Assembly Drawings
26
CHAPTER 9.
Dimensions
29
Appendix A.
PART LIST
Appendix B.
Picture of PCB (Main Board)
Appendix C.
Circuit Diagrams
3
T E C H N I C A L
S E R V I C E
M A N U A L
( V E R .
1 . 1 )
Chapter 1. Specifications
Technical Specifications (DSC-230SI)
PAL
Effective Pixels ................... 752 (H) X 582 (V) pixels
Scanning ............................. 625 lines, 50 fields, 25 frames
Horizontal ............................ 15.625 kHz
Vertical ................................. 50 Hz
Operational
Manual Pan Speed ............... 0.1˚ - 250˚ per second (based on
zoom wide position)
Manual Tilt Speed ................. 0.1˚ – 90˚ per second
Preset Pan/Tilt Speed ........... 360˚ per second, maximum
Pan Travel ............................. 360˚ continuous
Tilt travel ................................ 92˚
Pan/Tilt Accuracy ................... ± 0.2˚
Total Zoom ............................. 220x
Optical Zoom ......................... 22x
Digital Zoom .......................... 10x
Zoom Start .............................. Selectable 1x to 12x
Zoom Limit .............................. Selectable 13x, 17x, 22x,
44x (Zoom Limit default), 66x,
88x, 110x, 132x, 154x, 176x,
198x, 220x
Programmable Presets ....................... 128
Programmable Group-tours ................. 6
Programmable Auto-tour ..................... 1
Programmable PTZ Trace (Pattern) .... 1
Programmable Privacy Zones ............. 6
Auto Synchronization
Line-Locked .................... Remote V-phase adjustment
Internal ........................... Built-in AC-DC ractifier
Address Range
RS-485/RS-422 .................... 1 – 255
Alarm Inputs ............................... 4
Alarm Output .............................. 1 relay output at 12 VDC/AC,
500 mA
Menu Language .......................... English
All Cameras
White Balance .......................... Through the Lens (TTL)
Auto Tracing White Balance
(ATW)
Horizontal Resoultion ................ 480 TVLines at center
Imager.......................................1/4-inch Color Super HAD
CCD (SONY)
Scanning System ................ 2:1 interlace
Video Output ....................... 1.0 Vp-p, 75 ohm composite
S/N Ratio ............................. 48 dB (Typical)
Minimum Illumination ........... Better than 1.0 lux (30 IRE,
AGC) on 0.01 lux with 1/8 sec
open shutter and day/night mode
0.1 lux in black and white mode
with open shutter
Lens
Design .......................................... Aspherical
Aperture ....................................... F1.6
3.9 mm ......................................... 51.26° (H) x 39.03° (V)
85.8 mm .................................... 2.39° (H) x 1.8° (V)
Focal Length ................................. 3.9 to 85.8 mm
Field of view Formulas
Horizontal View = (0.8 x A)/B
Vertical View = (0.6 x A)/B
Mechanical
Electrical
Height ......................................... 224 mm (8.8 inch)
Diameter ..................................... 189 mm (7.4 inch)
Weight
Housing and dome drive ......... 2.0 kg (4.4 lbs)
Input Voltage .............................. 24 VAC, 50/60 Hz Class 2
Design Tolerance ....................... 20 to 30VAC, 50/60 Hz
Power ......................................... 18 Watts
Power On In-Rush Current ......... 0.8 amps
Allowable Drop-Out .................... 100 µsec
Surge Protection
Video ...................................... Switching Diode
RS-422/RS-485 .......................... TVS rated 9.8V/1 A,
500 watts, 8/20 µsec impulse
Power Line ................................. INR rated at 77 V, 250 A,
1.5 joules
Environmental
Operating Temperature ............... -5 ℃ to 50 ℃
(14 ℉ to 122 ℉)
Humidity ...................................... 0 to 90 %RH
(non condensing)
Storage Temperature .................. -15 ℃ to 50 ℃
(23 ℉ to 122 ℉)
Cameras
Certifications
NTSC
Effective Pixels .................... 768 (H) X 494 (V) pixels
Scanning ............................. 525 lines, 60 fields, 30 frames
Horizontal ............................ 15.734 kHz
Vertical ................................. 59.94 Hz
CE, Class B
FCC, Class B
4
T E C H N I C A L
S E R V I C E
M A N U A L
( V E R .
1 . 1 )
Technical Specifications (DSC-270SI)
All Cameras
White Balance............................Through the Lens (TTL)
Auto Tracing White Balance
(ATW)
Horizontal Resoultion.................480 TVLines at center
Imager.......................................1/4-inch Color Super HAD
CCD (SONY)
Scanning System..................2:1 interlace
Video Output.........................1.0 Vp-p, 75 ohm composite
S/N Ratio...............................50 dB (Typical)
Minimum Illumination.............Better than 1.0 lux
(30 IRE, AGC) on
0.01 lux in color with 1/16 sec
open shutter mode
0.03 lux in black and white mode
with 1/16 sec open shutter
Operational
Manual Pan Speed...................0.1˚ - 250˚ per second (based
on zoom wide position)
Manual Tilt Speed...................0.1˚ – 90˚ per second
Preset Pan/Tilt Speed.............360˚ per second, maximum
Pan Travel...............................360˚ continuous
Tilt travel..................................92˚
Pan/Tilt Accuracy.....................± 0.2˚
Total Zoom...............................270x
Optical Zoom...........................27x
Digital Zoom.............................10x
Zoom Start................................Selectable 1x to 12x
Zoom Limit................................Selectable 13x, 17x, 22x, 27x,
54x (Zoom Limit default), 81x,
108x, 135x, 162x, 189x, 216x,
243x, 270x
Programmable Presets ....................... 128
Programmable Group-tours ................. 6
Programmable Auto-tour ..................... 1
Programmable PTZ Trace (Pattern) .... 1
Programmable Privacy Zones ............. 6
Auto Synchronization
Line-Locked...........................Remote V-phase adjustment
Internal...................................Built-in AC-DC ractifier
Address Range
RS-485/RS-422.............................1 – 255
Alarm Inputs........................................4
Alarm Output.......................................1 relay output at 12
VDC/AC,
.500 mA
Menu Language..................................English
Lens
Design..................................................Aspherical
Aperture................................................F1.5
3.25 mm.............................................57.0° (H) x 45° (V)
88 mm................................................2.5° (H) x 1.9° (V)
Focal Length.........................................3.25 to 88.0 mm
Field of view Formulas
Horizontal View = (0.8 x A)/B
Vertical View = (0.6 x A)/B
Mechanical
Height....................................................224 mm (8.8 inch)
Diameter................................................189 mm (7.4 inch)
Weight
Housing and dome drive.....................2.0 kg (4.4 lbs)
Electrical
Environmental
Input Voltage......................................24 VAC, 50/60 Hz Class 2
Design Tolerance..............................20 to 30VAC, 50/60 Hz
Power...............................................18 Watts
Power On In-Rush Current...............0.8 amps
Allowable Drop-Out..........................100 µsec
Surge Protection
Video...........................................Switching Diode
RS-422/RS-485...............................TVS rated 9.8V/1 A,
500 watts, 8/20 µsec
impulse
Power Line .................................... INR rated at 77 V, 250 A,
1.5 joules
Operating Temperature.........................-5 ℃ to 50 ℃
(14 ℉ to 122 ℉)
Humidity.................................................0 to 90 %RH
(non condensing)
Storage Temperature............................-15 ℃ to 60 ℃
(23 ℉ to 122 ℉)
Certifications
CE, Class B
FCC, Class B
Cameras
NTSC
Effective Pixels.....................768 (H) X 494 (V) pixels
Scanning...............................525 lines, 60 fields, 30 frames
Horizontal.............................15.734 kHz
Vertical.................................59.94 Hz
PAL
Effective Pixels.....................752 (H) X 582 (V) pixels
Scanning............................. .625 lines, 50 fields, 25 frames
Horizontal.............................15.625 kHz
Vertical.................................50 Hz
5
T E C H N I C A L
S E R V I C E
M A N U A L
( V E R .
Chapter 2. Contents
ⓐ DOME DRIVE
ⓑ BACK BOX
ⓒ LOWER BUBBLE
ⓓ ATTACHED SCREW BOLT x 6 PCS, 250 V/1 Amp FUSE x 1 PCS
ⓔ PACKING BOX
<Fig. 1>
6
1 . 1 )
T E C H N I C A L
S E R V I C E
M A N U A L
Chapter 3. Parts Name
1. Dome Driver
ⓐ Camera Cover.
ⓑ Zoom Camera
ⓑ-1. Camera PCB Assembly
ⓑ-2. Camera Base Plate
ⓒ Tilt Bracket Assembly
ⓓ Pan Bracket Assembly
ⓔ Weight (poise)
<Fig. 2>
ⓕ Main Base Plate Assembly
ⓖ Pan Motor Belt
ⓗ Pan Motor Assembly
ⓘ Main PCB
(Printed Circuit Board)
ⓙ Drive’s Main Board Cover
<Fig. 3>
7
( V E R .
1 . 1 )
T E C H N I C A L
S E R V I C E
M A N U A L
2. Back Box Assembly
ⓚ Connector Cover Assembly
ⓛ Back Box
<Fig. 4>
3. Lower Bubble
ⓜ Clear Bubble
ⓝ Low Cover
ⓞ Bubble Bracket
<Fig. 5>
8
( V E R .
1 . 1 )
T E C H N I C A L
S E R V I C E
M A N U A L
( V E R .
1 . 1 )
Chapter 4. Installation
1. Wirings in Head Box Assembly and Cautions
<Fig. 6>
A. Power Source: 24VAC, 1.5 Amp.
z
z
The input no-load voltage is 24 VAC ~ 26 VAC and the input load voltage is 19 VAC ~ 28 VAC
normally. Turning on the power switch, the red LED is lighting.
Use a suitable power cable for power capability and if you use a junk power supply cable that
is supplied in the pack, never extend the secondary cable of 24 VAC (Power Supply). It may
cause to harm or damage to the dome and it reason of faulty operation.
9
T E C H N I C A L
S E R V I C E
M A N U A L
( V E R .
1 . 1 )
<Fig. 7>
B. VIDEO OUTPUT
z This part connects with each other video equipment.
z If BNC cable is not in a condition for insulation, it may go out of video signals or with video
noise distortion therefore please make sure to have a proper connection to video signal
separating from GND entirely and then go for connection.
C. RS 485 DATA INPUT.
z
z
z
z
z
z
Connect DI(+), DI(-) with RS 485(+) and RS 485(-) of Keyboard (DCK-255), DVR, PC and Web
Server in each.
If the cables of RS 485 (+) and RS 485 (-) are switched or short-circuited that do not connect, it
cause the equipment to be not worked and faulty.
Especially, please be careful not to be connected with ground of building and do not use wire
cables that are used for power sources. do not make wiring together with heavy power
(350VAC), it cause to faulty operation, injury or damage for the dome.
By using RS 485, data can be transmitted as well as received for a distance of 1.2 km (about
4000 ft) totally. i. e., the length of whole wiring cables for data must be less than 1.2 km.
Use the proper cables which have useful capability, specifications for video, power and data in
each.
Never use wires in a same cable for connecting to power, data and so on. It may cause serious
injury, damage to the dome. For data cable, it is recommended to use twist paired shield cable.
10
T E C H N I C A L
S E R V I C E
2. SETTING DOME DRIVE (CAMERA)
A. Remove the plastic tapes on the zoom camera module
<Fig. 8>
11
M A N U A L
( V E R .
1 . 1 )
T E C H N I C A L
S E R V I C E
M A N U A L
( V E R .
1 . 1 )
B. Check initialized setting (5-CIRCUIT DIP S/W)
z
z
z
z
z
z
z
z
In factory default, the DIP switches turn on
as below:
TM (Terminal Resister) switch : OFF
Data protocol : RS 485
Turn to ADDRESS mode
Turn to INT mode
Protocol : D-MAX
(Please refer to operation manual for
protocol setting)
TM (Terminal Register) is used for turning
on at final dome -farthest from keyboard
controller- among several domes in
parallel.
Switches of RS485 mode, NT/PAL mode
and INT/EXT mode are used in factory
default in themselves.
<Fig. 9>
C. Address Setting (8-CIRCUIT DIP S/W)
The above DIP switches shown in Fig. 9 can be used for setting up a protocol where DIP
switch, No.3. i.e. ‘ADDR’ turning to ‘INI’
Please set up the desired protocol or address for each camera as given in this operation
manual.
12
T E C H N I C A L
S E R V I C E
M A N U A L
( V E R .
1 . 1 )
D. Assembly Dome Drive into Back box
ⓐ Check for connections, lighting LED
on the Back Box before assembly.
ⓑ Join dome drive in turned power off
forwarding power switch and DIP
switches to ‘©’ in back box.
ⓒ Tighten rear screw first and both of
front screws with a screw driver (+) to
join dome drive into back box.
.
<Fig. 10>
** If it is not good to join both of them, cause faulty video output and faulty operation.
13
T E C H N I C A L
S E R V I C E
M A N U A L
( V E R .
1 . 1 )
E. Power on Camera
ⓐ A green LED is on in the right
DIP S/W when power S/W on.
<Fig. 11>
ⓑ When initializing is dome, display model name, software version, address no., protocol
information and baud rate on the monitor.
SPEED DOME CAMERA
Ver : 5.3L7
Memory Checking
SPEED DOME CAMERA
ÆSPEED DOME CAMERA
Ver : 5.3L7
ÆVer:5.3 : Software Version
ÆL7 DSC-270S Series
ÆC2 DSC-230S Series
Address : 001
Sp: 90
<Fig. 12>
Memory Checking
ÆThe dome drive scans the saved setting
values of the dome drive.
Address : 001
Æ It appears address of dome drive (speed dome camera).
14
T E C H N I C A L
SPEED DOME CAMERA
S E R V I C E
M A N U A L
( V E R .
1 . 1 )
SP: 90
Æ It is baud rate and protocol.
Ver : 5.3L7
Memory Checking
Address : 001
Sp: 90
<Fig. 13>
SP :
SP :
SP :
SP :
90
22
41
43
BAUD RATE
9600 BPS
2400 BPS
4800 BPS
4800 BPS
PROTOCOL
D - MAX
PELCO-D
PELCO-P
AD
* If it appears other values of SP, cause faulty operation. Please check operation
manual and then set up baud rate and protocol exactly.
ⓒ Display
z
z
After display OSD in item ⓑ, initialize pan and tilt.
After initializing pan & tilt moving, display video images, camera address on the
monitor.
CAM-001
Display Images
<Fig. 14>
15
T E C H N I C A L
S E R V I C E
M A N U A L
( V E R .
1 . 1 )
Chapter 5. Installing Each Bracket
DSC-230Se (Wall Mount: DSC-20EWP & Ceiling Mount: DSC-20ECP)
1
Remove the
dome drive
from the back
box.
POWER
LINE
DATA
LINE
LOCK NUT
2
COVER COUPLE
Join the Lock Nut to the cover
coupler.
3
Put all the lines through the bracket and fix it.
5
4
Connect the data cable.
Connect the video cable.
Connect the power cable.
After joining the Lock Nut
Coupler to the wall bracket fix it
with 3-bolts supplied.
7
Rejoin the
dome drive to
the back box.
Unite the lower
bubble with the
back box.
6
16
IMAGE
LINE
T E C H N I C A L
S E R V I C E
M A N U A L
( V E R .
1 . 1 )
DSC-230Se (Ceiling Mount: DSC-20ECP)
1
3
Remove the
Dome drive
From the
back box.
Turn the
ceiling pole
to connect.
2
Fix the pole
box on the
ceiling.
4
5
Turn the
cover
coupler to
connect.
6
7
Connect the cover
coupler with the
housing and fix it
with 3-bolts.
Connect the data cables.
Connect the video cable.
Connect the power cables.
9
8
Unite the lower
bubble with the
back box.
Rejoin the
dome drive to
the back box.
CHAPTER 6.각 PART 별 동작상태 점검 및 유의 사항
17
Turn the
joint coupler
to connect.
T E C H N I C A L
S E R V I C E
M A N U A L
( V E R .
1 . 1 )
Chapter 6. Check Point & Maintenance of Parts
A. Power Unit PART
ⓐ Back Box Assembly
<Fig. 15>
If there is no light to red LED in the center of electrical panel into the back box, check
the primary cable of power supply and the secondary cable of power supply.
* The primary: 100 VAC ~ 230 VAC (50/60HZ)
* The secondary: 24 VAC (±20% / 1.5 Amp)
If there is no problem in the above check point, it may be a fault in the back box in
itself.
z
z
z
Use proper power cables, if use power supply for the dome, do not extend the
secondary cable of a power supply. If the secondary cable of a power supply is
extended, it should cause serious injury, damages for the dome.
When you use a cable for 24 VAC, it allows use PVC Insulated Flexible Cord Cable
(VFF/2cores/AWG 18).
Do not use UTP cable or single cable for the power.
18
T E C H N I C A L
S E R V I C E
M A N U A L
B. Dome Drive
ⓐ In case of, if power LED is not
lightened even though the power
switch is on: Check to join the
dome drive into the back box.
If there is no matter of the above
check, make a focus on main
board. If it is removed system
cover, there is a main board.
ⓑ There is a fuse holder between left
pan motor and right yellow coils.
z Check the fuse.
z The fuse is 250 VAC, 1 Amp
and 20 mm of length.
ⓒ In spite of, if the fuse is replaced,
the LED does not Green (on) i.e.
glow and the fuse goes for a
toggling, please make sure of
check the following steps.
z First of all, check 24 VAC
power terminal.
z Check if the output voltage is
more than 20 VAC or not.
z If the output voltage is more
than 20 VAC, it is fine and
then.
z Replace LT 1170 (Short-key
Diode) at the cooling-plate on
the main board.
z The part no. on the main
board is U19.
<Fig. 16>
19
( V E R .
1 . 1 )
T E C H N I C A L
S E R V I C E
M A N U A L
ⓓ If the problems persists when you
have checked the fuse, terminal of
output voltage and short-key diode.
Please make sure to go for the
following steps.
z Check the address PCB
assembly of alphabet ‘L’ has
DIP S/W panels.
z If it is not clear, replace it.
z The switches are a duplex
short switch.
ⓔ There is no clear, even if all of
points were checked, please replace
main board.
<Fig. 17>
20
( V E R .
1 . 1 )
T E C H N I C A L
S E R V I C E
M A N U A L
C. Video & OSD Part
ⓐ Back Box Assembly
While connecting a video cable to
BNC, you may experience problems
like, i) video Noise Distortion
ii) Faulty Video Signal
Please make sure to go for the
following steps.
z Separate video signal with
GND (Ground) entirely.
z Check whether male of BNC
connector joining to female of
BNC connector tight.
ⓑ Check power switch is on and initial
movement of dome drive is correct.
If not, step as followings.
ⓒ Check to set up NT / PAL mode and
INT / EXT mode on 5-circuit DIP S/W
panel.
ⓓ
When turning the power on, after
displaying initialized OSD, the
message displays “Camera Module
Error” on the monitor. In this case,
there is no initialized moving.
Replace camera PCB assembly to
connect with zoom module camera.
<Fig. 18>
21
( V E R .
1 . 1 )
T E C H N I C A L
S E R V I C E
M A N U A L
ⓔ-1. The video image is changed from
left to right like a mirror,
ⓔ-2. If the view is more bright or more
blue, display will be in
monochrome during day.
ⓔ-3. Select “Factory Reset” in OSD
menu then please make a initialize
to setting value.
But it allows “Factory Reset” to
clear all of program. e.g. preset,
group and so on.
ⓕ After the power is on, it transmits as
well as receives data from the main
board to module camera.
After all initializing movement of dome
drive, the red LED will glow on
camera PCB Assembly.
ⓖ If the problem persists even when the
camera PCB assembly and module
camera are replaced, change the
main board.
<Fig. 19>
22
( V E R .
1 . 1 )
T E C H N I C A L
S E R V I C E
M A N U A L
D. Pan/Tilt Actuate Part
ⓐ Back Box Assembly
Check if the RS-485 terminal is connected
exactly. If the polarity is changed or short
of them, it may cause faulty operation.
ⓑ Dome Drive
During initialization, neither pan nor tilt
movement are not successful, and the
movement is not tilt but pan, you may
experience problem like a message “Pan/Tilt
Position Error” in OSD menu, then replace
Pan Sensor Assembly from the Main Base
Plate Assembly.
ⓒ During initialization, the movement is not
pan but tilt, you may experience problem
like a message “Pan/Tilt Position Error” in
OSD menu, then replace Tilt Limit
Assembly from the Tilt Bracket Assembly.
(Refer to fig 24.)
ⓓ During initialization, there are unexpected
sounds or vibration on the motor, then
replace Pan Motor Assembly and Tilt
Motor Assembly in each.
ⓔ If the problems persists even when make
all steps as the above, then replace main
board.
<Fig. 20>
23
( V E R .
1 . 1 )
T E C H N I C A L
S E R V I C E
M A N U A L
Chapter 7. Trouble Shooting
1) In case of control problem, even video & initializing is well done
ⓐ Check for exact address between
“CAM-001” displayed on the monitor
and desired control address.
ⓑ In normal connection, the green LED
on the DIP S/W panel will be
lightened together with red light while
receiving data.
If the LED turns to RED without data,
the polarity of data cables is changed
or shorted.
Check data lines and control
equipment.
ⓒ If the green LED is not lightening
without RED lighting, the camera
does not receive the data.
Check for the data lines and control
equipment.
ⓓ If there is no problem in the above
check point, check the protocol as you
desire.
D-MAX protocol is “SP : 90” in
initializing OSD when power is on.
<Fig. 21>
24
( V E R .
1 . 1 )
T E C H N I C A L
S E R V I C E
M A N U A L
( V E R .
1 . 1 )
ⓔ If it could be operated but it is not exact, faulty operation, check control equipment and
length of RS-485 data cables that is for a max. 1.2 km.
ⓕ If the controller is PC, DVR or Web server, check protocol to command for suitable.
ⓖ If you make configuration with lot of domes in parallel, make sure to turn on TM (No.1)
switch of 5-circuit DIP S/W panel for farthest dome from controller.
<Fig. 22>
* Use the shielded twist paired cable for data and if you use wiring coil in a same cable to
power or with high power voltage cable in a pack,
ⓗ If you look into the steps as above, it is not clear, replace the main board.
ⓘ This dome is self-testing to get the power for less than 18 VAC ± 1 VAC input. If the input is
less than regular voltage, the dome will shut down the system by itself. In order to prevent
the system, i) You have to switch off the power and ii) check for power line and power
system for installation then after recover the power lines, turn on the power switches.
z
If irregular input voltage is detected for 30 second, the system will shut down and you
may get the following messages:
z
z
< DETECTED LOWER VOLTAGE >
“SHUT DOWN VOLTAGE: XX V” Æ It appears the shut down voltage due to this voltage
is for 30 second. To prevent system, the dome is shut down by itself.
“THE PRESENT VOLTAGE: XX V” Æ Even the system shut down, it appears the present
voltage if the voltage is recovered or not from irregular voltage.
z
25
T E C H N I C A L
Chapter 8. Assembly Drawings
A. Camera Part
<Fig. 23>
26
S E R V I C E
M A N U A L
( V E R .
1 . 1 )
T E C H N I C A L
S E R V I C E
B. Camera PCB (Printed Circuit Board) Part
<Fig. 24>
27
M A N U A L
( V E R .
1 . 1 )
T E C H N I C A L
C. Lower Bubble & Assembly
<Fig. 25>
28
S E R V I C E
M A N U A L
( V E R .
1 . 1 )
T E C H N I C A L
Chapter 9. Dimensions
<Fig. 26>
29
S E R V I C E
M A N U A L
( V E R .
1 . 1 )
T E C H N I C A L
Appendix A. Part List
S E R V I C E
M A N U A L
( V E R .
1 . 1 )
T E C H N I C A L
S E R V I C E
M A N U A L
( V E R .
1 . 1 )
T E C H N I C A L
S E R V I C E
M A N U A L
( V E R .
1 . 1 )
T E C H N I C A L
S E R V I C E
M A N U A L
( V E R .
1 . 1 )
ⓑ MAIN PCB DIP PARTLIST
NO
Classification
ITEM
Standard
Q'TY
LOCATION
T E C H N I C A L
S E R V I C E
M A N U A L
( V E R .
1 . 1 )
ⓒ CONNECT PCB PARTLIST
NO
Classification
ITEM
STANDARD
Q'TY
LOCATION
T E C H N I C A L
S E R V I C E
M A N U A L
( V E R .
1 . 1 )
ⓓ CAMERA PCB SMD PARTLIST
NO
Classification
ⓔ CAMERA PCB DIP PARTLIST
ITEM
STANDARD
Q'TY
LOCATION
T E C H N I C A L
S E R V I C E
M A N U A L
( V E R .
1 . 1 )
ⓕ ADDRESS DIP SWITCH PCB PARTLIST
NO
Classification
ITEM
Standard
Q'TY
LOCATION
T E C H N I C A L
S E R V I C E
Appendix B. Picture of PCB (Main Board)
M A N U A L
( V E R .
1 . 1 )
T E C H N I C A L
Appendix C. Circuit Diagrams
S E R V I C E
M A N U A L
( V E R .
1 . 1 )