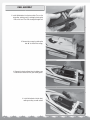
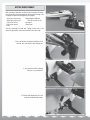
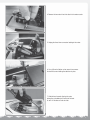
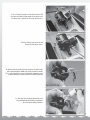
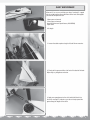
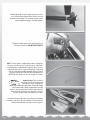
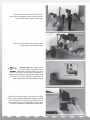
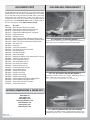
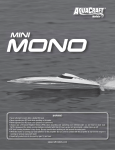
1
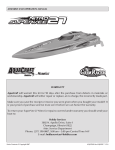
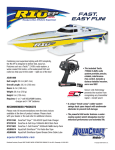
™
™
WARNING:
• NEVER attempt to swim after a stalled RC boat!
• Never operate your RC boat while standing in the water.
• Never operate your RC boat in the presence of swimmers.
• Always use a Personal Flotation Device (PFD) when boarding and operating your retrieval craft, i.e. Jon boat or duck boat.
NOTE: Because of the sharp running hardware included with this RC boat, we do not recommend a rubber blow up raft.
• RC boat running hardware is very sharp. Be very careful when working on and around the metal parts.
• While the motor is running pay close attention to the propeller. Do not come in contact with the propeller at any time the
engine is running or serious injury will result.
• AquaCraft products are to be used by ages 14 and over.
aquacraftmodels.com
INTRODUCTION & DESCRIPTION CHANGES
OPTIONAL PARTS
Thank you for purchasing the AquaCraft SuperVee 27R. We at
AquaCraft want the time you spend with your boat to be safe, fun
and successful. If for any reason you feel this R/C model is not for
you return it to your place of purchase immediately. Your hobby
dealer cannot accept returns on any model after final assembly or
after your boat has been operated.
❏ GPMQ4480 Hook and Loop: Remember if you purchase extra
battery packs you are going to need to purchase extra hook and
loop as well.
❏ AQUB9700 40X52 3-bladed prop (this prop closely mimics the
stock plastic prop but with better overall performance)
❏ AQUB9725 42X55 2-bladed prop (this prop has great acceleration
as well as top speed)
❏ AQUB9514 Grimracer Pro Radio Box Tape (most top competitors
tape shut the perimeter of the cowl to help keep water out of the
boat)
❏ AQUB9500 Grimracer Speed Grease (you are going to need to
re-grease the drive cable after each day of running)
❏ AQUB6322 Grimracer decal set (let them know that you’re ready
to race!)
AquaCraft products are to be used by ages 14 and over.
All pictures, descriptions, and specifications found in this instruction
manual are subject to change without notice. AquaCraft™ maintains
no responsibility for inadvertent errors in this manual.
PARTS NEEDED TO COMPLETE YOUR MODEL
❏ 4 – AA Batteries (transmitter)
For your convenience we have listed below a few different battery
and charger options. Most 7.2V NiMH battery packs of around
3000mAh or larger will work quite well in the SuperVee 27R. It is
also important to note that chargers come in both DC and AC/DC
versions. DC chargers require a 12V power supply like a 12V car
battery or bench top power supply to power up the charger. AC/DC
chargers allow you to plug the charger into a 120V house outlet or
DC power supply, therefore making them more convenient for most
charging situations.
OPTION 1: (This is about the minimum cost and performance one
would need to own to operate your SuperVee 27R.)
❏ DTXC2054 Onyx™ 3000mAh NiMH battery pack (2)–you need two
battery packs to operate the boat.
❏ DTXP4002 Piranha DC Charger
OPTION 2: (This is a good middle of the road option; you will get
good battery performance as well as an AC/DC charger.)
❏ DTXC2145 Onyx 3800 NiMH battery pack (2)
❏ DTXP4200 Onyx 200 sport peak charger
OPTION 3: (This option will provide the longest run times and best
over-all performance, as well as allow you to charge both batteries
at the same time.)
❏ DTXC2151 DuraTrax® 5000mAh NiMH battery pack (2)
❏ DTXP4240 Onyx Dual AC/DC charger
2
Grimracer says: Now is a good time to
get your batteries on charge!
WARRANTY SERVICE
AquaCraft will warrant your SuperVee 27R for 90 days after the
purchase from defects in materials or workmanship of original
manufacture. AquaCraft, at their option, will repair or replace at
no charge the incorrectly made part. This warranty does not cover
damage caused by crash, abuse, misuse, alteration or accident. To
return your boat for service you need to provide proof of purchase.
Your store receipt or product invoice will suffice.
IN NO EVENT SHALL THE PURCHASER BE ENTITLED TO ANY
INCIDENTAL, SPECIAL, INDIRECT OR CONSEQUENTIAL DAMAGES,
WHETHER RESULTING FROM THE USE, MISUSE OR INABILITY TO
USE THE PRODUCT OR FROM DEFECTS IN THE PRODUCT.
This warranty gives you specific legal rights and you may also have
other rights, which vary from state to state.
Outside USA and Canada, contact local importer for warranty
information.
Hobby Services
3002 N. Apollo Drive, Suite 1
Champaign, Illinois 61822
Attn: Service Department
Phone: (217) 398-0007 9:00 am - 5:00 pm Central Time M-F
E-mail: [email protected]
OTHER FEATURES:
SAFETY PRECAUTIONS
• Never, ever attempt to swim after a stalled RC boat. DO NOT get
in the water for any reason to retrieve your boat. Your SuperVee
27R has flotation added to the interior of the hull and the cowl;
they will not sink. To aid you in retrieving a stalled RC boat, you
can use a fishing reel with a tennis ball tied to the end of the
line. Or better yet, get yourself a small Jon boat so you can row
out and pick up your boat. Remember to use a PFD any time you
enter your retrieval craft.
• Do not touch the propeller anytime the motor is running. Pay equally
close attention to items such as loose clothing, shirtsleeves, ties,
scarves, long hair or anything that may become entangled in the
spinning prop. If your fingers, hands, etc. come in contact with the
spinning propeller, you may be severely injured.
• The speed and mass of this boat can inflict property damage and
severe personal injury if a collision occurs. Never run this boat
in the presence of swimmers or where the possibility of collision
with people or property exists.
• This boat is controlled by radio signals, which are susceptible to
possible interference from RF sources. It is a good idea to precheck the system to make sure it’s operating properly before you
launch your boat.
• If your SuperVee27R should happen to stall, water currents will
slowly carry it to shore. The bad news is the boat could be carried
to the opposite shore. When surveying areas to run your model,
keep variables in mind such as wind direction, size of the lake, etc.
It is not advisable to run R/C boats on any free-flowing bodies of
water such as creeks or rivers.
Hand-laid fiberglass construction
High-gloss painted finish
Water-resistant radio box
Brass stuffing tube
Low-friction cable guide
.150" flex drive cable
Standard 3/16" (.187") prop shaft
40mm Fiber Reinforced Plastic (FRP) Propeller
Aluminum hardware nut plates
SPECIFICATIONS:
Hull Length: 27" (685mm)
Overall Length: 31" (790mm)
Width: 8" (204mm)
Height: 6.5" (165mm)
Empty Weight: 53oz
Weight RTR: 84oz
MOTOR SPECIFICATIONS:
Diameter: 36mm
Length: 56mm
Shaft Length: 15mm
Overall Length: 71mm
Shaft Size: 5mm
Connectors: 4mm Bullet
Weight: 212g
Input Voltage: 7-18.5v
Max. Constant Current: 50A
Max. Surge Current: 80A/five seconds
No Load Current: 5.0A
kV Rating: 1800 rpm/V
Watts: 925Max
ESC SPECIFICATIONS:
FEATURES & SPECIFICATIONS
NEW SUPERVEE 27R FEATURES:
Tactic™ 2.4GHz radio system
New 1800 KV 6-pole motor
Stronger hull seam joint
New aluminum motor cooling jacket
New water cooling jacket for the ESC
Addition of a port side turn fin
Black anodized hardware
Updated center of gravity for better handling
Transom mounted water cooling pickup
Stronger interior mounted motor rails
Custom built and installed tow hook
Stronger hook and loop battery mounting
New graphics package
Length: 80mm
Width: 38mm
Height: 17mm
Wire Gauge: 14g
Battery Connectors: Male Deans® Ultra Plugs® (2)
Motor Connectors: 4mm Bullet connectors (3)
Input Voltage: 12-14 cells NiMH, (8-20V w/o BEC)
Output Current: 45A continuous, 60A max surge
Max Output Power: 900 watts
On-resistance: 0.003 ohms
Operating frequency: 8kHz
BEC: 5.2V/2A
Thermal Cutoff: 110C
Timing Angle: 10°
WARNING: This ESC is not designed to be used with LiPo batteries!
3
FINAL ASSEMBLY
1. Install 4AA batteries into the transmitter. Turn on the
transmitter, making sure it’s working by viewing the
LED on the front. The LED should glow bright red.
2. Remove the canopy by rotating the
lock 90° to unlatch the canopy.
3. Remove the hook and loop from the battery area
inside the boat and attach it to your battery packs.
4. Install the batteries into the boat,
making sure they are well-seated.
4
START UP & OPERATION PROCEDURE
1. Turn on your transmitter, taking note that the power light is illuminated.
2. Stand clear of the propeller and plug each of the main batteries into the ESC.
3. At this time you will hear one beep. To arm the ESC, squeeze the throttle trigger and hold until you hear one more beep. Release the
throttle trigger and you will hear three more. Your boat is now ready to operate.
4. If your boat does not beep after plugging in the batteries, turn the throttle trim knob either left or right until you hear the boat beep.
2
%
6
)
%
7
Plug in the packs
Squeeze the throttle trigger and hold
Release the trigger
You boat is now ready to operate!
One (1) beep
One (1) beep
Three (3) beeps
Now is a good time to check the rotation of the prop. Very quickly jab the throttle trigger and check the direction of the motor. It should
spin the propeller counterclockwise when viewing the boat from the back. If the motor spins the wrong way, simply switch any two of the
three wires between the motor and the ESC. Warning: Do not hold the throttle down for more than one or two seconds to check the motor
direction or you might risk damaging the motor. Also check the steering direction. When you turn the wheel to the right, the back of the
rudder blade should also move to the right.
Install the cowl and snap it in place by pushing down on the back
latch. You are now ready to run the boat.
Launch the boat in water that is at least 12" deep and weed free. You
can set the boat still in the water and hit the throttle or you can hand
launch it (toss the boat in with a forward motion and power up as
the boat hits the water). The boat will leave using either method.
When using the still method, you are going to have to be quite
aggressive with the throttle to get the boat on plane.
When the batteries are exhausted, bring the boat in and unplug the
batteries. Be careful as the motor and batteries can become very
hot during operation.
TIPS AND NOTES:
The handling and performance of your SuperVee 27R can be disrupted by the smallest obstructions in the water. If you happen to pick up a
small duck feather or leaf, the power system could draw more current than the ESC is capable of handling; the performance of the boat will
be compromised and you could damage the motor, ESC or batteries. Please make sure the water you are running in is clear of obstructions.
Its also important to note that if you operate the boat for extended periods of time at less than full throttle, you can overheat the ESC. It is
a good idea to get into the habit of looking for water squirting out the water cooling exit on the port side of the boat. When the boat is in
operation water will be squirting out of the exit about 8" to 12".
TROUBLE SHOOTING:
• No signal between the transmitter and the boat: Check to make sure the transmitter is bound to the receiver. To bind, open the radio box
by prying up on the side tabs. Remove the protective balloon from the receiver. With the transmitter turned on and the batteries plugged
into the boat, press and hold the bind button on the top of the receiver (use a tooth pick or other small pointed object) for approximately
4 seconds or until the system binds. You will know it’s bound when the small LED hidden behind the face of the receiver stops flashing
and stays lit.
• Boat runs backwards: Switch any two of the three motor wires.
• ESC will not arm: Move the throttle trim knob slowly clockwise and then counterclockwise to adjust the center point of the throttle
system. Also check the throttle reverse switch to make sure it is in the down position.
• Boat is slow to take off: This is called cavitation and is normal with the stock prop. Try being more aggressive with the throttle during
the launch or toss the boat forward with more force, applying power as the boat touches the water. It is also important to note that metal
props flex less, reducing cavitation.
• Boat slows down or shuts off in the middle of a run: Check for weeds on the prop or any obstruction blocking the water cooling pickup.
• After a run the motor and batteries are VERY hot: Check to make sure the water pickup is not plugged. Check to see that the prop is not
broken or that you have changed to a propeller that is too large for the power system.
5
MOTOR MAINTENANCE
After each day of operation we feel it’s best to remove the motor,
flush it out with a moisture displacer and re-oil the bearings. You
are going to need the following tools and supplies.
12mm open end wrench
10mm open end wrench
1.5mm hex wrench
2.5mm hex wrench
Pliers
Water displacer (WD-40,
CRC-56 or Corrosion X)
Bearing oil
Paper towel
Start by removing the radio box. Taking the box out is not
necessary but it does make this procedure a lot easier to do:
1. Use a set of pliers to detach the ball link off of
the tiller arm. Just rotate it and it will pop off.
2. Unscrew the ball link, counting
the turns as you remove it.
3. Pull the water pickup line off of the
transom mounted water pickup.
6
4. Remove the two water lines that attach to the motor cooler.
5. Unplug the three 4mm connectors leading to the motor.
6. Use a 2.5mm ball driver or hex wrench two remove
the two M3 screws holding the radio box in place.
7. Slide the box forward, slipping the water
pickup line and rudder push rod out of the boat
as well. Lift the box out and set aside.
7
8. Use a 1.5mm hex wrench or hex driver to loosen the
set screw that holds the flex coupler to the motor shaft.
You don’t have to remove the set screw; just loosen it.
9. Using a 2.5mm wrench, loosen and
remove the two motor screws.
10. Remove the motor from the boat and spray the entire motor
with moisture displacer. Make sure to fully saturate the motor.
This is also a good time to spray the displacer through the water
jacket. Removing any water from there is equally important.
11. After you have the motor flushed out, re-oil
the motor bearings.Reinstall the components
by reversing the above procedure.
8
SHAFT MAINTENANCE
After each 5 or so runs and after your day of running it’s a good
idea to re-lubricate the drive cable. Here are the tools and supplies
you need to complete the task.
10mm open end wrench
12mm open end wrench
AquaCraft Grimracer Speed Grease (AQUB9500)
Paper towel
Let’s begin.
1. Loosen the cable coupler using the 10 and 12mm wrenches.
2. Firmly pull the prop and drive shaft out of the back of the boat.
Wipe away any old grease and water.
3. Apply new speed grease to the shaft and slide it back into
the strut, moving it in and out as you do so to help spread the
grease along the length of the cable.
9
4. Before tightening the cable coupler, make sure to leave
a 4 or 5mm distance between the back of the strut and
the front of the drive dog. This will keep the drive system
from binding or breaking as the cable operates.
5. Tighten the cable coupler, reversing the direction of
the open end wrenches. DO NOT OVER TIGHTEN.
NOTE: The drive cable is supported by the brass stuffing tube
which has a low friction liner. The prop shaft (or “stub shaft”)
is hard-soldered to the flexible drive cable and spins in a brass
bushing located in the back of the stuffing tube. The bushing
and low friction liner should be replaced when they start to
show wear. (AQUB7884 Prop Shaft Bushing SuperVee 27;
AQUB7869 .150" Cable Liner 10", cut to length as needed.)
Grimracer Says: There are quite a
few things you can do to increase the
performance. One is spending time
optimizing and tuning the drive cable. Things like making
sure the drive cable is perfectly aligned with the cable
coupler as well as making sure the drive system does not
bind are the key to winning races. Keep this in mind as
you learn all about setup and tuning your new boat.
At the end of the day make sure to leave the cowl off the boat
overnight as well as the lid of the radio box. This will allow any
moisture that collected in the boat to safely evaporate.
10
TUNING TIPS AND PROP INFO
STRUT: The type of strut your boat is supplied with is called a
“Stinger” strut.
“The Business End of the Boat”
Tilting the strut up lifts the prop out of the water as well as
changing the thrust angle to positive. Lowering (tilting down)
does the opposite. It is good to keep in mind that lowering the
prop or tilting down causes the prop to run deeper, supplying
more load and causing the boat to run tighter as well.
When adjusting the strut, make very small adjustments at a
time. To adjust the strut we recommend removing the two
larger center bolts from the strut and very carefully bending the
stinger’s brass stuffing tube up or down. Re-install the bolts and
tighten. When making smaller adjustments you do not have to
remove the bolts.
Also note that if you feel you want to go past the adjustment
limits of the boat, you might have to slide the stinger off the
stuffing tube and file or remove some of the forward boss
feature of the strut.
Grimracer Says: Use a 12" or 24" straight
edge placed along the bottom of the keel to
help view the changes.
Here is a simple “how to” regarding adjusting the strut:
1. Use a 3mm hex wrench to loosen and swing the starboard
turn fin up and out of the way.
11
2. Using the same 3mm hex wrench and a 7mm nut
driver (Note: you are going to need a thin wall nut driver)
remove the two center strut bolts and set aside.
3. You can now see that the center strut is free from
its mount and can be removed if needed.
Grimracer Says: Here is a great race tip
if you wish to follow along. With the strut
removed, file the forward boss away from
the strut. This will give you more room for adjustments if
needed. I also like to place a radii around the bottom edge
of the strut. This assures minimal lift is created from any
water that approaches the leading edge of the strut.
4. With the strut slid back fully on to the back of the stuffing
tube, use a firm but gentle pulling motion to hyper-extend the
brass stuffing tube. You really only need to bend it about 5
or 6mm to get enough room for adjustment. Take your time.
If you pull it too hard you could damage the stuffing tube.
12
5. With the strut in position replace the two center bolts. You can
use a metal ruler or straight edge to help view your changes.
The point regarding removing the strut to yield the brass
tubing is this: The brass tubing acts a bit like a spring.
We have found it easier to preload the strut in a negative
position. Then, set the angle of the strut by pushing up
on the strut and tightening the bolts to hold it in place.
TRIM PLATES: The trim plates are located on the back transom
and are used to fine-tune the ride of the hull. The further
down you tilt the plates, the “tighter” the boat will run.
This “tighter ride” will help stabilize the boat but at the risk
of more power consumption as well as a loss of speed. It’s
also important to note that this “tight ride” could cause the
ESC and/or motor to overheat. Be mindful of this as you
tune your ride plates. Tilting the plates up will loosen the ride
and increase the speed but at the risk of the boat becoming
unstable. Take your time adjusting the trim plates and make
one small change at a time. Test and repeat until you have the
desired boat ride. Although this adjustment appears somewhat
similar to the strut adjustment, the real difference is this set of
adjustments does not lower or raise the prop from the water.
You can use a large pair of pliers to adjust the trim
plates. Remember, just tweaking the plates a very small
amount can drastically change the way the boat runs.
RUDDER: The rudder can be tuned in a variety of ways. The
most important aspect is how sharp it is or you make it. Using
a flat file, sharpen the leading edge of the rudder, finishing
with 400grit, then 600grit wet-dry sandpaper. You can also
gain some performance if you remove the lift the rudder
makes off the bottom of the blade. You can either round or
sharpen the bottom of the blade as well, as either method
works. Another important aspect is the angle front to back
of the rudder blade. The further back you tilt the rudder, the
looser the boat will run. The further under the boat the tighter.
Keep in mind as you do this that this adjustment does not
have the same effect as the trim plates. Adjusting the rudder
has a larger effect on straight line performance-vs-cornering
performance. Keep this in mind as you tune the rudder blade.
13
CG: Adjusting the CG or center of gravity of the boat has a lot to do
with how tight the boat rides as well as the how the boat “flies” as it
exits the water. Moving the battery packs forward or rearward is the
best way to adjust the CG.
SCUFFING: Scuffing is a tuning trick boat racers use to increase
the speed of their boat. Scuffing involves dulling the area/s of the
boat that touch the water as the boat is running. We like to use a red
scratch pad like the ones you find in the paint section of your local
home supply store. Only scuff the bottom of the boat to the point
the shine is removed from the paint. While this tuning trick is mostly
geared towards the hard core boat racer, sport runners can benefit
from this as well.
PROPS: About the best we can do is help guide you to a better
performing prop. Ultimately how you drive and tune your boat will
determine the best prop for your racing program. Having said that
we have found the GrimRacer 40x52/3 (AQUB9720) or GrimRacer
42x55 (AQUB9725) are about the best overall props for your
SuperVee 27R. It is also advisable that you balance your propeller
when it is new and check it for balance periodically. If you want to
learn more about tuning props check out some of the links listed in
the “National Organizations and Online Help” section of this manual.
You can also learn more about balancing and sharpening your prop
at aquacraftmodels.com.
IMPORTANT! Scuffing will remove the attractive shine from the
bottom of your hull. If having a pretty finish is important to you,
don’t scuff!
GRIMRACER HIGH-PERFORMANCE METAL PROPELLERS
Give your SV27R an added burst of speed—as easily as bolting on
a high-quality copper-beryllium-titanium GrimRacer metal prop!
Racer-designed and USA-made, these are the most accurately cast
metal props available. Ultra-clean casting and true center-bore hubs
place each prop near its balance point right out of the package.
You can fine-tune them using less effort than stainless steel props
require—and they hold their shape better for balancing, sharpening,
and changing pitch.
Stock #
AQUB9720
AQUB9725
Description
40 x 52/3
42 x 55
Type
3-Blade
2-Blade
Diameter
40mm
42mm
Pitch
52mm
55mm
Bore
3/16"
3/16"
Precision cast from Copper-Beryllium-Titanium!
GRIMRACER PRECISION PROP BALANCER
To maximize performance—and minimize damage to on-board
electronics and parts—balance your props with the GrimRacer
Precision Prop Balancer. It’s easy to use. Three thumb screws
provide perfect level adjustment, and a precise bubble level is built
into the one-piece extruded aluminum base. The balancer includes
balancing shafts for 1/8" (3.2mm), 3/16" (4.8mm) and 1/4" (6.4mm)
bore prop hubs. Propeller not included. AQUB9575
14
RACING
Below are a set of racing rules provided to use from our friends of the Puget Sound Fast Electric Model Boat Club based in Washington
State. These rules have been taking off across the country and can help you and your friends come up with your own racing program.
• This class is a spec series for the AquaCraft SuperVee27R (SV27) RTR Brushless Mono in its stock form. Only a select set of well defined
modifications will be allowed. The boat will otherwise remain OEM stock.
• Spec SV27 races will be held as either a standard 5-Lap Sprint Race or a 10-Lap endurance race. The hosting club shall announce the
official race length prior to date of the race.
ALLOWED MODIFICATIONS:
• The SV27 must remain in stock form, using only OEM parts as delivered, with the exception of the following allowances:
• Factory flex cable assembly and motor coupler may be replaced with any .150" Flex cable assembly and appropriate motor coupler. The
distance from the transom to the propeller shall not be altered. Motor output shaft may be trimmed to facilitate installation of motor
coupler and to increase coupler to stuffing tube clearance.
• Material may be removed at the forward end of the strut housing to eliminate interference with the transom, but no further aft than the
leading edge of the strut’s vertical mounting bracket.
• Holes in the stock trim tabs may be opened up to allow tabs to be aligned flush with the bottom of the hull. Alternate trim tabs may be fitted
provided they serve no other purpose and that the wetted area does not exceed 33mm (1.3 in.) in length by 29mm (1.14 in.) in width.
Alternate tabs may be adjustable. Alternate tabs must be mounted in the OEM location and have the width of the wetted area centered on
this location.
• Stock turn fin must be retained unmodified, but the leading edge may be sharpened. No modifications to the mounting bracket or bracket
location are allowed. No additional fins are allowed. A mounting bracket for a left side fin may be present, but shall not be used.
• Stock rudder may be sharpened and water cooling hole may be cleaned up to improve cooling. No other modifications to rudder are
permitted.
• Motor Water cooling jacket may be replaced. Water cooling outlet may be modified or replaced. Water cooling tubing may be replaced.
• Receiver and transmitter may be replaced.
• Any antenna may be used. Holes may be drilled in the hull to mount a replacement antenna, provided they serve no other purpose. Existing
antenna hole may be filled or covered.
• The hull, from the chine up, may be painted or have graphics applied as desired. Hull bottom may be “scuffed”, but must otherwise remain
stock.
• Any adjustment within the designed range of adjustment for any part is permitted. No part may be modified to provide adjustment beyond
the given factory tolerances.
• Fasteners may be replaced with metric or standard replacements.
• Hatch may be taped down. Factory locking mechanism may be removed and existing holes filled or taped over.
• Battery requirements: Any capacity Sub-C NiMH 12-cell battery set will be permitted. OEM connectors shall be retained.
• OEM propeller shall be used. Propeller may be cleaned up to remove flashing, but must otherwise remain unmodified.
• Alternately, a hosting club may specify a propeller for an event, provided they supply supplemental regulations clarifying the propeller
selection. The host club must take measures to insure that all propellers for the event are prepared as equitably as possible and to notify
competitors in advance of the propeller selection.
• Records shall only be maintained using the OEM propeller as specified above.
• No other modifications or substitution of parts is permitted. Any repairs required due to race damage must be done in a fashion so as to
return the SV27 to its factory specifications. Inspection for compliance with these rules will be at the discretion of the event CD, and boats
exhibiting modification or unauthorized repairs beyond the scope of these rules will be excluded from competition.
15
REPLACEMENT PARTS
ALSO AVAILABLE FROM AQUACRAFT
To order replacement parts for the SV27R, use the order numbers in the
Replacement Parts List that follows. Replacement parts are available
only as listed and can be purchased from hobby shops or mail order/
Internet order firms. Hardware items (screws, nuts, bolts) are also
available from these outlets. If you need assistance locating a dealer to
purchase parts, visit www.hobbico.com and click on “Where to Buy.” If
this kit is missing parts, contact Hobbico Product Support.
Order #
Description
AQUG7002 ... Marine Brushless Motor 6-Pole 1800kV
AQUM7005 .. Marine Brushless Water-Cooled ESC, 45 Amp
AQUB8746 ... Rudder Blade w/Set Screws & Hinge Pin
AQUB8747 ... Rudder Bracket w/Mounting Bolts & Backplate
AQUB8748 ... Rudder Control Arm
AQUB8613 ... Radio Box ESC Seal
AQUB7877 ... Mono FE Strut Assembly w/Mounting Bracket & Bolts
AQUB7876 ... Mono FE Starboard Turn Fin w/Bracket, Backplate & Bolts
AQUB7875 ... Mono FE Port Turn Fin w/Bracket, Backplate & Bolts
AQUB9025 ... Tow Hook Small
AQUB6329 ... Decal Sheet
AQUB9044 ... Trim Plates w/Backplates
AQUB7883 ... Drive Cable w/Prop Shaft Assembled
AQUB7884 ... Prop Shaft Bushing
AQUB7885 ... Drive Dog w/Prop Nut
AQUB7886 ... Motor Cable Coupler
AQUB7887 ... Motor Mount w/Motor Screws, Mounting Bolts & Screws
AQUB8603 ... Radio Box w/Servo Tray & Lid
AQUB9012 ... Servo Linkage w/Connectors
AQUB7888 ... FRP 3-blade 40mm Prop (2)
AQUB7100 ... Boat Stand (Unassembled)
AQUB9513 ... GrimRacer Cowl Locks (2)
AQUB9514 ... GrimRacer Pro Radio Box Tape
AQUB9520 ... Transom Water Pick Up
AQUB6201 ... Fiberglass Cowl (White)
AQUB6203 ... Fiberglass Cowl (Red)
AQUB6204 ... Fiberglass Cowl (Yellow)
AQUB6206 ... Fiberglass Cowl (Orange)
AQUB9519 ... Aluminum Water Cooling Outlet w/Mounting Nut
AQUB9540 ... Aluminum Water Cooling Jacket 36mm
TACJ0245 ... Tactic 2.4GHz Transmitter & Receiver
TACL0324 ... Tactic 2.4GHz Receiver
UL-1 SUPERIOR™ FE HYDRO RTR (AQUB20**)
Unleash brushless lightning with the UL-1’s 2030kV motor and 60A ESC;
2.4GHz radio system; and GrimRacer-designed hull and hardware.
RIO™ 51Z OFF-SHORE 2.4GHZ GAS RTR (AQUB41**)
Performance defined! Includes a 26 cc Zenoah® G260PUM gas engine, a
Tactic™ 2.4GHz radio system and a 26 oz. fuel tank.
Zenoah is a registered trademark of HUSQVARNA ZENOAH CO. LTD. CORPORATION of Japan.
NATIONAL ORGANIZATIONS & ONLINE HELP
www.impba.net
www.namba.com
www.ampba.asn.au
www.aquacraftmodels.com
www.inltlwaters.com
www.rcgroups.com
www.rcuniverse.com
VS1™ COMPETITION WOOD TUNNEL HULL ARR (AQUB0006)
The only ARR version of Mike “Grimracer” Zaborowski’s title-winning design,
competition-ready in 6-8 hours — and loaded with proven GrimRacer™ parts.
AQUB23**Mnl
© 2012 Hobbico®, Inc.