1
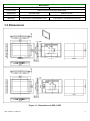
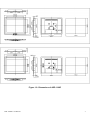
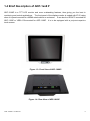
ADP-1XX8P Display User Manual Release Date Revision Nov. 2013 ® 2013 Aplex Technology, Inc. V1.1 All Rights Reserved. Aplex Technology, Inc. 15F-1, No.186, Jian Yi Road, Zhonghe District, New Taipei City 235, Taiwan Tel: 886-2-82262881 Fax: 886-2-82262883 E-mail: [email protected] ADP-1XX8P User Manual Published in Taiwan URL: www.aplex.com.tw 1 Warning!___________________________________ This equipment generates, uses and can radiate radio frequency energy and if not installed and used in accordance with the instructions manual, it may cause interference to radio communications. It has been tested and found to comply with the limits for a Class A computing device pursuant to FCC Rules, which are designed to provide reasonable protection against such interference when operated in a commercial environment. Operation of this equipment in a residential area is likely to cause interference in which case the user at his own expense will be required to take whatever measures may be required to correct the interference. Electric Shock Hazard – Do not operate the machine with its back cover removed. There are dangerous high voltages inside. Disclaimer This information in this document is subject to change without notice. In no event shall Aplex Technology Inc. be liable for damages of any kind, whether incidental or consequential, arising from either the use or misuse of information in this document or in any related materials. ADP-1XX8P User Manual 2 Table of Contents______________________ Warning!…………………………………………………………………………….……..….2 Disclaimer………………………………………………………………….…………………2 Chapter 1 Getting Started 1.1 Features………………………………………………..………….………….5 1.2 Specifications…………………………………………. ...……………...….5 1.3 Dimensions…………………………………...………………………….…6 1.4 Brief Description...................................................................................8 1.5 Display Mode……………………………………………………………….9 Chapter 2 2.1 2.2 2.3 2.4 OSD Front Panel OSD Functions….………………………………….…..…10 OSD Controls…………………..…………………………………………..11 Main Menu…..………..……………………………………………………..12 AD Board (VA-3600) OSD Functions…….………………………………14 Chapter 3 Control Board 3.1 Introduction to Control Board……………….……………………………..15 3.4 Installation of Control Board……………………………………………...15 Chapter 4 Installation 4.1 Windows 2000/XP Driver Installation…………………………………….16 4.2 Configuring eGalax Windows 2000/XP Driver………………………17 Chapter 5 Software 5.1 Software Functions………………………………………………………..22 ADP-1XX8P User Manual 3 Figures Figure 1.1: Dimensions of ADP-1158P………………………..………………..6 Figure 1.2: Dimensions of ADP-1198P……………………..…………………..7 Figure 1.3: Front View of ADP-1XX8P………………………………………….8 Figure 1.4: Rear View of ADP-1XX8P………………………………………….8 Figure 3.1: Bird Eye’s View of Control Board………………………………15 ADP-1XX8P User Manual 4 Chapter 1_____________________________ 1.1 Features ● ● ● ● ● Flat Panel Design Aluminum front Bezel and Steel Chassis Projected Capacitive Touch OSD Keypad Control at rear side, front side for option Wide Range 11~32V DC Power Input 1.2 Specifications Display Model No. ADP-1158P ADP-1198P Display 15” 1024x768 color TFT LCD 19” 1280x1024 color TFT LCD Luminance 400 nits 350 nits Touch point feature 1000 nits(optional) 2 fingers touch Viewing Angle H: 160 / V: 145 H: 170 / V: 160 Resolution 1024x768 1280x1024 Backlight 50,000 hrs Lifetime Touch Screen Projected Capacitive touch Light Transmission 90% OSD On rear side default, on front side optional Power Input 11~32V/DC Outside I/O port VGA X1 DVI X1 AV X1 S-Video X1 3 pins Terminal block power input 1XUSB for touch Environment Model No. ADP-1158P ADP-1198P Operating -20~60˚C 0~50˚C -20~70˚C -20~60˚C Temperature Storage Temperature Storage Humidity 10~90% @40˚C non-condensing Vibration 1G peak, 5~500Hz (at random) Certifications CE/FCC Class A Shock 15G peak acceleration (11msec. duration)/operation ADP-1XX8P User Manual 5 Mechanical ADP-1158P Model No. Construction Aluminum Sliver front/Steel Black Back Dimensions 410x333.6x42 IP Rating Mounting ADP-1198P 484x416.07x42 Front Panel IP65 Panel Mount / VESA Mount 75x75 Panel Mount / VESA Mount 100x100 1.3 Dimensions Figure 1.1: Dimensions of ADP-1158P ADP-1XX8P User Manual 6 Figure 1.2: Dimensions of ADP-1198P ADP-1XX8P User Manual 7 1.4 Brief Description of ADP-1xx8 P ADP-1XX8P is a TFT LCD monitor and more outstanding features, thus giving you the best in monitoring and control applications. The front panel of the display monitor is sealed with IP 65 rating when it is panel-mounted in a NEMA rated cabinet or enclosure. It can also be VESA 75-mounted for ADP-1158P or VESA 100-mounted for ADP-1198P. It is to be equipped with a projected capacitive touch screen. Figure 1.3: Front View of ADP-1XX8P Figure 1.4: Rear View of ADP-1XX8P ADP-1XX8P User Manual 8 1.5 Display Mode Display Mode VGA 640 x 480 SVGA 800 x 600 XGA 1024 x 768 1152 x 864 SXGA 1280 x 1024 Full HD 1920 x 1080 ADP-1XX8P User Manual Hori. Sync (KHz) Vert. Sync. (Hz) 31 60 38 72 38 75 35 56 38 60 48 72 47 75 48 60 56 70 60 75 68 75 64 60 80 75 75 60 9 Chapter 2_____________________________ 2.1 Front Panel OSD Functions Auto Adjust Up/Left Menu/Entry Down/Right Power Power Indicator Power switch: To turn ON or OFF the power Shift the icon to the right side or shift it up Shift the icon to the left side or shift it down Menu: To enter OSD menu for related icon and item. Auto Button: One-touch auto adjustment 1.) Getting into Burn-in Mode Before setting into a burn-in mode, first disconnect the AC power cord. Then press (don’t let them go) the buttons until the AC power cord is connected and the “RGB” appears on the top left corner of your screen. Now it can be put into the burn-in mode for changing colors. 2.) Getting Out of Burn-in Mode Before getting out of the burn-in mode, please first disconnect the AC power cord. Then press the button (If not workable, press the button and don’t let them go) until the AC power cord is connected. Please don’t let your fingers go until the AC power cord is connected again and the wording of “RGB” appears on the top left corner of your screen, and wait for 3 seconds. Under the non-signal entry situation, if Cable Not Connected is seen, exit is thus successfully made. ADP-1XX8P User Manual 10 2.2 OSD Controls To make any adjustment, select the following: 1. Press (Menu) to show the OSD menu or disable the OSD menu. 2. Select the icon that you wish to adjust with the ( / 3. Press (Menu) and then choose the item with the ( 4. Press (Menu) and then adjust the quality with the 1.) or +/-) key in the menu. or +/-) key. / ( / If the “RGB” is still on the top left corner of the screen, press choose “Reset”, and then Yes, and press or +/-) key. to enter “Miscellaneous” and . When the screen goes black, disconnect power and repeat the above steps. 2.) If the “RGB” is not found, disconnect the AC power cord first. Then press the 3.) (don’t let them go) until the AC power cord is connected, and wait for 2 to 3 seconds. When “RGB” appears, repeat the above steps. Functions of OSD Keys ADP-1XX8P User Manual buttons 11 2.3 Main Menu In the Main menu, there are the following items: Color Image Setting Position OSD Menu Language Misc Exit For Color, check out the following: Contrast Brightness Color Adjust Color Temp Back For Image setting, check out the following: Clock ADP-1XX8P User Manual Phase Gamma Sharpness Back 12 In the Position, there are the following: H. Position V. Position Back In the OSD menu, there are: OSD H. Pos. OSD V. Pos. OSD Timer Back In the Language menu, there are: English Frances Germany Spanish Traditional Chinese Simplified Chinese Japanese In the Misc menu, there are: Signal Source Select VGA: Analogue VGA Input Select DVI: Digital DVI-D Input Select AV: Composite Video Input Select SV: S-Video Video Input Reset Back ADP-1XX8P User Manual 13 2.4 AD Board (VA-3600) OSD Functions 2.) Getting into Burn-in Mode Before setting into a burn-in mode, first disconnect the AC power cord. Then press (don’t let them go) the buttons until the AC power cord is connected and the “RGB” appears on the top left corner of your screen. Now it can be put into the burn-in mode for changing colors. 2.) Getting Out of Burn-in Mode Before getting out of the burn-in mode, please first disconnect the AC power cord. Then press the button (If not workable, press the button and don’t let them go) until the AC power cord is connected. Please don’t let your fingers go until the AC power cord is connected again and the wording of “RGB” appears on the top left corner of your screen, and wait for 3 second. Under the non-signal entry situation, if Cable Not Connected is seen, exit is thus successfully made. When the Burn-in Mode is Unable to Eradicate… 4.) If the “RGB” is still on the top left corner of the screen, press choose “Reset”, and then Yes, and press to enter “Miscellaneous” and . When the screen goes black, disconnect power and repeat the above steps. 5.) If the “RGB” is not found, disconnect the AC power cord first. Then press the 6.) (don’t let them go) until the AC power cord is connected, and wait for 2 to 3 seconds. When “RGB” appears, repeat the above steps. Functions of OSD Keys Auto Adjust Up/Left Menu/Entry ADP-1XX8P User Manual Down/Right buttons Power Power Indicator 14 Chapter 3_____________________________ 3.1 Introduction to Control Board This chapter describes how to install drivers and other software that will allow your Touch Screen Controller Board to work with different operating systems. eGalaxy touch panel control board is a touch screen control board designed for USB interface and specific for touch screens. It is designed with USB interface features with multiple devices supporting function. It is designed for Projected Capacitive Touch Panel (PCAP) application; through glass touch sensing is ready for products that require a complete flat surface. It also can drive the touch panel to get two fingers touch function that based on the Windows 7 support. Figure 3.1: Bird’s Eye View of control board 3.2 Installation of Control Board Before installing the Windows 2000/XP driver software, you must have the Windows 2000/XP system installed and running on your computer. ADP-1XX8P User Manual 15 Chapter 4_____________________________ 4.1 Windows 2000/XP Driver Installation for eGalaxy Control Board Before installing the Windows 2000/XP driver software, you must have the Windows 2000/XP system installed and running on your computer. You must also have eGalaxy Interface controller board installed. Follow the steps below to install eGalaxy Windows 2000/XP driver. Step 1. Insert the CD-ROM. Go to Driver folder. Click Driver. Step 2. There is eGalaxTouch, double click the folder. ADP-1XX8P User Manual 16 Step 3. Click setup. 4.2 Configuring eGalaxTouch Windows 2000/XP Driver After click setup, InstallShield Wizard screen appears click Next to continue. ADP-1XX8P User Manual 17 Step 1. Tick Install RS232 interface driver. Then click Next. Step 2. Select None. Then click Next to continue. ADP-1XX8P User Manual 18 Step 3. Please make sure your touch monitor or touch controller’s USB cable is plugged into the computer now. Click OK to continue the installation. Step 4. If you want to use Multi-Monitor, check Support Multi-Monitor System. continue the installation. Then, click Next to Step 5. Click Browse to create a new folder. Click Next to setup eGalaxTouch in the destination folder you want to install. ADP-1XX8P User Manual Click Next to continue the installation. 19 Step 6. Under eGalaxTouch, select Accessories. Step 7. Check Create a eGalaxTouch Utility shortcut on desktop. Click Next to continue. ADP-1XX8P User Manual 20 Step 8. The installation files are extracted. Step 9. eGalaxTouch driver has been installed. To do 4 point calibration, click Yes to continue. ADP-1XX8P User Manual 21 Chapter 5_____________________________ 5.1 Software Functions General In this window, you can see there is a USB Controller. Click OK to continue. Monitor Mapping to adjust touch panel Add to search for device ADP-1XX8P User Manual 22 Setting Check Beep On Touch and Beep from System Beep, click OK to continue. Beep Beep On Touch: when you touch, it will beep. Beep On Release: when you release, it will beep. Beep From System Beep Beep From Sound Card Linearization Style 9 points 25 points Double Click Time Shorter Longer Double Click Area Smaller Bigger ADP-1XX8P User Manual 23 Normal mode Simulate the mouse mode Check Enable Constant Touch, Enable Auto Right Click, Enable Touch, Enable Cursor Stabilization. Click OK to continue. Option Function Enable Constant Touch Enable Auto Right Click Enable Touch Enable Cursor Stabilization Constant Touch Area Auto Right Click Time ADP-1XX8P User Manual 24 Tools Click OK to continue the settings. 4 Points Calibration Do 4 points alignment to match display. Clear and Calibrate Clear linearization parameter and do 4 points alignment. Linearization Do 9 points linearization for better touchscreen linearity. Draw Test Do draw test to verify the touch accuracy. ADP-1XX8P User Manual 25 Display In this window, it shows the mode of display. Select Full Screen, click OK to continue. Enable Multiple Monitors. Map to main display if system has only one display monitor Full Screen Lower Screen Left Screen Upper Screen Right Screen ADP-1XX8P User Manual 26 Other Other mode of display. Quarter1~4 and Customized area. Active Area Drag active area to enable Active Area Function. ADP-1XX8P User Manual 27 Hardware Click OK. Hardware Configuration ADP-1XX8P User Manual Click OK to continue. 28 About To display information about eGalaxTouch and its version. ADP-1XX8P User Manual 29