1
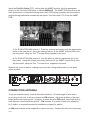
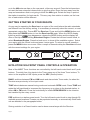
AMBIT TUNER
Plug-in FM/AM Tuner
Instruction Manual
Rev 1.1
User Instructions for the EVOLUTION 50A integrated amplifier,
when using the AMBIT Tuner.
Thank you for purchasing the AMBIT Tuner Module from Creek Audio. You are now in possession of a State of the Art FM/AM analogue Tuner with RDS (Radio Data Service).
The AMBIT tuner module is an upgrade option, suitable only for the Evolution 50A and
Evolution 100A Integrated Amplifiers. Your supplying dealer should fit it, but if that is not
possible or you bought your amplifier remotely, these instructions are designed to help you
install the Tuner module without danger.
The function and operation of the AMBIT Tuner is deceptively simple considering how
many features it offers, all of which can be controlled remotely. For clarity, when referring
to the amplifier with the AMBIT module installed, we will describe the two as a ‘Receiver’
from now-onwards.
SAFETY REQUIREMENTS
Read all the following instructions carefully before installing or operating the AMBIT. Keep
this User Manual so you can refer to these safety instructions later if required.
FITTING THE AMBIT MODULE
Safety!
Please disconnect the amplifier from the mains power supply, by removing the
mains plug from the rear IEC socket.
Remove the top cover from the EVOLUTION 50A integrated amplifier, by un-screwing the
4 side screws and the 3 rear screws. Be careful to retain these screws and the cutting
washer for re-fitting. Pull the cover up on one side only and peel it up and over to the other side, to avoid bending the cover in the middle.
EVOLUTION 50A amplifiers with serial/batch numbers, ‘EVO50A S/B 1315 0500’ or earlier, will have a single Torx T7 screw, holding a blanking plate to the inside of the rear panel. Take the AMBIT module from the packaging and remove it from the (90 x 36mm, 3.5 x
1.4”) fixing plate it has been supplied with.
EVOLUTION 50A amplifiers with serial/batch numbers later than quoted above, will have
an extra pair of RCA sockets, marked LINE INPUT 5 mounted on the rear panel in the
expansion slot. Input 5 sockets are mounted on 90 x 36mm (3.5 x 1.4”) plate. Input 5
mounting plate is held-on with two Torx T7 screws. Remove the outer two screws that hold
the plate to the back panel. Move the plate away from the back panel and pull-out the flat
foil cable from the Pre-amp PCB socket, underneath it, marked MODULE.
Page: 1
Insert the Flat Foil Cable (FFC), exiting from the AMBIT module, into the appropriate
socket on the Pre-amp PCB below it, marked MODULE. The AMBIT PCB should now be
held upside-down (components facing down, bare PCB facing upwards) with the antenna
sockets facing backwards towards the rear panel. Fold the loose FFC under the AMBIT
PCB.
1. For EVOLUTION 50A version 1: Push the antenna sockets through the appropriate
holes on the rear panel. Using the retained screw, fix the AMBIT module firmly onto
the rear panel, using the Torx T7 screw driver supplied in the pack.
2. For EVOLUTION 50A version 2: Line the plate up with the expansion slot in the
rear panel. Using the screws previously removed, fix the AMBIT module firmly onto
the rear panel, using the Torx T7 screw driver, supplied in the pack.
FUSE: T5AL250V
USE RATED FUSE ONLY
Replace the cover as before, making sure to put the cutting washer back on the same
screw position.
CONNECTING ANTENNA
To get you started quickly, Creek Audio has included a 1.5 metre length of wire with a
co-ax plug at one end, to act as a temporary FM antenna. Adjust the position of this temporary antenna for best results. However, to obtain the best FM signal, use a high quality,
multi-element, directional external VHF - FM antenna. If in doubt consult your supplying
Hi-Fi dealer, or a specialist antenna installation company for advice.
An AM loop antenna is also supplied for indoor use only. Connect the two-wire loop antenPage: 2
na to the AM antenna clips on the rear panel, either way around. Press the buttons down
to insert the bare wires and release them to grip the wires. Place the loop away from the
amp and somewhere that is not going to block the AM signal. Rotate the loop to point at
the station transmitter, for best results. This may vary from station to station, as the location of each station will be different.
GETTING STARTED IN YOUR REGION
As you may be operating the Receiver in a region of the world where the radio standards
are different from the factory setting, it is necessary to manually select the correct, or most
appropriate region first. Power-OFF the Receiver; Press and hold the MENU button and
then press the POWER button to turn the Receiver-ON again. When the OLED display
lights-up and the
logo disappears, release the MENU button and the display will
show a Set-Up menu, including Broadcast Region. Rotate the left-hand control knob, to
select Broadcast Region. Press the knob once, to show all the available regions. Select
your region with the control knob and press it once again. To return to normal operation,
press the MENU button once more. After a couple of seconds delay the Receiver will work
with the correct settings for your region.
EVOLUTION 50A FRONT PANEL CONTROLS & OPERATION
Most of the AMBIT Tuner functions are controlled by the left-hand control knob and 3 push
buttons. To switch from Line inputs to the Tuner press any of the three Tuner buttons. To
return to the amplifier’s LINE inputs, press the SRC (Source) button.
BAND, switches between FM and AM bands and also selects Tuner mode, for when the
Receiver was previously in Line input mode.
TUNE selects between manual tuning mode and automatic SEEK mode. Press TUNE and
rotate the left-hand knob to increment the frequency up or down to the desired station, in
either AM or FM mode. Press the knob briefly to initiate SEEK/SEARCH in the direction
last travelled by the rotary control.
PRE switches to a station preset mode. Turn the left-hand control knob to step through 99
available preset locations. Presets can be populated manually or automatically. Both methods are detailed in the paragraphs bellow.
Storing a station in a Preset location can be done several ways with the Receiver.
Page: 3
1. Seek or manually tune to a station; Press and hold PRE button until a Preset
location number flashes on the screen in place of FM or AM text. The flashing number indicates the preset location immediately following the last one in use, making it
convenient to program a series of presets in a row. If you wish, you can change the
offered preset location by turning the control knob. To confirm and store the tuned
frequency into the selected preset location, press PRE again briefly. The received
station is now stored in your chosen location. N.B. The flashing number will time-out
and the preset store operation will be cancelled in about 9 seconds, without any user
input.
2. Repeat the steps above for any subsequent station(s).
3. Automatically SEEK and store all stations of a usable quality in Preset locations
starting from the last one in use. Press PRE and TUNE together and hold down for
about 3 seconds, until the Receiver starts to SEEK automatically starting from the
currently tuned frequency up and wrapping around the band edge to complete the
seek throughout the entire active band. All stations with a reasonable signal strength
and quality encountered during seek will be memorised and given a Preset number
in succession. Auto Preset can be helpful during initial use of the Receiver or upon
moving antenna location to be able to quickly browse through all the available stations instead of having to seek or tune manually. With all the available stations residing in Presets, you can simply browse to the station(s) of interest and store them
again into a new preset location of your choice in an order of your choice.
4. To clear all stored Pre-sets (along with all the Receiver preferences), select Factory Defaults from the SETUP MENU. See details.
RDS (RBDS in the USA) means Radio Data Service or Radio Broadcast Data Service.
Most international FM stations broadcast RDS. If the received signal is strong enough and
if the station is broadcasting RDS data, the OLED display will switch from showing frequency to RDS information. See further details in the MENU section.
DISPLAY
The EVOLUTION 50A’s OLED display shows the following status of the AMBIT Tuner and
Amplifier:
1. Pre-Set station number 01 -99
2. Frequency
3. BAND (AM/FM)
4. RDS
5. Radio metrics show at the top of the display, in a graphical form.
6. Signal strength, is shown as an antenna with a bar graph.
7. Signal Quality, is shown as Q with a bar graph. It is based on a combination of
Page: 4
Signal Strength, Signal-to-Noise Ratio and Multipath distortion.
8. Stereo is displayed in three settings: The Infinity symbol is full width STEREO, two
overlapping circles means partial stereo and a single circle means MONO.
9. PS, means Program Service, indicating that station name is available.
10. RT, means Radio Text is available. Up to 64 characters of textual information
about the station, DJ, music or other information may be transmitted by this method.
11. CT, means Time data is available.
The remote control IR (Infra-Red) sensor is placed at the right hand end of the display window. Do not block this area of the display or the remote control may not work
properly.
TIME
If you are tuned to an FM station with RDS, it will normally transmit the real time. The
default RDS info shown in the screen does not include TIME. To show time on the display
from the front panel controls, press INFO once. From the Remote control handset, press
TIME or INFO buttons once. Note: if the FM signal is not strong enough to show RDS
data, TIME cannot be displayed.
INFO, operates in Tuner mode to display the different pages of information available from
the tuner and RDS data. To display the different pages, it is necessary to toggle the INFO
button several times to call-up: Pre-Set number, Frequency, Tuner metrics, (PS, RT, CT,
see DISPLAY for details)
STEREO/MONO
AMBIT automatically adjusts the Left/Right separation to maintain good signal to noise
ratio. If the signal strength is not high enough, Stereo will blend proportionally into MONO.
The infinity symbol ∞ will be displayed when full stereo operation is in operation. MONO
operation will display O instead.
OPERATION FROM THE EVO REMOTE CONTROL
TUNER. Press the green TUNER button to switch from Line inputs to tuner. Green buttons on the remote are exclusively for Tuner functions, but many others are also functional
without having to press the green TUNER button first. Here is a list of remote operation
buttons:
Green Buttons
LEVEL is not operational in this model.
BAND switches between FM and AM bands and also selects Tuner mode, for when the
Page: 5
Receiver was previously in Line input mode.
MODE switches between PREset mode and TUNE mode.
MONO manually forces the FM tuner into mono in three stages, for when an FM stereo
signal may be too noisy to listen to in Stereo. Normally, the AMBIT Tuner will automatically
adjust the amount of stereo separation, from full stereo to mono, to maintain a good signal
to noise.
Other Buttons
DIM changes between three levels of display brightness. Display off is not possible.
NUMBERIC buttons 0-9
1. To tuner directly to a frequency.
2. To go directly to a Pre-set address
Numeric frequency entry: To enter a known station frequency directly, press the exact
numbers, without a decimal point, i.e. to tune to 101.1 MHz FM, enter 1011, or to tune to
909 kHz AM, enter 909. No other entry is required and if this is a valid frequency, the Receiver will automatically jump to it. It is necessary to select the desired BAND first.
Numeric Pre-set entry: Select pre-set mode, via the green MODE button. Use the button
on the handset marked -/-- once or twice to select either a 1 or 2 digit number, shown with
one or two hyphens (- or --). Now press a number or numbers directly from the handset. If
a valid memory address is entered, the Receiver will tune to it.
STORE adds stations to memory. Press STORE for 2 seconds; when the display flashes, select a number using SEL up / down, or use the default number flashing and press
STORE again briefly, to memorize the station into a pre-set address.
SEL, Press the top or bottom of the blue button to tune to the next Pre-set.
<< >> TUNE moves the frequency up / down.
I<< >>I SEEKs up / down.
INFO operates the same as on the front panel.
TIME displays the actual time derived from RDS information. It cannot display unless an
FM –RDS station is tuned.
Page: 6
Technical specification
FM Frequency range 76 - 108 MHz (selectable for region)
AM frequency range 520 - 1710 kHz (selectable for region)
Tuning Increments FM: 50, 100 and 200 kHz (selectable for region)
AM: 9 kHz AM or 10 kHz (selectable for region)
Pre-set stations
99 for FM/AM combined
Station programmin
Manual or Automatic
Sensitivity (Audio SINAD = 26dB max RF gain)-3.5 dBuV
Image rejection>70dB
Adjacent Channel rejection
>65dB
Alternate channel rejection
>70dB
Frequency response (FM only)
30 Hz- 16 kHz -1dB
Total harmonic distortion <0.1%
Stereo separation (FM only) >40dB
Signal to noise (FM only) >70dB (Full limiting) Stereo
De-emphasis
50 or 75 µsec selected for region
Appendix
If more than one EVOLUTION 50 is being used, it may help to join them together via the
remote connections on the rear panel, using a special interface cable from Creek Audio.
This will synchronise the operation of both products. Check with your supplying dealer for
details.
SOFTWARE INSTALATION
The AMBIT module contains additional software to enable the EVOLUTION 50A amp to become a Receiver. When the amp is first turned-on, after adding the AMBIT module, there will be a slight delay as the new
software is downloaded from the module into the amp’s system microcontroller. Once this is completed, the
OLED display will show the extra features and the amp will work as normal.
This is how to confirm the Software revision: Power-off, Press and hold the INFO button, then press the power button-on and release the INFO button after the Creek logo disappears. The display will show the model
name, software version number and heatsink temperature. To clear the screen and use the product, press or
turn any control button or knob.
Page: 7
N.B. No A-weighting. Noise integrated from 30 Hz to 15 kHz for audio SINAD and SNR
measurements.
Aerial connections: 75 Ohm co-ax MALE, AM loop antenna with spring clip connector.
The EVOLUTION 50A, fitted with the AMBIT Tuner, can be operated virtually anywhere in
the world. First select the correct mains voltage to either 115 or 230V AC – 50 to 60 Hz
and then choose the correct region as described in the section above “GETTING STARTED IN YOUR REGION”.
Page: 8
Creek Audio Ltd
12 Avebury Court, Mark Road, Hemel Hempstead, Hertfordshire, HP2 7TA England
www.creekaudio.com - [email protected] - +44(0)1442 260146