1
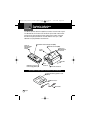
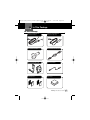
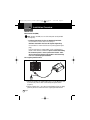
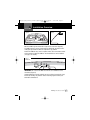
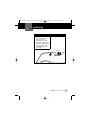
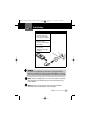
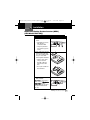
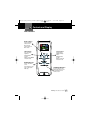
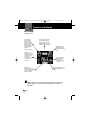
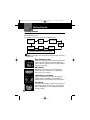
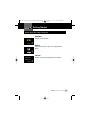
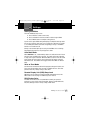
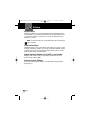
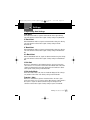
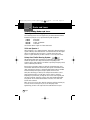
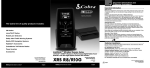
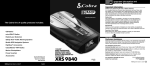
XRS_R7_R9G_Final_012507.qxd:Layout 1
1/25/07
4:30 PM
Page FC1
IntelliLink™ Wireless Remote Series
12-Band™ S-XRS™ Maximum Performance Digital Radar/Laser
Detector with Red Light/Speed Camera GPS Locator*
XRS_R7_R9G_Final_012507.qxd:Layout 1
Introduction
1/25/07
4:30 PM
Page A1
Important Information and
Customer Assistance
Important Information
•
Safe Driving
Motorists are expected to exercise all due caution while using this product, and to obey
all applicable traffic laws. Do not attempt to change settings of the unit while the car is
in motion.
Federal Laws Governing the Use of Radar Detectors
It is not against federal law to receive radar transmissions with your Cobra® radar/laser
detector. The Communications Act of 1924 guarantees your right to receive radio
transmissions on any frequency. Local laws that contravene this Act, while illegal, may
be enforced by your local law enforcement officials until and unless they are prohibited
from doing so by federal court action.
Safety/Strobe Alert
Use of this product is not intended to, and does not, ensure that motorists or
passengers will not be involved in traffic accidents. It is only intended to alert the
motorist that an emergency vehicle equipped with a Cobra Safety Alert, 3M or Tomar
strobe transmitter is within range as defined by that product. Please call local fire and
police departments to learn if coverage exists in your area.
Some states and municipalities prohibit mounting any object on your windshield. If you
drive in these states or areas; you can mount the MDU on the dash.
Security of Your Vehicle
Before leaving your vehicle, always remember to conceal your Remote Display Unit
(RDU) in order to reduce the possibility of break-in and theft. Your Main Detector Unit
(MDU) has a two-position bracket that, when in the up position, presents a very discreet
profile from outside the vehicle.
Customer Assistance
Customer Assistance
Use your owner’s manual to learn about product features. Cobra Electronics offers the
following customer assistance services:
For Assistance in the U.S.A.
Automated Help Desk, English only. 24 hours a day, 7 days a week 773-889-3087.
Customer Assistance Operators, English and Spanish, 8:00 am to 6:00 p.m. Central
Time Mon. through Fri. (except holidays) 773-889-3087.
Questions, English and Spanish, Fax: 773-622-2269.
Technical Assistance, English only, www.cobra.com.
English and Spanish e-mail, Product [email protected].
For Assistance Outside the U.S.A. Contact Your Local Dealer
•
©2007 Cobra Electronics Corporation™
6500 West Cortland Street
Chicago, Illinois 60707 USA
www.cobra.com
A1 English
XRS_R7_R9G_Final_012507.qxd:Layout 1
Introduction
1/25/07
4:30 PM
Page A2
Controls, Indicators
and Connections
The XRS R7 provides detection capabilities for radar, laser and strobe signals.
The XRS R9G has all the features of the XRS R7 plus a GPSL module which
provides alerts when approaching photo-enforced intersections and roads
with fixed red light/speed cameras. The XRS R9G can store up to 1,000
additional user-programmable Location Alerts.
IntelliLink™ Remote Display Unit (RDU)
Full-Color
Extreme Bright
DataGrafix™
Display
Main Detector Unit (MDU)
Two-Piece,
Self-Adhesive
Fasteners
Power
Button
Speaker
GPSL
Connector
USB Power Connector
for Recharging Battery
12V Power Connector
Optional GPSL for Model XRS R7 and Standard on Model XRS R9G
Global Positioning System Locator
(GPSL)
IS CE
TH FA DS
R R
U A
S W Y
K
TO S
MDU Connector
GPSL Cable
A2 English
XRS_R7_R9G_Final_012507.qxd:Layout 1
Introduction
1/25/07
4:30 PM
Page A3
In This Package
In This Package
•
12V Power Cord with In-line Fuse
for Hardwired Installation
12V Power Cord with In-line Fuse
and Cigarette Lighter Plug
12V to 5V USB Power Adapter
USB to Mini-USB Retractable Cable
RDU Holster and Vent/Visor Clips
GPSL Cable (R9G Only)
Optional Hook and Loop Strips
for Mounting Holster
MDU Power Cord Clips and Pre-cut
Adhesive Tapes
Nothing Comes Close to a Cobra®
A3
XRS_R7_R9G_Final_012507.qxd:Layout 1
Introduction
1/25/07
4:30 PM
Page 1
Contents
Introduction
Important Information . . . . . . . . . .A1
Customer Assistance . . . . . . . . . . .A1
Controls, Indicators and
Connections . . . . . . . . . . . . . . . .A2
In This Package . . . . . . . . . . . . . . .A3
Product Overview . . . . . . . . . . . . . . .2
Installation Overview . . . . . . . . . . . .4
Your Detector
Installation . . . . . . . . . . . . . . . . . . . .7
Controls and Display . . . . . . . . . . .15
Getting Started . . . . . . . . . . . . . . . .17
EasySet Programming . . . . . . . . . .21
Program Navigation . . . . . . . . . . . .22
Settings . . . . . . . . . . . . . . . . . . . . .24
Detection Alerts . . . . . . . . . . . . . . .29
Radar and Laser . . . . . . . . . . . . . . .32
Maintenance . . . . . . . . . . . . . . . . . .35
Specifications . . . . . . . . . . . . . . . . .36
Warranty
Warranty . . . . . . . . . . . . . . . . . . . . .37
User License
User License . . . . . . . . . . . . . . . . . .39
Customer Assistance
Product Service . . . . . . . . . . . . . . .41
Trademark Acknowledgement . . . .42
Optional Accessories . . . . . . . . . . .43
Accessories Order Info . . . . . . . . . .44
Nothing Comes Close to a Cobra®
1
XRS_R7_R9G_Final_012507.qxd:Layout 1
Introduction
1/25/07
4:30 PM
Page 2
Product Overview
Cobra XRS R7 and XRS R9G
•
WARNING
Modifications or parts not approved by Cobra Electronics Corporation
may violate FCC Rules and void authority to operate this equipment.
Read and understand the information in the Installation Overview and
Installation sections of this manual for best operation.
The XRS R7 consists of a Main Detector Unit (MDU) and a wireless Remote
Display Unit (RDU). The XRS R9G adds a Global Positioning System Locator
(GPSL) module, providing fixed red light/speed camera location-based alerts.
The XRS R7 can be upgraded with the optional Cobra GPSL to provide fixed
red light/speed camera location-based alerts.
Main Detector Unit (MDU)
The MDU is equipped with an adjustable, two-position bracket for detection
operation in the down (horizontal) position or in the up position for a less
visible profile from the outside. The MDU issues audible messages during
power-on and self-testing. The MDU is also equipped with an alternate power
button used to power the unit.
The MDU contains detection function sensors so proper mounting and
orientation are important.
2
English
XRS_R7_R9G_Final_012507.qxd:Layout 1
Introduction
1/25/07
4:30 PM
Page 3
Product Overview
Remote Display Unit (RDU)
The RDU is a wireless remote controller/display module that shows alerts
detected by the MDU. The RDU display uses an Extreme Bright DataGrafix™
(Organic Light Emitting Diode) Display to show large graphical alerts as
signals are detected.
The RDU uses a rechargeable lithium-ion (LiON) battery and is supplied with
a holster and clips for mounting on heating/air conditioner vents or sun visor.
12V to 5V USB Power Adaptor with cigarette lighter plug and USB to
Mini-USB Retractable Cable are supplied. The RDU can be charged in the
vehicle using these two components or by plugging the USB to Mini-USB
Retractable Cable to the USB port of your personal computer.
The normal Auto Dark screen is almost completely dark with only a moving
dot. The Auto Dark screen provides discreet usage and helps conserve RDU
battery life. The display color can be changed to match most dash
illumination.
Global Positioning System Locator (GPSL) (XRS R9G Only)
The GPSL module tracks vehicle location. It uses a database that provides
alerts as you approach photo-enforced intersections and roads with fixed red
light/speed cameras.
Use the GPSL functions to program alerts and store up to 1,000 user
programmable Location Alerts. Software will be available to update the
database and stay current with future photo enforced locations. The GPSL
module has no external controls and connects to the MDU with one cable.
Registering Your Detector
To register your Cobra XRS R7 or XRS R9G go to www.cobra.com. Click on
the Product Registration tab.
Nothing Comes Close to a Cobra®
3
XRS_R7_R9G_Final_012507.qxd:Layout 1
1/25/07
4:30 PM
Page 4
Installation Overview
Introduction
Mount Unit
Main Detector Unit (MDU)
Note: To power the MDU, use one of the two power cords provided
(See Page A3).
• 12V Power Cord with In-line Fuse for Hardwired Installation:
For connection to vehicle’s fuse box or battery, or
• 12V Power Cord with In-line Fuse and Cigarette Lighter Plug:
For connection to 12-volt vehicle accessory outlet (cigarette lighter
plug).
Fuse box hard wiring is recommended. Use this configuration to
provide a more discreet installation. If you are unsure about making
this connection yourself, contact a professional installer. Cobra
does not warrant any damages to the product or vehicle that may
occur as a result of improper installation.
On a negative grounded vehicle:
Figure A
ACC
1. Connect the positive wire [marked with a tag (+)] of the DC power cord
to an accessory 12V fuse that is controlled by the ignition switch
(Figure A).
2. Connect negative wire (-) to a chassis ground location (Figure A). Body
paint may need to be removed to assure a good ground connection.
4
English
XRS_R7_R9G_Final_012507.qxd:Layout 1
Introduction
1/25/07
4:30 PM
Page 5
Installation Overview
Figure B
Figure C
Mount the MDU high on windshield to right of rear view mirror (Figure B).
The MDU must have a clear view through the windshield, be parallel to the
road (Figure C) and have clearance to snap into the “up” position.
Position the MDU for easy access to power switch, cable connections and for
mirror movement. Mount the MDU on the windshield close to the headliner.
(See page 7 for details.)
Figure D
External View
THIS
SURFACE
TOWARDS
SKY
MDU Lens
IMPORTANT: Do not block the MDU lens with the sun-shaded area of the
windshield (Figure D).
Heated windshields currently available on some vehicles (Instaclear for Ford,
Electriclear for GM), may block or weaken incoming signals. Consult your
automobile manufacturer.
Nothing Comes Close to a Cobra®
5
XRS_R7_R9G_Final_012507.qxd:Layout 1
Introduction
1/25/07
4:30 PM
Page 6
Installation Overview
Global Positioning System Locator (GPSL) - (XRS R9G Model Only)
Figure E
Internal View
Mount GPSL module close enough to the MDU for supplied cable to connect
both modules (Figure E). Mount GPSL with proper side (“This Surface
Toward Sky” wording embossed in unit case) attached to windshield and
exposed to the sky.
Figure F
Internal View
IMPORTANT: Some States and municipalities prohibit mounting any object on
the windshield. If you drive in these states or areas, mount the MDU on the
dash (Figure F).
IMPORTANT: The MDU will need to be flipped upside-down compared to a
windshield installation. Pay special attention to mount the GPSL unit with
proper side (“This Surface Toward Sky” wording embossed in unit case)
towards the sky.
6
English
XRS_R7_R9G_Final_012507.qxd:Layout 1
Your Detector
1/25/07
4:30 PM
Page 7
Installation
Main Detector Unit (MDU)
1. Position MDU before actual
mount.
• Do not attempt to adjust
MDU bracket.
• Hold unit in place.
• Using non-permanent
pen, mark two opposite
corners.
2. Peel off film from two-piece
fastener strips. Align with
two corner markings made
in step 1. Press MDU
bracket against windshield.
• Fastener strips cannot
easily be removed.
Strength of adhesive
strips increases with
time.
• Do not pull on MDU for
first 20 minutes.
Nothing Comes Close to a Cobra®
7
XRS_R7_R9G_Final_012507.qxd:Layout 1
Your Detector
1/25/07
4:30 PM
Page 8
Installation
1. Loosen MDU (gray) bracket
Not In Use.
adjust knob.
Stored/Concealed
Position.
1
Bracket
Adjust Knob
2. Adjust module to a position
parallel to the road.
Lower to
Operating
Detection
Position.
Loosen
2
3
3. Tighten knob to set proper
horizontal detection
position. The MDU
mounting bracket has two
detent positions:
• one for detection
operation (horizontal
position)
• one for storage or
concealment (up
position). Makes MDU
less visible from outside.
IMPORTANT: MDU
will not provide any
radar/laser detection in
“Stored/Concealed”
position.
8
English
Detection
Position
Tighten
XRS_R7_R9G_Final_012507.qxd:Layout 1
Your Detector
1/25/07
4:30 PM
Page 9
Installation
4. Attach power cord to MDU.
Use power cord clips to
route to fuse box or
lighter/accessory outlet,
depending on the selected
power cord. Surfaces must
be clean and free of dirt,
oil and dust. Plug in the
power cord.
Internal View
Nothing Comes Close to a Cobra®
9
XRS_R7_R9G_Final_012507.qxd:Layout 1
Your Detector
1/25/07
4:30 PM
Page 10
Installation
Remote Display Unit (RDU)
Battery Installation
1. Turn RDU over and slide
battery cover off of RDU
body.
2. Carefully plug battery wire
connector into the battery
connection port in RDU.
Connector only fits one way.
3. Replace battery cover.
Battery Charging
The unit is shipped with a sealed lithium-ion (LiON) battery pack that is
rechargeable.
IMPORTANT: Avoid temperature extremes (hot and/or cold) to help prolong
battery life and performance. DO NOT leave RDU exposed to direct sunlight. If
the RDU is mounted on vent, clip must be on lower fin to avoid hot air
blowing on RDU battery compartment.
NOTE: When battery begins to discharge too quickly, it is time to
install a new battery.
10 English
•
XRS_R7_R9G_Final_012507.qxd:Layout 1
Your Detector
1/25/07
4:30 PM
Page 11
Installation
1. Attach 12V to 5V
retractable USB power
cable to bottom of RDU
and to 12V power adapter.
2. Connect 12V power
adapter to vehicle
accessory outlet (cigarette
lighter plug).
3. Initial charge for battery is
two (2) hours.
(RDU may be used while
charging.)
WARNING
This lithium-ion (LiON) battery should only be recharged inside the
RDU. Do not substitute any other type of charging adapter or charging
base to charge the battery. Battery damage, fire or explosion may result.
NOTE: Lithium-ion (LiON) batteries are toxic. Please dispose of properly.
Some municipal waste disposal agencies have special provisions for
battery disposal.
NOTE: After battery is fully charged, unit can be operated without
retractable power cord until battery needs recharging.
Nothing Comes Close to a Cobra®
11
XRS_R7_R9G_Final_012507.qxd:Layout 1
Your Detector
1/25/07
4:30 PM
Page 12
Installation
RDU Holster
A holster is provided to allow you to position the RDU for best driver
visibility and access while charging the battery. A vent or visor clip will attach
to the rear of the holster. Self-adhesive hook and loop strips are also
included for alternative mounting locations.
Hook and Loop Strips
Vent Clip
Visor Clip
12 English
XRS_R7_R9G_Final_012507.qxd:Layout 1
Your Detector
1/25/07
4:30 PM
Page 13
Installation
Global Positioning System Locator (GPSL)
(XRS Model R9G Only)
•
1. Position GPSL before actual
mount.
• Hold GPSL unit in place
with USB cable
connected to MDU.
• Using non-permanent
pen, mark two opposite
corners.
IS CE
TH FA DS
R R
U A
S W Y
K
TO S
2. Peel off film from two-piece
fastener strips. Align with
two corner markings made
in step 1. Press GPSL
bracket against windshield.
• Fastener strips cannot
easily be removed.
Strength of adhesive
strips increases with
time.
• Do not pull on GPSL for
first 20 minutes.
3. Connect cable between
MDU and GPSL.
IMPORTANT: Proper side of
GPSL module (“This Surface
Toward Sky” wording
embossed in unit case) must
be against windshield and
face sky.
Nothing Comes Close to a Cobra®
13
XRS_R7_R9G_Final_012507.qxd:Layout 1
Your Detector
1/25/07
4:30 PM
Page 14
Installation
GPSL Initial Satellite Lock
The GPSL module now needs to detect the Global Positioning satellites.
1. With vehicle running and
parked in an area clear of
obstructions to the sky, turn
on the power to the MDU
with GPSL connected.
2. Keep the MDU turned on for
at least 15 minutes. This
will allow fast satellite
acquisition in subsequent
power-ups.
GPSL Icon
IMPORTANT: This procedure may need to be repeated if the unit has not
been used for a prolonged period of time.
14 English
•
XRS_R7_R9G_Final_012507.qxd:Layout 1
Your Detector
1/25/07
4:31 PM
Page 15
Controls and Display
RDU Controls
MUTE/Button
Press for Standby
Status Screens.
Mutes an alert.
Selects features in
Menu mode.
DIM/Button
Press for display
brightness.
Navigates Menu
Screens.
Adjusts volume DOWN
in Volume mode.
MENU/SAVE Button
Press to enter Menu
screen.
Press and hold to save
User Location (XRS
R9G only).
CITY/Button
Toggle between
Highway and City
modes.
Navigates Menu
Screens.
Adjusts volume UP
in Volume mode.
POWER/VOLUME Button
A two second press and
release turns unit on or off.
A momentary press for
Volume screen.
Nothing Comes Close to a Cobra®
15
XRS_R7_R9G_Final_012507.qxd:Layout 1
Your Detector
1/25/07
4:31 PM
Page 16
Controls and Display
RDU Display
Standby Screen
The IntelliMute
(I-Mute) symbol
shows only if the
feature is activated.
Symbol changes to
indicate if above or
below Set-point
when IntelliMute is
turned on.
(Refer to page 24.)
The RDU link
indicators show the
the MDU is connected
to the RDU by the
wireless link.
The indicator changes
to show a lost
connection.
When arrow is
displayed, you can go to
the next Standby Control
screens by pushing
MUTE/ button.
RDU battery icon displays
charge condition of RDU
battery. Sections change to
display battery level, or if
the battery is being charged.
City/Highway symbol
changes to indicate
activated alert filtering
mode.
GPS icon indicates
GPS satellite lock.
Icon changes to
indicate lost signal
condition.*
Compass indicator uses
GPSL to indicate direction of
travel.*
*Note: The GPS icon, Compass and other GPS features only display
if GPSL module is connected (optional for XRS R7, standard on
XRS R9G).
16 English
XRS_R7_R9G_Final_012507.qxd:Layout 1
Your Detector
1/25/07
4:31 PM
Page 17
Getting Started
Power On/Off
•
1. Press power button
on RDU.
2. Unit cycles through power
on/self test. Displays
Standby screen when
process completed.
3. Display changes to Auto
Dark operating screen after
30 seconds (factory
default).
4. Press, hold power button
on RDU for more than two
seconds to turn off unit.
Nothing Comes Close to a Cobra®
17
XRS_R7_R9G_Final_012507.qxd:Layout 1
1/25/07
4:31 PM
Page 18
Getting Started
Your Detector
Standby Screens
Press Mute/ while the Standby screen is displayed to cycle through
different Standby screens.
The Standby screens will be displayed in the following order:
Main Standby
Screen
RDU
Battery
I-Mute
City/Hwy Mode
Car
Voltage
Latitude/
Longitude
Speed
Compass
Compass, Speed and Latitude/Longitude screens
only display if GPSL is connected to system.
NOTE: Last Standby screen viewed will be displayed when exiting Auto
Dark mode.
Main Standby Screen
Standby screen displays information about detector: alert
filtering, automatic muting functions and RDU battery
status. If GPSL is connected, compass heading and GPS
status icon also display.
RDU Battery
Charging
RDU Battery screen displays status of RDU battery.
Indicates charge left in battery or if it is plugged into
power source and is charging.
I-Mute/City or Hwy Mode
I-MUTE
CITY
I-Mute screen displays status of alert filtering (City or
Highway modes) and automatic muting (IntelliMute)
functions. Refer to related sections to set these features.
Car Voltage
Car Voltage screen displays voltage level of car battery. If
battery voltage drops below 11.9 volts, an alert sounds.
Low Car Voltage feature in Alert Settings programming
must be activated.
18 English
•
XRS_R7_R9G_Final_012507.qxd:Layout 1
Your Detector
1/25/07
4:31 PM
Page 19
Getting Started
Screens display only if GPSL is connected.
Compass
Compass
Indicates driving direction.
NW
Speed
Speed
55
Shows speed of vehicle (may be changed to km/h in
Menu).
mph
Lat / Lon
41º54'53"N
87º47'22"W
Lat/Lon
Displays latitude and longitude of present location.
Nothing Comes Close to a Cobra®
19
XRS_R7_R9G_Final_012507.qxd:Layout 1
Your Detector
1/25/07
4:31 PM
Page 20
Getting Started
Auto Dark
When Auto Dark screen is engaged, a small dot displays
at bottom of screen to show that power is on. Touch any
button to recall Standby screen.
Highway/City Mode
IntelliShield® Tri-level City mode has a Highway mode and three City mode
levels: City X, City X Beep Off and City X+K.
•
•
IntelliShield® Tri-Level City Mode
Toggle from Highway to City mode for three levels of
Audio Alert suppression. Pressing City button will toggle
between Highway and the default City mode which is
City X. Default City mode can be changed within the
Menu. Factory setting is City X.
City X sounds a single beep when X band signal is first
detected but then subsequent audio alert is muted. The
alert sounds again when signal strength reaches level 3.
City X+K combines City X mode with delay of K band
audio alerts until signal strength reaches level 2.
City X Beep Off blocks all X band audio alerts until signal
strength reaches level 3.
Muting Alerts
Manual Mute
Press MUTE/button momentarily to turn off Audio Alert during an Alert
condition. Press MUTE/button again during alert to turn on Audio Alert.
After current alert is gone, detector will un-mute and next alert sounds.
20 English
•
XRS_R7_R9G_Final_012507.qxd:Layout 1
1/25/07
4:31 PM
Page 21
EasySet Programming
Your Detector
Programming Overview
•
Begin all programming or setup with MENU/SAVE button.
Select this to change USER or ALERT settings. USER
settings customize how system handles alert filtering,
audio-related options, visual options and system-related
options. ALERT settings determine which ALERT types
are activated. ALERT settings on the XRS R9G model
include GPS-related features.
Choose Menu Type
User
Alert
Press MENU/SAVE button again to save feature and
function changes and return to Standby screen. If a
button is not pressed within 15 seconds while in
Setup/Programming mode, Standby screen displays and
settings made up to this point are saved automatically.
NOTE: You can restore factory settings at any time.
Enter USER or ALERT settings sub-menu and display
shows left arrow , down arrow and right arrow.
Arrows correspond with arrows on DIM, MUTE and CITY
buttons on RDU.
Press left arrow to return to previous screen. Press
right arrow to access next screen. Press down arrow
to make changes. Press MENU/SAVE button to exit
setup program and save new settings.
Each of these functions and settings are explained in
SETTINGS section of this manual.
NOTE: Advancing at the end of menu returns to beginning of menu.
NOTE: Setup/Programming mode cannot be accessed during an alert.
Unit does not detect signals while in Setup/Programming mode.
Nothing Comes Close to a Cobra®
21
XRS_R7_R9G_Final_012507.qxd:Layout 1
Your Detector
1/25/07
4:31 PM
Page 22
Program Navigation
Program Flow Diagrams
User Settings Diagram
•
Screens display in the following order when cycling through User Settings
menu. Speed Units screen displays only if GPSL is connected to system. Pair
RDU screen displays only if system detects a missing RDU connection.
User Settings
City
Default
Pair
Remote
NOTE: Only
shown if RDU
lock is lost.
22 English
Intelli
Mute
Restore
Factory
Settings
Auto
Mute
Speed
Units
NOTE: Only
shown when
GPSL is
connected.
Voice/
Tone
Smart
Power
RDU
Beeps
Display
Color
Display
Set-up
XRS_R7_R9G_Final_012507.qxd:Layout 1
Your Detector
1/25/07
4:31 PM
Page 23
Program Navigation
Alert Settings Diagram
Screens display in the following order when cycling through Alert Settings
menu. Speed Alert, Display GPS Database Version and Delete ALL User
Locations screens display only if a GPSL is connected to system.
Alert Settings
POP
Delete
All User
Locations
X Band
K Band
Display
GPS
Database
Ku Band
Speed
Alert
VG-2
Spectre
Low Car
Voltage
Safety
Alert
These screens display only if GPSL is connected.
Nothing Comes Close to a Cobra®
23
XRS_R7_R9G_Final_012507.qxd:Layout 1
Your Detector
1/25/07
4:31 PM
Page 24
Settings
Programming User Settings
IntelliMute® Mode
•
Set IntelliMute to mute alerts when vehicle is stopped or
moving slowly. Intellimute senses engine RPMs and
mutes alerts. IntelliMute does not mute strobe signals
from emergency vehicles. IntelliMute works with City and
Auto Mute modes.
Set an RPM activation point to start IntelliMute.
IntelliMute begins muting alerts when engine RPMs fall
below set RPMs. The activation point is stored in
memory and recalled each time the power is turned on.
IntelliMute is factory set off.
An IntelliMute icon appears in display when IntelliMute is
on and activation is set. When engine RPMs fall below
the activation point, Arrow points down. Arrow points up
when engine RPMs are above the activation point. If unit
stops sensing the engine’s RPMs, IntelliMute indicates an
error and automatically turns off.
When initially choosing your IntelliMute activation point, a
setting approximately 300 to 600 RPMs above idle is
recommended. Reset the activation point at any time to fit
individual preferences and driving style.
NOTE: Reset RPM point if detector is used in a different vehicle.
IntelliMute may not work with some vehicles because it cannot sense
the engine’s RPMs. Reduce unwanted audio alerts by using Auto Mute
IntelliShield® Tri-level and City Mode.
WARNING
DO NOT attempt to set the RPM point while driving. Your vehicle should
be parked and idling to avoid a collision during the process.
24 English
XRS_R7_R9G_Final_012507.qxd:Layout 1
Your Detector
1/25/07
4:31 PM
Page 25
Settings
Setting IntelliMute
From the IntelliMute Setup screen:
1. Press MUTE/ button to start setup.
2. Press and hold the vehicle accelerator at desired engine RPMs.
3. Press DIM/button to complete setting process.
System stores engine RPM setting and displays a completion message and a
tone or voice message. Unit must sense a usable pulse within three seconds
or a set RPM point within 30 seconds of beginning of setup, or IntelliMute
detects an error and turns off.
Change a set activation point by accessing Set IntelliMute in User Settings
Programming. Repeat three-step setup process above.
Auto Mute Mode
When Auto Mute is on, it automatically reduces the audio volume of all alerts
after they have sounded for four seconds. The signals will remain muted for
as long as the signal is detected. When Auto Mute is off, the alerts will sound
at full volume for as long as the signal is detected. The factory setting for
Auto Mute is On. Press MUTE/to toggle between Auto Mute vs. Manual
Mute.
Voice or Tone Mode
Set detector to sound alerts and confirm program settings with a Voice or a
Tone. Voice Alert provides voice messages in addition to tones. Tone Alert
provides tones only. Factory setting is Voice Alert.
Remote Display Unit (RDU) Beep Level
RDU Beep sets the volume level for the keypad confirmation tones of the
RDU. Choose from low, high or off RDU beep level volumes.
RDU Display Color
The RDU screen color theme is customizable to match your personal
preference or your vehicle’s dash illumination. Choices include Multi-Color,
Red, Blue, Orange or Green. Factory setting is Multi-Color.
Nothing Comes Close to a Cobra®
25
XRS_R7_R9G_Final_012507.qxd:Layout 1
Your Detector
1/25/07
4:31 PM
Page 26
Settings
Display Setup
Display Setup determines how long RDU button backlight and display stays
on before RDU screen switches to Auto Dark mode. Set RDU display time for
15 seconds, 30 seconds, one minute, three minutes or Always On. Factory
default is 30 seconds.
NOTE: If selecting “Always On” setting, RDU battery will need charging
more frequently.
Smart Power Mode
SmartPower feature turns system off five minutes after car’s engine is turned
off. Before SmartPower engages, three beeps sound and SmartPower flashes
on display. Start the car or press Power/Pairing button to return to normal
power. Factory setting is SmartPower On.
Speed Indicator (Shown only if GPSL is connected)
Displays vehicle speed in miles per hour (MPH) or kilometers per hour
(km/h). Factory setting is MPH.
Restore Factory Settings
Restore detector to original settings here. Confirmation messages display
during process.
26 English
XRS_R7_R9G_Final_012507.qxd:Layout 1
Your Detector
1/25/07
4:31 PM
Page 27
Settings
Programming Alert Settings
POP Alert
•
With Pop Detect mode on, signals are detected and an alert given. During
alert unit continues to detect other signals. Factory setting is Pop Detect Off.
X Band Alert
With X Band Detect mode on, signals are detected and an alert given. During
alert unit continues to detect other signals. Factory setting is X Band
Detection On.
K Band Alert
With K Band Detect mode on, signals are detected and an alert given. During
alert unit continues to detect other signals. Factory setting is K Band Detect
On.
Ku Band Alert
With Ku Band Detect mode on, signals are detected and an alert given. During
alert unit continues to detect other signals. Factory setting is Ku Band Detect
Off.
VG-2 Alert
Detector is undetectable by VG-2 detection devices. An alert is given when
such a device is in use near the vehicle. When VG-2 Detect mode is On, VG-2
signals are detected and an alert given. During alert unit continues to detect
other signals. Factory setting is VG-2 Detect Off.
VG-2 Audio Mode
When VG-2 Audio mode is On, alerts are heard and displayed. This setting is
only available if VG-2 Alert is On. Factory setting is VG-2 Audio Off.
Spectre 1 Alert
Detector is undetectable by Spectre 1 detection devices. An alert is given
when such a device is in use near the vehicle. When Spectre 1 Detect mode is
On, Spectre 1 signals are detected and an alert given. During alert unit
continues to detect other signals. Factory setting is Spectre 1 Detect Off.
Nothing Comes Close to a Cobra®
27
XRS_R7_R9G_Final_012507.qxd:Layout 1
Your Detector
1/25/07
4:31 PM
Page 28
Settings
Spectre 1 Audio Mode
Spectre 1 Audio mode is only available if Spectre 1 Alert is on. Alerts are
audio and displayed on screen. Safety Alert radar signals are detected and
alerts given when Safety Alert mode is on. Factory setting is Spectre 1 Audio
Off.
Safety Alert
When Safety Alert mode is On, Safety Alert radar signals are detected and an
alert is given. During alert unit continues to detect other signals. Factory
setting is Safety Alert On.
Low Car Voltage Warning
Many U.S. cars have continuous power to 12V outlet and if a device is
connected/kept on, it will drain vehicle’s battery. To avoid this, XRS R7/R9G
comes with SmartPower and Low Car Voltage Warning features.
The detector emits a car battery low alert when voltage drops below 11.9
volts. The detector enters SmartPower mode to avoid further battery draining.
Factory setting is Car Battery Low On.
The following functions are available only if a Global Positioning System
Locator is connected to the system.
Speed Alert
The Speed Alert with the GPSL module tracks vehicle speed and sounds an
alert when set speed is exceeded. Speed settings increase or decrease in
5 MPH or km/h increments, depending upon Speed Units chosen in User
Settings. Speed Alert must be turned on to see Adjust Speed Setting screen.
Factory setting is Off.
Display GPS Database Date
The GPS database screen is only informational. The screen changes only
when you have updated the database.
Delete all User Locations
Delete all user-programmed location alerts with this screen.
28 English
XRS_R7_R9G_Final_012507.qxd:Layout 1
Your Detector
1/25/07
4:31 PM
Page 29
Detection Alerts
Detection Alerts
Alert Screens
•
All alerts have a unique tone and a vocal alert if the Voice
Alert feature is activated.
Radar Alerts
RADAR
RADAR
X1
Ku1
RADAR
K1
RADAR
Ka1
Radar alerts for X band, Ku band, K band and Ka band
generate a screen display “RADAR,” signal type and a
number (1-5) indicating the signal strength. A unique
tone sounds with a vocal alert if the Voice Alert feature is
activated.
RADAR
RADAR
RADAR
POP VG2 SP1
POP, VG2 or SP1 display depending on signal type
detected.
Laser Alerts
ULTRA LYTE
L
PRO LASER
L
PRO LASER 3
L
20 / 20
L
Laser alerts are indicated by an “L” and laser signal type.
Nothing Comes Close to a Cobra®
29
XRS_R7_R9G_Final_012507.qxd:Layout 1
Your Detector
1/25/07
4:31 PM
Page 30
Detection Alerts
Emergency Vehicle Alerts
EMERGENCY
EV
Emergency vehicle alerts are indicated by “EV” and the
label “EMERGENCY.”
Road Hazard Alerts
ROAD HAZARD
Road Hazard alerts show “RH” and “ROAD HAZARD.”
RH
Railroad Alerts
RAILROAD
Railroad alerts generate “RR” and “RAILROAD.”
RR
Low Car Voltage Alert
WARNING
CAR VOLTAGE
LOW
30 English
The detector emits a car battery low alert when voltage
drops below 11.9 volts. The detector enters SmartPower
mode to avoid further battery draining. Factory setting is
Car Battery Low Off.
XRS_R7_R9G_Final_012507.qxd:Layout 1
Your Detector
1/25/07
4:31 PM
Page 31
Detection Alerts
The following screens are shown only if a Global Positioning System
Locator (GPSL) is connected to the system.
A detector system with a GPSL also receives alerts based on vehicle location
and information in its databases.
Photo Enforcement Alerts
An alert to a Photo Enforcement area is indicated by a
camera surrounded by a circle. As you get closer to the
location, the circle and the camera get progressively
larger and you hear a unique chime. If the Voice Alert is
activated you will also hear a voice alert.
In Multi-Color theme the circles change from green, to
yellow, to red.
User Location Alerts
The system can store up to 1,000 User Programmable
Location Alerts set to give hazard warnings not known to
the GPSL. The screen displays a flag surrounded by a
circle. When approaching a stored location, the circle
and flag get progressively larger. In addition, a unique
tone sounds as vehicle approaches location. A voice alert
sounds if Voice Alert is activated.
NOTE: A particular User Location can be deleted only when the vehicle
returns to that location and receives a User Location Alert. Press
MENU/SAVE to delete that location. A confirmation screen displays with
“Yes” and “No” selections. Press “Yes” to confirm User Location
Deleted. Press “No” to cancel delete. All User Locations can be deleted
within the menu (see page 28).
Speed Alerts
Speed Alert
55
mph
Speed alerts are generated when the GPSL senses the
vehicle is going faster than the speed setting
programmed in the Alert Setting menu. The display
indicates actual vehicle speed and a tone sounds. All
radar, laser, strobe and safety alerts have priority and
override this alert. Factory default is Off.
Nothing Comes Close to a Cobra®
31
XRS_R7_R9G_Final_012507.qxd:Layout 1
Your Detector
1/25/07
4:31 PM
Page 32
Radar and Laser
Understanding Radar and Laser
Radar Speed Monitoring Systems
•
Four band frequencies have been approved by the Federal Communications
Commission (FCC) for use by speed monitoring radar equipment:
X band
K band
Ka band
Ku band
10.525 GHz
24.150 GHz
33.400 – 36.000 GHz
13.435 GHz
Your detector detects signals in all four radar bands.
VG-2 and Spectre 1
VG-2 and Spectre 1 are “detector detectors” that work by detecting low-level
signals emitted by most radar detectors. Your detector does not emit signals
that can be detected by VG-2 or Spectre 1, but does detect VG-2 and
Spectre 1 signals and alerts you when a device is in use near your vehicle.
Safety Alert Traffic Warning System
FCC-approved Safety Alert transmitters emit microwave radar signals that
indicate the presence of a safety-related concern. Depending on the
frequency of the signal emitted, it can indicate a speeding emergency vehicle,
train or a stationary road hazard.
Because these microwave signals are within the K band frequency, most
conventional radar detectors detect Safety Alert signals as standard K band
radar. Your detector, however, is designed to differentiate between standard
K band and Safety Alert signals, and give separate alerts for each.
Safety Alert technology is relatively new. Safety Alert transmitters can be
found in limited numbers in all 50 states, but the number is growing.
Depending on your location, you may not receive these alerts regularly and
may often encounter emergency vehicles, trains and road hazards without
being alerted. As the number of transmitters increases, these alerts will
become more common.
When you receive such an alert, watch for emergency vehicles ahead of you,
on cross streets or behind you. If you see an emergency vehicle
approaching, pull over to the right side of the road and allow it to pass.
32 English
XRS_R7_R9G_Final_012507.qxd:Layout 1
Your Detector
1/25/07
4:31 PM
Page 33
Radar and Laser
Strobe Alert
Special strobes mounted on the light bars of authorized emergency vehicles
(fire trucks, police cars, ambulances) automatically change traffic signals as
the vehicle approaches an intersection. These strobes and the special strobe
detectors located on the traffic signals are already in use in more than 1000
cities nationwide. Cobra’s exclusive Strobe Alert detector detects these
special strobes and sounds an emergency vehicle alert.
When you receive such an alert, watch for an approaching emergency vehicle
and pull over to allow it to pass. Contact your local fire and police
departments for information about coverage in your area.
LIDAR (Laser)
The correct name for the technology that most people refer to as “laser” is
actually LIDAR, Light Detection And Ranging. LIDAR operates much like
radar. Its signal spreads out like a radar signal, though not as widely. Unlike
radar, LIDAR must have a clear line of sight to its target vehicle throughout
the entire measurement interval. Obstructions such as sign posts, utility
poles or tree branches prevent valid speed measurement.
Some common questions about LIDAR include:
I Does weather have any affect on LIDAR?
Yes. Rain, snow, smoke, fog or airborne dust particles reduce the
effective range of LIDAR and can, with dense conditions, prevent its
operation.
I
Can LIDAR operate through glass?
Yes. Newer LIDAR guns can obtain readings through most types of
glass. However, the laser pulse also can be received through glass to
trigger an alarm by your detector.
I
Can LIDAR operate while in motion?
No. Because LIDAR operates by line of sight, the person using it cannot
drive the vehicle, aim and operate the gun all at the same time.
I
Is LIDAR legal to use?
Yes. It is legal in all 50 states.
Nothing Comes Close to a Cobra®
33
XRS_R7_R9G_Final_012507.qxd:Layout 1
Your Detector
1/25/07
4:31 PM
Page 34
Radar and Laser
Pop Radar Guns
The Pop Mode Radar Gun is a single-pulse Doppler radar that is a feature of
a K and Ka (Bee III Ka radar gun) band Instant-On radar gun. It uses a single,
short-time pulse to measure the target vehicle’s speed.
The Pop mode receiver senses Pop signals beyond the effective range of Pop
radar guns. As the Pop mode receiver is so sensitive, you should limit the
use of Pop Detect mode to highway and rural driving.
34 English
XRS_R7_R9G_Final_012507.qxd:Layout 1
Your Detector
1/25/07
4:31 PM
Page 35
Maintenance
Maintenance
Detector is designed and built to give years of trouble-free performance
without service. No routine maintenance is required.
•
Follow these steps if unit is not operating properly:
I
Make sure power cord is properly connected.
I
Make sure lighter/accessory outlet of vehicle is clean and free of
corrosion.
I
Make sure power cord’s accessory adapter is firmly seated in
lighter/accessory outlet.
I
Check power cord fuse (unscrew ribbed end cap of accessory adapter
and examine fuse) or in-line fuse of cable to fuse box, depending on
cord used. If required, replace with 2-amp fuse only.
NOTE: Rechargeable battery packs should be recycled or disposed of
properly in compliance with all applicable laws. Certain states or
municipalities provide recycling and have established collection
programs. Please contact your local waste removal authority for
instructions.
WARNING
Do Not put battery packs into fire or expose to high heat. They may
explode.
WARNING
To reduce risk of damage, use only approved battery packs.
Nothing Comes Close to a Cobra®
35
XRS_R7_R9G_Final_012507.qxd:Layout 1
Your Detector
1/25/07
4:31 PM
Page 36
Specifications
Band and Frequencies
•
Band
Frequencies
X Band
10.525
± 0.050
GHz
K Band
24.125
± 0.125
GHz
Safety Alert
Traffic Warning
System
24.070
± 0.010
GHz
24.110
± 0.010
GHz
24.190
± 0.010
GHz
24.230
± 0.010
GHz
Ka Band
34.700
± 1.300
GHz
Ku Band
13.435
± 0.050
GHz
Laser
910
± 50
nm
Strobe
700
± 300
nm
This radar detector is covered by one or more of the following U.S. patents: 5,497,148; 5,594,432;
5,612,685; 6,078,279; 6,094,148; 6,621,447. Additional patents may be listed inside the product
or pending.
NOTE: This device complies with part 15 of FCC rules: Operation is
subject to the following two conditions: (1) This device may not cause
harmful interference, and (2) This device must accept any interference
received including interference that may cause undesired operation.
36 English
XRS_R7_R9G_Final_012507.qxd:Layout 1
Warranty
1/25/07
4:31 PM
Page 37
Warranty
Warranty
COBRA ELECTRONICS CORPORATION warrants that its products, and the
component parts thereof, will be free of defects in workmanship and
materials for a term of one year from the date of first consumer purchase.
This warranty may be enforced by the first consumer purchaser, provided
that the product is used solely within the U.S.A and Canada.
•
Cobra will, without charge, repair or replace, at its option, defective products
or component parts upon delivery to the Cobra Factory Service Department,
accompanied by proof of the date of first consumer purchase, such as a
duplicated copy of a sales receipt. The consumer must pay any initial
shipping charges required to ship the product for warranty service. Return
charges will be at Cobra’s expense, if the product is repaired or replaced
under warranty.
This warranty gives the consumer specific rights, and he or she may also
have other rights which vary from state to state.
NOTE: Cobra makes no warranty as to the accuracy or completeness
of the data in the products and disclaims any and all express, implied
or statutory warranties, including any implied warranty of
merchantability or fitness for a particular purpose.
EXCLUSIONS – This limited warranty does not apply:
1. To any product damaged by accident;
2. In the event of misuse or abuse of the product or as a result of
unauthorized alterations or repairs;
3. If the serial number has been altered, defaced or removed;
4. If the owner of the product resides outside the U.S.A and Canada.
Nothing Comes Close to a Cobra®
37
XRS_R7_R9G_Final_012507.qxd:Layout 1
Warranty
1/25/07
4:31 PM
Page 38
Warranty
All implied warranties, including warranties of merchantability and fitness for
a particular purpose are limited in duration to the length of this warranty.
COBRA SHALL NOT BE LIABLE FOR ANY INCIDENTAL, CONSEQUENTIAL OR
OTHER DAMAGES; INCLUDING, WITHOUT LIMITATION, DAMAGES
RESULTING FROM LOSS OF USE OR COST OF INSTALLATION. Some states
do not allow limitations on the duration of an implied warranty and/or do not
allow the exclusion or limitation of incidental or consequential damages, so
the above limitations may not apply to some consumers.
It is the user’s responsibility to use this product prudently and responsibly.
This product is intended to be used only as a travel aid and must not be used
or any purpose requiring precise measurement of direction, distance, location
or topography.
38 English
XRS_R7_R9G_Final_012507.qxd:Layout 1
User License
1/25/07
4:31 PM
Page 39
User License
User License
•
This document and the software and data described in it are furnished under
license and may be used or copied only in accordance with such license.
Except as permitted by such license, the contents of this document, software
and data may not be disclosed to third parties, copied or duplicated in any
form, in whole or in part, without the prior written permission of Cobra
Electronics Corporation. This document, software and DATA contain
proprietary and confidential information of Cobra Electronics Corporation and
its licensors.
Cobra grants the purchaser a limited license for use of this document,
software and data incorporated in its products for personal use, and not for
resale, sublicense or commercial use. By using this product, the purchaser
agrees to be bound by the terms and conditions of this license agreement.
The purchaser acknowledges that the content of this document, software and
data are the property of Cobra and its licensors and are protected by
copyright laws of the USA and international treaties. The purchaser agrees
not to modify, decompile, disassemble, reverse engineer or reduce to human
readable form the software, DATA or any part thereof, nor to create derivative
works based on the contents of the document, software or data, nor remove
or obscure any copyright, trademark notice, or restrictive legend. The
purchaser agrees not to export or re-export this document or this product to
any country in violation of the export control laws of the U.S.A.
The contents of this document, software and data are for informational use
only and are subject to change without notice. Cobra and its licensors intend
to provide their customers the most complete and accurate location database
for red light/speed cameras available from government and private data
sources. However, all data sources have limitations and some have
inaccuracies or are incomplete to some degree. These characteristics carry
over to this product as well. As such, COBRA AND ITS LICENSORS SHALL
NOT BE LIABLE TO THE USER FOR ANY INCIDENTAL, CONSEQUENTIAL,
SPECIAL, INDIRECT OR EXEMPLARY DAMAGES ARISING FROM THE USE
OF ITS PRODUCTS.
THIS PRODUCT IS PROVIDED ON AN “AS IS” AND “WITH ALL FAULTS
BASIS” AND COBRA AND LICENSORS EXPRESSLY DISCLAIM ALL
WARRANTIES, EXPRESS OR IMPLIED, INCLUDING BUT NOT LIMITED TO,
THE IMPLIED WARRANTIES OF NON-INFRINGEMENT, MERCHANTABILITY,
Nothing Comes Close to a Cobra®
39
XRS_R7_R9G_Final_012507.qxd:Layout 1
User License
1/25/07
4:31 PM
Page 40
User License
QUALITY, ACCURACY, TITLE AND FITNESS FOR A PARTICULAR PURPOSE.
NO ORAL OR WRITTEN ADVICE OR INFORMATION PROVIDED BY COBRA
AND/OR ITS LICENSORS OR ANY OF THEIR AGENTS, EMPLOYEES OR
THIRD PARTY PROVIDERS SHALL CREATE A WARRANTY AND USER IS
NOT ENTITLED TO RELY ON ANY SUCH ADVICE OR INFORMATION. THIS
DISCLAIMER OF WARRANTIES IS AN ESSENTIAL CONDITION OF THE
AGREEMENT.
Cobra encourages customers to report any errors found in our data by
contacting technical assistance (available in English and Spanish) at
product [email protected] (e-mail), by visiting our website: www. cobra.com,
or by calling customer assistance (available in English and Spanish) at
773-889-3087 between 8:00 a.m. and 6:00 p.m. Central Time, Monday
through Friday (except holidays).
40 English
XRS_R7_R9G_Final_012507.qxd:Layout 1
Customer Assistance
1/25/07
4:31 PM
Page 41
Product Service
Product Service
•
For questions about operating or installing this new Cobra product, or if
parts are missing…CALL COBRA FIRST…do not return this product to the
store.
If this product should require factory service, call Cobra before sending the
product. This will ensure the fastest turn-around time on any repair. If Cobra
asks that the product be sent to its factory, the following must be furnished
to have the product serviced and returned.
1. For Warranty Repair, include some form of proof-of-purchase, such as a
mechanical reproduction or carbon of a sales receipt. Make sure the date
of purchase and product model number is clearly readable. If the originals
are sent, they cannot be returned.
2. Send the entire product except for hardwired or permanently placed
components such as 12V hardwire power cord and cord clips.
3. Enclose a description of what is happening with the product. Include a
typed or clearly printed name and address of where the product is to be
returned, with phone number (required for shipment).
4. Pack product securely to prevent damage in transit. If possible, use the
original packing material.
5. Ship prepaid and insured by way of a traceable carrier such as United
Parcel Service (UPS) or Priority Mail to avoid loss in transit to:
Cobra Factory Service
Cobra Electronics Corporation
6500 West Cortland Street
Chicago, Illinois 60707 U.S.A.
6. If the product is in warranty, upon receipt of the product, it will either be
repaired or exchanged depending on the model. Please allow
approximately 3 – 4 weeks before contacting Cobra for status. If the
product is out of warranty, a letter will automatically be sent with
information as to the repair charge or replacement charge.
For any questions, please call 773-889-3087 for assistance.
Nothing Comes Close to a Cobra®
41
XRS_R7_R9G_Final_012507.qxd:Layout 1
Customer Assistance
1/25/07
4:31 PM
Page 42
Trademark Acknowledgement
Trademark Acknowledgement
Cobra®, 6 Band®, 9 Band®, DigiView®, EasySet®, Extra Sensory Detection®,
IntelliMute®, IntelliShield®, LaserEye®, Nothing Comes Close to a Cobra®,
Safety Alert® Traffic Warning System, Strobe Alert®, VG-2 Alert®, Xtreme
Range Superheterodyne® and the snake design are registered trademarks of
Cobra Electronics Corporation, USA.
•
Cobra Electronics Corporation™, 12 Band™, Extreme Bright DataGrafix™,
IntelliLink™, Revolution™ Series, SmartPower™, Spectre Alert™, SuperXtreme Range Superheterodyne™, S-XRS™, UltraBright™, and Voice Alert™
are trademarks of Cobra Electronics Corporation, USA.
Opticom™ is a trademark of 3M Corporation.
Instaclear® for Ford is a registered trademark of Ford Motor Company, Inc.
Electriclear® for GM is a registered trademark of General Motors Corporation.
20-20™ and Ultra-Lyte™ are trademarks of Laser Technology, Inc.
ProLaser™ and ProLaser III™ are trademarks of Kustom Signals, Inc.
Bee III™ and Pop™ are trademarks of MPH Industries.
Spectre™ is a trademark of Stalcar.
Interceptor VG-2™ is a trademark of TechniSonic Industries LTD.
Tomar® is a registered trademark of TOMAR Electronics, Inc.
42 English
XRS_R7_R9G_Final_012507.qxd:Layout 1
Customer Assistance
1/25/07
4:31 PM
Page 43
Optional Accessories
IS CE
TH FA DS
R R
U A
S W Y
K
TO S
Dual Port Power Adapter
Includes adjustable plug (up to 90˚)
and fuse
GPS Locator (w/cable) Upgrade Kit
(for Model XRS R7 Only)
Item #RDA GPSL
Item #CLP-2B
LiON Replacement Battery Pack
Replacement RDU
Item #RDA LIBP
Item #RDA RDU
Nothing Comes Close to a Cobra®
43
XRS_R7_R9G_Final_012507.qxd:Layout 1
Customer Assistance
1/25/07
4:30 PM
Page 44
Accessories Order Info
Ordering From U.S.A.
Call 773-889-3087 for pricing or visit www.cobra.com.
For Credit Card Orders
Call 773-889-3087 [Press one from the main menu] 8:00 a.m. to 6:00 p.m. Central Time,
Monday through Friday.
Make Check or Money Order Payable To
Cobra Electronics, Attn: Accessories Dept.,
6500 West Cortland Street, Chicago, IL 60707 U.S.A.
To Order Online
Please visit our website: www.cobra.com
Item #
Description
CLP-2B
RDA GPSL
RDA LIBP
RDA RDU
Dual Port Power Adapter
GPS Locator (w/cable) Upgrade Kit (for Model XRS R7 Only)
LiON Replacement Battery Pack
Replacement RDU
44 English
XRS_R7_R9G_Final_012507.qxd:Layout 1
1/25/07
4:30 PM
Page BC1
The Cobra line of quality products includes:
CB Radios
microTALK® Radios
Radar/Laser Detectors
Safety Alert® Traffic Warning Systems
Handheld GPS Receivers
Mobile GPS Navigation Systems
HighGear® Accessories
CobraMarine® VHF Marine Radios
CobraMarine® Chartplotters
Power Inverters
Accessories
Nothing Comes Close to a Cobra®
For more information or to
order any of our products,
please visit our website:
www.cobra.com
English