1
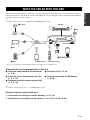
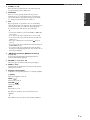
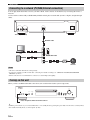
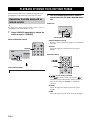
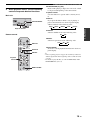
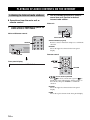
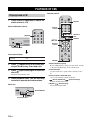
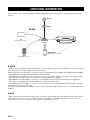
UA
Network CD Player
OWNER’S MANUAL
IMPORTANT SAFETY INSTRUCTIONS
CAUTION
RISK OF ELECTRIC SHOCK
DO NOT OPEN
CAUTION: TO REDUCE THE RISK OF
ELECTRIC SHOCK, DO NOT REMOVE
COVER (OR BACK). NO USER-SERVICEABLE
PARTS INSIDE. REFER SERVICING TO
QUALIFIED SERVICE PERSONNEL.
• Explanation of Graphical Symbols
The lightning flash with arrowhead symbol, within
an equilateral triangle, is intended to alert you to the
presence of uninsulated “dangerous voltage” within
the product’s enclosure that may be of sufficient
magnitude to constitute a risk of electric shock to
persons.
The exclamation point within an equilateral triangle
is intended to alert you to the presence of important
operating and maintenance (servicing) instructions
in the literature accompanying the appliance.
1
2
3
4
5
6
7
8
9
10
11
12
IMPORTANT
Please record the serial number of this unit in the space
below.
MODEL:
Serial No.:
The serial number is located on the rear of the unit. Retain
this manual in a safe place for future reference.
13
14
Read these instructions.
Keep these instructions.
Heed all warnings.
Follow all instructions.
Do not use this apparatus near water.
Clean only with dry cloth.
Do not block any ventilation openings. Install in
accordance with the manufacturer’s instructions.
Do not install near any heat sources such as radiators,
heat registers, stoves, or other apparatus (including
amplifiers) that produce heat.
Do not defeat the safety purpose of the polarized or
grounding-type plug. A polarized plug has two blades
with one wider than the other. A grounding type plug has
two blades and a third grounding prong. The wide blade
or the third prong are provided for your safety. If the
provided plug does not fit into your outlet, consult an
electrician for replacement of the obsolete outlet.
Protect the power cord from being walked on or pinched
particularly at plugs, convenience receptacles, and the
point where they exit from the apparatus.
Only use attachments/accessories specified by the
manufacturer.
Use only with the cart, stand, tripod,
bracket, or table specified by the
manufacturer, or sold with the apparatus.
When a cart is used, use caution when
moving the cart/apparatus combination to
avoid injury from tip-over.
Unplug this apparatus during lightning storms or when
unused for long periods of time.
Refer all servicing to qualified service personnel.
Servicing is required when the apparatus has been
damaged in any way, such as power-supply cord or plug
is damaged, liquid has been spilled or objects have fallen
into the apparatus, the apparatus has been exposed to rain
or moisture, does not operate normally, or has been
dropped.
We Want You Listening For A Lifetime
Yamaha and the Electronic Industries Association’s Consumer Electronics Group want you to get the most out of your
equipment by playing it at a safe level. One that lets the sound come through loud and clear without annoying blaring or
distortion – and, most importantly, without affecting your sensitive hearing. Since hearing damage from loud sounds is
often undetectable until it is too late, Yamaha and the Electronic Industries Association’s Consumer Electronics Group
recommend you to avoid prolonged exposure from excessive volume levels.
i En
FCC INFORMATION (for US customers)
1 IMPORTANT NOTICE: DO NOT MODIFY THIS
UNIT!
This product, when installed as indicated in the
instructions contained in this manual, meets FCC
requirements. Modifications not expressly approved by
Yamaha may void your authority, granted by the FCC,
to use the product.
2 IMPORTANT: When connecting this product to
accessories and/or another product use only high quality
shielded cables. Cable/s supplied with this product MUST
be used. Follow all installation instructions. Failure to
follow instructions could void your FCC authorization to
use this product in the USA.
3 NOTE: This product has been tested and found to comply
with the requirements listed in FCC Regulations, Part 15
for Class “B” digital devices. Compliance with these
requirements provides a reasonable level of assurance that
your use of this product in a residential environment will
not result in harmful interference with other electronic
devices.
This equipment generates/uses radio frequencies and,
if not installed and used according to the instructions
found in the users manual, may cause interference
harmful to the operation of other electronic devices.
Compliance with FCC regulations does not guarantee
that interference will not occur in all installations. If
this product is found to be the source of interference,
which can be determined by turning the unit “OFF”
and “ON”, please try to eliminate the problem by using
one of the following measures:
Relocate either this product or the device that is being
affected by the interference.
Utilize power outlets that are on different branch
(circuit breaker or fuse) circuits or install AC line
filter/s.
In the case of radio or TV interference, relocate/
reorient the antenna. If the antenna lead-in is 300 ohm
ribbon lead, change the lead-in to coaxial type cable.
If these corrective measures do not produce
satisfactory results, please contact the local retailer
authorized to distribute this type of product. If you can
not locate the appropriate retailer, please contact
Yamaha Corporation of America A/V Division, 6600
Orangethorpe Ave., Buena Park, CA 90620.
The above statements apply ONLY to those products
distributed by Yamaha Corporation of America or its
subsidiaries.
COMPLIANCE INFORMATION STATEMENT (DECLARATION OF CONFORMITY PROCEDURE)
Responsible Party:
Yamaha Corporation of America
A/V Division
Address:
6600 Orangethorpe Avenue
Buena Park, CA 90620, USA
Telephone:
1-714-522-9011
Type of Equipment: Network CD Player
Model Name:
CD-N500
• This device complies with Part 15 of the FCC Rules.
• Operation is subject to the following conditions:
– This device may not cause harmful interference.
– This device must accept any interference received including
interference that may cause undesired operation.
See the troubleshooting section in this Owner’s Manual if
interference to radio reception is suspected.
FCC CAUTION
Change or modifications not expressly approved by the party
responsible for compliance could void the user’s authority to
operate the equipment.
ii En
CAUTION: READ THIS BEFORE OPERATING YOUR UNIT.
1
2
3
4
5
6
7
8
9
10
11
12
13
14
15
16
To assure the finest performance, please read this manual
carefully. Keep it in a safe place for future reference.
Install this sound system in a well ventilated, cool, dry,
clean place - away from direct sunlight, heat sources,
vibration, dust, moisture, and/or cold. For proper
ventilation, allow the following minimum clearances.
Top: 10 cm (4 in)
Rear: 10 cm (4 in)
Sides: 10 cm (4 in)
Locate this unit away from other electrical appliances,
motors, or transformers to avoid humming sounds.
Do not expose this unit to sudden temperature changes
from cold to hot, and do not locate this unit in an
environment with high humidity (i.e. a room with a
humidifier) to prevent condensation inside this unit,
which may cause an electrical shock, fire, damage to this
unit, and/or personal injury.
Avoid installing this unit where foreign object may fall
onto this unit and/or this unit may be exposed to liquid
dripping or splashing. On the top of this unit, do not
place:
– Other components, as they may cause damage and/or
discoloration on the surface of this unit.
– Burning objects (i.e. candles), as they may cause fire,
damage to this unit, and/or personal injury.
– Containers with liquid in them, as they may fall and
liquid may cause electrical shock to the user and/or
damage to this unit.
Do not cover this unit with a newspaper, tablecloth,
curtain, etc. in order not to obstruct heat radiation. If the
temperature inside this unit rises, it may cause fire,
damage to this unit, and/or personal injury.
Do not plug in this unit to a wall outlet until all
connections are complete.
Do not operate this unit upside-down. It may overheat,
possibly causing damage.
Do not use force on switches, knobs and/or cords.
When disconnecting the power cable from the wall outlet,
grasp the plug; do not pull the cable.
Do not clean this unit with chemical solvents; this might
damage the finish. Use a clean, dry cloth.
Only voltage specified on this unit must be used. Using
this unit with a higher voltage than specified is dangerous
and may cause fire, damage to this unit, and/or personal
injury. Yamaha will not be held responsible for any
damage resulting from use of this unit with a voltage
other than specified.
To prevent damage by lightning, keep the power cable
and outdoor antennas disconnected from a wall outlet or
this unit during a lightning storm.
Do not attempt to modify or fix this unit. Contact
qualified Yamaha service personnel when any service is
needed. The cabinet should never be opened for any
reasons.
When not planning to use this unit for long periods of
time (i.e. vacation), disconnect the AC power plug from
the wall outlet.
Be sure to read the “TROUBLESHOOTING” section on
common operating errors before concluding that this unit
is faulty.
iii En
17 Before moving this unit, press to set this unit to the
standby mode, and disconnect the AC power plug from
the wall outlet.
18 Condensation will form when the surrounding
temperature changes suddenly. Disconnect the power
cable from the outlet, then leave this unit alone.
19 When using this unit for a long time, this unit may
become warm. Turn the power off, then leave this unit
alone for cooling.
20 Install this unit near the AC outlet and where the AC
power plug can be reached easily.
21 The batteries shall not be exposed to excessive heat such
as sunshine, fire or the like.
– Keep the batteries in a location out of reach of
children. Batteries can be dangerous if a child were to
put in his or her mouth.
– If the batteries grow old, the effective operation range
of the remote control decreases considerably. If this
happens, replace the batteries with two new ones as
soon as possible.
– Do not use old batteries together with new ones.
– Do not use different types of batteries (such as
alkaline and manganese batteries) together. Read the
packaging carefully as these different types of
batteries may have the same shape and color.
– Exhausted batteries may leak. If the batteries have
leaked, dispose of them immediately. Avoid touching
the leaked material or letting it come into contact with
clothing, etc. Clean the battery compartment
thoroughly before installing new batteries.
– If you plan not to use the unit for a long period of
time, remove the batteries from the unit. Otherwise,
the batteries will wear out, possibly resulting in a
leakage of battery liquid that may damage the unit.
– Do not throw away batteries with general house
waste. Dispose of them correctly in accordance with
your local regulations.
22 Excessive sound pressure from earphones and
headphones can cause hearing loss.
This unit is not disconnected from the AC power source as long as
it is connected to the wall outlet, even if this unit itself is turned off
by . This state is called the standby mode. In this state, this unit is
designed to consume a very small quantity of power.
WARNING
TO REDUCE THE RISK OF FIRE OR ELECTRIC SHOCK, DO
NOT EXPOSE THIS UNIT TO RAIN OR MOISTURE.
WARNING
DO NOT TOUCH THIS UNIT WHEN IT IS USED
CONTINUOUSLY AT HIGH VOLUME BECAUSE THE
BOTTOM OF THIS UNIT MAY BECOME HOT. IT MAY LEAD
TO INJURIES SUCH AS BURNS, ETC.
PREPARATION
WHAT YOU CAN DO WITH THIS UNIT
y
For details on DLNA or NAS, see “ADDITIONAL INFORMATION” (☞ P.30).
1 Internet
Amplifier
4 CD
Modem
SELECT
PUSH
SOURCE
ENTER
PURE DIRECT
RETURN
5V
2.1A
Broadband router*
This unit (CD-N500)
2 PC
5 iPod/USB devices
3 NAS
A Mobile device*
B Remote control
* You need a commercially available WiFi broadband router when you use a mobile device.
❚ Sources that can be played back on this unit
1 Play back audio contents on the Internet
(☞ P.16)
2 Play back music files stored on your PC
(☞ P.11, 14)
3 Play back music files stored on your NAS
(☞ P.11, 14)
4 Play back a CD (☞ P.18)
5 Play back your iPod or USB devices
(☞ P.20)
y
For details on connecting the devices, see “CONNECTIONS” (☞ P.9).
❚ Devices that can control this unit
A Control this unit using your mobile devices (☞ P.11, 13)
B Control this unit using the remote control (☞ P.6, 14, 16, 18, 20, 22, 23)
1 En
PREPARATION
This unit is a network CD player, on which you can enjoy playing back music files stored on your media server (PC or
NAS), audio contents on the Internet, CD, iPod and USB devices, by connecting the unit to your home network (DLNA)
and audio system on the same network.
FREQUENTLY ASKED QUESTIONS
What kind of settings do I need to make?
→ For details on settings of your PC, NAS or mobile devices, see “SETUP OF YOUR PC/NAS/MOBILE DEVICES”
(☞ P.11).
→ For details on the setup menu on this unit, see “SETUP MENU” (☞ P.23).
Why can’t I find music files on my PC?
→ Check the media sharing settings of your PC or media server, such as Windows Media Player 12 (☞ P.11).
→ Check if the music files are playable (☞ P.31).
Can I control this unit with my iPhone?
→ For details on controlling this unit from your mobile device, see “Operations from your mobile device” (☞ P.13).
I can’t find this unit using the dedicated application installed on my mobile device!
→ Check if this unit is properly connected to the same network via the broadband router.
→ Check if access to this unit is restricted by MAC address filter function (☞ P.27).
What music files are playable on this unit?
→ For details on playable files and formats, see “PLAYABLE DISCS AND FILE FORMATS” (☞ P.31).
How can I listen to Internet radio on this unit?
→ For details on listening to Internet radio stations, see “PLAYBACK OF AUDIO CONTENTS ON THE
INTERNET” (☞ P.16).
How do I play back my iPod or USB devices?
→ For details on playback of your iPod or USB devices, see “PLAYBACK OF YOUR iPod/USB DEVICES”
(☞ P.20).
What do the messages on the front panel display stand for?
→ For details on the front panel display messages, see “Front panel display messages” (☞ P.29).
For latest information, please visit Yamaha website.
2 En
CONTENTS
OTHERS
WHAT YOU CAN DO WITH THIS UNIT ................. 1
FREQUENTLY ASKED QUESTIONS ....................... 2
SUPPLIED ACCESSORIES ......................................... 4
REMOTE CONTROL PREPARATION..................... 4
CONTROLS AND FUNCTIONS ................................. 5
TROUBLESHOOTING ...............................................26
CONNECTIONS ............................................................ 9
Playable media and devices ............................................. 31
Playable discs and file formats ........................................ 32
SPECIFICATIONS.......................................................33
(at the end of this manual)
Information about software ...............................i
Connecting to an amplifier................................................. 9
Connecting to a network
(PC/NAS/Internet connection)..................................... 10
Turning on this unit.......................................................... 10
OPERATIONS
Front panel ......................................................................... 5
Remote control................................................................... 6
Rear panel .......................................................................... 8
Front panel display messages........................................... 29
ADDITIONAL INFORMATION ................................30
PLAYABLE DISCS AND FILE FORMATS .............31
PREPARATION
PREPARATION
OPERATIONS
OTHERS
SETUP OF YOUR PC/NAS/MOBILE DEVICES .... 11
Sharing music files stored on your PC............................. 12
Operations from your mobile device ............................... 13
PLAYBACK OF MUSIC FILES ON YOUR
PC/NAS...................................................................... 14
Operations from the main unit or remote control ............ 14
PLAYBACK OF AUDIO CONTENTS ON THE
INTERNET ............................................................... 16
Listening to Internet radio stations .................................. 16
PLAYBACK OF CDS .................................................. 18
Playing back a CD ........................................................... 18
Using program playback mode ........................................ 19
PLAYBACK OF YOUR iPod/USB DEVICES .......... 20
Connecting your iPod or USB devices ............................ 20
Playing back your iPod .................................................... 20
Using extended playback mode for your iPod ................. 21
Playing back USB devices ............................................... 22
SETUP MENU .............................................................. 23
Setup menu operations ..................................................... 23
Setup menu list................................................................. 24
Advanced setup menu ...................................................... 25
About this manual
• Notes contain important information about safety and operating instructions. y indicates a tip for your operation.
• “iPod” described in this manual may also refer to “iPhone” or “iPad”.
3 En
PREPARATION
SUPPLIED ACCESSORIES
Check that you have received all of the following items.
Remote control
RCA stereo cable
Power cable
Batteries (AA, R6, UM-3) (× 2)
Owner’s manual
OPEN/CLOSE
SOURCE
PURE DIRECT
DISPLAY
1
2
3
4
5
6
7
8
9
0
PROGRAM
CLEAR
SHUFFLE
REPEAT
A/B
ENTER
HOME
NOW PLAYING
SETUP
RETURN
MODE
FOLDER
AMP
INPUT
VOLUME
MUTE
REMOTE CONTROL PREPARATION
❚ Installing the batteries
Aim the remote control directly at the remote control
sensor on the main unit during operation.
4
1
❚ Operation range
Remote control sensor
3
SOURCE
5V
2.1A
2
Within 6 m (20 ft)
Notes
• Change all batteries if the operation range of the remote control
narrows.
• Before inserting new batteries, wipe the compartment clean.
30
30
OPEN/CLOSE
SOURCE
1
PURE DIRECT
2
DISPLAY
3
4
5
7
8
9
0
PROGRAM
CLEAR
SHUFFLE
REPEAT
A/B
6
HOME
NOW PLAYING
ENTER
RETURN
MODE
SETUP
FOLDER
AMP
INPUT
4 En
VOLUME
MUTE
PURE DIRECT
CONTROLS AND FUNCTIONS
PREPARATION
Front panel
1
8
7
SELECT
PUSH
SOURCE
ENTER
PURE DIRECT
RETURN
5V
2.1A
2 3 4 5 6
1 Power indicator
• Lights up:
This unit is in a state that you can switch the unit to on or
standby mode with the remote control or mobile devices
(when network standby mode is on), or this unit is turned
on.
• Lights up dimly:
This unit is in a state that you can turn the unit on with the
remote control (when network standby mode is off).
• Off:
This unit is turned off and you can turn the unit on with the
power switch on the front panel of the main unit only.
9
0A B
7 Disc tray
Loads a disc.
8
2 Power switch (☞ P.10)
Switches this unit between on and off.
: On
: Off
(Open/Close)
Opens or closes the disc tray.
9 Front panel display
Shows menu items, playback information, etc.
y
For details on display messages, see “Front panel display
messages” (☞ P.29).
0
/ (Play/Pause)
Starts or pauses playback.
A
(Stop)
Stops playback.
B
/
(Skip/Search backward)
/
(Skip/Search forward)
Skips back to the previous/beginning of the current track or
to the next track, or searches backward/forward.
Operations differ depending on audio sources.
y
You can switch the setting of the network standby mode to
on or off in the setup menu (☞ P.24).
C D
3 Remote control sensor (☞ P.4)
Receives infrared signals from the remote control.
C SELECT/ENTER (jog dial) (☞ P.14, 16, 18, 21, 22, 24)
Rotate to select an item and press to confirm the selection.
4 USB port (☞ P.20)
Connects your iPod or USB devices.
D RETURN (☞ P.14, 16, 21, 22)
Shows the upper-level menu in the front panel display.
5 SOURCE (☞ P.14, 16, 18, 20, 22)
Selects an audio source. Each press cycles the audio sources
as follows.
CD → USB → SERVER → NET RADIO → Back to CD
6 PURE DIRECT
Turns on or off PURE DIRECT mode. Audio quality will be
improved when PURE DIRECT mode is on.
y
The PURE DIRECT indicator lights up when PURE
DIRECT mode is on.
5 En
CONTROLS AND FUNCTIONS
Remote control
1 Remote control signal transmitter
Transmits infrared signals to the main unit.
2 OPEN/CLOSE
Opens or closes the disc tray.
3 SOURCE (☞ P.14, 16, 18, 20, 22)
Selects an audio source. Each press cycles the audio sources
as follows.
CD → USB → SERVER → NET RADIO → Back to CD
1
OPEN/CLOSE
C
2
3
4
5
6
7
SOURCE
PURE DIRECT
DISPLAY
D
4 PURE DIRECT
Turns on or off PURE DIRECT mode. Audio quality will be
improved when PURE DIRECT mode is on.
5 Numeric buttons (☞ P.18)
Use to select directly a track on the disc or the current folder.
1
2
3
4
5
6
6 SHUFFLE (☞ P.15, 18, 21, 22)
Switches shuffle modes.
7
8
9
7 REPEAT (☞ P.15, 18, 21, 22)
Switches repeat modes.
0
PROGRAM
CLEAR
SHUFFLE
REPEAT
A/B
8 Playback buttons (☞ P.14, 16, 18, 21, 22, 23)
E
F
G
H
(Play)
Starts playback.
(Stop)
Stops playback.
(Pause)
Pauses playback.
8
(Skip backward)
Skips backward.
ENTER
9
I
HOME
0
A
NOW PLAYING
RETURN
MODE
SETUP
J
FOLDER
9 HOME (☞ P.14, 16, 21, 22)
Shows the top-level menu in the front panel display.
A SETUP (☞ P.23)
Shows the setup menu in the front panel display.
AMP
VOLUME
S/T/W/X (Cursor buttons)/ENTER
Use the cursor buttons to select an item and press ENTER to
confirm the selection.
0 NOW PLAYING (☞ P.15, 17, 21, 22)
Shows the playback information in the front panel display.
B
INPUT
(Skip forward)
Skips forward.
MUTE
K
B FOLDER ( / ) (☞ P.18)
Switches playback folders when playing music on data CDs.
C A (Power) (☞ P.10)
Switches this unit between on and standby mode.
y
For details on standby mode, see “Front panel” (☞ P.5).
D DISPLAY (☞ P.15, 17, 18, 21, 22)
Switches information shown in the front panel display, such
as playback information.
6 En
CONTROLS AND FUNCTIONS
E CLEAR (☞ P.19)
Erases the last programmed track of an audio CD (except
data CDs) during program editing mode.
PREPARATION
F PROGRAM
Turns on or off program playback mode. In program
playback mode, you can playback tracks of an audio CD
(except data CDs) in a programmed sequence. For details,
see “Using program playback mode” (☞ P.19).
G A/B
Repeats playback of a specified section of a track during
audio CD playback (except data CDs). To set the starting and
end points (A and B), press A/B twice during playback.
To cancel the repeat A-B function, press A/B again.
y
• A data CD is defined as a disc in which MP3 or WMA files
are recorded.
• You cannot set the repeat A-B function over two tracks.
• You cannot set the repeat A-B function for data CDs and
USB devices.
• The repeat A-B function is canceled when
(Stop) is
pressed.
• You cannot set the repeat A-B function when this unit is in
PURE DIRECT mode.
• You cannot set the repeat A-B function when the unit is
showing the remaining playback time of the track or disc in
the front panel display.
H
(Search backward),
(Search forward)
(☞ P.18, 21)
Searches tracks backward/forward while the button is
pressed and held during playback.
I RETURN (☞ P.14, 16, 21, 22)
Shows the upper-level menu in the front panel display.
J MODE (☞ P.21)
Switches between standard mode and extended mode when
playing back your iPod.
K Amplifier control buttons
Controls the corresponding functions of a Yamaha amplifier.
A (Power)
Turns your amplifier on and off.
INPUT ( / )
Switches input sources.
VOLUME ( / )
Adjusts the volume.
MUTE
Turns mute on or off.
For details on operations, refer to the manual of your
amplifier.
y
These buttons may not work for some Yamaha amplifiers.
7 En
CONTROLS AND FUNCTIONS
Rear panel
AC IN
ANALOG OUT
R
L
1
DIGITAL OUT
COAXIAL
NETWORK
OPTICAL
2 3
4
1 ANALOG OUT terminal (☞ P.9)
Outputs L/R analog audio signals. Connect to your amplifier
or audio system using the RCA stereo cable (supplied).
2 DIGITAL OUT terminal (COAXIAL) (☞ P.9)
Outputs digital audio signals. Connect to your amplifier or
audio system using a coaxial digital audio cable
(commercially available).
3 DIGITAL OUT terminal (OPTICAL) (☞ P.9)
Outputs digital audio signals. Connect to your amplifier or
audio system using an optical cable (commercially
available).
4 NETWORK terminal (☞ P.10)
Connects to a network using a network cable (commercially
available).
5 AC IN socket (☞ P.9)
Connects to an AC outlet using the power cable (supplied).
8 En
5
CONNECTIONS
Notes
•
•
•
•
Do not connect the power cable of this unit until all connections are completed.
You need to connect this unit to an amplifier and speakers before playing back.
This unit can output digital signals up to 192 kHz/24 bits linear PCM signals.
Proper playback may not be possible depending on the connected device and environment. Verify the settings and specifications of the
connected playback source device.
Connecting to an amplifier
AC IN
DIGITAL OUT
ANALOG OUT
R
COAXIAL
L
NETWORK
OPTICAL
This unit (CD-N500)
ANALOG OUT
R
L
DIGITAL OUT
COAXIAL
2
Power cable
(supplied)
OPTICAL
1
1
2
3
To AC outlet
DAC
(Digital-to-analog converter)
Amplifier
Amplifier
* The digital output is turned off when this unit is in
PURE DIRECT mode.
1
Connect this unit to your amplifier with
one of the following cables.
1 RCA stereo cable
(supplied)
2 Coaxial digital audio cable
(commercially available)
3 Optical digital cable
(commercially available)
2
Connect the supplied power cable to the
AC IN socket, then plug into an AC
outlet.
y
For details on speaker connections, refer to the manual of your
amplifier or speakers.
Note
When using a digital connection, audio output may be interrupted
at the beginning of a track depending on the audio system
(amplifier, etc.).
9 En
PREPARATION
This section describes connections required before playing back with this unit.
CONNECTIONS
Connecting to a network (PC/NAS/Internet connection)
You can play back music files stored on your PC or NAS, audio contents on the Internet, by connecting this unit to a
network.
Connect with a commercially available STP (shielded twisted pair) network cable (CAT-5 or higher, straight-through
cable).
AC IN
ANALOG OUT
R
L
DIGITAL OUT
COAXIAL
NETWORK
OPTICAL
This unit (CD-N500)
Network cable
LAN
PC
Broadband router
WAN
NAS
Modem
Internet
Notes
• All devices other than this unit are sold separately.
• You need to configure your PC or NAS after connecting. For details on settings, see “SETUP OF YOUR PC/NAS/MOBILE
DEVICES” (☞ P.11).
• Wired connections are recommended for each device to sustain high sound quality.
Turning on this unit
When you have established all cable connections, turn on this unit and other system components.
SELECT
PUSH
SOURCE
ENTER
PURE DIRECT
RETURN
5V
2.1A
Press the power switch to turn this unit on.
y
• With the power switch on, you can switch this unit to on or standby mode by pressing the power button on the remote control (☞ P.6).
• For details on standby mode, see “Front panel” (☞ P.5).
10 En
OPERATIONS
SETUP OF YOUR PC/NAS/MOBILE DEVICES
Configure your PC or NAS connected to the network to play back music files stored on the PC or NAS, or configure your
mobile device to control this unit.
y
For details on Internet connection, please refer to the manual of your network devices.
❚ Configuring your PC
Setup
Page
Play back music files stored on your PC
You need to configure the media sharing setting of your PC.
• Configure the media sharing setting of music files on
Windows Media Player 12.
12
y
You can operate from your PC using Windows Media Player. For details, refer to Windows Media Player help.
❚ Configuring your NAS
What you want to do
Play back music files stored on your
NAS
Setup
Page
You need to configure the following settings to access your
NAS.
• Configure media sharing settings of your NAS.
• Enable DHCP setting of your NAS.*
Setup operations differ depending on your NAS. Refer to the
NAS manual.
—
* In case that you use DHCP and automatically obtain necessary information for network, such as IP address. If you want to configure
the network parameters manually, check that you are using an IP address which is not used by other network devices in your network.
❚ Configuring your mobile device
What you want to do
Setup
Page
You need to download the dedicated application, and install it.
• Enable DHCP setting of your mobile device.*
13
Operate this unit with your mobile
device
* In case that you use DHCP and automatically obtain necessary information for network, such as IP address. If you want to configure
the network parameters manually, check that you are using an IP address which is not used by other network devices in your network.
11 En
OPERATIONS
What you want to do
SETUP OF YOUR PC/NAS/MOBILE DEVICES
Sharing music files stored on your
PC
4
Select “Allowed” from the drop-down
list next to “CD-N500”.
5
In the same way, select the icons for
devices to be used as external media
controllers (other PCs or mobile
devices), then click “Allowed”.
6
Click “OK” to exit.
To browse folders (directories) on your PC from this unit,
you need to change the media sharing setting of Windows
Media Player 12 or Windows Media Player 11 to make
those folders accessible from this unit. For details on
Windows Media Player, please refer to Windows Media
Player help.
y
You can connect up to 16 media servers to this unit.
❚ When using Windows Media Player 12
(on Windows 7)
1
Start Windows Media Player 12 on your
PC.
2
Select “Stream”, then “Turn on media
streaming”.
The Control Panel window of your PC appears.
3
Click “Turn on media streaming”.
12 En
SETUP OF YOUR PC/NAS/MOBILE DEVICES
❚ When using Windows Media Player 11
Start Windows Media Player 11 on your
PC.
2
Select “Library” then “Media Sharing”.
3
Check the “Share my media to” box,
select the “CD-N500” icon, then click
“Allow”.
4
In the same way, select the icons for
devices to be used as external media
controllers (other PCs or mobile
devices), then click “Allow”.
5
Click “OK” to exit.
OPERATIONS
1
Operations from your mobile
device
You can operate this unit by viewing the screen of your
mobile device.
❚ Using the dedicated application
You can do the following operations from your mobile
device using the dedicated application (free application).
• You can select and play back music files stored on your
PC or NAS.
• You can select the Internet radio stations.
• You can operate playback of CDs and USB devices.
y
For configuring the PC or NAS settings, see “SETUP OF YOUR
PC/NAS/MOBILE DEVICES” (☞ P.11).
❚ About the dedicated application
Download and install the dedicated application on your
mobile device.
For details, please visit Yamaha website.
13 En
PLAYBACK OF MUSIC FILES ON YOUR PC/NAS
This section describes how to play back using the front
panel buttons on the main unit, or the remote control.
Operations from the main unit or
remote control
2
Use the following controls to select a
menu item until you find a desired music
file.
Main unit
y
For details on the controls on the main unit or remote control, see
“CONTROLS AND FUNCTIONS” (☞ P.5).
SELECT
ENTER
PUSH
RETURN
1
Press SOURCE repeatedly to switch the
audio source to “SERVER”.
SELECT/ENTER
Main unit/Remote control
SELECT/ENTER (Jog dial)
Rotate to select a menu item and press to confirm the
selection.
OPEN/CLOSE
SOURCE
PURE DIRECT
DISPLAY
1
2
3
4
5
6
SOURCE
SOURCE
5V
RETURN
Shows the upper-level menu in the front panel
display.
Remote control
PURE DIRECT
2.1A
S/T/W/X/
ENTER
SOURCE
ENTER
RETURN
HOME
Front panel display
S ource
RETURN
HOME
S E RV E R
SETUP
NOW PLAYING
RETURN
MODE
S/T/W/X (Cursor buttons)/ ENTER
Press S/T to select a menu item (or press W/X to
display the gauge indicating the current position of
the content), then press ENTER to confirm the
selection.
RETURN
Shows the upper-level menu in the front panel
display.
HOME
Shows the top-level menu in the front panel display.
14 En
PLAYBACK OF MUSIC FILES ON YOUR PC/NAS
SELECT/ENTER (Jog dial)
3
Rotate while playing to skip to the next track, or back
to the previous/beginning of the current track.
When playback starts, use the following
controls to operate desired functions.
Playback buttons
Use these buttons to operate audio contents (☞ P.5,
6).
Main unit
DISPLAY
SELECT
PUSH
If you press this button while a song is playing or
paused, the information on the front panel display
will be switched in the following order.
ENTER
SELECT/ENTER
RETURN
Song
Artist
Album
Time
Source
OPERATIONS
Playback buttons
SHUFFLE
Switches shuffle mode in the following order.
On
Remote control
Off
REPEAT
OPEN/CLOSE
Switches repeat mode in the following order.
SOURCE
PURE DIRECT
DISPLAY
One
DISPLAY
1
2
3
0
PROGRAM
CLEAR
SHUFFLE
REPEAT
A/B
SETUP
NOW PLAYING
Shows the current playback information in the front
panel display.
SHUFFLE
y
• If the song being played is stopped, the track that you listened
will start playback from the beginning of the track the next time
you play.
• For details on playable files, see “PLAYABLE DISCS AND
FILE FORMATS” (☞ P.31).
ENTER
HOME
Off
NOW PLAYING
REPEAT
Playback
buttons
All
RETURN
MODE
NOW PLAYING
15 En
PLAYBACK OF AUDIO CONTENTS ON THE INTERNET
Listening to Internet radio stations
❚ Operations from the main unit or
remote control
2
Use the following controls to select a
menu item until you find a desired
Internet radio station.
Main unit
1
Press SOURCE repeatedly to switch the
audio source to “NET RADIO”.
SELECT
ENTER
PUSH
RETURN
Main unit/Remote control
SELECT/ENTER
OPEN/CLOSE
SOURCE
PURE DIRECT
DISPLAY
1
2
3
4
5
6
SOURCE
SOURCE
5V
SELECT/ENTER (Jog dial)
Rotate to select a menu item and press to confirm the
selection.
RETURN
Shows the upper-level menu in the front panel
display.
PURE DIRECT
2.1A
Remote control
SOURCE
S/T/W/X/
ENTER
Front panel display
S ource
RETURN
ENTER
NET RADIO
RETURN
HOME
HOME
SETUP
NOW PLAYING
RETURN
MODE
S/T/W/X (Cursor buttons)/ ENTER
Press S/T to select a menu item (or press W/X to
display the gauge indicating the current position of
the content), then press ENTER to confirm the
selection.
RETURN
Shows the upper-level menu in the front panel
display.
HOME
Shows the top-level menu in the front panel display.
16 En
PLAYBACK OF AUDIO CONTENTS ON THE INTERNET
/
3
(Play/Pause) or
(Play)
Starts playback.
When playback starts, use the following
controls to operate desired functions.
(Stop)
Stops playback.
DISPLAY
Main unit
If you press this button while a song is playing or
paused, the information on the front panel display
will be switched in the following order.
SELECT
PUSH
ENTER
Station
RETURN
Time
Source
NOW PLAYING
y
Remote control
OPEN/CLOSE
SOURCE
PURE DIRECT
DISPLAY
1
2
3
DISPLAY
4
5
6
SHUFFLE
REPEAT
A/B
You can register and bookmark your favorite Internet radio
stations by accessing the “vTuner Radio Guide” website. To use
this feature, you need the MAC address of this unit (☞ P.24) as
the ID for your Media player and your e-mail address to create
your personal account.
For details, visit the website below.
http://yradio.vtuner.com/
ENTER
HOME
SETUP
NOW PLAYING
RETURN
MODE
NOW PLAYING
17 En
OPERATIONS
Shows the current playback information in the front
panel display.
/
PLAYBACK OF CDS
Remote control
Playing back a CD
OPEN/CLOSE
1
Press SOURCE repeatedly to switch the
audio source to “CD”.
Main unit/Remote control
SOURCE
PURE DIRECT
DISPLAY
1
2
3
4
5
6
7
8
9
0
PROGRAM
CLEAR
SHUFFLE
REPEAT
A/B
DISPLAY
Numeric
buttons
OPEN/CLOSE
SOURCE
PURE DIRECT
DISPLAY
1
2
3
4
5
6
SOURCE
SOURCE
5V
SHUFFLE
A/B
REPEAT
/
PURE DIRECT
Playback
buttons
2.1A
ENTER
SOURCE
HOME
Front panel display
S ource
NOW PLAYING
SETUP
CD
RETURN
MODE
FOLDER
FOLDER
2
Press
(Open/Close) on the main unit
to open the disc tray, then load a CD.
SELECT/ENTER (Jog dial)
3
Press
(Open/Close) again to close the
disc tray.
Playback buttons
Playback automatically starts.
Rotate while playing to skip to the next track, or back
to the previous/beginning of the current track.
Use these buttons to operate audio contents (☞ P.5,
6).
Numeric buttons (Audio CD only)
4
When playback starts, use the following
controls to operate desired functions.
(Search backward)/
Searches backward/forward.
FOLDER ( / ) (Data CD only)
Main unit
Selects the desired folder.
SELECT
PUSH
ENTER
SELECT/ENTER
RETURN
Playback buttons
18 En
Use to select directly a track on the CD.
(Search forward)
PLAYBACK OF CDS
DISPLAY
If you press this button while a song is playing or
paused, the information on the front panel display
will be switched in the following order.
Audio CD:
Time
(Song)
(Artist)
(Album)
Source
Using program playback mode
In program playback mode, you can play back tracks in a
programmed sequence.
1
Press PROGRAM on the remote control
while playback is stopped.
This unit enters program editing mode.
y
Data CD:
Time
Song
Artist
Album
Switches shuffle mode to “Folder”, “All” and “Off”
as follows.
All
Data CD:
Folder
2
3
4
5
6
7
8
9
0
PROGRAM
CLEAR
SHUFFLE
REPEAT
A/B
CLEAR
PROGRAM
Source
2
Select a track by using the numeric
buttons and press ENTER to confirm.
3
Repeat step 2 to program the next track.
SHUFFLE
Audio CD:
1
You can program up to 50 tracks.
Off
y
All
To cancel the programmed track, press CLEAR during program
editing mode. The last programmed track will be deleted.
Off
4
A/B (Audio CD only)
Repeats playback of a specified section of a track
during audio CD playback (except data CDs)
(☞ P.7).
REPEAT
Switches repeat mode in the following order.
Audio CD:
One
All
Data CD:
One
Folder
Off
All
Off
y
• If the song being played is stopped, the track that you listened
will start playback from the beginning of the track the next time
you play.
• If you press
(Stop) while playback is stopped, the first track
of the CD you listened will start playback the next time you
play.
• For details on playable discs and files, see “PLAYABLE
DISCS AND FILE FORMATS” (☞ P.31).
Press
unit or
/
(Play/Pause) on the main
(Play) on the remote control.
Playback starts from the beginning of the
programmed sequence.
y
• To erase all programmed tracks, press CLEAR while playback
is stopped.
• You cannot set a program playback for data CDs.
Note
The programmed tracks are erased when the disc is ejected or this
unit is turned off.
19 En
OPERATIONS
• “Time” cycles through the three steps as follows each time
you press this button.
– Track number and elapsed playback time.
– Track number and remaining playback time of the track.
– Remaining playback time of the disc.
• “Song”, “Artist” and “Album” are shown only if text
information is included in the disc.
PLAYBACK OF YOUR iPod/USB DEVICES
Connecting your iPod or USB devices
SELECT
PUSH
SOURCE
ENTER
PURE DIRECT
RETURN
5V
2.1A
y
• Connect your iPod using the USB cable supplied with your iPod.
• Remove a USB device after you stop playback.
• Do not use a USB hub. This unit does not recognize a USB device if the USB device is connected via a USB hub.
Playing back your iPod
1
Press SOURCE repeatedly to switch the
audio source to “USB”.
Main unit/Remote control
SOURCE
PURE DIRECT
DISPLAY
1
2
3
4
5
6
SOURCE
5V
PURE DIRECT
2.1A
Start playback on your iPod.
Operate your iPod to start playback, select a track,
pause, and stop playback (standard playback mode).
• You can also operate to play, pause, stop, skip forward/
backward, and search forward/backward from the playback
buttons on the main unit and remote control during standard
playback mode.
Main unit:
/ , ,
/
,
/
Remote control:
, , ,
,
,
,
• You cannot operate shuffle and repeat modes from your iPod
and the remote control during standard playback mode.
iPod may not function properly with this unit if software on iPod
is not updated. Be sure to use the latest version of iPod software.
For details on supported iPod, see “Supported iPod via USB port”
(☞ P.31).
Front panel display
20 En
3
Note
SOURCE
S ource
Connect your iPod to the USB port on
the main unit.
y
OPEN/CLOSE
SOURCE
2
USB
PLAYBACK OF YOUR iPod/USB DEVICES
Using extended playback mode for
your iPod
SELECT/ENTER (Jog dial)
Rotate while playing to skip to the next track, or back
to the previous/beginning of the current track.
Playback buttons*
You can operate your iPod from the main unit or remote
control in extended mode.
1
Use these buttons to operate audio contents (☞ P.5,
6).
RETURN
Press MODE on the remote control while
playing back your iPod.
Shows the upper-level menu in the front panel
display.
It switches to extended playback mode.
(Search backward)/
(Search forward)*
Searches backward/forward.
HOME
RETURN
NOW PLAYING
Shows the top-level menu in the front panel display.
SETUP
MODE
MODE
2
DISPLAY
If you press this button while a song is playing or
paused, the information on the front panel display
will be switched in the following order.
Use the following controls to operate
desired functions.
Main unit
Song
Artist
Album
Time
Source
SHUFFLE*
Switches shuffle mode of your iPod.
Songs
SELECT
PUSH
ENTER
Albums
Off
SELECT/ENTER
RETURN
REPEAT*
Switches repeat mode in the following order.
Playback buttons
One
RETURN
All
Off
NOW PLAYING
Shows the current playback information in the front
panel display.
Remote control
* Operations differ depending on your iPod.
OPEN/CLOSE
SOURCE
PURE DIRECT
y
DISPLAY
DISPLAY
1
2
3
0
PROGRAM
CLEAR
SHUFFLE
REPEAT
A/B
Playable file formats via iPod depends on your iPod.
SHUFFLE
REPEAT
/
Playback
buttons
ENTER
RETURN
HOME
HOME
SETUP
NOW PLAYING
RETURN
MODE
NOW PLAYING
21 En
OPERATIONS
HOME
PLAYBACK OF YOUR iPod/USB DEVICES
Playing back USB devices
1
2
Press SOURCE on the main unit or
remote control to switch the audio
source to “USB” (☞ P.20).
Connect your USB device to the USB
port on the main unit.
File name is displayed in the front panel display and
playback starts automatically in order by date and
time of creation if playable files are in the USB
device.
3
SELECT/ENTER (Jog dial)
Rotate while playing to skip to the next track, or back
to the previous/beginning of the current track.
Playback buttons
Use these buttons to operate audio contents (☞ P.5,
6).
RETURN
Shows the upper-level menu in the front panel
display.
HOME
Shows the top-level menu in the front panel display.
DISPLAY
If you press this button while a song is playing or
paused, the information on the front panel display
will be switched in the following order.
When playback starts, use the following
controls to operate desired functions.
Song
Artist
Album
Time
Source
SHUFFLE
Main unit
Switches shuffle mode in the following order.
On
Off
SELECT
PUSH
ENTER
SELECT/ENTER
RETURN
REPEAT
Switches repeat mode in the following order.
One
Playback buttons
All
Off
RETURN
NOW PLAYING
Shows the current playback information in the front
panel display.
Remote control
y
OPEN/CLOSE
SOURCE
PURE DIRECT
DISPLAY
1
2
3
0
PROGRAM
CLEAR
SHUFFLE
REPEAT
A/B
DISPLAY
SHUFFLE
REPEAT
Playback
buttons
ENTER
RETURN
HOME
HOME
SETUP
22 En
NOW PLAYING
RETURN
MODE
NOW PLAYING
• If the song being played is stopped, the track that you listened
will start playback from the beginning of the track the next time
you play.
• For details on playable files, see “PLAYABLE DISCS AND
FILE FORMATS” (☞ P.31).
SETUP MENU
You can configure the various settings of this unit using
the setup menu.
2
Press S/T to select a menu item to
configure, then press ENTER.
For some menu items, repeat step 2 to select a
submenu item.
Setup menu operations
❚ Operations from the remote control
1 –1 D H C P
y
1
Press SETUP to enter the setup menu
(☞ P.24).
To make the advanced setup menu
items (☞ P.25) selectable, press SETUP
while holding down RETURN (on the
main unit).
3
Press S/T to select a parameter, then
press ENTER.
y
You need to enter a numerical address for some menu items. In
this case, press W/X to move the target and S/T to select a
number, or use the numeric buttons. Then press ENTER to
confirm it.
Remote control
1
2
3
4
5
6
7
8
9
0
PROGRAM
CLEAR
SHUFFLE
REPEAT
A/B
Numeric
buttons
S/T/W/X/
ENTER
ENTER
RETURN
HOME
NOW PLAYING
RETURN
MODE
SETUP
SETUP
Main unit
SELECT
PUSH
ENTER
RETURN
RETURN
Front panel display
1
Network Configuration
23 En
OPERATIONS
For details on the controls on the main unit or remote control, see
“CONTROLS AND FUNCTIONS” (☞ P.5).
SETUP MENU
Setup menu list
Menu
Submenu
DHCP
Network
Configuration
Network
Information
Settings
(Bold:
default)
On, Off
Function
Select “On” to use the DHCP server to automatically configure the
network settings of this unit or “Off” to configure manually.
IP Address
Specify the IP address when “DHCP” is “Off”. *1
Subnet Mask
Specify the subnet mask when “DHCP” is “Off”. *1
Default
Gateway
Specify the default gateway when “DHCP” is “Off”. *1
DNS Server
(P)
Specify the primary DNS server when “DHCP” is “Off”. *1
DNS Server
(S)
Specify the secondary DNS server when “DHCP” is “Off”. *1
MAC
Address
The MAC address of this unit is shown. The MAC address is also used
as a vTuner ID.
Status
The network status of this unit is shown (“Connected” or “Not
connected”).
System ID
The system ID number is shown.
Network Standby
On, Off
Select “On” to enable the network standby mode.
Auto Power Down
4 Hours,
8 Hours,
12 Hours,
Off
This unit automatically enters standby mode if it is left turned on for
the selected time without playback or any other operation being
performed.
Dimmer
–3 to 0
Adjust the brightness of the front panel display.
Firmware Version
Firmware Update
The firmware version of this unit is shown.
Network,
USB
Update the firmware of this unit after selecting “Network” or “USB”.
When “Press ENTER to start” appears, press ENTER to start firmware
update. Do not operate this unit until “UPDATE SUCCESS” appears.
Then turn off this unit once and turn it on again.
*1: When “DHCP” is “On”, you can check the values (IP address, etc.) assigned by the DHCP server.
24 En
SETUP MENU
Advanced setup menu
The following menu items are available only when you enter the setup menu by pressing SETUP (on the remote control)
while holding down RETURN (on the main unit).
Menu
MAC Address Filter
Settings
(Bold:
default)
On, Off
Function
Select “On” to specify the MAC addresses (up to 5) of the network
components that will be permitted access to this unit (“Address1” to
“Address5”). Select “Off” to disable the MAC address filter function.
Gapless Playback
On, Off
y
When “Gapless Playback” is “On”, this unit starts to read data of the
next track at the end of the current track. Some playback operations
(skip, repeat, etc.) will work on the next track during this process.
Select “Yes” and press ENTER on the remote control to reset the
vTuner account.
y
vTuner Account Reset
Yes, No
Initialize
Yes, No
• If you reset your vTuner account, your user name, password and bookmarks
will be reset.
• To create a new account, visit the website below.
http://yradio.vtuner.com/
You need the MAC address of this unit as the ID for your Media player and
your e-mail address.
Select “Yes” to reset the settings of this unit to factory default. The
reset operation will be reflected the next time you turn on this unit.
25 En
OPERATIONS
Select “On” to skip silence between each track and enable seamless
playback. Select “Off” to disable the gapless playback function. This
function works on “SERVER” audio contents only.
OTHERS
TROUBLESHOOTING
Refer to the table below when this unit does not function properly. If the problem you are experiencing is not listed below
or if the instruction below does not help, turn off this unit, disconnect the power cable, and contact the nearest authorized
Yamaha dealer or service center.
❚ General
Problem
This unit fails to turn on.
The power indicator on the front
panel flashes.
This unit suddenly turns off.
No sound.
Cause
Remedy
Page
The power cable is not
connected to the AC IN socket
on the main unit or not plugged
into an AC outlet.
Connect the power cable firmly.
9
This unit has been exposed to a
strong external electric shock
(such as lightning or strong
static electricity).
Turn off this unit, disconnect
the power cable, plug it back in
after 30 seconds, then use it
normally.
—
The protection circuitry has
been activated three times
consecutively. When this unit is
in this condition, the power
indicator on the main unit blinks
if you try to turn on the power.
As a safety precaution,
capability to turn on the power
is disabled. Contact your nearest
Yamaha dealer or service center
to request repair.
—
There is a problem with the
internal circuitries of this unit.
Turn off this unit, disconnect
the power cable, then contact
the nearest authorized Yamaha
dealer or service center.
—
This unit entered standby mode.
This unit enters standby mode
after the time set for “Auto
Power Down” in the setup menu
has elapsed.
24
The audio cable connection
between this unit and amplifier
is improper.
Connect the audio cable firmly.
If the problem persists, use
another audio cable.
9
The input setting on the
amplifier is incorrect.
Select the correct input (from
this unit) on the amplifier.
—
The amplifier is not compatible
with the digital signals.
Use an analog signal
connection.
9
This unit is too close to the
digital or radio-frequency
equipment.
Move this unit away from such
equipment.
—
The audio cable between this
unit and the media sever is
defective.
Connect the audio cable firmly.
If the problem persists, use
another audio cable.
—
Noise is heard.
26 En
TROUBLESHOOTING
Problem
The remote control does not
work or function properly.
The amplifier control buttons on
the remote control do not work
on the amplifier.
Cause
Remedy
Page
Wrong distance or angle.
The remote control functions
within a maximum range of 6 m
(20 ft) and no more than 30
degrees off-axis from the front
panel of the main unit.
4
Direct sunlight or lighting is
striking the remote control
sensor of this unit.
Adjust the lighting angle, or
reposition this unit.
—
The batteries are weak.
Replace both batteries with new
ones.
4
Your amplifier is not one of
Yamaha amplifiers. (These
buttons may not work on some
Yamaha amplifiers.)
Use the remote control of your
amplifier.
—
❚ Network
The network feature does not
function.
Cause
Remedy
Page
The network parameters (IP
address) have not been obtained
properly.
Enable the DHCP server
function on the broadband
router and set “DHCP” in the
setup menu to “On” on this unit.
If you want to configure the
network parameters manually,
check that you are using an IP
address which is not used by
other network devices in your
network.
24
The media sharing setting is not
correct.
Configure the media sharing
setting of your PC.
11
Some security software installed
on your PC is blocking the
access of this unit to your PC.
Check the settings of security
software installed on your PC.
—
This unit and your PC are not in
the same network.
Check the network connections
and the broadband router
settings, then connect this unit
and your PC to the same
network.
10
Access to this unit is restricted
by MAC address filter function
Disable MAC address filter
function in the setup menu of
this unit.
24
There are more than two routers
in use that are overlapping
among the network devices.
Disconnect the Internet
connection temporarily and
check via your local network, or
connect the network devices
you want to use to the same
router.
—
This unit does not detect the
digital media server (PC).
27 En
OTHERS
Problem
TROUBLESHOOTING
Problem
Cause
Remedy
Page
31
31
The files in your PC cannot be
viewed or played back.
The files are not supported by
this unit or the media server.
Use the file format supported by
both this unit and the media
server. For details on the
supported file formats by the
unit, see “PLAYABLE DISCS
AND FILE FORMATS”.
Some audio files cannot be
played back on this unit.
You are trying to play back
DRM audio files you purchased
on iTunes Store.
You cannot play back DRM
audio files you purchased on
iTunes Store.
❚ Audio contents on the Internet
Problem
The Internet radio cannot be
played.
Cause
Remedy
Page
The selected Internet radio
station is currently not
available.
There may be a network
problem at the radio station, or
the service may have been
stopped. Try the station later or
select another station.
—
The selected Internet radio
station is currently broadcasting
silence.
Some Internet radio stations
broadcast silence at certain of
times of the day. Try the station
later or select another station.
—
Access to the network is
restricted by the firewall
settings of your network devices
(such as the broadband router).
Check the firewall settings of
your network devices. The
Internet radio can be played only
when it passes through the port
designated by each radio station.
The port number varies
depending on the radio station.
—
Cause
Remedy
Page
A foreign object is obstructing
the tray.
Carefully check the disc tray and
remove the foreign object.
—
The disc is damaged.
Check the disc carefully and
replace it if necessary.
—
There is moisture on the laser
pickup.
Wait 20 to 30 minutes after
turning this unit on before trying
to play back a disc.
—
The disc is loaded upside down.
Reload the disc with the label
side up.
—
The disc is dirty.
Clean the disc.
32
The format of the MP3 or WMA
file is not compatible with this
unit.
Replace the disc with a correctly
recorded disc playable with this
unit.
31
❚ CD
Problem
The disc tray does not close
completely.
Disc playback does not start.
28 En
TROUBLESHOOTING
Problem
Cause
Remedy
Page
The CD-RW (ReWritable) disc
is not recorded correctly.
Replace the disc with a correctly
recorded disc playable with this
unit.
31
The disc is a non-standard disc
not playable with this unit.
Replace the disc with a correctly
recorded disc playable with this
unit.
31
Playback is delayed, or begins
at the wrong place.
The disc is scratched or
damaged.
Check the disc carefully and
replace it if necessary.
32
Noise from inside of the disc tray.
The disc is warped.
Replace the disc.
—
Disc playback does not start.
❚ iPod/USB
Problem
iPod playback does not start
though iPod is connected.
Remedy
Page
The connected iPod is not
compatible with this unit.
Connect an iPod compatible with
this unit.
31
The USB device is not
connected properly.
Connect the USB device again.
20
The format of the MP3 or WMA
file is not compatible with this
unit.
Replace the file with a correctly
recorded file playable with this
unit.
31
This unit is set to an audio
source than “USB”.
Press SOURCE on the main unit
or remote control to switch the
audio source to “USB”.
22
Front panel display messages
Message
Status
This unit cannot access the USB device.
This unit cannot access the iPod.
Access error
The connected iPod is not supported by the unit.
There is a problem with the signal path from the network to the unit.
Unable to play
This unit cannot play back specified content.
List updated
The content list of the media server has been updated.
No content
This unit cannot find any content.
Not available
The operation you have performed is not available.
Searching…
This unit is searching for content.
No disc
A CD is not inserted in the disc tray.
Connect error
Connection to your iPod or USB device failed.
No device
Your iPod or USB device is not connected.
USB overloaded
An overcurrent is flowing through the USB device.
Loading…
The specified content is being loaded.
Unknown iPod
The connected iPod is not compatible.
29 En
OTHERS
USB playback does not start.
Cause
ADDITIONAL INFORMATION
This section describes about general ideas of DLNA (Digital Living Network Alliance) and NAS (Network Attached
Storage).
Internet
Modem
DLNA
SELECT
PUSH
PC
(Digital Media Server)
SOURCE
ENTER
PURE DIRECT
RETURN
5V
Broadband
router
2.1A
This unit (CD-N500)
(Digital Media Renderer)
Mobile device
(Digital Media Controller)
NAS
(Digital Media Server)
❚ DLNA
“DLNA” stands for Digital Living Network Alliance, and is a guideline to promote standardization of interconnection of
home network devices such as digital consumer electronics.
DLNA components are separated into four device classes: Digital Media Server (DMS), Digital Media Renderer (DMR),
Digital Media Player (DMP) and Digital Media Controller (DMC).
“Digital Media Server (DMS)” is a device that is used to store or distribute digital contents such as music files. For the
system using this unit, PCs and NAS are regarded as “Digital Media Server (DMS)”.
“Digital Media Controller (DMC)” is a device to control digital contents. The dedicated mobile device application
corresponds to “Digital Media Controller (DMC)” for the system using this unit.
“Digital Media Renderer (DMR)” is a device to receive instructions from “Digital Media Controller (DMC)” and play
back digital contents such as this unit.
Similarly, “Digital Media Player (DMP)” is a device that can play back digital contents stored on “Digital Media Server
(DMS)”.
❚ NAS
“NAS” stands for Network Attached Storage. By connecting your NAS and home network with a network cable directly,
NAS can be a storage device, such as a hard disc drive. If your NAS is compatible with DLNA, you can share your
music, pictures, or movies on the same home network as a digital media server.
30 En
PLAYABLE DISCS AND FILE FORMATS
Notes
Playable media and devices
❚ Supported PC
PC with Windows Media Player 11 or Windows Media
Player 12 installed.
❚ Supported NAS
NAS that is compatible with DLNA version 1.5.
• iPod is licensed on the condition that individuals perform
privately duplication and playback of uncopyrighted material or
material legally approved of duplication and playback.
Infringement of copyright is prohibited by law.
• Yamaha and suppliers accepts no liability for the loss of data
saved on iPod connected to this unit. It is recommended that the
files are made backup copies.
❚ Supported mobile devices
For details, please visit Yamaha website.
❚ Supported USB devices
❚ Playable discs
Class/Protocol
File formats
USB memory
devices
MSC (Mass
Storage Class)
FAT16/32
USB audio
player
MSC (Mass
Storage Class)
FAT16/32
Use compact discs bearing the marks below.
Mark
Compact discs (digital audio)
CD-R, CD-RW digital audio discs
• CD-R or CD-RW discs bearing one of
the following phrases.
FOR CONSUMER
FOR CONSUMER USE
FOR MUSIC USE ONLY
• Finalized CD-R or CD-RW discs only.
Notes
• Some devices may not work properly even if they meet the
requirements.
• This unit does not support encrypted USB memory devices.
• Do not connect devices other than USB mass storage class
devices: USB chargers, USB hubs, PCs, external HDD, etc.
• Yamaha and suppliers accepts no liability for the loss of data
saved on the USB devices connected to this unit. It is
recommended that the files are made backup copies.
• Playability of and power supply to all kinds of USB devices are
not guaranteed.
Note
This unit may not be able to play some CD-R/
CD-RW discs or discs on which recording
was not made correctly.
❚ Supported iPod via USB port
iPod
iPod touch,
iPod nano (2nd
through 6th
generations)
* As of August 2012
iPhone
iPhone,
iPhone 3G,
iPhone 3GS,
iPhone 4,
iPhone 4S
CD-TEXT discs
The disc title, artist name, and track
name are also displayed in addition to
the time displays when playing back a
CD with CD TEXT.
iPad
iPad,
iPad 2,
iPad (3rd
generation)
Details
OTHERS
Device
To play back an 8-cm (3-inch) CD
Place it in the inner recessed area of the disc tray. Do not
put a normal 12-cm (5-inch) CD on top of an 8-cm (3inch) CD.
Notes
• Do not use any nonstandard shaped disc
(heart, etc.) available on the market
because it might damage the unit.
• Do not use a disc with tape, stickers, or
paste on it. If you use such a disc, the
disc may get stuck in the unit, or damage
to the unit may result.
31 En
PLAYABLE DISCS AND FILE FORMATS
❚ About handling discs
• Always handle with care so that the playing surface is
not scratched. Do not warp discs.
Playable discs and file formats
❚ DLNA/USB
Sampling
frequency (kHz)
Quontization bit
WAV*1
8 to 192
16/24
MP3*2
8 to 48
16
WMA*3
8 to 48
16
AAC
8 to 48
16
FLAC
8 to 192
16/24
44.1 to 48
16
Formats
• To keep clean the playing surface, wipe with a clean,
dry cloth. Do not use any type of disc cleaner, spray, or
any other chemical-based liquid.
• Do not wipe with a circular motion; wipe straight
outward from the center.
ALAC*4
• Use a soft-tipped pen when writing on the label side of
the disc.
• When a disc is not being used, remove it from this unit
and store in an appropriate case.
• Do not expose discs to direct sunlight, high temperature
or high humidity for a long time.
Note
Do not use any lens cleaners as they may be a cause of
malfunction.
*1
*2
*3
*4
Only Linear PCM format files are playable.
MP3 PRO files are not supported.
WMA PRO and Lossless files are not supported.
ALAC stands for Apple Lossless Audio Codec.
y
• Playable file formats via iPod depends on your iPod.
• Files recorded with multi-channels are not supported.
• Playback for USB starts in order by date and time of creation.
❚ Discs
Sampling
frequency (kHz)
Quontization bit
MP3
8 to 48
16
WMA
16 to 48
16
Formats
Notes
• Playback for MP3 or WMA files starts in alphanumeric order.
• Copyright-protected WMA (DRM) files cannot be played back
by this unit.
• The disc must be ISO 9660 compatible.
• Elapsed time may not be displayed correctly while playing back
variable bitrate contents.
32 En
SPECIFICATIONS
INPUT/OUTPUT
• NETWORK
Ethernet connection .................................100Base-TX/10Base-T
DLNA version .........................................................................1.5
• ANALOG OUT ............................................................... 2ch (L/R)
• DIGITAL OUT
Optical ................................................................................... × 1
Coaxial................................................................................... × 1
• USB........................................................................................... × 1
AUDIO SECTION
GENERAL
• Power supply
[Europe model] ......................................... AC 230-240 V, 50 Hz
[U.S.A and Canada models] .............................AC 120 V, 60 Hz
[Asia model] ..........................AC 110-120/220-240 V, 50/60 Hz
[Australia model] ...................................... AC 230-240 V, 50 Hz
[China model] ...................................................AC 220 V, 50 Hz
• Power consumption ................................................................28 W
• Standby power consumption when network standby mode is
enabled (reference data)......................................................... 3.5 W
• Standby power consumption when network standby mode is
disabled (reference data)...................................................... 0.35 W
• Dimensions (W × H × D).............................. 435 × 96 × 313.3 mm
(17-1/8 × 3-3/4 × 12-1/3 in)
• Weight...................................................................5.25 kg (11.6 lb)
“Made for iPod,” “Made for iPhone,” and “Made for
iPad” mean that an electronic accessory has been
designed to connect specifically to iPod, iPhone, or
iPad, respectively, and has been certified by the
developer to meet Apple performance standards. Apple
is not responsible for the operation of this device or its
compliance with safety and regulatory standards.
Please note that the use of this accessory with iPod,
iPhone, or iPad may affect wireless performance.
Android™ is a trademark of Google Inc.
Windows™
Windows is a registered trademark of Microsoft
Corporation in the United States and other countries.
Windows XP, Windows Vista, Windows 7, Windows
Media Audio and Windows Media Player are either
registered trademarks or trademarks of Microsoft
Corporation in the United States and/or other countries.
DLNA™ and DLNA CERTIFIED™ are trademarks or
registered trademarks of Digital Living Network
Alliance. All rights reserved. Unauthorized use is
strictly prohibited.
* Please note that all specifications are subject to change without
notice.
MPEG Layer-3 audio coding technology licensed from
Fraunhofer IIS and Thomson.
33 En
OTHERS
• Output level
1 kHz, 0 dB, fs 44.1 kHz ............................................2.0 ± 0.3 V
• Signal to noise ratio (IHF-A network)
1 kHz, 0 dB, fs 44.1 kHz .................................... 110 dB or more
• Dynamic range
1 kHz, 0 dB, fs 44.1 kHz .................................... 100 dB or more
• Harmonic distortion
1 kHz, 0 dB, fs 44.1 kHz ...................................... 0.003% or less
• Frequency response
(CD)
fs 44.1 kHz................................................2 Hz to 20 kHz, –3 dB
(NETWORK)
fs 48 kHz...................................................2 Hz to 24 kHz, –3 dB
fs 96 kHz...................................................2 Hz to 48 kHz, –3 dB
fs 192 kHz.................................................2 Hz to 96 kHz, –3 dB
iPod, iPhone, iPad
iPad, iPhone, iPod, iPod nano, and iPod touch are
trademarks of Apple Inc., registered in the U.S. and
other countries.
❚ Information about software
This product uses the following free software.
For information (copyright, etc) about each software, read the original sentences stated
below.
About The Independent JPEG Group’s JPEG software
The Independent JPEG Group’s JPEG software
Copyright © 1991-2010, Thomas G. Lane, Guido Vollbeding.
All Rights Reserved except as specified below.
The authors make NO WARRANTY or representation, either express or implied, with
respect to this software, its quality, accuracy, merchantability, or fitness for a particular
purpose. This software is provided “AS IS”, and you, its user, assume the entire risk as
to its quality and accuracy.
Permission is hereby granted to use, copy, modify, and distribute this software (or
portions thereof) for any purpose, without fee, subject to these conditions:
(1) If any part of the source code for this software is distributed, then this README
file must be included, with this copyright and no-warranty notice unaltered; and
any additions, deletions, or changes to the original files must be clearly indicated in
accompanying documentation.
(2) If only executable code is distributed, then the accompanying documentation must
state that “this software is based in part on the work of the Independent JPEG
Group”.
(3) Permission for use of this software is granted only if the user accepts full
responsibility for any undesirable consequences; the authors accept NO
LIABILITY for damages of any kind.
These conditions apply to any software derived from or based on the IJG code, not just
to the unmodified library. If you use our work, you ought to acknowledge us.
Permission is NOT granted for the use of any IJG author’s name or company name in
advertising or publicity relating to this software or products derived from it. This
software may be referred to only as “the Independent JPEG Group’s software”.
We specifically permit and encourage the use of this software as the basis of
commercial products, provided that all warranty or liability claims are assumed by the
product vendor.
About PNG Reference Library
libpng versions 1.2.6, August 15, 2004, through 1.4.5, December 9, 2010, are Copyright
© 2004, 2006-2010 Glenn Randers-Pehrson, and are distributed according to the same
disclaimer and license as libpng-1.2.5 with the following individual added to the list of
Contributing Authors
Cosmin Truta
libpng versions 1.0.7, July 1, 2000, through 1.2.5 - October 3, 2002, are Copyright ©
2000-2002 Glenn Randers-Pehrson, and are distributed according to the same
disclaimer and license as libpng-1.0.6 with the following individuals added to the list of
Contributing Authors
Simon-Pierre Cadieux
Eric S. Raymond
Gilles Vollant
and with the following additions to the disclaimer:
There is no warranty against interference with your enjoyment of the library or against
infringement. There is no warranty that our efforts or the library will fulfill any of your
particular purposes or needs. This library is provided with all faults, and the entire risk
of satisfactory quality, performance, accuracy, and effort is with the user.
libpng versions 0.97, January 1998, through 1.0.6, March 20, 2000, are Copyright ©
1998, 1999 Glenn Randers-Pehrson, and are distributed according to the same
disclaimer and license as libpng-0.96, with the following individuals added to the list of
Contributing Authors:
Tom Lane
Glenn Randers-Pehrson
Willem van Schaik
libpng versions 0.89, June 1996, through 0.96, May 1997, are Copyright © 1996, 1997
Andreas Dilger Distributed according to the same disclaimer and license as libpng-0.88,
with the following individuals added to the list of Contributing Authors:
John Bowler
Kevin Bracey
Sam Bushell
Magnus Holmgren
Greg Roelofs
Tom Tanner
Tim Wegner
The PNG Reference Library is supplied “AS IS”. The Contributing Authors and Group
42, Inc. disclaim all warranties, expressed or implied, including, without limitation, the
warranties of merchantability and of fitness for any purpose. The Contributing Authors
and Group 42, Inc. assume no liability for direct, indirect, incidental, special,
exemplary, or consequential damages, which may result from the use of the PNG
Reference Library, even if advised of the possibility of such damage.
Permission is hereby granted to use, copy, modify, and distribute this source code, or
portions hereof, for any purpose, without fee, subject to the following restrictions:
1. The origin of this source code must not be misrepresented.
2. Altered versions must be plainly marked as such and must not be misrepresented as
being the original source.
3. This Copyright notice may not be removed or altered from any source or altered
source distribution.
The Contributing Authors and Group 42, Inc. specifically permit, without fee, and
encourage the use of this source code as a component to supporting the PNG file format
in commercial products. If you use this source code in a product, acknowledgment is
not required but would be appreciated.
About zlib Library
Copyright notice:
©1995-2010 Jean-loup Gailly and Mark Adler
This software is provided ‘as-is’, without any express or implied warranty. In no event
will the authors be held liable for any damages arising from the use of this software.
Permission is granted to anyone to use this software for any purpose, including
commercial applications, and to alter it and redistribute it freely, subject to the
following restrictions:
1. The origin of this software must not be misrepresented; you must not claim that you
wrote the original software. If you use this software in a product, an acknowledgment
in the product documentation would be appreciated but is not required.
2. Altered source versions must be plainly marked as such, and must not be
misrepresented as being the original software.
3. This notice may not be removed or altered from any source distribution.
About FLAC codec Library
Copyright ©2000,2001,2002,2003,2004,2005,2006,2007, 2008,2009 Josh Coalson
Redistribution and use in source and binary forms, with or without modification, are
permitted provided that the following conditions are met:
– Redistributions of source code must retain the above copyright notice, this list of
conditions and the following disclaimer.
– Redistributions in binary form must reproduce the above copyright notice, this list of
conditions and the following disclaimer in the documentation and/or other materials
provided with the distribution.
– Neither the name of the Xiph.org Foundation nor the names of its contributors may
be used to endorse or promote products derived from this software without specific
prior written permission.
THIS SOFTWARE IS PROVIDED BY THE COPYRIGHT HOLDERS AND
CONTRIBUTORS “AS IS” AND ANY EXPRESS OR IMPLIED WARRANTIES,
INCLUDING, BUT NOT LIMITED TO, THE IMPLIED WARRANTIES OF
MERCHANTABILITY AND FITNESS FOR A PARTICULAR PURPOSE ARE
DISCLAIMED. IN NO EVENT SHALL THE FOUNDATION OR CONTRIBUTORS
BE LIABLE FOR ANY DIRECT, INDIRECT, INCIDENTAL, SPECIAL,
EXEMPLARY, OR CONSEQUENTIAL DAMAGES (INCLUDING, BUT NOT
LIMITED TO, PROCUREMENT OF SUBSTITUTE GOODS OR SERVICES; LOSS
OF USE, DATA, OR PROFITS; OR BUSINESS INTERRUPTION) HOWEVER
CAUSED AND ON ANY THEORY OF LIABILITY, WHETHER IN CONTRACT,
STRICT LIABILITY, OR TORT (INCLUDING NEGLIGENCE OR OTHERWISE)
ARISING IN ANY WAY OUT OF THE USE OF THIS SOFTWARE, EVEN IF
ADVISED OF THE POSSIBILITY OF SUCH DAMAGE.
About lwIP Library
Copyright © 2001-2004 Swedish Institute of Computer Science.
All rights reserved.
Copyright © 2002-2003, Adam Dunkels.
All rights reserved.
Copyright © 2001-2004 Leon Woestenberg
<[email protected]>
Copyright © 2001-2004 Axon Digital Design B.V., The Netherlands.
All rights reserved.
libpng versions 0.5, May 1995, through 0.88, January 1996, are Copyright © 1995,
1996 Guy Eric Schalnat, Group 42, Inc.
Copyright © 2007 Dominik Spies <[email protected]>
All rights reserved.
For the purposes of this copyright and license, “Contributing Authors” is defined as the
following set of individuals:
Andreas Dilger
Dave Martindale
Guy Eric Schalnat
Paul Schmidt
Redistribution and use in source and binary forms, with or without modification, are
permitted provided that the following conditions are met:
1. Redistributions of source code must retain the above copyright notice, this list of
conditions and the following disclaimer.
2. Redistributions in binary form must reproduce the above copyright notice, this list of
i
conditions and the following disclaimer in the documentation and/or other materials
provided with the distribution.
3. The name of the author may not be used to endorse or promote products derived from
this software without specific prior written permission.
THIS SOFTWARE IS PROVIDED BY THE AUTHOR “AS IS” AND ANY
EXPRESS OR IMPLIED WARRANTIES, INCLUDING, BUT NOT LIMITED TO,
THE IMPLIED WARRANTIES OF MERCHANTABILITY AND FITNESS FOR A
PARTICULAR PURPOSE ARE DISCLAIMED. IN NO EVENT SHALL THE
AUTHOR BE LIABLE FOR ANY DIRECT, INDIRECT, INCIDENTAL, SPECIAL,
EXEMPLARY, OR CONSEQUENTIAL DAMAGES (INCLUDING, BUT NOT
LIMITED TO, PROCUREMENT OF SUBSTITUTE GOODS OR SERVICES; LOSS
OF USE, DATA, OR PROFITS; OR BUSINESS INTERRUPTION) HOWEVER
CAUSED AND ON ANY THEORY OF LIABILITY, WHETHER IN CONTRACT,
STRICT LIABILITY, OR TORT (INCLUDING NEGLIGENCE OR OTHERWISE)
ARISING IN ANY WAY OUT OF THE USE OF THIS SOFTWARE, EVEN IF
ADVISED OF THE POSSIBILITY OF SUCH DAMAGE.
Copyright © 2002 CITEL Technologies Ltd.
All rights reserved.
Redistribution and use in source and binary forms, with or without modification, are
permitted provided that the following conditions are met:
1. Redistributions of source code must retain the above copyright notice, this list of
conditions and the following disclaimer.
2. Redistributions in binary form must reproduce the above copyright notice, this list of
conditions and the following disclaimer in the documentation and/or other materials
provided with the distribution.
3. Neither the name of CITEL Technologies Ltd nor the names of its contributors may
be used to endorse or promote products derived from this software without specific
prior written permission.
CAUTION
Use of controls or adjustments or performance of procedures
other than those specified herein may result in hazardous
radiation exposure.
LASER SAFETY
This unit employs a laser. Due to possible eye injury, only a
qualified service person should remove the cover or attempt to
service this device.
DANGER
This unit emits visible laser radiation when open. Avoid direct
eye exposure to beam. When this unit is plugged into the wall
outlet, do not place your eyes close to the opening of the disc tray
and other openings to look into inside.
LASER
Type
Wave length
Output Power
Semiconductor laser GaAs/GaAlAs
790 nm
10 mW
The laser component in this product is capable of emitting radiation
exceeding the limit for Class 1.
THIS SOFTWARE IS PROVIDED BY CITEL TECHNOLOGIES AND
CONTRIBUTORS “AS IS” AND ANY EXPRESS OR IMPLIED WARRANTIES,
INCLUDING, BUT NOT LIMITED TO, THE IMPLIED WARRANTIES OF
MERCHANTABILITY AND FITNESS FOR A PARTICULAR PURPOSE ARE
DISCLAIMED. IN NO EVENT SHALL CITEL TECHNOLOGIES OR
CONTRIBUTORS BE LIABLE FOR ANY DIRECT, INDIRECT, INCIDENTAL,
SPECIAL, EXEMPLARY, OR CONSEQUENTIAL DAMAGES (INCLUDING, BUT
NOT LIMITED TO, PROCUREMENT OF SUBSTITUTE GOODS OR SERVICES;
LOSS OF USE, DATA, OR PROFITS; OR BUSINESS INTERRUPTION)
HOWEVER CAUSED AND ON ANY THEORY OF LIABILITY, WHETHER IN
CONTRACT, STRICT LIABILITY, OR TORT (INCLUDING NEGLIGENCE OR
OTHERWISE) ARISING IN ANY WAY OUT OF THE USE OF THIS SOFTWARE,
EVEN IF ADVISED OF THE POSSIBILITY OF SUCH DAMAGE.
Notice for Windows Media DRM
Use or distribution of such technology outside of this product is prohibited without
a license from Microsoft.
Content owners use Windows Media digital rights management technology
(WMDRM) to protect their intellectual property, including copyrights. This
device uses WMDRM software to access WMDRM protected content. If the
WMDRM software fails to protect the content, content owners may ask Microsoft
to revoke the software’s ability to use WMDRM to play or copy protected content.
Revocation does not affect unprotected content. When you download licenses for
protected content, you agree that Microsoft may include a revocation list with the
licenses. Content owners may require you to upgrade WMDRM to access their
content. If you decline an upgrade, you will not be able to access content that
requires the upgrade.
Do not disassemble, decompile, or reverse engineer the software included in
Yamaha AV products.
About Apple Lossless Audio Codec
Copyright © 2011 Apple Inc. All rights reserved.
Licensed under the Apache License, Version 2.0 (the “License”); you may not use this
file except in compliance with the License.
You may obtain a copy of the License at
http://www.apache.org/licenses/LICENSE-2.0
Unless required by applicable law or agreed to in writing, software distributed under the
License is distributed on an “AS IS” BASIS, WITHOUT WARRANTIES OR
CONDITIONS OF ANY KIND, either express or implied.
See the License for the specific language governing permissions and limitations under
the License.
CAUTION: INVISIBLE LASER RADIATION WHEN OPEN.
DO NOT STARE INTO BEAM.
DANGER: INVISIBLE LASER RADIATION WHEN OPEN.
AVOID DIRECT EXPOSURE TO THE BEAM.
ii
© 2012 Yamaha Corporation
Printed in Malaysia ZE54110-1