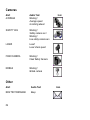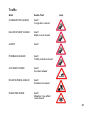
1
USER GUIDE Road Angel Group Ltd Email: Web: [email protected] www.roadangelgroup.com Clark House Silverstone Technology Park Silverstone Circuit Northants NN12 8GX Thank you for choosing the Navigator 9000, from Road Angel. The Navigator 9000 was designed with the driver of the future in mind. Staying alert to road and traffic conditions is a challenge - no matter how good a driver you are. That’s why up-to-the-minute information is essential in making your journeys as safe and stress free as possible. It’s also becoming increasingly important to be environmentally aware; reducing those unnecessary and costly miles helps everyone. That’s why we at Road Angel listen to our customers and keep track of the changes in our industry. The ROAD ANGEL Navigator 9000 is a useful addition to any vehicle, alerting you in advance to known hazards and providing point-to-point navigation. It is simple-to-use and has a full-screen interface. The ROAD ANGEL Navigator 9000 uses a comprehensive location database with information being included from the Police, Local Authorities and Department for Transport regarding designated danger spots and safety camera locations. Using the latest Global Positioning Satellite (GPS) technology, ROAD ANGEL Navigator 9000 compares your position with the known danger spot locations and gives you an audible and visual warning as you approach them. An accurate GPS speedometer in the display gives you time to adjust your driving to the approaching danger. The safety of you and your passengers is our prime consideration. As such, we at Road Angel anticipate that your ROAD ANGEL Navigator 9000 will become your perfect driving companion, enhancing the safety and enjoyment of your journey. We hope you will be delighted with your ROAD ANGEL Navigator 9000. You are a valued customer; we welcome feedback of your experiences with the product. Dave Clark Founder Road Angel Group Ltd. Table of Contents 1. Introduction....................................................................1 Unpacking the Box.................................................................................. 2 Subscriptions .......................................................................................... 4 Warranty.................................................................................................. 5 Security ................................................................................................... 5 Controls and Connectors........................................................................ 6 Inserting an SD Card .............................................................................. 7 The Reset Button ................................................................................... 7 2. Registration....................................................................8 3. Putting It All Together..................................................10 4. Getting Started.............................................................12 Switching On for the First Time ............................................................ 12 ROAD ANGEL Mode .............................................................................. 13 Understanding the Icons ....................................................................... 14 Navigation Mode ................................................................................... 15 Tracking Mode ..................................................................................... 16 Browse Mode ....................................................................................... 17 Navigation Mode buttons ...................................................................... 18 Changing back to ROAD ANGEL mode................................................. 19 i 5. Hazard Warnings..........................................................20 Camera Locations.................................................................................21 Camera Van Locations..........................................................................22 Traffic Alerts .........................................................................................23 Other Hazards ......................................................................................24 Acting on an Alert .................................................................................24 6. Destinations and Routes.............................................25 Entering an Address..............................................................................26 If you know the postcode.......................................................................27 If you don’t know the postcode ..............................................................28 Fine-tuning ...........................................................................................29 Points of Interest (POI) ..........................................................................30 Getting to a POI....................................................................................31 Favourites Options ................................................................................33 Bookmarks ...........................................................................................34 Recent..................................................................................................35 Trips.....................................................................................................36 Presets.................................................................................................37 Using the Map........................................................................................39 Planning your Route..............................................................................41 Routing and Waylists ............................................................................44 ii 7. Getting There ...............................................................45 Changing a Route.................................................................................. 47 Making a Detour ................................................................................... 48 Editing the Waylist ................................................................................ 49 Traffic Reports ...................................................................................... 50 Traffic Rerouting ................................................................................... 51 8. Navigation Settings .....................................................52 Map Settings.......................................................................................... 53 About Info Layers ................................................................................. 54 Route Settings....................................................................................... 55 General Settings.................................................................................... 57 9. Hazard and Device Settings........................................58 Hazard Settings ..................................................................................... 59 Audio ................................................................................................... 60 Distances ............................................................................................. 62 Alerts ................................................................................................... 63 Device Settings ..................................................................................... 64 Display Settings.................................................................................... 65 10. Adding and Deleting Danger Zones ...........................66 Deleting zones....................................................................................... 66 Adding new locations............................................................................ 67 iii 11. Updating the Database ................................................69 Updating by PC/ActiveSync...................................................................70 12. Media and Remote Options.........................................71 Media Options........................................................................................72 Music ...................................................................................................72 Photos..................................................................................................73 Movie ...................................................................................................74 Remote Options.....................................................................................75 Text Messages .....................................................................................75 Weather Reports...................................................................................77 13. Background Information .............................................78 About Global Positioning Satellites (GPS)............................................78 The ROAD ANGEL Database................................................................78 Using ROAD ANGEL Navigator 9000 Abroad ........................................79 Speed Cameras and Hazards ................................................................80 Alert Icons and Audio Text....................................................................83 Safety...................................................................................................83 Cameras...............................................................................................84 Other....................................................................................................84 Traffic...................................................................................................85 14. Accessories..................................................................86 15. End User License Agreement .....................................87 iv 1. Introduction ROAD ANGEL Navigator 9000 uses the latest global positioning satellite technology (based on the Sirf3 chipset) to give you point-to-point navigation information. It can alert you to traffic problems on a planned route (using real-time traffic information received via GPRS) and automatically calculate a new route to avoid the incident. ROAD ANGEL Navigator 9000 displays a constantly updated and accurate speed reading. Should you break down, ROAD ANGEL Navigator 9000 has RescueLoc, a feature that allows you to pinpoint your location and direct rescue services to your vehicle. There are audible and visible alerts as you approach hazardous sections of road: Accident black spots (as designated by the Police and Local Authorities) Safety camera locations (including mobile vans) Average speed monitoring zones Primary schools Congestion charging zones Ungated railway crossings Your unit, when it is switched on, receives updates automatically by GPRS: the wireless data service available over the GSM network. You can also manually update your ROAD ANGEL Navigator 9000 via an Internet-connected PC. You can also use your ROAD ANGEL Navigator 9000 to: Browse photos and watch videos Listen to MP3 music files Receive text messages and view weather reports. 1 IMPORTANT INFORMATION! The directors of Road Angel Group Ltd sell ROAD ANGEL Navigator 9000 as a road safety enhancement device. Driving within the speed limits at all times and within the limitations of the road condition and your abilities is paramount. The directors of Road Angel Group Ltd. take no responsibility for the use of ROAD ANGEL Navigator 9000 for purposes other than those stipulated. Placement Position your ROAD ANGEL Navigator 9000 as low as possible on the screen so that it does not impair your all-round visibility: we recommend you use either a central position or by the A-post. The device should be mounted securely and all cables must be trained via locations that do not impact any vehicle controls and importantly do not impede the intended operation of any Air Bag zones. Do not leave the device in position when you leave the vehicle unattended for security reasons (see page 5) and because it may suffer heat damage if left in direct sunlight. MOT Examinations For vehicles undertaking MOT examinations, Road Angel or any dashboard mounted device should either be removed, or adhere to the rules and regulations on positioning. This normally restricts placement within the swept (windscreen wiper) area of the screen, located as low as practical to minimise potential loss of visibility. Safety Road Angel driver safety and satellite navigation systems are designed with the sole purpose of making drivers more aware of vehicle speed, the environment and potential hazards ahead. To ensure Road Angel provides this information effectively and without distraction, devices incorporate both visual and verbal instructions on the potential hazard, along with in some cases, colour coded screens to remove the need for the driver to take their eyes from the road ahead. Under no circumstances, should Road Angel products be operated by the driver whilst the vehicle is in motion. Road Angel devices are aimed at increasing driver awareness and should always be considered secondary to the primary purpose of driving the vehicle. 2 Unpacking the Box Empty all the parts out of the box and familiarise yourself with each item. Each pack contains: ROAD ANGEL Navigator 9000 unit Fitted with SD card Cradle with mounting bracket Mains power adapter PC USB cable Charge the unit before use for cable-free operation. Connects unit to PC for Connects unit to cigar socket for manual updating using in-car charging and power. ActiveSync 12V/24V cigar socket lead 3 Subscriptions Your ROAD ANGEL Navigator 9000 subscription allows your unit to receive weather reports, traffic information and updates to its camera and accident blackspot database (you can also subscribe to tracking of your device: for more details go to http://www.roadangelgroup.com/). Why do you need to subscribe for updates? With constant additions to the ROAD ANGEL camera and accident blackspot database (1000+ sites per year), the benefit of your ROAD ANGEL Navigator 9000 and the protection it provides will be dramatically reduced if you fail to remain subscribed. In this instance, your automatic updates will be disabled. It is critical to the operation of your ROAD ANGEL Navigator 9000 that your unit updates regularly. In areas of low GPRS coverage, manual updates via Active Sync may be necessary (see page 70). How do you subscribe? 1. You will need to complete an online Direct Debit form after registration (see page 8) in order for us to process your request. If you prefer, you may print the form and post it to us (our address is on the front of this manual). Alternatively you can telephone our subscriptions team on 01327 855586. 2. There are two subscription options: monthly or yearly. Current subscription rates can be found at http://www.roadangelgroup.com/. 3. Once your account has been set up we will write to you to confirm details of when your first payment will be due. Please be aware that all subscriptions are non-refundable and non-transferable. How long will it take to activate your subscription? 4 Once we have receipt of your Direct Debit instruction, the process will take less than 24 hours. Warranty Your ROAD ANGEL Navigator 9000 is guaranteed for one year from the date of purchase from all manufacturing defects that occur with normal use. If your unit fails to perform as specified in these instructions, please visit: http://www.roadangelgroup.com/warranty You can also purchase extended warranty and theft-loss insurance. Visit http://www.roadangelgroup.com/ for details. Security Owing to the high number of thefts, we strongly suggest you remove your ROAD ANGEL Navigator 9000 and its bracket from view when you leave your vehicle. Security can also be increased by cleaning any marks from your windscreen. 5 Controls and Connectors These are the main features of your ROAD ANGEL Navigator 9000: On/Off button External Antennae connector (covered) Stylus SD Card slot (see page 7) 6 Charging indicator LED: Red – charging Green – fully charged Reset button Earphone socket USB connector Inserting an SD Card Insert as shown with SD card label facing to back of unit. If you remove the card when the unit is in use you may receive an error message:”Fatal Application Error. MobileNavigator.exe has performed an illegal operation and will be shut down”. Press the Reset button and switch the unit back on to restart. The Reset Button Your ROAD ANGEL Navigator 9000 has a recessed reset button on its base. Use this: If you have replaced the SD card, or If you are having problems with your unit Press the button using a pencil and then press the On/Off button to restart the unit. Reset button 7 2. Registration You can use your ROAD ANGEL Navigator 9000 straight out of the box but to get the full benefit of up-to-the-minute safety, weather and travel information you should register the unit, charge its internal battery and wait for it to receive a SIM update. Register your unit online: 1. Go to www.roadangelgroup.com 2. Click on the Product Registration link. 3. Follow the on-screen instructions. You can also register by phone: call 01327 855586 (Mon-Fri 9am-5.30pm). Charge the unit and get a SIM update: 1. Using the mains charger, connect your ROAD ANGEL Navigator 9000 and switch it on. Place it in a location where there is a GSM signal (watch the phone icon on the left of the screen as shown below). 2. When your unit has been registered, it will receive a SIM update from Orange within the next 24 hours (as long as the unit is on and has a GSM signal). This is confirmed by a text message. 3. When you have received the SIM update, press the unit's Reset button and restart your ROAD ANGEL Navigator 9000. Your unit will now receive updates automatically. Charging in progress 8 GSM coverage OK No GSM coverage Connected for automatic updates Why should I register? Registration is important for two reasons: Your unit cannot receive updates until it has been registered. Without registration, we cannot resolve warranty issues, log queries or solve problems with your ROAD ANGEL Navigator 9000. How do I update my ROAD ANGEL Navigator 9000? Your unit receives updates automatically by GPRS. If you live in an area with low GPRS coverage, you can update your ROAD ANGEL Navigator 9000 manually by connecting it to a PC using the supplied USB cable. Please refer to the Updating the Database section on page 69 for details. How much do updates cost? Current subscription rates can be found at www.roadangelgroup.com. 9 3. Putting It All Together This section explains how to fit your ROAD ANGEL Navigator 9000 into your vehicle: 1. Align the groove on the bottom edge of the cradle with the slot under the ROAD ANGEL Navigator 9000: Locking lever If the bracket should become loose, ensure the two side screws on the pivot arm are fastened tightly. Release button 2. Straighten the ROAD ANGEL Navigator 9000 so that the connector on the top of the cradle slots into the back of the unit. To remove the ROAD ANGEL Navigator 9000, press the release button on the base of the cradle and gently pull the top of the unit forwards. 3. Take the power lead, and plug it into the socket on the rear of the cradle. 4. Hold the suction cup against the windscreen. Adjust the position of the unit by twisting the mounting bracket’s ball-and-socket joint so that you can clearly see the screen without the assembly obscuring your view through the windscreen. 5. Pull the locking lever upwards to apply suction. For maximum adhesion, it may help to dampen the suction cup beforehand. 6. Route the power cable to the cigar socket. Ensure that it does not interfere with any of the vehicle's controls or airbag modules. If you use your cigar socket for any other devices, a dual adaptor may be used. You are now ready to use the unit for the first time. 10 Where should I put my ROAD ANGEL Navigator 9000? ROAD ANGEL Navigator 9000 has a high sensitivity GPS antenna and requires a clear view of the sky to receive information from GPS satellites. We highly recommend that ROAD ANGEL Navigator 9000 is positioned in the centre of the front windscreen, low down, just above the dashboard (see page 2). If screen glare is a problem in this position, try installing the unit beside the driver's “A-pillar”. Check that the GPS reception operates correctly in this position. If you want to install ROAD ANGEL Navigator 9000 anywhere else within your vehicle, you may require an external GPS antenna. Please contact Road Angel Group Ltd or visit www.roadangelgroup.com for details. My car has a UV/heated windscreen UV screens block GPS signals from entering the vehicle, stopping ROAD ANGEL Navigator 9000 from acquiring its position. This can be a problem with certain models of vehicle, i.e. BMW, Mercedes, Renault, Peugeot & Citroen. Heated screens can also affect GPS signal strength. If your vehicle has a UV or heated screen, you may need an external antennae (please contact Road Angel Group Ltd or visit www.roadangelgroup.com for details). Most vehicles fitted with a UV screen have a defined section behind the rear view mirror where you can fit the antennae. Can I hardwire the unit? ROAD ANGEL Navigator 9000 has a 5V regulator built into its power cable. If the cable is cut and used to hardwire the unit into the vehicle, you will damage the ROAD ANGEL Navigator 9000. To hardwire ROAD ANGEL Navigator 9000 into your vehicle, purchase a cigar socket; wire this into the power system and use with the supplied cable. Consult an auto electrician if you are unsure how to carry out this procedure as incorrect hardwiring may affect the validity of vehicle and product warranty. Consult vehicle manufacturer if in doubt. 11 4. Getting Started Switching On for the First Time 1. Park your vehicle so that ROAD ANGEL Navigator 9000 has a clear view of the sky away from obstacles such as tall buildings and over-hanging trees (these may delay or prevent satellite acquisition). 2. Switch the ROAD ANGEL Navigator 9000 on by pressing the button on the top of the unit (see page 6). 3. If a “Please Register” prompt is displayed, tap on the Continue button. If you have registered the unit, it will update itself automatically when it establishes GPRS connectivity. If the unit continues to show the “Please Register...” screen at startup, you may need to update the database manually (see page 70). 4. ROAD ANGEL Navigator 9000 now tries to identify its location by acquiring information from GPS satellites. This may take a few minutes. During the procedure, the unit displays the following screen. Battery charging (see page 14) GSM coverage (see page 14) 12 ROAD ANGEL Mode When ROAD ANGEL Navigator 9000 has identified its position it displays the full screen ROAD ANGEL mode: Heading Speed Battery charge (see page 14) Time & date Update icon (see page 14) Satellite reception (see page 14) GSM coverage (see page 14) Navigation button Switch to Navigation mode Store location button Add current location to unit’s camera database Menu button Access Photo, Music and Settings In this mode, you can start driving and ROAD ANGEL Navigator 9000 will show you your speed and compass heading. If you are approaching a known hazard, it will alert you to the type and proximity of the hazard (see page 20). Alternatively, if you want ROAD ANGEL Navigator 9000 to guide you to your destination, or to view on-screen map information, tap on the Navigation button to change to Navigation mode. The first time you do this, you will be prompted to choose the language, voice and time zone for the unit. You can explore the Media and Remote functions of your ROAD ANGEL Navigator 9000 by tapping on the Menu button (see page 71 - please also read the important safety information on page 2) 13 Understanding the Icons This table explains the meanings of the icons used on the Searching for satellites and ROAD ANGEL mode screens: Battery charging GSM network coverage 20% Critical charge unit Starting up 40% 20% No signal 60% 40% Error 80% 60% Ready poor signal 100% 80% Ready low signal 100% Ready average signal Update status 14 Battery strength Connected via GPRS Ready good signal Connected via ActiveSync Ready excellent signal GPS Satellite coverage Low satellite coverage Good satellite coverage Navigation Mode When you switch to Navigation mode, ROAD ANGEL Navigator 9000 shows its Navigation menu: To view an on screen map of your current location, tap on the Map button. The Tracking screen is displayed (see page 16). The menu also provides a number of ways to specify your destination: Address Enter a new address (see page 26). Favourites Select a previously visited or bookmarked destination (see page 33) POI Search Search for a Point of Interest (see page 30). Recent Choose your destination from a list of your recent trips (see page 35). You can also tap on the Device Menu button to return to the Road Angel mode or the Settings button to modify the way that your ROAD ANGEL Navigator 9000 works (see page 52). 15 Tracking Mode In tracking mode, the display shows a map of your current GPS location and tracks your route: Satellite status (red: no coverage, green: OK) Battery status Speed Time Elevation above sea level Latitude/ Longitude GPS status information Compass rose Zoom out Current location Info box Zoom in Menu button Back button If you encounter a road hazard (see page 80), ROAD ANGEL Navigator 9000 will provide visual, spoken and sound warnings about the type of hazard and its proximity (see page 20). 16 Browse Mode If you tap anywhere on the Tracking screen, ROAD ANGEL Navigator 9000 stops tracking your position and enters Browse mode. Now, you can use the map to find a destination or get information about your surroundings. Tap on a location on the map and ROAD ANGEL Navigator 9000 centres the view at that point. Use the + and – buttons, and the scroll bar that appears when you do so, to change the magnification. Tap on a road or POI (Point of Interest) icon to view information about it in the Info box. Browse mode You can use this mode to identify a destination: tap on the Menu button for options. Tap on the Back button (see below) to return to Tracking mode. 17 Navigation Mode buttons In Navigation mode, ROAD ANGEL Navigator 9000 displays various buttons in the lower corners of the screen: Tap on the Back button to return to the previous screen. If you are in the Browse mode, tap on the Back button to return to Tracking mode. Continue to tap on the Back button to return to the Navigation menu. Tap on the Menu button to display commands relevant to the current screen. In Browse mode, the commands allow you to enter your destination and create a route (this is described fully in the Destinations and Routes section on page 25). Tap on the Tick button to confirm a selection. For example: to change a map setting (see page 53). Tap on the Search button to identify a location based on your selection. For example: to search for a destination close to a specified postcode (see page 27). Tap on the Forward button to continue with a procedure. For example, creating a route with multiple stops (see page 44). 18 Changing back to ROAD ANGEL mode If you don't want to use the navigation features now, and want to return to full screen ROAD ANGEL mode: Tap on the Trip Information panel (if displayed – see page 45), or Tap on the Back button until the Navigation menu is displayed. Then, tap on the Device Menu button. The Device menu is displayed: Tap on the RoadAngel button to return to the full-screen ROAD ANGEL mode: The screen also offers the following options: Store location Add your current position to your unit’s hazard database (see page 67). This button is not displayed if your vehicle is at rest or travelling at less than 4mph. Menu Access the hazard and device settings (see page 58) or use your unit’s media or remote options (see page 71). Navigation Return to the Navigation mode main menu. 19 5. Hazard Warnings Your ROAD ANGEL Navigator 9000 alerts you to: Fixed, temporary or average camera locations Mobile safety van locations Hazard locations: accident black spots, schools, congestion zones or ungated railway crossings. Traffic incidents Weather hazards Speech warnings will tell you the type of hazard followed by an audible tone that increases with your proximity to the location. A proximity-to-hazard gauge increases from 1 to 5 bars as you get closer to the danger zone. If it is a fixed, temporary or average speed camera location, the unit alerts you to the advisory speed limit. USE THE ADVISORY SPEED LIMIT FOR GUIDANCE ONLY. Any road speed limit can change without prior notice or consultation, for example, in temporary road works. It remains important for drivers to constantly re-evaluate and be aware of the road limit at all times. Speed limits may vary according to vehicle type and class. All Road Angel products are designed to provide the driver with a high visibility speedometer reading within your field of vision. Although GPS speedometers are known to be highly accurate at steady speed, atmospheric conditions and hindered skyward visibility (e.g. tunnels) can adversely affect accuracy. In all situations, drivers should always refer to the vehicle’s speedometer, which is known to fall within approved guidelines of accuracy in all situations, and be aware of the applicable speed limit. You can customize the way your ROAD ANGEL Navigator 9000 alerts you to road dangers: see Hazard and Device Settings on page 58. 20 Camera Locations If you are approaching a fixed, temporary or average speed camera location and travelling below the advisory speed limit, the alert message is shown on a green background. If you are travelling above the advisory limit the background is red. If your speed subsequently drops below the advisory speed limit, the background changes to green. Safety camera alerts in ROAD ANGEL mode and Navigation mode are shown below: Hazard icon Hazard type Personal icon* Actual speed Advisory speed limit Proximity-tohazard meter Audio On/Off icon Actual speed Advisory speed limit Hazard warning message Dismiss/ Delete button Proximity-tohazard meter Hazard type icon* * A circled ‘P’ on the hazard icon indicates that you have created this location. 21 Camera Van Locations “Live” mobile camera van locations (where a mobile camera van has been reported to be present within the last two hours) are indicated by a red background. Road Angel mode Navigation mode On other occasions, the location is shown with an orange background: Road Angel mode Navigation mode If you pass a safety van location where a mobile camera van is present, tap on the Set Live button. Your unit will send a message to update the camera database. Other ROAD ANGEL Navigator 9000 users approaching this location in the next two hours will then receive a Live Van Alert. 22 Traffic Alerts In full-screen ROAD ANGEL mode or when you are driving in Navigation mode without a programmed destination, your unit will provide traffic alerts if you are driving towards a traffic incident. You are only alerted to incidents close to your current heading. Traffic alerts in ROAD ANGEL mode and Navigation mode For more information about traffic alerts, see page 84. If you are driving in Navigation mode with a programmed destination, your ROAD ANGEL Navigator 9000 will alert you to any incidents that have occurred on your route. Depending on how you have set up your unit, this information can be used to optimise your route and avoid traffic congestion, roadworks and accidents (see page 57). You can view traffic reports from any map screen: tap on the Menu button and then tap on the Traffic Info button (see page 47). 23 Other Hazards If you are approaching any other type of hazard, no advisory speed limit is shown. The background is blue for an accident black spot, congestion zone or primary school hazard. Road Angel mode Navigation mode Acting on an Alert To mute an audio alert, tap on the Hazard-Type icon. To dismiss the alert, or remove it from the unit’s database, tap on the Dismiss/Delete icon (see page 66). In ROAD ANGEL mode, tap anywhere on the screen. 24 6. Destinations and Routes ROAD ANGEL Navigator 9000 knows where you are from its GPS data; to calculate your route, it only needs you to specify the destination (see page 26). It can then use its map data and your preferences to calculate the most efficient route for your journey. For more complicated journeys, you can specify multiple destinations (see page 39). ROAD ANGEL Navigator 9000 works out the best route between each stop. If you encounter any traffic problems on your journey, ROAD ANGEL Navigator 9000 can calculate a detour for you (see page 48). From full-screen Road Angel mode or from the Device menu, tap on the Navigation button. The Navigation main menu is displayed: This offers you a number of different ways to specify the destination: Address Enter a new address (see page 26). Favourites Select a bookmarked or recent destination (see page 33) POI Search Search for a Point of Interest (see page 30). Map View the map (see pages 16 and 39). Recent Select your destination from a list of recently visited locations (see page 35). You can also tap on the Device Menu button to return to the Road Angel mode or the Settings button to modify the way that your ROAD ANGEL Navigator 9000 works (see page 52). 25 Entering an Address 1. Tap on the Address button to identify your destination by its postal address or postcode. The Find Address window is displayed. 2. Tap on Country. Select your country from the list. This step is only necessary for the first address you enter on the unit. There are two ways you can specify your destination: 26 The best way is to enter the postcode (see page 27). If you don’t know the postcode, you can enter the name of the town or city and, optionally, the street and house number (see page 28). If you know the postcode 1. Tap on the Post Code button and enter the post code of your destination. 2. After the first few characters, you may tap on the search symbol (the magnifying glass) to display a hit list of post codes matching your entry. 3. Choose the appropriate post code from the list. 4. Tap on the menu button in the lower right corner. Go to the Fine Tuning section (see page 29). 27 If you don’t know the postcode 1. Tap on the City button. Use the displayed keypad to enter the name of your destination. Enter at least the first three characters and then tap on the search symbol (the magnifying glass). 2. Find your target city or town in the ‘hit’ list and tap on its name. 3. Tap on Street to enter the name of the street. 28 4. Type the name of the street you are looking for. After the first few characters, you may tap on the search symbol (magnifying glass) to display a hit list of streets matching your entry. Choose the appropriate street from the hit list. 5. Optionally, enter the number of the property. 6. Tap on the menu button to continue. Fine-tuning 1. When you tap on the menu button after entering an address, ROAD ANGEL Navigator 9000 displays the following screen: 2. To start driving to your destination, tap on the Navigate button. ROAD ANGEL Navigator 9000 calculates a route to your destination and displays your first route instruction (see page 45). The screen also offers the following options: Via Enter further stops on your journey (see page 39). Save Store the destination in the bookmark list (see page 34). On Map Use an on-screen map display to identify your destination more accurately (see page 38). Back Return to the Find Address screen. 29 Points of Interest (POI) ROAD ANGEL Navigator 9000 contains a database of information about amenities and attractions. These are collectively called Points of Interest (POI). You can use this feature to identify destinations. For example, you could use the POI database to find the nearest garage or identify a restaurant close to your route. POIs are arranged in the following categories: Automotive e.g. Picnic Sites, Car Parks, Garages Overnight e.g. Campsites, Hotels Eat drink e.g. Restaurants, Coffee Shops Sights e.g. Museums and Galleries, Tourist Attractions Shopping e.g. Florists, Groceries, Childrens, Sports and Outdoors, Home&Garden Leisure e.g. Cinemas, Golf Clubs, Zoos Service e.g. Educational Facilities, Hospitals Transport e.g. Airports, Railway Stations 30 Getting to a POI 1. On the Find Destination screen (see page 23), tap on the POI button. The POI Search screen is displayed: ROAD ANGEL Navigator 9000 will search for a POI close to your current location. Tap on the Where? button to identify another location for the search (see page 26). 2. Tap on a POI category, for example: Automotive. 3. On the next menu, choose a subcategory, for example: Gas Stations. 31 4. A list of the POIs in the category is shown (in this example, gas stations) with their distance from your current location. 5. Select a POI by tapping on it. The following menu is displayed: 6. To start driving to the POI, tap on the Navigate button. ROAD ANGEL Navigator 9000 calculates a route to your destination and displays your first route instruction (see page 45). The screen also offers the following options: Via Enter further stops on your journey (see page 39). Save Store the destination in the bookmark list (see page 34). On Map Display an on-screen map showing the POI (see page 38). Description View details about the selected POI. 32 Favourites Options If you want to go to your designated home or work locations (see below), or choose a bookmarked destination, a recently visited location, or make a pre-planned trip, tap on the Favourites button. The following menu buttons are displayed: There are four types of locations in the Favourites menu: Bookmarks Single-stop destinations you have saved through ROAD ANGEL Navigator 9000’s menus (see page 34). Recent Destinations you have recently visited (see page 35). Trips Pre-planned journeys with two or more stops that you have saved to your trips list (see page 36). Presets Your Home and Work destinations available for easy selection (see page 37). 33 Bookmarks Tap on the Bookmarks button. A list of saved destinations is displayed. Select an item by tapping on it. The following menu is then displayed: Tap on the Navigate button to follow a route to the chosen bookmark. Now refer to the Getting There section (see page 45). 34 The menu also offers the following options: Via Enter the chosen bookmark as a stop in the destination list (see page 34). Sort Order the bookmark destination list alphabetically. On map View the location of the bookmark on an on-screen map. Rename Change the name of the selected bookmark. Delete Delete the selected bookmark. Delete all Clear the bookmark list. Recent Tap on the Recent button to choose your destination from a list of your recently visited destinations: Select an item by tapping on it. Tap on the Navigate button to follow a route to the chosen destination. Other menu options are as described in the Bookmarks section on the previous page. 35 Trips Tap on the Trips button to choose your destination from a list of your pre-saved trips (a “trip” consists of two or more stops): Tap on Create a new trip to define the stopovers for a new trip. Select an existing trip by tapping on it. The following menu is then displayed: Tap on the Navigate button to follow a route to the stops defined in the trip. Now refer to the Getting There section (see page 45). 36 The menu also offers the following options: Edit stopovers Modify the selected trip (see page 41). Sort Order the bookmark destination list alphabetically. Rename Change the name of the selected trip. Delete Delete the selected trip. Delete all Clear the trip list. Presets The Presets list features Home and Work buttons. These provide shortcuts to your most commonly used destinations. Setting up Home/Work buttons for the first time To assign a destination to one of these buttons, tap on it. You can choose the destination in three ways: By searching for an address in the way described on page 26. By selecting your current GPS position. By choosing a recently visited location. 37 Using My Work/My Home After you have followed the setup procedure described above, the next time you want to travel to home or work: 1. Tap on the Presets button (see page 23). 2. Tap on the Home or Work entry in the Presets list. The following menu buttons are displayed: Tap on the Navigate button to follow a route to the chosen preset. Now refer to the Getting There section (see page 45). The menu also offers the following options: Via Enter the chosen preset as a stop in the destination list (see page 41). On map View the location of the preset on an on-screen map. Delete selected Delete the selected preset. Rename Change the name of the selected preset. Delete all Clear the preset list. 38 Using the Map You can also select your destination from the map while ROAD ANGEL Navigator 9000 is in its Browse mode (see page 17). 1. Display your destination on the map. 2. Tap on the precise location. 3. Tap on the Menu button. 4. Tap on the Navigate button to follow a route to the location. Now refer to the Getting There section (see page 45). 39 The menu also offers the following options: Via Enter the chosen location as a stop in the destination list (see page 41). 40 Save Save the location in the bookmark list (see page 34). Search Search for POIs close to the location. Map options Change the way your ROAD ANGEL Navigator 9000 displays maps. Planning your Route In most cases, you will enter a single destination and allow ROAD ANGEL Navigator 9000 to determine your route and guide you there. However, if you want to stop at one or more places on the way, you can enter more destinations into your itinerary as stops and let ROAD ANGEL Navigator 9000 calculate the best route to get you from one stop to the next. This section describes ROAD ANGEL Navigator 9000’s route planning feature. This allows you to plan your route in advance, choosing multiple stopovers along your journey. To plan your route: 1. Identify the location for your destination or stop as described in the previous sections. 2. Tap on the Via button to add the location to your destination list: 41 3. To add a stopover, tap on the + symbol. The Choose stopover screen is displayed. 4. Enter a stop using one of the procedures described in the last section: a home or work address, a bookmark, a point of interest, a recent location, an address or a destination pinpointed on the map. 5. Repeat the procedure to add further stops. 6. To change the order of the stopovers, select one and then use the up and down arrows to move it up or down the list. 7. To delete a stopover, select it and then tap on the ‘Bin’ symbol. 42 8. When you have completed your route, tap on the menu symbol (bottom right-hand corner of the screen). 9. Choose from the following options: Tap on the Back button to return to the Choose Stopover screen. Tap on Start Navi to start your journey (see page 45). Tap on Simulate to view a simulation of the journey. Tap on the Save button to add the itinerary to your Trip list. Tap on Routing if you want ROAD ANGEL Navigator 9000 to calculate the itinerary for your route. The Route Summary is displayed (see below). 43 Routing and Waylists Tap on one of the stopovers in the Route Summary to display a detailed itinerary in the Waylist (this may take a while). This is a complete list of all the instructions for the route. Tap on the Forward button to step through the list, page by page. If you want to avoid a particular road or junction, tap on the relevant waypoint and confirm that your want to delete it. Your ROAD ANGEL Navigator 9000 will calculate an alternative route (see page 48). 44 7. Getting There When you have specified your route, and tapped on the Navigation button, ROAD ANGEL Navigator 9000 switches to the full screen Guidance mode. It gives you a view of the whole route and then provides you with on-screen and audio directions to get you to your destination(s). Distance to next turn Name of next road Current position shown by green arrow Trip information panel 3D map view (see page 43) Route (shown in blue) The Trip information panel on the left side of the screen displays your speed, the current time, estimated time of arrival and the distance to your destination. Tap on the + and – icons to increase or decrease the map magnification. Tap anywhere else on the screen to browse across the map, away from your route. Tap on the Back button to return to the Tracking mode. 45 If you want to cancel the route guidance instructions, click on the Back button (from Tracking mode). The ROAD ANGEL Navigator 9000 will prompt you to confirm that you want to stop the route instructions. Tap on the Yes button to return to the Navigation menu or the No button to resume route instructions. If you cancel the instructions, you could use the Tracking mode (click on the Map button) or full-screen ROAD ANGEL mode (click on the Device Menu button) to monitor your progress and to continue with hazard alerts and traffic information. Tap on the menu button to view the Guidance menu (see Changing a Route on the next page) and commands to modify your route. Tap on the Trip Information panel to display the Device Menu (see page 19). This allows you to change to full-screen ROAD ANGEL mode, change alert settings or add your present location as a hazard zone. 46 Changing a Route There are various ways you can change the route recommended by your ROAD ANGEL Navigator 9000: Let the ROAD ANGEL Navigator 9000 calculate an alternative route close to your current position. Remove one or more entries from your route itinerary. Your ROAD ANGEL Navigator 9000 picks a new route avoiding these roads or junctions. Use the Traffic Rerouting option (see page 57 to automatically calculate new routes avoiding traffic jams (see page 51). Alternatively, you could programme the unit with a new route or create a detour using one or more additional stops (see page 39). To change a route, the audio volume or any other settings from Guidance mode, tap on the Menu button. The Guidance menu is displayed: 47 The Guidance menu has several options: Alt. route Make a detour in the immediate area (see below). Waylist View and modify the route itinerary (see page 49). Save Store your location as a bookmark (see page 34). Volume Change the sound output level of the unit. Traffic Info View the latest traffic reports (see page 50). Search Select, and navigate to, a POI close to your route. Tap on the Search button to open the POI menu (see page 31). Making a Detour To request a new route: 1. Tap on the Alt. route button. The Detour menu is displayed: 2. You can block the original calculated route for a given distance (e. g. 0.5 mile) and force an alternative route. Tap on the required distance icon. Your journey is reassessed and, if an alternative route is available, the previous instructions will be discarded for the given distance. 48 Editing the Waylist View the full itinerary of your route. You can adjust your route by removing 1. Tap on the Waylist button. Your current itinerary is displayed. 2. Identify and tap on the section of the route that you want to avoid. 3. Confirm that you want to remove the waypoint. If the section of road is an integral part of the route or if there is no viable alternative, your ROAD ANGEL Navigator 9000 will retain the waypoint and inform you of the problem. Otherwise, it calculates a new route avoiding the section of road you have identified. 49 Traffic Reports To view traffic reports, tap on the Menu button when in Navigation mode. Tap on the Traffic Info button. The Traffic Information screen is displayed: You can adjust the list to show all available traffic information or just incidents affecting your route. Tap on the Menu button and then choose from the On route or All events options. 50 Traffic Rerouting If you have set Traffic Rerouting to the Automatic option (see page 57), your unit will immediately calculate a new route to avoid a traffic incident, if one is available, displaying the following confirmation that your route has changed: If you have set Traffic Rerouting to the Manual option (see page 57), your ROAD ANGEL Navigator 9000 displays the following screen if it has received information about an incident affecting your route and can offer an alternative to avoid it: Choose whether to accept the detour or continue with the original route. 51 8. Navigation Settings On the Navigation main menu, tap on the Settings button if you want to change the volume of audio alerts and announcements or change any other settings. The following menu is shown: This provides the following options: General Settings Change the language, time and view version information (see page 57). Map Settings Adjust the way maps are displayed (see page 53). Route Settings Change guidance and route-finding options (see page 55). Volume Change the sound output level of the unit. Many of these settings are also available on other menus. 52 Map Settings Tap on the Map Settings button to change the appearance and style of screen maps. The Settings menu is displayed: Use this menu to: Info Layers Change the information displayed on the map (see Info Layers below). Day/Night/ Automatic Toggle between night and day modes. In the Automatic mode, ROAD ANGEL Navigator 9000 changes between day and night modes at 07.00 and 19.00. Maps Select map data (UK supplied - for other options, please contact Road Angel Group Ltd). 2D/3D Toggle between 2D and 3D map modes Track Up/Down Change the compass tracking used by ROAD ANGEL Navigator 9000. The two options are to automatically rotate the map display so that your current heading is always up the screen or to lock the map display so that it always faces north. 53 About Info Layers The elements and symbols displayed on the maps are determined by information layers. Select the boxes of any POI category (see page 30) you want to have displayed on the map. Deselect those that should be hidden. Press the confirmation symbol in the bottom right-hand corner to select/deselect all categories. Tap the back arrow symbol to return to the map. 54 Route Settings Tap on the Route Settings button if you want to change the way ROAD ANGEL Navigator 9000 calculates routes. The Route Settings menu is displayed: Fast/Slow/Bike/ Motorbike/ Scooter/Van/ Pedestrian ROAD ANGEL Navigator 9000 uses this setting to calculate the best route and estimate your journey time. By default, ROAD ANGEL Navigator 9000 assumes you are travelling by car. Tap on this button to specify your mode of transport: fast car, slow car, motorbike, etc. See note below about suitability for various vehicle types. Fastest/Shortest Tap on this button to choose whether ROAD ANGEL Navigator 9000 selects the fastest (based on road quality, terrain and speed restrictions) or the shortest route (based on the shortest distance on good roads) Toll Roads Tap on this button if you want ROAD ANGEL Navigator 9000 to avoid toll roads when it calculates a route. Tap on the button again to restore the use of toll roads. The London Congestion Zone in Central London is regarded as a toll road: if you choose to avoid toll roads, you will not be guided through this zone. 55 Motorways Tap on this button if you want ROAD ANGEL Navigator 9000 to avoid motorways when it calculates a route. Tap on the button again to restore the use of motorways. Ferries Tap on this button if you want ROAD ANGEL Navigator 9000 to avoid the use of ferries when it calculates a route. Tap on the button again to restore the use of ferries. It is worth noting that with the vehicles listed above, advisory speed limits may change based on the type and weight class of that vehicle. Road Angel alerts have been designed for the passenger car market and as such advisory speed limits are set accordingly. These limits are only advisory and in all situations, the responsibility remains with the driver to drive within the limits and conditions for the road and the vehicle. Road Angel would also like to note that the routing utilised in this product is not in some cases suitable for Heavy Goods Vehicles. For these specific applications, products designed to take account of increased weight, height and length should be sought. In limited cases, drivers towing large trailers/ caravans should also take into consideration these factors prior to travel. 56 General Settings Tap on the General Options button if you want to change the way ROAD ANGEL Navigator 9000 uses traffic information or displays text, time and distances. The General Options menu is displayed: Choose from the following options: Automatic/ Set up the Traffic Rerouting feature. Manual/Off With the Automatic option (this is the default setting), your ROAD ANGEL Navigator 9000 will automatically adjust your route to avoid traffic jams; with the Manual option it will first alert you to an incident and prompt you to choose between the existing route and an alternative route avoiding the traffic jam. Language Choose the language used on menu buttons and other screens. Miles/Kilometres Tap on this button to change the distance units used on-screen between miles and kilometres. Set time Select your time zone. Tap on the ‘tick’ button to confirm any changes and return to the previous screen. Tap on the Back button to return to the previous screen and discard any changes to these settings. 57 9. Hazard and Device Settings This section describes how you can use the main menu to: Change the way that ROAD ANGEL Navigator 9000 alerts you to road hazards. Adjust unit settings such as the screen brightness, power saving settings, and stylus calibration, or view RescueLoc information. View text messages and weather reports. To access these settings: 58 In Navigation mode: o Tap on the Trip Info panel (if shown – see page 45), or o Tap on the Back button until the Navigation menu is displayed. Tap on the Device Menu button and then the Menu button. In Road Angel mode, tap on the Menu button. The main menu is displayed: Hazard Settings To change the Hazard Alert settings, tap on the RoadAngel button: The menu offers the following options: Audio Change the way ROAD ANGEL Navigator 9000 uses audio alerts (see Audio on page 60). Distances Adjust the distance from a hazard that your ROAD ANGEL Navigator 9000 starts an alert, and enable or disable speed sensitivity (see page 62). Alerts Choose the active hazards alerts (see page 63). Reset Restore the factory default values for Audio, Distances and Alerts settings. Tap on the Back button to return to the ROAD ANGEL main menu. The following sections list the properties in each category. 59 Audio Settings in the Audio menu determine how ROAD ANGEL Navigator 9000 uses audio alerts to warn you about road hazards. 60 Property Details Options (factory setting in bold) Camera Alert Volume Change the sound level of safety camera related warnings. Off…1…2…3… 4…5 Safety Alert Volume Change the sound level for Blackspot, School and Congestion related warnings. Off…1…2…3… 4…5 Slowspeed Automute Mutes audible warning if you are travelling less than 15MPH. Female or Male Voice Choose whether alerts are spoken with a male or female voice. Switch alert on or off, as each proximity bar counts up it will emit a Camera Alert Single Beep single beep. In Auto, single beep if speed is below advisory limit. Off…On Female…Male Off…On…Auto Safety Alert Single Beep Switch alert on or off, as each proximity bar counts up it will emit a single beep. Off…On Speed Sensitive Volume Adjust the warning volumes depending on how fast the vehicle is travelling. Off…On Voice Alerts Switch voice alerts on or off. Off…On 61 Distances A Camera Van alert occurs when you are 500m from its location; a School or Congestion zone alert occurs at a distance of 125m. These alert distances are fixed. For other types of hazards, the factory setting for the alert distance is 250m. You can change this warning distance to 500m or 1000m, if you prefer. You can also choose to double the warning distance when you are travelling over 50mph using the Speed Distance Sensitivity setting. Property Details Options (factory setting shown in bold) Alert distance Adjusts the warning distance as you approach danger zones (not Congestion Zone, School or Camera Van locations – see above). 250..500..1000m Speed distance sensitivity Doubles the alert distance at 50MPH and above (no effect on School, Congestion or Camera Van alerts) Off...On 62 Alerts Your ROAD ANGEL Navigator 9000 will always warn you about Fixed, Average and Mobile Safety Camera zones. However, you can choose whether to receive alerts about other hazards using settings on the Alerts menu. Property Details Options (factory setting in bold) Blackspot Alert Switch Blackspot alerts on or off. Off...On Safety van Alert Switch camera van alerts on or off. Off...On Congestion Alert Switch Congestion Charging zone entry warnings on or off. Off...On Overspeed Alert Set a speed at which the unit will warn if you exceed the speed. School Alert Switch School alerts on (only effective 8-9.30am and 1.30-4.30pm Mon-Fri) or off. Off...On Railway Alert Alerts you to railway crossings with no barrier. Off...On Rest Alert Select this option if you want to be alerted whenever you have been driving for two hours without a break. Off...On Traffic Alerts Switch Traffic Alerts on or off Off...On Off..20 - 165 in increments of 5mph 63 Device Settings From the ROAD ANGEL main menu, tap on the Device button. The Device menu has three options: Rescueloc Shows your latitude, longitude and last heading. Display Allows you to adjust the screen brightness, power saving options and display mode, and calibrate the stylus (see page 65). Version Information about your unit’s software and memory utilization, the date the unit was most recently updated and the current subscription coverage. 64 Display Settings Using this menu, you can adjust the screen brightness, power saving options and display mode, and calibrate the stylus. Property Details Options (factory setting shown in bold) Backlight level Change the intensity of the screen display. Battery Backlight Timeout Switch the unit off if it is not used for the Off… 30s…1m… 3m… 5m…10m specified time period when using battery power. Off…1…2…3… 4…5 Ext Power Backlight Switch unit off if not used for the specified time Off… 30s…1m… 3m… 5m…10m Timeout period when using an external power supply. Stylus Calibration Commence the stylus calibration procedure – follow the on-screen instructions. Day or night mode Select a day or night mode colour scheme. Day…Night 65 10. Adding and Deleting Danger Zones Road Angel Group Ltd. is constantly updating the central database of danger zones. You can be of great value to all ROAD ANGEL Navigator 9000 users by adding any new zones you encounter to your unit's own database. When your ROAD ANGEL Navigator 9000 is updated, this data can be verified by Road Angel Group Ltd before being added to the central file. PLEASE ONLY ADD OR DELETE DANGER ZONES WHEN IT IS SAFE TO DO SO. Deleting zones When your ROAD ANGEL Navigator 9000 alerts you to a danger zone, you can delete it from your unit’s database so that you will not be warned about it in future. This will only affect your unit’s personal database. In Navigation mode, tap on the Dismiss/Delete button; in Road Angel mode, tap anywhere on the screen (see page 24). This menu is then displayed: Tap on the Delete button to confirm the permanent deletion of the location or tap on the Dismiss button to stop the alert on this occasion but leave it in the database. When a location has been deleted it can only be restored by re-entering the location (see Adding new locations, below) or by requesting a factory reset for your next update: email [email protected] with your serial number and contact details. Note: By using a factory reset all your personally stored locations will be lost. 66 Adding new locations You may add new locations to the FIXED, MOBILE VAN, AVERAGE, MOBILE, BLACKSPOT, SCHOOL and RAILWAY categories of your unit’s own database. When you update your ROAD ANGEL Navigator 9000, these new locations will also be downloaded to the central database, and can then be verified by Road Angel Group Ltd technicians for inclusion in future updates. ROAD ANGEL Navigator 9000 needs to be travelling in excess of 4 MPH to calculate the heading for the location. Store an average speed monitoring area only if you are absolutely sure of the start and finish points. When your vehicle is precisely alongside the new location: 1. In full-screen Road Angel mode (see page 13), tap on the Store location button. In Navigation mode, tap on the Trip info panel or return to the main menu and tap on the Device Menu button, then tap on the Store location button (see page 19). 2. Choose the type of zone: 67 3. Identify the speed limit for the zone (camera locations only): Use the + and – buttons to adjust the displayed advisory speed limit for the new zone. Click on the ‘tick’ button to continue. 4. If you are adding an Average Speed monitoring section (SPECS zone), press the STORE button again when you are underneath the finish camera. ROAD ANGEL Navigator 9000 prompts you to confirm the end of the zone. 5. ROAD ANGEL Navigator 9000 confirms that the zone has been saved and returns to the original display mode. 68 11. Updating the Database Your ROAD ANGEL Navigator 9000 has a comprehensive database of danger zones (see page 78). As soon as possible after your purchase, you should register the unit online at www.roadangelgroup.com (see page 8). The next day, your unit will be able to receive updates, although you must also have a valid subscription (see page 4). Your unit receives updates automatically by GPRS, the wireless data service available over the GSM network. If you live in an area with low GPRS coverage and cannot receive automatic updates, you can also update your ROAD ANGEL Navigator 9000 manually over the Internet using your PC. In this case, we recommend that you update your ROAD ANGEL Navigator 9000 fortnightly, as safety camera locations are constantly changing. If you are a high mileage motorist, using unfamiliar roads, you may want to update your database weekly. You should also update the database before you set off on a long trip. You can check the date of your last update on the Information page (see page 64). 69 Updating by PC/ActiveSync To update your ROAD ANGEL Navigator 9000 using your PC, you will need: A PC with internet access running Microsoft Windows 2000 or XP (we do not support Apple Macs) Internet Explorer version 5.5 or above Microsoft ActiveSync 3.8 or above To set up your ROAD ANGEL Navigator 9000 with ActiveSync: 1. Switch on your ROAD ANGEL Navigator 9000 (if the internal battery is flat, you will need to connect it to the PC first) and wait for it to boot up. 2. Connect your ROAD ANGEL Navigator 9000 to your PC (with an active Internet connection) using the USB cable. 3. Microsoft ActiveSync starts; when it prompts you to set up a partnership, select the No option and then click on the Next button. The ActiveSync window displays Guest: 'Connected’. 4. The unit should update within 5 minutes of a connection being established. If you have any problems, check that your firewall or Internet Security software allows the unit access to the Internet. Please refer to your firewall’s documentation. 70 12. Media and Remote Options In addition to the navigation and hazard warning system, you can also use your ROAD ANGEL Navigator 9000 to: Play music, browse photos and watch videos on this unit. Receive text messages and access weather forecasts. To close ROAD ANGEL Navigator 9000, and access the unit’s media options: From Navigation mode, tap on the Device Menu button on the Navigation menu screen (see page 15). Tap on the Menu button. From ROAD ANGEL mode, tap on the Menu button. The main menu is displayed: The following commands are available: Navigation Return to Navigation mode. Remote Access text messages or weather reports (see page 75). Device Change the appearance and operation of the unit (see page 64). RoadAngel Customize road hazards warnings (see page 59). Media Play MP3 files, view photos or videos (see page 72). 71 Media Options Tap on the Media icon. The Media screen is displayed: Choose from the three media options: Music, Picture or Movie. Music Tap on the Music button. The MP3 Player is displayed. This lists the MP3 files stored in the “Music” folder on the unit’s SD memory card. Use the on-screen controls to select and play MP3 files. 72 Photos Tap on the Picture button. The image viewer is displayed. This allows you to browse image files stored on the SD memory card. Tap on the Previous and Next buttons to navigate through the images and folders stored on the SD memory card. Tap on the Open button to display the selected image or to open a folder. Tap on the Slideshow button to view a slideshow of all the images in the selected folder. Tap on the Up icon to navigate back through the folder structure. Tap on the Back button to go back to Main Menu. 73 Movie Tap on the Movie button. The movie viewer is displayed. This allows you to browse image video files stored on the SD memory card. Select the required video file and then use the on-screen controls to view it. Tap on the Back button to close the viewer and return to the Media screen. 74 Remote Options Tap on the Remote button. The Remote options menu is displayed: Choose from the two options: Text Messages or Weather. Text Messages You can receive and view text messages on your ROAD ANGEL Navigator 9000. It is also possible to have a destination postcode sent by text directly to your unit. Tap on the Text Messages button on the Remote menu to view the inbox: 75 To view a message, tap on it and then tap on the View button (you could also double-tap on the message). The selected message is then displayed. The unit’s phone number is displayed on the Inbox screen. To receive a destination postcode by text: You can receive a destination postcode directly through the text messaging service. The text message must have the format: dest [space] [postcode] (for example: dest nn12 8gx) When your unit receives the text message, the following screen is displayed: Tap on the Yes button to accept the postcode as your new destination and abandon any existing route instructions. It is also possible to receive a destination postcode through an online portal – see www.roadangelgroup.com for details. 76 Weather Reports You can receive and view weather forecasts on your ROAD ANGEL Navigator 9000. Tap on the Weather button on the Remote menu to view the Weather menu. 1. Select a country: 2. Tap on a region. If your unit has GPRS connectivity or an ActiveSync connection, the weather forecast for the chosen area is displayed. 77 13. Background Information About Global Positioning Satellites (GPS) Operational since 1990, 24 satellites orbit the earth at a height of 11,000 miles. At any given point on the globe, at least 4 satellites are in view at any one time. Using sophisticated aerials and triangulation techniques, units such as ROAD ANGEL Navigator 9000 are able to compute your position to within 5-10 metres. ROAD ANGEL Navigator 9000 is equipped with a Sirf3 chipset, which enables fast and deep GPS signal search capabilities. Occasionally, when roads are close together, ROAD ANGEL Navigator 9000 may place you on the wrong road. If this happens, keep driving and the device will automatically correct itself when it has a better fix or when the road network simplifies. ROAD ANGEL Navigator 9000 may lose the GPS satellite signal temporarily owing to tunnels, tall buildings, bridges, dense foliage or adverse weather conditions. When you are clear of the obstruction, ROAD ANGEL Navigator 9000 should re-acquire satellite signals in a few seconds. The ROAD ANGEL Database ROAD ANGEL Navigator 9000 uses a database of Police, Local Authority and Ministry of Transport designated danger spots, including accident black spots and safety camera locations, primary schools and congestion charging zones. Using the latest Global Positioning Satellite (GPS) technology, ROAD ANGEL Navigator 9000 compares your position with known danger spot locations and gives you an audible and visual warning as you approach them. It is critical to the accurate operation of your ROAD ANGEL Navigator 9000 that you update your unit regularly to maintain the very latest data. With up to 100 new hazard locations added each month, we suggest that you update your ROAD ANGEL Navigator 9000 fortnightly. If you are a high mileage driver, using unfamiliar roads, we recommend weekly updates. 78 To qualify for database updates: 1. Register your ROAD ANGEL Navigator 9000 with Road Angel Group Ltd. You cannot receive updates until you have registered (see page 8). 2. Purchase a valid subscription package (see page 4). For information about how to update your ROAD ANGEL Navigator 9000, see page 69. Using ROAD ANGEL Navigator 9000 Abroad Your ROAD ANGEL Navigator 9000 is specifically designed for use within its designated country, as stated on the packaging. It will have limited functionality in other countries because the appropriate map and camera/safety GPS data will not be present on the standard SD card. You can purchase SD cards with mapping and camera data for other European countries: please visit www.roadangelgroup.com for details. GPRS connectivity cannot be enabled abroad. You will need to update the unit manually via ActiveSync using an Internet-connected PC. If you intend to use ROAD ANGEL Navigator 9000 abroad, seek independent legal advice prior to departure as laws differ between countries on the use of any GPS safety system. 79 Speed Cameras and Hazards This section describes the type of cameras and road hazards covered by ROAD ANGEL Navigator 9000: Gatso The most common type of speed camera – used in fixed positions mounted on poles at the roadside. Measures vehicle speed using radar and, if the speed limit has been exceeded, photographs the rear of the vehicle. Uses a flash unit inside the camera cabinet or mounted on a gantry to illuminate the offending vehicle's rear number plate. ROAD ANGEL Navigator 9000 relies on up-to-date database information for detection. SPECS Takes a digital photograph of your vehicle at the ‘start’ point and then another a set distance further down the road. If your average speed is greater than the speed limit between these two cameras you are automatically prosecuted. ROAD ANGEL Navigator 9000 relies on upto-date database information for detection. Watchman Measures vehicle speed and, if the speed limit has been exceeded, takes a photograph of the rear of the vehicle. Can be accessed remotely allowing operators to download live video, stored images or data. ROAD ANGEL Navigator 9000 relies on up-to-date database information for detection. 80 Speedcurb Measures the speed of vehicles in the monitored section of road using pressure sensors in the road surface. If the speed limit has been exceeded, it takes a photograph of the rear of the vehicle. Uses a flash module for night-time operation. ROAD ANGEL Navigator 9000 relies on up-todate database information for detection. Traffiphot Uses pressure sensors in the road (similar to Speedmaster – see below) to measure vehicle speed and photographs the rear of any speeding vehicle. Not to be confused with red-light cameras. ROAD ANGEL Navigator 9000 relies on up-to-date database information for detection. Speedmaster Semi-permanent (fixed location but only used part-time), system that uses pressure sensors in the road to measure vehicle speed. Connects to a camera on a tripod for evidence of any offence. ROAD ANGEL Navigator 9000 relies on up-to-date database information for detection. Black spot A specific location, identified by the police and local authorities, where a high number of accidents have occurred e.g. a difficult junction. Black spots are often targeted by mobile speed enforcement units. ROAD ANGEL Navigator 9000 relies on up-to-date database information to identify black spots. 81 Mobile Safety Vans Operators generally publish the locations where their mobile safety camera vans will be sited 1-2 weeks in advance. An updated ROAD ANGEL Navigator 9000 has the latest mobile safety van information. Congestion Drivers must pay in advance or on the day of travel to enter the designated zone during the scheme’s hours of operation. There are substantial penalties if you do not pay the congestion charge. Primary Schools You can set up ROAD ANGEL Navigator 9000 to alert you whenever you are within 250 metres of a primary school. Unprotected Railway Crossings Alerts you to railway crossings with no barrier. Fatigue Timer Warning The Highway Code recommends a minimum break of at least 15 minutes after every two hours of driving. ROAD ANGEL Navigator 9000 alerts you whenever you have been driving for two hours without a break. 82 Alert Icons and Audio Text Safety Alert Audio Text CONGESTION ZONE Caution! Congestion zone ahead REST Caution! Rest alert SCHOOL ZONE Caution! School zone ahead BLACKSPOT AHEAD Caution! Black spot ahead RAILWAY Caution! Ungated railway crossing Icon OVERSPEED 83 Cameras Alert AVERAGE Audio Text Warning! Average speed monitoring ahead SAFETY VAN Warning! Safety camera van / Warning! Live safety camera van LASER Laser! Laser check speed FIXED CAMERA Warning! Fixed Safety Camera MOBILE Warning! Mobile camera Icon Other Alert Audio Text NEW TEXT MESSAGE Beep 84 Icon Traffic Alert Audio Text CONGESTION AHEAD Alert! Congestion ahead MAJOR EVENT AHEAD Alert! Major event ahead ALERT Alert! PROBLEM AHEAD Alert! Traffic problem ahead ACCIDENT ZONE Alert! Accident ahead ROAD WORKS AHEAD Alert! Roadworks ahead WEATHER ZONE Alert! Weather may affect road ahead Icon 85 14. Accessories Please visit the ROAD ANGEL Navigator 9000 online shop at www.roadangelgroup.com for details. Road Angel Group Ltd. has made every effort to ensure that all the information contained in this manual is accurate and reliable. However, the information is subject to change without notice. Road Angel Group Ltd assumes no responsibility for any damage or injury resulting from the use of this product. 86 15. End User License Agreement Portions of the software are copyright © 1996-2002 The FreeType Project ( www.freetype.org). All rights reserved. Please read the following agreement (“Licence”) carefully. Acceptance: Installation or use of the enclosed ROAD ANGEL GROUP LTD software (the “Software") on your computer constitutes your acceptance of these terms. If you do not agree to the terms of this Licence, you must immediately delete the Software from your computer and destroy any copies you made of the Software and of any written materials relating to the software, and promptly return the Software and, if bought as part of a package, any associated devices to your retailer for a refund. Licence: ROAD ANGEL GROUP LTD grants you, as an individual, a licence to install and use one copy of the Software on a single personal computer and a single PDA (“personal digital assistant”) at a time. Your licence to use the Software is subject to you complying with the terms of this Licence. A licence is required for each installation of the Software, unless the Software is (i) installed temporarily on a computer during the repair or maintenance of the computer and/or PDA on which the Software is normally installed and (ii) is immediately deleted from such computer/PDA as soon as those repairs or maintenance are complete. You may make one copy of the Software for backup purposes only. Copyright: United States copyright law and international treaty provisions protect the Software. You agree that no title to the intellectual property in the Software is transferred to you. You further acknowledge that title and ownership rights will remain the exclusive property of ROAD ANGEL GROUP LTD, and you will not acquire any rights to the Software except as expressly set out in this licence. You agree that any copies of the Software will contain the same proprietary notices that appear on and in the Software. Prohibited Use: Unless you have ROAD ANGEL GROUP LTD’s prior written permission, you may not (i) use, copy, modify, alter, or transfer the Software or accompanying documentation, except as expressly permitted in this Licence; (ii) translate, disassemble, decompile, or reverse engineer the Software (iii) sublicense or lease the Software or its documentation; or (iv) use the Software in a multi-user or networked environment or on a rental basis or in a time-sharing or computer service business. 87 Limited Warranty: ROAD ANGEL GROUP LTD warrants that the Software will perform substantially in accordance with the accompanying written materials for a period of 12 months from the date of purchase. Any implied warranties relating to the Software are limited to 12 months provided that limitation is permitted by applicable law. End-User Remedies: If the Software does not conform to the “Limited Warranty” above, ROAD ANGEL GROUP LTD’s entire liability and your sole and exclusive remedy will be, at ROAD ANGEL GROUP LTD’s option, either to (i) correct the error, or (ii) help you work around the error, or (iii) accept a return and issue a refund through your retailer. The Limited Warranty is void if failure of the Software has resulted from your fault, abuse, or misapplication. If we correct an error in the Software for you, then the unexpired portion of the Limited Warranty period as at the date you informed us of the error will apply to the corrected software once you have received the corrected version. NO OTHER WARRANTIES: EXCEPT AS SET OUT IN THE LIMITED WARRANTY, ROAD ANGEL GROUP LTD DOES NOT WARRANT THAT THE SOFTWARE IS ERROR FREE. ROAD ANGEL GROUP LTD DISCLAIMS ALL OTHER WARRANTIES WITH RESPECT TO THE SOFTWARE, WHETHER EXPRESS OR IMPLIED, INCLUDING BUT NOT LIMITED TO IMPLIED WARRANTIES OF MERCHANTABILITY, FITNESS FOR A PARTICULAR PURPOSE AND NON-INFRINGEMENT OF THIRD PARTY RIGHTS. Some jurisdictions do not allow the exclusion of implied warranties or limits on how long an implied warranty may last, or an exclusion of incidental damages. This means the above limitations or exclusions may not apply to you. This warranty gives you specific legal rights and you may also have other rights depending on your country. No Liability for indirect loss: In no event will ROAD ANGEL GROUP LTD be liable to you for any loss of profit, wasted time, lost business or for any incidental, or indirect loss of any kind arising out of the performance or use of the Software, even if ROAD ANGEL GROUP LTD has been advised of the possibility of such damages. Termination: Without prejudice to its other rights, ROAD ANGEL GROUP LTD may terminate this Licence if you fail to comply with these terms and conditions. In that situation, you must destroy all copies of the Software. Choice of Law: This Licence is governed by the laws of England. 88