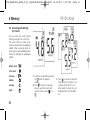
1
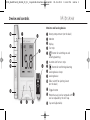
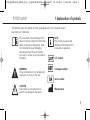
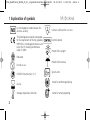
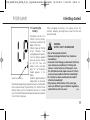
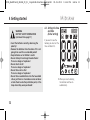
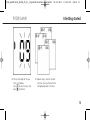
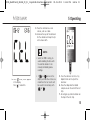
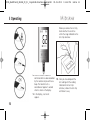
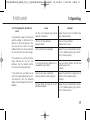
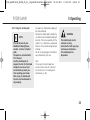
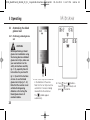
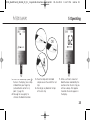
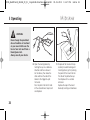
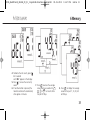
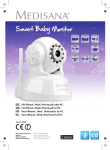
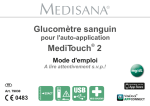
79026_MediTouch_GA/GB_09_01_12.qxd:Blutzucker-Messgerät 09.01.2012 13:43 Uhr Seite 1 Blood glucose monitor MediTouch Instruction Manual Please read carefully. Art. 79026 79026_MediTouch_GA/GB_09_01_12.qxd:Blutzucker-Messgerät 09.01.2012 13:43 Uhr Seite 2 Contents 1 Explanation of symbols ................ 1 2 Safety information ......................... 2.1 Always observe the following points .............................................. 2.2 Instructions for your health ...... 2.3 Instructions on how to use the blood glucose test strips .... 2.4 Instructions on how to use the control solution .................... 4 4 5 7 8 3 Useful information ........................ 9 3.1 Items supplied and packaging ... 9 3.2 Special features of the MEDISANA blood glucose monitor MediTouch .................... 10 4 Getting started ................................ 11 4.1 Inserting the battery ................... 11 4.2 Setting the time and date (initial settings) ................... 12 5 Operating ........................................... 14 5.1 Using the control solution ........ 14 5.1.1 Why do I need to perform a test with control solution? ... 14 5.1.2 Performing a test with control solution ...................... 14 5.1.3 Evaluating the test result ...... 17 5.2 Preparing the blood glucose test ................................................... 18 5.2.1 Using the lancing device ....... 18 5.2.2 Inserting the lancet in the lancing device .......................... 18 5.2.3 Using the AST cap .................. 21 5.2.4 Using the alcohol pads .......... 23 5.3 Determining the blood glucose level ................................................. 24 5.3.1 Performing a blood glucose test with a blood sample from the finger tip .................. 24 5.3.2 Evaluating a test result .......... 27 5.3.3 Unusual test results ................ 27 5.3.4 Comparing your test results with a laboratory result ......... 28 6 Memory .............................................. 29 6.1 Saving the test result .................. 29 6.2 Accessing and deleting test results .................................... 30 7 Miscellaneous .................................. 32 7.1 Display and troubleshooting .... 32 7.2 Cleaning and maintenance ...... 36 7.3 Technical specifications ............. 37 7.4 MEDISANA MediTouch accessories ..................................... 38 7.5 Disposal .......................................... 38 8 Warranty ............................................ 39 79026_MediTouch_GA/GB_09_01_12.qxd:Blutzucker-Messgerät 09.01.2012 13:44 Uhr Seite 3 Device and controls Monitor and lancing device Battery compartment (on the back) Monitor Display Test strip -Button for switching on and entering/selecting Insertion slot for test strips Trigger button -Button for confirming/selecting Lancing device clamp Lancing device Slider switch for ejecting lancet (on the back) Protective cap (can be removed with can be replaced by the AST cap. Cap end (adjustable) ) 79026_MediTouch_GA/GB_09_01_12.qxd:Blutzucker-Messgerät 09.01.2012 13:44 Uhr Seite 4 Device and controls Display Time (hours:minutes) Number of test result Blood glucose reading Battery symbol (low battery) Insert test strip Apply the blood sample or control solution System error Date (month:day) Front Test strip Blood sample area (absorbent slot) Reaction cell Grip/holder Insert in the direction of the arrow Contact electrode Explanation of symbols on page 3 Back 79026_MediTouch_GA/GB_09_01_12.qxd:Blutzucker-Messgerät 09.01.2012 13:44 Uhr Seite 1 1 Explanation of symbols The following signs and symbols on items, packaging and in the instruction manual bear important information: This instruction manual belongs to this device. It contains important information about starting up and operation. Read the instruction manual thoroughly. Non-observance of these instructions can result in serious injury or damage to the device. NOTE These notes give you useful additional information on the installation or operation. WARNING These warning notes must be observed to prevent any injury to the user. Catalogue number LOT number Serial number CAUTION These notes must be observed to prevent any damage to the device. Manufacturer 1 79026_MediTouch_GA/GB_09_01_12.qxd:Blutzucker-Messgerät 09.01.2012 13:44 Uhr 1 Explanation of symbols In vitro diagnostic medical device (for external use only) This blood glucose monitor corresponds to the requirements of the EU guidelines 98/79 for in vitro diagnostic devices and bears the CE marking (conformance label) CE 0483. Contains sufficient for <n> tests <n> Control solution Protect from sunlight Biohazard Protect from moisture Do not re-use CR2032 lithium battery ( 3 V ) Use by Storage temperature limitation 2 System error Button for confirming/selecting Button for entering/selecting Seite 2 79026_MediTouch_GA/GB_09_01_12.qxd:Blutzucker-Messgerät 09.01.2012 13:44 Uhr Seite 3 1 Explanation of symbols before meals (AC) after meals (PC) Morning, from 4:00 am to 10:00 am Midday, from 10:00 am to 04:00 pm Evening, from 04:00 pm to 10:00 pm Night: from 10:00 pm to 04:00 am Hypoglycemia (low glucose) 1.1 - 3.3 mmol/L (20 - 60 mg/dL) 3 79026_MediTouch_GA/GB_09_01_12.qxd:Blutzucker-Messgerät 09.01.2012 13:44 Uhr Seite 4 2 Safety Information IMPORTANT INFORMATION! RETAIN FOR FUTURE USE! Read the instruction manual carefully before using this device, especially the safety instructions, and keep the instruction manual for future use. Should you give this device to another person, it is vital that you also pass on these instructions for use. 2.1 Always observe the following points Contraindication Proper use • This system is intended for taking an adult’s blood glucose test from the finger tip, alternatively from the ball of the hand or lower arm. 4 • The system is not suitable for diagnosing diabetes for children younger than 12 years. For use on older children ask your doctor. • It is not suitable for diagnosing diabetes or for testing the blood glucose levels of newborn babies. 79026_MediTouch_GA/GB_09_01_12.qxd:Blutzucker-Messgerät 09.01.2012 13:44 Uhr Seite 5 2 Safety Information • This device measures in mmol/L. • The unit is only to be used for the specific purpose described in this instruction manual. • Any misuse will void the warranty. • Only use the accessories which have been recommended by the manufacturer (test strips, control solution) with this monitor. • This device is not designed to be used by persons (including children) with limited physical, sensory or mental abilities, or by persons with insufficient experience and/or knowledge, unless under observation by a person responsible for their safety, or unless they have been instructed in the use of the device. • Children must be supervised to ensure that they do not play with the device. • Do not operate the device in the vicinity of highfrequency transmitters, e.g. microwave and short wave transmitters. • Do not use the device if it is not working correctly, if it has been dropped or has fallen into water or has been damaged. • Protect the unit from moisture. Should moisture enter the unit, remove the battery and stop using it immediately. Contact your authorised service centre. • If a fault occurs, do not try to repair the unit yourself. Attempts to do so will void the warranty. Refer all servicing to authorized service personnel. • Always keep the monitor clean and store it in a safe place. Protect the monitor from direct sunlight to prolong its service life. • Do not store the monitor and the test strips in a vehicle, bathroom or refrigerator. • Extremely high humidity can affect the test results. A relative humidity of more than 90% can cause incorrect readings. • Store the monitor, the test strips and the lancing device out of reach of children and pets. 2.2 Instructions for your health • This blood glucose monitor is intended for actively testing a person’s blood glucose at home. The reading from a blood glucose home-test system does not replace a professional test performed in a laboratory. • The monitor is intended for external use only (in vitro). • It is not suitable for diagnosing diabetes or for testing the blood glucose of newborn babies. 5 79026_MediTouch_GA/GB_09_01_12.qxd:Blutzucker-Messgerät 09.01.2012 13:45 Uhr Seite 6 2 Safety Information • Only use fresh, capillary whole blood from the finger tips for the test. • You may only adapt the procedure for using products at home and self-monitoring, if you have first received the appropriate training to do so. • Do not change any treatments as a result of your blood glucose reading without first consulting your doctor. • Your monitor only requires one small drop of blood to perform a test. You can get this from a fingertip. Use different place for each test. Repeated lancing in the same place can lead to infection and numbness. • Test results below 3.3 mmol/L (60 mg/dL) are an indication of hypoglycemia, meaning the blood glucose level is too low. If the reading is above 13.3 mmol/L (240 mg/dL), symptoms of a high blood glucose level (hyperglycemia) can occur. Consult your doctor, if your readings are regularly above or below these levels. • If the test results display “HI” or “LO”, perform the test once again. If you obtain a “HI” = above 33.3 mmol/L (600 mg/dL) or “LO” = below 1.1 mmol/L (20 mg/dL) reading again, consult your doctor immediately and follow his instructions. • Dehydration or a lack of water (such as from sweating) can result in incorrect readings. If you think you are suffering 6 • from dehydration or a lack of water, consult your doctor immediately. • If the proportion of red blood cells (haemotocrit level) is very high (over 55 %) or very low (under 30 %), this could distort the test results. • If you have followed the instructions in this manual and symptoms persist which are not associated with your blood glucose level or your blood pressure, consult your doctor. • For additional advice on your health, read the instruction manual for the test strips carefully. WARNING Risk of infection • Used test strips and lancets are considered to be hazardous, biological non-biodegradable waste. Carelessness when disposing of these items can lead to the spread of infection. If necessary, consult your local waste disposal -> company, your doctor or pharmacist. 79026_MediTouch_GA/GB_09_01_12.qxd:Blutzucker-Messgerät 09.01.2012 13:46 Uhr Seite 7 2 Safety Information WARNING Risk of infection (continued from page 6) • Dispose of your used test strips and used lancets carefully. If you dispose of the used parts with the household rubbish, make sure you wrap them first to avoid harming or infecting other people. • Medical staff or others who use this monitor on more than one patient must be aware that all products or objects which come into contact with human blood must be dealt with as if they are capable of spreading viral diseases, even after cleaning. • Never use a lancet or the lancing device on more than one person. • Use a new sterile lancet and a new test strip for every test. • Lancets, test strips and alcohol pads are disposable. • Avoid getting hand cream, oil or dirt in or on the lancet, lancing device and test strip. 2.3 Instructions for using the blood glucose test strips • Only use these with the MediTouch monitor. • Store the test strips in their original container. • To avoid contamination, only touch the test strips with clean, dry hands. When removing the strips from the container and inserting them in the monitor, only touch them using the grip (holder). • Close the container again immediately once you have removed the test strip. This keeps the test strips dry and free of dust. • Use the test strip within three minutes of removing it from the container. • The test strip is intended to be used only once. Do not use it again. • Write the opening date on the label of the container when you open it for the first time. Observe the expiry date. The test strips can be used for approx. three months after opening the container or until the expiry date, whichever comes first. • Do not use test strips which have already exceeded the expiry date, as this can distort the test result. The expiry date is printed on the container. 7 79026_MediTouch_GA/GB_09_01_12.qxd:Blutzucker-Messgerät 09.01.2012 13:46 Uhr Seite 8 2 Safety Information • Store the test strips in a cool, dry place but not in the refrigerator. • Store the test strips between 2 °C and 30 °C (35.6 °F - 86 °F). Do not freeze the test strips. • Protect the strips from damp and direct sunlight. • Do not apply the blood sample or control solution to the test strip before you have inserted it in the monitor. • Only apply the blood sample or the control solution provided on the test strip slot. Applying any other substance will lead to an imprecise or incorrect reading. • Do not bend, cut or adjust the test strips in any way. • Keep the container with the test strips away from children. There is a risk of choking from the lid. The lid also contains desiccative substances which could be dangerous if they are inhaled or swallowed. This could also lead to skin and eye irritations. 2.4 Instructions on how to use the control solution • Only use MediTouch control solution. • Only use with the MediTouch test strips. 8 • Write the opening date on the label of the container. The control solution can be used for approx. three months after opening the container or until the expiry date, whichever comes first. • Do not use the control solution after the expiry date. • The ambient temperature for using the control solution should lie between 10 °C - 40 °C (50 °F - 104 °F). • The temperatures for storing and transporting the control solution should lie between min 2 °C and max 30 °C (35.6 °F – 86 °F). Do not store the solution in the refrigerator and do not freeze it. • Shake the bottle with the control solution well before you open it. Wipe away the first drop and use the second one to ensure a good sample for a precise test result. • To ensure the control solution does not get contaminated, wipe away the remaining solution on the tip of the container with a clean cloth before closing it again. • The control solution may stain your clothing. Rinse the soiled clothing with water and detergent. • Do not put any excess control solution back in the container. • Close the container carefully after every use. 79026_MediTouch_GA/GB_09_01_12.qxd:Blutzucker-Messgerät 09.01.2012 14:10 Uhr Seite 9 3 Useful Information Thank you very much 3.1 Items supplied and packaging Thank you for your confidence in us and congratulations! The blood glucose monitor MediTouch that you have purchased is a top quality product from MEDISANA. In order to achieve the desired effect with your MEDISANA MediTouch blood glucose monitor in the long term, we recommend that you read the following information on its use and maintenance carefully. Please check first of all that the device is complete and is not damaged in any way. In case of doubt, do not use and contact your supplier or your service centre. The following parts are included: • 1 MediTouch blood glucose monitor from MEDISANA • 1 MEDISANA lancing device • 10 MediTouch blood glucose test strips • 10 MediTouch lancets • 1 MEDISANA control solution • 5 Alcohol pads • 1 AST cap • 1 CR2032 lithium battery • 1 Storage bag • 1 Instruction manual • 1 Quick reference guide • 1 Diary for diabetics The packaging can be reused or recycled. Please dispose properly of any packaging material no longer required. If you notice any transport damage during unpacking, please contact your supplier without delay. 9 79026_MediTouch_GA/GB_09_01_12.qxd:Blutzucker-Messgerät 09.01.2012 13:46 Uhr Seite 10 3 Useful Information WARNING Please ensure that the polythene packing is kept away from the reach of children! Risk of suffocation! 3.2 Special features of the MEDISANA MediTouch blood glucose monitor Measuring your blood glucose level regularly can be a great help when dealing with your diabetes. This blood glucose monitor is designed so that you can use it easily, regularly and anywhere you choose. The lancing device can be set to the sensitivity of your skin. The diabetic diary provided helps you to recognise and record the affect of your eating habits, sport activities or medication on the test results. Always consult your doctor about your test results and treatment. 10 This monitor is intended for actively testing a person’s blood glucose at home. It is not suitable for diagnosing diabetes or for testing the blood glucose of newborn babies. Your MediTouch blood glucose monitor from MEDISANA consists of five main parts: the blood glucose monitor, the lancing device, the lancets, the test strips and the control solution. These parts are specially designed to be used together and for their quality to ensure precise test results. Only use MediTouch approved test strips, lancets and control solution for your blood glucose monitor. Precise test results can only be ensured when the monitor is used properly. Only use fresh, capillary whole blood for the test, preferably from the finger tips. The monitor measures the blood glucose level very precisely. It has an automatic memory for 360 readings with the date and time. It also calculates the average level using the blood glucose readings from the previous 7, 14, 30, 60 and 90 days. This allows you to monitor any changes and discuss them with your doctor. 79026_MediTouch_GA/GB_09_01_12.qxd:Blutzucker-Messgerät 09.01.2012 13:46 Uhr Seite 11 4 Getting started 4.1 Inserting the battery The monitor runs on a 3 V CR2032 lithium battery. One battery usually lasts for approx. 1000 tests. Different types of CR2032 lithium batteries have varying degrees of capacity. Insert the battery supplied when you use the monitor for the first time and replace it with a new one when “LP” or the battery symbol appears in the display. To do this, open the battery Symbol for low battery compartment on the back of the device by gently pressing on the panel in the direction of the arrow and insert the cell battery (3 V CR2032 lithium battery). Make sure that the positive terminal (+) is facing up. Put the lid of the battery compartment back on and push it until it clicks into place. When changing the battery, the memory retains the contents. However, you might have to reset the time and date afterwards. WARNING BATTERY SAFETY INFORMATION • Do not disassemble batteries! • Remove discharged batteries from the device immediately! • Increased risk of leakage, avoid contact with skin, eyes and mucous membranes! If battery acid comes in contact with any of these parts, rinse the affected area with copious amounts of fresh water and seek medical attention immediately! • If a battery has been swallowed seek medical attention immediately! • Only replace with batteries of the same type, never use different types of batteries together or -> used batteries with new ones! 11 79026_MediTouch_GA/GB_09_01_12.qxd:Blutzucker-Messgerät 09.01.2012 13:46 Uhr Seite 12 4 Getting started WARNING BATTERY SAFETY INFORMATION (continued from page 11) • Insert the batteries correctly, observing the polarity! • Remove the batteries from the device if it is not going to be used for an extended period! • Keep batteries out of children's reach! • Do not attempt to recharge these batteries! There is a danger of explosion! • Do not short circuit! There is a danger of explosion! • Do not throw into a fire! There is a danger of explosion! • Do not throw used batteries into the household refuse; put them in a hazardous waste container or take them to a battery collection point, at the shop where they were purchased! 12 4.2 Setting the time and date (initial setting) If you want to use the memory you must set the time and date first. 1. When you insert a battery, the monitor switches on automatically. 79026_MediTouch_GA/GB_09_01_12.qxd:Blutzucker-Messgerät 09.01.2012 13:46 Uhr Seite 13 4 Getting started 2. The last two digits of the year flash in the display. Press , to enter the year and press , to confirm. 3. Repeat step 2, to enter the date and time. The area flashes for the setting being made at the time. 13 79026_MediTouch_GA/GB_09_01_12.qxd:Blutzucker-Messgerät 09.01.2012 13:46 Uhr Seite 14 5 Operating 5.1 Using the control solution 5.1.1 Why do I need to perform a test with control solution? When you perform a test with control solution, you will find out whether your monitor and test strips work properly and deliver exact readings. You should perform a test in the following cases: • You are using the monitor for the first time. • You have a new container of test strips. • You suspect the monitor or test strips might not be working properly. • The monitor has been dropped. • You have repeated a test and the results are still lower or higher than you expected. 14 • You are practising the test procedure. 5.1.2 Performing a test with control solution. WARNING Before you perform a test with control solution, read section 2 on Safety instructions (p 4 - 9), carefully, especially items 2.3 Instructions on using the blood glucose test strips (pages 7 - 8) and 2.4 Instructions on how to use the control solution (p. 8). 1. Insert a test strip into the monitor in the direction of the arrow. The symbol appears automatically. 79026_MediTouch_GA/GB_09_01_12.qxd:Blutzucker-Messgerät 09.01.2012 13:46 Uhr Seite 15 5 Operating 3. Place the monitor on a level surface, such as a table. 4. Unscrew the cap of the container for the solution and wipe the tip with a clean cloth. NOTES • Select the “CtL” setting, to avoid recording the data with the control solution in the memory for blood glucose readings. 2. Press twice, “CtL” appears in the display. Press , to confirm. • If or remain in the display and no other entries are made then the test results will be saved in the memory with or . 5. Press the container so that a tiny droplet forms on the tip of the container. 6. Place the drop onto the blood sample area on the end of the test strip. 7. Do not get any control solution on the top of the test strip. 15 79026_MediTouch_GA/GB_09_01_12.qxd:Blutzucker-Messgerät 09.01.2012 13:46 Uhr Seite 16 5 Operating Before you remove the test strip, check whether the result lies within the range indicated on the test strips container. 8. When a sufficient amount of control solution has been absorbed by the reaction cell you will hear a beep. The monitor starts a countdown of approx. 5 seconds which is shown in the display. 9. In the display, a test result appears. 16 10. Once you have compared the test reading with the reading indicated on the test strip container, remove the test strip and throw it away. 79026_MediTouch_GA/GB_09_01_12.qxd:Blutzucker-Messgerät 09.01.2012 13:46 Uhr Seite 17 5 Operating 5.1.3 Evaluating the control test result The permissible range for the control solution reading is indicated on the label of the test strip container. Your test result must lie within the range indicated. Make sure that you compare the test result with the correct range. If the control test result lies within the range indicated on the test strip container, then the monitor and the test strips are working accurately. If the control test result does not lie within the range indicated on the test strip container, then the following options will be displayed to rectify the problem: Cause Remedy Has the test strip been lying around open for a long time? Repeat the test with a test strip that has been stored correctly. Was the test strip container properly closed? The test strips are damp. Replace the test strip. Did the monitor work properly? Repeat the test as described in section 5.1.2. If problems persist, get in touch with the service centre. Is the control solution soiled or has it exceeded the expiry date? Use new control solution to check the performance of the monitor. Were the test strips and control solution stored in a cool, dry place? Repeat the control test using strips and solution that have been stored correctly. Did you follow the steps of the test procedure properly? Repeat the test as described in section 5.1.2. If problems persist, get in touch with the service centre. 17 79026_MediTouch_GA/GB_09_01_12.qxd:Blutzucker-Messgerät 09.01.2012 13:46 Uhr Seite 18 5 Operating 5.2 Preparing a blood glucose test 5.2.1 Using the lancing device The lancing device enables you to hygienically and easily draw a drop of blood for the blood glucose test and it is quick and painless. The lancing device can be set to the sensitivity of your skin. You can adjust the tip to 5 different lancing depths. Twist the cap end in the appropriate direction until the arrow is pointing to the number for the lancing depth you want. Consult the following for the suitable lancing depth: - 1 - 2 for soft or thin skin 3 for normal skin - 4 - 5 for thick or callous skin 18 WARNING Never use a lancet or a lancing device that belongs to another person. Use a new sterile lancet for each test. Lancets are intended to be used only once. Used test strips and lancets are considered hazardous, biological non-biodegradable waste. Dispose of them taking into account that they are capable of spreading infection. Dispose of the lancets so that there is no risk of injury or infection to other people. 5.2.2 Inserting the lancets into the lancing device Before using the lancing device you need to insert a lancet. WARNING Before performing a blood glucose test and before using the lancing device, make sure you read section 2 on the safety instructions carefully (p 4 - 9), especially item 2.2 Instructions for your health (p 5 - 7) and 2.3 Instructions on how to use the blood glucose test strips (p. 7 - 8). 79026_MediTouch_GA/GB_09_01_12.qxd:Blutzucker-Messgerät 09.01.2012 13:46 Uhr Seite 19 5 Operating 1. Wash your hands with soap and warm water. Rinse and dry thoroughly. If you are out or travelling or the circumstances prevent you from washing your hands, you can also rub the area of skin you have chosen for the blood sample with a special cleansing pad. (see 5.2.4, p. 23). 2. Open the lancing device by twisting the cap in a clockwise direction and then remove it. Insert the lancet all the way into the cup without twisting it in the lancing device. 3. Twist off the protective cap of the lancet carefully, retain to aid disposal of the lancet after use. 19 79026_MediTouch_GA/GB_09_01_12.qxd:Blutzucker-Messgerät 09.01.2012 13:46 Uhr Seite 20 5 Operating Markings for lancing depths 4. Replace the cap on the lancing device and tighten by turning it in an anti-clockwise direction (not too tight). 20 5. Set the appropriate lancing depth, as described on p.18. 6. Set the lancing device by extending it until it clicks into place. If it does not click, it is probably already in position from when you inserted the lancet. The lancing device is ready to use. Do not lance your finger before the monitor and test strips are ready to use. 79026_MediTouch_GA/GB_09_01_12.qxd:Blutzucker-Messgerät 09.01.2012 13:46 Uhr Seite 21 5 Operating 5.2.3 Using the AST cap 7. Once the monitor and test strips are ready and the area of skin has been cleaned, place the lancing device on a finger tip (preferably at the side) and press the trigger button. Draw a drop of blood by gently massaging the area. Make sure that the blood droplet does not smudge and perform the test as described in 5.3.1 Performing a blood glucose test (p. 24). It is generally recommended that a blood sample for a blood glucose test performed at home is taken from the finger tip. If you are not able to take a blood sample from your finger tip, you can also take one from another part of the body (AST), such as the ball of the hand, lower arm, upper arm, thigh or calf using the lancing device. In this case, exchange the protective cap on the lancing device with the AST cap. After inserting the lancet, put the transparent AST cap on the lancing device instead of the protective cap and tighten. Note that the AST cap is not intended to be used for a blood sample from the finger tip. WARNING In the case of low glucose (hypoglycemia), the blood sample must be drawn from the finger tip, as any changes in the blood glucose level are quicker to detect from a blood sample from the finger than from any other part of the body. The readings from a finger tip blood sample and from another part of the body can lead to the readings which radically differ from one another. Therefore, always consult your doctor before you perform a blood glucose test using a blood sample from another part of the body. 21 79026_MediTouch_GA/GB_09_01_12.qxd:Blutzucker-Messgerät 09.01.2012 13:46 Uhr Seite 22 5 Operating This is how to do it: The blood sample can also be taken from: Any finger tip can be used from either hand for a blood sample. Finger tip (example) Upper arm Lower arm Thigh Ball of the hand Calf 22 1. Select a part of the body that is soft, not too densely covered with hair and not near a bone or a vein. 2. Massage the area gently to prepare the skin and to improve the circulation. 3. Hold the lancing device against the lancing spot for a few seconds and then press the trigger button. 4. Wait until a blood drop forms under the AST cap with a diameter of approx. 1.4 mm. 5. Remove the lancing device from the skin carefully and proceed in the same way as for the normal protective cap (see 5.3.1 Performing a blood glucose test, p. 24 onwards). 79026_MediTouch_GA/GB_09_01_12.qxd:Blutzucker-Messgerät 09.01.2012 13:46 Uhr Seite 23 5 Operating 5.2.4 Using the alcohol pads NOTE The starter pack of your MediTouch blood glucose monitor contains 5 alcohol pads. The pads are saturated with 75% ethanol. Use the alcohol pads to prepare the skin for the blood sample if you are out and circumstances prevent you from washing your hands. After using an alcohol pad the skin must be allowed to dry properly. Tear open the alcohol pad wrapping at the place indicated. Remove the alcohol pad and wipe the skin firmly where the blood sample will be taken. Wait a few seconds until the alcohol has completely evaporated from the skin to avoid causing incorrect readings. Do not use the pad again and throw it away immediately after use. WARNING The alcohol pads are for external use only. Avoid contact with eyes, lips and mucous membranes. The alcohol pads are disposable. Note: If necessary the alcohol pads can also be used to clean the surface of the monitor (see 7.2 Cleaning and maintenance, p. 36). 23 79026_MediTouch_GA/GB_09_01_12.qxd:Blutzucker-Messgerät 09.01.2012 13:47 Uhr Seite 24 5 Operating 5.3 Determining the blood glucose level 5.3.1 Performing a blood glucose test WARNING Before performing a blood glucose test and before using the lancing device and blood glucose test strips, make sure you read section 2 on the safety instructions carefully (p. 4 - 9), especially item 2.2 Instructions for your health (p. 5 - 5) and 2.3 Instructions on how to use the blood glucose test strips (p. 7 - 8). Note that the monitor is not suitable for diagnosing diabetes or for testing the blood glucose levels of newborn babies. 24 1. Insert a test strip into the monitor in the direction of the arrow. Note that the test strips must be used within 3 minutes of being removed from the container. The symbol appears automatically. 2. Press , to set (before a meal) or (after a meal) and press , to confirm. 79026_MediTouch_GA/GB_09_01_12.qxd:Blutzucker-Messgerät 09.01.2012 13:47 Uhr Seite 25 5 Operating 3. When the blood drop symbol flashes in the display, take a drop of blood from your finger tip (as described in section 5.2.2, point 7., page 18). 4. Massage the area gently to stimulate the blood circulation. 5. Place the drop onto the blood sample area on the end of the test strip. 6. Do not get any blood on the top of the test strip. 7. When a sufficient amount of blood has been absorbed by the reaction cell on the test strip you will hear a beep. After approx. 5 seconds the result appears in the display. 25 79026_MediTouch_GA/GB_09_01_12.qxd:Blutzucker-Messgerät 09.01.2012 13:47 Uhr Seite 26 5 Operating WARNING Never change the prescribed dose of medicine or treatment on your own initiative on the basis of one test result from a blood glucose test. Always consult your doctor. 8. Open the lancing device by twisting the cap in a clockwise direction and then remove it. Set the device, then move the slide switch on the side of the device to the trigger to eject the lancet. Press the point into the flat side of the retained lancet cap to aid safe disposal. 26 9. Dispose of the lancet with cap carefully to avoid harming and infecting others, by first pushing the point of the lancet into the flat side of the protective cap then dispose of in a suitable container. Replace the cap of the lancet device by twisting anti-clockwise. 79026_MediTouch_GA/GB_09_01_12.qxd:Blutzucker-Messgerät 09.01.2012 13:47 Uhr Seite 27 5 Operating 5.3.2 Evaluating a test result The MediTouch blood glucose test strips work based on plasma and are calibrated to easily compare with laboratory test results. The normal average blood glucose reading of an adult without diabetes is between 3.9 and 6.7 mmol/L (70 -120 mg/dL). The blood glucose level of an adult without diabetes two hours after a meal is less than 7.8 mmol/L (140 mg/dL). For those with diabetes: consult your doctor about the range of blood glucose level valid for you. 5.3.3 Unusual test results If your test result is not what you expected, proceed as follows: 1. Perform a control test, see section 5.1.2 Performing a test with control solution, p. 14. 2. Repeat the blood glucose test, see section 5.3.1 Performing a blood glucose test, p. 24. 3. If your test result is still not what you think it should be, consult your doctor immediately. NOTES • Extremely high humidity can affect the test results. A relative humidity of more than 90% can cause incorrect readings. • If the proportion of red blood cells (haemotocrit level) is very high (over 55%) or very low (under 30%), this could distort the test results. • Studies have shown that electromagnetic fields can affect the test results. Do not perform a test near any devices which emit strong electromagnetic rays, such as microwaves, mobile phones etc. 27 79026_MediTouch_GA/GB_09_01_12.qxd:Blutzucker-Messgerät 09.01.2012 13:47 Uhr Seite 28 5 Operating 5.3.4 Comparing your test results with a laboratory result The question of how you can compare the blood glucose level of the monitor with tests performed in the laboratory is frequently asked. Your blood glucose level can change quickly, especially after a meal, after taking medicine or strenuous activities. Your blood glucose is affected by various factors and has different values at different times of the day. If you would like to compare the test result of your monitor with a laboratory result, you must do the blood glucose test on an empty stomach. Therefore, it is advisable to do this in the morning. Take your monitor with you to the doctor’s and test yourself five minutes before or after a trained nurse has taken a blood sample from you. Take into account that the technology in the laboratory is different from your monitor and that blood glucose monitors for using at home generally produce slightly different results. 28 To ensure the accuracy and precision of such important information, read the instructions included with the blood glucose test strips. NOTE Make sure that you always record your test results with the date and time in your diabetes diary and label with the appropriate symbol for before a meal , after a meal morning , midday , and night . evening , 79026_MediTouch_GA/GB_09_01_12.qxd:Blutzucker-Messgerät 09.01.2012 13:47 Uhr Seite 29 6 Memory 6.1 Saving the test results Your monitor can save up to 360 test results, including the time and date. You can access the readings at any time. If the memory is full and you want to add a new test result, the oldest test result will be deleted automatically. Therefore, it is essential to enter the time and date correctly in your monitor. NOTES • The content of the memory will not be deleted if you change the battery. Just check that the time and date is still correct. You may have to reset the time and date after changing the battery. To do this read 4.2 Setting the time and date (initial setting) (p. 12 - 13). • If the memory contains 360 test results and you want to add a new test result, the oldest test result saved will be deleted. • Average values: Using the blood glucose readings from the previous 7, 14, 30, 60 and 90 days, the MediTouch monitor calculates the average value taken from the latest (360) to the first (001) test result and all those results AC (before a meal) and PC (after a meal) from the past 30 days. 29 79026_MediTouch_GA/GB_09_01_12.qxd:Blutzucker-Messgerät 09.01.2012 13:47 Uhr Seite 30 6 Memory 6.2 Accessing and deleting test results You can access test results anytime without having to insert a test strip. Test results which are under certain criteria are marked with the appropriate symbol. When accessing saved test results, you can select according to these criteria by choosing the appropriate symbol: before meals after meals morning midday evening night 30 1. Switch on the monitor by pressing the button for approx. 3 seconds. 2. Press , to access the average value of saved test results from the past 30 days under , or . 3. Press , to access all saved test results one after the other in the sequence of 360 to 001, or in other words, the latest entry will be displayed first and the oldest last. 79026_MediTouch_GA/GB_09_01_12.qxd:Blutzucker-Messgerät 09.01.2012 13:47 Uhr Seite 31 6 Memory 4. To delete the test results, press for 3 seconds and “dEL” appears in the display. 5. Press , to view the next entry saved. 6. If no other button is pressed, the monitor switches off automatically after approx. 2 minutes. 7. Press , to access the average value which was saved with , , or test results from the past 30 days. 8. Press , to display the average values of the past 7, 14, 30, 60 or 90 days. 31 79026_MediTouch_GA/GB_09_01_12.qxd:Blutzucker-Messgerät 09.01.2012 13:47 Uhr Seite 32 6 Memory / 7 Miscellaneous 7 Miscellaneous 7.1 Display and troubleshooting 9. Press , to return to the display. 10. If no other button is pressed, the monitor switches off automatically after approx. 2 minutes. 32 Display The monitor automatically checks its own system when you switch it on and shows you any irregularities in the display. To ensure that the display is working properly, switch on the monitor . Press and hold down for approx. 3 seconds so that you can see the whole display. All the display elements must be clear to see with the accompanying symbol. If this is not the case, get in touch with the service centre. A description of the symbols shown can be found at the beginning of this instruction manual. 79026_MediTouch_GA/GB_09_01_12.qxd:Blutzucker-Messgerät 09.01.2012 13:47 Uhr Seite 33 7 Miscellaneous Error display On no account should you change your medication due to a measurement, which may be incorrect. If in doubt, consult your service centre or your doctor. Cause Remedy Damp/used test strips Replace with a new test strip. Low battery Replace with a new battery. 33 79026_MediTouch_GA/GB_09_01_12.qxd:Blutzucker-Messgerät 09.01.2012 13:47 Uhr Seite 34 7 Miscellaneous System error First replace the battery. If error 001 appears again, get in touch with the service centre. 34 Test result is higher than 33.3 mmol/L. Repeat the test. If the result does not change, consult your doctor. Test result is between 3.3 and 1.1 mmol/L. The symbol H for hypoglycemia (low glucose) is shown. Consult your doctor. 79026_MediTouch_GA/GB_09_01_12.qxd:Blutzucker-Messgerät 09.01.2012 13:47 Uhr Seite 35 7 Miscellaneous Test result is lower than 1.1 mmol/L Repeat the test. If the result does not change, consult your doctor. Ht / Lt appears. Temperature is too high or too low, not within the required range of 10 °C - 40 °C (50 °F - 104 °F). The user is warned about a potentially incorrect test result if the test proceeds. Move your monitor to a place with a temperature between 10 °C and 40 °C (50 °F - 104 °F). 35 79026_MediTouch_GA/GB_09_01_12.qxd:Blutzucker-Messgerät 09.01.2012 13:47 Uhr Seite 36 7 Miscellaneous 7.2 Cleaning and maintenance Monitor Your MediTouch blood glucose monitor is a high-precision instrument. Handle with care to avoid damaging the electronics and prevent defects. You do not need any additional cleaning to maintain your monitor, provided it has not come into contact with blood or control solution. Keep the monitor free from dirt, dust, blood and water stains. Observe the following instructions: • Make sure that the monitor is switched off. • Clean the surface of the monitor with a slightly damp cloth (with water and a mild detergent). • Never use abrasive detergents or strong brushes. • Never use cleaning agents on the monitor. • Never immerse the monitor in water. Do not allow water or other liquids to penetrate the monitor. Dry the monitor with a lint-free cloth after cleaning. • You can also use one of the alcohol pads supplied for cleaning or disinfecting the surface of the monitor. Read the instructions in 5.2.4 Using the alcohol pads on p. 23. • Make sure that dirt, dust, blood, control solution, water or alcohol do not penetrate the test strip slot or get onto the buttons on the inside of the monitor. 36 • Do not expose the monitor to extreme temperatures. • Store the monitor in the zip bag provided after every use. • Do not store the monitor and the test strips in a vehicle, bathroom or refrigerator. • Remove the battery if you do not intend to use the monitor for one month or longer. Lancing device • Clean the lancing device with a slightly damp cloth (with water and a mild detergent). Do not immerse it in water or other liquids and never allow water or other liquids to penetrate the inside of the lancing device. To disinfect the protective cap, soak it in 70 % - 75 % cleaning alcohol for 10 minutes once a week after cleaning. Leave the cap to dry thoroughly after disinfecting. 79026_MediTouch_GA/GB_09_01_12.qxd:Blutzucker-Messgerät 09.01.2012 13:47 Uhr Seite 37 7 Miscellaneous 7.3 Technical specifications Name and model Measuring methods Measuring range Measuring time Memory Calibration Operating conditions Storage/transport conditions Blood sample volumes Sample material Haemotocrit value (Htc) Power supply Battery operation Automatic switch-off Dimensions (display) Dimensions (base unit) L x W x H Weight Article number EAN number MEDISANA MediTouch blood glucose monitor Electrochemical biosensor technology 1.1 - 33.3 mmol/L approx. 5 seconds 360 test results with time and date Plasma Temperature 10°C – 40°C (50°F – 104°F), maximum relative humidity 90% Temperature 2°C – 30°C (35.6°F - 86°F), maximum relative humidity 90% 0,6 ÌL Fresh blood from the finger tip, palm of the hand or arm (capillary whole blood) 30 – 55 % 1 x 3 V CR2032 lithium battery For approx. 1000 samples After approx. 2 minutes Approx. 42 x 32 mm Approx. 75 x 44 x 10 mm Approx. 40 g without battery 79026 40 15588 79026 3 In accordance with our policy of continual product improvement, we reserve the right to make technical and visual changes without notice. 37 79026_MediTouch_GA/GB_09_01_12.qxd:Blutzucker-Messgerät 09.01.2012 13:47 Uhr Seite 38 7 Miscellaneous Electromagnetic compatibility: The device complies with the EN 60601-1-2 standard for electromagnetic compatibility. Enquire at MEDISANA for details on this measurement data. 7.5 Disposal This product must not be disposed of together with domestic waste. The monitor is certified in accordance with the requirements of EU guidelines 98/79 for in vitro diagnostic devices. All users are obliged to hand in all electrical or electronic devices, regardless of whether or not they contain toxic substances, at a municipal or commercial collection point so that they can be disposed of in an environmentally acceptable manner. 7.4 MEDISANA MediTouch accessories Please remove the batteries before disposing of the device/unit. Do not dispose of old batteries with your household waste, but at a battery collection station at a recycling site or in a shop. Enquire at your local supplier or service centre. • 100 MediTouch lancets • 1 MEDISANA lancing device • 1 MEDISANA control solution • 50 MediTouch test strips 38 item item item item no. no. no. no. 79028 79002 79029 79027 Always dispose of the test strips, lancets and alcohol pads in a way that prevents injury and the spread of infection to others. Consult your local authority or your supplier for information about disposal. 79026_MediTouch_GA/GB_09_01_12.qxd:Blutzucker-Messgerät 09.01.2012 13:47 Uhr Seite 39 8 Warranty 8.1 Warranty and repair terms Please contact your supplier or the service centre in case of a claim under the warranty. If you have to return the device, please enclose a copy of your receipt and state what the defect is. The following warranty terms apply: 1. The warranty period for MEDISANA products is three years from date of purchase. In case of a warranty claim, the date of purchase has to be proven by means of the sales receipt or invoice. 2. Where defects in materials or workmanship arise we will repair or replace free of charge with in the warranty period. 3. Repairs under warranty do not extend the warranty period either for the unit or for the replacement parts. 4. The following is excluded under the warranty: a. All damage which has arisen due to improper treatment, e.g. non observance of the user instructions. b. All damage which is due to repairs or tampering by the customer or unauthorised third parties. c. Damage which has arisen during transport from the manufacturer to the consumer or during transport to the service centre. d. Accessory parts which are subject to normal wear and tear, such as battery, lancing device and disposable items etc. 5. Liability for direct or indirect consequential losses caused by the unit are excluded even if the damage to the unit is accepted as a warranty claim. MEDISANA AG Jagenbergstraße 19 · 41468 NEUSS · GERMANY E-Mail: [email protected] Internet: www.medisana.de Service: MEDISANA Healthcare UK Ltd, Emery House, Greatbridge Road, Romsey, Hampshire SO51 0AD Hotline - 0844 888 3090 Mon-Fri 8am - 9pm · Sat/Sun 9am - 8pm, except bank holidays (international 0044 844 888 3090) E-mail: [email protected] Internet: www.meditouch.co.uk 39 79026_MediTouch_GA/GB_09_01_12.qxd:Blutzucker-Messgerät 09.01.2012 13:47 Uhr Seite 40 79026_MediTouch_GA/GB_09_01_12.qxd:Blutzucker-Messgerät 09.01.2012 13:47 Uhr Seite 41 79026_MediTouch_GA/GB_09_01_12.qxd:Blutzucker-Messgerät MEDISANA AG Jagenbergstraße 19 41468 NEUSS GERMANY E-Mail: [email protected] Internet: www.medisana.de 79026 01/2012 09.01.2012 13:47 Uhr Seite 42