1
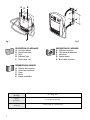
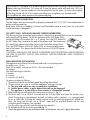
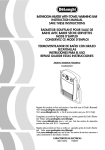
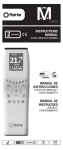
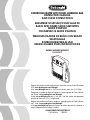
BATHROOM HEATER WITH TOWEL WARMING BAR
INSTRUCTION MANUAL
SAVE THESE INSTRUCTIONS
RADIATEUR SOUFFLANT POUR SALLE DE
BAINS AVEC BARRE SÈCHE-SERVIETTES
MODE D’EMPLOI
CONSERVEZ CE MODE D’EMPLOI
TERMOVENTILADOR DE BAÑO CON BRAZO
SECATOALLAS
INSTRUCIONES PARA EL USO
REPASE GUARDE ESTAS INSTRUCCIONES
MODEL/MODELE/MODELO
HWB5050T
Register this product on-line and receive a free trial issue of Cook's Illustrated.
Visit www.prodregister.com/delonghi.
Visit www.delonghi.com for a list of service centers near you. (U.S. Only)
Enregistrez ce produit en ligne et recevez un numéro gratuit de Cook's Illustrated. Visitez www.prodregister.com/delonghi.
Visitez www.delonghi.com pour y voir une liste des centres de réparation
proches de chez vous. (É.-U. uniquement)
Registre este producto en línea y reciba un ejemplar gratis de Cook's Illustrated. Visite www.prodregister.com/delonghi.
Visite www.delonghi.com para ver la lista de centros de servicios cercanos a
usted. (Solamente en los Estados Unidos)
CARACTERISTICAS ELECTRICAS
120V-60Hz
1500W
A
D
B
C
E
fig.1
DESCRIPTION OF APPLIANCE
A. Function selector
B. Room thermostat
C. Timer
D. Indicator light
E. Towel dryer rail
fig.2
DESCRIPTION DE L’APPAREIL
A. Sélecteur fonctions
B. Thermostat d’ambiance
C. Minuterie
D. Lampe témoin
E. Bras sèche-serviettes
DESCRIPCIÓN DEL APARATO
A. Selector de funciones
B. Termostato ambiente
C. Timer
D. Piloto
E. Brazo secatoallas
2
Voltage
Wattage
See rating label
Tension
puissance
voir plaquette données
Tension
Potencia
véase placa de características
IMPORTANT INSTRUCTIONS
When using electrical appliances, basic precautions should always be followed to reduce risk of fire, electric
shock, and injury to persons, including the following:
1. Read all instructions before using this heater.
2. If your appliance is equipped with a polythene tape used as carry handle, remove it before connecting
appliance to the outlet.
3. This heater is hot when in use. To avoid burns, do not let bare skin touch hot surfaces. Keep combustible
materials, such as furniture, pillows, bedding, papers, clothes, and curtains at least 3 feet (0,9 m) from the
front and top of the heater and keep them away from the sides and rear. When In the towel warming
function, make sure to place the towel on the raised towel bar only
4. Extreme caution is necessary when any heater is used by or near children and whenever the heater is left
operating and unattended.
5. Always unplug heater when not in use.
6. Do not operate any heater with a damaged cord or plug or after the heater malfunctions, has been
dropped or damaged in any manner. Return heater to authorized service facility for examination,
electrical or mechanical adjustment, or repair.
7. Do not use outdoors.
8. Never place heater where it may fall into a bathtub or other water container.
9 Do not run cord under carpeting. Do not cover cord with rugs, runners, or the like. Arrange cord away
from traffic area and where it will not be tripped over.
10. To disconnect heater, turn it off then unplug it.
11. Connect to properly polarized outlets only.
12. Do not insert or allow any object to enter any ventilation or exhaust opening as this may cause an electric
shock, fire, or damage the heater.
13. To prevent the risk of fire, do not block air intakes or exhaust in any manner. Do not use on soft surfaces,
like a bed, where ventilation or exhaust openings may be blocked.
14. A heater has hot, arcing or sparking parts inside. Do not use it in areas where gasoline, paint, or flammable liquids are used or stored.
15. Use this heater only as described in this manual. Any other use not recommended by the manufacturer
may cause fire, electric shock, or injury to persons.
16. To prevent overloaded fuses, be sure that no other appliance is plugged into the same outlet or into
another outlet wired into the same circuit.
17. It is normal for the heater’s plug and cord to feel warm to the touch. A plug or cord which becomes hot to
the touch or becomes distorted in shape may be a result of a worn electrical outlet. Worn outlets should
be replaced prior to further use of the heater. Plugging heater into a worn outlet may result in overheating of the power cord or may cause the risk of fire.
18. This heater is not intended for use with an extension cord. Plug the cord directly into an appropriate wall
receptable.
19. Be sure that the plug is fully inserted into an appropriate outlet. Please remember that outlets also deteriorate due to aging and continuous use: check periodically if signs of overheating or deformations are evidenced by the plug. Do not use a deteriorated outlet . CALL your electrician.
20. Check that neither the appliance nor the power cable have been damaged in any way during transportation.
21. Make sure that no pieces of polystyrene or other packaging material are left in ventilation or exhaust
openings.
22. When switching on the appliance for the first time, allow it to run at full power for at least two
hours to get rid of possible unpleasant smell. Make sure that the room in which the appliance is
placed is well ventilated during this operation. It is normal for the appliance to emit small crackling sounds when you turn it on for the first time.
23.CAUTION: to prevent electric shock match wide blade of plug to wide slot, and fully insert the
plug into the outlet.
24. Do not cover the appliance while it is functioning in order to avoid overheating and the risk of
fire.
SAVE THESE INSTRUCTIONS
3
Your product is equipped with a polarized alternating current line plug (a plug having one
blade wider than the other). This plug will fit into the power outlet only one way. This is a
safety feature. If you are unable to insert the plug fully into the outlet, try reversing the plug.
If the plug should still fail to fit, contact your electrician to replace your obsolete outlet.
Do not defeat the safety purpose of the polarized plug.
ELECTRIC POWER CONNECTION
The fan heater must be connected to a properly polarized A/C 110/120 V household outlet in
perfect working condition.
Keep loose clothing or bedding, furniture and flammable material away from the wall outlet
where the heater is plugged in.
GFI SAFETY PLUG (APPLIANCE LEAKAGE CURRENT INTERRUPTER)
This device provides protection against electric shock due to ground fault currents by automatically shutting off the power. To test the operation of the GFI Safety Plug ,
switch the heater ON at either the 1 or 2 setting. Press the TEST button on
the GFI Safety Plug located at the end of the power cord. The heater and
fan should stop operating and the Power Light should be extinguished.
Press the RESET button on the GFI Safety Plug to resume normal operation of the heater. This device should not be used as on ON/OFF operation switch.
“CAUTION: ALTHOUGH THIS DEVICE IS PROVIDED WITH PROTECTION WHICH REDUCES
THE RISK OF ELECTRIC SHOCK, THIS PRODUCT SHOULD NEVER BE USED CARELESSLY
NEAR WATER.”
WALL-MOUNTING INSTALLATION
The appliance must always be wall-mounted and in a vertical position.
Assembly time: 15 min
Tools for assembly: screwdriver PH 2 x 100 (not included)
list of parts:
The wall mounting kit includes:
1 bracket
2 x screws
2 x anchors (0. 6x30)
To mount, proceed as follows:
1. Remove the bracket on the back panel by pulling downwards.
2. Choose where you want to install the appliance, making sure that:
a. The plug and socket are easy to reach after installation.
b. Neither power cables or pipes behind the wall can be damaged.
c. The appliance is a safe distance from curtains or inflammable material.
3. Before drilling the wall, mark the exact points as shown in fig. 2.
4. For brick walls, use a 15/64" concrete drill bit. Drill the holes and insert the anchors supplied. If mounting on plasterboard, drywall, or hollow walls in general, it is recommended
to use a stud-finder to locate the nearest stud on which to mount the bracket for added stability. For these type of walls, use a 15/64" wood drill bit, and drill directly into the stud
using the specific anchors (not included)
For any other type of wall, seek the advice of a specialist.
5. Fix the bracket with the two screws provided (fig. 2).
Attach the appliance to the top and bottom hooks of the bracket, then push it gently downwards.
4
OPERATION AND USE
1. Make sure the the function selector is in the “0” position before turning the heater on.
2. Turn the appliance on by placing the thermostat (B) in the maximum position and the function selector (A) in one of the following positions: /1/2.
- Summer mode (fan only): turn the function selector (A) to the position.
- Min power operation: turn the function selector (A) to position 1. The red light comes on.
- Max power operation: turn the function selector (A) to the "2" position.
- To turn the appliance off: turn the function selector to the “0” position.
Adjusting the thermostat (B)
When the room has reached the required temperature,turn the thermostat slowly counter-clockwise until
the light turns off and no further.
The thermostat will automatically maintain the temperature set and keep it constant.
Frost prevention mode (anti-freeze setting)
With the thermostat dial at minimum
and the function selector on "2", the appliance maintains room temperature at about 41°F (5°C ), preventing freezing with minimal energy consumption.
24 HOUR TIMER (C)
To set the heating periods proceed as follows:
Check the time on your clock or watch. If it is 10.00 AM for example, turn the numbered programmer disk until the number 10 is alligned coincides with the pointer ▲ marked on the programmer. Set the periods of time during which you want the appliance to operate by pushing
the teeth towards the center. Each notch corresponds to a period of 15 min. At the end of this
procedure, red sectors corresponding to the operating periods can be seen below the notches.
- When programmed, the appliance will function automatically each day at the times set.
(Important: the heater must be plugged in for the timer to keep the correct time).
- To modify programming, return the red teeth to the initial position and set the new operating periods.
- To use the appliance without programming, push all the teeth into the centre. In this case,
to turn the appliance off completely, as well as turning off the switches, also unplug from
the mains to avoid the programmer operating uselessly.
TOWEL WARMING FUNCTION
This heater is equipped with a a towel warming bar (E) to dry towels. Lift the rail (E) up slowly
until you hear a click sound. Now you can hang towels on the bar to dry them or warm them
up.
When the appliance is not used for drying towels, lift the rail upwards as far as it will go then
move it downwards (fig. 1).
Important: Never overload the towel warming bar (E) and avoid drying delicate fabrics.
ATTENTION
A safety device switches the fan heater off if it accidentally overheats. To reset the unit for normal
operation, unplug the heater for a few minutes, and eliminate the cause of over-heating.
5
MAINTENANCE AND SERVICE
Always remove the plug from the power socket and allow the heater to cool. After the heater has
cooled, clean it with a soft damp cloth, do not use detergents or abrasives. Periodically clean the
air intake and outlet grilles during the period in which the heater is in use with a vacuum cleaner.
Should the heater not be in use over a certain length of time, store it in a dry place.
This appliance has been built to provide many years of trouble free service.
In case of malfunction, do not try to repair the heater yourself it may result in fire hazard or electric shock. Call the nearest Service Center (see attached list of Service Centers).
6
LIMITED WARRANTY
This warranty applies to all products with De’Longhi or Kenwood brand names.
What does the warranty cover?
We warrant each appliance to be free from defects in material and workmanship. Our obligation
under this warranty is limited to repair at our factory or authorized service center of any defective
parts or part thereof, other than parts damaged in transit. In the event of a products replacement or
return, the unit must be returned transportation prepaid. The repaired or new model will be returned
at the company expense.
This warranty shall apply only if the appliance is used in accordance with the factory directions,
which accompany it, and on an Alternating current ( AC ) circuit.
How long does the coverage last?
This warranty runs for one year (1) from the purchase date found on your receipt and applies only to
the original purchaser for use.
What is not covered by the warranty?
The warranty does not cover defects or damage of the appliance, which result from repairs or alterations to the appliance outside our factory or authorized service centers, nor shall it apply to any
appliance, which has been subject to abuse, misuse, negligence or accidents. Also, consequential
and incidental damage resulting from the use of this product or arising out of any breach of contract
or breach of this warranty are not recoverable under this warranty. Some states do not allow the
exclusion or limitation of incidental or consequential damage, so the above limitation may not apply
to you.
How do you get service?
If repairs become necessary, see contact information below:
U.S. Residents:
Please contact our toll free hotline at 1-800-322-3848 or log onto our website at www.delonghi.com.
For all accessories, spare parts or replacement parts, please contact our parts division at 1-800-865-6330.
Residents of Canada: Please contact our toll free hotline at 1-888-335-6644 or log onto our website
at www.delonghi.com.
Residents of Mexico: Please refer to the Limited Warranty statement for Mexico.
Please refer to the back page of the manual for De’Longhi addresses.
The above warranty is in lieu of all other express warranties and representations. All implied warranties are limited to the applicable warranty period set forth above. This limitation does not apply if you
enter into an extended warranty with De’Longhi. Some states do not allow limitations on how long an
implied warranty lasts, so the above exclusions may not apply to you. De’Longhi does not authorize
any other person or company to assume for it any liability in connection with the sale or use of its
appliance.
How does state law apply?
This warranty gives you specific legal rights, and you may also have other rights, which vary from
state to state.
7