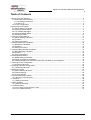
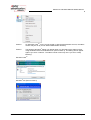
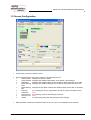
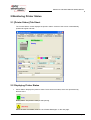
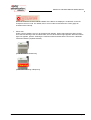
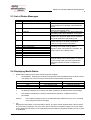
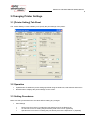
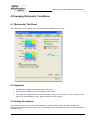
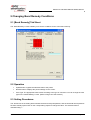
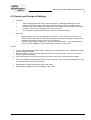
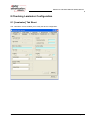
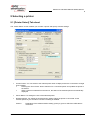
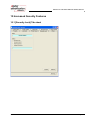
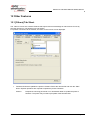
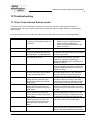
1
XID 8300 Ethernet Status Monitor Instruction Manual Rev. 1.0 – 11 2009 ® EDIsecure XID 8300 Ethernet Status Monitor ® Welcome to the EDIsecure XID 8300 Ethernet Status Monitor. This manual will help to use and understand this Software. Please note that this software runs on the following systems: ® Microsoft Windows Vista ™ 32 bit ® Microsoft Windows XP 32 bit (Service Pack 2) ® Microsoft Windows 2000 Professional 32 bit (Service Pack 4) This manual and the software described in it are copyrighted © 2009 Digital Identification Solutions Group. All rights reserved. ® ® EDIsecure and IDExpert are registered trademarks of Digital Identification Solutions AG. All other trademarks and service marks are the property of their respective owners. Illustrations used in this manual may differ slightly from the actual product. Microsoft product screen shot(s) reprinted with permission from Microsoft Corporation. This product includes software developed by the OpenSSL Project for use in the OpenSSL Toolkit. (http://www.openssl.org/) This product includes cryptographic software written by Eric Young ([email protected]). This product includes software written by Tim Hudson ([email protected]). Instruction Manual Page 2 ® EDIsecure XID 8300 Ethernet Status Monitor Table of Contents 1 Before Using this Software ............................................................................................................................... 4 1.1 What is the status monitor? ....................................................................................................................... 4 1.1.1 Operating Environment ....................................................................................................................... 4 1.1.2 How to run ........................................................................................................................................... 4 1.2 Screen Configuration ................................................................................................................................. 6 2 Monitoring Printer Status .................................................................................................................................. 7 2.1 [Printer Status] Tab Sheet ......................................................................................................................... 7 2.2 Displaying Printer Status ........................................................................................................................... 7 2.3 List of Status Messages............................................................................................................................. 9 2.4 Displaying Media Status ............................................................................................................................ 9 2.5 Selecting a Printer.................................................................................................................................... 10 3 Changing Printer Settings............................................................................................................................... 11 3.1 [Printer Setting] Tab Sheet ...................................................................................................................... 11 3.2 Operation ................................................................................................................................................. 11 3.3 Setting Procedures .................................................................................................................................. 11 4 Changing Retransfer Conditions .................................................................................................................... 13 4.1 [Retransfer] Tab Sheet............................................................................................................................. 13 4.2 Operation ................................................................................................................................................. 13 4.3 Setting Procedures .................................................................................................................................. 13 5 Changing Bend Remedy Conditions .............................................................................................................. 15 5.1 [Bend Remedy] Tab Sheet ...................................................................................................................... 15 5.2 Operation ................................................................................................................................................. 15 5.3 Setting Procedures .................................................................................................................................. 15 6 Checking Media Status................................................................................................................................... 16 6.1 [Media Setting] Tab Sheet ....................................................................................................................... 16 6.2 Display and Change of Settings .............................................................................................................. 17 6.3 Message displayed and actions to take when ink ribbon is not recognized ............................................ 18 7 Checking Printer Configuration ...................................................................................................................... 19 7.1 [Property] Tab Sheet................................................................................................................................ 19 8 Checking Laminator Configuration ................................................................................................................. 20 8.1 [Laminator] Tab Sheet ............................................................................................................................. 20 9 Selecting a printer........................................................................................................................................... 21 9.1 [Printer Select] Tab sheet ........................................................................................................................ 21 9.2 Network Settings...................................................................................................................................... 22 9.3 Security Settings ...................................................................................................................................... 22 10 Increased Security Features ........................................................................................................................ 25 10.1 [Security Lock] Tab sheet ...................................................................................................................... 25 11 Test Print ...................................................................................................................................................... 26 11.1 [Others] Tab Sheet................................................................................................................................. 26 12 Other Features ............................................................................................................................................. 27 12.1 [Others] Tab Sheet................................................................................................................................. 27 13 Troubleshooting............................................................................................................................................ 28 13.1 Error Code List and Actions to take ....................................................................................................... 28 13.2 Error of Status Monitor........................................................................................................................... 31 Instruction Manual Page 3 ® EDIsecure XID 8300 Ethernet Status Monitor 1 Before Using this Software 1.1 What is the status monitor? The status monitor is software for displaying the printer status as well as specifying various printer settings. Caution: Use the status monitor only when the power of the printer is turned on. 1.1.1 Operating Environment The status monitor runs on the following systems. OS ® TM Microsoft Windows Vista 32bit ® ® Microsoft Windows XP 32bit (Service Pack 2) ® ® Microsoft Windows 2000 Professional 32bit (Service Pack 4) Other software The printer driver needs to be installed on the host computer. You can install the printer driver using the CD-ROM supplied with the printer. User authority When the status monitor runs by a user within the administrator authority (Administrators group), enables the printer settings. The following screen is displayed when the status monitor runs by a user without administrator authority. If [OK] is clicked, the status monitor can run, but it is only displayed, without enabling the printer settings. 1.1.2 How to run The status monitor runs on the following method. 1) Runs by the shortcut of desktop. (This setting is at the installation.) 2) Runs by the start menu. (This setting is at the installation.) 3) Runs directly by installed folder of the program. TM On Windows Vista ; choose the “Run as administrator”, and the status monitor runs by a user within administrator authority. Open or double-click the icon of the status monitor, it runs by a user without administrator authority. Instruction Manual Page 4 ® EDIsecure XID 8300 Ethernet Status Monitor TM Caution: On Windows Vista ; even if a user logged on with the administrator account, the status monitor may be run by a user without administrator authority. Caution: The following Windows dialog may appear when you first start up the status monitor TM ® using Windows Vista and Windows XP (Service Pack 2). This dialog will not appear again if you set to “Unblock”. The status monitor incorrectly runs if you set to “Keep Blocking”. ® Windows Vista TM ® Windows XP (Service Pack 2) Instruction Manual Page 5 ® EDIsecure XID 8300 Ethernet Status Monitor 1.2 Screen Configuration Close button: Closes the status monitor. Screen selection tabs: Use these to switch to the following screens. Printer Status: Displays the printer’s status. Printer Setting: Displays and enables specification of the printer’s print settings. Retransfer: Displays and enables setting of the conditions during retransfer of the card. Bend Remedy: Displays and enables setting of the conditions during bend remedy of the card. Media Setting: Displays the ink ribbon’s status and enables setting of the card or retransfer film. Property: For verifying the device configuration as well as printer’s firmware version. Laminator: XXX Printer Select: For selecting a printer and setting the network. Security Lock: XXX Others: For performing test prints and specifying other settings. Minimize button: Minimizes the status monitor to an icon. The icon is displayed in the task bar. Instruction Manual Page 6 ® EDIsecure XID 8300 Ethernet Status Monitor 2 Monitoring Printer Status 2.1 [Printer Status] Tab Sheet The “Printer Status” screen displays the printer’s status. Content of the screen is automatically updated at regular intervals. 2.2 Displaying Printer Status Printer Status: Displays the printer’s status. There are three modes, which are represented by different icons. Ready status. The printer is ready to start printing. Printer is active. For details, refer to “List of Status Messages” on the next page. Instruction Manual Page 7 ® EDIsecure XID 8300 Ethernet Status Monitor Error has occurred. An error code and details of the failure are displayed. “0102D100” on the left example is the error code. For details, refer to “Error Code List and Actions to Take” (page 25 onwards of this manual). Printer icon: Under normal conditions, the icon at the bottom left appears. When 1000 cards have been printed since the last cleaning of the card feed rollers, the icon at the bottom right appears. When the bottom right icon appears, perform “Cleaning the card feed rollers and heat rollers” found in the “XID 8300 Instruction Manual” (separate booklet). [Under Normal Circumstances] [When Roller Cleaning is Required] Instruction Manual Page 8 ® EDIsecure XID 8300 Ethernet Status Monitor 2.3 List of Status Messages No. Displayed Message 1 No printer is found 2 Ready 3 Initializing 4 Offline Mode 5 Preheating 6 7 8 9 10 11 12 13 Card Loading Card Transporting MG Encoding Retransfer Contact IC Encoding No-Contact IC Encoding Printing Power Saving Description The power of the printer is not turned on, or the host computer is not properly connected to the printer. The printer is in the ready mode. The printer is ready to start printing cards. The printer is initializing. The printer switches to the Ready mode after initialization is complete. The printer is in the setting mode, or roller cleaning is in progress. When this is complete, the printer switches to the Ready mode. Preheating of the heat roller is in progress. The printer switches to the Ready mode upon reaching an appropriate temperature. The printer is issuing cards. The printer’s operating status when issuing cards is displayed. After card issuance is complete, the printer returns to the Ready mode. The printer is in the Power Saving mode, which helps to reduce power consumption. To exit the Power Saving mode, press the Reset button, followed by the Enter button to initialize the printer. 2.4 Displaying Media Status Media Status: Displays the media’s remaining space available. Card Quantity: Displays the remaining card quantity as three different levels as shown below. The display may vary according to the thickness as well as bend of the card. Card Quantity Display Enough Less None Card Thickness of 0.25 mm Approx. 70 cards or more Less than 70 cards No card Ink Quantity: Displays the remaining ink ribbon quantity in 50 different levels in percentage. Film Quantity: Displays the remaining retransfer film quantity in 10 different levels in percentage. Caution: Card Thickness of 0.76 mm Approx. 25 cards or more Less than 25 cards No card The remaining quantity shown is an estimated value. Differences may occur according to the usage as well as media type. Ink: Displays the information on the mounted ink ribbon. The print counter appears blank if the ink ribbon is not correctly recognized. You may not be able to control the ink ribbon properly in this case. Refer to the “Setting the ink ribbon” of the “XID 8300 Instruction Manual” (separate booklet) on how to check its installation. Instruction Manual Page 9 ® EDIsecure XID 8300 Ethernet Status Monitor Film: Displays the type of retransfer film mounted. Print Counter: Displays the number of cards that have been issued. Press the “Clear” button to reset the print counter to 0. 2.5 Selecting a Printer Printer Selection: You can switch to the relevant printer when multiple printers are connected to a single host computer. Pressing the “Update” button searches for a connected printer and updates the printer in the list box. When a printer is selected from the list box, the status of the selected printer is automatically displayed. Document Info: Displays the owner and document names when printing is enabled through a network connection. Instruction Manual Page 10 ® EDIsecure XID 8300 Ethernet Status Monitor 3 Changing Printer Settings 3.1 [Printer Setting] Tab Sheet The “Printer Setting” screen enables you to specify the print settings of the printer. 3.2 Operation Update button: Enables the printer settings specified using the slide bars, radio buttons and list box. Refresh button: Displays the printer settings on the screen. 3.3 Setting Procedures Make sure that you take down the set values before making any changes. Print Settings Resin K Ink Print Level: For setting the print density level of the Resin K ink. UV Ink Print Level: For setting the print density level of the UV ink. (Optional) Special Ink 2 Print Level: For setting the print density level of the Special Ink 2. (Optional) Instruction Manual Page 11 ® EDIsecure XID 8300 Ethernet Status Monitor MG Unit Number of Retry: For specifying the maximum number of retries when writing/reading of the magnetic stripe fails. The default value is 1. ISO Mode: For specifying the coercivity with respect to the ISO magnetic stripe. The default setting is “Hi-Co”. Encoder Unit Resin K Ink Print Mode: For setting the print quality using the Resin K ink. Selecting “Fine” enhances the printing quality, but slows down the printing speed. MG Print (JIS): For specifying the way to peel the retransfer film of cards that come with a JIS magnetic stripe when the JIS MG unit is mounted. The default setting is “Disable”. Standby Mode: For specifying the card standby position while waiting for the laminator to switch to the Ready mode during double-sided printing when the laminator is connected. The default setting is “Front Wait”. Cooling Time: For specifying the standby time in units of seconds before peeling the retransfer film from the card after retransfer is complete. The default value is 0. Contact IC Encoder: For specifying the contact position of the contact IC encoder. The default setting is “None”. Non-contact IC Encoder: For specifying the antenna position of the non-contact IC encoder. The default setting is “None”. Others Buzzer: For enabling/disabling the alert sound when error occurs or when the card quantity is running low, as well as the sound upon pressing the Enter key in the user mode. The buzzer does not sound if you disable this feature. The default setting is “Enable”. Power Saving Interval: Enables switching to the Power Save mode to reduce power consumption when printing or operation is not performed over a specified time interval. Select whether to disable the Power Save mode or the time interval before switching to the Power Save mode. Selecting “Disable” deactivates the Power Save mode. The default setting is “Disable”. HR Control: Switches to the standby mode by lowering the temperature of the retransfer heat roller when printing is not performed for 30 minutes or longer. The default setting is “Enable”. Instruction Manual Page 12 ® EDIsecure XID 8300 Ethernet Status Monitor 4 Changing Retransfer Conditions 4.1 [Retransfer] Tab Sheet The “Retransfer” screen enables you to set the retransfer conditions on the card. 4.2 Operation Update button: Applies the selected value to the printer. Refresh button: Displays the printer settings on the screen. Card Type: The appropriate value varies according to the type of card used. You can change the card type on the “Media Setting” screen. (Refer to Page 16 of this manual.) 4.3 Setting Procedures The vertical axis shown in the setting area indicates the retransfer temperature, and the horizontal axis represents the retransfer speed. Click on the corresponding square to change the value. The selected value is indicated using “*”. Instruction Manual Page 13 ® EDIsecure XID 8300 Ethernet Status Monitor Setting a value toward the top right end increases the transfer force; however heat deformation of the card will also be greater. The colors below serve as a rough indicator for selection. Color Green Light Blue Yellow Blue Red Description Standard value. Optimal value for the selected card. Select this under normal circumstances. Appropriate range. Recommended range when selecting a value other than the standard value. Card bends increases. Retransfer defect may occur. Do not choose these values. Caution 1. The setting areas serve only as a rough indicator. The optimal value varies according to the card type as well as the environment in which the printer is used. As such, set the values after trying out under the environment where it is to be used. It may take a while for printing to start when the retransfer temperature is changed. 2. There is only one standard retransfer temperature. Altering the retransfer temperature on one side changes the temperature on the other side as well. 3. The range of optimal values varies according to the “Card Type”. You can change the card type in the “Media Setting” screen. 4. If the card type varies across printers, set the card type to use accordingly. The color of the setting area varies according to the card type in use. Instruction Manual Page 14 ® EDIsecure XID 8300 Ethernet Status Monitor 5 Changing Bend Remedy Conditions 5.1 [Bend Remedy] Tab Sheet The “Bend Remedy” screen enables you to set the conditions for the card’s bend remedy. 5.2 Operation Update button: Applies the selected value to the printer. Refresh button: Displays the printer settings on the screen. Card Type: The appropriate value varies according to the type of card used. You can change the card type on the “Media Setting” screen. (Refer to Page 16 of this manual.) 5.3 Setting Procedures The vertical axis in the setting area indicates the bend remedy temperature, and the horizontal axis represents the bend remedy speed. Click on the corresponding square to change the value. The selected value is indicated using “*”. Instruction Manual Page 15 ® EDIsecure XID 8300 Ethernet Status Monitor Setting a value toward the top right end increases the bend remedy force, however impact of heat on the card will also be greater. Parts for which the bend remedy force is similar is indicated using the same color in the setting area. To disable bend remedy, select the “Disable” radio button. The default setting is “Disable”. Caution 1. The setting areas serve only as a rough indicator. The optimal value varies according to the card type as well as the environment in which the printer is used. As such, set the values after trying out under the environment where it is to be used. 2. Bend remedy is effective when printing on only one side. Performing double-sided printing with a high bend remedy temperature may cause the card to deform significantly. As such, select the “Disable” button during double-sided printing. 3. When the “Disable” radio button is turned on, the printer switches to and remains in the preheating mode (for approximately 10 minutes) until the bendy remedy roller’s temperature has gone down. This is not a malfunction. Wait for the printer to switch to the Ready mode. 4. When bend remedy is disabled using the “Disable” button, the speed is automatically set to the maximum value (+2). 5. If the bend remedy force becomes strong, the surface of remedy side will become lusterless. 6 Checking Media Status 6.1 [Media Setting] Tab Sheet The “Media Setting” screen enables you to display the ink ribbon’s status and specify the card or retransfer film settings. Instruction Manual Page 16 ® EDIsecure XID 8300 Ethernet Status Monitor 6.2 Display and Change of Settings Ink Status Name: Displays the name of the mounted ink ribbon. A message indicating the cause appears when the ink ribbon cannot be recognized. (Refer to Page 18 of this manual.) Number of Ink Sets: Displays the specification of the number of screens which is mounted ink ribbon. This is not an indication of the current ink level. Ink Lot Number: Displays the lot number of the mounted the ink ribbon. Card Type: Material: Select one of the card materials from “PET-G”, “PVC”, and “PET (0.25 mm)”. An optimal value for the retransfer speed and temperature settings is displayed according to the selected card. (Refer to Pages 13 and 15 of this manual.) Thickness: Select either “Standard” or “Thin” for the card thickness. If the card thickness is 0.76 mm, select “Standard”. If the card thickness is 0.25 mm, select “Thin”. Caution 1. To use cards of different thickness, refer to “Switching the card thickness” of the “XID 8300 Instruction Manual” (separate booklet). 2. When thin cards are used for double-sided printing, errors such as card jam may occur. Use them only for single-sided printing. 3. If the card material to use varies according to the printer, specify the card material accordingly. Film Type: Displays the specifications of the number of screens which is mounted retransfer film. This is not an indication of the current film level. Update button: Applies the selected value to the printer. Refresh button: Displays the printer settings on the screen. Instruction Manual Page 17 ® EDIsecure XID 8300 Ethernet Status Monitor 6.3 Message displayed and actions to take when ink ribbon is not recognized When the ink ribbon cannot be recognized, the cause for this problem is indicated in the “Name” field under “Ink Status”. Message (252:Invalid TAG Data) (253:Defective TAG) (254:No TAG) (255:Defective R/W) Instruction Manual Cause and Action to Take During Ink Recognition Error The TAG record data adhered to the ink ribbon is incorrect. Replace the ink ribbon and try again. Unable to establish communication with the TAG adhered to the ink ribbon. Replace the ink ribbon and try again. Unable to read the TAG adhered to the ink ribbon. Check to ensure that the ink ribbon is correctly set. Printer TAG reader error. The printer needs to be repaired. Page 18 ® EDIsecure XID 8300 Ethernet Status Monitor 7 Checking Printer Configuration 7.1 [Property] Tab Sheet The “Property” screen enables you to verify the device configuration as well as the printer’s firmware version. Version: Displays the firmware version of the printer as well as peripheral devices. When optional devices, such as the MG unit, external IC unit, and laminator, are not connected, this is indicated as “????”. Optional Unit Configuration: Displays the configuration of optional devices. Caution: When a value other than ”None” is shown in the contact IC encoder or non-contact IC encoder field, this means the configuration allows mounting of an IC encoder, and does not indicate that an IC encoder is mounted. Consult our authorized dealers on how to install the IC encoder. Others: Displays the printer’s status. Printer Print Counter: Displays the accumulated number of cards issued by the printer. Thermal Head Counter: Displays the number of print ink panels for the thermal head. For example, when printing on a single side using all YMCK inks, 4 are added to each card. Instruction Manual Page 19 ® EDIsecure XID 8300 Ethernet Status Monitor 8 Checking Laminator Configuration 8.1 [Laminator] Tab Sheet The “Laminator” screen enables you to verify the device configuration. Instruction Manual Page 20 ® EDIsecure XID 8300 Ethernet Status Monitor 9 Selecting a printer 9.1 [Printer Select] Tab sheet The “Printer Select” screen enables you to select a printer and specify network settings. Current Printer: You can switch to the relevant printer when multiple printers are connected to a single host computer. Pressing the “Scan Printer” button searches for a connected printer and updates the printer in the list box. When a printer is selected from the list box, the status of the selected printer is automatically displayed. Printer Name: For setting the name of the selected printer. Default Interface: For setting the interface during startup. When the printer is connected via the network (Ethernet), the set value is shown but setting is disabled. Caution: Instruction Manual Regardless of the default interface setting, priority is given to USB if the USB cable is connected. Page 21 ® EDIsecure XID 8300 Ethernet Status Monitor 9.2 Network Settings Caution 1. Determine the “Network Setting” items according to the instructions of the network administrator for the location where the printer unit is installed. 2. Other network devices may be affected if the “Network Setting” is incorrect. 3. When only USB connection is used, there is no need to specify the “Network Setting”. 4. To apply the “Network Setting” to the printer unit without connecting via USB, do so using the operation panel on the printer. Network Setting: For specifying items related to the network (Ethernet). When the printer is connected via the network, the set values are shown but setting is disabled. When “Obtain and IP Address Automatically” is selected, the IP address, subnet mask, and default gateway values are automatically acquired from the DHCP server. If the DHCP server is not found, settings in the “Use the following IP Address” will apply. Note 1. The IP address, subnet mask, and default gateway values that are automatically acquired from the DHCP server are not shown. 2. The IP address, subnet mask, and default gateway values may change regularly according to the DHCP server settings. To use a static IP address such as for the printer driver’s application software, it is recommended that you select “Use the following IP Address”. When “Use the following IP Address” is selected, specify the “IP Address”, “Subnet Mask”, and “Default Gateway” fields accordingly. Use “Session Timeout” to specify the timer interval before disconnecting when communication is not established after print connection. The default setting is “None”. The printer’s MAC address is shown in the “MAC Address” field. 9.3 Security Settings Caution 1. Determine the “Security Setting” items according to the instructions of the network administrator for the location where the printer unit is installed. 2. Encrypted communication cannot be established if the “Security Setting” is incorrect. 3. When only USB connection is used, there is no need to specify the “Security Settings”. Encrypted communication is not possible with USB connection. 4. It is not possible to apply the “Security Setting” to the printer without connecting via USB. 5. Refer to the “Installation Manual” for procedures to create the download file to be used for the “Security Setting”. Manage the download file according to the instructions of the network administrator. Security Setting: For specifying items related to IPSec of the network (Ethernet). When the printer is connected via the network, the set values are shown but setting is disabled. When “IP Sec Disable” is selected, only communication that does not make use of IP Sec is enabled. The default setting is “IP Sec Disable”. When “IP Sec Enable” is selected, communication that makes use of IP Sec is enabled. Upon completing the setting using the “Details” button, the “Pre-shared Key” or “Printer Certificate” selection is enabled. Instruction Manual Page 22 ® EDIsecure XID 8300 Ethernet Status Monitor Note 1. The “Details” button is enabled when “IP Sec Enable” is selected. 2. You cannot make a selection by pressing the “Pre-shared Key” or “Printer Certificate” button. Refer to the table below on whether encrypted communication using IP Sec is allowed. Printer Setting “IP Sec Disable” “IP Sec Enable” (When authentication fails) “IP Sec Enable” (When authentication is successful) Security Required PC’s IP Sec Policy Request for Security Not Protected Communication Disabled Communication Disabled Encrypted Communication Normal Communication Normal Communication Encrypted Communication Normal Communication Normal Communication Normal Communication Pressing the “Details” button displays the “IP Sec Setting” screen, and enables you to send the download file required for IP Sec authentication to the printer. The “pre-shared key file” is required for “pre-shared key authentication”. The “printer certificate file” and the “certification authority certificate” are required for “printer certificate authentication”. Instruction Manual Page 23 ® EDIsecure XID 8300 Ethernet Status Monitor Enter the password for the printer certificate file. After setting of the necessary files is complete, click on the “Close” button on the “IP Sec Setting” screen to close the screen. Doing so ends the IP Sec setting for the printer. Press the “Sync Time” button to send the current time of the PC to the printer. Setting can be performed via a USB or network connection. Update button: Applies the selected value to the printer. Refresh button: Displays the printer settings on the screen. Instruction Manual Page 24 ® EDIsecure XID 8300 Ethernet Status Monitor 10 Increased Security Features 10.1 [Security Lock] Tab sheet Instruction Manual Page 25 ® EDIsecure XID 8300 Ethernet Status Monitor 11 Test Print 11.1 [Others] Tab Sheet The “Others” screen enables you to perform test print for the printer. Test print uses the printer’s selfdiagnosis function without making use of the printer driver. You can use it to verify whether the printer is functioning correctly. For printers connected via the network, the items on this screen are not displayed. Select “Single Side” or “Both Sides” under test print, followed by pressing the “Print” button to start test print. Doing so executes printing on a card using the built-in test pattern of the printer. Instruction Manual Page 26 ® EDIsecure XID 8300 Ethernet Status Monitor 12 Other Features 12.1 [Others] Tab Sheet The “Others” screen also contains features that require technical knowledge as well as those for use by technical personnel. The following is a brief outline. For printers connected via the network, the items on this screen are not displayed. Firmware Download: Updates the printer’s firmware. Select the relevant file and click the “Start” button. Special operations are required to update the printer’s firmware. Caution: Instruction Manual Request the servicing personnel or our authorized dealer to update the printer’s firmware. The printer may not start up if update of the firmware fails. Page 27 ® EDIsecure XID 8300 Ethernet Status Monitor 13 Troubleshooting 13.1 Error Code List and Actions to take Connection may not be recognized if the power of the printer is turned on while the status monitor is operating. When this occurs, switch off the printer’s power and switch on again, followed by restarting the status monitor. For actions requiring servicing calls, turn off the power of the printer and consult our authorized dealer. Error Code 0102D000 0102D100 0102D600 Displayed Message No Printer is found. Please confirm the printer is connected correctly, or it is powered. There is no card. Please supply cards. Printer door is opened. Please close the door and initialize the printer by pressing RESET and ENTER button. Ink Ribbon Cassette or Retransfer Film Cassette is not set. 0102D700 Cleaning Unit is not set. 01039000 Feed Jam happens. Please unset the card tray and remove the card after turning off the printer power. 01039100 Card Jam happens in the printer. Please open the printer door and remove the card after turning off the printer power. Card Jam happens in the printer. Please open the printer door and remove the card after turning off the printer power. Card Jam happens in the printer. Please open the printer door and remove the card after turning off the printer power. Card Jam happens in the printer. Please open the printer door and remove the card around the card outlet after turning off the printer power. Retransfer Film is broken. 01039200 01039300 01039400 0103A000 Instruction Manual Actions Check to ensure that the connection between the host computer and the printer is properly established. Check to ensure that the power of the printer is turned on. Replenish cards into the card tray. Close the printer door followed by pressing the RESET and ENTER buttons in sequence to initialize the printer. Install the ink ribbon cassette or retransfer film cassette. After installing, close the printer door, followed by pressing the RESET and ENTER buttons in sequence to initialize the printer. Install the cleaning unit. After installing, close the card tray, followed by pressing the RESET and ENTER buttons in sequence to initialize the printer. Turn off the power, and refer to “Removing card jams (Hopper jam)” in the “XID 8300 Instruction Manual” (separate booklet) on procedures to remove the jammed card. Turn off the power, and refer to “Removing card jams (Turnover section)” in the “XID 8300 Instruction Manual” (separate booklet) on procedures to remove the jammed card. Press the RESET and ENTER buttons in sequence to initialize the printer. If the card is not ejected, turn off the power and remove the card. Turn off the power, and refer to “Removing card jams (Retransfer section)” in the “XID 8300 Instruction Manual” (separate booklet) on procedures to remove the jammed card. Turn off the power, open the printer door and remove the card at the card outlet. Refer to “Mending broken ink ribbon and retransfer film” in the “XID 8300 Instruction Manual” (separate booklet) on procedures to Page 28 ® EDIsecure XID 8300 Ethernet Status Monitor Error Code Displayed Message 0103A100 Mark on Retransfer Film could not be detected. Please set Retransfer Film correctly. 0103B000 Ink Ribbon is broken. 0103B100 Ink Ribbon cannot be controlled. Please set Ink Ribbon correctly. 0103BB00 Card Jam happens in External IC unit. Please remove the card in External IC unit. 01044400 0104D800 0104FA00 0104A900 Hardware failure happens in the printer unit. Please turn off and on the printer power to initialize the printer. MG encoder is not set correctly. Please turn off the printer power and set MG unit correctly. Mechanical failure happens in the MG encoder. Please turn off and on the printer power to initialize the printer. Hardware failure happens in the MG encoder. Please turn off and on the printer power to initialize the printer. Communication error happens between printer and MG encoder. Please turn off and on the printer power to initialize the printer. External IC unit is not set correctly. Please turn off the printer power and set External IC unit correctly. Dip switch setting in the external IC unit is not correct. Please turn off the printer power and correct Dip switch setting in External IC unit. Communication error happens between printer and External IC unit. Please turn off the printer power and connect communication cable correctly. Communication error happens between printer and laminator. Please turn off the printer power and connect communication cable correctly. Hardware failure happens in the turnover unit. Please turn off and on the printer power to initialize the printer. Hardware failure of Heater Cam happens. Please turn off and on the printer power to initialize the printer. The temperature of Retransfer Roller is too hot. Please turn off the 0104AB00 0104AC00 0104AF00 0104B900 0104BA00 0104BE00 0104BF00 0104C000 0104C100 0104F000 Instruction Manual Actions restore the retransfer film. Install the retransfer film correctly. After installing, close the printer door, followed by pressing the RESET and ENTER buttons in sequence to initialize the printer. Refer to “Mending broken ink ribbon and retransfer film” in the “XID 8300 Instruction Manual” (separate booklet) on procedures to restore the ink ribbon. Install the ink ribbon correctly. After installing, close the printer door, followed by pressing the RESET and ENTER buttons in sequence to initialize the printer. Press the RESET and ENTER buttons in sequence to initialize the printer. If the card is not ejected, turn off the power and remove the card. Turn off the power of the printer and turn on again. Call for servicing if this problem recurs. Turn off the power of the printer and turn on again. Call for servicing if this problem recurs. Turn off the power of the printer and turn on again. Call for servicing if this problem recurs. Turn off the power of the printer and turn on again. Call for servicing if this problem recurs. Turn off the power of the printer and turn on again. Call for servicing if this problem recurs. Turn off the power of the printer and turn on again. Call for servicing if this problem recurs. Turn off the power of the printer and turn on again. Call for servicing if this problem recurs. Turn off the power of the printer. Unplug the cable connecting the external IC unit to the printer, and plug in again. Turn off the power of the printer. Unplug the cable connecting the laminator to the printer, and plug in again. Call for servicing if this problem recurs. Turn off the power of the printer and turn on again. Call for servicing if this problem recurs. Turn off the power of the printer and turn on again. Call for servicing if this problem recurs. Turn off the power of the printer. Turn on again after the temperature of the retransfer Page 29 ® EDIsecure XID 8300 Ethernet Status Monitor Error Code 0104F100 0104F200 0104F300 0104F400 0104F500 0104F600 Displayed Message printer power till it becomes cool enough. Hardware failure of Retransfer Roller happens. Please turn off and on the printer power to initialize the printer. Hardware failure of Retransfer Roller Thermistor happens. Please turn off and on the printer power to initialize the printer. The temperature of Bend Remedial Roller is too hot. Please turn off the printer power till it becomes cool enough. Hardware failure of Bend Remedial Roller happens. Please turn off and on the printer power to initialize the printer. Bend Remedial Roller thermistor is out of order. Please turn off and on the printer power to initialize the printer. The temperature in the printer is too cool. Please turn off the printer power till it becomes warm enough. 0104F800 The temperature of Thermal Head is too hot. Please turn off the printer power till it becomes cool enough. 0105FB00 Download data to the printer is invalid. Please confirm the file is correct. End of Retransfer Film; please replace the film with a new one. 0142A200 0142B200 Instruction Manual End of Ink Ribbon; please replace the ink ribbon with a new one. Actions roller has gone down. Call for servicing if this problem recurs. Turn off the power of the printer and turn on again. Call for servicing if this problem recurs. Turn off the power of the printer and turn on again. Call for servicing if this problem recurs. Turn off the power of the printer. Turn on again after the temperature of the bend remedy roller has gone down. Turn off the power of the printer and turn on again. Call for servicing if this problem recurs. Turn off the power of the printer and turn on again. Call for servicing if this problem recurs. Turn off the power of the printer. Turn on again after allowing the surrounding temperature of the printer to rise. Call for servicing if this problem recurs. Turn off the power of the printer. Turn on again after the temperature of the thermal head has gone down. Call for servicing if this problem recurs. Check to ensure that the downloaded file is correct. Replace the retransfer film. After doing so, close the printer door, followed by pressing the RESET and ENTER buttons in sequence to initialize the printer. Replace the ink ribbon. After doing so, close the printer door, followed by pressing the RESET and ENTER buttons in sequence to initialize the printer. Page 30 ® EDIsecure XID 8300 Ethernet Status Monitor 13.2 Error of Status Monitor TM The following error occurred when the status monitor is started up on Windows Vista . Cause: The status monitor cannot run because it is an unidentified program by Windows TM Vista . Action: Choose the “Run as administrator”, and the status monitor runs by a user within administrator authority. After that, this error does not occur because it becomes TM identified program by Windows Vista . Instruction Manual Page 31 Digital Identification Solutions AG Teckstrasse 52 73734 Esslingen Germany Phone: + 49 711 341 689 - 0 Fax: + 49 711 341 689 - 550 Email: [email protected] Digital Identification Solutions Pte. Ltd. #03-01 Hiangkie Industrial Building IV 27 Woodlands Industrial Park E1 Singapore 757718 Phone: + 65 6352 8364 Fax: + 65 6352 8365 Email: [email protected] Digital Identification Solutions (Beijing) Co. Ltd. Lonsdale Center C207, No. 5 Wanhong Road Chaoyang District, Beijing, 1 00015 P.R. China Phone: + 86 10 6437 4376 Fax: + 86 10 6433 1278 Email: [email protected] Digital Identification Solutions LLC 111 Kiowa Lane Piedmont, SC 29673 United States of America Phone: + 1 864 272 1199 Fax: + 1 770 234 5798 Email: [email protected] Digital Identification Solutions (Branch) Unit E-20, Dubai Airport Free Zone P.O. Box 5 46 68 Dubai, United Arab Emirates Phone: + 971 4 299 4146 Fax: + 971 4 299 4147 Email: [email protected] Digital Identification Solutions S. de R.L. de C.V. Parque Industrial Benito Juárez Acceso II, No. 5, Bodega No. 1 Querétaro, Qro, C.P. 76130 México Phone: + 52 442 2171 768 - 0 Fax: + 52 442 2171 768 - 10 Email: [email protected] vps ID Systems GmbH Carl-Zeiss-Strasse 2 76275 Ettlingen Germany Phone: + 49 7243 5488 - 0 Fax: + 49 7243 5488 - 11 Email: [email protected] www.digital-identification.com Copyright 2009 Digital Identification Solutions Group. All rights reserved. Information in this document is subject to change without prior notice. IDExpert® and EDIsecure® are registered trademarks of Digital Identification Solutions AG. All other trademarks, tradenames, service names are trademarks or registered trademarks of their respective owners.