1
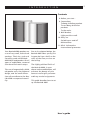
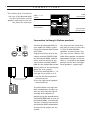
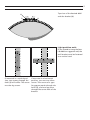
B E O L A B
4 0 0 0
2
CAUTION: To reduce the risk
of electric shock, do not
remove cover (or back).
No User-serviceable parts
inside. Refer servicing to
qualified service personnel.
WARNING: To prevent fire or electric
shock, do not expose this appliance to
rain or moisture.
This symbol indicates that a
dangerous voltage constituting a risk of electric shock is
present within this unit.
This symbol indicates that
there are important operating
and maintenance instructions
in the literature
accompanying this unit.
For the US-market only!
NOTE: This equipment has been tested and
found to comply with the limits for a class B
digital device, pursuant to part 15 of the FCC
Rules. These limits are designed to provide
reasonable protection against harmful interference in a residential installation.
This equipment generates, uses and can
radiate radio frequency energy and, if not installed and used in accordance with the
instructions, may cause harmful interference
to radio communications. However, there is
no guarantee that interference will not occur
in a particular installation. If this equipment
does cause harmful interference to radio or
television reception, which can be determined
by turning the equipment off and on, the
user is encouraged to try to correct the interference by one or more of the following
measures:
– Reorient or relocate the receiving antenna.
– Increase the separation between the equipment and receiver.
– Connect the equipment into an outlet on a
circuit different from that to which the
receiver is connected.
– Consult the dealer or an experienced radio/
TV technician for help.
3
I N T R O D U C T I O N
Contents
4 Before you start…
6 Connections
To Bang & Olufsen products
To non-Bang & Olufsen
products
To the mains
8 Wall bracket
Light partition walls
10 Daily use
Switching on and off
Maintenance
11 Miscl. information
International guarantee
Your BeoLab 4000 speakers are
a set of very small, active loudspeakers. Their size, style and
versatility make the BeoLab
4000 ideal loudspeakers for all
types of audio/video, surround
sound and link room setups.
The use of magnetically shielded speaker units, the sculptural
design, and the small dimensions all contribute to the BeoLab 4000 unsurpassed versatility.
Due to its sculptural design, the
BeoLab 4000 takes up very little space, be it on a shelf, on the
wall, on the floor, or even on
the ceiling.
The highly polished finish of
the BeoLab 4000, in your
chosen colour combination, will
enhance the beauty of your
home as well as give you extraordinary musical enjoyments.
This guide describes how to set
up the BeoLab 4000.
User’s guide
4
B E F O R E
The BeoLab 4000 is designed
to accomodate many placement alternatives and takes up
very little space. In fact, it can
be placed in a position which
suits its surroundings and your
preferred listening position.
The BeoLab 4000 can, of course,
be used in connection with your
audio system. The speaker units
are magnetically shielded and
you can safely connect a pair of
speakers to your video system
without affecting the picture
quality (you may even connect
a pair of speakers to your computer system and benefit from
their exceptionally good sound
handling capabilities). The BeoLab 4000 may also be used in a
surround sound system.
The BeoLab 4000s are extremely suitable for use in a link
room.
Y O U
S T A R T …
On the following two pages we
have listed a few things which
should be considered before
setting up the BeoLab 4000:
n Do not connect any units in
your system to the mains, until
after you have made the other
connections (as described on
page 6 and 7).
n For safety reasons, the mains
cord must be secured as explained on page 7.
n The BeoLab 4000 is designed
for use in dry environments only, and for use within a temperature range of 10 – 40° C
(50 – 105° F).
n When the BeoLab 4000 is
placed standing in an upright
position (or in the Base type
2037 – optional accessory) make
sure that the power switch is
at the base (i.e. the speaker will
be more stable because its
centre of gravity will be low).
n In order not to impede ventilation alway leave at least
1 cm (½") above the BeoLab
4000.
n To support the weight of the
BeoLab 4000 always use the
correct size and type of screws
and wall plugs (depending on
the material and the construction of the wall).
If in doubt, consult your Bang
& Olufsen dealer.
n Light partition walls are often constructed of gypsum
panels – known as drywall or
wall board – secured to vertical
studs. Gypsum is not a satisfactory material to support the
weight of the BeoLab 4000!
You may, however, hang your
BeoLab 4000 on a gypsum wall,
but be sure to use the correct
size and type of screws.
n Remember that all speakers
in a setup need a connection to
a mains outlet, and they are
designed to be left on at all
times.
n When you are placing the
speakers try to ‘aim the front
cloth’ towards your preferred
listening position.
5
BANG & OLUFSEN
The BeoLab 4000 on a level surface, e.g. a
shelf or a table.
To protect both your furniture and the BeoLab
4000 from being scratched, we recommend
that you attach the enclosed rubber pads to
the bottom plate of the BeoLab 4000 (as indicated on the following illustration).
BANG & OLUFSEN
The BeoLab 4000 fastened to a wall in a vertical position (using the standard wall bracket).
The bracket can also be used to fasten the BeoLab 4000 in a horizontal position, on a wall or
to the ceiling.
The BeoLab 4000 placed in a horizontal position
on a level surface, e.g. the floor (using the
optional stand).
6
C O N N E C T I O N S
The socket panel is located on
the rear of the BeoLab 4000.
Use this illustration and the
graphics imprinted on the socket panel for reference.
LINE
connection
LINE • L • R
switch
Power Link
connections
Connection
to the mains
Connection to Bang & Olufsen products
LINE
L
R
POWER
1
2
LINK
Connect the BeoLab 4000 to
your audio (or video) system
using the enclosed 8-pin Power
Link cable.
Plug one end into one of the
sockets marked POWER LINK
on the BeoLab 4000, and the
other end into either of the
two sockets marked POWER
LINK on the audio/video system
(please refer to the setting-up
guide for that system).
The switch marked LINE • L • R
must be set to either L or R:
L for the left-hand speaker/
sound channel
R for the right-hand speaker/
sound channel
To avoid cables running from
both loudspeakers to your system you may loop the signal
through from speaker to
speaker using the second socket
marked POWER LINK on one of
the BeoLab 4000, as illustrated.
You can, of course, also connect
one BeoLab 4000 loudspeaker
to each of the sockets on the
system.
You may connect more than
one pair (as many as ten pairs,
in fact) of BeoLab 4000
speakers to your system. You
just have to run a Power Link
cable from speaker to speaker.
Remember though, to set the
LINE • L • R switch to the proper
position for the left- and righthand speakers, respectively.
7
Connection to non-Bang & Olufsen products
The phono socket marked LINE
must be used instead of the
Power Link sockets if the BeoLab 4000 is to be connected to
a non-Bang & Olufsen product
(using e.g. a cable, part no.
6270595). The signal must be
on a regulated low-voltage
level.
Connect one speaker to each
of the sound channels.
The switch marked LINE • L • R
must in this case be set to LINE.
LINE
L
R
POWER
1
2
LINK
Connection to the mains
Connect the enclosed mains
cord socket marked ~ on the
BeoLab 4000, but do not connect it to the wall socket yet.
For safety reasons fasten the
mains lead behind the small
peg, before running it out from
the socket compartment.
8
W A L L
The wall bracket consists of two
main parts. The bracket (A)
must be secured to the wall,
and the bracket (B) to the rear
grille of the BeoLab 4000.
The lock can be released by inserting e.g. a small screwdriver
through the hole (C).
1 Separate the two parts (A
and B) – if necessary, loosen
the two screws (D).
2 Fasten the bracket (B), in the
preferred position, to the
BeoLab 4000.
Tighten the two screws (D)
securely!
3 Hold up the BeoLab 4000
against the wall in your selected position and mark up
the outline of the bracket (B).
Use the bracket (A) as a template to drill the holes (E).
4 Fasten the bracket (A) to the
wall through the holes (E),
and hang up the BeoLab
4000 by inserting the four
hooks into the appropriate
holes.
The lock will engage and thus
secure the two parts.
B R A C K E T
A
B
D
E
C
E
D
The placement of the bracket
on the rear of the BeoLab 4000
determines the angle between
the speaker and the wall.
9
Top-view of the BeoLab 4000
and the bracket (B).
B
D
D
Light partition walls
If you intend to hang the BeoLab 4000 on a gypsum wall, the
wall bracket must be fastened
to a vertical stud.
If mounted in a vertical position, two screws through the
holes (E) will suffice. The screws
must be lag screws.
If mounted in a horizontal
position, you must use three
screws. Two screws of a type
for gypsum panels through the
holes (E), and one lag screw
through the centre hole of the
bracket.
10
D A I L Y
U S E
Switching on and off
Power switch
and indicator
When you have finished setting
up your BeoLab 4000, connect
your entire Bang & Olufsen system to the mains.
Turn on the power switch on
each of your BeoLab 4000. The
stand-by indicator (in the
power switch button) lights up
in red, indicating that the
speaker is on stand-by, ready to
be used.
The BeoLab 4000 speakers are
designed to be left in this
stand-by mode when not in use.
When you switch on your audio
system (or video system), the
BeoLab 4000 loudspeakers
switch on simultaneously. The
red stand-by light turns green,
indicating that the speakers are
switched on.
When you switch off your system, or mute the sound, the
red light appears immediately,
indicating that the BeoLab 4000
speakers are not in use.
If the BeoLab 4000 speakers are
connected to a non-Bang &
Olufsen system – via the phono
socket (LINE) – they switch on
when a signal is received from
the system. They switch off a
few minutes after the signal
has disappeared.
Maintenance
Clean the surfaces of the BeoLab 4000 using a soft, lint-free
cloth which you have wrung
firmly in a solution of lukewarm
water containing a few drops
of mild household cleaner, for
example a dish washing detergent.
The cooling fins on the rear
may be cleaned using a soft
brush or a vacuum cleaner. The
front cloth may be cleaned with
a vacuum cleaner set to the
lowest level.
Note: Never use alcohol or
other solvents to clean any part
of your BeoLab 4000!
M I S C L .
International Guarantee
This Bang & Olufsen product
carries a guarantee against
defects in workmanship and
materials. The terms of the
guarantee apply to the country
of purchase but will be met by
authorized Bang & Olufsen
dealers in other countries. The
guarantee period applying to
the country of purchase takes
priority over guarantee periods
applying in other countries,
even where differences exist.
In order to obtain service under
this guarantee, a certificate
stating the following information is required:
– Name of product and type
number
– Serial number
– Date of purchase
– Guarantee period
– Dealer's or supplier's
signature
If you intend to use the product
in a country other than that in
which it was bought, it may be
necessary for you to have the
product modified to suit the
transmission system, or mains
supply etc., used in the country
you are moving to. We therefore recommend that you
contact your Bang & Olufsen
dealer before moving to
another country. No costs incurred in this connection will
be covered under the terms of
the guarantee.
I N F O R M A T I O N
Environmental information
This Bang & Olufsen product
was delivered in a packing
made to protect and transport
the product safely from the
factory to your home.
In the design of our packing we
use the most conserving and
recyclable materials known today, and we constantly work
to reduce any negative side
effects our packing materials
may have on the environment.
We observe any progress with
great interest.
Corrugated cardboard Made
of at least 45 % recycled
material. The printing ink
contains no heavy metals,
and the box is reusable for
paper production.
Foamed plastic parts Made
without use of injurious inert
gasses. Can be recycled or
incinerated, liberating carbon dioxide and water.
Usable for soil improvement
in granular form.
Plastic bags All plastic parts are
free of PVC and can be recycled or incinerated, liberating carbon dioxide and
water.
Batteries We urge you to show
consideration when changing
the batteries in your remote
control terminal. Used-up
batteries should be disposed
of and kept separately.
This product fulfils the conditions stated in the EEU directives 89/336 and 73/23.
11
3506220
0996
Printed in Denmark by
Bogtrykkergården a-s, Struer