1
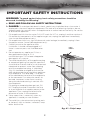
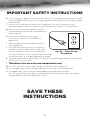
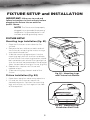
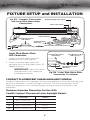
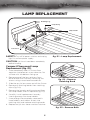
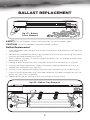
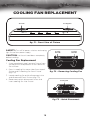
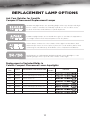
Owner’s
Manual
Compact
Fluorescent
Lunar Aqualight
Aquarium
Light Fixture
Featuring: Directional
Lunar Blue LEDs
IMPORTANT SAFETY INSTRUCTIONS
WARNING: To guard against injury, basic safety precautions should be
observed, including the following:
a. READ AND FOLLOW ALL SAFETY INSTRUCTIONS.
b. DANGER: To avoid possible electric shock, special care should be taken since water is
employed in the use of aquarium equipment. For each of the following situations, do not
attempt repairs by yourself; return the appliance to an authorized service facility for service
or discard the appliance:
1. If the appliance falls into the water, DO NOT reach for it! First, unplug it and then retrieve it.
If the electrical components of the appliance get wet, unplug the appliance immediately.
(non-immersible equipment only)
2. If the appliance shows any signs of abnormal water leakage, immediately unplug it from the power source. (immersible equipment only)
3. Carefully examine the appliance after
installation. It should not be plugged in if
there is water on parts not intended to be
wet.
Light
Fixture
4. Do not operate any appliance if it has a
damaged cord or plug, or if it is
malfunctioning or if it has been dropped or
damaged in any manner.
5. To avoid the possibility of the appliance plug
or receptacle getting wet, position aquarium
stand and tank to one side of a wall-mounted
receptacle to prevent water from dripping
onto the receptacle or plug. A "drip loop" (fig. A1) should be arranged by the user for
each cord connecting an aquarium appliance
to a receptacle. The "drip loop" is that part of the cord below the level of the receptacle,
or the connector if an extension cord is to be used, to prevent water from traveling
along the cord and coming in contact with
the receptacle.
Power
Supply Cord
If the plug or receptacle does get wet, DO
NOT unplug the cord. Disconnect the fuse or circuit breaker that supplies power to the
appliance. Then, unplug and examine for
presence of water in the receptacle.
c. Close supervision is necessary when any
DRIP LOOP
appliance is used by or near children.
d. To avoid injury, do not contact moving parts
or hot parts such as heaters, reflectors, lamp
bulbs and the like.
fig. A1 - Drip Loop
2
IMPORTANT SAFETY INSTRUCTIONS
e. Always unplug an appliance from an outlet when not in use, before putting on or taking off
parts and before cleaning. Never yank cord to pull plug from outlet. Grasp the plug and pull
to disconnect.
f.
Do not use an appliance for other than intended use. The use of attachments not
recommended or sold by the appliance manufacturer may cause an unsafe condition.
g. Do not install or store the appliance where it
will be exposed to weather or to temperatures
below freezing.
h. Make sure an appliance mounted on an aquarium is securely installed before operating it.
i.
Read and observe all the important notices on the appliance.
j.
If an extension cord is necessary, a cord with a proper rating should be used. A cord rated
for less amperes or watts than the appliance
rating may overheat. Care should be taken to arrange
the cord so that it will not be tripped over or pulled.
fig. A2 - Three-Prong
Receptacle
k. To prevent corrosion or deterioration of materials that could lead to electric shock, do not
allow contact with saltwater.
l. This fixture is for use over covered aquariums only.
m.DO NOT install this fixture inside a canopy or enclosure covering the unit.
n. Use included mounting legs to place Aqualight fixture over a covered aquarium.
o. For added safety, the fixture must be plugged into a receptacle controlled by a GFI (ground fault interrupter) circuit breaker. Device must be properly connected to a grounded three-prong receptacle. (fig. A2)
SAVE THESE
INSTRUCTIONS
3
TABLE OF CONTENTS
Important Safety Instructions
2-3
Table of Contents
4
Fixture Setup and Installation
5-6
Grounding and Operation
7
Lamp Replacement
8
Ballast Replacement
9
Cooling Fan Replacement
10
Replacement Lamp Options
11
Warranty Information
12
4
FIXTURE SETUP and INSTALLATION
IMPORTANT: Make sure to read and
follow instructions in their entirety before
plugging the fixture into an outlet or
power source.
NOTE: The fixture must be properly plugged into a grounded three-prong receptacle. If a grounded outlet is not available, provide grounding means.
FIXTURE SETUP
Mounting Legs Installation (fig. B1)
1. Place the fixture on a non-abrasive flat
surface.
2. Remove the lens retainer on both ends of
the fixture by removing the screws using a
crosshead screwdriver.
3. Slide the mounting leg brackets into the
mounting leg tracks on the front and back
of the fixture. One mounting bracket should
be inserted on each end of the Aqualight so
that the vertical cornered end of the bracket
faces the outside of the light fixture. (fig. B2)
Aqualight
Fixture
Mounting
Leg Track
Lens Retainer
Mounting
Leg
Clear
Aquarium
Cover
Aquarium
4. Replace lens retainers on fixture and replace screws.
5. Slide mounting legs to each end of the
fixture.
fig. B1 - Mounting Legs
and Fixture Installation
Fixture Installation (fig. B2)
1. Place clear aquarium cover onto aquarium.
2. Lift and set the fixture on top of the
covered aquarium. Position the mounting
legs so that they lay flush against the side of the aquarium.
Slide
Slide
fig. B2 - Mounting Legs
Installation Side View
5
FIXTURE SETUP and INSTALLATION
fig. B3 - Compact Fluorescent
and Lunar Blue-Moon-Glow
Connections
10,000K Daylight Lamp Switch
Actinic Lamp Switch
Actinic Lamp Plug
Lunar Blue-Moon-Glow
LED Adaptor
10,000K Daylight
Lamp Plug
Lunar Blue-Moon-Glow LED Connector
Lunar Blue-Moon-Glow
LED Connector
Lunar Blue-Moon-Glow
LED Adaptor
Lunar Blue-Moon-Glow
LED Connector
1. Locate Lunar Blue-Moon-Glow LED
connector from fixture. (fig. B3)
2. Attach Lunar Blue-Moon-Glow LED
connector to Lunar Blue-Moon-Glow LED
adaptor. (fig. B4)
Lunar Blue-Moon-Glow
LED Switch
IMPORTANT:
Make sure that the lamp connector is fully seated into the adaptor connector.
fig. B4 - Lunar Blue-Moon-Glow
Connection To Adaptor
COMPACT FLUORESCENT LUNAR AQUALIGHT MODELS
Compact Fluorescent Lunar Aqualight fixtures are available for marine, reef and freshwater
aquariums and come in a variety of lengths and sizes. The fixture should span the full
length of the aquarium with the mounting legs resting on each of the aquarium side end panels.
Maximum Aquarium Dimensions For Use With
Coralife Compact Fluorescent Lunar Aqualight Models:
SIZE
LUNAR AQUALIGHT FIXTURE
DIMENSIONS
MAXIMUM AQUARIUM
LENGTHS
24"
24"L x 7.5"W x 3"H
24.25" L
30"
30.25"L x 9.25"W x 3"H
31.25" L
36"
36"L x 7.5"W x 3"H
37.25" L
48"
48.25"L x 9.25"W x 3"H
49.25" L
6
GROUNDING and OPERATION
GROUNDING
Grounding Setup
This appliance should be grounded to minimize
the possibility of electric shock. This appliance
is equipped with an electric cord with an
equipment grounding conductor and a
grounding-type plug. The plug must be
plugged into an appropriately grounded outlet.
This appliance is for use on a nominal 120-volt
circuit and has a grounding plug that looks like
the plug illustrated below.
Two-Pole Receptacle
Temporary
Adaptor
Rigid Ear
(Grounding Means)
fig. C1 - Temporary Adaptor
Ground Outlet
Two-Pole Receptacle
Grounded
Plug
Temporary
Adaptor
Screw
Grounding Pin
A temporary adaptor may be used to connect
this plug to a two-pole receptacle if a
grounded outlet is not available (fig. C1)
The temporary adaptor should be used only
until a grounded outlet can be installed by a
qualified electrician.
Rigid Ear
(Grounding Means)
fig. C2 - Temporary Adaptor
Installation
Grounding Installation
The green-colored rigid ear (screw and the
like) extending from the adaptor must be
fastened to a permanent ground, such as a
ground outlet box. (fig. C2)
Grounded
Plug
1. Plug temporary adaptor into two-pole
outlet. (fig. C3)
Ground Outlet
Box Cover
2. Insert screw through rigid ear on temporary
adaptor and into grounded outlet box.
START-UP OPERATION
fig. C3 - Grounded Plug
Connection
SAFETY: Make sure fixture with mounting legs is securely positioned on the covered aquarium.
NOTE: Make sure that all switches are in the off position before plugging into a power source.
1. Plug into grounded outlet or power source and turn switches to the on position.
2. Verify that all lamps are lit and functioning properly.
7
LAMP REPLACEMENT
Mounting Leg
Lamp Prong
Lamp Holder
Lens Cover
SAFETY: Turn off all power switches and unplug
fig. D1 - Lamp Replacement
light fixture from power supply.
CAUTION: Let the unit cool down completely
before handling.
Compact Fluorescent Lamp
Replacement (fig. D1)
1. Once completely cool, lift fixture from
aquarium and place on a non-abrasive, flat
surface with the bottom facing up.
2. Remove one of the lens retainers from
either end of the fixture by removing the
screws using a crosshead screwdriver.
fig. D2 - Remove
Retaining Band
3. Slide the acrylic lens cover out of the fixture.
4. Remove all retaining bands from retaining
clips. (fig. D2)
5. Remove the lamp by pulling outward from
the lamp holder, then lift upward. (fig. D3)
6. Carefully install replacement lamp by
inserting prongs into lamp holders.
7. Once prongs are completey recessed in
lamp holders, push down to lock into
retaining clips and replace retaining bands.
8. Replace acrylic lens cover and lens retainer.
fig. D3 - Remove Bulb
8
BALLAST REPLACEMENT
fig. E1 - Ballast
Cover Removal
SAFETY: Turn off all power switches and unplug light fixture from power supply.
CAUTION: Let the unit cool down completely before handling.
Ballast Replacement
1. Once completely cool, remove fixture from the aquarium and place on a non-abrasive,
flat surface.
2. Remove the vented ballast cover from the back of the fixture by removing the screws
using a crosshead screwdriver. (fig. E1)
3. Press in ballast tray tabs, lift slightly and pull out ballast tray far enough to reach quick
disconnects. (fig. E2)
4. Unplug all quick-disconnect wires from both ballasts. Pull out ballast tray. (fig. E2)
5. Using a crosshead screwdriver, remove the screws holding the ballast you wish to
replace from the ballast tray. (fig. E2)
6. Carefully install replacement ballast and the screws connecting it to the ballast tray.
7. Plug in all quick-disconnect wires and slide the ballast tray back into position until the
ballast tray tabs "click" into place.
8. Replace ballast cover and the screws that connect it to the fixture. fig. E2 - Ballast Tray Removal
SLIDE
OUT
PRESS
IN
PRESS
IN
SLIDE
OUT
9
COOLING FAN REPLACEMENT
Air Vent
Cooling Fan
fig. F1 - Front View of Fixture
light fixture from power supply.
before handling.
Cooling
Fan Tab
PRESS
IN
CAUTION: Let the unit cool down completely
Cooling
Fan Tab
PRESS
IN
SAFETY: Turn off all power switches and unplug
Cooling Fan Replacement
1. Once completely cool, remove fixture from
the aquarium and place on a non-abrasive,
flat surface.
2. Press in cooling fan cover tabs from top of
fixture and lift cooling fan from fixture. (fig. F2)
fig. F2 - Removing Cooling Fan
3. Locate cooling fan quick-disconnect wire
and disconnect from fixture (fig. F3)
4. Reconnect quick-disconnect wires and
insert cooling fan into fixture.
Cooling Fan
LIFT
UP
LIFT
UP
DISCONNECT
fig. F3 - Quick Disconnect
10
REPLACEMENT LAMP OPTIONS
Ask Your Retailer for Coralife
Compact Fluorescent Replacement Lamps
10,000K
daylight
6,700K
10,000K Daylight lamps cast sparkling bright white rays and provide high
lumen output to simulate the mid-day tropical sun. An excellent choice for both freshwater and saltwater tropical aquariums.
daylight
6,700K Daylight lamps cast a natural white glow to simulate the appearance
of sunlight. Ideal for freshwater aquariums with live plants.
ACTINIC
Actinic lamps emulate the softer shades of blue light found at dawn, dusk
and in deeper water. Promotes photosynthesis in corals and live plants while
enhancing the natural beauty and vibrant colors of aquarium inhabitants.
bluelight
50/50
50/50 lamps are half 10,000K daylight and half Actinic Bluelight to cast
sparkling bright white rays and softer shades of blue light.
Replacement of Included Bulbs In
Coralife Compact Fluorescent Lunar Aqualights:
FIXTURE
SIZE
ITEM #
REPLACEMENT LAMP DESCRIPTION
NO. OF
LAMPS
24"
05477
10K 65 Watt CF
1
24"
05496
Actinic Bluelight 65 Watt CF
1
30"
05477
10K 65 Watt CF
1
30"
05496
Actinic Bluelight 65 Watt CF
1
36"
05476
10K 96 Watt CF
1
36"
05495
Actinic Bluelight 96 Watt CF
1
48"
05477
10K 65 Watt CF
2
48"
05496
Actinic Bluelight 65 Watt CF
2
11
PIN BASE
LIMITED WARRANTY *
Coralife warrants that this product shall be free from defective electrical components due to defects in
materials or workmanship for a period of twelve months from the date of purchase. If a defect is shown,
Coralife will, at Coralife’s sole discretion, either repair or replace the product without charge. No cash
refunds will be made. This warranty is provided solely to the original consumer purchaser of the product
and may not be transferred or assigned.
This warranty does not apply to damage resulting from accident, misuse, abuse, lack of reasonable care,
failure to follow safety and installation instructions, use of the product with non-standard electrical service,
or any other defect not resulting from defects in the electrical components of the product or defects in
materials or workmanship. This warranty will not be effective unless and until the Coralife product is shown
to have been used in accordance with the safety and installation instructions accompanying the product,
including the requirement that the product be used over a covered aquarium. THIS CONSTITUTES CORALIFE’S ENTIRE WARRANTY AND CORALIFE MAKES NO OTHER
WARRANTIES, WHETHER EXPRESS OR IMPLIED, WITH RESPECT TO THE PRODUCT. CORALIFE
SPECIFICALLY DISCLAIMS ANY AND ALL IMPLIED WARRANTIES, INCLUDING, WITHOUT LIMITATION,
WARRANTIES OF MERCHANTABILITY AND FITNESS FOR A PARTICULAR PURPOSE. IF CORALIFE
CANNOT LAWFULLY DISCLAIM IMPLIED WARRANTIES UNDER THIS LIMITED WARRANTY, ALL SUCH
WARRANTIES, INCLUDING WARRANTIES OF MERCHANTABILITY AND FITNESS FOR A PARTICULAR
PURPOSE ARE LIMITED IN DURATION TO THE DURATION OF THIS WARRANTY.
CORALIFE IS NOT RESPONSIBLE FOR DIRECT, SPECIAL, INCIDENTAL OR CONSEQUENTIAL DAMAGES
RESULTING FROM ANY BREACH OF WARRANTY OR CONDITION, OR UNDER ANY OTHER LEGAL
THEORY. CORALIFE EXPRESSLY DISCLAIMS ALL ALLEGED DAMAGES FOR LOSS OF AQUATIC LIFE,
PERSONAL INJURY, AND/OR PROPERTY DAMAGE. Some states and provinces do not allow the exclusion
or limitation of incidental or consequential damages or exclusions or limitations on the duration of implied
warranties or conditions, so the above limitations or exclusions may not apply to you. This warranty gives
you specific legal rights, and you may also have other rights that vary by state or province.
Coralife shall not have any obligations under this warranty unless the owner notifies Coralife in writing of any alleged defect(s) within 30 days of discovery of the defect(s). Any notice to Coralife must be
delivered by United States or electronic mail to one of the following addresses: U.S. Mail:
Central Aquatics - Coralife
5401 West Oakwood Park Drive
Franklin, Wisconsin 53132
Electronic Mail:
[email protected]
Coralife shall be allowed a reasonable period of time to investigate any warranty claim and to perform any
testing Coralife deems necessary to determine the cause of the defect. This warranty shall be interpreted
under the laws of the state of Wisconsin.
For additional information regarding this limited warranty, please contact us at the addresses above, or call us at 888-255-4527. *Lamps are not included in this warranty.
Coralife®
A product of Central Aquatics™
(Division of Central Garden & Pet Co.)
Franklin, WI 53132
888.255.4527
Coralife® is a registered trademark of Central Garden & Pet Co.
©2010 Central Garden & Pet Co.
12