1
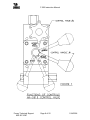
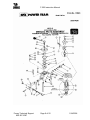
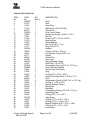
INSTRUCTION MANUAL
F-502
COMPRESSION TESTING MACHINE
MN-F-502
Contents
Page Number
Warranty
Installation Procedure
4
Accessories Installation
5
Sequence Of Operation
6
Functions Of The Control Valve
7
Control Valve Operation Sketch
8
Control Valve Schematics
9-10
Control Valve Repair Parts List
11
SPX Power Team Pump
12
SPX Power Team Pump Operation
13
Preventive Maintenance
14
Preventive Maintenance
15
Forney Authorized Service Representatives
16-22
Warranty, Service and Return Policy
F-502 Series Testing Machines
Statement of Warranty
Subject to the terms and conditions as stated herein, Forney Inc. warrants all F-502 Series
testing machines to be free from defects in material, and factory workmanship, for a period of
twenty-four (24) months from the date of shipment from Hermitage, Pennsylvania.
Terms and Conditions of Warranty
A. If within 24 months from the date of shipment from the Forney factory, the F-502 Series
tester malfunctions, is noted defective or not complying with the stated A.S.T.M.
specification, you must contact the Forney service department for disposition under
warranty. Forney Inc. will repair, replace, or credit, (at Forney option and expense), all items
found defective while under warranty. Items not manufactured by Forney, will carry the
vendor warranty extended by the vendor to Forney Inc. Some items in this category include:
digital equipment, pressure transducers, hydraulic pumps & valves, and computer printers.
B. Items not covered under warranty are those considered to be maintainable such as: O-rings
and back-up rings, fittings, hoses, filters, etc.
C. The warranty does not cover expenses, either direct or indirect, that may arise from the use
or inability to use these products. Liability for financial losses, injury or damage caused to
persons or property, are the sole responsibility of the purchaser. The warranty does not
cover the second owner in the event of resale. The warranty does not cover on-site
calibration or transportation costs due to replacement or repair of warranted items.
D. The warranty is void if defects result from misuse, negligent handling, improper installation,
or accidental damage caused by fire, water, or an act of God.
E. Forney Inc. reserves the right to make improvements in materials and design on products
without notice and without obligation to incorporate the same improvements on previously
manufactured products.
F. To qualify for warranty, all repairs or modifications must be authorized by Forney Inc. All
serial numbers must be intact and unaltered
.
Freight Carrier Damage
Claims for equipment damaged in transit must be returned to the freight carrier by the receiver.
Visible damage must be reported immediately or shipment rejected. Concealed damage must
be reported within fifteen (15) days from receipt of shipment, in accordance with the freight
carrier’s regulations.
Serial Number: ____________________
Date: _______________________
F-502 Instruction Manual
Installation Procedure
1. Before uncrating, inspect to see that no visual damage has occurred during
shipment. If damage has occurred, notify the delivering carrier immediately.
2. Locate the packing list and carefully uncrate and remove. Check parts and units
against the packing list to make sure the shipment is complete.
3. It is recommended that the machine be located in an area where the atmosphere is
free from acidic or contaminating fumes, which could possibly accelerate corrosion
to, machined surfaces or electrical contacts.
4. Machines equipped with electronic load monitors should be located in a heated lab
type environment where humidity or condensation is not a problem.
5. A dedicated electric outlet is strongly recommended to help insure that proper
electric is provided to the unit.
6. An inline surge suppressor (TA-1235-55) should be installed to protect against
power surges and lightning strikes.
7. The machine should be positioned allowing sufficient space at the side and rear for
calibration, servicing, and working space.
8. The machine should be accurately leveled.
9. Clean off the machine surfaces that have been coated with rust preventative using
any suitable non-corrosive safety solvent. Wipe machined surfaces with a clean,
oiled cloth to minimize rusting.
10. If the oil reservoir has been drained for shipment, fill with Dexron III Automatic
Transmission Fluid.
Forney Technical Support
800-367-6397
Page 4 of 22
1/24/2006
F-502 Instruction Manual
ACCESSORIES (METHOD OF INSTALLATION)
F- 502F Series Machine Accessories:
All accessories for this machine are held in place by a draw rod (Part # TM-3300-16).
Spacers can be used when changing from one size specimen to another to close down
the daylight opening between the top of the specimen, and the bottom of the accessory.
Accessory Installation
1. Stack the testing accessory and spacer (or spacers) on the machine work platen.
2. Slide the draw rod through the center hole in the top of the machine and then
through the spacer (or spacers) that will be used with the testing accessory.
3. Thread the draw rod into the testing accessory by turning the T-Nut at the top of the
draw rod clockwise, and securing it tightly into the accessory.
4. Turn the hand wheel clockwise while holding the T-Nut at the top of the draw rod
firmly. Continue turning the hand wheel until the testing accessory and spacers are
drawn up tightly to the top block of the frame.
Safety Features (F-502 Models)
1. An adjustable relief valve on the pump protects the testing machine from becoming
overloaded.
2. A limit switch has been installed and will shut off the power to the electric motor &
pump assembly if the piston should be extended beyond the 2 ½” travel limit.
3. Fragment guards are standard equipment and have been installed to protect the
operator from flying debris.
Calibration after Installation
Forney Testing Machines are factory-calibrated in accordance with applicable
specifications. During the calibration procedure, all accuracy adjustments are made,
along with setting the safety devices. Even though the testing machine is completely
factory calibrated and serviced, ASTM requires a second calibration or verification of the
machine after delivery and setup, to insure the highest degree of accuracy possible.
Calibration & Service
Forney Inc. offers complete on-site calibration & service that is coordinated through our
Authorized Regional Service Representatives. (See Pages 16-22)
Replacement Parts
When ordering parts, refer to the applicable model and serial number of your testing
machine. This information can be found on the data tag attached to your machine.
Forney Technical Support
800-367-6397
Page 5 of 22
1/24/2006
F-502 Instruction Manual
Sequence of Operation
Testers Equipped with Control Valve, HA-0619
1. Motor switched off, carefully center specimen in testing machine.
2. Turn Control Knob No. 2 clockwise to a snug position.
3. Position Valve Control Handle No. 1 to the “Metered Advance” position.
4. Turn on the electric pump.
5. If a fast preload is desired, position Valve Control Handle No. 1 to “Full Advance”.
6. Watch the load monitor closely and when the desired preload has been attained,
move Valve Control Handle No. 1 to the “metered” position.
7. To increase the rate of loading, turn Control Knob No 2 counterclockwise.
8. To decrease the rate of loading, turn Control Knob No. 2 clockwise.
9. To hold pressure at any desired point, position Valve Control Handle No. 1 to the
“Hold” position.
10. To release pressure so that the platen will return after a test has been completed,
position Valve Control Handle No. 1 to the “Retract” position.
Forney Technical Support
800-367-6397
Page 6 of 22
1/24/2006
F-502 Instruction Manual
FUNCTIONS OF THE HA-0619 CONTROL VALVE
(REFER TO FIG. 1)
Metered Advanced Position
This position of the Control Handle No. 1 allows the operator to adjust the rate of
loading. Using Control Knob No. 2 as the adjustment, turn the control knob clockwise for
a decrease and counterclockwise for an increase in the rate of load.
Full Advance Position of Control Handle No. 1
This places the machine in a rapid advance, non-controlled rate. This is used chiefly for
setting a pre-load or positioning the crosshead.
Hold Position of Control Handle No. 1
This position holds the pressure constant on the specimen.
Control Knob No. 2
With valve Control Handle No. 1 in the metered advance position, this knob allows the
operator to accurately control the loading rate. Turn the control knob clockwise for a
decrease, and counterclockwise for an increase in the rate of load.
Retract Position of Control Handle No. 1
This position channels oil from the pump to the reservoir releasing pressure from the
specimen, and allowing the piston to retract.
Note: During operation, the flow control valve will go through a significant temperature
rise. Do not be alarmed, as this rise will not affect the operation of the testing machine.
Forney Technical Support
800-367-6397
Page 7 of 22
1/24/2006
F-502 Instruction Manual
Forney Technical Support
800-367-6397
Page 8 of 22
1/24/2006
F-502 Instruction Manual
Forney Technical Support
800-367-6397
Page 9 of 22
1/24/2006
F-502 Instruction Manual
Control Valve Parts List
ITEM
No.
1
2
5
6
7
9
10
11
12
13
14
15
16
17
18
19
20
21
22
23
24
25
26
27
28
29
32
33
34
35
36
37
38
39
40
41
42
44
45
46
47
48
PART
No.
250885
21639
11455
11010
44708
302938
10008
11916
11229
11227-1
11228
10496
11127
302939
10300
10425
20771
64528
21298
204748
15134
207404
302953
10022
11953
10269
10855
44686
10146
10266
12184
207381
10375
16320
201814
10268
207380
10267
10527
15500
12098
10241
Forney Technical Support
800-367-6397
NO.
Req`d,
1
1
1
1
1
1
4
1
1
1
1
1
1
1
2
1
1
1
1
1
1
1
1
4
1
3
4
1
4
4
4
4
1
1
1
1
1
1
1
1
1
1
DESCRIPTION
Knob
Stud
Snap Plug
Machine Nut (#10-32 UNF)
Valve Knob
Flow Control Valve
Socket Cap Screw (1/4-20 x ¾”LG.)
Roll Pin
O-ring (2 3/8” x 2 3/16” x 3/32”)
Bearing Race
Thrust Bearing
Roll Pin (5/16” x 1” Lg.)
Plug (3/8” NPTF)
Adaptor
O-Ring (.468 ID x .078 cs)
Compression Spring (3/8” x ¾”)
Poppet
Valve Body
Drain Line
Spring Retainer Fitting
Pipe Plug (1/16” NPTF)
Compression Spring (5/16” x 2 7/16” Lg.)
Spool & Body Assembly
Socket Head Cap Screw
Plug
O-Ring (3/8” x 9/16” x 3/32”)
Socket Head Cap Screw (1/4-20 x 2 ¾”)
Rotor
Compression Spring (19/64” O.D. x 7/16” Lg.)
O-Ring ¼” x 3/8” x 1/16”)
Backup Washer (Teflon)
Shear Seal
Steel Ball
Compression Spring (1/4” O.D. X ¾” Lg.)
Valve Body Cap
O-Ring (3/8” x ½” x 1/16”)
Valve Stem
O-Ring (7/16” x 5/16” x 1/16”)
O-Ring (13/16” x .644 x .087)
Backup Washer (9/16” x 7/16” x .048)
O-Ring (9/16” x 7/16” x 1/16”)
Lockwasher
Page 10 of 22
1/24/2006
F-502 Instruction Manual
SPX POWER TEAM VALVE # HA-0619
REPAIR PARTS
PART #
HA-0619-47
HA-0619-48
HA-0619-49
HA-0619-51
HA-0619-53
HA-0619-54
HA-0619-55
HA-0619-56
HA-0619-57
HA-0619-58
HA-0619-59
DESCRIPTION
Valve Knob
Compression Spring (19/64 O.D.X 7/16 Lg.)
Flow Control Valve
Spool & Body Assembly
Spring Washer
O-Ring (1/4x3/8x1/16)
Teflon Backup Washer
Shear Seal
Rotor
Roll Pin (5/16x1Lg.)
O-Ring (2 3/8 x 2 3/16 x 3/32)
The above list includes the most common repair parts requested, and the part numbers
can be used to order from a Forney sales associate.
SPX POWER TEAM VALVE REPAIR KIT # HA-0619-62
The SPX Power Team Valve Repair Kit includes the following parts:
HA-0619-48
HA-0619-53
HA-0619-54
HA-0619-55
HA-0619-56
HA-0619-57
HA-0619-58
HA-0619-59
Compression Spring
Spring Washer
O-Ring 3/8x1/4x1/16
Teflon Backup Washer
Shear Seal
Rotor
Roll Pin 5/16x1
O-Ring 2 3/8 x 2 3/16 x 3/32
QTY.
4
4
4
4
4
1
1
1
We recommend that you contact a FORNEY authorized service technician to service
and install repair parts on your machine.
Forney Technical Support
800-367-6397
Page 11 of 22
1/24/2006
F-502 Instruction Manual
F-SERIES
EQUIPPED WITH SPX POWER TEAM PUMP
The oil reservoir has been filled prior to shipment with Dexron III Automatic
Transmission Fluid.
NEVER OPERATE THE ELECTRIC PUMP WITHOUT OIL!!!
Keep the oil level to approximately 1” to 1 ½” from the top of the reservoir with the
hydraulic piston in the testing machine retracted all the way.
NOTE: The reservoir capacity of the ¾ hp. pump is 2 gallons, and the reservoir
capacity for the ½ hp. pump is 7 quarts.
The electric pump operates on 115/220 volts, 50/60 cycles, single phase current unless
otherwise ordered. If the voltage of the pump is changed, be absolutely sure the
rotation is in the correct direction according to the arrow on the motor.
The electric pump is practically noiseless when idling; however, as pressure builds up,
the pumping noise gradually increases, but this is not cause for alarm. If the pump
becomes excessively noisy, check the filter element for possible dirt particles.
Forney Technical Support
800-367-6397
Page 12 of 22
1/24/2006
F-502 Instruction Manual
Operating Instructions
SPX Power Team Pump
This two-stage hydraulic pump incorporates precision design and engineering features,
which make it the most outstanding pump of its kind on the market. All moving parts are
made from high-grade tool steel, heat-treated, machined, ground and lapped to
extremely close tolerances to assure efficient operation and long life. Peak efficiency
for either continuous or intermittent operation is assured at the full range of pressures
up to 10,000 P.S.I. You will have uninterrupted, trouble free service if you keep it clean
and use only high grade, Dexron III Automatic Transmission Fluid.
NOTE: The reservoir capacity of the ¾ hp. pump is 2 gallons, and the reservoir
capacity for the ½ hp pump is 7quarts.
How to Operate the Pump
1. Check the oil level in the reservoir to be sure it is at the correct level.
2. Make sure all valve and hose connections are tight.
3. Plug in the power cord.
4. Set the control valve in the hold or retract position,
5. Turn on the power switch to your pump and let the pump idle for a few minutes.
6. Use the control valve to advance the piston out to its full travel limit of (2 ½”) several
times to eliminate air from the system.
DO NOT EXTEND BEYOND THE 2 ½” TRAVEL LIMIT!
The pump is now ready to be put into regular operation using the control valve to
perform testing operations.
Forney Technical Support
800-367-6397
Page 13 of 22
1/24/2006
F-502 Instruction Manual
Preventive maintenance
F-502F Series Machines
Keeping this unit clean and the oil free of dirt will increase the life of the pump &
valve
The reservoir should be drained, cleaned, and replenished with clean oil at least once a
year or more often if possible. The frequency of the oil change will depend on the
general working conditions, hours of use, and the overall cleanliness and care given to
the pump & valve.
The following operations should be performed with the power off and the piston
should be retracted.
Draining & Cleaning the system
Using a 3/16” Allen wrench, loosen the Allen head screws and remove the loading valve
from the cover plate, to perform the following steps.
1.
Thoroughly clean the pump exterior before the pump interior is removed from the
reservoir.
2.
Remove the Phillips head screws that fasten the motor and pump assembly to
the reservoir.
3.
Lift the pump and motor off the reservoir carefully to avoid damaging the gasket
or any internal components.
4.
Clean the inside of the reservoir and fill it half full of clean ATF DEXRON III.
5.
Place the pump and motor assembly back into the reservoir and secure with 2
machine screws assembled on the opposite corners of the housing.
6.
Connect a hose to the pressure port that the valve was sitting on; place the other
end of the hose in the hole next to the port.
7.
Run the pump for several minutes and then disconnect the motor & pump
assembly.
8.
Drain & clean the inside of the reservoir.
9.
Clean or replace the screen on the pump.
10.
Fill the reservoir with clean Dexron III Automatic Transmission Fluid to the proper
level.
NOTE: The reservoir capacity of the ¾ hp. pump is 2 gallons, and the reservoir
capacity for the ½ hp pump is 7quarts.
11.
Place the pump & motor assembly with the gasket on the reservoir and tighten all
the screws.
Forney Technical Support
800-367-6397
Page 14 of 22
1/24/2006
F-502 Instruction Manual
Preventive Maintenance
F-502F Series Machines
Checking & maintaining the oil level
1.
2.
Check the oil level in the reservoir by removing the plastic cap on the top of the
cover plate, the oil level should come to within 1” to 1 ½” of the cover plate with
the piston retracted. If the level is okay, replace the cap.
When it is necessary to add oil to the reservoir, remove the cap and fill the
reservoir to the proper level with DEXRON III AUTOMATIC TRANSMISSION
FLUID. (Do Not Overfill)
NOTE: The reservoir capacity of the ¾ hp. pump is 2 gallons, and the reservoir
capacity for the ½ hp pump is 7quarts.
How to Fill the Reservoir with Hydraulic Oil
1. Viewing the top of the reservoir, you will notice a plastic screw-in-plug. This is the fill
hole for hydraulic oil. Clean the area around the plug to remove all dust and grit
before removing the screw-in-plug. Any foreign particles in the oil could damage
pump surfaces resulting in loss of performance.
2. Insert a clean funnel with filter.
3. Fill with oil to within 1” to 1½” from the top of the filler hole.
4. Replace the plug.
Bleeding air from the system
Upon initial start up, air can accumulate within the hydraulic system. The trapped air can
cause the system to advance slowly or surge and make the motor become noisy. To
remove the trapped air, try the following steps.
1.
With oil in the unit and the machine ready to operate under zero load, advance
the piston or platen out toward the 2 ½” travel limit of the machine and then
retract to the starting position. DO NOT ADVANCE PAST THE TRAVEL LIMIT
OF 2 ½”. This should be done several times to work the air out of the system. If
this does not remove all of the trapped air, you can perform step #2.
2.
With oil in the unit and the machine ready to operate under zero load, loosen a
couple of turns, but do not remove, a hose fitting that is situated higher than the
rest of the hose fittings in the system. Run the pump until a steady flow of oil, free
of air bubbles is observed. Re-Tighten the fitting.
Forney Technical Support
800-367-6397
Page 15 of 22
1/24/2006
F-502 Instruction Manual
Forney Authorized Service
Representatives
Revised December 12, 2001
Name and Address
A&A Enterprises (11455)
12421 Charloma Dr.
Tustin, CA 92780
Phone: (714) 730-7726
Fax: (714) 730-3685
Attn: W.P. "Bunk" Haines & Ricky Gore
American Calibration & Testing(32926)
34 Forest Park Ave.
N. Billerica,MA 01862-1333
Phone: (978) 670-2361
Fax: (978) 671-6423
Attn: Gordon Mooney
Applied Technical Services, Inc.(19372)
1280 Field Parkway
Marietta, GA 30066
Phone: (770) 514-3299
Fax:
(678) 819-1055
Attn: Lee Oxendine or Darren Black
Connecticut
Long Island
Maine
Massachusetts
New Hampshire
New York City
Rhode Island
Vermont
Alabama
Georgia
S. Carolina
Tennessee(east of Nashville)
Arizona
New Mexico
S. Colorado
S. Nevada
S. Utah
Arizona Calibration (18318)
761 S. Roca
Mesa, AZ 85204
Phone: (480) 641-2994
Fax:
(480) 854-0996
Mobile: (480) 859-7494
Pager: (602) 210-2994
Attn: Mike Gourde
Forney Technical Support
800-367-6397
Territory
California(Fresno&South)
Guam
Saipan
Kwajalein
Page 16 of 22
1/24/2006
F-502 Instruction Manual
Alabama
Florida
Georgia
N. Carolina
S. Carolina
Tennessee
Accu-Cal, Inc. (738)
466 Lakeview Dr., PO Box 515
Dahlonega, GA 30533
Phone: (706) 867-7751
Fax:
(706) 867-9203
Pager: (404) 533-4361
Cell: (770) 530-2227
Attn: Ben James
Alaska
Colorado
Idaho
Montana
Cal-Cert Co. (55846)
PO Box 416
Clackamas, OR 97015
Phone: (503) 654-9620
Toll: 1-800-356-4662
Fax:
(503) 654-9670
Cell: (503) 708-5357
Attn: Marshall Doyle
Ship to: 7010 S.E. Norbert Dr.
Milwaukee, OR 97222
N. California
Oregon
Sacramento North
Utah
Washington
Wyoming
All of Canada
Cal-Chek Canada (18888)
250 Governor's Rd.
Dundas Ontario
Canada L9H 3K3
Phone: (905) 628-4636
Fax:
(905) 627-5903
Attn: John Newitt or Judy Newitt
Calibrations, Inc. (21717)
PO Box 2966
Conroe, TX 77305
Phone: 800-848-2953
Attn: Frank Rotecki
Ship to: 1005 McCall, Conroe TX 77301
Arkansas
Louisiana
Oklahoma
Texas
Forney Technical Support
800-367-6397
1/24/2006
Page 17 of 22
F-502 Instruction Manual
Bahamas
Bermuda
Delaware
Kentucky
Maryland
Calibration Services, Inc. (446)
Box 735
Emlenton, PA 16373
Phone: (724) 867- 6664
Fax:
(724) 867-1346
Attn: Bill Stump III, David Culp
Kris Allaman or Diane Reese
Ship to: RD#3, Buttertown Rd.
Emlenton, PA 16373
Colorado
Utah
W. Kansas
W. Nebraska
Wyoming
Cal Test, Inc. (23036)
160 Vallejo St.
Denver, CO 80223
Phone: (303) 715-1283
Fax: (303) 733-1823
Attn: Don Rosch
Illinois
Indiana
Iowa
Kansas
Kentucky, Louisville West
Missouri
Nebraska
Northern Arkansas
Tennessee, Nashville West
Wisconsin
Calser Corporation (43957)
PO Box 24121
Belleville, IL 62223
Phone: (618) 277-0329
Fax: (618) 277-0196
Attn: Tom Gagen or Jerry Parker
Ship to: 302 N. Belt East
Swansea, IL 62226
Coast Calibration Co., Inc. (15003)
655 Linden Ave.
Carpinteria, CA 93013
Phone: (805) 684 - 1807
Fax: (805) 969-1846
Cell: 310-748-9988
Attn: Ted R. Buergey, President
[email protected]
Forney Technical Support
800-367-6397
Michigan (Not Upper Pennisula)
Puerto Rico
US Virgin Islands
Virginia
W. Virginia
Western NY to I-81
WPA to Philly
Page 18 of 22
California
Nevada in emergencies
1/24/2006
F-502 Instruction Manual
Mobile Calibration Service(14776)
PO Box 640192
Kenner, LA 70064
Phone: (504) 466-5255
Fax: (504) 466-2826
Attn: Warren Meyn, Jr.
Ship to: 411 Incarnate Word Dr.
Kenner, LA 70065
Alabama
Arkansas
Florida
Georgia
Kansas
Louisiana
Mississippi
Oklahoma
S. Carolina
Tennessee
National Calibration, Inc.(734)
3737 E. Broadway Rd.
Phoenix, AZ 85040
Phone: (602) 437-0114
Fax: (602) 437-8897
Attn: Buck Halloran, Donald Weeks
Arizona
National Calibration, Inc. (34948)
8305 Washington Place, N.E.
Albuquerque, NM 87113
Mobile: (505) 252-7288
Fax: (505) 821-2963
Attn: Jeff Pettit
National Calibration, Inc. (962050)
3611 W. Tompkins Ave.
New Mexico
Western Texas
Colorado
Oklahoma Panhandle
Las Vegas Nevada
(is in LasVegas 1 time per
month)
Las Vegas, NV 89103
Cell Phone: (702) 379-1693
Fax: (702) 798-7664
Attn: Donald Weeks
National Calibration, Inc.
3650 W. 2100 South
Salt Lake City, Utah 84120
Phone: 801-560-5891
Fax: 801-972-3653
Attn: Rod Wickham
4 LOCATIONS FOR NATIONAL
CALIBRATION, INC. - 1 COMPANY
Forney Technical Support
800-367-6397
Page 19 of 22
Salt Lake City Utah
Wyoming
Colorado
1/24/2006
F-502 Instruction Manual
Pacific Calibration Service (35836)
295 Old County Rd. Suite #2
San Carlos, CA 94070
Phone: (650) 591-2177
Fax:
(650) 591-2328
Attn: Brian Richardson or Dave Mazza
California (north and central)
Nevada
Pyrometeric Service Company (19860)
1312 S. 96th St.
Seattle, WA 98108
Phone: (206) 762-8307
Fax:
(206) 763-9459
Attn: Mike Johnson
Alaska
Idaho
Oregon
Washington
Richardson Associates (21589)
2513 Weaver St., Suite A
Fort Worth, TX 76117
Phone: (817) 222-1904
Fax:
(817) 222-1105
Attn: Bill Richardson
Texas
Oklahoma
Arkansas
New Mexico
Kansas
Louisiana
Forney Technical Support
800-367-6397
Page 20 of 22
1/24/2006
F-502 Instruction Manual
SBCR (SB Calibration & Repair,
LLC)(537)
9915 Hwy 18 North
Cavalier ND 58220
Phone: (701)265-4376
Cellular: (303) 589-5165
Attn: Norm and Sandy Becker
Test Technology, Inc. (59533)
PO Box 119
Rogers, MN 55374-0119
Phone: (952) 925-9565
Fax:
(952) 928-3072
Attn: Bill Moulds,Sharon Garrison,
Jerry Thorpe
Ship to: 4810 Brookside Ave.
Edina, MN 55436
Forney Technical Support
800-367-6397
Page 21 of 22
Colorado
E. Idaho
Illinois
Iowa
Kansas
Minnesota
Mississippi
Montana
N. Dakota
Nebraska
S. Dakota
Utah
Wisconsin
Wyoming
Pickup & Delivery service 3
days PA to destination &
calibration
Arizona
Colorado
Florida
Georgia
Idaho
Illinois
Indiana
Iowa
Kansas
Kentucky
Michigan
Minnesota
Missouri
Montana
Nebraska
New Mexico
North and South Carolina
North and South Dakota
Ohio
Oklahoma
Tennessee
Utah
W. Virginia
Wisconsin & Wyoming
1/24/2006
F-502 Instruction Manual
Universal Calibration
19 Black Point Rd.
Scarborough, ME. 04074
Phone: (207) 885-9007
Toll Free (888) 293-2121
Cell (207) 252-1210
Attn. John Myers
Forney Technical Support
800-367-6397
Maine
New Hampshire
Vermont
New York
Connecticut
Rhode Island
New Jersey
Delaware
Maryland
Virginia
Massachusetts
Washington D.C.
Page 22 of 22
1/24/2006