1
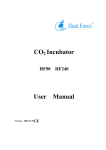
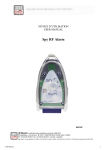
USE AND CARE MANUAL GAS COOKTOP MODELS: CTG304D, CTG305D, CTG365D IMPORTANT: Before beginning use please read these instructions completely and carefully. INSTALLER: Leave this owner’s manual with the cooktop. OWNER: Please retain this manual for future reference. CNP INDUSTRIES, INC. P.O. BOX 18645 ANAHEIM, CA 92817 (714) 482-2320 ● (714) 482-2337 FAX 1 Dear Customer, Thank you for selecting a Wind Crest Gas Cooktop. By following the procedures and recommendations in this manual the cooktop should give you many years of service. The top is produced from high quality stainless steel, which is very durable but does require some care to maintain its beauty. Using cleaners and polishes that are designed for use on stainless steel will aid in the maintenance of your cooktop and keep it looking new. Please read the entire Use and Care Manual before using your cooktop. We are sure you will enjoy using this product. Contact us if you have questions or comments. When you write, please include the model and serial number of your product. Yours Truly, The Wind Crest Team TO REDUCE THE RISK OF FIRE, ELECTRIC SHOCK, OR INJURY TO PERSONS, OBSERVE THE FOLLOWING WARNING: If the information in this manual is not followed exactly, a fire or explosion may result causing property damage, personal injury or death. - Do not store or use gasoline or other flammable vapors or liquids in the vicinity of this, or any other Appliance. - WHAT TO DO IF YOU SMELL GAS Do not try to light the appliance. Do not touch any electrical switch. Do not use any phone in your building. Immediately call your gas supplier from a neighbor's phone. Follow the gas supplier's instructions. If you cannot reach your gas supplier, call the fire department. - Installation and service must be performed by a qualified installer, service agency or the gas supplier. CAUTION: Improper installation, adjustment, alteration, service, or maintenance can cause personal injury or property damage. Refer to these instructions. For assistance or additional information, consult a qualified installer, service agency, manufacturer, dealer, or the gas supplier. 2 1. For your safety: -Do not obstruct the flow of combustion and ventilation air to the unit. -Keep appliance area clear and free from combustible material. 2. Never use this product for warming or heating a room. 3. An approved gas regulator is supplied and should be used with this appliance. POWER SUPPLY – Requires a 120 VAC, 60 HZ, 15 Amp single-phase circuit for all models. A three prong grounded receptacle is required. Plan the installation for the unit so that the location of the three-prong receptacle is within three (3) feet of the right rear bottom corner of the cooktop and accessible from the front of the cooktop. See FIG – 6. Warning - The grounding prong must not be cut or removed from the power cord. - A three prong grounded receptacle must be used. - The power source must be properly polarized. Reverse polarity will cause continuous sparking of the electrodes. - Do not use a Ground Fault Circuit Interrupter (GFCI). The electrode spark ignition module will cause GFCI’s to trip. This appliance, when installed, must be electrically grounded in accordance with local codes, or in the absence of local codes, in accordance with National Electric Code ANSI/NFPA 70. The correct voltage, frequency and amperage must be supplied to the appliance from an individual, dedicated grounded circuit which is protected by a properly sized circuit breaker or time delay fuse. The required voltage, frequency and amperage ratings are listed on the product data plate and also shown above. This appliance is factory equipped with a 5-foot long power supply cord having a 3-prong grounded plug. This plug must be inserted into a mating grounded receptacle in accordance with National Electrical Code and applicable state, municipal and local codes. In Canada, installation must be in accordance with CSA C22.1 Canadian Electrical Code Part-1 and/or local codes. GAS SUPPLY PRESSURE – NATURAL GAS: 6 to 14 inches water column (Manifold at 4-inches) PROPANE GAS: 11 to 14 inches water column (Manifold at 10-inches) CAUTION: For LP gas installations, the LP gas tank must have its own high pressure regulator. This is in addition to the pressure regulator supplied with the cooktop. Check your local building codes for the proper method of installation. In the absence of local codes, this appliance should be installed in accordance with the National Fuel Gas Code ANSI Z223.1. Be certain that the appliance being installed is correct for the gas service provided. Refer to the data plate located on the bottom of the cooktop and pressure requirements above. In Canada, installation must be in accordance with current CAN/CGA B149.1 and 2 gas installation codes and/or local codes. NOTE: The cooktop settings for natural gas are established at the factory. No field adjustments are required. Natural gas cooktops can be converted for Liquid Propane (LP) use by qualified servicers only. A factory supplied “LP” conversion kit is available. To obtain kit contact your local dealer. MODEL CTG304D – LP KIT #10691.00 MODEL CTG305D – LP KIT #10692.00 MODEL CTG365D – LP KIT #10693.00 3 SAFETY PRACTICES TO AVOID PERSONAL INJURY IMPORTANT SAFETY INSTRUCTIONS THE RISK OF FIRE, ELECTRIC SHOCK OR INJURY TO PERSONS, OBSERVE THE FOLLOWING: C. Use high range settings on range only when necessary. Heat oil slowly on low to medium setting. A. Use this unit only in the manner intended by the manufacturer. If you have any questions, contact the manufacturer. D. Do not leave range unattended when cooking. E. Always use cookware and utensils appropriate for the type and amount of food being prepared. B. Before servicing or cleaning unit, switch power off at service panel and lock service panel to prevent power from being switched on accidentally. WARNING – TO REDUCE THE RISK OF SHOCK, OR INJURY TO PERSONS, OBSERVE THE FOLLOWING: WARNING – TO REDUCE THE RISK OF INJURY TO PERSONS, IN THE EVENT OF A GREASE FIRE, OBSERVE THE FOLLOWING: B. NEVER PICK UP A FLAMING PAN – You may be burned. C. DO NOT USE WATER, including wet dishcloths or towels – a violent steam explosion will result. D. Use an extinguisher ONLY if: 1. You know you have a class ABC extinguisher, and you already know how to operate it. 2. The fire is small and contained in the area where it started. A. SMOTHER FLAMES with a close-fitting lid, cookie sheet, 3. The fire department is or other metal tray, then turn being called. off the gas burner or the A. Keep exhaust hoods, filters electrical element. BE 4. You can fight fire with and grease-laden surfaces CAREFUL TO PREVENT your back to an exit. clean. BURNS. If the flames do not go out immediately B. Always turn hood ON EVACUATE AND CALL when cooking at high heat. THE FIRE DEPARTMENT. ************************************************************************************************* When properly used and cared for your new Wind Crest Cooktop has been designed to be a safe, reliable appliance. When using kitchen appliances, basic safety precautions must be followed, including the following: Read this Use and Care annual carefully before using your new cooktop to reduce the risk of fire, electric shock, or injury to persons. Begin by insuring proper Installation and servicing. Follow the installation instructions provided with this product. Have the cooktop installed and grounded by a qualified technician. Have the installer show you where the gas shut-off valve is located so that you know how and where to turn off the gas to the cooktop. light even though the electric igniters click. See cleaning and general care section. If you smell gas, your installer has not done a proper job of checking for leaks. Connections can loosen in transit. If the connections are not perfectly tight, you can have a small leak and therefore a gas smell. Finding a gas leak is not a “do-it-yourself” procedure. Some leaks can only be found with the burner control in the ON position. The cooktop is factory assembled for natural gas. It should be correctly adjusted by a qualified service person or installer for the type of gas with which it is used. For proper lighting and performance of the burners, keep the igniters clean. It is necessary to clean these when there is a boil over, or when the burner does not 4 Do not repair or replace any part of the appliance unless specifically recommended in this manual. All other servicing should be referred to a qualified technician. When using the cooktop: DO NOT TOUCH THE BURNER GRATES OR THE IMMEDIATE SURROUNDING AREA. Areas adjacent to the burners may become hot enough to cause burns. Children should not be left alone or unattended in an area where appliances are in use. They should never be allowed to sit or stand on any part of the appliance. Never leave the burners unattended when using high flame settings. Boil overs cause smoking and greasy spillovers that may ignite. More importantly, if the flame is smothered, unburned gas will be coming into the room. See “What to do if you smell gas,” page 2. Caution: Do not store items of interest to children above the cooktop or at the back. If children should climb onto the appliance to reach these items, they could be seriously injured. Do not store flammable materials on or near the cooktop. Do not use water on grease fires. Turn appliance off and smother fire with baking soda or use a dry chemical or foam-type extinguisher. Never let clothing, potholders, or other flammable materials come in contact with the burners or the burner grates, until they are cool to the touch. Use only dry potholders; moist or damp potholders on hot surfaces may cause burns from steam. Do not use a towel or other bulky cloth in place of potholders. Do not let potholders touch hot burners or burner grates. For personal safety, wear proper apparel. Loose fitting garments or hanging sleeves should never be worn while cooking. Do not use aluminum foil to line any part of the cooktop. Improper use of a foil liner could result in a shock, fire hazard or it could obstruct the flow of combustion and ventilation air. Foil is an excellent heat insulator and heat will be trapped beneath it. This will upset the cooking performance and can damage the cooktop finish. Warning: The appliance is for cooking. Based on safety considerations never use the cooktop to warm or heat a room. Also, such use could be damaging to the cooktop. Do not heat unopened food containers; a buildup of pressure may cause the container to burst. Match the pot size to the burner and flame size. The flame should be equal to or smaller than the pan bottom. Always use utensils that have flat bottoms. Hold the handle of the pan to prevent movement of the utensil when stirring or turning food. To minimize burns, ignition of flammable materials, and unintentional spillovers, position handles of utensils so that they do not extend over adjacent work areas, burners, or the edge of the cooktop. During cooking, set the burner control so that the flame heats only the bottom of the pan and does not extend beyond the edge of the pan. Only certain types of glass, heat-proof glass-ceramic, ceramic, earthenware, or other glazed utensils are suitable for cooktop use. This type of utensil may break with sudden temperature changes. Use only on low or medium flame settings according to manufacturer’s directions. If the cooktop is near a window, be certain the curtains do not blow over or near the burners; they could catch on fire. In the event a burner goes out and gas escapes, open a window or door. Do not attempt to use the cooktop until the gas has had time to dissipate. Wait at least 5 minutes before using the cooktop. Clean the cooktop with caution. Avoid steam burns; do not use a wet sponge or cloth to clean the cooktop while it is hot. Some cleaners produce noxious fumes if applied to a hot surface. Turn the ventilator OFF in case of fire or when intentionally “flaming” liquor or other spirits on the cooktop. The blower, if in operation, could unsafely spread the flames. To achieve optimum cooking performance do not use warped pots and pans. For safety reasons do not use unbalanced pots and pans – heavy handles or warped bottoms can cause pans to be unstable 5 California Proposition 65 – Warning: Burning gas cooking fuel generates some by-products which are on the list of substances which are know by the state of California to cause cancer or reproductive harm. California law requires businesses to warn customers of potential exposure to these substances. To minimize exposure to these substances, always operate this unit according to the instructions contained in this booklet and provide good ventilation. ♦ SAVE THESE INSTRUCTIONS ♦ BEFORE USING YOUR COOKTOP FOR THE FIRST TIME: 1. Remove all packaging materials and labels before using your cooktop. 2. Check that you have these items: CTG304D: - 2 Burner Grates - 4 Single Burner caps - Use and Care Manual CTG305D: - 2 Burner Grates - 4 Single Burner Caps - 1 Center Burner Assembly (see page 9) - Use and Care Manual CTG365D: - 3 Burner Grates - 4 Single Burner Caps - 1 Center Burner Assembly (see page 9) - Use and Care Manual 3. Record the Model and Serial Number for any future contacts with your servicer or the factory. Data label is located on bottom of cooktop. Model #: ____________________ Serial #: _____________________ Date Installed: ________________ Keep a copy of your purchase invoice for future reference. 6 Controls & Burners Model CTG304D (Grates not shown) 4 3 2 4 3 2 1 1 1 – Right Front Burner Control 9,000 BTU/HR 2 – Left Front Burner Control 15,000 BTU/HR 3 – Left Rear Burner Control 12,000 BTU/HR 4 – Right Rear Burner Control 15,000 BTU/HR Model CTG305D (Grates not shown) 5 4 5 4 3 2 1 3 2 1 1 – Right Front Burner Control 9,000 BTU/HR 2 – Left Front Burner Control 15,000 BTU /HR 4 – Left rear Burner Control 12,000 BTU/HR 5 – Right Rear Burner Control 9,000 BTU/HR 3- Center Burner Control 18,500 BTU/HR 7 Model CTG365D (Grates not shown) 5 1 3 2 1 – Left Rear Burner Control 12,000 BTU/HR 2 – Left Front Burner Control 15,000 BTU/HR 4 3 – Center Burner Control 18,500 BTU/HR 4 – Right Front Burner Control 9,000 BTU/HR 5 – Right Rear Burner Control 15,000 BTU/HR Control Knob & Graphic OFF HIGH HEAT LOW HEAT ULTRA - LOW HEAT CENTER BURNER ONLY 8 CONTROL OPERATION Each burner has an individual control knob allowing infinite heat selection between high and low. - 9,000 Btu/hr burner adjusts to 1300 Btu/hr Low 12,000 Btu/hr burner adjusts to 1600 Btu/hr Low 15,000 Btu/hr burner adjusts to 2100 Btu/hr Low 18,500 Btu/hr burner adjusts to 4100 Btu/hr Low and 500 Btu/hr Ultra-Low The control knobs are plated metal and can be removed (by pulling straight upward) for improved cleaning. Be sure the control is in the OFF position before removing a knob. When cleaning in the area of the controls, use a damp cloth to wipe surfaces only after cooktop has cooled. DO NOT USE CLOTHS THAT ARE SOPPING WET. To operate a control, push down and rotate counter clockwise. The high heat position has a detent for easy selection. The center burner control (CTG305D & CTG365D only) has detents at the HIGH, MEDIUM and LOW heat positions. The controls rotate counter clockwise from OFF to LOW. Rotate the control knob clockwise to the full OFF position. SIMMER BURNER CAP BURNER HEAD LOCATING PIN AND NOTCH IN BURNER RING ALIGNS WITH HOLE AND TAB IN BURNER HEAD BURNER HEAD WITH PROCELAIN CAP GAS PORTS SKIRT TAB BURNER BASE NOTCH SINGLE BURNER ASSEMBLY (INSERT TAB INTO NOTCH) BURNER RING (TOP VIEW) INSERT BOTTOM PIN ON BURNER HEAD INTO HOLE IN BURNER BASE LOCATING HOLE BURNER BASE LOCATED IN COOKTOP CENTER BURNER ASSEMBLY FIG - 7 CAUTION: IMPROPER POSITIONING OF BURNER CAN DAMAGE COOKTOP AND CAUSE INJURY TO PERSONS. CORRECT POSITIONING RESULTS IN EVEN FLAME DISTRIBUTION AND APPEARANCE. BURNER ASSEMBLY Burners are sealed for easier cleaning. Single Burner – The burner head has two locating tabs that fits into notches in the burner base (located in cooktop) For proper burner operation the burner head tabs must be located in the burner base notches. See illustration. Center Burner – On those models that have a center burner, the sequence of assembly and positioning of the components is important for proper burner operation. The order of the assembly is – burner ring first, skirt next and the burner head last. The simmer cap can be positioned in any sequence. The burner head and burner ring index with pins, tabs and notches to indicate proper assembly. See illustration. 9 Electronic Ignition Each burner has an igniter that sparks when the burner is turned on, or during re-ignition if the flame is extinguished. When a flame is present the igniter will stop sparking. If a cross draft is present the flame can be affected and some sparking can occur. This is normal. The igniter can get dirty due to normal cooking splatter or spills. This may cause nuisance sparking. The igniter can be cleaned by using a Scotch Brite cleaning pad to clean the igniter disk. Do not touch the igniter on the burner if the control is in the ON position. Hold the pad against the igniter tip and using light pressure rotate the pad in a circular motion. A few rotations are usually sufficient to clean the surface. If a burner does not ignite in approximately 4 seconds, check the positioning of the burner head to be sure the tabs and notches are properly aligned. Grates Grates are to be properly installed onto cooktop. Model CTG304D – Has two symmetrical grates. Position side by side into recessed area of cooktop over burners. Model CTG305D – Has two non-symmetrical grates. Position side by side into recessed area of cooktop over burners. Center burner section of grates match each other over center burner. Model CTG365D – Has three grates; two larger symmetrical grates and one smaller center grate. Position larger grates into recessed area of cooktop on each side of control area. Smaller center grate fits between the larger grates. CAUTION: THE GRATES ARE HEAVY. USE BOTH HANDS AND SPECIAL CARE WHEN LIFTING. PROVIDE SURFACE PROTECTION WHEN PLACING ON COUNTERTOP. CLEANING AND GENERAL CARE CAUTION: CONTROLS SHOULD BE OFF AND SURFACES COOL BEFORE CLEANING. Control Knob When in place on cooktop, wipe with a damp cloth. A mild soap solution can be used. Do not soak. If removed and cleaned, be sure the knob has dried fully before reinstalling. DO NOT FORCE KNOB ONTO CONTROL STEM. ALIGN THE FLAT ON STEM WITH THE FLAT ON KNOB AND GENTLY PUSH INTO PLACE. Burner Base Use cloth or Scotch Brite pad dampened with a water and detergent solution. Rub in circular motion. AVOID SCRATCHING STAINLESS STEEL WITH SCOTCH BRITE PAD. Burner Head Scotch Brite pad dampened with a water and detergent solution. Rub in circular motion. AVOID USING HARSH SCOURING PADS AND ABRASIVE CLEANERS. If parts become clogged, clean using a paper clip. Do not use toothpick, which can break and clog the parts. 10 Grates The grates are porcelain enamel coated cast iron. Non-abrasive cleaners are preferred. Use a hot or warm water and detergent solution. Mild abrasive cleaners, such as Bon Ami®, are acceptable. After cleaning always rinse and dry immediately. If grates are extremely dirty, a Scotch Brite pad will aid cleaning. Acidic and sugar-laden spills attack the porcelain – remove soil immediately. Note: The grates will show discoloration, crazing, and chips due to high heat exposure. This is normal. Stainless Steel Although stainless steel is strong and durable, and resists most food stains it can be affected by some compounds and food spills. Remove spills and salt as soon as safely possible – don’t leave exposed for long periods of time. Always rub lightly in direction of brush (graining) lines. Chlorine can be corrosive – always check ingredients on cleaner label. Non-abrasive cleaners or hot water and detergent solutions are recommended. Always rinse and dry immediately. Hard water spots can be removed with household white vinegar. Stainless Steel Magic® is an acceptable cleaner/polish to protect the stainless finish and appearance. Mild abrasive cleaners such as Bon Ami®, Kleen King Stainless Steel Cleaner, Cameo Aluminum and Stainless Cleaner can be used depending on the clean up necessary. The high quality 300-series stainless steel can discolor when exposed to high heats. Bar Keepers Friend® or Revere Stainless Steel Cleaner will remove the discoloration. Always rub in the direction of the brush (graining) lines. Igniter Avoid excess water on igniter. Damp or wet igniters can prevent the burner from lighting. Use a Scotch Brite pad, dry or damp, to clean stainless tip. Use a cotton swab dampened with water, ammonia, or formula 409 to clean ceramic. WARRANTY FULL ONE YEAR WARRANTY – Covers repair and replacement of parts found to be defective due to materials and workmanship, for one year from date of purchase. Keep proof of purchase handy for inspection. SERVICE MUST BE PROVIDED BY A FACTORY AUTHORIZED SERVICE AGENCY, DURING NORMAL WORKING HOURS. ITEMS NOT COVERED IN WARRANTY: 1. Damage or repairs due to service by an unauthorized agency or use of unauthorized parts. 2. Service visits to teach you how to use the appliance. 3. Correct installation related problems – you are responsible for providing electrical wiring and other connecting items. 4. Reset circuit breakers or replace fuses. 5. Damage caused by abuse, accident, alteration, misuse, local code violations. 6. Failure due to other than normal house use. 7. Travel fees and associated charges incurred when product in a location with limited or restricted access (i.e. airplane flights, ferry charges, isolated geographic locations, unusual wait times, etc.) FOR SERVICE CONTACT YOUR DEALER FOR NAME OF FACTORY AUTHORIZED SERVICER IN YOUR AREA OR CALL THE FACTORY TOLL FREE: (877) 387-6721 This warranty applies to appliances used in residential operations only. The warranty is for products purchased and retained in the 50 states of the USA, the District of Columbia, and Canada. If the appliance is sold by the original purchaser during the warranty period the new owner is protected until expiration of the original purchasers warranty. This warranty gives you specific legal rights. You may also have other rights, which vary from state to state. 11 NOTES 12 13 14