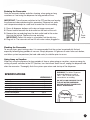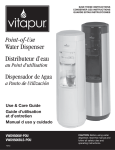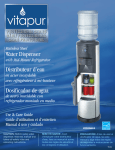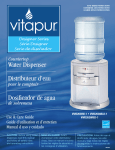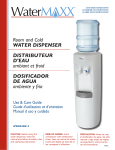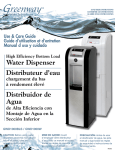
1
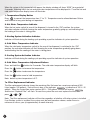
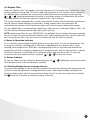
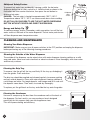
Premium Point-of-Use
Water Dispenser
Distributeur d’eau
individuel de première qualité
Dosificador de agua
de primera calidad disponible
en donde se necesita
Use & Care Guide
Guide d’utilisation et d’entretien
Manual d uso y cuidado
CAUTION: Before using water
dispenser, read this manual and
follow all safety rules and
operating instructions.
MISE EN GARDE: Avant
d'employer votre distributeur
d'eau, lisez ce manuel et suivez
toutes les règles de sécurité et
les consignes d'utilisation.
VWD8000W-F
PRECAUCIÓN: Antes de usar el
dosificador de agua, lea este
manual y siga todas las reglas
de seguridad e instrucciones de
funcionamiento.
Thank you for purchasing a vitapur® Water Dispenser. Please read the
enclosed operating instructions carefully and retain this booklet for future reference.
We have carefully engineered your vitapur® Water Dispenser to give you years of
enjoyment and trouble free operation.
Your new Water Dispenser may or may not have been equipped with a water treatment
system. If a seperate water treatment system has been added to your dispenser, please reference the
water treament system manufacturer instructions for correct operation of their system.
IMPORTANT SAFEGUARDS
• Installation by a certified plumber is recommended
• Never turn the dispenser upside down or tilt more than 45 degrees. Let unit stand
upright for 12 hours before turning on.
• Ensure all tubing connections are sealed and that there are no system leaks before
operating unit.
• Never use this dispenser with water that is unsafe to drink or is from an unknown source.
• Never use any other liquid in the dispenser other than known and microbiologically safe water.
• Never allow children to dispense hot water without proper and direct supervision.
• This water dispenser is equipped with a grounded power cord plug for your safety. It must be
plugged into a grounded outlet. Do not use an extension cord with your water dispenser.
• Keep your water dispenser in a dry place away from direct sunlight.
• Never put anything flammable close to the dispenser.
• Leave a minimum of 2” (5 cm) around the back and sides of the dispenser for proper
ventilation.
• Always install your water dispenser on a level floor. Wait 3 minutes before
restarting machine after shutting down.
• Always unplug the water dispenser before servicing or cleaning.
• Only replace filters with Vitapur® replacement filters.
If a seperate water treatment system has been added to your dispenser, please
reference the system manufacturers instructions for the correct operating and
maintenance requirements.
1
YOUR VITAPUR® WATER DISPENSER
1.
2.
3.
4.
5.
6.
7.
8.
9.
10.
11.
12.
13.
14.
Electronic display panel
Hot water push button
Childproof safety switch
Room temperature push button
Cold water push button
LED night light
Removable drip tray
Pre-filter / carbon block filter
Mechanical float reset switch
Cold water power switch (rear of dispenser)
Hot water power switch (rear of dispenser)
Adjustable cold water thermostat (rear of dispenser)
Drain valve (rear of dispenser)
Condenser coils (rear of dispenser)
1
2
4
3
5
10
11
6
7
12
8
13
14
9
2
OPERATING INSTRUCTIONS
Initial Product Cleaning Procedure
As with most new appliances, it is recommended to flush the system
prior to first time use.
1. Make sure the unit is plugged in and the power switches for the hot and cold tanks are turned off.
2. Ensure there are no leaks from any of the tubing connections.
3. Exhaust air from the dispenser by dispensing water from the hot and cold buttons until flow
is stabilized (as there is alot of air in the water filters, this will take a couple of minutes).
4. Drain a minimum of 4-6 glasses of water from each button prior to turning the power switches
on at the rear of the unit.
5. Turn the power switches for the hot and cold water reservoirs on at the rear of the unit.
6. Adjust cold water temperature to desired temperature.
NOTE: When replacing water filters, the above procedure must be repeated.
Dispensing Water
Place a glass under the spigot and push down on the appropriate button; red for hot water, white for
room temperature water and blue for cold water. Press until the desired amount of water is dispensed,
then release the button.
Electronic Display Control / Description and Operation
8
7
1
6
3
1.
2.
3.
4.
5.
6.
7.
8.
9.
10.
2
4
9
5
Temperature Display Button
Hot Water Temperature Indicator
Heating System Activation Indicator (blinking when active)
Cold Water Temperature Indicator
Cooling System Activation Indicator (blinking when active)
Cold Water Temperature Adjustment Buttons
Filter Replacement Indicator
Hours of Operaion Indicator
Volume Indicator
Flashing Display: Leak Sensor System
3
When the system is first connected with power, the display window will show “8000” for a period of
5 seconds, following which the hot and cold water temperature will be displayed in °F and the hot and
cold water temperature display icons will illuminate.
1. Temperature Display Button
Press
to convert the temperature from °F to °C. Temperature can be altered between Celcius
and Farenheit at any point during unit operation.
2. Hot Water Temperature Indicator
When the hot water switch (at rear of the dispenser) is turned to the “ON” position, the system
activation indicator will blink showing the water temperature gradually going up, and indicating that
the heating of the water is taking place.
3. Heating System Activation Indicator
Indicator will flash during the heating cycle providing a positive indicator of system operation.
4. Cold Water Temperature Indicator
When the cold water temperature switch (at the rear of the dispenser) is switched to the “ON”
position, the activation indicator will flash showing the water temperature gradually going down,
and indicating that the cooling of the water is taking place.
5. Cooling System Activation Indicator
Indicator will flash during the cooling cycle providing a positive indicator of system operation.
6. Cold Water Temperature Adjustment Buttons
Press and hold the
button for 3 seconds. The cold water temperature display will blink.
Press the
button to increase the temperature.
Press the
button to decrease the temperature.
Press the
button once to hold temperature.
Note: default system temperature is 5°C.
7a. Filter Replacement Indicator
The filter replacement indicator shows the remaining filter life based on a maximum volume of 900
Litres (approx. 240 gallons). Each of the six bars in the indicator
is indicative of 150 L / 40
gallons. When the system flow meter reaches 900 L / 240 gallons, the icon will read as
and the text “Replace Filter” will flash. To reset the system the user must replace the filter, and
press
+
+
.
Note: The filter replacement indicator will function regardless of whether a filtration system is installed.
If no filtration system is installed, the system must be reset based on volume, and/or time at a
minimum of twice a year (at approximately 6 month intervals).
4
7b. Replace Filter
When the “Replace Filter” icon appears, the water dispenser will still function for a limited time. If the
working volume or time exceed 10% of the rated working volume or time, and the system remains in
the “Replace Filter” condition, the system will shut down and must be manually reset by pressing
+
+
following replacement of the filter (if a filtration system is installed within the system).
This reset function will work only when the “Replace Filter” icon is flashing.
The system has been designed with a memory chip function to retain critical information pertaining to
filter life (volume treated and hours of operation). During a power failure this information will
automatically be retained, and will be present upon start-up of the system following the outage.
For your added safety, if a power outage should occur when the unit is indicating “Replace Filter”, the
unit will continue to display the message upon system start-up.
NOTE: Replacement filters for your VWD8000W-F are available from the retailer where you purchased
the unit. As these are custom sized filter elements, only Vitapur replacement filters can be used in this
unit. Using alternate filters will cause the unit to malfunction and will void the warranty.
8. Hours of Operation Indicator
As it is normally recommended to replace filters on a six month basis, the unit will automatically time
its usage to a maximum working time of 4320 hours, independent of the volume of flow. Upon
reaching a total usage time of 4320 hours, the temperature of the hot and cold water and the filter
working time will flash in opposing sequence at 30 second intervals, and the “Replace Filter” indicator
will flash in sequence to remind the user to replace the filters and reset the system. To reset the
system the user must replace the filter, and press
+
+
to reset the system.
9. Volume Indicator
To view the volume of water treated (or dispensed) press the
will automatically exit to the normal display condition.
+
. Following 8 seconds the system
10. Flashing Display Screen: Leakage detector
To prevent water leakage in case of incorrect sealing of filter housings following filter replacement, the
system has been designed with a leakage detection system. When water leakage is detected, the
electronic display panel will flash and water flow will be shut off. To reset the system press and hold
the
button for 3 seconds, or disconnect power to the unit.
5
Childproof Safety Feature
To prevent hot water from accidentally harming a child, the hot water
dispenser button has a safety switch on it. Hold the knob as shown in the
illustration and turn counter clockwise, then press the red button to
dispense hot water..
DANGER: The hot water is heated to approximately 190˚ F / 88˚ C.
Temperatures above 125˚ F / 52˚ C can cause severe burns from scalding.
DO NOT ALLOW CHILDREN TO USE THE HOT WATER DISPENSING
BUTTON WITHOUT PROPER AND DIRECT SUPERVISION.
Childproof
safety
switch
Energy and Safety Tip
To conserve energy and as a secondary safety precaution, turn off the hot
water switch at the back of the water dispenser. The hot water push button
will then dispense room temperature water.
CLEANING AND MAINTENANCE
Cleaning Your Water Dispenser
IMPORTANT: Make sure you turn all power switches to the OFF position and unplug the dispenser
before performing any of the following cleaning procedures.
Cleaning the Outside of the Water Dispenser
The outside of the dispenser can be wiped clean with water dispenser cleaning solution or a mild
soap and water. Never use harsh chemicals or abrasive cleaners. Rinse thoroughly with clean water
and then dry surfaces.
Cleaning the Drip Tray
To remove, take the grill off the tray and firmly lift the tray up, dislodging it
from the guides. Drain and clean.
The drip tray should be emptied and cleaned regularly to remove spotting
and any mineral deposits. Clean with water dispenser cleaning solution or
a mild soap and water. For tough deposits, add vinegar and let it soak until
the deposits come loose. Then wash, rinse and dry thoroughly.
To replace, put the grill back on the tray and slide the tray onto the guides.
Cleaning the Condenser
Vacuum or sweep away the dust from the condenser coils at the back of
the dispenser. For best results, you can purchase a brush designed
specifically for this purpose from your local appliance store.
This will improve cooling and efficiency.
Condenser
coils
6
Draining the Reservoirs
Drain the reservoirs before and after cleaning, when going on long
vacations or if not using the dispenser for long periods of time.
IMPORTANT! Turn all power switches to the OFF position and unplug
the dispenser before performing this procedure. Dispense hot water
until temperature drops to a safe level to avoid the risk of scalding.
1. Press all dispenser buttons until water no longer comes out.
2. Place a bucket beneath the drain outlet on the back of the unit.
3. Remove the cap and plug from the drain outlet and let the water
flow into the bucket. Replace the cap and plug.
IMPORTANT: Collect the water in a container, not the drip tray.
4. Plug unit in. The reservoirs will not fill with water unless plugged in.
Drain
valve
Flushing the Reservoirs
To ensure clean, great-tasting water, it is recommended that the system be periodically flushed,
especially following long periods of non-use. Simply dispense 4-6 glasses of water from each button,
and allow system temperatures (hot and cold water) to stabilize prior to re-use.
Going Away on Vacation
When not using the dispenser for long periods of time or when going on vacation, conserve energy by
setting all power switches to the OFF position, turn the influent water line off, unplug the dispenser and
drain the reservoirs. Thoroughly flush the system upon return and startup of the dispenser.
SPECIFICATIONS
VWD8000W-F
Output per hr:
Internal Tank:
Heating Temp (approx.):
Cooling Temp (approx.):
Power Consumption:
Hot
Cold
Hot
Cold
Hot
Cold
1.2 gal / 4.6 L
0.5 gal / 2.0 L
0.3 gal / 1.1 L
0.8 gal / 3.2 L
190°F / 88°C
46°F / 8°C
450 W
85 W
WARNING: The Water Dispenser
heats and dispenses water to
190˚ F / 88˚ C which can cause
severe burns or scalding.
DO NOT ALLOW CHILDREN TO USE
THE HOT WATER DISPENSING
BUTTON WITHOUT PROPER AND
DIRECT SUPERVISION.
Childproof
safety
switch
7
TROUBLESHOOTING TIPS
Problem
Possible Cause
Suggested Solution
“E6” error message
Water level switch failure
Make sure valve at rear of unit or on
incoming water line is open.
Otherwise, unit needs servicing.
“Full” error message
Water level is too high
Influent water pressure may be too high.
Restrict water flow to reduce pressure,
and drain water from unit to reset float
switches.
If problem persists, unit needs servicing.
Water dispenser is leaking
Water connection at rear of the dispenser
is not secure.
Secure connection.
Drain cap and silicone seal are not secure.
Ensure seal is secure in drain plug and
tighten drain cap.
Water treatment system is leaking.
Refer to operating instructions supplied
by water treatment system manufacturer.
The unit is unplugged.
Plug unit into the outlet.
The circuit breaker in your home is
tripped or the fuse has blown.
Reset the breaker or replace the fuse.
Power switches are not turned on at
back of unit.
Turn switches to the ON position.
Temperature limit tripped.
Set all power switches to OFF position,
wait 5 minutes, then set all power
switches to the ON position. Wait 30
minutes for the water to heat or cool.
Thermostat needs to be adjusted colder.
Adjust temperature level to achieve
desired temperature.
The unit is unplugged.
Plug unit into the outlet.
Mineral deposits clogging tanks.
See Flushing the Reservoirs.
Possible air pocket.
Push in the dispenser buttons to
establish flow.
Filters are clogged.
Replace filters and reset filter reminder.
Water dispenser is uneven.
Make sure the dispenser is on an even
surface that can support its full weight.
Water is not hot or
cold enough
Water dispenser is not
dispensing water
Water dispenser is noisy
8
ATTENTION: Do not return this product to the store. For questions on operation, assembly
or parts, please contact us at www.greenwayhp.com or 1-866-253-0447.
FREQUENTLY ASKED QUESTIONS
Q: Why does my water dispenser not dispense when the power cord is unplugged, even though
it is a direct connection?
OR
Will my water dispenser work during a power failure?
A: As your water dispenser is equipped with an electronic solenoid valve to prevent water flow
unless required, the system will not function unless there is power to the unit. This feature has
been added as a safeguard to your system.
Q: Do I require a separate water treatment system with this dispenser?
A: The use of a separate water treatment system is optional, and not required for normal operation.
Addition of a treatment system is solely based on the requirements of the consumer.
Q: Do I have to keep hot switch on if I’m not using hot water?
A: You can turn the hot switch off. However, water should be drained from the tap periodically to
circulate the water in the reservoir.
99