1
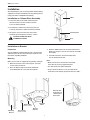
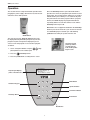
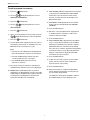
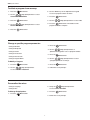
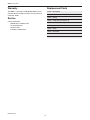
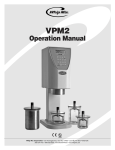
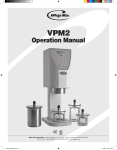
VPM2 Operation Manual Whip Mix Corporation • 361 Farmington Ave. • P.O. Box 17183 • Louisville, KY 40217-0183 USA 502-637-1451 • 800-626-5651 • Fax 502-634-4512 • www.whipmix.com VPM2 Operation Manual Features • Premixing – The Vacuum Mixer includes a unique mixing feature which eliminates the need for hand incorporation. It gives the user the option to premix up to 8 stages. Premixing is customizable with options to adjust the speed, time and direction in all 8 stages. • The Whip Mix VPM2 is designed for mixing all types of gypsum, plaster and investment material. • Powerful Vacuum – The twin-chamber vacuum pump quickly creates a high vacuum. • Hands Free Mixing – The powerful vacuum allows the unit to hold the Vac-U-Mixer to the unit. • Program Descriptions – Up to 9 characters may describe the type of program stored in any location for easy recall. • 30 Flexible Programs – Advanced electronics allow user to pre-program speed and mix time for specific materials. Specifications Dimensions: 59.375 cm H x 18.7325 cm W x 26.670 cm D (23.375" H x 7.375" W x 10.5" D) Display Characters: 4 Lines x 20 Characters Operational Altitude: Sea level – 2,000 meters (6,560 feet) Weight: 20.4 kg (45 lbs.) Operational Temperature: 13° C – 41° C (55° F – 105° F) Voltage: 100 – 120 Vac, 5A 200 – 240 Vac, 2.5A 50/60 Hz Maximum Relative Humidity: 80% for temperatures up to 35° C (95° F) decreasing linearly to 50% relative humidity at 35° C (104° F) Mixing Speed: 100 Rpm – 500 Rpm (Premix, 100 Rpm – 400 Rpm) Pollution Tolerance: Level 2 (in accordance with IEC 664) Recommended Environment: Vertical position, indoors within operational parameters (see Installation for more detail) Vacuum: 27.5 In Hg (930 mbar) User Programs: 30 Mixing Time: 1 Second – 255 Seconds (4.25 Minutes) Fuse Type: 5 Amp Fast Acting Contents Accessories #6585 500 mL Vac-U-Mixer 29344 300 mL Vac-U-Mixer Power Cord — 1 29345 500 mL Vac-U-Mixer User Manual — 1 29346 875 mL Vac-U-Mixer Extra Vacuum Filter — 1 29348 1,200 mL Vac-U-Mixer Allen Wrench — 1 29352 350g Flexible Vac-U-Mixer Base Cover 29355 650g Flexible Vac-U-Mixer Column/Base Assembly Hardware 15680 Spatula 29343 Bench Stand 29342 Wall Bracket 2 VPM2 Operation Manual Symbols Used = Safety Ground = Warning or Caution = Important Note Cautions CAUTION: Never place your finger inside the vacuum casting for any reason or injury could result. If the mixing paddle will not rotate, contact service provider. CAUTION: Always place one hand below the mixing bowl before pressing the Start/Stop button to release vacuum. CAUTION: Do not overfill the mixing bowl (past the max fill line on the bowl) or material can be drawn into the vacuum pump or filter, possibly plugging the vacuum line. If the mixing bowl can easily be removed during a mixing cycle or the “>>>>” symbols do not extend all the way across the display, then the vacuum is not at an optimal level. Failure to address a weak vacuum can eventually cause the mixing bowl to drop to the countertop. CAUTION: If the VPM2 vacuum mixer is not used in accordance with the instructions and warnings in this User Manual, the protection provided by the mixer may be impaired. CAUTION: If the detachable AC power cable is replaced for any reason, the new cord must have equivalent or greater safety ratings. The ratings are embossed along the length of the cord. CAUTION: If the mixing bowl will not support itself even though the display indicates sufficient vacuum is present, it means material is blocking the vacuum line between the bowl and the pump. Have a qualified service person change the inline trap filter inside the mixer. 3 VPM2 Operation Manual Installation After unpacking the unit, check for possible damage during shipping or transport. Should there be any damage please notify your dealer or Whip Mix immediately. Mixer Installation on Column/Base Assembly 1. Connect the base to the stand column using the two flat washers, two lock washers and two 1/4" x 1/2" bolts provided. 2. Assemble the column to the mixer using the four 1/4" bolts, flat washers and lock washers provided. Stand Column 3. The power connector in the back of the mixer should be open through the slot in the column. CAUTION: Do not use near Flammable Liquids Base Installation on Bracket 3. Slide the VPM2 down onto the wall mount bracket. (Make sure the place the unit is mounted can handle the weight.) Preparation The only hardware supplied with the unit is one #8-32 nut and the bracket clip. See the instructions below for more information regarding hardware. 4. Install the #8-32 nut onto the threaded stud. See the illustrations below. Mounting Note: Make sure the wall can support 20.4 kg (45 lbs.) of weight. • Make sure the unit is anchored on wall studs, either directly or using a plywood board. 1. Mount the bracket to the wall using four 1/4" bolts, screws and lock washers. • The drive shaft must point downward. 2. Place the Bracket Clip on the back and bottom of the VPM2 with the screw hole facing down. • Keep a minimum distance of 9" (23 cm) between the bottom of the mixing ring and the bench or table. Move the unit down from top of the bracket until secure 2 Vacuum Filters Bracket Nut (hardware included) Mounting Bracket Bracket Clip Bracket Clip Slot (hardware included) 4 VPM2 Operation Manual Operation Once the Start/Stop button is pressed and the bowl is placed on the chuck, the program begins and the vacuum pump starts. The vacuum will rise until there is no need to hold the bowl in place. Mixing occurs automatically from this point until the end of the program. When a program finishes, the VPM2 will play the program finished tune repeatedly and the vacuum will continue to run until the Start/Stop button is pressed. The vacuum mixer is ready for immediate operation after plugging the power supply cable into the back of the unit. Switch the unit to “ON” position. Note: Make sure to support the bowl when the Start/Stop button is pressed at end of mix cycle. Vacuum is released once Start/Stop is pressed and cycle ends allowing paddle/bowl assembly to separate from the unit. On/Off Switch The start-up message “Whip Mix VPM2 Ver. X.X” will be displayed briefly followed by Program 0 (or the last program run). Once Program 0 is displayed you can choose to run that program or select another program as follows: 1. Select a Program Number using the (Arrow) buttons or the number pad. 2. Press the Hold the bowl and paddle up until the vacuum supports both and the paddle begins to turn. Step Start/Stop button. 3. Place the paddle/bowl assembly into the chuck. Liquid Crystal Display (4 lines x 20 characters) Prgm Name: Program Number: 0 Mix Time: 5 Press MENU for Setup Menu Button 16-Button Keypad Up Arrow Button Down Arrow Button Start/Stop Button Enter Button Back Button 5 VPM2 Operation Manual To add a program to memory: 1. Press the 11. Pre Vacuum? No will be displayed. If Pre Vacuum is desired press an Arrow button and the Enter button then select the amount of time for Pre Vacuum. If no Pre Vacuum is desired press the Enter button again. Menu button. Step (Arrow) buttons to select 2. Use the Add/Delete Programs. 3. Press the Enter button. Step (Arrow) buttons to select 4. Use the 12. Mix Speed? will be displayed. Use the number pad to enter the desired Mix Speed (100 rpm – 500 rpm). Add Program. 5. Press the 13. Press the Enter button. Enter button. 14. Mix Time – using the alphanumeric keypad enter a number between 1 and 255 seconds for the amount of mix time needed. 6. Select a memory number slot to program using the Step (Arrow) buttons or the number pad. 7. Press the 15. Press the Enter button. Enter button. 16. Post Vacuum? No is displayed. Use the Arrow keys to choose yes or no. Mix cycle w/o POST VAC beeps immediately after mixing is complete. POST VAC allows for continued vac for allotted time after mix is complete. Important for Phosphate Investments and yes, if you did not program PST VAC you could achieve it by ignoring the END CYCLE tune for 10–15 seconds. 8. Use the alphanumeric keypad to enter the name of the program (9 characters are available). Press the Enter button after each letter to accept. Note: • Pressing the same alphanumeric keypad button will scroll through the characters on that button. • Pressing the Enter button without selecting a character will move the cursor right. 17. Press the Enter button. 18. If yes was selected in step 16, use the number pad to enter the amount of time needed for Post Vacuum (0 – 30 seconds). • Use the Down Arrow key to move back and erase a character. 9. Once all the characters have been entered press the Enter button until the next screen is displayed. 19. Press the Enter button. 20. When the program is complete the Main Menu will be displayed and another memory slot may be selected for programming. 10. Premix Yes? will be displayed. If no premix is desired press an Arrow button to change from yes to no and press the Enter button again. If a Premix is desired press the Enter button and enter the speed, time and direction as prompted. The addition of the program should be complete. Press Enter button to select program to run. 6 VPM2 Operation Manual To delete a program from memory: 1. Press the 6. Use the Arrow keys or the alphanumeric keypad to select a program number to delete. Menu button. 2. Use the Step (Arrow) buttons to select Add/Delete Programs. 3. Press the 7. Press the 8. Use the Enter button. Step (Arrow) buttons to select Yes. 9. Press the Enter button. The deletion of the program should be complete. 4. Use the Step (Arrow) buttons to select Delete Program. 5. Press the Enter button. Enter button. Change a specific program parameter: 3. Press the • Change Mix Time • Change Mix Speed 4. Use the Step (Arrow) buttons or alphanumeric keypad to select a program number. • Change Premix • Change Pre Vacuum 5. Press the • Change Post Vacuum Enter button. 6. Use the Step (Arrow) buttons to select a program parameter to change. • Change Program Name To Modify a Program: 1. Press the Enter button. 7. Press the Menu button. Enter button. 8. Follow the screen prompts. 2. Use the Step (Arrow) buttons to select Modify Program. Personalize the mixer: • Change Language 2. Using the Step (Arrow) buttons to select Setup Options. • Change Tune To Change Setup Options: 1. Press the 3. Press the Menu button. Enter button. 4. Follow the screen prompts. 7 VPM2 Operation Manual Premix/Mixing Program 2 – Invest 60 Before using – rinse the bowl and lid assembly. Shake off the excess water. This is most important whenever water and material are measured. Proportion water and material (water first – material next) into bowl according to manufacturer’s specifications. Premix Premixing may eliminate the need to hand incorporate the mix before placing the bowl into the mixer. The unit includes a default premix option and also the ability to customize the premix parameters according to material and volume being mixed. The allowable parameters include the ability to customize the speed, time and paddle direction in up to eight stages. Stage 1 100 RPM 3 seconds CW Stage 2 200 RPM 3 seconds CCW Stage 3 300 RPM 3 seconds CW Stage 4 400 RPM 3 seconds CCW Main Mix 450 RPM 60 seconds CW Post Vac. 10 seconds Mix Program 3 – Invest 90 Premix Note: When mixing denser stones in the #7685, 1200ml bowl, premixing by hand is recommended to prevent motor stall. Stage 1 100 RPM 3 seconds CW Stage 2 200 RPM 3 seconds CCW The default parameters are: Stage 3 300 RPM 3 seconds CW CW = CLOCKWISE Stage 4 400 RPM 3 seconds CCW Main Mix 450 RPM 90 seconds CW Post Vac. 10 seconds Mix CCW = COUNTER CLOCKWISE Program 0 – Gypsum Premix Program 4 – Formula 1 Stage 1 100 RPM 3 seconds CW Stage 2 200 RPM 3 seconds CCW Premix Stage 3 300 RPM 3 seconds CW Stage 1 100 RPM 3 seconds CW Stage 4 400 RPM 3 seconds CCW Stage 2 200 RPM 3 seconds CCW Stage 5 400 RPM 3 seconds CW Stage 3 300 RPM 3 seconds CW Stage 6 400 RPM 3 seconds CCW Stage 4 400 RPM 3 seconds CCW Stage 7 400 RPM 3 seconds CW Stage 8 400 RPM 3 seconds CCW Main Mix 450 RPM 120 seconds CW Post Vac. 0 Main Mix 450 RPM 30 seconds CW Post Vac. 0 Mix Mix The mixing portion of the program is customizable according to the needs of the material manufacture with the ability to include a premix, pre vacuum and post vacuum. All mixing stages include the ability to customize the speed, time and direction of the paddle. Program 1 – Invest 45 Premix Stage 1 100 RPM 3 seconds CW Stage 2 200 RPM 3 seconds CCW Stage 3 300 RPM 3 seconds CW Stage 4 400 RPM 3 seconds CCW Main Mix 450 RPM 45 seconds CW Post Vac. 10 seconds Before starting a program, make sure the paddle and bowl are clean. Start the program and place the appropriate mixing paddle on the Vac-U-Mixer bowl. Hold the bowl and paddle up until the vacuum supports the bowl and paddle. The rest is automatic. Mix 8 VPM2 Operation Manual Troubleshooting Start Button Does Not Start the Program – Reset the unit (cycle the power off then back on) and try again. If the problem persists the button is probably bad and needs to be replaced. Call technical support. Paddle Jams – If the mixing paddle jams for any reason, switch the power to the mixer off, clear the jam, then turn the power back on to reset the fault condition, then test the mixer with an empty mixing bowl/lid to ensure normal operation. If turning the power off, then on does not reset the fault, disconnect the power cord from the unit and check the fuse located in the module where the power cord inserts. Maintenance/Cleaning Painted Surface – The VPM2 has been painted with special epoxy based powder coat paint. To clean the surface, use Windex® or water and a clean cloth. Never use Windex® on the display screen as this may cause the screen to become dry and easy to scratch. Unit Will Not Turn On – Check the power cord to make sure the unit is plugged into a working outlet. Make sure the power switch is in the on position. Check the fuse in the fuseholder of the power connector. The unit is shipped with a spare fuse in the fuseholder. Note: Use only a 5 amp fast acting fuse. Bowls – Keep bowls clean. Residual materials, set gypsum or investment, can create contamination issues. Replace bowls when they show signs of wear. Worn bowls can reduce reactions of phosphate investments resulting in casting inconsistency. For a list of solvents that will harm the bowls call technical support. Motor Will Not Start – Check for vacuum, by looking at the vacuum display bars >>>>. If the bars do not go all the way across the screen, vacuum is low. If the unit does not sense enough vacuum the motor will not start. Make sure all seals are in place and are clean and free of debris. Make sure the vacuum filter is not clogged. Make sure the paddle is engaged properly. Try a different paddle and bowl. If they work, order a replacement for the size that does not work. If a loud clicking noise is heard when the paddle is supposed to begin turning call technical support. O-Ring Maintenance – Lubriplate has been applied to the O-Rings of the VPM2 to maintain suppleness. If the O-Rings dry they may not seal properly. Apply Lubriplate monthly to maintain the O-Rings on both the lids and VPM2. Vacuum Filter – An extra filter has been supplied with the VPM2. Replace the filter when the vacuum is clogged or the filter is soiled. Preventing the vacuum pump becoming contaminated will extend the life of the VPM2. Program Restarts – If the vacuum drops in the middle of a program, the program will play a warning sound and bowl will drop. The program will stop and go back to the program selection screen. Check to make sure the correct program is selected. Reposition the bowl and ensure a good seal before leaving the bowl. To clean filter: Rinse with water and allow to dry before replacing in VPM2. Display Is Not Working – Check to see if the unit is on. Reset (cycle the power off then back on) the unit; if the start-up tune is played but the display is still blank call technical support. 9 VPM2 Operation Manual Warranty Replacement Parts The VPM2 is covered by a standard Whip Mix three year warranty. All parts and labor for three years on purchases made after 9/1/05. Part # Description 29347 Inlet Filter Service 29349 O-Ring 29350 5 Amp Fuse (Package of 2) 29351 Control Pad Overlay 29356 Logic Board 29358 Pump 29359 Inline Filter 29360 Motor Driver Board 08940 Drive Nut Assembly Contact Information: 800-626-5651 or 502-637-1451 361 Farmington Ave. P.O. Box 17183 Louisville, KY 40217 USA MPL30485 08/13 10