1
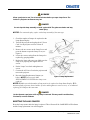
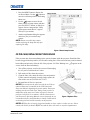
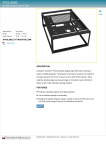
LX1500 Lamp/Filter Replacement
Instruction Sheet
INTRODUCTION
These instructions outline the details for Lamp and Filter replacement in the LX1500 projector (Model
No. 103-013100-01). The lamp is located at the rear of the projector (below the input panel) and can be
accessed by removing the lamp door. Use only a Christie approved Lamp and Filter Kit for your
specific projector model.
KITS REQUIRED
003-120338-01 (Replacement Lamp Type No.: POA-LMP109)
003-001733-01 (Replacement Air Filter)
INSTRUCTIONS
This Projector is equipped with 4 Projection Lamps to ensure brighter image and those lamps are
controlled by the Lamp Management Function. The Lamp Management Function detects the status of
all lamps and shows the status on screen or on the LAMP REPLACE indicator. This function also
automatically controls the Lamp Mode when any of lamps is out for the end of life or malfunctions.
Refer to the User’s Manual for complete details on Lamp Management.
LAMP REPLACEMENT PROCEDURE
When the projection lamp of the projector reaches its end of life, the Lamp Replacement icon
appears on the screen and LAMP REPLACE indicator lights orange. Replace the lamp with a new one
promptly. The timing when the LAMP REPLACE indicator should light is dependent on the lamp
mode.
DANGER
Disconnect all power sources to the projector before opening lamp cover.
LX1500 Lamp/Filter Replacement Instruction Sheet
020-000013-01 Rev. 1 (09/07)
1 of 4
WARNING
Allow a projector to cool, for at least 45 minutes before you open Lamp Cover. The
inside of a projector can become very hot.
DANGER
Do not drop the lamp assembly or touch a glass bulb! The glass can shatter and may
cause injury.
NOTICE: For continued safety, replace with a lamp assembly of the same type.
1. Check the number of lamp to be replaced on the
Lamp Status Display.
2. Turn off the projector and unplug the AC Power
Cord. Let the projector cool for at least 45
minutes.
3. Remove the two screws on the Lamp Cover and
press the button to open the Lamp Cover (see
Figure 1).
4. Loosen two screws and pull out the Lamp to be
replaced by grasping handle.
5. Replace the Lamp with a new one. Make sure the
Lamp is set properly, then tighten the two
screws.
6. Put the Lamp Cover back and tighten two
screws.
7. Connect the AC Power Cord to the projector and
turn on the projector.
8. Reset the Lamp Replacement Counter (see
below). NOTE: Do not reset LAMP
REPLACEMENT COUNTER when lamp is not
replaced.
Figure 1 Lamp Replacement
NOTES: 1) Make sure which number of lamp needs to be replaced on Lamp Status Display. 2) To
maintain quality of picture (better balance of color and brightness in entire screen), we recommend
replacing all 4 lamps at the same time.
DANGER
Do Not Operate a projector while any lamp is removed. This may result in malfunctions,
fire hazard, or other accidents.
RESETTING THE LAMP COUNTER
Reset the Lamp counter after the lamp is replaced. This will turn off the LAMP REPLACE indicator
and the Lamp replacement icon will disappear.
2 of 4
LX1500 Lamp/Filter Replacement Instruction Sheet
020-000013-01 Rev. 1 (09/07)
1. Press the MENU button to display the
On-Screen Menu. Use the
buttons to
move the red frame pointer to the Setting
Menu icon
2. Use the
buttons to move the red
frame pointer to Lamp counter and then
press the SELECT button. A dialog box
appears. Select a lamp and the “Lamp
replacement counter Reset?” appears.
Select [Yes] to continue.
3. Another confirmation dialog box appears
and select [Yes] to reset the Lamp
counter.
NOTE: Do not reset the Lamp counter
without replacing the lamp and only after
replacing the lamp.
Figure 2 Reset Lamp Counter
FILTER CARE/REPLACEMENT PROCEDURE
Filter prevents dust from accumulating on the optical elements inside the projector. Should the filter
become clogged with dust particles, it will reduce cooling fans’ effectiveness and may result in internal
heat buildup and adversely affect the life of the projector. If a Filter Warning icon
screen, clean the filter immediately.
appears on the
1. Turn off the projector, wait for fans to tunr off and unplug
the AC power cord from the AC outlet.
2. Pull out the air filter from the projector.
3. Clean the filter with a brush to remove dust and particles.
If filter cannot be adquately cleaned, simply replace the
filter with a new one (P/N 003-001733-01).
4. Re-install the air filter in a projector.
NOTICE: Do not operate the projector with the Air Filter(s)
removed. Dust may accumulate on the LCD Panels and
Projection Mirrors degrading the picture quality. Do not put
anything into the air intake vents. Doing so may result in a
malfunction of the projector. Failure to properly clean the
projector's air filters (in accordance with the instructions in
your Projector's Operating Manual, or more frequently in any
environment which is somewhat dusty or smoky) could result in
overheating and will void the warranty on the projector.
Figure 3 Replace Filter
NOTES: 1) If the filter is heavily clogged and unable to clean, replace it with a new one. Please
consult your dealer for details. 2) Do not wash the filter with water or any other liquid matter.
LX1500 Lamp/Filter Replacement Instruction Sheet
020-000013-01 Rev. 1 (09/07)
3 of 4
RESETTING THE FILTER COUNTER
Be sure to reset the Filter counter after cleaning
or replacing the filter.
1. Press the MENU button to display the OnScreen Menu. Use the
buttons to move
the red frame pointer to the Setting Menu
icon.
2. Use the
buttons to move the red frame
pointer to Filter counter and then press the
SELECT button. A dialog box appears
showing the Used Time option you can
scroll to view the remaining Time options.
Use the
buttons to select Used time.
3. Used Time shows the total accumulated time
of the filter use, a Timer Setting option, and
the Reset option. Select Reset and the “Filter
counter Reset?” appears. Select [Yes] to
continue.
4. Another confirmation dialog box appears,
select [Yes] to reset the Filter counter.
Figure 4 Reset Filter Counter
NOTE: Do not reset the FIlter Counter without
replacing the filter and only after replacing the lfilter.
4 of 4
LX1500 Lamp/Filter Replacement Instruction Sheet
020-000013-01 Rev. 1 (09/07)