1
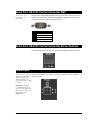
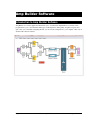
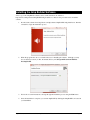
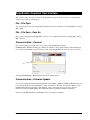
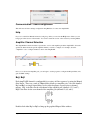
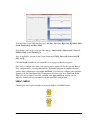
AmpTraXX TM 16 Channel Vehicle Amplifier with DSP User’s Manual Alcorn McBride Inc. 3300 S. Hiawassee Rd. Building 105 Orlando, Florida 32835 tel: (407) 296-5800 fax: (407) 296-5801 http://www.alcorn.com [email protected] Document Number 110-104365.50 Copyright 2014 Alcorn McBride, Inc. All rights reserved. AmpTraXX™ is a trademark of Alcorn McBride Inc., all rights reserved. Every effort has been made to assure the accuracy of the information contained in this manual, and the reliability of the Alcorn McBride AmpTraXX hardware and software. Errors can sometimes go undetected, however. If you find one, please bring it to our attention so that we can correct it for others. Alcorn McBride welcomes comments and suggestions on the content and layout of its documentation. Applications described herein are for illustrative purposes only. Alcorn McBride Inc. assumes no responsibility or liability for the use of these products, and makes no representation or warranty that the use of these products for specific applications will be suitable without further testing or modification. Alcorn McBride products are not intended for use in applications where a malfunction can reasonably be expected to result in personal injury. Customers using or selling Alcorn McBride products for use in such applications do so at their own risk, and agree to fully indemnify Alcorn McBride for any damages resulting from such improper use or sale. Product Design: Jim Carstensen, Martin Chaney, Scott Harkless, Joy Burke, Steve Alcorn Page ii Alcorn McBride AmpTraXX User’s Manual • Rev 1.0 • September 9 2014 Table of Contents Welcome! ................................................................................... 1 Features ..................................................................................... 2 Technical Support..................................................................... 4 Getting Started .......................................................................... 5 Let’s make some noise!............................................................................................ 5 AmpTraXX Software Tutorial ...................................... Error! Bookmark not defined. Front Panel ................................................................................ 6 Power LED .............................................................................................................. 6 Signal Present and Clip Indicators.............................. Error! Bookmark not defined. Volume Controls ........................................................ Error! Bookmark not defined. Rear Panel ............................................................................... 10 Configuration DIP Switches ...................................................................................... 8 Disable Front Panel ....................................... Error! Bookmark not defined. Reset Factory Defaults ................................................................................ 8 Firmware Update Mode ............................................................................... 8 Ground Lift .................................................... Error! Bookmark not defined. Unbalanced Inputs ................................................................................................... 9 Balanced Inputs (Optional) ......................................... Error! Bookmark not defined. Speaker Terminals ................................................................................................. 10 Serial Port: RS-232C Control Connector ................................................................ 11 Power Input and Switch.......................................................................................... 11 AmpTraXX Configuration Software ......... Error! Bookmark not defined. Introduction to AmpTraXX Software ....................................................................... 12 Installing the AmpTraXX Configuration Software .................................................... 13 AmpTraXX Application Modes .................................... Error! Bookmark not defined. Offline Mode .................................................. Error! Bookmark not defined. Live Mode...................................................... Error! Bookmark not defined. Firmware Update Mode ................................. Error! Bookmark not defined. AmpTraXX Application Controls ................................. Error! Bookmark not defined. Help .......................................................................................................... 14 Load Configuration File.................................. Error! Bookmark not defined. Save Configuration File ................................. Error! Bookmark not defined. Configuration ................................................. Error! Bookmark not defined. Connect to AmpTraXX ................................... Error! Bookmark not defined. Disconnect from AmpTraXX........................... Error! Bookmark not defined. Store Settings to AmpTraXX .......................... Error! Bookmark not defined. Retrieve Settings from AmpTraXX ................. Error! Bookmark not defined. Update AmpTraXX Firmware ......................... Error! Bookmark not defined. Front Panel Status Indicator........................... Error! Bookmark not defined. Gain Control .................................................. Error! Bookmark not defined. September 9, 2014 • Alcorn McBride AmpTraXX User’s Manual • Rev 1.0 Page iii Filter Type ..................................................... Error! Bookmark not defined. Filter Quality .................................................. Error! Bookmark not defined. Frequency ..................................................... Error! Bookmark not defined. Master Control Panel ..................................... Error! Bookmark not defined. Simple Serial Control ............................................................. 20 Select Filter................................................................ Error! Bookmark not defined. Set Gain................................................................................................................. 20 Set Filter Quality ........................................................ Error! Bookmark not defined. Set Frequency ........................................................... Error! Bookmark not defined. Store Settings ............................................................ Error! Bookmark not defined. Reset Amplifier....................................................................................................... 21 Version Request .................................................................................................... 21 Advanced Serial Control ............. Error! Bookmark not defined. Error Codes ........................................................................................................... 22 70V/100V Output Option.............. Error! Bookmark not defined. Updating Your Firmware ............. Error! Bookmark not defined. Troubleshooting Guide / FAQ................................................ 23 Specifications .......................................................................... 24 Page iv Alcorn McBride AmpTraXX User’s Manual • Rev 1.0 • September 9 2014 Welcome! Thank you for purchasing The Alcorn McBride AmpTraXX™ sixteen channel vehicle amplifier and DSP system. AmpTraXX gives you a total of 400W RMS into sixteen channels (25Wx16) of amplification and DSP in a compact chassis. Specially designed for vehicle applications, it's a perfect companion to the Alcorn McBride RideTraXX 16-channel solid-state audio playback system. Each AmpTraXX channel can provide up to 25W RMS, each with independent DSP capability including a 9-band EQ, dynamic range and compression control (DRC), as well as gain and stereo/mono mixing capability. Channel pairs can also be bridged to provide 50W if more power is required. The AmpTraXX is configured using an easy-to-understand graphical Windows and MacOS compatible program. Setup is simple: select a channel, click on the DSP element you want to program and type in the desired frequency or gain settings. Do this for all 16 channels and download to the unit via USB or serial. All settings are non-volatile, and the USB and serial interfaces can also be used for on-the-fly volume and mute adjustments for installations equipped with a control system. The AmpTraXX can even be controlled directly from an Alcorn McBride RideTraXX or AM4 eliminating the need for an external control system altogether. Each amplifier is completely protected against short-circuit and overdrive events, and all inputs and outputs are on vibration-resistant, locking connectors to guarantee years of maintenance-free operation. A dual-color LED constantly displays the status of the unit. The AmpTraXX is the perfect solution for any vehicle-based system that requires up to 16 amplified, DSP configured audio channels. Applications include theme park ride vehicles, multi-lingual transportation systems, and tour buses. This manual describes the various connectors and controls on the AmpTraXX unit, and describes the best way to use the AmpTraXX Windows software to set up your system. A serial protocol section is also included to allow you to program RS-232 control systems for dynamic volume control of the AmpTraXX. Product files for Alcorn McBride Show Controllers are available for AmpTraXX. Please browse the table of contents and install the AmpTraXX programming software on your PC. Once you’re connected, you’ll likely find that your AmpTraXX is one of the most versatile pieces of audio gear you’ve ever used! We would like to provide you with Firmware and Software updates and notify you when additional features become available. If you are interested, please subscribe to our AmpTraXX mailing list at http://alcorn.com/library/lists/subscribe.html. September 9, 2014 • Alcorn McBride AmpTraXX User’s Manual • Rev 1.0 Page 1 Features The AmpTraXX offers a wide range of features including: • 16 Channels x 25W Each (into 8 ohms) • Outputs Capable of Driving 4 Ohm Speaker Loads • Bridge-able Outputs for 50W Operation • Outputs Protected Against Over-Current and Short Circuit Conditions • Independent Channel Volume Controls With Gain of 24dB to Mute with 0.125-dB Resolution Steps • Programmable Two-Band Dynamic-Range Control for Each Channel • 10 Programmable Biquads per Channel for Speaker EQ and Other Audio-Processing Features • Serial RS-232 or USB Control • Front Panel Status LED indicator • Locking Vibration-Proof Connectors • 12-24VDC Power Input (Full power available with 20-24VDC power input) Page 2 Alcorn McBride AmpTraXX User’s Manual • Rev 1.0 • September 9 2014 September 9, 2014 • Alcorn McBride AmpTraXX User’s Manual • Rev 1.0 Page 3 Technical Support You can obtain information about specifying, installing, configuring, updating and programming your Alcorn McBride AmpTraXX from several sources: Page 4 For… Contact… When?… Telephone Support Fax Support Knowledge Base (FAQ) E-mail Support Firmware Updates (407) 296-5800 (407) 296-5801 http://www.alcorn.com/kb [email protected] http://www.alcorn.com/support M-F 9am–6pm (EST) M-F 9am-6pm (EST) Any Time Any Time Any Time Alcorn McBride AmpTraXX User’s Manual • Rev 1.0 • September 9 2014 Getting Started So you don’t have the time or patience to read this stupid manual. You just want to know how to make your AmpTraXX do something useful. We understand your situation perfectly, and we have written this section especially for you. Let’s make some noise! Follow these simple steps to have your AmpTraXX working right out of the box. 1. Remove your AmpTraXX from its cushiony bed of packing material, and make sure that the parcel service did not use it as a basketball during shipment. 2. Verify that all DIP switches on the side of the unit are in the OFF (Down) position. 3. Wire up some speakers to one of the supplied speaker wiring harnesses and plug them into the Speaker Connector on the rear panel of the AmpTraXX. For starters use Channels 1 and 2. 4. Connect your audio gear (CD Player, MP3 Machine, etc.) to the unbalanced RCA cable inputs labeled “1” and “2” and plug the input cable into the Input Connectors on the front panel of the AmpTraXX. 5. Install the AmpTraXX software onto a PC or Mac and connect up the serial or USB connection. 6. Connect up an 18-24VDC power source to the power input (cable supplied). 7. As your AmpTraXX comes to life, you should see the status LED blink Green a few times indicating initialization. 8. Once you start your audio source you should hear sound from the speakers. At this time you can open the AmpTraXX software and use it to configure the unit. You can adjust volume using the Master Volume slider, or double-click on the Biquad blocks to select various EQ profiles and other DSP functions. September 9, 2014 • Alcorn McBride AmpTraXX User’s Manual • Rev 1.0 Page 5 Front Panel The front panel of the AmpTraXX contains the Audio Input connectors, the USB port, and the dual-color Power/Status LED. Power/Status LED A Green/Red LED indicates the current status of AmpTraXX. Here is a table explaining the different states of this LED: Status Description Off Blinking Green Quickly LED State No Power Power-up Initialization Blinking Red Slowly (1 sec.) Firmware Update Mode This one is pretty obvious. AmpTraXX is initializing its internal hardware AmpTraXX is waiting for a firmware upgrade – If you do not wish to update the firmware, return DIP switch #2 to the DOWN position. Amplifiers are active, and everything is happy and normal. AmpTraXX has experienced a serious error. See below for conditions which can cause an error. On Green Normal Operation 3 Red blinks – pause Error* *Error Conditions that can cause the LED to blink Red: 1) Speaker connection mis-wire (i.e. short circuit or less than 4 ohm load) 2) Over-Temperature 3) Too High or Too Low Power Supply Input Voltage 4) Not enough current from the Power Supply 5) Serial Communication Error 6) Speaker channels wired for Bridged operation without corresponding DIP switch position set correctly. The LED will continue to blink Red even though the error condition is removed. The LED will return to Normal (Green) when the Fault Status is read serially or the system is reset. Page 6 Alcorn McBride AmpTraXX User’s Manual • Rev 1.0 • September 9 2014 USB You can connect to the USB interface to configure and control the AmpTraXX using the AmpTraXX Configuration software or external control system. September 9, 2014 • Alcorn McBride AmpTraXX User’s Manual • Rev 1.0 Page 7 Configuration DIP Switches The configuration DIP switches are located on the right side of the AmpTraXX. Changing the states of these switches alter the behavior of AmpTraXX. See the descriptions below. Program Enable If you want to have the settings selected in the AmpTraXX configuration software stored permanently to the unit and be restored on the next power-cycle, place the 1st DIP switch in the UP position. If this switch is DOWN then any settings sent from the AmpTraXX configuration software or external control system will not be stored on the unit and not be set on power-up. ENABLE DISABLE Firmware Update Mode While in Firmware Update Mode, AmpTraXX will not operate normally. All filters and amplifiers will remain off until this switch is returned to the ON state. Whenever switch #2 is in the UP position, AmpTraXX will be in Firmware Update Mode. In this mode of operation, AmpTraXX will sit in an idle state and wait for a firmware update via RS-232 or USB. For a detailed explanation on Updating AmpTraXX firmware, see the Updating Your Firmware section. UPDATE NORMAL Reset Factory Defaults Simply toggle the Factory Defaults switch Up then Down to reset the unit to factory default settings. The 3rd DIP switch position is used to reset AmpTraXX settings to factory defaults. Any stored DSP or gain settings will be erased from non-volatile memory and restored to their factory defaults. It may take several seconds Note: It will take several seconds to complete the loading of the default settings, for the Factory defaults to during which time the led will blink Green. be loaded. Once loaded, this DIP switch should be switched ON once again. There is no need to power RESET NORMAL cycle AmpTraXX to perform this reset. Page 8 Alcorn McBride AmpTraXX User’s Manual • Rev 1.0 • September 9 2014 Reset The 4th DIP Switch will initiate a software reset to the unit. RESET NORMAL Channel Bridging DIP Switches An 8-Position DIP switch located on the side of the AmpTraXX is used to enable channel pairs for parallel bridge-tied operation. Each DIP switch position corresponds to a channel pair, and when in the UP position it configures the channel pair to output up to 50 watts together instead of 25W/channel. For example, turning on switch position #1configures speaker outputs 1-2 for bridged operation, switch #2 configures speaker outputs 34 for bridged operation and so on. IMPORTANT: The AmpTraXX evaluates the state of the bridge enable DIP switch only once on boot-up. Therefore, always set this DIP switch before applying power. Changing this DIP switch after power is applied will not configure the output for bridged operation, and if the speakers are wired for bridged operation without the channel pair configured accordingly damage to the unit may occur! When operating channels in bridged mode only one input channel (the odd numbered channel) is used. Connect the (+) and (-) of the 2 corresponding speaker outputs together to form the connection to a single 4-8 ohm loudspeaker. An example connection diagram is shown below: September 9, 2014 • Alcorn McBride AmpTraXX User’s Manual • Rev 1.0 Page 9 Rear Panel The rear panel contains the speaker output terminals, the RS232 connectors, and the power input connector. Unbalanced Inputs Unbalanced Inputs are high-impedance (10k) linelevel inputs. Two locking, vibration-proof connectors are used for the 16 unbalanced audio inputs. A breakout cable is supplied with female RCA connectors, one for each input. Important: Never connect or disconnect inputs with power applied otherwise damage may occur to your speakers, the AmpTraXX, or your ears! Speaker Outputs Speaker outputs are designed to drive 4 to 8 ohms at 25W RMS/CH. Sixteen pairs of speaker outputs are split among two vibration-proof connectors. A breakout cable is supplied to which speaker cables can be conveniently spliced into. Important: Speaker outputs must never be connected to ground otherwise damage may occur to the AmpTraXX! Also Important: Never connect or disconnect speaker outputs with power applied otherwise damage may occur to your speakers, the AmpTraXX, or your ears! Page 10 Alcorn McBride AmpTraXX User’s Manual • Rev 1.0 • September 9 2014 Serial Port: RS-232C Control Connector DB9 A 9-pin serial cable is provided with each AmpTraXX. This input is a standard DB-9 male RS-232C connector. This connector allows for external control using a PC running the AmpTraXX configuration software or an external control system. The pinout appears below. Pin Function 2 3 5 TXD (data from AmpTraXX) RXD (data to AmpTraXX) GND Serial Port: RS-232C Control Connector Screw-Terminal . A second RS-232 input is provided on screw terminals The pinout appears below. Power Input The power input accepts 18- A locking, vibration-proof connector is used for power input. A four-conductor 24VDC at 22 Amps (Max). cable is provided. The unit will operate at 12VDC, although power output will be limited to 10W per channel. Important: It is highly recommended that an inline fuse be included at the power source. There is no fuse internal to the AmpTraXX. September 9, 2014 • Alcorn McBride AmpTraXX User’s Manual • Rev 1.0 Page 11 Amp Builder Software Introduction to Amp Builder Software Amp Builder is a software application that enables you to customize the AmpTraXX for your needs. This program allows you to select channel’s filter type, cutoff frequencies, filter quality, frequency response, and gain. Once you’ve finished configuring the unit, you can save the configuration to your computer. This section describes this software in detail. Page 12 Alcorn McBride AmpTraXX User’s Manual • Rev 1.0 • September 9 2014 Installing the Amp Builder Software A free copy of the Amp Builder software can be downloaded from our website at http://alcorn.com/ftp/software/AmpTraXXConfig-installer.exe. Below is the procedure used to install the software. 1. Download the software from http://alcorn.com/ftp/software/AmpTraXXConfig-installer.exe. Run the executable to begin the installation process. 2. When the program asks, choose a suitable directory for installing the software. Although you may choose whatever location you like, the default directory is C:\Program Files\Alcorn McBride Inc\AmpTraXX. 3. Follow the on-screen instructions, and step through the installation process using the Next button. 4. Once the installation is complete, you can run AmpTraXX by clicking the AmpTraXX icon located in your Start Menu. September 9, 2014 • Alcorn McBride AmpTraXX User’s Manual • Rev 1.0 Page 13 Amp Builder Graphical User Interface This section describes the various controls on the Amp Builder program. First, we’ll have a look at the menu selections across the top of the program. File…File Open You can open a previously saved AmpTraXX configuration file and download it to the AmpTraXX by selecting File…Open. File…File Save…Save As Once you have configured the AmpTraXX you can save your configuration in a file by selecting File…Save or File…Save As. Communication…Connect One of the first things you might want to do is connect to the AmpTraXX. Selecting Communication…Connect will bring up a “Find Your Amplifier” dialog which searches serial and USB ports for a connected AmpTraXX. Once it is found just click on the AmpTraXX in the list and you’ll be connected. Selecting Communication…Disconnect will disconnect communications. Communication…Firmware Update If you need to update the firmware in the AmpTraXX select Settings…Firmware Update. DIP Switch #2 needs to be in the UP position for the AmpTraXX to accept new firmware. This will cause the status LED to slowly blink Red indicating that it is ready for new firmware. Once you have this all set up, browse to the new firmware file and select Start Update. The AmpTraXX will be programmed with the new firmware. Be sure to return DIP Switch #2 to the DOWN position once this process finishes. Page 14 Alcorn McBride AmpTraXX User’s Manual • Rev 1.0 • September 9 2014 Communication…Send Configuration This will cause all of the settings configured in Amp Builder to be sent to the AmpTraXX. Help If you’ve lost this User Manual and need to bring it up online you can select the Help button. There you can bring up an online version of the manual. You can also check the version of the software by selecting About. Amplifier Channel Selection The Amp Builder Software includes 8 separate tabs, one for each amplifier pair in the AmpTraXX. Select the specific tab that includes the specific amplifier channel you wish to configure. For example, select the “Amplifier 2” tab to configure channels 3 and 4 of the AmpTraXX. Once you’ve selected an Amplifier pair, you can begin to use the program to configure the Biquad filters, mix, gain, and DRC settings. Bq1, Bq2 Each AmpTraXX channel is configurable for a variety of filter responses by using the Biquad filter blocks. There are a total of 4 Biquad filter blocks per amplifier pair, 2 for each channel. Bq1 and Bq2 are single biquad filters used to tailor frequency response prior to channel mixing. Bq1 is the filter for the odd channel of the amplifier pair (channels 1,3,5, and 7); BQ2 is the filter for the even channel of the amplifier pair (channels 2,4,6, and 8). Double-click either Bq1 or Bq2 to bring up the graphical Biquad filter window. September 9, 2014 • Alcorn McBride AmpTraXX User’s Manual • Rev 1.0 Page 15 You can select several different filter types: All Pass, Low Pass, High Pass, EQ Phase Shift, Notch, Treble Shelf, and Bass Shelf. If applicable, you can also select the filter subtype: Butterworth 1, Butterworth 2, Bessel 2, Linkwitz Raily 2, and Variable Q 2. Also, if applicable, you can set the Center Frequency FC(Hz), Gain (dB), Bandwidth BW (Hz), and Q. Click the Graph checkbox if you would like to see a graph of the filter response. Once you’ve configured the filter, you can save it in a separate file for this specific Biquad filter configuration by selecting Save In File. To actually program the amplifier channel with the filter configuration select Apply and Draw. If you need to configure other amplifier channels with the same Biquad filter configuration all you need to do is click Load From File, select the previously saved file, and then click Apply and Draw and the selected amplifier channel will be programmed with the same filter configuration. InMix1, InMix2 Channel pairs can be mixed together by using the InMix1 and InMix2 blocks. Page 16 Alcorn McBride AmpTraXX User’s Manual • Rev 1.0 • September 9 2014 Double-clicking the InMix1 or InMix2 blocks brings up a dialog allowing you to change the relative mix levels of each channel into the other. September 9, 2014 • Alcorn McBride AmpTraXX User’s Manual • Rev 1.0 Page 17 Bq3, Bq4 After the Mix blocks in the signal chain come the second set of Biquad filters. Bq3 and Bq4 each contain 9 filters which can be used concurrently. Operation is identical to the Bq1 and Bq2 filter blocks. ChVol1, ChVol2 Individual channel volume can be configured using the ChVol1 and ChVol2 blocks. Page 18 Alcorn McBride AmpTraXX User’s Manual • Rev 1.0 • September 9 2014 Clicking the up and down arrows for each volume block will respectively increase or decrease the channel gain. Relative values are displayed in dB. Master This is the Master Volume slider. Values are displayed in dBs. Uncheck (check) the Mute checkbox to unmute (mute) the amplifier. Upperband, Lowerband The Upperband and Lowerband blocks are used to configure the DRC (Dynamic Range Control) of the amplifier. Double clicking either of these will bring up a set of slider controls allowing you to configure the Threshold and Rate for each of the Softening Filter, Attack, and Release components. September 9, 2014 • Alcorn McBride AmpTraXX User’s Manual • Rev 1.0 Page 19 Basic Serial or USB Control For serial communications with a PC or an Alcorn McBride Show Controller, use the supplied straight-thru (not Null) serial cable supplied with the AmpTraXX. The gain of each channel of the AmpTraXX may be independently controlled using serial RS-232C or USB messages. The serial data format is 38400,N,8,1: 38400 baud, 8 bits/byte, no parity, with one stop bit. Other parameters related to DSP and DRC configuration as well as initial Gain are loaded and saved to non-volatile memory using the Amp Builder Software and are not dynamically-controllable. Set Gain Description: This command causes AmpTraXX to change the gain level of a specified channel. You have the choice between entering this gain level as a percentage (0% 100%) or as a real number value between 0.0 and 10.0. Note: This setting will not be stored in non-volatile memory and is intended for dynamic volume control. Only the setting downloaded from the AmpTraXX Configuration Software are stored in non-volatile memory, and only if the Program Enable Dipswitch is in the UP position. Command bytes: GAnnn%cc<CR> or GAxx.xcc<CR> where nnn% is a percentage between 0% 100%. where xx.x is real number between 0.0 10.0 where cc represents the 2-digit channel number between 0116 (or * for All Channels). Message Response: R<CR> Examples: Set Gain to 55% on channel 2. GA55%02<CR> Set Gain to 2.5 on channel 11. GA2.511<CR> Set Gain to 25% on All Channels. GA25%*<CR> Get Gain Description: This command causes AmpTraXX to report the current gain level of a specified channel. The level is returned as a percentage of full scale. Command bytes: ?GAcc<CR> where cc represents the 2-digit channel number between 0116. Message Response: Gain %<CR> Examples: ?GA01<CR> sent will return the currently programmed gain of Channel 1. Page 20 Alcorn McBride AmpTraXX User’s Manual • Rev 1.0 • September 9 2014 Get Fault Status Description: This command causes AmpTraXX to report the current fault status of a specified channel pair. Command bytes: ?Fc<CR> where c represents the 1-digit channel pair number between 18. (Note that Fault Status will always be reported in relation to channel pairs, where Channels 1 & 2 form the Channel Pair 1, Channels 2&3 form Channel Pair 2, and so on) Message Response: Status Byte<CR> Where individual bits in the Status Byte are set if the following errors are detected: Bit 0 (LSB) – Not Used Bit 1 – Over Current, Under Voltage, Over Voltage, or Over Temperature Bit 2 – Input Signal clip (Overdriven input) Bit 3 – Bit 7 – Not Used The Front Panel LED will blink Red if a Fault is detected, and will return to normal (Green) once the Fault Status is read. Reset Amplifier Description: This command will reset the AmpTraXX. Command bytes: RA<CR> Message Response: R<CR> Version Request Description: This command instructs AmpTraXX to return its current firmware version. Command bytes: ?V<CR> Message Response: AmpTraXX Vn.nn<CR> where n.nn is the current firmware version of AmpTraXX September 9, 2014 • Alcorn McBride AmpTraXX User’s Manual • Rev 1.0 Page 21 Serial Error Codes If AmpTraXX experiences any kind of error during serial control, it will respond with one the following error codes. Error Code E00 E01 E04 Page 22 Description What to Do: Invalid Channel Number Hardware Error Invalid Command Check the syntax of the channel number (01,02,03,04, etc.) AmpTraXX has experienced an internal hardware problem Have you entered the correct command? Are you using a command that is not supported by the current firmware? Alcorn McBride AmpTraXX User’s Manual • Rev 1.0 • September 9 2014 Troubleshooting Guide / FAQ If you have a question not answered by this manual, take a look at our Knowledge Base at http://www.alcorn.com/kb/index.html. We’re always updating it with new answers and useful information! If your question isn’t answered there, please email us at [email protected] Q: I hear a knocking sound when I am playing AmpTraXX loudly. What is causing this? A: This is the sound of your neighbor pounding on your wall. Maybe you should turn it down a few notches, eh? After all, it is 2 o’clock in the morning! Q: Why does it take so long for my AmpTraXX to boot up? A: It is likely that DIP Switch #3 is in the UP position. The AmpTraXX is being programmed for Default operation each boot cycle which takes many seconds to complete and only needs to be done once. Turn DIP Switch #3 to the DOWN position. Q: The Front Panel LED is slowly blinking Red and the AmpTraXX is unresponsive. Why? A: It is likely that DIP Switch #2 is in the UP position. This Dip Switch places the AmpTraXX in the firmware update mode, and the blinking Red LED indicates that it is ready for new firmware. If you are not updating the firmware, move DIP Switch #2 to the DOWN position. Q: The Front Panel LED blinks Green for several time and then stops. This goes on constantly and the AmpTraXX is unresponsive. Why? A: It is likely that DIP Switch #4 is in the UP position. This Dip Switch activates a soft-reset on AmpTraXX Move DIP Switch #4 to the DOWN position. Q: Why can’t I establish a connection with AmpTraXX? A: First, if you are using the serial connection verify that you are using a straight-through (not NULL) RS-232 cable like the one provided with AmpTraXX. Next, make sure that you have the correct COM port selected in the AmpTraXX configuration menu. If you are not sure which COM port your PC’s external serial port is using, just use trial and error to figure it out. Also be sure that another program (like a terminal program) isn’t currently using your computer’s serial port. If you still cannot connect, contact Technical Support. Q: I cranked up the volume, and then the channel stopped working and the LED is blinking Red. What is going on? A: Congratulations! You have just discovered AmpTraXX’s built-in overdrive protection. Turn down the volume. September 9, 2014 • Alcorn McBride AmpTraXX User’s Manual • Rev 1.0 Page 23 Specifications Parameter Power Output Per Channel * Specification Test Conditions & Notes 25W 15W Power Input 24VDC Power Input 18VDC 9W Power Input 12VDC 50W (8 Channels, Bridged Pairs) Power Input 24VDC THD+Noise 0.07% 1W, 18VDC Signal-to-Noise Ratio 106 dB A-weighted, f=1kHz, Maximum Power @ THD<1% Crosstalk -69 dB 1 kHz, any channel to any channel Input Type Unbalanced Unbalanced Input Connectors 2xMolex Mini-Fit 0039301160 Mating Connector: Molex 0039012180 (Female RCA breakout cable included) Input Impedance 10 k Ohm Minimum each leg to ground Frequency Response 20-20 kHz No DSP EQ Maximum Level - SOA 4 volts p-p 20W 8ohm load each channel level control full Maximum Level - SOA 2.25 volts p-p 13W 4ohm load each channel level control full Output Connectors 2xMolex Mini-Fit 0039301160 Mating Connector: Molex 0039012180 (16GA Wired Breakout Harness Included) On/Off Transient Muting Yes, active "depop" circuitry built-in Short Circuit Protection Over-Current Shutdown - no damage Thermal Characteristics Automatic over-temperature shutdown Shutdown - no damage Power/Status Indicator Front Panel Red-Green LED Serial Connectors DB9 Male & Phoenix Screw Terminals Serial Protocol EIA232 38400 N,8,1 Serial Control Capabilities Volume, DSP Configuration, etc. ASCII Protocol User Controls Soft Reset Resets Microprocessor Reset Factory Defaults Restores all channel settings to factory defaults Switchable On-Off Firmware Update Causes unit to wait for Firmware Update Switchable On-Off Program Enable All commands are stored non-volatile Switchable On-Off Bridge Enable 8xDIP switch enable channel pair bridging Switchable On-Off Input Voltage 9-26VDC Full 25W power at 20-24VDC Under/Over Voltage Protection <7VDC or >26VDC Shutdown - no damage Input Current 22A Max 24VDC Input Voltage, All Channels Driven Input Connector Molex 0039301040 Mating Connector: Molex 0039012040 (Pre-Wired Mating Harness Included) Size 7.1"W x 1.75"H x 11"D (18cm x 4.4cm x 28cm) Weight 4lb (1.8 kg) Environment 0º to 38º C (32º to 100º F) Switchable On-Off 0 to 90% relative humidity, non-condensing Agency Compliance CE *20-20 KHz, 0.3%THD max *All Channels Driven 8 ohms Page 24 Alcorn McBride AmpTraXX User’s Manual • Rev 1.0 • September 9 2014