1
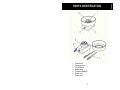
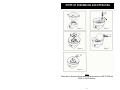
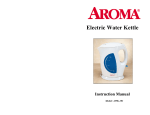
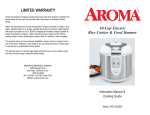
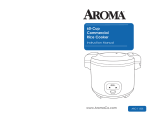
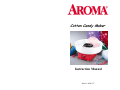
Cotton Candy Maker Instruction Manual Model: APM-837 Congratulations on your purchase of the Aroma Cotton Candy Maker. The uniqueness of this product will make you and your family enjoy the fun time of making cotton candy together. Enjoy it! Please read the following instructions carefully before your first use. Published By: Aroma Housewares Co. 6469 Flanders Drive San Diego, CA 92121 U.S.A. www.aromaco.com 2002 Aroma Housewares Company IMPORTANT SAFEGUARDS 1. 2. 3. 4. 5. 6. 7. 8. 9. 10. 11. 12. 13. Read all Instructions. Do not touch hot surfaces. Use handles or knobs. To protect against electrical shock, do not immerse electrical cord in water or other liquid. Close supervision is necessary when any appliance is used by or near children. Unplug from outlet when not in use and before cleaning. Allow to cool before putting on or taking off bowl and extractor head assembly, and before cleaning the appliance. Do not operate any appliance with a damaged cord or plug or after the appliance malfunctions or has been damaged in any manner. Return appliance to the nearest authorized service facility for examination, repair or adjustment. The use of accessory attachments not recommended by the appliance manufacturer may result in fire, electric shock or injury. Do not let cord touch hot surfaces or hang over the edge of a counter or table. Do not place on or near a hot burner or in a heated oven. Do not use the appliance for other than intended use. Always attach plug to appliance first, and then plug cord into the wall outlet. To disconnect, turn the temperature control to "OFF" then remove plug from wall outlet. Only use properly grounded outlet for plugging in. Do not add excess sugar while using the cotton candy maker. Excess sugar may cause noise or vibration of the cotton candy maker. SAVE THESE INSTRUCTIONS 1 SHORT CORD INSTRUCTIONS 1. A short detachable power-supply cord is provided to reduce risks resulting from becoming entangled in or tripping over a longer cord. 2. Longer detachable power-supply cords or extension cords are available and may be used if care is exercised in their use. 3. If a longer detachable power-supply cord or extension cord is used: a. The marked electrical rating of the extension cord should be at least as great as the electrical rating of the appliance. b. The longer cord should be arranged so that it will not drape over the counter top or tabletop where it can be pulled on by children or tripped over unintentionally, the extension cord should be a grounded-type 3-wire cord. POLARIZED PLUG If this appliance has a polarized plug (one blade is wider than the other) follow the instructions below: To reduce the risk of electric shock, this plug is intended to fit into a polarized outlet only one way. If the plug does not fit fully into the outlet, reverse the plug. If it still does not fit, contact a qualified electrician. Do not attempt to modify the plug in any way. This appliance is intended for Household Use Only. 2 PARTS IDENTIFICATION 1. 2. 3. 4. 5. 6. 7. Plastic bowl Extractor head On/Off Switch Base / Body Protective Housing Power cord Paper cone 3 STEPS OF ASSEMBLING AND OPERATING Note: Please refer to the above figures when reading instructions in HOW TO USE and HOW TO CLEAN sections. 4 HOW TO USE BEFORE USING FOR THE FIRST TIME 1. Remove all packaging material from the product. 2. Use warm water to rinse the plastic bowl and wipe dry with a paper towel. TO ASSEMBLE 1. Make sure the cotton candy maker is unplugged. 2. Align hooks on the protective housing of cotton candy maker with the opening of the plastic bowl. Turn bowl clockwise to lock it into the housing. See Figure 1 on page 4. 3. To assemble the extractor head: Take the extractor head (face the end with copper pipe down) and push down firmly on the spindle at the center of the heating element opening. Push it firmly and make sure the extractor head is well fitted and secured onto the spindle. See Figure 2. Note: Improper placing of the extractor head may result in failure to produce cotton candy or will result in excessive vibration. 4. Operate the cotton candy maker on a flat, sturdy surface. Plug in before use. THE TYPE OF SUGAR TO USE 1. Prepare pure granulated sugar ONLY for making cotton candy. TO MAKE COLORFUL COTTON CANDY 1. Prepare 2 to 3 teaspoons of liquid food coloring (For example: RED food coloring to make pink cotton candy; BLUE food coloring to make sky blue cotton candy.) 2. Mix the liquid food coloring with 1 cup of water and place it in a small water spray bottle. Slightly adjust the amount of food coloring if needed. 3. Place 3 to 4 cups of pure granulated sugar in a 12” pan. Spray the sugar with the food coloring mixture. Use hand or wood spatula to stir and mix the sugar and food coloring together. 4. Place the colored sugar in a ventilated place and let it dry for few hours before using. When colored sugar gets dried and not lumpy, use measuring spoon to add colored sugar into the rotating extractor head of the cotton candy maker. Follow the instruction below to make cotton candy in your favorite color. START USING 1. Turn switch to “ON” position. Allow unit to warm up for 5 to 8 minutes. The extractor head assembly starts to spin and is heated up by the heating element. 5 2. Prepare pure granulated sugar only for making cotton candy. 3. After the cotton candy maker is preheated, turn switch to “OFF” position. Evenly place one spoon of sugar into the center hole of the extractor head assembly. Use the spoon provided in the package, or you may use a regular teaspoon with filling one leveled teaspoon of sugar. Do not put more than one teaspoon of sugar in the cotton candy maker at a time. See Figure 3. CAUTION: • EXCESS SUGAR MAY CAUSE NOISE OR VIBRATION. 4. Turn “ON” the cotton candy maker. Cotton candy starts to come out little by little. Wind cotton candy on the paper cone provided in the package with the wider end. Collect cotton candy by holding paper cone in vertical position and turning paper cone along the inside wall of plastic bowl several times. See Figure 4. Next, lay paper cone horizontally above the bowl and wind cotton candy. See Figure 5. 5. When finished making cotton candy, do not turn the switch to “OFF” yet. Let the maker continue running for another 5 minutes to remove the excess sugar. This step helps prevent from noise or vibration of the cotton candy maker. Now you may turn switch to “OFF” position. For making more cotton candy, repeat the HOW TO USE steps. CAUTION: • While the cotton candy is in operation or just finished operating, DO NOT TOUCH THE ROTATING EXTRACTOR HEAD. THE EXTRACTOR HEAD ASSEMBLY SPINS FAST AND IT IS HOT! 6 HOW TO CLEAN CLEANING PLASTIC BOWL AND EXTRACTOR HEAD 1. 2. 3. 4. 5. Unplug and wait for the cotton candy maker to completely cool. Turn the plastic bowl counterclockwise to detach from base. Clean the bowl with soapy water and rinse with water thoroughly. Use dry, soft dishcloth to wipe it dry. For cleaning the EXTRACTOR HEAD: Wipe the head surface by using a soft, moistened dishcloth to clean. Dip cotton tips with warm water and clean inside of the extractor head thoroughly. Repeat the steps for several times or until the sugar residue is removed. For best cleaning result: When finished making cotton candy, do not turn the switch to “OFF” yet. Let the maker continue running for another 5 minutes to remove the excess sugar inside the extractor head. TO STORE 6. Put the cotton candy maker in a large plastic bag to prevent from dust and air exposure. 7. Store the cotton candy maker in a dry area at normal room temperature. CAUTION: • • • • Always unplug the cotton candy maker first and allow it to cool before starting to clean. Do not use abrasive cleaners or scouring pads for cleaning the plastic bowl and the cotton candy maker. Do not use dishwasher for cleaning the cotton candy maker. FOR ORDERING PARTS OR IF YOU HAVE ANY COMMENTS ABOUT THIS PRODUCT, PLEASE CONTACT AROMA CUSTORMER SERVICE DEPARTMENT AT 1-800-276-6286 7 LIMITED WARRANTY Aroma Housewares Company warrants this product free from defects in material and workmanship for one year from provable date of purchase in continental United States. Within this warranty period, Aroma Housewares Company will repair or replace, at its option, defective parts at no charge, provided the product is returned, freight prepaid with proof of purchase and U.S. $6.00 for shipping and handling charges to Aroma Housewares Company. Please call the toll free number below for return authorization number. Allow 2-4 weeks for return shipping. This warranty does not cover improper installation, misuse, abuse or neglect on part of the owner. Warranty is also invalid in any case that the product is taken apart or serviced by an unauthorized service station. This warranty gives you specific legal rights and they may vary from state to state and does not cover areas outside continental United States. AROMA HOUSEWARES COMPANY 6469 Flanders Drive San Diego, California 92121 1-800-276-6286 M-F, 8:30 AM - 5:00 PM, Pacific Time Website: www.aromaco.com 8