1
Multi-Room Audio System
Installation and User’s Guide
THIS DOCUMENT WAS WRITTEN AND PREPARED BY
Multi-Room Audio System
Any Music, from any source, in any room,
any time you want it.
All Rights Reserved Copyright@2005 NetStreams
All brand names, product names, and trademarks are properties of
their respective owners.
3600 W. Parmer Lane, Suite 100
Austin, TX 78727
USA
Phone: +1 512.977.9393 ¤ Fax: +1 512.977.9393
www.netstreams.com
TABLE OF CONTENTS
IMPORTANT SAFEGUARDS!
IMPORTANT SAFETY INSTRUCTIONS AND PRECAUTIONS...1
SINGLE/MULTI-ZONE MULTI-ZONE MODES
TO CHANGE THE MULTI-ZONE MODE ........................................ 25
FEATURES
4-SOURCES/6-ROOMS ..........................................................2
DIGITAL FM TUNER CARD
INSERTING THE MU5066DFMT DIGITAL FM TUNER CARD......... 26
PLUG AND PLAY EXPANSION .................................................2
ADD LOCAL FM TUNER ...........................................................2
REMOTE INTEGRATED DIGITAL AMPLIFIERS .........................2
5-BAND GRAPHIC EQUALIZER ...............................................2
3D SOUND STAGE MODE .......................................................2
NETSTREAMS Shhh! TECHNOLOGY ....................................3
ADD MORE POWER WITH MU290 AMPLIFIER ......................3
SIMPLIFIED PROGRAMMING...................................................3
INTELLIGENT POWER CONTROL............................................3
AUTOMATIC MUTING ..............................................................3
MUSICA NETWORK .................................................................3
IP CONTROLLABLE .................................................................3
INSTALLING THE FM ANTENNA .................................................... 26
PROGRAMMING FM STATION PRESETS ...................................... 26
NAMING THE FM STATION PRESETS ........................................... 27
ADJUSTING THE SETTINGS FOR THE FM TUNER ........................ 28
MU5066ADC AUDIO DISTRIBUTION CENTER GUIDE
MU5066ADC COMPONENTS .................................................4
MU5066ADC SPECIFICATIONS ..............................................5
WIRING THE SYSTEM ................................................................... 32
WIRING THE SOURCE COMPONENTS ......................................... 33
WIRING RS-232 AND DOORBELL/TELEPHONE SENSORS ......... 33
MUSICA POSSIBLE CONFIGURATIONS ........................................ 34
REMOTE CONTROL ................................................................6
IR EMITTERS ...........................................................................7
REMOTE/KEYPAD AMPLIFIER OVERVIEW
WIDE-SCREEN HIGH RESOLUTION LCD.................................8
REMOTE DIGITAL AMPLIFIER IN EACH ROOM ........................8
SIMPLE SOURCE SELECTION .................................................8
EASY VOLUME CONTROL .......................................................8
MENU-DRIVEN DESIGN ..........................................................8
SOURCE FUNCTIONS .............................................................9
ROOM CONTROL AND SYSTEM STATUS................................9
PLUG AND PLAY EXPANSION .................................................9
MU5066KP REMOTE/KEYPAD AMPLFIER GUIDE
MU5066KP COMPONENTS ..................................................10
MU5066KP MENU LIST ........................................................11
MU5066KP SPECIFICATIONS ..............................................12
MU5066KP DISPLAY SCREENS
CONNECTING, INITIAL AND BASIC SCREENS.......................13
MENU SCREENS ...................................................................15
PROGRAMMING MACROS ....................................................22
PROGRAM IR CODES FOR THE EQUIPMENT .......................24
AUDIO PORT GUIDE
AUDIO PORT COMPONENTS........................................................ 29
MU290 POWER AMPLIFIER
MU290 SPECIFICATIONS AND CONNECTIONS ........................... 30
MU290 DAISY CHAIN CONFIGURATION ...................................... 31
MUSICA WIRING DIAGRAMS
HOW TO
OPERATE THE SYSTEM ............................................................... 35
CONTROL THE VOLUME .............................................................. 36
SELECT A SOURCE FOR PLAYBACK............................................ 37
TROUBLESHOOTING.....................................................38
IMPORTANT SAFEGUARDS
WARNING: TO REDUCE THE RISK OF FIRE OR ELECTRIC SHOCK, DO NOT
EXPOSE THIS APPLIANCE TO RAIN OR MOISTURE.
CAUTION: TO REDUCE THE RISK OF ELECTRIC SHOCK, DO NOT REMOVE
COVER. NO USER - SERVICEABLE PARTS INSIDE. REFER SERVICING TO
QUALIFIED SERVICE PERSONNEL.
The lightning flash with arrowhead symbol, within an equilateral triangle, is intended to alert the user to the presence of un-insulated “dangerous
voltage” within the products enclosure that may be of sufficient magnitude to constitute a risk of electric shock to persons.
The exclamation point within an equilateral triangle is intended to alert the user to the presence of important operating and maintenance (servicing)
instructions in the literature accompanying the appliance.
POWER CORD NOTICE FOR INTERNATIONAL OPERATION - Please call NetStreams Technical Services at (512)977-9393.
Important Safety Instructions:
1.
2.
3.
4.
5.
6.
7.
8.
9.
10.
11.
12.
13.
14.
15.
16.
17.
18.
19.
Read these instructions
Keep these instructions
Heed all warnings
Follow all instructions
Do not use this apparatus near water
Clean only with dry cloth.
Do not block any ventilation openings. Install in accordance with the manufacturer’s instructions.
Do not install near any heat sources such as radiators, heat registers, stoves, or other apparatus (including amplifiers) that produce heat.
Do not defeat the safety purpose of the polarized or grounding-type plug. A polarized plug has two blades with one wider than the other.
A grounding type plug has two blades and a third grounding prong. The wide blade or the third prong is provided for your safety. If the
provided plug does not fit into your outlet, consult an electrician for replacement of the obsolete outlet.
Protect the power cord from being walked on or pinched particularly at plugs, convenience receptacles, and the point where they exit
from the apparatus.
Only use attachments/accessories specified by the manufacturer.
Unplug this apparatus during lightning storms or when unused for long periods of time.
Refer all servicing to qualified service personnel. Servicing is required when the apparatus has been damaged in any way, such as
power-supply cord or plug is damaged, liquid has been spilled or objects have fallen into the apparatus, the apparatus has been exposed
to rain or moisture, does not operate normally, or has been dropped.
The apparatus shall not be exposed to dripping or splashing and that no objects filled with liquids, such as vases, shall be placed on the
apparatus.
Carts and Stands - The appliance should be used only with a cart or stand that is recommended by the manufacturer. An appliance and
cart combination should be moved with care. Quick stops, excessive force and uneven surfaces may cause the appliance and cart
combination to overturn.
Wall or ceiling Mounting - The appliance should be mounted to a wall or ceiling only as recommended by the manufacturer.
Power Sources - The appliance should be connected to a power supply only of the type described in the operating instructions or as
marked on the appliance.
Object and Liquid Entry - Care should be taken so that objects do not fall and liquids are not spilled into the enclosure through the
openings.
Servicing-The user should not attempt to service the appliance beyond that described in the operating instructions. All other servicing
should be referred to qualified service personnel.
Precautions:
1. Power – WARNING, BEFORE TURNING ON THE POWER FOR THE FIRST TIME, READ THE FOLLOWING SECTION CAREFULLY.
All models are designed for use only with the power supply voltage of the region where they are sold.
2. Voltage Label (Rear Panel) – A label located at the rear panel power connection indicates the AC power input for the unit. The label will
read 100-240V AC 50-60Hz 210W Auto-switching.
3. Do Not Plug in the keypad connections while the power switch is switched to the “ON” position.
4. Do Not Touch the NS-MU5066 with wet hands. Do not handle the NS-MU5066 or power cord when your hands are wet or damp. If
water or any other liquid enters the NS-MU5066 cabinet, take the NS-MU5066 to qualified service personnel for inspection.
5. Place the NS-MU5066 in a Well - Ventilated Location. Take special care to provide plenty of ventilation on all sides of the NS-MU5066
especially when it is placed in an audio rack. If ventilation is blocked, the NS-MU5066 may over heat and malfunction. Do not expose the
NS-MU5066 to direct sun light or heating units as the NS-MU5066 internal components temperature may rise and shorten the life of the
components. Avoid damp and dusty places.
6. Care – From time to time you should wipe off the front and side panels and the cabinet with a soft cloth. Do not use rough material,
thinners, alcohol or other chemical solvents or cloths since this may damage the finish or remove the panel lettering.
All specifications subject to change without notification. All rights reserved. Copyright©2007 NetStreams
Main +1 512.977.9393 / fax +1 512.977.9398 / 3600 W. Parmer Lane Suite 100, Austin, TX 78727 / www.netstreams.com
NS-0505-7121
1
FEATURES
NetStreams’ Musica MU5066 Multi-Room Audio System builds on the award-winning Musica product
line by introducing several new features for convenience and use, simpler install, with even better audio
performance.
New MU5066 features include:
•
•
•
•
•
•
•
•
•
•
•
Discrete channel communication between each Musica MU5066 keypad and the Musica Audio
Distribution Center
Enhanced IR capabilities for IR learning
New FM Tuner card (sold separately) to add FM Tuner listening to any MU5066 keypad model
Turn all rooms ON or OFF from any keypad
5-band graphic equalizer
3D Sound Mode (MU5066KP50 only)
NetStreams’ proprietary Shhh! Technology
Macro Functions on all Musica Keypad models (see keypad specifications page 12).
Control Musica from any web browser with new R2EM Module – now offering multiple connections (sold
separately)
Advanced RS-232 control for full integration with other control systems
Blue and White backlighting now offered as standard / Amber and Green on KP25S model only
4-Sources / 6-Rooms
The Musica system distributed 4 home-wide sources to 6 rooms and is expandable to 18 rooms of audio with up
to 2 additional local sources per room. The system is programmed to select any available audio source, and then
to distribute them up to any of the rooms selected. Users can listen to any of the different sources, at the same
time, in each separate room. Compensating automatic gain adjustments at the inputs insure that all of the
sources are distributed at equal levels.
Plug and Play Expansion with the Audio Port
Using the optional Audio Port, users can plug in local sound sources such as Gaming systems, Computers, CD
Players or MP3 players to expand the system at the local room level. You can also add a powered subwoofer in
any room, synchronized with the speakers connected to the keypad/amplifier or use the Musica keypad/amplifier
to control a large power amplifier driving large floor-standing speakers or multiple in-ceiling/in-wall speakers
installed in a very large space.
Add Local FM Tuner Listening to Any Room with the NetStreams Digital FM Tuner Card
Each Musica MU5066 keypad/amplifier features a slot for an optional Digital FM Tuner Card (sold separately) so
any room can have its’ own private FM Tuner listening. The Digital FM Tuner card kit includes a between-stud
antenna featuring a RG6 connection for easy connection to a roof-top or attic-mounted antenna.
Remote Integrated Digital Amplifiers
Digitally controlled stereo digital amplifiers are integrated into the keypads and are located within the rooms. With
this design, minimizing the lengths of the amplifier-to-speaker cables creates better sound quality. This reduces
the distortions and sound deterioration, which are attributed to the length of the cable run. This design also keeps
heat away from delicate source components in the main equipment rack or location.
5-Band Graphic Equalizer
All Musica MU5066 keypad/amplifiers feature a 5-band graphic equalizer which allows for further customization of
the sound quality to suit your tastes. Adjust the level of the sound output in each room at 100Hz, 300Hz, 1 kHz, 3
kHz, and 10 kHz.
3D Sound Stage Mode
The MU5066KP50 keypad/amplifier features a proprietary 3D sound stage to expand the spacious quality of the
sound. Particularly beneficial for installations where speakers have been placed very close together, or for smaller
rooms, the 3D sound mode improves the sound stage in the listening area.
All specifications subject to change without notification. All rights reserved. Copyright©2007 NetStreams
Main +1 512.977.9393 / fax +1 512.977.9398 / 3600 W. Parmer Lane Suite 100, Austin, TX 78727 / www.netstreams.com
NS-0505-7121
2
FEATURES
NetStreams’ Shhh! Technology & Sleep Timer
Musica MU5066 keypads also feature NetStreams’ proprietary Shhh! Technology, featuring a gentle sleep timer
so the volume level of the audio gradually decreases in the room as you drift to sleep, finally shutting off.
Add More power to any room with the NetStreams MU290 amplifier.
For an installation where more power is merited (like a larger room or an outdoor area), simply add an optional
MU290 2x90 watt amplifier to any keypad in the system. The MU290 amplifier is also bridgeable and up to six
amplifiers can be daisy chained to provide for 90W / 200W (bridged) power to up to six pairs of speakers in one
room!
Simplified Programming – No Laptops Required
When the settings for each source have been learned into any keypad in any room, they are stored on the Audio
Distribution Center (ADC). The ADC then “teaches” all the other keypads connected to it. This prevents having to
program all the keypads in the system individually, significantly reducing the programming time required to complete the
installation. You can also upload all learned IR codes into a laptop to easily download them for your next installation. To
achieve this you must use the Musica Tools software offered by NetStreams. To download this software, please visit the
Dealer Resources area on our website at www.netstreams.com.
Intelligent Power Control
When all the rooms are switched off, the main system enters into a power-saving mode. The power-saving mode
begins 20 minutes after the last keypad/amplifier in the system has been shut off. The 2-color LED of the front
panel indicates the status of the system (Red: Standby Mode, Green: Operating Mode). The Audio Distribution
Center controls the power of the sources by means of relay, which offers a dry contact output. A power strip with
a dry contact trigger or a home control system with inputs will be needed in order to use this feature effectively.
Automatic Muting
External signals such as doorbell, door phone, telephone, etc. can be detected. When these signals are detected,
the main system will enter into the mute mode for 20 seconds so that the doorbell or telephone can be heard
when an optional doorbell/phone ring detector is used. (We recommend the use of an ELK 930 doorbell and ring
detector from ELK Industries. For more information see www.elkproducts.com or call 828-397-4200).
Musica Network
The data communication between the ADC and the room is performed via Musica’s network. This protocol offers
more than 2,000 commands for the Musica system.
IP Controllable
With the R2EM web interface, up to 12 rooms can be controlled via a flash-enabled web browser. This will allow
the user more features from one device, such as controlling all rooms individually or all rooms simultaneously.
All specifications subject to change without notification. All rights reserved. Copyright©2007 NetStreams
Main +1 512.977.9393 / fax +1 512.977.9398 / 3600 W. Parmer Lane Suite 100, Austin, TX 78727 / www.netstreams.com
NS-0505-7121
3
MUSICA AUDIO DISTRIBUTION CENTER GUIDE
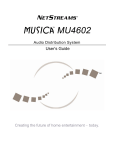
Musica MU5066ADC Audio Distribution Center Components
1. LED Lamp
Indicates the state of system mode. Red: Standby mode or Green: Operating mode.
2. Source Input
Provides the inputs from the 4 home-wide sources.
3. IR Output
Provides outputs for the IR Emitters. IR signals from source remote control will pass through to the main
and on to the source components.
4. RS-232 Interface
Provides an interface between a PC and the NS-MU5066ADC. This interface is also for use when
integrating the Musica system with other control products such as Vantage, Creston and AMX.
5. Remote Interface
These are the remote amplifier connections (using CAT5e & 14/4 or CAT5e 16/4 Siamese cable).
6. Doorbell/Telephone Interface
• Change Door: When doorbell rings, music mutes for 30 seconds and returns to play mode.
• Change Phone: When telephone rings, music mutes for 30 seconds and return to play mode.
7. Source Pwr. Control Output
When all room systems are off, the ADC goes into a standby mode 20 minutes after the last
keypad/amplifier has been turned off. The standby mode opens up the relay connected to the control
output.
8. AC Power Cord
CAUTION: Do NOT plug in the connections for the
9. ADC Power Switch
keypads to the ADC while the power switch is in the
ADC Power On/Off switch.
“ON” position!
CAUTION: Always make sure that the polarity is correct
for the 2-pin Phoenix-type power connections on the
keypad and the ADC BEFORE you plug the connector
into the keypad and/or into the ADC.
All specifications subject to change without notification. All rights reserved. Copyright©2007 NetStreams
Main +1 512.977.9393 / fax +1 512.977.9398 / 3600 W. Parmer Lane Suite 100, Austin, TX 78727 / www.netstreams.com
NS-0505-7121
4
MUSICA AUDIO DISTRIBUTION CENTER GUIDE
Specifications for the Musica MU5066ADC Audio Distribution Center
Component Type:
Source Inputs:
Connector:
Input Level:
Input Impedance:
Connector 1 (Data):
Connector 2 (Power):
Output Level:
IR Source Control Outputs Type:
Muting Interface (telephone/doorbell):
Microprocessor:
Memory:
Power Voltage:
Power Consumption:
Source Power Control Output:
Dimensions:
Note:
Line level Audio Multi Room Controller
4, stereo paired
Gold-plated RCA Connectors
150mV
47KOhms
8-pin RJ45 Data Jack EIA/TIA 568A
2-pin 5mm Phoenix type
2.0Vrms
Infrared LED Flasher
(2) 2-pin 3.5mm Phoenix type
Advanced RISC Microprocessor
Non-Volatile EEPROM, 256K
100-240V AC, 50-60Hz
200W
2-pin 5mm Phoenix type
16.95"(W) x 2.28"(H) x9.04"(D)
424mm (W) x 57mm (H) x 226mm (D)
The Musica MU5066ADC Audio Distribution Center uses the Middle Atlantic (www.middleatlantic.com)
shelf for mounting into a standard 19-inch rack (part number RSH4A2S).
All specifications subject to change without notification. All rights reserved. Copyright©2007 NetStreams
Main +1 512.977.9393 / fax +1 512.977.9398 / 3600 W. Parmer Lane Suite 100, Austin, TX 78727 / www.netstreams.com
NS-0505-7121
5
MUSICA AUDIO DISTRIBUTION CENTER GUIDE
Remote Control
The ergonomically designed, simple to use Musica remote control duplicates all functions of the wall-mounted keypad.
The remote control also features a mute button, and discrete power on/off buttons. One Musica Remote MU4601RC is
included with each Musica MU5066ADC Audio Distribution Center. Additional remotes may also be purchased.
Specifications
Dimension:
Buttons:
Power:
5.52"(L) x 1.72"(W) x 1.22"(D)
Room System Buttons and SRC Buttons
3V DC (Off 2 x 1.5V AAA Batteries)
All specifications subject to change without notification. All rights reserved. Copyright©2007 NetStreams
Main +1 512.977.9393 / fax +1 512.977.9398 / 3600 W. Parmer Lane Suite 100, Austin, TX 78727 / www.netstreams.com
NS-0505-7121
6
MUSICA AUDIO DISTRIBUTION CENTER GUIDE
IR Emitter
IR emitters are connected to the Musica ADC and run and installed at the house-wide sources. The IR emitters
will deliver the IR codes programmed into a Musica keypad, and stored in the ADC. Four (4) IR Emitters
MU4601IRE are provided with the Audio Distribution Center. Additional IR Emitters may be purchased.
TIPS:
•
Use the supplied IR emitters to transmit the commands from your keypads to your source components.
•
An emitter must be connected from the Musica ADC to each of your four sources.
•
Remove the adhesive backing and stick the emitter directly over the source components IR window. Be sure
to wipe the window clean of any finger prints before applying the emitter.
•
Keep the source components away from fluorescent light sources as this can interfere with emitters.
All specifications subject to change without notification. All rights reserved. Copyright©2007 NetStreams
Main +1 512.977.9393 / fax +1 512.977.9398 / 3600 W. Parmer Lane Suite 100, Austin, TX 78727 / www.netstreams.com
NS-0505-7121
7
MUSICA KEYPAD AMPLIFER OVERVIEW
The interactive in-wall keypad/amplifier features a
wide-screen graphic LCD that aids in easy operation of
the system by providing feedback to the user on the
status of the system. It responds visually to any press
of any button confirming the action to the user. The
menu screen uses a “look-and-follow” window-style
menu and adds aesthetic value to the user’s living
environment. The keypad also features an IR sensor
that receives the system’s remote control as well as the
original remote controls of the audio sources. This IR
sensor also allows for the pass-through of other IR.
Wide-screen High Resolution Graphic LCD
The wall-mounted keypad
uses a large Active View
Area 1.41” x 0.78” graphic
LCD that displays the state
of all sources and rooms and
provides instant visual
feedback for all commands.
Remote Digital Amplifier in each Room
The digitally controlled amplifiers are integrated to each keypad and are located within the rooms to ensure superior
sound quality. Minimizing the lengths of amplifier-to-speaker cables minimizes the distortions and sound deterioration
that can be attributed to the length of the cable in conventional designs. Musica’s architecture places the amplifier in the
room where the audio will be played – close to the speaker, achieving maximum wattage, with minimal noise and
distortion. The high quality pre-amplifier in the system provides the controls for fine adjustments of balance, loudness
and volume in each individual room, while a 5-band graphic equalizer allows for further customization of the sound.
Simple Source Selection
Using a button labeled SRCE, the sources can be browsed and selected.
Easy Volume Control
Pressing the UP and DOWN button provides very fine control over the volume with a resolution of 35 steps. When the
UP or DOWN buttons are pressed the LCD automatically switches to the volume level view for 1.5 seconds for
confirmation of the button presses and then switches back to the previous view.
Menu-Driven Design
Below is a list of the available pop-up style menus:
•
SOUND Adjusts the balance and loudness contour of the sound. Also contains the 5-band graphic equalizer for fine
tuning of the sound. The KP50 features 3D Sound Mode (ON/OFF).
•
NAME Stores the name of the audio source by user’s selection (CD, Tape, DVD, Classic, Pop, etc.) Also stores the
name of FM Tuner presets when the DFMT Digital FM Tuner Card is inserted and the room name or name of the
external (EXT) source (Audio Port).
•
IR Adjusts the IR Frequency (38 kHz to 56 kHz). Registers the buttons of the source’s remote controls to the keypad.
•
ADJ (Adjust) Sets the Sleep Timer on the keypad and provides amplifier adjustments for the type of speakers used (8Ohm,
6Ohm, or 4Ohm). Selects the color (green or amber- MU5066KP25S; blue or white – MU5066KP25 & MU5066KP50), adjusts the
brightness, timer and the on/off mode of the backlight.
All specifications subject to change without notification. All rights reserved. Copyright©2007 NetStreams
Main +1 512.977.9393 / fax +1 512.977.9398 / 3600 W. Parmer Lane Suite 100, Austin, TX 78727 / www.netstreams.com
NS-0505-7121
8
MUSICA KEYPAD AMPLIFER OVERVIEW
•
ROOM Accesses other rooms in the system to turn them ON or OFF and adjust sources.
•
EXT (External Audio) Controls direction of the audio signal (input/output) of an external component such as a local
room audio source when the room is expanded utilizing the Audio Port (EIM). Also allows for the choice of a fixed or
variable output, and tuner controls, spacing, sensitivity, as well as deemphasize of the FM tuner card (DFMT).
Source Functions
The wall-mounted keypad/amplifiers come with a
group of buttons designated as a direct user
interface to the audio sources. It functions as a
control for the 4 different home-wide audio sources.
Once the buttons have been programmed, they control
the audio source currently selected from that room.
When the settings for each source have been
learned at any wall-mounted keypad, they are then
stored in non-volatile memory in the ADC.
All settings are then available across all rooms
without any additional programming.
Room Control and System Status
One room can monitor the state of all other rooms
and turn the power of other rooms on or off
remotely. The at-a glance display allows easy
operation of all rooms from any location in the
home. The menu functions of any keypad can be
locked out by pressing the sequence 1,2,3,4 at any
keypad to prevent unwanted changes being made to
the settings for that keypad. To reactivate the menu
function, from the remote control or keypad, press
5,6,7,8.
Plug & Play Expansion
Using the optional Audio Port, users can easily add external sound sources and
output devices to expand the system at the local room level. When the Audio Port is
connected, the keypad detects it automatically and displays it in the menu view as a
fifth source for that room only. The user can now select it using the source button.
The sources can now be browsed and selected in the following sequence as an
example: TAPE, CD, AUX, TUNER, and EXT.
When an external audio system is connected to the audio output, for maximum
flexibility the user can select the integrated digitally controlled amplifier, an external
amplifier, or both via the amp selection menu of the keypad.
All specifications subject to change without notification. All rights reserved. Copyright©2007 NetStreams
Main +1 512.977.9393 / fax +1 512.977.9398 / 3600 W. Parmer Lane Suite 100, Austin, TX 78727 / www.netstreams.com
NS-0505-7121
9
MUSICA KEYPAD AMPLIFIER PARTS GUIDE
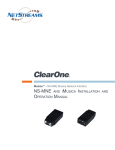
MU5066KP Keypad with Digital Amplifier
1. LCD
Wide-screen graphic LCD user interface.
2. PWR
Room system power
ON/OFF button; whole
system ON/OFF.
3. Menu
Menu offers total freedom in
selecting sound, naming
source, adjusting backlight
brightness, and allows you
to program audio sources
from remotes. Automatically
returns to basic screen if
there is no input for 30
seconds. See menu list on page 13.
4. SRCE
Browse the audio sources [S1/S2/S3/S4/EXT* / FM**] to listen.
*if optional Audio Port is connected. ** With optional DFMT FM tuner card.
5. IR Confirmation LED
This LED will flash to confirm the reception of an IR signal from a remote control through the remote sensor.
6. Remote Sensor
The REMOTE SENSOR is used to receive commands from an IR remote control. The IR receiver also
handles routing IR commands back to head end sources, and to the Audio Port if connected.
7. Source Control / 10-Key Direct Tuner Access
These buttons provide you with a convenience of controlling 4 audio sources connected to the ADC. They
consist of 10 buttons and allow you to register up to 20 commands per audio source.
KEYPAD CONNECTIONS
8. Speaker Output
4 pin 5mm Phoenix type connection.
9. Power In
(+27V DC) 2 pin 5mm Phoenix type connection.
10. ADC Input
8-pin RJ45 Data Jack EIA/TIA 568A.
11. Audio Port (EIM) Input
8-pin RJ45 Data Jack EIA/TIA 568A.
12. Digital FM Tuner Card Slot
Insert NetStreams Digital FM Tuner Card (DFMT) for local FM Tuner listening (sold separately).
All specifications subject to change without notification. All rights reserved. Copyright©2007 NetStreams
Main +1 512.977.9393 / fax +1 512.977.9398 / 3600 W. Parmer Lane Suite 100, Austin, TX 78727 / www.netstreams.com
NS-0505-7121
10
MUSICA KEYPAD AMPLIFIER MENU LIST
Keypad Menu List
Sound:
Provide control over the sound such as:
Balance and Loudness
Balance: 15 steps from left to right, including center.
Loudness: ON/OFF
5-band graphic equalizer: 100 Hz, 300 Hz, 1 k Hz, 3 k Hz, 10 k Hz.
3D Sound mode: ON/OFF (MU5066KP50 only).
Name:
If you wish to name the sources, NAME menu provides you with a choice of 52 names (see page 16):
In the event that the optional Digital FM Tuner card is inserted, use the Name selection on the menu to name
FM Tuner presets.
In the event that the optional Audio Port is connected, use the Name selection on the menu to name the source.
IR:
You can adjust the IR Frequency for the global source input for IR Learning. Select 38 kHz or 56 kHz
Can register up to 20 (IR) commands per audio source. Source [S1/S2/S3/S4] with Remote or keypad.
Registered buttons are stored In Main system, and they can be used by other rooms.
Create and set Macros for the keypad:
Eight, 4-step macros (for IR Codes already learned).
The MU5066KP50 also adds the capability for up to 10 macros per global source.
Adjust:
You can adjust the amplifier to match the impedance of the speakers used (8Ω/6Ω/4Ω)
You can adjust the brightness and select color.
Bright: Adjust Brightness level from 0% - 100% 9 steps.
Color: Choose Green or Amber. (KP25S only)
Color: Choose Blue or White. (KP25 and KP50 only)
Timer: On/Off Back Light turns off 3,5,10 or 15 minutes after last button press.
You can adjust the Sleep timer for the room. Select 10, 20, or 60 minutes.
Room:
Control the power (ON/OFF) of all room systems. [R1-R6]
ON: Indicates that a room’s system power is on and can be turned off.
OFF: Indicates that a room’s system power is off and can be turned on.
Turn ALL ROOMS ON or OFF
Select the source for any room on the system by pressing the SRCE button. (Source will begin playing at
the last known volume or the default volume, in the event that the last known volume was less than 15
dB.
EXT (External Audio):
Defines the output direction of audio signal when the Audio Port (EIM) is connected. This menu is
activated either when the Audio Port (EIM) is connected or DFMT is inserted.
ROOM AMP only or
Both ROOM AMP + External AMP (variable output) or
External AMP only (variable output) or
External AMP only (fixed output)
If the keypad has the optional Digital FM Tuner inserted, you can adjust the following:
Tuner Sensitivity: Low / Middle / High
Adjust the spacing for the Tuner Reception: 50 kHz (Europe) / 100 kHz (Europe) / 200 kHz (US, default)
Adjust the Tuner Pre-Emphasis: 50 milliseconds (Europe) / 75 milliseconds (US, default).
All specifications subject to change without notification. All rights reserved. Copyright©2007 NetStreams
Main +1 512.977.9393 / fax +1 512.977.9398 / 3600 W. Parmer Lane Suite 100, Austin, TX 78727 / www.netstreams.com
NS-0505-7121
11
MUSICA KEYPAD AMPLIFIER SPECIFICATIONS
Specifications for Musica MU5066KP Keypads
Musica MU5066KP25S:
Output Power:
Load Impedance:
Signal to Noise:
Distortion:
Channel Separation:
Dynamic Range
Level Control Volume:
Backlighting:
Macros
25 Watts RMS/channel @ 4 ohms with both channels
driven, 18 watts RMS/channel @ 8 ohms,
20 – 20 kHz +/- 3 dB
8, 6 or 4 ohms (user selectable)
>102dB (A-weighted ref: 1 Vrms, 1 KHz)
0.01% (power output: 1W @ 1 KHz)
>94dB
96 dB
-70 - 0dB
Green or Amber (selectable)
Eight (8), four-step macros
Musica MU5066KP25:
Output Power:
Load Impedance:
Signal to Noise:
Distortion:
Channel Separation:
Dynamic Range
Level Control Volume:
Backlighting:
Macros
25 Watts RMS/channel @ 4 ohms with both channels
driven, 18 watts RMS/channel @ 8 ohms,
20 – 20 kHz +/- 3 dB
8, 6 or 4 ohms (user selectable)
>102dB (A-weighted ref: 1 Vrms, 1 KHz)
0.01% (power output: 1W @ 1 KHz)
>94dB
96 dB
-70 - 0dB
Blue or White (selectable)
Eight (8), four-step macros
Musica MU5066KP50:
Output Power:
Load Impedance:
Signal to Noise:
Distortion:
Channel Separation:
Dynamic Range
Level Control Volume:
Backlighting:
Macros
50 Watts RMS/channel @ 6 ohms with both channels
driven, 36 watts RMS/channel @ 8 ohms,
20 – 20 kHz +/- 3 dB
8, 6 or 4 ohms (user selectable)
>102dB (A-weighted ref: 1 Vrms, 1 KHz)
0.01% (power output: 1W @ 1 KHz)
>94dB
96 dB
-70 - 0dB
Blue or White (selectable)
Ten (10) per source plus Eight (8), four-step macros
All specifications subject to change without notification. All rights reserved. Copyright©2007 NetStreams
Main +1 512.977.9393 / fax +1 512.977.9398 / 3600 W. Parmer Lane Suite 100, Austin, TX 78727 / www.netstreams.com
NS-0505-7121
12
MUSICA KEYPAD DISPLAY SCREENS
The Musica MU5066KP Display Screens
1. The Connection Screen
The first time the MU5066 Keypads are connected to the ADC are powered up, a connection screen with a progress
bar will briefly appear as the keypads attempt to communicate with the ADC. This screen will not appear anytime
afterwards unless there is trouble with the connection. For more information, see the troubleshooting section of this
manual.
The connection screen then quickly is replaced by the initial screen. Subsequent use of the keypad will show the
initial screen.
2. The Initial Screen
This is the screen that appears after the power is turned on by the POWER key or button. It shows the following
information:
• Room Number
• Model Type
• NetStreams logo
• Firmware version
3. The Basic Screen
The Initial state of the Basic Screen shows the following information:
• Name of the audio source selected
• Status of Volume and Mute
• Room name
All specifications subject to change without notification. All rights reserved. Copyright©2005 NetStreams
Main +1 512.977.9393 / fax +1 512.977.9398 / 3600 W. Parmer Lane Suite 100, Austin, TX 78727 / www.netstreams.com
NS-0505-7121
13
MUSICA KEYPAD DISPLAY SCREENS
Volume Up/Down in Basic Screen
Displays the current level of volume with
graphical view
Shows the status of volume adjusting when pressing volume UP/DOWN
Mute Function in Basic Screen
Displays the current state of volume. Stops the
output of the audio signals and Audio Level
Meter.
Shows that MUTE is activated.
External AMP Mode View in Basic Screen
EXT is displayed when an external audio source
connected to the Audio Port is selected for
playback and you have selected the EXT source.
All specifications subject to change without notification. All rights reserved. Copyright©2007 NetStreams
Main +1 512.977.9393 / fax +1 512.977.9398 / 3600 W. Parmer Lane Suite 100, Austin, TX 78727 / www.netstreams.com
NS-0505-7121
14
MUSICA KEYPAD DISPLAY SCREENS
1.
Menu Screen
This screen shows the system settings for the local room.
Enter and Exit by MENU key.
The Menu screen consists of four sections
¾ Main Menu: You can select six menu items for the
adjustment or setup.
SOUND, NAME, IR, ADJ, ROOM, EXT (Audio
Port-EIM, FM TUNER)
Sub 1 Menu: Select the sub-items for adjustment
or setup available for each main menu item.
¾ Sub 2 Menu: Adjust or set the value of the
selected sub-item.
¾ Directional Arrows: Shows the pathway for adjustments or setup.
Direction Type ◄ (Left), ► (Right), ▲ (Up), ▼ (Down).
The arrows blink to indicate possible directional path of menu or adjustments and settings available.
Shadowing and solid lines show selected items.
¾
The basic screen returns automatically after 30 seconds pass without any keypad input.
4.1 Sound Menus – The following four figures show the adjustment of Balance, Loudness, 5-Band Equalizer,
and 3D Sound Mode (MU5066KP50 only):
(Balance Adjustment)
(5-Band Graphic Equalizer)
(Loudness Adjustment)
(3D Sound Mode available on KP50 only)
All specifications subject to change without notification. All rights reserved. Copyright©2007 NetStreams
Main +1 512.977.9393 / fax +1 512.977.9398 / 3600 W. Parmer Lane Suite 100, Austin, TX 78727 / www.netstreams.com
NS-0505-7121
15
MUSICA KEYPAD DISPLAY SCREENS
4.2 Name Menu:
You can select any of the following names for source names, Audio Port names, Room names, or Tuner
preset names (*requires Digital FM Tuner card):
52 Default names are in the memory of the NS-MU5066 System: CD / AUX / Tape / Tuner / Escient/
AM / FM / MP3 / Blues / Children / Classic / Country / DAD / Dance / DVD / Lights / Internet / Jazz /
ReQuest / MOM / XM Radio / POP / R&B / Rap / Radio / Rock / SAT / Xiva / Soul / iPOD / Talk /
News / Sirius / Traffic / Weather / Sports / NPR / DSS / M-Server / {Blank} [All presets default] / Ext
[Ext. Default] / Master Bed / Bedroom / Kitchen / Dining / Living / Family / Great / Study / Room [All
Rooms Default] / Outside
You can check the current name of each audio source in the Sub 1 Menu.
Select the new name of an audio source in Sub 2 Menu if desired.
Note: Each audio source must have its own name.EX: EXT Name is for a local source connected to an
Audio Port
(Naming Source 1)
(Naming Source 2)
(Naming Source 3)
(Naming Source 4)
(Naming Room in which Keypad resides)
(Naming External Audio Port Source)
Non Volatile Keypad memory
All variables in the keypad are stored in nonvolatile memory. After adjusting any setting on the keypad to lock in that value, you
must turn the keypad off and then back on.
All specifications subject to change without notification. All rights reserved. Copyright©2007 NetStreams
Main +1 512.977.9393 / fax +1 512.977.9398 / 3600 W. Parmer Lane Suite 100, Austin, TX 78727 / www.netstreams.com
NS-0505-7121
16
MUSICA KEYPAD DISPLAY SCREENS
4.3 IR Menu:
Displays the screen for IR Learning.
Can Register 20 commands for each audio source. (Source 1, 2, 3, 4).
SRC functions cannot be registered for external audio systems (EXT).
Also Adjusts the IR Frequency
4.3.1 Adjusting the IR Frequency for each source:
Select between 38 kHz and 56 kHz per source input.
4.3.2 Learning IR Codes for sources connected to the ADC:
Step 1: Press the arrow up key to
begin the IR Learning process.
Step 2: Select the keypad button for the IR
code to be learned
Step 3: On the remote control for the source equipment, press the button for the code you want to learn,
pointing it at the IR Receiver window on the Musica keypad. Then, press the same button on the remote
control to confirm the code.
All specifications subject to change without notification. All rights reserved. Copyright©2007 NetStreams
Main +1 512.977.9393 / fax +1 512.977.9398 / 3600 W. Parmer Lane Suite 100, Austin, TX 78727 / www.netstreams.com
NS-0505-7121
17
MUSICA KEYPAD DISPLAY SCREENS
Step 4: The results of the registration of the IR code on the button are displayed. Normal Mode: Indicates
the completion of registration. Error Mode: Indicates error during IR code learning
• The previous screen returns automatically after 3 seconds
• Repeat the procedures until all IR codes are learned
• Exit the IR learning menu by pressing the MENU key or the arrow left key.
4.4 Adjust (ADJ) Menu Screens-to learn how to program macros in the keypads, please refer to pages 22 - 24.
4.4.1 Adjusting the amplifier to better match the impedance of the speakers:
4.4.2 Adjusting the Brightness level of the LCD screen (0% to 100% in 9 step increments):
H
All specifications subject to change without notification. All rights reserved. Copyright©2007 NetStreams
Main +1 512.977.9393 / fax +1 512.977.9398 / 3600 W. Parmer Lane Suite 100, Austin, TX 78727 / www.netstreams.com
NS-0505-7121
18
MUSICA KEYPAD DISPLAY SCREENS
4.4.3 Adjusting the Color of the backlight
*Note: The MU5066KP25S keypad features amber or green backlighting
4.4.4 Adjusting the Backlight Time out settings
4.4.5 Adjusting the Sleep Timer settings:
All specifications subject to change without notification. All rights reserved. Copyright©2007 NetStreams
Main +1 512.977.9393 / fax +1 512.977.9398 / 3600 W. Parmer Lane Suite 100, Austin, TX 78727 / www.netstreams.com
NS-0505-7121
19
MUSICA KEYPAD DISPLAY SCREENS
4.5 Room Menu Screens:
View other rooms and see what source they’re listening to.
Turn ALL ROOMS OFF by pressing and holding the power button for 2 seconds.
Change a source in another room by selecting the room and then hitting the source key.
Turn off another room by selecting the room from the menu and hitting the right arrow button.
Turn ALL ROOMS ON by first selecting a source and then pressing and holding the SRCE button for 2
seconds. The volume will return to the last known state or 15, whichever is the higher volume.
(Viewing sources playing in each room)
(Turning room 3 off from another room)
(Turning room 3 on from another room)
All specifications subject to change without notification. All rights reserved. Copyright©2007 NetStreams
Main +1 512.977.9393 / fax +1 512.977.9398 / 3600 W. Parmer Lane Suite 100, Austin, TX 78727 / www.netstreams.com
NS-0505-7121
20
MUSICA KEYPAD DISPLAY SCREENS
4.6 EXT (External Input / Output) Menu Screens (Audio Port or DFMT must be connected):
Defines the direction of the audio signal when the Audio Port (EIM) is in use.
ROOM: Only the amplifier in the keypad will be used.
ROOM + EXT: Uses both the keypad amp and external amp.
EXT VAR: Passes the audio signal into the external amplifier or audio system at line level
at a variable output.
EXT FIXED: Passes the audio signal into the external amplifier or audio system at line level
at a fixed output.
This menu is only available if the Audio Port is connected
All ADC controls are available for use with the Audio Port; SRCE control is not supported in this mode.
EXT will indicate when the external source has been selected.
4.7 Locking & Unlocking the menu
Press the “Menu” button, then the “1, 2, 3, 4” keys on the
keypad to lock the menu.
Press the “Menu” button, then “5, 6, 7, 8” on the remote
control or keypad to unlock the menu.
4.8 Locking & Unlocking the keypad
Press the “Menu” button, then the “0, 7, 8, 9” keys on the
keypad to lock the keypad
Press the “Menu” button, then the “0, 7, 8, 9” keys on the keypad to unlock the keypad.
All specifications subject to change without notification. All rights reserved. Copyright©2007 NetStreams
Main +1 512.977.9393 / fax +1 512.977.9398 / 3600 W. Parmer Lane Suite 100, Austin, TX 78727 / www.netstreams.com
NS-0505-7121
21
MUSICA KEYPAD DISPLAY SCREENS
4.9 Programming Macros
All Musica MU5066 keypads have the capability to program two individual macros per input source
to begin programming:
1. Completely learn the IR codes into all source buttons on all four source pages (FM tuner excluded).
2. Select source S1 through S4 to build the macro for that device.
3. Push the menu button and scroll with the right arrow to the “IR” location on menu bar.
4. Scroll with the up arrow to “Macro 11” or “Macro 12”.
5. Scroll with the right arrow to highlight “Start”
6. “Press a source button! For step 1” will appear on the LCD screen.
7. Press the desired source button (0 through 9) for step 1.
8. Press the desired source button (0 through 9) for step 2.
9. Press the desired source button (0 through 9) for step 3.
10. Press the desired source button (0 through 9) for step 4.
11. Macros can contain 2, 3, or 4 steps.
To exit macro programming mode, push the menu button or the arrow left button or wait for keypad to time-out
and return to the source display.
Time delays can be added to the steps which have been programmed. To do so:
1. Push the menu button and scroll with the right arrow to “IR” location on menu bar.
2. Scroll with up arrow to “Timing”.
3. Scroll with right arrow to enter the timing selection window. In this window you may select “500MSEC, 1
SEC, or 2 SEC”.
4. To make a selection, scroll with up arrow or down arrow to highlight the selection needed. This selection is
applied to all steps in Macro 1 and Macro 2 for this source. Each source can receive the time delay
necessary.
To exit the Timing programming mode, push the menu button or wait for keypad to time-out and return to the
source display.
All specifications subject to change without notification. All rights reserved. Copyright©2007 NetStreams
Main +1 512.977.9393 / fax +1 512.977.9398 / 3600 W. Parmer Lane Suite 100, Austin, TX 78727 / www.netstreams.com
NS-0505-7121
22
MUSICA KEYPAD DISPLAY SCREENS
4.9 Programming Macros continued
The Musica MU5066KP50 also has the capability for an additional 10 macros per global source.
These macros will work with any IR controlled equipment.
This is particularly useful when you have an IR connecting block to multiple pieces of equipment off of 1 global
source. On example may be a DVD Player, TV and an R-based lighting control system connected as such:
NOTE: This will not work if there are two of the same sources connected to the IR connecting block.
NOTE: All products connected to the IR connecting block must be transmitting IR on the same frequency!
All specifications subject to change without notification. All rights reserved. Copyright©2007 NetStreams
Main +1 512.977.9393 / fax +1 512.977.9398 / 3600 W. Parmer Lane Suite 100, Austin, TX 78727 / www.netstreams.com
NS-0505-7121
23
MUSICA KEYPAD DISPLAY SCREENS
4.9 Programming Macros continued
To program in the IR codes for the equipment:
1.
2.
3.
4.
First, make sure you’re on a global source input selected on the MU5066KP50 keypad.
Select IR from the Menu screen and hit the arrow pointing right.
Press the keypad button to start learning the IR code.
Point the Remote Control for the source equipment at the IR window on the Musica MU5066KP50 keypad
and press the command you want to learn.
5. Repeat step 3 to verify the command.
6. Upon verification, the LCD screen will display “Step 1 Complete”. Push the right arrow for the second IR
command.
7. Repeat up to 10 IR commands per global source.
All specifications subject to change without notification. All rights reserved. Copyright©2007 NetStreams
Main +1 512.977.9393 / fax +1 512.977.9398 / 3600 W. Parmer Lane Suite 100, Austin, TX 78727 / www.netstreams.com
NS-0505-7121
24
MUSICA SINGLE / MULTI-ZONE OPERATION MODES
The Musica MU5066 keypads feature two operations modes which can be selected from the menu on the
MU5066 keypad: Single-Zone and Multi-Zone modes.
The Multi-Zone mode is the default mode and allows for the keypad to access global sources connected to the Audio
Distribution Center.
The Single-Zone operations mode allows for the keypad to be used in a room without an Audio Distribution Center. To do
this, you will need the NetStreams PL228 plug-in power supply (sold separately) to power the keypad. The single-zone
mode will allow playback of FM tuner in that zone (when Digital FM Tuner card is inserted) and a local source (when Audio
Port is connected to the keypad).
**If upon connecting the keypad and powering it up the keypad can not find the Audio Distribution Center, the
keypad will default to single zone mode.
**If the “No Connection Check the Cable” message is displayed, disconnect power, hold the SRCE button down
and then turn power on. This will cause the keypad to enter operation mode menu.
To Change the Multi-Zone Mode, do the following:
1. On the MU5066 keypad, press the MENU key and then press the number keys “1, 3, 5, and 7”.
2. The Multi-Zone Mode Menu will appear. Use the arrow up / down key to select either “Multi-Zone Mode” or “Single
Zone Mode”.
Multi-Zone Mode / Multi-Zone (default)
Single-Zone Mode
3. Press the MENU key again.
4. The MU5066 keypad will restart and reset itself to the mode you have chosen. The mode you have selected will
appear on the before the NetStreams splash screen appears on the LCD screen upon restart.
NOTE: The Single-Zone mode will only allow the keypad to select from up to two sources – the local source connected to
the Audio Port and the local FM Tuner (Digital FM Tuner Card required).
NOTE: The Single-Zone mode can not transmit IR codes, since there is no communication with the Audio Distribution
Center.
All specifications subject to change without notification. All rights reserved. Copyright©2005 NetStreams
Main +1 512.977.9393 / fax +1 512.977.9398 / 3600 W. Parmer Lane Suite 100, Austin, TX 78727 / www.netstreams.com
NS-0505-7121
25
MUSICA DIGITAL FM TUNER CARD
The Musica MU5066 keypads also feature an expansion slot for a Musica Digital FM Tuner Card
(sold separately) for FM Tuner listening in the local room in which the keypad is installed.
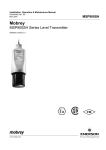
5.1 Inserting the MU5066DFMT Digital FM Tuner Card into the socket on the keypad:
The Digital FM Tuner
(DFMT) slides into the slot
on the back of any
MU5066 Keypad with the
NetStreams Logo on the
tuner card facing up.
Use the thumb screw to
secure the tuner card
once in place.
5.2 Installing the FM
Antenna:
The Musica MU5066DFMT
includes a dipole FM
Antenna for mounting inbetween studs in the wall,
as well as a RG6
connection for connecting
to an aftermarket FM
antenna. For best
reception, NetStreams
recommends the use of
a Coax connection from
an FM antenna mounted
in the attic or roof.
The 3.5mm jack on the FM
antenna connects to the
3.5mm jack on the PCB
board of the keypad itself.
Then use either the dipole
antenna (included) OR the
RG6 connection from an
antenna in the attic or
structured cable box.
All specifications subject to change without notification. All rights reserved. Copyright©2007 NetStreams
Main +1 512.977.9393 / fax +1 512.977.9398 / 3600 W. Parmer Lane Suite 100, Austin, TX 78727 / www.netstreams.com
NS-0505-7121
26
MUSICA DIGITAL FM TUNER CARD
5.3 Programming FM Station Presets:
Once the Digital FM Tuner card is inserted in the keypad, you can program in up to 8 FM Station presets
for easy selection. To do this, tune to the station you want to program in, then press and hold the MODE
key on the keypad until the “P” starts flashing. Once that happens, press and hold the corresponding
hard key numbered for that preset.
(e.g. If you would like to have FM 101.3 as your preset station number 1, first tune to 101.3, then press
and hold the MODE key till the “P” starts flashing, then press and hold the hard key labeled 1 until the
LCD menu confirms storage of that station as a preset.).
5.4 Naming the FM Station Presets:
You can select the name of the audio source from the predefined name set.
Default names are in the memory of the NS-MU5066 System. Refer to page 16.
¾
You can check the current name of each audio source in the Sub 1 Menu.
Select the new name of an audio source in Sub 2 Menu if desired.
Note: Each FM preset can have its own name.
All specifications subject to change without notification. All rights reserved. Copyright©2007 NetStreams
Main +1 512.977.9393 / fax +1 512.977.9398 / 3600 W. Parmer Lane Suite 100, Austin, TX 78727 / www.netstreams.com
NS-0505-7121
27
MUSICA DIGITAL FM TUNER CARD
5.5 EXT Menu Display Screens - Adjusting the settings for the FM Tuner
Once the Musica Digital FM Tuner card is inserted, additional adjustment screens will appear in the EXT
menu on the Musica 5066 keypad. The screens allow you to adjust the following:
• Adjustment of the spacing between frequencies:
o 50 kHz (Europe) OR
o 100 kHz (Europe) OR
o 200 kHz (USA, default)
•
Adjustment of the sensitivity of the tuner reception (particularly useful when seeking or scanning
through stations):
o LOW: signal strength does not have to be strong for it to stop on a station
o MIDDLE: strong signal strength required
o HIGH: signal strength has to be higher before it will stop on a station.
•
Signal De-emphasis Adjustment
o 50 microseconds (Europe, other country)
o 75 microseconds (USA, default)
Bulletins
All specifications subject to change without notification. All rights reserved. Copyright©2007 NetStreams
Main +1 512.977.9393 / fax +1 512.977.9398 / 3600 W. Parmer Lane Suite 100, Austin, TX 78727 / www.netstreams.com
NS-0505-7121
28
AUDIO PORT
All specifications subject to change without notification. All rights reserved. Copyright©2007 NetStreams
Main +1 512.977.9393 / fax +1 512.977.9398 / 3600 W. Parmer Lane Suite 100, Austin, TX 78727 / www.netstreams.com
NS-0505-7121
29
MU290 POWER AMPLIFIER
If more power is required (especially for larger rooms or outdoor zones), the MU290 power amplifier is
the perfect complement to your Musica system. The MU290 provides 90W of stereo power (200W
bridged) and features two RJ45 (EIM) ports which connect to the EIM port on the back of the MU5066
keypad. Up to 6 MU290 power amplifiers can be daisy chained to provide 90 Watts of stereo power to
up to 6 pairs of speakers in one zone, or, when bridged, 200 watts of power.
MU290 Specifications:
Output Power:
Power Bandwidth:
THD + N:
Input Impedance:
Input Connector:
Output Connectors:
Controls:
Dimensions (W x H x D)
70 Watts/channel @ 8 ohms; 200 Watts/channel @ 8
ohms (bridged); 100 Watts/channel @ 4 ohms,
20 – 20 kHz +0, - 0.5 dB, 1 W
5 Hz – 100 kHz (+3, -3 dB)
>98 dB
10k Ohms
RJ45 (EIA), EIA 568a
RJ45 (EIM), EIA 568a; 4-pin Phoenix connector
(speaker output)
Power On/Off; Channel Gain
8.2” X 1.75” x 10.2”
(205mm x 44 mm x 255mm)
MU290 connection to MU5066 keypad:
MU290 connected to keypad and EIM out of Audio Port (for local source output):
All specifications subject to change without notification. All rights reserved. Copyright©2007 NetStreams
Main +1 512.977.9393 / fax +1 512.977.9398 / 3600 W. Parmer Lane Suite 100, Austin, TX 78727 / www.netstreams.com
NS-0505-7121
30
MU290 POWER AMPLIFIER
6 MU290’s in daisy chain configuration:
NOTE: Make sure the RJ45 Terminator (included) is plugged into the EIM output on the last
MU290 amplifier in the chain.
All specifications subject to change without notification. All rights reserved. Copyright©2007 NetStreams
Main +1 512.977.9393 / fax +1 512.977.9398 / 3600 W. Parmer Lane Suite 100, Austin, TX 78727 / www.netstreams.com
NS-0505-7121
31
MUSICA WIRING DIAGRAMS
Wiring the System
Run CAT5e & 14/4 or CAT5e & 16/4 Siamese cable (as outlined in EIA/CEA 2030) between each Musica keypad and
the Musica ADC.
1. Run a CAT5e cable between each Musica keypad/amplifier and Musica Audio Port (EIM) installed.
2. IR Emitters run from the Audio Distribution Center to the house-wide sources.
All specifications subject to change without notification. All rights reserved. Copyright©2007 NetStreams
Main +1 512.977.9393 / fax +1 512.977.9398 / 3600 W. Parmer Lane Suite 100, Austin, TX 78727 / www.netstreams.com
NS-0505-7121
32
MUSICA WIRING DIAGRAMS
Wiring for Source Components
Wiring for RS-232 and Doorbell/Telephone Sensors
All specifications subject to change without notification. All rights reserved. Copyright©2007 NetStreams
Main +1 512.977.9393 / fax +1 512.977.9398 / 3600 W. Parmer Lane Suite 100, Austin, TX 78727 / www.netstreams.com
NS-0505-7121
33
MUSICA POSSIBLE CONFIGURATIONS
All specifications subject to change without notification. All rights reserved. Copyright©2007 NetStreams
Main +1 512.977.9393 / fax +1 512.977.9398 / 3600 W. Parmer Lane Suite 100, Austin, TX 78727 / www.netstreams.com
NS-0505-7121
34
HOW TO OPERATE THE SYSTEM
Balloon indicated the operation in the room system or remote control
Basic Screen: Displays the room and source selected, and the volume level.
All specifications subject to change without notification. All rights reserved. Copyright©2007 NetStreams
Main +1 512.977.9393 / fax +1 512.977.9398 / 3600 W. Parmer Lane Suite 100, Austin, TX 78727 / www.netstreams.com
NS-0505-7121
35
HOW TO CONTROL THE VOLUME
A. Press c button to turn up the volume, or d button to turn down the volume.
B. Keep pressing the button until the desired volume level is achieved.
C. If volume level is “0”, it shows system in mute state. It is released by using c button.
Mute State Window
Volume Setting Window
Note:
-- Volume setting window changes
back to the Level window in 1 second
in the absence of button presses.
-- Then default volume level is
set to 10 when power is first applied.
Level Window
All specifications subject to change without notification. All rights reserved. Copyright©2007 NetStreams
Main +1 512.977.9393 / fax +1 512.977.9398 / 3600 W. Parmer Lane Suite 100, Austin, TX 78727 / www.netstreams.com
NS-0505-7121
36
HOW TO SELECT A SOURCE FOR PLAYBACK
Press the “SRCE” button to scroll through
global and local sources.
All specifications subject to change without notification. All rights reserved. Copyright©2007 NetStreams
Main +1 512.977.9393 / fax +1 512.977.9398 / 3600 W. Parmer Lane Suite 100, Austin, TX 78727 / www.netstreams.com
NS-0505-7121
37
TROUBLESHOOTING
“Check the Cable” Message appears on the MU5066 keypad upon power up:
Upon first power up, if the “Check the Cable” message appears, this indicates that the something
is wrong with the CAT5 cable termination or the CAT5 cable itself.
Step 1: Turn OFF the power on the Audio Distribution Center
Step 2: Test your CAT5 cable connection at both ends with a cable tester and reterminate the cable.
RJ45
Pin Out for 568a
12345678
1
Green/White
2
Green
3
Orange/White
4
Blue
5
Blue/White
6
Orange
7
Brown/White
8
Brown
GW G OW B BW O BRW B
Step 3: Plug the CAT5 cable back into both the MU5066 keypad and the ADC.
Step 4: Turn the Audio Distribution Center power back on. The Keypad will try to reconnect to the ADC
and the “Connecting” screen will appear again.
All specifications subject to change without notification. All rights reserved. Copyright©2007 NetStreams
Main +1 512.977.9393 / fax +1 512.977.9398 / 3600 W. Parmer Lane Suite 100, Austin, TX 78727 / www.netstreams.com
NS-0505-7121
38
TROUBLESHOOTING
Upon First Power Up, the keypad does nothing and there is no backlight on the LCD window on
the keypad:
If this happens, the polarity may be incorrect for the power connection from the ADC to the keypad.
You’ll be able to hear the relay clicking on the ADC, which means that 1 of the keypads is connected
backwards. To remedy this:
Step 1: Turn OFF the power on the Audio Distribution Center
Step 2: Check all of the 2-pin Phoenix connectors on the ADC and the keypad for the correct polarity,
paying attention to the silkscreen on the back of the ADC and on the PCB board of the keypad.
Step 3: Re-connect the 2-pin Phoenix (power) connectors on the ADC and the keypad(s).
Step 4: Turn the ADC Power ON.
I can’t learn the IR Codes on the MU5066 keypad:
There could be several things to check for.
First, check to make sure that the IR Emitter output connection is using the port with the same number as
the source connected to the Audio Distribution Center. For example, a source connected by RCA analog
to “Audio Input 1” on the ADC should have the IR Emitter running from “IR Out 1” on the ADC.
If that’s ok, then consult the owner’s manual for the source equipment to double check that the IR codes
are transmitting at the correct frequency. The default IR setting for the Musica system is 38 kHz,
however if the source connected to the input takes IR codes that are transmitting at 56 kHz, you will need
to change the IR FREQ setting for that source input from the Menu on the MU5066 keypad (see the IR
section of the Menu).
Some source manufacturer’s remote controls transmits IR codes in reverse polarity. Try learning
the IR codes to the keypad by pointing the remote control at the keypad once to learn the code,
then point it away and press the same button again, then point it back at the keypad to verify the
IR code learned.
All specifications subject to change without notification. All rights reserved. Copyright©2007 NetStreams
Main +1 512.977.9393 / fax +1 512.977.9398 / 3600 W. Parmer Lane Suite 100, Austin, TX 78727 / www.netstreams.com
NS-0505-7121
39
NOTES
All specifications subject to change without notification. All rights reserved. Copyright©2007 NetStreams
Main +1 512.977.9393 / fax +1 512.977.9398 / 3600 W. Parmer Lane Suite 100, Austin, TX 78727 / www.netstreams.com
NS-0505-7121
40
www.netstreams.com
3600 W. Parmer Lane
Austin, TX 78727
(512)977-9393
(512)977-9398 fax
[email protected]
All specifications subject to change without notification. All rights reserved. Copyright©2005 NetStreams
Main +1 512.977.9393 / fax +1 512.977.9398 / 3600 W. Parmer Lane Suite 100, Austin, TX 78727 / www.netstreams.com
NS-0505-7121