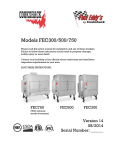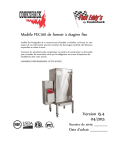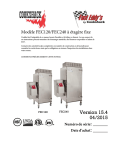
1
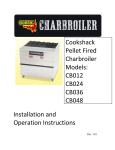
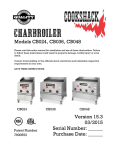
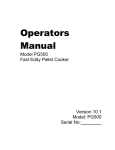
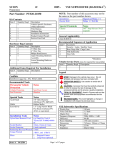
Cookshack, Inc. Model FEC500 Fast Eddy Oven Operator’s Manual Please read this entire manual installation and use of this pellet fired smoker oven. Failure to follow these instructions could result in property damage, bodily injury or even death. Contact local building or fire officials about restrictions and installation inspection requirements in your area. SAVE THESE INSTRUCTIONS Version 10.1 10/7/10 Dear Cookshack Customer Your model FEC500 “FAST EDDY’S BARBEQUE OVEN” by Cookshack will produce great barbecue and smoked foods. It is easy to operate, clean and maintain. Use this operator’s Manual to familiarize yourself with the smoker and its operation. If you have a question or problem not covered in the manual, call us as 1.800.423.0698 Monday through Friday, 9:00 AM to 4:00 PM or e-mail us at [email protected]. You can also join the Cookshack Barbecue Forum on our website at www.cookshack.com which has high participation by both Cookshack customers and staff. You must observe safe operating practices when using the smoker. Cookshack, Inc. assumes no responsibility for results of careless and dangerous operation of Cookshack smokers or other products. All warranties are null and void if the practices described in the Operator’s Manual are not observed. Read the following instructions thoroughly and completely before using your smoker! Observe the instructions carefully. Be certain that you understand completely how it functions before attempting to operate it. This smoker oven is intended for use as a food smoker. It is not intended for any use not specifically described in this manual. Misuse of this smoker can result in serious injury and a fire hazard. With these precautions in mind, enjoy your smoker and the delicious foods in will produce. Stuart Powell President and CEO Cookshack Inc. 2304 N Ash Street Ponca City, OK 74601 2 TABLE OF CONTENTS Fast Eddy’s Smoker Oven Model FEC500 Version 010.1 October 2010 GENERAL INSTRUCTIONS 4 INSTALLATION INSTRUCTIONS 4-5 EXHAUST SYSTEMS 6 OPERATING INSTRUCTIONS 7 CONTROL PANEL OPERATION 7-9 LOADING INSTRUCTIONS 9 SHUT DOWN PROCEDURES 10 SAFETY TIPS 10 MAINTENANCE 10-11 ELECTRICAL SPECIFFICATIONS 12 TROUBLE SHOOTING GUIDE 13-15 WARRANTY 16 NATIONAL SERVICE POLICY 16 RETURN POLICY 17 ELECTRICAL WIRING DIAGRAM 18 SMOKER ILLISTRATION 19 3 FAST EDDY’S BARBEQUE OVEN MODEL FEC500 GENERAL INSTRUCTIONS Keep the oven free from combustible materials Never store or use gasoline or other flammable material in the vicinity of this oven. Never use gasoline, gasoline-type lantern fuel, kerosene, charcoal lighter fluid, or similar liquids to start or “freshen up” a fire in this oven. Keep all such liquids well away from the oven while in use. Whenever working on, or servicing this unit ALWAYS disconnect the power. This oven is equipped with a 3 prong plug for your protection from a shock hazard. Always plug this unit directly into a properly grounded 3 prong receptacle. WARNING! Exterior surfaces may be HOT! Make sure all operator personnel are instructed on the proper use of the oven. INSTALLATION INSTRUCTION Local Code Officials and a Commercial Kitchen Ventilation Contractor should be consulted prior to installation to determine the need to obtain a permit. Unit must be installed per state and local fire codes and NFPA 96. WARNING! Unit is very HEAVY and extra care must be taken when unloading and moving. Provisions must be made for adequate air supply for the oven. If the oven is to be installed in a sealed room or building utilizing exhaust fans, the room must be supplied with a return air system. Return air must be equal or slightly higher than that of the exhausted air. WARNING do not pack required air spaces with insulation or other materials. Chimneys are 5 inches in diameter and should be type L-Vent and are required to extend 3 feet above the highest point where they pass through the roof and at least 2 feet higher than any portion of a building within 10 feet or in accordance with state and local fire codes (NFPA 96). A rain cap must be utilized on a chimney exhaust. A 4 foot extension is required for all units used outdoors. DO NOT INSTALL A FLUE DAMPER IN THE EXHAUST VENTING SYSTEM OF THIS UNIT. DO NO CONNECT THIS UNIT TO A CHIMNEY FLUE SERVING ANOTHER APPLIANCE. Attachment and securement of the exhaust venting system to the product and to each adjoining section of connector pipe are required to be fastened with at least three screws. 4 Electrical Requirements The unit requires a separate 120 volt, 20 amp circuit. The unit must be grounded in accordance to your local codes or with the National Electric Code ANSI/NFPA 701990. Location 1. Stationary installation should be on a level surface that can support a minimum weight of 2500 lbs. 2. The unit requires adequate air. Ventilation is required for the proper operation of burner and cooking motors. 3. The unit should not be installed in a location where facilities for normal air circulation or infiltration are so limited so as to interfere with ready obtainment of all air necessary for proper ventilation and draw. 4. Keep the oven free from combustible materials. A good rule of thumb is to allow an 18 inch clearance space around gear motor access panel and the fire pit door opening. 5. Minimum spacing from combustible material is 6”; these clearances must be maintained unless materials used are non-combustible. Following is the recommended service spacing: Top – 18” Left Side – 24” to load pellets and maintenance of rotisserie. Right Side – 24” for ash removal. Front – 48” for loading and unloading of product. Back – 24” maintenance of convection fan. Floor – May be combustible material except for area under the fire box. This must be a noncombustible material and must extend 6” beyond each side of the fire box. Venting Install under a hood in accordance with your local codes. If a hood is not used Chimneys are five (5) inches in diameter, type “L” pipe and are required to extend three (3) feet above the highest point where they pass through the roof and at least two (2) feet higher than any portion of a building within ten (10) feet. A rain cap must be utilized on a chimney exhaust. When planning your chimney, it is important to remember several items: 1. It must draw air naturally through the chimney. 2. The chimney should be cleaned every six (6) months. 3. One (1) inch clearance from combustible materials. The installation of a chimney will vary depending on the location and local codes; however, the chimney should not have more than two (2) ninety degree elbows in it and should not be longer than thirty (30) feet. Smoke Evacuator (Optional Louvers) The optional smoke evacuator requires a ten (10) inch pipe, minimum 24 gauge with mushroom type fan (minimum 280 cfm) mounted on roof (not provided by Cookshack). Pipe needs three (3) inches clearance from combustibles. The evacuator must be run on a separate electrical circuit from the smoker. 5 EXHAUST SYSTEM(S) All FEC750’s come with a standard system which vents smoke out of the oven through a 5 inch pipe. It is the customer’s responsibility to provide a method to move smoke from this exhaust to the outside following applicable local codes (NFPA 96). This system must remain in place any time the unit is operated inside a building. Cookshack, Inc. offers an accessory called the “Smoke Evacuator System” – Figure 2. This system is activated automatically when the doors are opened, and operates by drawing smoke from inside the oven and venting it out the top of the unit. This prevents smoke from escaping into the work area each time the operator open the doors. The customer is responsible for supplying the ducting and fan needed to carry the smoke from the Smoke Evacuator System to the outside. Figure 1 - Accessory, Smoke Evacuator System ADEQUATE MAKEUP AIR IS REQUIRED FOR SAFE OPERATION. Consult manual for more information. It is your responsibility to maintain essential combustion air at all times during operation of unit. ***IMPORTANT*** READ CAREFULLY Positive Air Flow through the air shutter on the burner must be maintained for safe and proper operation of the unit. Burner air flow may be affected by one or a combination of the following. 1. Improper flue installation 2. Inadequate makeup air for hood system or exhaust fans 3. Competing hood systems or ventilation in the building 4. Extreme drafts or inadequate clearance. Please contact Cookshack Customer Service with any questions at 1.800.423.0698 Monday through Friday, 9 AM to 4 PM or e-mail us at [email protected]. 6 OPERATING INSTRUCTIONS Before starting check the following: 1. Pellet level 2. Insure that the fire pot is clean and clear of ash. 3. Check to insure that there is not a build –up of grease in the bottom of the cooking chamber. 4. Make sure that the pellet slide is clean. Push the “START” button on the control panel. Unit has an automatic ignition system. In the event there should be a failure with the igniter system use the following manual lighting instructions: 1. Pour ½ cup of pellets into the fire pot. 2. Squirt approximately 2 tablespoons of alcohol gel into the fire pot. 3. Ignite with a match. NOTE: Never attempt to squirt alcohol gel into burning embers. This has a potential for serious injury. 4. Let the pellets burn for 4 to 5 minutes. 5. Set the thermostat to 180 degrees. Always warm the oven to at least 180 degrees prior to cooking. This should take approximately 10 to 15 minutes. Foot pedal and outside switch operation 1. With the rotisserie on/off switch in the off position – rotisserie with not rotate. 2. With the rotisserie on/off switch in the on position - rotisserie will rotate when door is closed and when the door is open it will rotate by depressing the foot switch. SELECTION OF FUEL Only 100% hardwood food-grade pellets should be used in your smoker. Pellets should be no larger than ¼” in diameter and ¾” long. Use of heating fuel pellets can be harmful to both the food you are cooking and your smoker. CONTROL PANEL OPERATION Note: On the rotisserie model cookers the “MODE” and “PROBE TEMP” buttons are NOT operational. Since the smoked product rotates it is not possible to connect a probe. Set cooking temperature by pressing and holding the COOK TEMP button while using the ADJUST TIME OR TEMP buttons to change settings. Set holding temperature by pressing and holding the HOLD TEMP button while using the ADJUST TIME OR TEMP buttons to change settings. Set cooking time by pressing and holding the COOK TIME button while using the ADJUST TIME OR TEMP buttons to change settings. 7 The smoker will cook the product at the selected cooking temperature for the selected cooking time and then change to the selected holding temperature until it is shut off manually. While Cooking the LCD display of the IQ4 continually displays oven status after the cook cycle has been started. Using these features the kitchen staff can easily determine the status of the load in progress. Please note that the oven temperature displayed while the oven is running is the actual air temperature inside the oven. To display the hold temperature, briefly press the “HOLD TEMP”. The IQ4 controller is equipped with two “PRESET BUTTONS” for easy selection of common settings for popular foods. Pressing the button marked RIBS OR CHICKENS will make the following settings: Cook Temp 225°F Hold Temp 140°F Cook Time 3 hours Pressing the button marked BRISKET will make the following settings: Cook Temp 225°F Hold Temp 140°F 8 Cook Time 12 hours Once one of these preset buttons has been pushed you may start a cook cycle using these settings by simply pressing “START”. The IQ4 controller is equipped with a power backup system to prevent your Smoker from ‘forgetting’ what it is doing in the case of a power failure. The IQ will wait out power failures of up to 2 minutes and resume normal cooking. This backup system means that turning off the Master Switch for less than 2 minutes will not cause the IQ4 to forget its current instructions. ***CAUTION*** the “RESET BUTTON” is used to clear the current instructions and cause the IQ4 to start over from the beginning. ALWAYS CLEAN THE FIRE POT BEFORE USING THE RESET BUTTON. Recommended cooking times and temperatures are based on full loads with no holding cycle. Larger or smaller loads or the addition of holding time may require adjustment of cooking time and temperature. When you think the product is finished, turn the Master Switch to the OFF position. Wait ten minutes before opening the oven door to check the product for doneness. When the product is done to your satisfaction, remove from the smoker. LOADING INSTRUCTIONS When loading meat load the bottom racks first. In order to make a product fit, it may be necessary to remove the middle rack on a section when cooking thick cuts of meat like whole briskets or pork butts. The product needs to be loaded so that the racks are balanced – i.e. hang evenly on the arm when finished. When loading briskets place them so that heavy ends and flat ends are on alternate sides of the rack. When loading turkeys allow ample room between them and adjoining racks. This is necessary so that when the rotisserie turns the wings and legs do not catch on the rack above or below and dump off the rack. After loading racks, be sure to advance the rotisserie at least two revolutions to check for adequate clearance of the produce on the walls of the cooking chamber and other racks. Reposition product if necessary. 9 SHUT DOWN PROCEDURE Press the reset button and wait 10 min to allow for cooling before opening the smoker then turn the master on/off switch to the “OFF” position. ***SAFETY TIPS*** A MAJOR CAUSE OF OVEN-RELATED FIRES IS FAILURE TO MAINTAIN REQUIRED CLEARANCES (AIR SPACES) TO COMBUSTIBLE MATERIALS. IT IS OF UTMOST IMPORTANCE THAT THIS OVEN BE INSTALLED ONLY IN ACCORDANCE WITH THESE INSTRUCTIONS. Always use a grounded 3 prong plug and plug in receptacle. Always unplug the unit before any maintenance. Never leave firebox door open while the oven is running. Never use a high pressure washer around electrical components. Always drain grease DAILY. All switches should be in the “OFF” position plugging into receptacle MAINTENANCE PROCEDURES Soot and Fly ash: Formation and Need for Removal – The products of combustion will contain small particles of fly ash. The fly ash will collect in the exhaust venting system and restrict the flow of the flue gases. Incomplete combustion such as occurs during startup, shutdown, or incorrect operation of the smoker oven will lead to some soot formation which will collect in the exhaust venting system. The exhaust venting system should be inspected at least once every year to determine if cleaning is necessary. Clean Ashes from fire pot and combustion chamber weekly or if it appears as if there is a buildup of ash. Disposal of Ashes – Ashes should be placed in a metal container with a tight fitting lid. The closed container of ashes should be placed on a noncombustible floor or on the ground, well away from all combustible materials, pending final disposal. If the ashes are disposed of by burial in soil or otherwise locally dispersed, they should be retained in the closed container until all cinders have thoroughly cooled. Grease rotisserie bearings using 2 to 3 squirts of high temperature bearing grease every 1 to 2 weeks – Figure 3. 10 Figure 3 - Greasing rotisserie bearings Lubricate rotisserie drive chain every six months, also check chain tension and adjust by loosening bolts and using motor weight to create tension – Figure 4 Figure 4 - Rotisserie drive chain and tension adjustment Clean the racks and inside of cooking chamber with a degreaser and power wash weekly. (Recommended cleaner is Zep FS10184 Degreaser) NOTE: PROTECT ALL ELECTRICAL COMPONENTS FROM MOISTURE DURING THIS PROCESS. If the oven is stored outdoors care should be taken to insure that water does not get into the pellet hopper. Wood pellets expand greatly when wet and will jam the auger system. A vinyl cover for the hopper is highly recommended. Brush the Convection fan blades off periodically – Figure 5. Clean the pellet slide periodically to prevent pellet dust buildup – Figure 6. Figure 5 – Convection Fan Cleaning Figure 6 – Pellet Slide Cleaning 11 ELECTRICAL SPECIFICATIONS 110 volts, 60 HZ, single phase, 4 amp service required. Fuse Holder Figure 8 - Control panel fuse, 15 amp Rotisserie motor is ¼ horsepower. Convection fan is ¼ horsepower. The fire pot igniter element is 200 watts each. Auger motor and burner induction fans are 25 watts each. 12 TROUBLE SHOOTING GUIDE Trouble Control Panel does not power up Probable Cause Solution Unit not plugged into a working outlet (110VAC) Check the outlet to insure working. Plug into alternate source. Main Fuse on Control Panel Replace Fuse with 15 amp fuse only. High Temperature limit switch tripped. Unplug Unit Remove control panel access cover. Reset limit switch by pushing in on button. If these procedures to not allow control panel power up, call Customer Service. Rotisserie not rotating with foot pedal but does rotate during the cook mode. Foot pedal not plugged in. Rotisserie not functioning in cook mode but does function with foot pedal. Door switch Plug in foot pedal If this procedure does not correct, call Customer Service. Insure that door is closed and switch is contacted. If this does not correct, bad switch—call Customer Service. Rotisserie not working any time. Rotisserie drive problem Unplug Unit Remove electrical/mechanical service panel. Confirm that the chain drive is in place and tight. Confirm that the drive belt from the motor to the gear 13 box is in place and tight. Check fuse and replace with 7 amp fuse only. If these procedures does not correct, call Customer Service. Fire goes out during operation Pellet hopper empty Auger motor turning but auger not turning Inspect hopper and clean pellet dust out and fill with pellets. Check shear pin between auger and motor—replace if broken Check auger for binding— clear cause of binding (jammed pellets) If auger clear and motor not turning—call Customer Service Not enough intake air Check air intake air fan—if not turning call Customer Service If fan turning, refer to installation instruction and verify that vent pipe is properly installed Fire does not light Excessive pellet feed Pellet auger not cycling, call Customer Service. Pellet hopper empty Inspect hopper and clean pellet dust out and fill with pellets. Switch on pellet hopper not in contact with lid Clear pellets so lid will fully close or adjust switch to make contact with closed hopper lid. 14 Dirty combustion pot Open fire box and clean combustion pot and try to restart unit. Trouble with igniter Open pellet hopper lid (stops pellet feed). Push start button. Open fire box and feel over pot If hot igniter is ok, if cold call Customer Service. Can manually light—see procedure in start up section. Not enough intake air Check air intake air fan—if not turning call Customer Service If fan turning, refer to installation instruction and verify that vent pipe is properly installed 15 TWO YEAR LIMITED WARRANTY Cookshack Smoker Ovens are guaranteed to be free from defects in material and workmanship under normal use and when installed in accordance with factory recommendations. This limited warranty includes parts and labor for the first 90 days. Following the 90 day period, the two (2) year limited warranty is for parts only. Cookshack, Inc.’s obligation under this warranty shall be to repair or replace at its option any part deemed defective upon examination by Cookshack, Inc., or its authorized agent, for a period of two (2) years from the date of sale. Customer must obtain approval from Cookshack, Inc. before performing any service. Cookshack, Inc. is not responsible for any unauthorized service work. 1. The Limited Warranty extends to the original purchaser only. 2. To make claim or request for the Limited Warranty, the original purchaser must notify Cookshack, Inc. Customer Service for instructions as to the repair or replacement of the defective merchandise prior to attempting or contracting for repair of the oven. (See following page for Return Merchandise Policies). 3. The model number and serial number of the Cookshack Smoker Oven must accompany any request for service to the oven. 4. The Limited Warranty shall not apply if the merchandise has been improperly installed, damaged due to abuse, misuse, misapplication, accident, or as a result of service or modification by any other than an authorized Cookshack, Inc. service agent. There are no express warranties other than the limited warranty stated herein above. No warranties whether express or implied, including, but not limited to, any implied warranties of merchantability of fitness for a particular purpose, shall extend beyond the respective warranty periods described above. Cookshack, Inc. shall not be liable for any direct, indirect, special, consequential, incidental, or punitive damages; lost profits or loss of use or interruption of business regardless of the form of action or theory of liability resulting from any defect in or use of the Cookshack smoker oven, accessories and/or heating elements. Additional information on obtaining service under this Limited Warranty is available on the following page or by contacting a Cookshack, Inc. Customer Service Representative directly at (580)765-3669. Warranty is voided unless 100% hardwood food-grade pellets are used. COOKSHACK, INC. NATIONAL SERVICE POLICY Cookshack, Inc.’s National Service Policy is to build quality equipment with easy serviceability. Because of the ease in serviceability, Cookshack does not have National Service Companies to repair their equipment. This allows each customer to use the service company of their choice. It your unit needs repairs, please contact your preferred local service company. If warranty work is deemed necessary, equipment owners should have their local service company contact Cookshack, Inc. for authorization to perform the repairs. Repair phone number is 580.765.3669. 16 RETURN MERCHANDISE POLICY If you have merchandise that you believe is defective and requires repair or replacement: 1. Call Cookshack, Inc. at (580)765-3669. Ask to speak to a Customer Service Representative. Have your Smoker Oven model number and serial number ready. If you are advised to return the merchandise to the factory for repair or replacement, please observe the following procedures. 2. You will be issued a return number. A Customer Service Representative will issue you a return number and/or mail you an instruction form (called a Return Merchandise Authorization) for returning the merchandise with the return number on it. All return merchandise must have a return number. Do not return merchandise without a return number. 3. Attach the return number to the merchandise. If you were sent a Return Merchandise Authorization, attach it to the merchandise you are returning. If you were issued an RETURN NUMBER by phone and not sent a Return Merchandise Authorization, attach a note to the merchandise with your name, address and RETURN NUMBER. Print the RETURN NUMBER on the outside of the return packaging. 4. Ship the merchandise back to Cookshack. Return the merchandise to Cookshack, Inc., shipping prepaid, F.O.B. destination, in the original container or equivalent. All return merchandise must be shipped to: Cookshack, Inc., 2304 N. Ash St., Ponca City, OK, 74601. You assume the risk of any loss or damage that occurs during transit due to improper packaging of the returned merchandise. Use the original container that the merchandise was shipped in or equivalent. 17 APPENDIX D 18 Hopper Latch PV166 Switch PV366 Auger motor PV518 Draft fan PV517 Igniter PV310 Not shown Door hinge PV105 Door closer PV570 Door seal PV303/PV299 Convection motor PV519 Fan blade inside PV540 Fan blade outside PV542 Rotisserie shaft Inside panel Switch Power Switch Rotisserie Label Keypad LA152 Transformer PV627 Control board PV687 Power supply PV520 Relay PV631 Relay PV634 Relay PV 682 Limit switch PV552 Temperature probe PV718 Rotisserie motor PV515 Drive chain with offset link PV586 PV587 PV588 Grill 3 per basket PV006 Door switch PV366 Caster PV195 19