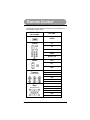
1
Cat No. 15-2130
Please read before using this equipment
Owner’s Manual
RadioShack
Guide Remote™
Table of Contents
Table of Contents
Table of Contents.......................………… .......................………… ..........…. 1
Introduction.....................………… .......................………… ............………… 3
Features.....................………… .......................………… ...........……………. 3
Key Layout.....................………… .......................………… .............. ............ 4
Basic Key Functions.....................………… .......................………… .............5
Mode Key Functions.....................………… .......................………… .......…. 6
Install Batteries…………………………………………………………………….. 7
Battery Saver………………………………………………………………………. 7
Adjust Contrast…………………………………………………………………….. 7
Remote Setup……………………………………………………………………… 8
Program Setup Codes…………………………………………………………. 8
Manual Code Search………………………………………………………….. 9
Auto Code Search……………………………………………………………… 9
View Device Codes……………………………………………………………. 10
Viiewing Codes………………………………………………………………… 10
Reassigning Device Keys…………………………………………………….. 10
Programming Macros…………………………………………………………….. 11
Recording Macro………………………………………………………………. 11
Playing Macro………………………………………………………………….. 11
Punch-Through……………………………………………………………………. 11
Volume Lock……………………………………………………………………….. 12
Turn Off Volume Lock…………………………………………………………..12
Volume Unlock – CBL/SAT…………………………………………………….12
Volume Unlock – VCR………………………………………………………….12
Volume Unlock – DVD Player………………………………………………….12
Turn On Volume Lock…………………………………………………………..13
Volume Lock – Cable Converter or SAT/DSS Receiver…………………….13
Volume Lock – VCR…………………………………………………………….13
Volume Lock – DVD Player…………………………………………………… 13
DVD/VCR Keys………………………………………………………………….13
Priority-Press………………………………………………………………………..14
Priority-Press Key Classes……………………………………………………. 14
Priority-Press Key Class Table………………………………………………. 14
Turn On Power Key Priority-Press…………………………………………… 15
Turn On Channel Key Priority-Press………………………………………… 15
Channel Key Priority-Press Setup – TV……………………………………... 16
Channel Key Priority-Press Setup – CBL/SAT……………………………… 16
Table of Contents
Channel Key Priority-Press Setup – VCR…………………………………… 16
Volume Key Priority-Press……………………………………………………..17
Volume Key Priority-Press Setup – TV……………………………………….17
Volume Key Priority-Press Setup – CBL/SAT………………………………. 17
Volume Key Priority-Press Setup – VCR……………………………………. 17
Volume Key Priority-Press Setup – DVD ………………………………………. 17
Turn On Transport Key Priority-Press…………………………………………… 17
Turn On Menu Keys Priority-Press………………………………………………. 18
Punch-Through vs Priority Press…………………………………………………18
Toggle Punch-Through and Priority-Press………………………………….. 18
Backlight……………………………………………………………………………. 19
Factory Reset………………………………………………………………………. 19
Computer Requirements………………………………………………………….. 20
Install USB Drivers………………………………………………………………… 20
Install RemoteLinker II* Software………………………………………………. 20
Activating Guide…………………………………………………………………… 21
Download TV Listings…………………………………………………………….. 23
Updating TV Listings………………………………………………………………. 23
Navigating Guide Screen………………………………………………………….23
Using Guide key…………………………………………………………………… 24
Accessing Guide Screens…………………………………………………….. 24
Title Screen…………………………………………………………………….. 25
Detail Screen…………………………………………………………………… 25
Guide Expiration……………………………………………………………….. 25
Manufacturers’ Codes…………………………………………………………….. 26
TV Codes……………………………………………………………………….. 26
Cable Codes……………………………………………………………………. 32
Satellite Codes…………………………………………………………………. 35
VCR Codes…………………………………………………………………….. 36
DVD Codes……………………………………………………………………... 41
PVR Codes……………………………………………………………………… 43
Video on Demand Codes……………………………………………………… 43
DVD/VCR Combo Codes……………………………………………………… 43
Miscellaneous Codes……………………………………………………………… 43
Troubleshooting……………………………………………………………………. 44
Frequently Asked Questions……………………………………………………... 45
Specifications………………………………………………………………………. 47
Declaration of Conformity……………………………………………… 47
Warranty……………………………………………………………… 48
INTRODUCTION
Introduction
Your new Guide Remote* allows you to control your TV, VCR, cable/SAT/DSS
converter, and DVD player, all in one easy to use remote control. The design includes
the functions used most often to operate TV, VCR, Cable converters and Satellite
receivers and DVD Players.
This manual includes a list of 4-digit manufacturer’s codes for TVs, VCRs, Cable and
Satellite converters and DVD players.
The screen on your Guide Remote can provide you instant access to the TV programs
listing, including a brief description of the TV show.
FEATURES
TV Listings – screen on remote provides access to TV program listings.
Program Details – press the GUIDE key to view program details.
Pre-Programmed Code Setup – contains the control codes for most
available brands, including some discontinued devices.
Auto Code Search – select the type of device you need to set up and Guide
Remote will search for the right code.
Code Verification – lets you recall the codes for each device in setup.
Programmable Macro Keys – each macro keys let you send a set of
commands containing up to 32 steps with a single key press.
Punch-Through – gives you the ability to control specific functions of two
different devices without being in the active mode for each device.
Priority-Press – gives you the ability to control the functions for each device
exclusively in the active device mode.
Record Safety – requires a double press of key to prevent accidental
recording.
Battery Saver – remote stops sending IR signal after 30 seconds if a key is
stuck to save battery power.
Code Saver – if batteries are removed or power runs out codes are stored in
memory.
3
Introduction / Features
INTRODUCTION
KEY LAYOUT
Your Guide Remote* controls the four most used functions in your home entertainment
center, the TV, VCR/PVR, Cable/SAT and DVD player.
After the initial set up, the command keys will work similar to the keys on your original
remote control.
Key Layout
4
INTRODUCTION
BASIC KEY FUNCTIONS
The following table details the list of all keys on the Guide Remote* and how
they function.
P
Use to program the remote to control your devices.
LIGHT
Use to turn the backlight on or off. When the
backlight key is pressed, the backlight will turn on for
5 seconds. Each time any key is pressed, the 5second timer is re-primed. If no key is pressed during
the 5-second interval, the backlight will turn off.
GUIDE
Press the GUIDE key near the display screen to
access the TV Listings, Program Details and
Information screen.
TV, VCR,
CBL/SAT, DVD
Use to set up the remote to control your devices. Use
these keys during normal operation, after setup, to
select a desired device to control.
POWER,
VOL+,
VOL-,
CH +,
CH-,
LAST,
MUTE,
GUIDE,
MENU,
SELECT,
INFO,
EXIT,
Digit Keys (0-9),
TV/VCR (A/B)
100+,
ENTER and
VCR & DVD Keys
Use these keys the same as the corresponding keys
on your original remote control.
(Transport Keys)
MACRO
5
Use MACRO keys to program multi-step commands.
Basic Key Functions
INTRODUCTION
MODE KEY FUNCTIONS
The table below details the function of selected keys in the various modes.
KEY
TV
CBL/SAT
VCR
DVD
GUIDE
Guide
Guide
Guide, Program
Guide
MENU
Menu
Menu
Menu
Menu
INFO
Display
Information
Display
Information
CH +
Channel Up
Channel Up
Channel Up
Channel Up
CH -
Channel Down
Channel Down
Channel Down
Channel Down
VOL +
Volume Up
Volume Up
Volume Up
Volume Up
VOL -
Volume Down
Volume Down
Volume Down
Volume Down
LAST
Last Channel
Last Channel
Last Channel
MUTE
Mute
Mute
Mute
Mute
ENTER
Enter
Enter
Enter
Enter
DIGIT
Enter
Enter
Enter
Enter
TV/VCR
TV/VCR
A/B
TV/VCR
TV/DVD
REW
Punch-through
to VCR
Punch-through
to VCR
Rewind
Rewind
PLAY
Punch-through
to VCR
Punch-through
to VCR
Play
Play
FFWD
Punch-through
to VCR
Punch-through
to VCR
Fast Forward
Fast Forward
REC
Punch-through
to VCR
Punch-through
to VCR
Record
Record
STOP
Punch-through
to VCR
Punch-through
to VCR
Stop
Stop
PAUSE
Punch-through
to VCR
Punch-through
to VCR
Pause
Pause
MACRO
Learn Macro
Learn Macro
Learn Macro
Learn Macro
Note: On some Cable and Satellite systems with VOD (Video on Demand) the Transport
(VCR/DVD) keys will not punch through to VCR. They will have the VOD function.
Mode Key Functions
6
INTRODUCTION
INSTALL BATTERIES
The battery cover is located on the back of the remote. Pay close attention to the
direction of the batteries. Align the poles (+ and -) as indicated in the battery
compartment. Remove battery case cover to install the batteries in the remote control.
1. Press firmly on the arrow on the back of the remote to remove the battery
cover.
2. Insert four new 1.5-volt AA alkaline batteries, taking care to align the polarity
symbols ( + and - ) as marked inside the battery case.
3. Replace the battery cover.
Notes:
• Use only fresh AA alkaline batteries.
• Do not use rechargeable batteries.
• Do not mix old and new batteries.
• Promptly remove old or weak batteries since they can leak chemicals that can
destroy electronic parts.
BATTERY SAVER
If a key on the remote becomes stuck or held for an extended period, the remote will stop
sending IR signal after 30 seconds.
ADJUST CONTRAST
Adjust the contrast on the screen of your new Guide Remote. Each time batteries are
removed and replaced in the Guide Remote; you can adjust the contrast on the display
screen to your desired level.
To adjust the contrast level, repeatedly press the left or right arrow keys located
directly below the display screen.
7
Install Batteries
Remote Control
REMOTE SETUP
You can use the remote control’s device keys to control the following devices:
TV (television), VCR (Video Cassette Recorder), CBL/SAT (Cable converter or
Satellite/Digital Satellite System receiver) or DVD (Digital Video Device) Player.
The default brands and codes preset in the remote are as follows:
•
RCA TV (0200),
•
RCA SAT receiver (0496),
•
RCA VCR (0817) and
•
RCA DVD player (0450)
To control devices other than the default brands perform the following steps. Skip this
section if you use the default brands.
•
Refer to the Manufacturers Codes on page 26 and write down the codes(s) for
the brand of each device you want to program.
•
Turn on all your home entertainment devices.
PROGRAM SETUP CODES
To set up the remote to control other devices or to change the set up of the default TV
perform the following steps. For this example we will set up the remote to control a
Curtis Mathis TV using manufacturers’ code 0 5 9 1.
1. Press the TV key. The red light blinks one time.
2. Press the P key. The red light blinks two times.
3. Enter 0 5 9 1 using the digit keys. The red light blinks one time for each digit
entered.
4. Press the P key. If the device is in the library the red light will blink three times
indicating acceptance of the code. If the device does not exist, the red light
will not blink on the remote.
Repeat the above steps to program codes into remote to control other devices.
For some combo devices (e.g. TV/VCR, DVD/VCR, etc.), you may need to set up each
device type. Press TV key to set up TV and enter manufacturers’ code. Then press the
VCR key and use the VCR code listed.
Remote Setup
8
Remote Control
MANUAL CODE SEARCH
If the Guide Remote* does not operate your device, when set up, you may not
have entered the correct 4-digit code. You may manually search for codes in each
device category to locate one that operates your brand of device. See page 26 for
list of Manufacturer’s codes. To manually search for a codes that works on your
device perform the following steps.
1. Press device key (TV, VCR, CBL/SAT or DVD). The red light blinks one
time.
2. Press the P key. The red light blinks two times.
3. Press the 0 0 0 0 digit keys. The red light blinks one time.
4. Press the P key. The red light blinks three times.
5. Press any IR key (POWER, CH+, CH-, VOL+, VOL-, etc.). The red light
blinks one time for each key pressed.
6. If the device operates the desired function, press the device key (TV,
VCR, CBL/SAT or DVD to exit and save the code. The red light blinks
one time.
7. If the device does not operate the desired function, press the P key then
the desired IR key(s), (POWER, CH+, CH-, VOL+, VOL-, etc.) again.
Repeat the process until you find a code that operates your device.
8. Once you find a code that works press the device key (TV, VCR,
CBL/SATor DVD) to exit and save the code.
AUTO CODE SEARCH
The remote can perform an auto-search to locate a code that operates your
devices. To allow the remote to perform an auto-search for a code perform the
following steps.
1. Press the desired device key (TV, VCR, CBL/SAT or DVD) on which to
perform a code search. The red light blinks one time.
2. Press the P key. The red light blinks two times.
3. Press the 7 digit key. The red light blinks one time.
4. Press the P key. The red light blinks three times.
5. At 2.5-second intervals, the remote will send POWER key commands. If the
device does not have a power code, the remote will send the following
commands in order, PLAY, CH+ and MUTE IR. If none of these commands
exists for the device, the device is skipped.
6. Press the device key (TV, VCR, CBL/SAT or DVD) to stop auto-search and
save the code. Press any other key except device key to terminate the
search without saving a code. The P key is ignored if pressed to terminate
auto search.
Note: It may take up to several minutes to locate a code that operates the device.
9
Manual Code Search
Remote Control
VIEW DEVICE CODES
To determine the 4-digit code for each device set up in your remote perform the following
steps:
VIEWING CODES
1. Press the desired device key (TV, VCR, CBL/SAT or DVD). The red light blinks
one time.
2. Press P key. The red light blinks two times.
3. Press number 1 digit key. Press P key. Count the blinks (for example, if the red
light blinks five times the first digit in the code is 5). Write down the number.
Note: The red light will not blink if the digit in the code is the number 0.
4. Press number 2 digit key. Press P key. Count the blinks. Write down the number.
5. Press number 3 digit key. Press P key. Count the blinks. Write down the number.
6. Press number 4 digit key. Press P key. Count the blinks. Write down the number.
You can re-verify the number of blinks to identify either the first, second, third or fourth
digit in the code by repeating any of the above steps.
Press any device key (TV, VCR, CBL/SAT or DVD) to exit this mode. The remote
automatically exits this mode after 20 seconds of inactivity.
REASSIGNING DEVICE KEYS
You can reassign a device key (TV, VCR, CBL/SAT or DVD) to control any type device.
For example, the VCR key can be set up to control a second TV, or the DVD key can be
set up to control a second VCR.
Note: You must use the device category assigned to the key to perform an Auto Search
and Manual Search.
View Device Codes
10
Remote Control
PROGRAMMING MACROS
The Guide Remote* has two hard keys for programming macros. Program each macro
key to send one command containing up to 32 keystrokes.
RECORDING MACRO
Perform these steps to program macros.
1. Press any device key (TV, VCR, CBL/SAT or DVD). The red light blinks one time.
2. Press the P key. The red light blinks one time.
3. Press Macro Key 1 or 2. The red light blinks 3 times.
4. Press the desired keys (TV, VCR, POWER, CH +, PLAY, etc.) associated with the
macro you want the remote to execute. The red light blinks one time for each key
press.
5. Press the P key. The red light blinks three times.
NOTES:
• Press the LIGHT key to add ½ second delays. Each press of the LIGHT adds a ½
second delay.
• If your original remote control requires you to press Enter, Select or any other command,
press ENTER after entering the channel number.
• Repeat Steps 1-4 above to assigning a new macro to either MACRO key. The previous
macro will be overwritten.
PLAYING MACRO
To play a macro, press the appropriate MACRO key.
If you want to add another macro to the second macro key, repeat the above steps and
substitute the desired key sequence for the macro you wish the remote to perform.
PUNCH-THROUGH
The Punch-Through feature lets you control two or more different devices without having
to press the device keys for each one. For instance, with Punch-Through enabled, you
can control the TV and/or VCR volume through your Cable converter. Punch-Through is
always on unless you disable it.
11
Programming Macros
Remote Control
VOLUME LOCK
Your remote’s Volume Lock is preset to ON, so the volume and mute keys only control
the TV volume, no matter which device is selected. If your device (CBL, VCR or SAT)
has volume keys, the remote will ignore them and control volume through your TV. If you
want to control the volume of other devices through your TV, skip the next section.
Note: TV/VCR Combo devices do not use this feature.
If you want to control the volume through each of your devices, perform the following
steps:
TURN OFF VOLUME LOCK
Volume Unlock – CBL/SAT
1. Press CBL/SAT key. The red light blinks one time.
2. Press P key. The red light blinks two times.
3. Press number 5 digit key. The red light blinks one time.
4. Press P key. The red light blinks 2 times.
Volume lock to CBL/SAT is now turned off. If you want to control volume through
Cable/SAT, you must be in the Cable/SAT mode.
Volume Unlock – VCR
1. Press VCR key. The red light blinks one time.
2. Press P key. The red light blinks two times.
3. Press number 5 digit key. The red light blinks one time.
4. Press P key. The red light blinks two times.
Volume lock to VCR is now turned off. If you want to control volume through your
VCR, you must be in the VCR mode.
Volume Unlock – DVD Player
1. Press DVD key. The red light blinks one time.
2. Press P key. The red light blinks two times.
3. Press number 5 digit key. The red light blinks one time.
4. Press P key. The red light blinks two times.
Volume lock to DVD is now turned off. If you want to control volume through your
DVD, you must be in the DVD mode.
Volume Lock
12
Remote Control
TURN ON VOLUME LOCK
You can turn on or reset Volume Lock to control volume through your TV by performing
the following steps:
Note: If no device is set up in the selected mode, the remote will punch-through and
attempt to find one. If none is found, it will not send the volume lock command.
Volume Lock – Cable Converter or SAT/DSS Receiver
1. Press CBL/SAT key. The red light blinks one time.
2. Press P key. The red light blinks two times.
3. Press number 5 digit key. The red light blinks one time.
4. Press P key. The red light blinks one time.
Volume to cable converter or satellite receiver is now controlled through TV.
Volume Lock – VCR
1. Press VCR key. The red light blinks one time.
2. Press P key. The red light blinks two times.
3. Press number 5 digit key. The red light blinks one time.
4. Press P key. The red light blinks one time.
Volume to VCR is now controlled through TV.
Volume Lock – DVD Player
1. Press DVD key. The red light blinks one time.
2. Press P key. The red light blinks two times.
3. Press number 5 digit key. The red light blinks one time.
4. Press P key. The red light blinks one time.
Volume to DVD is now controlled through TV.
DVD/VCR KEYS
DVD/VCR (transport) keys that have no function in the current device "punch-through" to
the VCR device. Example: Specific VCR keys (Play, Stop, Fast Forward, Rewind, Pause,
Record) will transmit these VCR IR codes in the Cable, Sat and TV mode.
The default setting in the Guide Remote is for the transport keys to Punch-Through to the
default VCR. If you have a VCR set up in the remote but want the transport keys to
punch-through to be controlled by your DVD player, turn on Priority-Press and map
the transport keys to the DVD player.
The transport keys will also punch-through to the DVD Player if you set up a DVD player
under the VCR key.
Transport keys will not punch-through to VCR, Cable and Sat if device has Video on
Demand feature. VOD functions are maintained.
13
Turn On Volume Lock
Remote Control
PRIORITY-PRESS
Priority-Press gives you the ability to assign common functions to keys associated with
your entertainment devices, regardless of which mode you are in, with the press of one
key.
Once set up, priority-press keys will only control the assigned device, regardless of the
currently active mode.
Example: You can set up the volume keys to only control the TV, the channel keys to
control the cable box, the transport keys to control the DVD and the power key to only
operate the cable or satellite box.
PRIORITY-PRESS KEY CLASS
There are four priority-press key classes, Channel (CH up and CH down), Volume (VOL
up and VOL down) and Transport (Play, Stop, FAST Forward, Rewind, Pause and
Record) and Power.
14
Priority-Press
Remote Control
PRIORITY-PRESS KEY CLASS TABLE
The table below details the classification of Priority-Press keys (See Page 14 for
more information on Priority-Press).
PRIORITY-PRESS
KEY CLASSES
KEY LABEL
Power
POWER
Channel
CH +
CH LAST
ENTER
Digit Keys (0-9)
Volume
VOL +
VOL MUTE
Transport
(VCR/DVD Keys)
REW
PLAY
FFWD
REC
STOP
PAUSE
Menu
(Navigation Keys)
GUIDE
MENU
SELECT
INFO
EXIT
NAVIGATION ARROWS
Priority-Press Key Class Table
15
Remote Control
TURN ON POWER KEY PRIORITY-PRESS
The Power key class is the POWER key. To setup Power class key perform the following
steps:
Power Key Priority-Press Setup
1. Press a device key (TV, VCR, CBL/SAT or DVD). The red light
blinks one time.
2. Press P key. The red light blinks two times.
3. Press Power Key. The red light blinks three times.
When the POWER key is pressed, power on/off will only work for the selected device.
CHANNEL KEY PRIORITY-PRESS
The Channel class keys are CH+, CH- Last and the digit keys. To setup and turn on
channel class key to various devices perform the following steps:
Channel Key Priority-Press Setup – TV
1. Press TV key. The red light blinks one time.
2. Press P key. The red light blinks two times.
3. Press number CH+, CH- or Last key. The red light blinks three
times.
When the CH+, CH-, Last or digit keys are pressed the remote will only change channels
through TV.
Channel Key Priority-Press Setup – CBL/SAT
1. Press CBL/SAT key. The red light blinks one time.
2. Press P key. The red light blinks two times.
3. Press number CH+, CH- or Last key. The red light blinks three
times.
When the CH+, CH-, Last or digit keys are pressed the remote will only change channels
through the CBL/SAT box.
Channel Key Priority-Press Setup – VCR
1. Press VCR key. The red light blinks one time.
2. Press P key. The red light blinks two times.
3. Press number CH+, CH- or Last key. The red light blinks three
times.
When the CH+, CH-, Last or digit keys are pressed the remote will only change channels
through the VCR.
Note: Digit keys cannot be used to program the channel class. To remove Channel Key
Priority-Press repeat the set up steps for the appropriate device.
16
Turn On Power Key Priority-Press
Remote Control
VOLUME KEY PRIORITY-PRESS
The Volume class keys are VOL+, VOL- and MUTE. To set up volume class key perform
the following steps:
Volume Key Priority-Press Setup – TV
1. Press TV key. The red light blinks one time.
2. Press P key. The red light blinks two times.
3. Press VOL+, VOL- or MUTE key. The red light blinks three times.
When the VOL+, VOL- or MUTE keys are pressed, the volume will only be controlled through
the TV.
Volume Key Priority-Press Setup – CBL/SAT
1. Press CBL/SAT key. The red light blinks one time.
2. Press P key. The red light blinks two times.
3. Press VOL+, VOL- or MUTE key. The red light blinks three times.
When the VOL+, VOL- or MUTE keys are pressed, the volume will only be controlled through
the CBL/SAT box.
Volume Key Priority-Press Setup – VCR
1. Press VCR key. The red light blinks one time.
2. Press P key. The red light blinks two times.
3. Press VOL+, VOL- or MUTE key. The red light blinks three times.
When the VOL+, VOL- or MUTE keys are pressed, the volume will only be controlled through
the VCR.
Volume Key Priority-Press Setup – DVD
1. Press DVD key. The red light blinks one time.
2. Press P key. The red light blinks two times.
3. Press VOL+, VOL- or MUTE key. The red light blinks three times.
When the VOL+, VOL- or MUTE keys are pressed, the volume will only be controlled through
the DVD.
To remove Volume Key Priority-Press repeat the setup steps for the appropriate device. Two
blinks of the red light indicate Volume Lock is turned off.
TRANSPORT KEYS PRIORITY-PRESS
The Transport class keys are REW, PLAY, FFWD, REC, STOP, and PAUSE. To setup
and turn on transport class keys to devices perform the following steps:
Transport Key Priority-Press Setup
1. Press VCR or DVD key. The red light blinks one time.
2. Press P key. The red light blinks two times.
3. Press a Transport Class Key. The red light blinks three times.
When a Transport Class key is pressed, transport keys will only work for the selected device.
Volume Key Priority-Press
17
Remote Control
TURN ON MENU KEY PRIORITY-PRESS
The Menu class keys are MENU, SELECT, GUIDE, INFO, EXIT and Navigation arrows.
To setup and turn on menu class key to various devices perform the following steps:
Menu Key Priority-Press Setup
1. Press device key (TV, VCR, CBL/SAT or DVD). The red light blinks one time.
2. Press P key. The red light blinks two times.
3. Press Menu Class Keys. The red light blinks three times.
When a Menu Class key is pressed, the menu will only work for the selected
device.
PUNCH-THROUGH VS PRIORITY PRESS
Punch-Through and Priority-Press are mutually exclusive features. If Priority-Press is
turned on, Punch-Through is turned off. If Priority-Press is turned off, Punch-Through is
turned on.
Note: If you enable priority-press with no class key priorities programmed the remote does not sent
either Punch-Through or Priority-Press command.
TOGGLE PUNCH-THROUGH AND PRIORITY-PRESS
To toggle between Punch-Through and Priority-Press perform the following steps:
1.
Press any device key (TV, VCR, CBL/SAT or DVD). The red light will blink
one time.
2.
Continue to press and hold the device key for 3.5 seconds.
•
If the red light blinks three times, Punch-Through is OFF and PriorityPress is ON.
•
If the red light blinks two times, Punch-Through is ON and Priority-Press
is OFF.
Turn On Menu Key Priority-Press
18
Remote Control
BACKLIGHT
•
Press the LIGHT key to turn on the backlight. When the LIGHT key is
pressed, the backlight is preset to stay on for 5 seconds.
•
Each time any key is pressed, the 5 second timeout is reset. If no key is
pressed for 5 seconds, the backlight will turn off.
•
If the LIGHT key is pressed while the backlight is on, it will turn off.
The backlight on your remote can be set to turn on and stay on for up to 10
seconds. To change the backlight setting to a 10-second timeout perform the
following steps:
1.
Press any device key (TV, VCR, CBL/SAT or DVD). The red light blinks 1 time.
2.
Press the P key. The red light blinks 2 times.
3.
Press the number 9 digit key. The red light blinks 1 time.
4.
Press the P key. The red light blinks 2 times. The backlight will now remain on
for up to 10 seconds after the last key is pressed.
Repeat steps 1-4 to change the backlight setting back to a 5 second timeout. The
red light blinks 1 time in step four to indicate a 5 second backlight timeout.
FACTORY RESET
The Guide Remote* can be reset to the factory default settings. Once reset, all macros
and setup devices revert to default settings and devices. To reset remote to factory
settings, perform the following steps.
19
1.
Press any device key. The red light blinks 1 time.
2.
Press the P key. The red light blinks 2 times.
3.
Press the number 8 digit key. The red light blinks 1 time.
4.
Press and hold the P key for 3 seconds. The red light blinks 2 times.
Backlight / Factory Reset
COMPUTER REQUIREMENTS
Minimum system requirements for software installation and use:
A PC running Windows 98SE / 1ME / 2000 / 2XP
Internet Explorer 5.0+, Netscape 4.0+ or AOL 5.0+ Browser
Note:
Microsoft Internet Explorer 5.0 must be installed on your computer even if it is not
your default browser, because RemoteLinker II uses resource files provided only
with Internet Explorer.
An available USB Port.
A CD ROM Drive.
Minimum of 5 MB free hard disk space.
Minimum of 8 MB RAM.
Active connection to the Internet.
INSTALL USB DRIVERS
1. Connect the RemoteLinker II cable to your Guide Remote and to an available
USB port on your computer.
2. Wait for your computer to finish installing the required drivers.
3. Disconnect the cable from the remote.
INSTALL REMOTELINKER II* SOFTWARE
1. IMPORTANT: Temporarily disable any anti-virus software running on your PC.
2. Insert the RemoteLinker II CD in your CD ROM drive. Follow the installation
instructions on the computer screen.
3. When prompted, click on the option to install the RemoteLinker II icon to the
desktop.
After successful installation, a RemoteLinker II icon will appear in the system tray. This
is usually located in the lower right corner of your computers screen near the clock.
Note:
1 RemoteLinker II has been successfully tested on all of the above mentioned operating
systems. This software was specifically designed to use USB drivers supplied by Microsoft
in each operating system and does not install drivers for you. Reliability is assured if the
following three conditions are met:
•
The system meets the minimum system requirements.
•
The operating system and all the USB drivers were properly installed without errors.
•
The systems anti-virus software was disabled during the RemoteLinker II software
installation.
2Some computers require a shutdown and restart to complete installation of software.
Please follow your systems instructions if it prompts you to perform a shutdown and
restart.
Computer Requirements
20
Activating Guide
ACTIVATING GUIDE
Verify or establish an active connection to the Internet. You must be online to complete
the activation process. Verify the connection or connect the RemoteLinker* cable to the
remote and PC.
An Activation page should appear.
1.
First-time Users (Only)
Click on the “Register Me” button to continue the activation process.
Click here to continue Activation
2.
21
Enter User Profile Information
Note: You must enter a VALID EMAIL ADDRESS
Activating Guide
Activating Guide
ACTIVATING GUIDE (CONTINUED)
3. Select Guide Lineup
You may customize the Guide downloaded in your Guide Remote* in the SETTINGS
section at the Web site. Some of the customization features are as follows:
a. Week Day Guide – If you only watch TV Monday through Friday you may
choose to select only a customized Week Day Guide. If you only watch TV the
mornings, afternoon, or evenings, you may choose to only download TV
Listings for the part of the day that you watch TV.
b. Weekend Guide - If you only watch TV on the weekends you may choose to
select only a customized Weekend Guide. If you only watch TV in the
mornings, afternoon, or evenings, on the weekend you may choose to only
download TV Listings for the part of the day that you watch TV on the weekend
c. Complete or Customized Guide – You may choose to download the full
Guide of TV Listings, or a combination of weekday and weekend day parts in
to your Guide Remote.
4. Select Channel Lineup
Select the channels you want to appear in your Guide Remote.
Notes: At the end of the activation and sign-up process you will be sent a confirmation email.
5.
Check EMAIL
Check your email account and click on the link in the email to complete the
activation process.
Activating Guide
22
Using the Guide
DOWNLOAD TV LISTINGS
You will see a message on your new Guide Remote* display screen indicating you can
download or update the Guide Listings in you remote.
Under these three conditions, you will see the Download New Data message on your
remotes display screen.
• New Guide Remote that has not been synced for the first time.
• RemoteLinker II cable is connected to Guide Remote and computer.
• The RemoteLinker II cable was unplugged from Guide Remote while Guide
Listing update was in progress.
Establish an Internet connection then connect the RemoteLinker II cable to your PC
and Guide Remote anytime you see this message to sync your remote.
UPDATING TV LISTINGS
Establish an Internet connection and connect the RemoteLinker II cable to your remote
and PC at anytime to update your TV Listings.
NAVIGATING GUIDE SCREEN
23
Download TV Listings
Using the Guide
USING GUIDE KEY
Your Guide Remote*contains two types of TV Listings, Guide Listings and Program
Details. It also contains an Information Screen.
ACCESSING GUIDE SCREENS
1. Press the GUIDE key once to access the program Title Screen.
2. Press the GUIDE key a second time to the program Detail Screen.
3. Press the GUIDE key a third time to go to the Information Screen.
Continue to press of the GUIDE key to toggle to the next screen.
Use the navigation keys to scroll Up, Down, Left or Right, in each of the Guides
and the Information screens for additional information.
Using GUIDE Key
24
Using the Guide
TITLE SCREEN
Personalize TV Listings of up to 7 days at the Web site and download them into
your Guide Remote*. Below is an example of a typical screen you will see when
scrolling through the TV Listings.
Press the Left and Right Arrows to view the TV Listings in previous or
next half-hour timeslot. Press the Up and Down Arrows to view the TV
Listings for additional shows in the channel lineup.
DETAIL SCREEN
The Program Details in your Guide Remote give you detailed information about the
show you may want to watch. Get a brief description of show contents, channel
number, station call sign and additional information on the display screen.
Press the Left and Right Arrows to view the Program Details of shows
in the previous or next half-hour timeslot. Press the Up and Down
Arrows to view the Program Details for additional shows in the
channel lineup.
GUIDE EXPIRATION
Press and hold the GUIDE key to view the current time current day and date, and
Guide expiration date.
25
Title / Detail Screens
Manufacturers’ Codes
MANUFACTURERS’ CODES
The following lists tell you which 4-digit codes to enter to set up the Guide Remote™.
Notes:
• The remote control might not have every command featured on your original
remote controls.
• A key on the Guide Remote that has the same name may have a slightly
different function.
• Some codes are very similar and may operate some but not all the desired
functions as your original remote. Try different codes to attempt to locate one
that operates most or all desired functions.
TV CODES
Brand
Codes
ADMIRAL
ADVENT
ADVENTURA
AIKO
AIWA
AKAI
ALLERON
AMARK
ANAM
ANAM NATIONAL
AOC
APEX
ARCHER
AUDIOVOX
AUDIO DYNAMICS
BELCOR
BELL AND HOWELL
BLAUPUNKT
BRADFORD
BROCKWOOD
0716, 0710, 0667,0643, 0718, 0584, 0600, 0951, 0968
0716
0611
0696
0549, 0544, 0546
0637, 0644, 0649, 0724, 0682
0584, 0600
0961
0600, 0591, 0950, 0944, 0961
0668, 0636, 0600, 0682
0637, 0906, 0644, 0961, 0588, 0568, 0646
1073, 0707
0961
0961, 0600, 0949
0740
0644, 0906
0584, 0710, 0716, 0600, 0642
0558, 0658
0600
0906, 0644
Manufacturers’ Codes
26
Manufacturers’ Codes
Brand
TV Codes
BROKSONIC
CANDLE
CAPEHART
CARNIVALE
CARVER
CCE
CELEBRITY
CENTURION
CETRONIC
0644, 0637, 0926, 0549, 0961, 0600, 0623
0637, 0644, 0611, 0560
0646
0644
0578, 0629, 0570
0579
0682
0644
0600
0576, 0959, 0644, 0637, 0906, 0586, 0611, 0696,
0560, 0600, 0905
0588
0600
0644, 0906
0637, 0644, 0906
0600, 0588
0639, 0959
0623, 0874, 0566, 0720, 0600, 0668
0567
0959, 0600
0720, 0710, 0605, 0644, 0906, 0959, 0586, 0643,
0629, 0642
0600
0873, 0564, 0949, 0696, 0644, 0906, 0868, 0728,
0959, 0630, 0600, 0904, 0545
0694, 0637, 0644, 0906, 0959, 0696,
0716
0906, 1043
0600
0611, 0945
0682, 0588
0906, 0644, 0682, 0941, 0982
0694, 0567, 0623, 0874, 0566, 0720, 0644, 0906,
0676, 0718, 0549, 0803, 0576, 0593, 0588, 0959,
0620, 0600, 0584, 0561, 0896, 0902
0644
0721, 0642, 0597, 0897
CITIZEN
CLAIRTONE
CLASSIC
COLORTYME
CONCERTO
CONTEC/CONY
CORONADO
CRAIG
CROSLEX
CROWN
CURTIS MATHES
CXC
DAEWOO
DAYTRON
DENON
DUMONT
DYNASTY
DYNATECH
ELECTROBAND
ELECTROHOME
EMERSON
ENVISION
FISHER
27
Manufacturers’ Codes
Manufacturers’ Codes
Brand
TV Codes
FORTRESS
FUJITSU
FUNAI
FUTURETECH
0716
0584
0713, 0600, 0584
0600
0200, 0704, 0200, 0636, 0626, 0667, 0644, 0566,
0582, 0643, 0645, 0682, 0624, 0607, 0937, 0948,
0960, 0965, 0969, 0547, 0968
1043, 0644, 0906
0686, 0694, 0875, 0628, 0637, 0644, 0906, 0959, 0618
0069, 0592
0600, 0584
0644, 0906, 0584, 0623
0644, 0600, 0584, 0623
0724, 0555, 1072, 0694, 0708, 0644, 0906, 0819,
0581, 0898, 0563, 0959, 0620, 0637, 0599, 0621,
0909, 0967
0600
0629
0611
0629
0636, 0628, 0644, 0906, 0961, 0573, 0645, 0643,
0959, 0608, 0935, 0586, 0624, 0607
0682
0644, 0906, 0899
0722, 0551, 0670, 0603, 0645, 0985
0644, 0906, 0682
0646
0600, 0586
0644, 0906
0611, 0644, 0612
0612, 0611
0618
0705
0697, 0694, 0713, 0715, 0600, 0720, 0644, 0576,
0579, 0588, 0959
0069, 0592
1043
GE
GIBRALTER
GOLDSTAR
GRISWOLD
GRUNDY
HALLMARK
HAVARD
HITACHI
IMA
INFINITY
JANEIL
JBL
J.C. PENNEY
JCB
JENSEN
JVC
KAWASHO
KAYPANI
KEC
KENWOOD
KLOSS
KLOSS NOVABEAM
KMC
KONKA
KTV
LINATECH
LODGENET
Manufacturers’ Codes
28
Manufacturers’ Codes
Brand
TV Codes
LOEWE
LOGIK
LUXMAN
0629
0710, 0600, 0623
0637, 0644, 0906
0553, 0721, 0642, 0605, 0950, 0567, 0629, 0667,
0643, 0637, 0644, 0906, 0907, 0900
0961, 0716, 0935, 0644, 0906, 0629, 0584, 0696
0725, 0920, 0629, 0694, 0567, 0586, 0644, 0637,
0906, 0578, 0572, 0609, 0612, 0614, 0560
0710, 1043
0629, 0578, 0572, 0644, 0906
0961, 0724, 0644, 0906
0645, 0588
0676, 0907, 0637, 0644, 0906, 0549, 0700, 0618,
0710, 0642
0563, 0700, 0644, 0906
0645, 0643, 1043
0624
0557, 0644, 0637, 0906, 0629, 0700, 0958 0695, 0563,
0716, 0649,0682, 0917, 0939, 0821
0578, 0582, 0572, 0634, 0629, 0614, 0609, 0710,
0644, 0637, 0906, 0718, 0624, 0607, 0694, 0567,
0568, 0584, 0642
0700, 0716, 0645, 0636, 0629, 0682
0637, 0644, 0906, 0630, 0588, 0586
0579, 0600
0935, 0903, 0644, 0906
0912, 0557, 0644, 0637, 0906, 0682, 0570, 0962, 0552
0600
0696, 0644, 0906
0696
0600
0600
0600, 0700, 0584, 0718, 0642, 0903
0716, 0718
0600, 0584, 0623, 1043
0719, 0950, 0930, 0955, 0650, 0645, 0626, 0636,
0687, 0668, 0556, 0826, 0601, 0629, 0682
0694, 0644, 0906, 0567, 0629, 0578, 0609, 0612,
0614, 0560
LXI
MAGNASONIC
MAGNAVOX
MAJESTIC
MARANTZ
MEGATRON
MEI
MEMOREX
MGA
MIDLAND
MINUTZ
MITSUBISHI
MONTGOMERY WARD
MOTOROLA
MTC
MULTITECH
NAD
NEC
NIKEI
NIKKO
NTC
ONKING
ONWA
OPTIMUS
OPTONICA
ORION
PANASONIC
PHILCO
29
Manufacturers’ Codes
Manufacturers’ Codes
Brand
PHILIPS
PILOT
PIONEER
PORTLAND
PRISM
PROSCAN
PROTON
PULSAR
QUASAR
RADIOSHACK
RCA
REALISTIC
RHAPSODY
RUNCO
SAMPO
SAMSUNG
SANSUI
SANYO
SCIMITSU
SCOTCH
SCOTT
SEARS
SHARP
SHOGUN
SIGNATURE_2000
SIMPSON
SONIC
Manufacturers’ Codes
TV Codes
0567, 0578, 0572, 0629, 0609, 0614, 0682, 0607,
0644, 0906, 0956
0644, 0906
0747, 0727, 0903, 0605, 0626, 0620, 0644, 0906,
0651, 0963, 0964
0693, 0644, 0959, 0906, 0696
0645, 0636
0703, 0550, 0582, 0592, 0643, 0634, 0620, 0608, 0906
0961, 0622, 0959, 0644, 0906, 0646
1043, 0696, 0644, 0906
0826, 0715, 0636, 0626, 0930, 0687, 0668, 0650,
0645, 0682
0695, 0720, 0721, 0642, 0667, 0643, 0637, 0644,
0906, 0861, 0959, 0639, 0718, 0600
0200, 0706, 0693, 0636, 0691, 0550, 0562, 0558,
0667, 0861, 0644, 0689, 0592, 0637, 0567, 0674,
0582, 0643, 0716, 0634, 0620, 0719, 0906, 0608,
0682, 0931
0637, 0642, 0644, 0906, 0600, 0718
0588
0644, 1043, 0960, 0970, 0971, 0977, 0978
0644, 0646, 0906
0701, 0586, 0772, 0775, 0698, 0699, 0694, 0637,
0644, 0906, 0554, 0959, 0639, 0554
0676, 0456
0721, 0642, 0597, 0571, 0644, 0906, 0901, 0943
0906
644, 0906
0720, 0637, 0600, 0584, 0959, 0623, 0644, 0906
0629, 0642, 0571, 0643, 0584, 0907, 0573, 0935,
0597, 0644, 0637, 0906
0716, 0880, 0694, 0718, 0959, 0559, 0644, 0906,
0936, 0976, 1071
0906, 0644
0722, 0566, 0710, 0716, 0906, 0643, 0629
0644, 0578, 0560
0588
30
Manufacturers’ Codes
Brand
SONY
SOUNDESIGN
SPECTRACON
SSS
STARLITE
SUPRE MACY
SUPREME
SYLVANIA
SYMPHONIC
TANDY
TATUNG
TECHNICS
TECHNOL ACE
TECHWOOD
TEKNIKA
TERA
THOMSON
TIME WARNER
TMK
TOSHIBA
TOSONIC
TOTEVISION
UNIVERSAL
VECTOR RESEARCH
VICTOR
VIDEO CONCEPTS
VIDTECH
VIKING
WEB TV
YAMAHA
YORK
ZENITH
ZONDA
31
TV Codes
0682, 0667, 0644, 0689, 0669, 0598, 0568, 0620,
0565, 0966, 0979, 0980
0600, 0644, 0906, 0560, 0584
0961, 0600, 0637, 0644, 0906
0906, 0644, 0600, 0623
0600, 0906, 0623
0611, 0560
0682
0553, 0713, 0644, 0637, 0906, 0567, 0629, 0578,
0572, 0614, 0612, 0609, 0560
0713, 0553, 0720, 0600, 0584
0657, 0716, 0643, 0629, 0718
0636, 0961, 0645, 0682
0645, 0636
0584
0637, 0644, 0906, 0961, 0645
0637, 0644, 0906, 0959, 0586, 0710, 0611, 0696,
0700, 0584, 0600, 0560, 0629
0622, 0906, 0644
0596, 0595
225
0637, 0644, 0906, 0623
0907, 0707, 0553, 0716, 0605, 0935, 0573, 0642, 0586
0588
0959
0643, 0624, 0607
0722, 0644
0722
0649
0724, 0567, 0637, 0644, 0906
0611
0825
0906, 0644
0644
0724, 0711, 0710, 0637, 0644, 0906, 0865, 0949,
0961, 1043, 0696, 0957
0961, 0773
Manufacturers’ Codes
Manufacturers’ Codes
CABLE CODES
Brand
Codes
ABC
ALLEGRO
ANTRONIX
ARCHER
BELLSOUTH
CABLETENNA
CABLEVIEW
CENTURY
CITIZEN
CLEAR MAX
COMCAST
COMTRONICS
COX
CTX
0227, 0231, 0239, 0250, 0617, 0995
0243, 0208, 0914
0243
0208, 0259, 0243, 0281, 0990
0883
0259
0259
0208
0208, 0249
0702
0238
0228, 0204
0225, 0238
0208
DIGITAL
ENTERTAINMENT
0501
EAGLE COMTRONICS
EASTERN
ELECTRICORD
EMERSON
EVERQUEST
EXPLORER
GARRARD
GC ELECTRONICS
GE
GEMINI
GENERAL
INSTRUMENT
GOLDSTAR
HAMILTON
HAMLIN/REGAL
HARMON KARDON
HITACHI
Manufacturers’ Codes
0228, 0996
0235
0211
0295
0226, 0228
0225
0208
0215
0272, 0267, 1006
0216, 0219, 0217, 0993, 0299, 0226, 0192, 0244
0238, 0187, 0248, 0226, 0195, 0196, 0192, 0244,
0250, 0229, 0231,0194, 0266
0228
0188, 0189, 0198
198, 0191, 0236, 0240, 0202, 0201, 0277, 0230, 0189,
1000, 0188
0213
0229, 0231
32
Manufacturers’ Codes
Brand
HITEX
JASCO
JERROLD
KINGSTON
MACOM
MAGNAVOX
MEDIA ONE
MEMOREX
MITSUBISHI
MOTOROLA
MOVIE TIME
NOVAPLEX
NOVAVISION
NSC
OAK
OMEGA
OPTIMUS
PANASONIC
PARAGON
PHILIPS
PHILIPS
PIONEER
Cable Codes
0227
0208
0229, 0231,0195,0196, 0226, 0238,0194,0187, 0248,
0192, 0244, 0250, 0989, 1004
0204, 0208, 0283
256
0991, 1009, 1010, 1003
0238
0797, 0914
1013
0238
0211, 0207,0199
0222, 0919
0224, 0233, 0239
0207,0199, 0992, 1005
993, 0227, 0994, 0997
0226, 0228
504
0197, 0294, 0210, 0914, 0998
0797, 0914
0214, 0220,0186, 1002
0193, 0204, 0258, 0251, 0252, 0260, 0276
0214, 220, 0186,1002
POPULAR MECHANICS
0471
PULSAR
RCA
RECOTON
REGAL
REGENCY
REMBRANDT
RUNCO
SAMSUNG
SCIENTIFIC ATLANTA
SIGNAL
SIGNATURE
0797, 0914
0197, 0294, 0496, 0492, 0498, 0867, 0503, 0494
1012
0236, 0202, 0201, 0189, 0198
0235
0219
0797, 0914
0228
0224, 0233, 0239, 0997, 0999
0228
0229, 0231
33
Manufacturers’ Codes
Manufacturers’ Codes
Brand
SKYCABLE
SL MARX
SONY
SPRUCER
STD COMPONENTS
STARCOM
STARGATE
STARQUEST
STORM
SYLVANIA
TANDY
TEKNIKA
TELECAPTION
TELEVIEW
TEXSCAN
TIME WARNER
TOCOM
TOSHIBA
TUSA
TV86
U.S. WEST
UNICA
UNITED ARTISTS
UNITED CABLE
UNIVERSAL
VIDEO WAY
VIEW MASTER
VIEWSTAR
WEST
YAMAHA
ZENITH
34
Cable Codes
0918
0228
0234, 0998, 1011
0197, 0294
0217
0226, 0187, 0192
0228, 0226, 0298
0226
0885
0237
0203
0255
0212
0228
0237, 0300
0225
0190, 0617, 0669, 0672
0914, 797
0226
0296
0813
0259, 0243, 0208
0227
0994, 0997
0211, 0230, 0294, 0277, 0208, 0218, 0259, 0243, 0281
0265
0278
0204, 0209, 0205, 0203, 1007
0208
0185
0221, 0247, 0298, 0914
Manufacturers’ Codes
Manufacturers’ Codes
SATELLITE CODES
Brand
Codes
ACCESS
0922
DIGITAL
ENTERTAINMENT
DIRECTV
DISH NETWORK
DRAKE
ECHOSTAR
BROCKWOOD
GENERAL INSTRUMENT
HUGHES
MAGNAVOX
MITSUBISHI
MONTGOMERY WARD
OPTIMUS
PANASONIC
PHILIPS
PRIMESTAR
RADIOSHACK
RCA
SAGEM
SAMSUNG
SONY
TOSHIBA
UNIDEN
ZENITH
35
0501, 0194, 0506, 0928
0497, 0493, 0849
0502, 0825, 0888, 0890, 0267, 0282, 0297, 0511,
0825, 0895
0932
0502, 0825, 0888, 0890, 0267, 0297, 0511, 0895
0906, 0644
0506, 0194, 0501, 0928, 0913
0497, 0493, 0849
0991, 1009, 1010, 1003
1013
820
504
0495
0214, 0220,0186, 1002, 0193, 0204, 0258, 0251, 0252,
0260, 0276, 0508
0194, 0501, 0506, 0928
0494
0197, 0294, 0496, 0492, 0498, 0867, 0503, 0494
0987
0228, 0509
0234, 0998, 1011, 0507, 0857, 0510
0500, 0496
0505, 0504
0221, 247, 298, 0914, 0915
Manufacturers’ Codes
Manufacturers’ Codes
VCR CODES
Brand
Codes
ADMIRAL
ADVENTURA
AIKO
AIWA
AKAI
ALLEGRO
AMERICAN HIGH
ASHA
AUDIO DYNAMICS
AUDIOVOX
BEAUMARK
BELL AND HOWELL
BROOKSONIC
CALIX0
CANDLE
CANON
CAPEHART
CARVER
CCE
CITIZEN
COLORTYME
COLT
CRAIG
CURTIS MATHES
CYBERNEX
DAEWOO
DAYTRON
DBX
DYNATECH
ELECTROHOME
ELECTROPHONIC
0747, 0768, 0749, 0797, 0764, 0761
0820
0545, 1053, 0868
0834, 0837, 0549, 0820, 0808, 0796, 0546, 0544
0780, 0744, 0847, 0743, 0787, 0762, 0737, 0815
0797
0862, 0771, 0807
0745, 1047
0767, 0823, 1028, 0768
0773, 0775
0745, 1047
0797, 0855
0785, 0810, 0768, 0764, 0549, 0761
0773
0773, 0775, 0823
0828, 0819, 1046, 1039, 0857, 0862
0797, 1049
0771
0545, 1053, 0868
0785, 0868
0823
0820
0731, 0818, 0745, 1047, 0856, 1021
0819, 1046, 1039, 0862
0745, 1047, 0805
0545, 1053, 0868, 0854, 0855, 1051, 1052, 1023, 1022
0797
0767, 0768
0820
0745, 1047, 0773, 1037
0773
0803, 0814, 0820, 0929, 0785, 0773, 0760, 0764,
0763, 1065, 0829, 0847, 0768, 0734, 0862, 0868,
0765, 0761
0774, 0736, 0731, 0833, 0855, 0856
EMERSON
FISHER
36
Manufacturers’ Codes
Manufacturers’ Codes
Brand
FUNAI
GARRARD
GE
GO VIDEO
GOLDSTAR
GRADIENTE
GRISWOLD
HARLEY DAVIDSON
HARMON KARDON
HARWOOD
HAVARD
HEADQUARTER
HI-Q
HITACHI
INSTANT REPLAY
INTEQ
J.C. PENNEY
JCL
JENSEN
JVC
KEC
KENWOOD
KLH
KODAK
LINATECH
LLOYD
LOGIK
LXI
M. WARD
MAGNASONIC
MAGNAVOX
MAGNIN
MARANTZ
Manufacturers’ Codes
VCR Codes
0820, 0868, 0747
0820
0812, 0809, 0791, 0547, 0817, 0768, 0767, 0751,
0837, 0749, 0819, 0862, 1048, 1050, 1060
0745, 0781, 0756, 1057, 1059, 0842, 1062
0823, 0775, 0552, 0773, 0868, 1056, 1024, 1064, 1026
0820
0841
0820
0775, 0740, 0552, 0813, 1031
0820, 0734
0820
0739, 1025, 0855
0731, 0856
0820, 0737, 0735, 0751, 0779, 0841, 0755, 0815,
0819, 0837, 0555
0820, 0798, 0862, 0807
0773
0745, 0775, 0740, 0552, 0737, 1039, 0855, 0862
0807, 0862
0737, 0815
0769, 1032, 0737, 0815, 0838, 0551, 1038, 0788,
0732, 0758, 0855, 1035
0773, 0868
0739, 1025, 0737, 0815, 0855
0820
0924, 0819, 0773, 0862
0841
0820, 0553
0820, 0553
0773
0765, 0820, 0731, 0737, 0745, 0819, 0826, 0556,
0747, 0754, 0856
0545, 1053, 0745, 0773, 0820, 0767, 0868
0870, 0754, 0819, 0771, 0862, 0868, 1040
0745, 1047
0775, 0771, 0732, 0855, 0862, 1041, 0807
37
Manufacturers’ Codes
Brand
MARTA
MASUSHITA
MEI
MEMOREX
MGA
MINOLTA
MITSUBISHI
MTC
MULTITECH
NAD
NEC
NECKERMANN
NIKKO
NIKON
NOBLEX
OPTIMUS
OPTONICA
ORION
PANASONIC
PENTAX
PHILCO
PHILIPS
PILOT
PIONEER
PRIMESTAR
PROSCAN
PROTEC
PULSAR
QUARTER
QUARTZ
QUASAR
RADIOSHACK
38
VCR Codes
0773
0924, 0747, 0819, 0771, 0862
0819, 0862
0755, 0773, 0731, 0833, 0808, 0797, 0819, 0826,
0556, 0747, 0820, 0832, 0855, 0856, 0862, 1058, 1047
0835, 0847, 0846, 0819
0737, 0841
0813, 0784, 0762, 0835, 0847, 1033, 0819, 0821,
0917, 0700
0745, 1047, 0820
0820
0839, 0545
0737, 0730, 0775, 0740, 0552, 0855, 0815, 0845
0760
0773
0753, 1036
0745
0862, 0820, 0774, 0773, 0739, 1025, 0731, 0745,
1047, 0833, 0747, 0826, 0789, 0556, 0819, 0855, 0856
0742, 0747, 0826, 0556
0785, 0868, 0814
0782, 0924, 0747, 0799, 0819, 1046, 0757, 0777,
0826, 0556, 1066, 0862
0737, 0841, 0837, 0751
0819, 0862
0844, 1042, 0923, 0771, 0819, 0862
0773
0839
0812
0749, 0550
0820
0797
0739, 1025
0739, 1025, 0855, 0790
0556, 0826, 0556, 0836, 0819, 0778, 0799
0924, 0747, 0820, 0826, 0556, 0819, 0739, 1025,
0745, 1047, 0773, 0855, 0861, 0862
Manufacturers’ Codes
Manufacturers’ Codes
Brand
RADIX
RANDEX
RCA
REALISTIC
RICOH
RUNCO
SAMSUNG
SANSUI
SANYO
SCHNEIDER
SCOTT
SEARS
SHARP
SHINTOM
SHOGUN
SIGNATURE
SINGER
SONY
STS
SYLVANIA
SYMPHONIC
TANDY
TASHIKO
TATUNG
TEAC
TECHNICS
TEKNIKA
TIME WARNER
TIVO
TMK
TOSHIBA
Manufacturers’ Codes
VCR Codes
0773
0773
0817, 0893, 0879, 0812, 0809, 0737, 0841, 0547,
0757, 0792, 0767, 0754, 0777, 0751, 0819, 0749,
0837, 0862, 0768, 0931, 0766
0820, 0774, 0773, 0739, 0731, 0745, 0833, 0819,
0826, 0556, 0924, 0747, 0855, 0856
0753, 1036
0797, 0753, 1036, 1061
0745, 0780, 0744, 0554, 0840, 0854, 1027, 1052,
1054, 1055, 0805
0818, 0737, 0815, 0845
0833, 0739, 1025, 0731, 0855, 0856
0755
0765, 0764, 0768, 0854, 0761
0804, 0819, 1046, 1039, 0774, 0773, 0736, 0739,
1025, 0731, 0737, 0833, 0841, 0855, 0856, 0862, 1044
0924, 0747, 0933, 0826, 0556
0820
0745
0820, 0805
0745, 0773, 0924, 0747, 0820, 0862
0822, 0819, 0752, 0786, 0755, 0753, 0752, 0851,
0794, 0800, 0793, 0786, 1034, 0776, 0759, 0802
0737, 0862
0819, 0835, 0862
0820
0820, 0855
0785
0737, 0815
0737, 0848, 0815, 0820
0819, 0862
0773, 0784, 0831, 0819, 0820, 0862
0820
0850, 0849, 0759, 0844
0760
0765, 1045, 0774, 0835, 0854, 0927, 0784, 1030
39
Manufacturers’ Codes
Brand
TOTEVISION
UNITECH
VECTOR RESEARCH
VICTOR
VIDEO CONCEPTS
VIDEOSONIC
WEBTV
WHITE
WESTINGHOUSE
YAMAHA
ZENITH
ZONDA
40
VCR Codes
0773, 0745, 1047
0745, 1047
0775, 0740, 0552
0838, 0854
0775, 0740, 0552, 0847, 0854
0745, 1047
0825
0820
0855, 0775, 0740, 0552, 0737, 0848, 0815
0773, 0755, 0753, 1036, 0797, 1043
773
Manufacturers’ Codes
Manufacturers’ Codes
DVD CODES
Brand
AIWA
APEX
BOSE
BROOKSONIC
CALIFORNIA AUDIO
CARY
CONCEPT
DAEWOO
DENON
FISHER
FUNI
GE
GOLDSTAR
GOVIDEO
HARMON KARDON
HITACHI
JVC
KENWOOD
KLH
KYOCERA
LASONIC
M. WARD
MAGNAVOX
MITSUBISHI
MYRYAD
NAD
ONKO
OPTIMUS
ORITRON
PANASONIC
PHILIPS
PIONEER
POPULAR MECHANICS
41
Codes
465
0455, 0467, 0449, 0437, 0921, 0454, 0461, 0485,
1067, 1068, 1069, 1070
0489
0925, 0456, 0925
0445
0459
0460, 0877
0884
0477, 0472, 0478, 0439, 0452, 0481, 0482, 0444, 0884
0445
1019
0441, 0450
0475
0881
0468
0447
0454, 0461, 0485
0480
0448
0439, 0452, 0481, 0482
0484
0820
0435, 0477, 0472, 0478, 0870, 0463
0477, 0472, 0478, 0470
0466
0477, 0472, 0478
0488
0474
0457
0439, 0452, 0481, 0482, 0445, 0483, 0479, 1020,
0486, 0477, 0472, 0478, 0434, 0886, 0869
0435, 0463, 0870
0458, 0453, 0477, 0472, 0478, 1014
0471
Manufacturers’ Codes
Manufacturers’ Codes
Brand
PROSCAN
QUASAR
RCA
REALISTIC
ROWA
SAMSUNG
SANSUI
SANYO
SHARP
SONY
SYLVANIA
TEAC
TECHNICS
THETA DIGITAL
THOMPSON
TOSHIBA
YAMAHA
ZENITH
Manufacturers’ Codes
DVD Codes
0450, 441
0445
0894, 0878, 0450, 0441, 0440, 0477, 0472, 0478
0474
0490
0464, 0447, 1016
0456
0476, 0436, 0827
0480, 0491, 0986
0443, 1018, 0469, 1015, 0464, 0827
0487
0438, 0871, 0872, 0882
0445, 0483, 0479, 1020
0435, 0870
0441, 0450
0456, 0925, 0451, 0477, 0472, 0478, 0480, 892
0462, 0473, 0471, 0439, 0452, 0481, 0482
0475
42
Manufacturers’ Codes
PVR CODES
Brand
TIVO
HUGHES / TIVO
PHILLIPS / TIVO
SONY / TIVO
SONY SATELLITE/TIVO
REPLAYTV
PRIDYWAVE
Codes
0850
0849
0844
0759, 0776
0776
0782, 0807
0836
VIDEO ON DEMAND CODES
Brand
SONY DIGITAL
BELL SOUTH
TIME WARNER
Codes
0234
0883
0225
DVD/VCR COMBO CODES
Brand
SYLVANIA
SYMPHONIC
SAMSUNG
Codes
0820, 0487
0820, 0487
0446 VOL+ = DVD, VOL-= VCR
MISCELLANEOUS CODES
Brand
SHARP PROJECTOR
SONY PROJECTOR
X10
WEB TV
43
Codes
0662
0663
1063
0825
Manufacturers’ Codes
Troubleshooting
TROUBLESHOOTING
The Display is blank
• Make sure fresh batteries are properly installed.
Devices do not respond to commands
• Make sure the remote is in the correct mode.
• The battery power may be too low. Replace all old batteries with new ones.
• The remote may not be pointed in the direction of the device. Point the remote
directly at the desired device.
• The device may be too far away from the remote. Move to within 30 feet of the
device.
• Something may be blocking the communication between the remote and the
device. Check for objects that might be blocking the signal from the remote.
• Make sure the device you are trying to operate is an IR-compatible and is
working properly by using the original remote control.
Syncing
I cannot sync the remote
• Make sure you are connected to the Internet before syncing the remote.
• Make sure that the RemoteLinker II* cable is properly connected to the remote
and the computer before syncing the remote.
If you have any other problems contact customer service at 949-450-1670.
44
Troubleshooting
FAQ’S
FREQUENTLY ASKED QUESTIONS
Why are the program titles and descriptions old in my remote?
• The Guide Remote* stores up to seven days of TV Listings. If you have not
downloaded the listings in more than seven days expired program titles and
listings will appear in your remote. Updated program titles will appear again in
your remote after you sync your remote.
Why can I not get a full seven-day Guide in my remote?
• Some digital cable and satellite systems have hundreds of channels. Unless you
remove some from your listings, you may receive less than a full seven days of
listings. Reduce the number of channels in your lineup in the Settings section
on your homepage
• If you elected to download Guide Listings for All Day everyday, Sunday
thorough Saturday, you may receive less than a full seven days of listings.
Increase the number of days of Guide Listings by electing not to download
listings for parts of the day that you do not watch TV. Remove one or more dayparts in the Settings section on your homepage.
• If you elected to download Program Descriptions into your remote, and have a
large channel lineup, you may receive less than a full seven days of listings. Try
turning off the Program Descriptions option in the Settings section on your
homepage.
How often should I sync my remote to update my TV Listings?
• We recommend that you sync your remote at least once a week. This ensures
you have up-to-date Guide Listings in your remote.
Can the Guide Remote support TV listings for satellite systems?
• Yes, the Guide Remote supports TV Listings for satellite systems such as
DirecTV, Dish, Bell ExpressVu, etc.
• The Guide Remote does not support listings for C-band satellite systems.
Can I download TV listings for my cable and satellite system at the same time into
my Guide Remote?
• The Guide Remote can only support Guide listings for one service type at a
time. You cannot download both into your remote simultaneously.
Will the Guide Remote work with my cable system?
Yes, the Guide Remote supports Guide listings for cable systems.
45
Frequently Asked Questions
FAQ’S
How do I update my email address?
• On the Web site, log into the Members section.
• Click on Settings.
• In Settings, click on Change next to Login Information.
• Enter your new User Name (email address) and click Update.
• We will automatically send you an email at your new address. Go to your email
and click on the link inside the email to finalize the change.
What kind of computer system do I need in order to use the Guide Remote?
To use the Guide Remote, you should meet the following requirements:
• A PC running Windows 98SE, ME, 2000 or XP.
• Internet Explorer 5.0+, Netscape 4.0+ or AOL 5.0+ Web Browser (Note: Microsoft
Internet Explorer 5.0+ must be installed on your computer even if it is not your default
browser, because RemoteLinker uses resource files provided only with Internet Explorer.)
• One available USB port
• A CD ROM drive
• At least 5 MB free hard disk space
• At least 8 MB RAM
• An active connection to the Internet
Why can't I complete a Guide Remote sync on my Windows ME/98SE/2000/XP
system?
RemoteLinker has been successfully tested on all of the above-mentioned operating
systems. This software was specifically designed to use the USB drivers supplied by
Microsoft in each operating system and does not install drivers for you. Reliability is
assured if the following three conditions are met:
• The system meets the minimum system requirements listed in this FAQ.
• The operating system and all of the USB drivers were properly installed without
errors.
• The system anti-virus software was disabled during the RemoteLinker software
installation/uninstallation.
Please use the Windows Update feature for your PC; particularly for the core, hardware
driver and Internet Explorer patches that Microsoft provides. If you still experience
difficulty syncing your Guide Remote, please contact customer service at 949-450-1670.
46
Frequently Asked Questions
Specifications
SPECIFICATIONS
Display Screen ............................................. 2.1 in x 0.7 in (53 mm x 18 mm)
Power .................................................…....... (4) AA Batteries
Dimensions (HWD) ........................................ 2.8 in x 8.1 in x 1.4 in
(71 mm x 206 mm x 36 mm)
Weight (Without Batteries) ......................….. 6 oz (170 g)
USB Cable ......................................………… 6 ft (1.8 m)
Operating Temperature ……….……………… 5oC (41oF) to 45oC (113oF)
Storage Temperature .......................………… 0oC (32oF) to 55oC (131oF)
DECLARATION OF CONFORMITY
We, the Responsible Party
RadioShack Corporation
200 Taylor Street Suite 600
Fort Worth, Texas
DECLARE THAT THE PRODUCT
GUIDE REMOTE
Model Number: 15-2130
is in conformance with Part 15 of the FCC Rules. Operation of this product is subject to
the following two conditions (1) this device may not cause harmful interference, and (2)
this device must accept any interference received, including interference that may cause
undesired operation.
For Home or Office Use
47
Specifications / Declaration of Conformity
Warranty
Limited Ninety-Day Warranty
RadioShack warrants this product against manufacturing defects in material and
workmanship under normal use for ninety (90) days from the date of purchase from
RadioShack company-owned stores and authorized RadioShack franchisees and
dealers. EXCEPT AS PROVIDED HEREIN, RadioShack MAKES NO EXPRESS
WARRANTIES AND ANY IMPLIED WARRANTIES, INCLUDING THOSE
OF MERCHANTABILITY AND FITNESS FOR A PARTICULAR PURPOSE, ARE
LIMITED IN DURATION TO THE DURATION OF THE WRITTEN LIMITED
WARRANTIES CONTAINED HEREIN. EXCEPT AS PROVIDED HEREIN, RadioShack
SHALL HAVE NO LIABILITY OR RESPONSIBILITY TO CUSTOMER OR ANY OTHER
PERSON OR ENTITY WITH RESPECT TO ANY LIABILITY, LOSS OR DAMAGE
CAUSED DIRECTLY OR INDIRECTLY BY USE OR PERFORMANCE OF THE
PRODUCT OR ARISING OUT OF ANY BREACH OF THIS WARRANTY, INCLUDING,
BUT NOT LIMITED TO, ANY DAMAGES RESULTING FROM INCONVENIENCE, LOSS
OF TIME, DATA, PROPERTY, REVENUE, OR PROFIT OR ANY INDIRECT,
SPECIAL, INCIDENTAL, OR CONSEQUENTIAL DAMAGES, EVEN IF RadioShack HAS
BEEN ADVISED OF THE POSSIBILITY OF SUCH DAMAGES.
Some states do not allow limitations on how long an implied warranty lasts or the
exclusion or limitation of incidental or consequential damages, so the above limitations or
exclusions may not apply to you.
In the event of a product defect during the warranty period, take the product and the
RadioShack sales receipt as proof of purchase date to any RadioShack store.
RadioShack will, at its option, unless otherwise provided by law: (a) correct the defect by
product repair without charge for parts and labor; (b) replace the product with one of the
same or similar design; or (c) refund the purchase price. All replaced parts and products,
and products on which a refund is made, become the property of RadioShack. New or
reconditioned parts and products may be used in the performance of warranty service.
Repaired or replaced parts and products are warranted for the remainder of the original
warranty period. You will be charged for repair or replacement of the product made after
the expiration of the warranty period.
This warranty does not cover: (a) damage or failure caused by or attributable to acts of
God, abuse, accident, misuse, improper or abnormal usage, failure to follow instructions,
improper installation or maintenance, alteration, lightning or other incidence of excess
voltage or current; (b) any repairs other than those provided by a RadioShack
Authorized Service Facility; (c) consumables such as fuses or batteries; (d) cosmetic
damage; (e) transportation, shipping or insurance costs; or (f) costs of product removal,
installation, set-up service adjustment or reinstallation.
This warranty gives you specific legal rights, and you may have other rights, which vary
from state to state.
RadioShack Customer Relations,
200 Taylor Street, 6th Floor,
Fort Worth, TX 76102
48
Limited Warranty