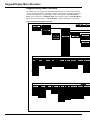
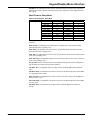
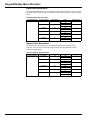
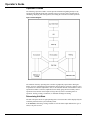
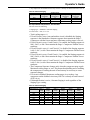
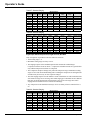
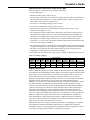
1
Operation and Maintenance Manual
MicroTech III® Unit Controller for Applied
Rooftop and Self-Contained Systems
RAH, RCS, RDS, RDT, RFS, RPS, SWP, and SWT
© 2008 McQuay International
OM 920
Group: Applied Systems
Part Number: OM 920
Date: October 2008
Contents
Introduction .............................................................. 4
Getting Started ................................................... 5
Using the Keypad/Display ....................................... 6
Passwords .......................................................... 7
Navigation Mode................................................. 8
Edit Mode ........................................................... 8
Service Timers.................................................... 8
Rapid Start.......................................................... 8
Manual Control ................................................... 9
Keypad/Display Menu Structure ........................... 10
System Summary Menu ................................... 12
Standard Menus ............................................... 13
System Menu.................................................... 14
Occupancy Menu.............................................. 16
Temperature Menu ........................................... 17
Flow Summary Menu........................................ 18
Supply Fan Speed Menu .................................. 18
Return/Exhaust Fan Speed Menu .................... 19
Cooling Menu.................................................... 20
Head Pressure Menu........................................ 21
Evap Condensing Menu ................................... 22
Economizer Menu............................................. 23
Min OA Damper Menu ...................................... 24
Heating Menu ................................................... 26
Energy Recovery .............................................. 27
Dehumidification Menu ..................................... 28
Daily Schedule Menu........................................ 28
One Event Schedule Menu............................... 29
Holiday Schedule Menu.................................... 29
Optimal Start Menu........................................... 29
Operating Hours Menu ..................................... 30
Extended Menus............................................... 30
Unit Setup Menu ............................................... 31
Timer Settings Menu......................................... 32
Time/Date Menu ............................................... 33
Supply Fan Setup Menu ................................... 33
Return/Exhaust Fan Setup Menu ..................... 34
Zone Temperature Setup Menu........................ 35
Compressor Setup Menu.................................. 36
Head Pressure Setup Menu ............................. 37
Chilled Water Setup Menu................................ 38
Economizer Setup Menu .................................. 38
Design Flow Setup Menu.................................. 39
Heating Setup Menu ......................................... 40
Dehumidification Setup Menu........................... 41
Alarm Out Configuration Setup Menu............... 42
Alarm Limits Setup Menu.................................. 43
Manual Control Menu ....................................... 44
LON/BACnetIP/BACnetMSTP Setup Menu...... 47
Active Alarm Menu............................................ 47
Alarm Log Menu ............................................... 47
Advanced Menus .............................................. 48
Unit Configuration Setup Menu......................... 48
Save/Restore Menu ......................................... 50
Alarm Delays Setup Menu ............................... 50
Analog Input Status Menu................................ 51
Universal I/O Status Menu ............................... 51
Digital Input Status Menu ................................. 52
Digital Output Status Menu .............................. 52
Adv Setup Settings Menu................................. 54
Adv Status Parameters Menu .......................... 55
Alarms..................................................................... 56
Alarm Clearing ................................................. 56
Warnings .......................................................... 56
Problems .......................................................... 57
Faults ............................................................... 60
Operator’s Guide.................................................... 62
Determining Unit State ..................................... 62
Off Operating State .......................................... 63
Start Up Operating State.................................. 64
Recirculating Operating State .......................... 64
Heating............................................................. 65
Economizer ...................................................... 65
Mechanical Cooling.......................................... 65
Determining Unit Status ................................... 66
Determining Control Mode ............................... 66
Determining Cooling Status ............................. 67
Determining Heat Status .................................. 68
Determining Economizer Status....................... 68
Determining Cooling Capacity.......................... 69
Determining Heating Capacity ......................... 69
Determining Supply Air Fan Capacity .............. 69
Determining RF/EF Capacity ........................... 69
Determining Outside Air Damper Position ....... 70
Determining Emergency Mode......................... 70
Determining Application Mode ......................... 70
Determining Occupancy Status........................ 71
Determining Occupancy Mode......................... 72
Determining Occupancy Source ...................... 72
Unoccupied Operation ..................................... 73
Scheduling ....................................................... 73
Temperature Control Configurations................ 75
Heat/Cool Changeover..................................... 75
Dehumidification............................................... 78
Energy Recovery.............................................. 80
Outside Air Damper Control ............................. 83
Outside Air Damper Control, Two Position ...... 85
Special Procedures for Units with WRV and More
Than Two Circuits. ........................................... 89
Water Pump Control......................................... 90
Cooling: Multistage........................................... 90
Cooling: Modulating ....................................... 104
Heating Control .............................................. 108
Modulating...................................................... 109
Min DAT ......................................................... 110
Indoor Air Fan - On/Off Control ...................... 114
Introduction
Introduction
This manual provides information regarding the MicroTech III control system. It specifically
describes the operation and programmable options for units with constant air volume (CAV)
control and variable air volume (VAV) control.
The MicroTech III Controller is a self contained device that is capable of complete, standalone operation. Information in the controller can be displayed and modified by using the
keypad/display in the units main control panel. For installation and startup instructions and
general information regarding a particular unit, refer to the applicable model-specific
installation and maintenance manual.
For installation and startup instructions and general information regarding a particular rooftop
unit, refer to the applicable model-specific installation and maintenance manual (Table 1).
Table 1: Installation and Maintenance Resources
Unit
Manual
MicroTech III Rooftop Unit Controller - BACnet IP
Communications
MicroTech III Rooftop Unit Controller - BACnet
MSTP Communications
MicroTech III Rooftop Unit Controller - BACnet
LON Communications
MicroTech III Unit Controller
RPS/RDT/RFS/RCS 015C-105C
RPS/RDT/RFS/RCS 050D-140D
SWP Self-Contained (018 to 105)
IM 916
IM 917
IM 918
IM 919
IM 926
IM 893
IM 937
NOTICE
This equipment generates, uses, and can radiate radio frequency energy and,
if not installed and used in accordance with this instruction manual, may cause
interference to radio communications. It has been tested and found to comply
with the limits for a Class A digital device, pursuant to part 15 of the FCC rules.
These limits are designed to provide reasonable protection against harmful
interference when the equipment is operated in a commercial environment.
Operation of this equipment in a residential area is likely to cause harmful
interference in which case the user is required to correct the interference at his
own expense. McQuay International disclaims any liability resulting from
any interference or for the correction thereof.
WARNING
Electric shock hazard. Can cause personal injury or equipment damage.
This equipment must be properly grounded. Connections and service to the
MicroTech II control panel must be performed only by personnel that are
knowledgeable in the operation of the equipment being controlled.
4
McQuay OM 920
Introduction
WARNING
Excessive moisture in the control panel can cause hazardous working
conditions and improper equipment operation.
When servicing this equipment during rainy weather, the electrical
components in the main control panel must be protected from the rain.
CAUTION
Extreme temperature hazard. Can cause damage to system components.
The MicroTech III controller is designed to operate in ambient temperatures
from -20°F to 125°F. It can be stored in ambient temperatures from -40°F to
140°F. It is designed to be stored and operated in relative humidity up to 95%
(non-condensing).
CAUTION
Static sensitive components. A static discharge while handling
electronic circuit boards can cause damage to the components.
Discharge any static electrical charge by touching the bare metal inside the
main control panel before performing any service work. Never unplug any
cables, circuit board terminal blocks, relay modules, or power plugs while
power is applied to the panel.
Getting Started
This manual contains information designed to assist the field technician with unit setup. The
technician will need to be familiar with the following topics at a minimum to successfully set
up unit operation.
• Keypad navigation/editing/passwords
• Control Mode
• Occ Mode
• DSP Setpoint
• BSP Setpoint
• Heat/Cool Changeover (Zone Setpoints)
• DAT Clg Setpoint
• DAT Htg Setpoint
• Clg Enable (OAT/EWT lockout)
• Htg Enable (OAT lockout)
• Econo Enable (Changeover temp/Enthalpy switch)
• Ventilation Limit/OA damper
McQuay OM 920
5
Using the Keypad/Display
Using the Keypad/Display
The keypad/display consists of a 5-line by 22 character display, three keys and a “push and
roll” navigation wheel. There is an Alarm Button, Menu (Home) Button, and a Back Button.
The wheel is used to navigate between lines on a screen (page) and to increase and decrease
changeable values when editing. Pushing the wheel acts as an Enter Button.
Figure 1: Keypad Controls
System Summary
3/23
Advanced Menus
Alarm Lists
Unit State=
Clg Capacity=
Cooling
25%
The first line on each page includes the page title and the line number to which the cursor is
currently “pointing”. The line numbers are X/Y to indicate line number X of a total of Y lines
for that page. The left most position of the title line includes an “up” arrow to indicate there
are pages “above” the currently displayed items, a “down” arrow to indicate there are pages
“below” the currently displayed items or an “up/down” arrow to indicate there are pages
“above and below” the currently displayed page.
Each line on a page can contain status only information or include changeable data fields.
When a line contains status only information and the cursor is on that line all but the value
field of that line is highlighted meaning the text is white with a black box around it. When the
line contains a changeable value and the cursor is at that line, the entire line is highlighted.
Each line on a page may also be defined as a “jump” line, meaning pushing the navigation
wheel will cause a “jump” to a new page. An arrow is displayed to the far right of the line to
indicate it is a “jump” line and the entire line is highlighted when the cursor is on that line.
The keypad/display Information is organized into five main menus or menus groups; Alarm
Lists Menu, System Summary Menu, Standard Menus, Extended Menus and Advance Menus.
Note – Only menus and items that are applicable to the specific unit configuration are displayed.
The Alarm Lists Menu includes active alarm and alarm log information. The System
Summary Menu includes status information indicating the current operating condition of the
unit. Standard Menus include basic menus and items required to setup the unit for general
operation. These include such things are control mode, occupancy mode and heating and
cooling setpoints. Extended Menus include more advanced items for “tuning” unit operation
such as PI loop parameters and time delays. Advanced Menus include the most advanced
items such as “unit configuration” parameters and service related parameters. These generally
do not needing changing or accessing unless there is a fundamental change to or a problem
with the unit operation.
6
McQuay OM 920
Using the Keypad/Display
Passwords
When the keypad/display is first accessed, the Home Key is pressed, the Back Key is pressed
multiple times, or if the keypad/display has been idle for the Password Timeout timer (default
10 minutes), the display will show a “main” page where the user can enter a password or
continue without entering a password. The three password levels available are Level 2, Level
4, and Level 6, with Level 2 having the highest level of access. Entering the Level 6 password
allows access to the Alarm Lists Menu, System Summary Menu, and the Standard Menus
group. Entering the Level 4 password allows similar access to Level 6 with the addition of the
Extended Menus group. Entering the Level 2 password allows similar access to Level 4 with
the addition of the Advanced Menus group. The Level 2 password is 6363, the Level 4 is
2526, and the Level 6 password is 5321. Continuing without entering one of these three levels
allows access only to the Alarm Lists Menu and the System Summary Menu.
Note – Alarms can be acknowledged without entering a password.
Figure 2: Password Main Page
McQuay AHU
1/3
Enter Password
Continue W/O Password
Version Information
The password field initially has a value **** where each * represents an adjustable field.
These values can be changed by entering the Edit Mode described below.
Figure 3: Password Entry Page
Enter Password 1/1
Enter Password
****
Entering an invalid password has the same effect as continuing without entering a password.
Once a valid password has been entered, the controller allows further changes and access
without requiring the user to enter a password until either the password timer expires or a
different password is entered. The default value for this password timer is 10 minutes. It is
changeable from 3 to 30 minutes via the Timer Settings menu in the Extended Menus.
McQuay OM 920
7
Using the Keypad/Display
Navigation Mode
In the Navigation Mode, when a line on a page contains no editable fields all but the value
field of that line is highlighted meaning the text is white with a black box around it. When the
line contains an editable value field the entire line is inverted when the cursor is pointing to
that line.
When the navigation wheel is turned clockwise, the cursor moves to the next line (down) on
the page. When the wheel is turned counter-clockwise the cursor moves to the previous line
(up) on the page. The faster the wheel is turned the faster the cursor moves.
When the Back Button is pressed the display reverts back to the previously displayed page. If
the Back button is repeated pressed the display continues to revert one page back along the
current navigation path until the “main menu” is reached.
When the Menu (Home) Button is pressed the display reverts to the “main page.”
When the Alarm Button is depressed, the Alarm Lists menu is displayed.
Edit Mode
The Editing Mode is entered by pressing the navigation wheel while the cursor is pointing to a
line containing an editable field. Once in the edit mode pressing the wheel again causes the
editable field to be highlighted. Turning the wheel clockwise while the editable field is
highlighted causes the value to be increased. Turning the wheel counter-clockwise while the
editable field is highlighted causes the value to be decreased. The faster the wheel is turned the
faster the value is increased or decreased. Pressing the wheel again cause the new value to be
saved and the keypad/display to leave the edit mode and return to the navigation mode.
Service Timers
A user may override timers for a period of up to 240 minutes by setting the Service Timer to a
non-zero number. When the Service Timer is not zero, the times listed below are set to the
Service Time (Default = 20 seconds) instead of the normal values. This allows the unit to be
run through its operating states without having to wait for the normal time delays to expire.
These times revert to the standard values when the Service Time count down to zero or is set
to zero by the user.
The affected times are:
• Cooling Stage Time
• Heating Stage Time
• Start Initial Time
• Recirculation
• ZeroOATime
Rapid Start
The user may elect to initiate a rapid startup sequence at unit power up by setting the Rapid
Start flag to Yes. When this flag is set to Yes, the Service Timer is set to 10 minutes whenever
the power is reset to the controller.
8
McQuay OM 920
Using the Keypad/Display
Manual Control
A user may manually control outputs to check operation of components when Manual Control
is set to ManCtrl. When Manual Control is set to ManCtrl, the unit is disabled and the unit is
shut down in the normal manner if it is operating. Outputs listed in the Manual Control menu
of the Keypad/Display section can then be controlled directly until Manual Control is set to
Normal.
Note – Manual Control will be set to No automatically after 240 minutes so that a person could not
put the unit into Manual Mode control and walk away from the unit and let it run at the
manual settings.
When Manual Control is set to Yes, the Control Mode is set to Off so that the unit will not
restart automatically.
When Manual Control is set to Normal all digital outputs in the Manual Control menu are set
to Off and all the analog outputs are set to 0.0% so that all outputs are in the Off or minimum
position when Manual Control is set to ManCtrl.
All alarms except those listed below are overridden during Manual Control.
During manual control, the unit will respond in the normal manner to the following alarms.
• Emergency Stop Fault
• Duct High Limit
• High Return Temperature
• High Discharge Temperature
• Low Discharge Temperature
• High Pressure - Circuit # 1
• High Pressure - Circuit # 2
• Low Pressure - Circuit # 1
• Low Pressure - Circuit # 2
McQuay OM 920
9
Keypad/Display Menu Structure
Keypad/Display Menu Structure
The following is a description of the MicroTech III menu structure. These menus and items
can all be displayed with the keypad/display. Menu items displayed will change based on the
selected unit configuration. Keypad/display menus are divided into 1) System Summary
menu - password required. 2) Standard menu - password not required. 3) Extended Menu higher level password required. 4) Advanced Menu - requires the highest level password.
Figure 4: Keypad/Display Menu Structure
10
McQuay OM 920
Keypad/Display Menu Structure
McQuay OM 920
11
Keypad/Display Menu Structure
System Summary Menu
Menus in the System Summary category contain basic unit operating status and control set
point parameters. The items shown in the System Summary Menu are Read Only and are not
adjustable from this menu. The following are brief descriptions of the System Summary
category menus and items. No password is required to view the System Summary Menu.
Table 2: System Summary Menu
Menu Display Name
Default
Setting
Unit State=
-
Clg Capacity=
OAD/Econo Cap=
Htg Capacity=
Control Temp=
Zone Clg Spt=
Zone Htg Spt=
Disch Air=
DAT Clg Spt=
DAT Htg Spt=
Min DAT Limit=
SAF Speed=
DSP
DuctSP Spt=
RF/EF Speed=
BSP
BldgSP Spt=
OA Temp=
EW Temp=
Rel Humidity=
-
Range
Off
Start
Recirc
FanOnly
MinDAT
Htg
Econo
Clg
0-100%
0-100%
0-100%
-50.0-200.0°F
0.0-100.0°F
0.0-100.0°F
-50.0-250.0°F
40.0-100.0°F
40.0-140.0°F
0.0-70.0°F
0-100%
0.2-4.0in
0.2-4.0in
0-100%
-0.25-0.25in
-0.25-0.25in
-50.0-200.0°F
-50.0-150.0°F
0-100%
Password
Level
None
None
None
None
None
None
None
None
None
None
None
None
None
None
None
None
None
None
None
None
Unit State is a status only item which indicates the state of operation in which the unit is
currently operating. The unit can be in any of the operating states shown.
Clg Capacity is a status only item which indicates the percentage of the unit maximum
cooling capacity currently operating.
OAD/Econo Cap is a status only item which indicates the percentage that the outdoor damper
or economizer valve is currently open.
Htg Capacity is a status only item which indicates the percentage of the unit maximum
heating capacity currently operating.
Control Temp is a status only item which displays the current value of the “Control
Temperature.” The “Control Temperature” is defined as the temperature input selected by the
Control Temperature Source parameter. For example, if the Control Temperature Source
parameter is set to “Return,” then the Control Temperature parameter reads the same value as
the Return Air parameter.
Zone Clg Spt is a status only item which indicates the temperature in which the unit will go
into the cooling mode of operation.
Zone Htg Spt is a status only item which indicates the temperature in which the unit will go
into the heating mode of operation.
Disch Air is a status only item which displays the current temperature reading from the unit's
discharge air temperature sensor (DAT). This sensor is standard on all units.
12
McQuay OM 920
Keypad/Display Menu Structure
DAT Clg Spt is a status only item which indicates the temperature that the DAT should be
maintained at when it is in the cooling mode of operation.
DAT Htg Spt is a status only item which indicates the temperature that the DAT should be
maintained at when in the heating mode of operation.
Min DAT Limit is a status only item which indicates the discharge air low limit temperature
on CAV zone control units. Heating will be activated to maintain this setting when the
discharge temperature falls below it during the Fan Only operating state. On VAV or CAV
discharge control units, the minimum discharge temperature limit is the DAT Clg Spt.
SAFSpeed is a status only item which indicates the capacity of the supply air fan.
DSP is a status only item which displays the current duct static pressure reading.
DuctSP Spt= is a status only item which indicates the duct static pressure set point used for
controlling the VFD for the supply air fan. The VFD is modulated to maintain the duct
pressure at this value.
RF/EF Speed is a status only item indicating the capacity of the return fan/exhaust air fans.
BSP is a status only item which displays the current building static pressure reading.
BldgSP Spt is a status only item which indicates the building static pressure set point used for
controlling the return/exhaust fan VFD. The return/exhaust fan VFD is modulated to maintain
the building static pressure sensor input to this value.
OA Temp is a status only item which displays the current temperature reading from the unit
mounted outdoor air temperature sensor. This sensor is standard on all units.
EW Temp is a status only item that displays the current temperature reading from the unit
mounted entering water temperature sensor. The sensor is standard on all water-cooled units.
Rel Humidity is a status only item that displays the current relative humidity reading from the
optional humidity sensor.
Standard Menus
The Standard Menus are menu items that control the unit's day to day operation. The menus
provide information about the units operation and its control parameters. Accessing the
Standard Menus requires the operator to enter the four-digit level 6 password, (5321) using the
keypad buttons located on the controller interface.
Table 3: Standard Menus
McQuay OM 920
Menu Display Name
Item Display Name
Standard Menu
System
Occupancy
Temperatures
Flow Summary
SAF Spd Control
RF/EF Spd Control
Cooling
Head Pressure
Evap Condensing
Economizer
Min OA Damper
Heating
Energy Recovery
Dehumidification
Daily Schedule
One Event Schedule
Holiday Schedule
Optimal Start
Operating Hours
Default Setting
Range
Password Level
6
6
6
6
6
6
6
6
6
6
6
6
6
6
6
6
6
6
6
13
Keypad/Display Menu Structure
System Menu
The “System” menu provides a summary of basic unit status and control items. This menu
summarizes the current operating state of the unit, giving the operating state the unit is in,
along with the current capacity level of that operating state.
Table 4: System Menu
14
Menu Display Name
Item Display Name
Default Setting
Range
Password Level
System
Unit State =
-
6
Unit Status =
-
Ctrl Mode =
Off
Clg Status =
-
Htg Status =
-
Econo Status =
-
Clg Capacity=
Htg Capacity=
SAF Speed =
RF/EF Speed =
OAD/Econo Cap=
Rel Humidity=
Emerg Mode=
Normal
Net App Mode=
Auto
Off
Start
Recirc
FanOnly
MinDAT
Htg
Econo
Clg
Enable
OffMan
OffMnCtl
OffNet
OffAlm
OffFnRty
Off
HeatOnly
CoolOnly
FanOnly
HeatCool
Auto
Enabled
None
OffAmb
OffAlarm
OffNet
OffMan
Enabled
None
OffAmb
OffAlarm
OffNet
OffMan
Enabled
None
OffAmb
OffAlarm
OffNet
OffMan
OffDehum
0-100%
0-100%
0-100%
0-100%
0-100%
0-100%
Normal
Off
Off
HeatOnly
CoolOnly
FanOnly
Auto
6
6
6
6
6
6
6
6
6
6
6
6
6
McQuay OM 920
Keypad/Display Menu Structure
Unit State is a status only item which indicates the state of operation in which the unit is
currently operating.
Unit Status is a status only item which indicates the current operating status.
Ctrl Mode is an adjustable item which allows the unit to be set for off, auto heating/cooling
operation, cooling only, heating only, and fan only.
Clg Status is a status only item which indicates whether or not mechanical cooling is currently
allowed. If cooling is disabled, the reason is indicated.
Htg Status is a status only item which indicates whether or not heating is currently allowed. If
heating is disabled, the reason is indicated.
Econo Status is a status only item which indicates whether or not the economizer is currently
enabled. If economizer is enabled, the reason is indicated.
Clg Capacity is a status only item which indicates the percentage of the unit maximum
cooling capacity currently operating.
Htg Capacity is a status only item which indicates the percentage of the unit maximum
heating capacity currently operating.
SAF Speed is a status only item which indicates the current speed of the supply air fan.
RF/EF Speed is a status only item which indicates the current speed of the return fan/exhaust
air fans.
OAD/Econo Cap is a status only item which indicates the percentage that the outdoor
damper/waterside economizer valve is currently open.
Rel Humidity is a status only item that displays the current relative humidity reading from the
optional humidity sensor.
Emerg Mode is an adjustable item which indicates if the unit was shut down in an emergency
situation via a network command.
Net App Mode is a network adjustable item which indicates that the unit is set for network
off, cooling only, heating only, fan only or auto heating/cooling operation via a network signal.
This item has no affect on the unit operation unless the Ctrl Mode item is set to “Auto.”
McQuay OM 920
15
Keypad/Display Menu Structure
Occupancy Menu
Menus in the Occupancy menu contain status and control items that relate to unit
occupied/unoccupied operation.
Table 5: Occupancy Menu
Menu Display Name
Item Display Name
Occupancy
Occupancy=
Default Setting
Occ Mode=
Auto
OccSrc=
-
UnoccSrc=
-
Tnt Ovrde Time=
0
Range
Password Level
Occ
Unocc
TntOvrd
Occ
Unocc
TntOvrd
Auto
None
NetSchd
IntSchd
OneEvnt
RemoteSw
OccManCmd
OccMode
TStatTO
ManTO
UnoccDehum
UnoccClg
UnoccHtg
IntOptStrt
NetOptStrt
None
0-300min
6
6
6
6
6
Occupancy is a status only item which indicates whether the unit is currently in an occupied,
unoccupied, or tenant override mode of operation.
OccMode is an adjustable item which allows the unit to be set for manual occupied or
unoccupied operation, automatic operation based on a time schedule input or manual bypass
operation.
OccSrc is a status only item which indicates the input source or function that is responsible for
setting the Occupancy parameter to “Occ.”
UnoccSrc is a status only item which indicates the input source or function that is responsible
for setting the Occupancy parameter to “Unocc.”
Tnt Ovrd Time is an adjustable item which indicates the amount of time remaining for unit
operation since tenant override operation was activated.
16
McQuay OM 920
Keypad/Display Menu Structure
Temperature Menu
Menus in the Temperatures menu contain unit temperature status information.
Table 6: Temperature Menu
Menu Display Name
Item Display Name
Default Setting
Range
Password Level
Temperatures
Control Temp=
Disch Air=
Return Air=
Space Temp=
OA Temp=
EFT/LC Temp=
EW Temp=
Mixed Air=
-
-50.0-200.0°F
-50.0-250.0°F
-20.0-200.0°F
-0.0-150.0°F
-50.0-200.0°F
-50.0-250.0°F
-50.0-150.0°F
-50.0-250.0°F
6
6
6
6
6
6
6
6
Control Temp is a status only item which indicates what the current control temperature is.
Disch Air is a status only item which displays the current temperature reading from the unit's
discharge air temperature sensor (DAT). This sensor is standard on all units.
Return Air is a status only item which displays the current temperature reading from the
unit's return air temperature sensor (RAT). This sensor is standard on all units.
Space Temp is a status only item which displays the current space (or zone) temperature
reading from the optional unit space air temperature sensor input. If an optional space
temperature sensor is not installed, the SpaceT Present= item in the Setup menu should be set
to “No” to disable the alarm function associated with an open circuit at the space temperature
sensor input.
OA Temp is a status only item which displays the current temperature reading from the unit
mounted outdoor air temperature sensor. This sensor is standard on all units.
EFT/LCT (RTU) is a status only item which displays the current entering fan/leaving coil
temperature reading from the unit mounted temperature sensor. This sensor is available on
RTU units with dehumidification capability. This sensor is also installed on units equipped
with either gas or electric heat and is used by the controller to calculate the heat rise across the
heat exchanger by comparing it to the discharge air temperature input. The controller uses this
information to protect the heat exchanger against overheating.
EWT (SCU) is a status only item that displays the current temperature reading from the unit
mounted entering water temperature sensor. The sensor is standard on all water-cooled units.
MAT (SCU) is a status only item that displays the current temperature reading from the unit
mounted mixed air temperature sensor. The sensor is standard on all Self Contained units.
McQuay OM 920
17
Keypad/Display Menu Structure
Flow Summary Menu
Table 7: Flow Summary Menu
Menu Display Name
Item Display Name
Default Setting
Range
Password Level
Flow Summary
Airflow =
-
6
Waterflow=
-
Water Pump=
-
NoFlow
Flow
NoFlow
Flow
Off
On
Off
On
Off
On
Off
On
Supply Fan=
Ret/Exh Fan=
VAV/FanOp=
6
6
6
6
6
Airflow is a status only item that indicates whether or not discharge airflow is detected.
Airflow status is sensed by a binary input delivered to the controller by a differential pressure
switch (PC7). On VAV units duct static pressure is also a factor in the indication of airflow.
Waterflow is a status only item that indicates whether or not water flow is detected. Water
flow status is sensed by a binary input delivered to the controller by an optional water flow
sensor (WF1).
Water pump is a status only item that indicates whether or not the Pump Start Output is
active. The pump start output is available for field use to start a field supplied pump when
water flow is required. For field wiring requirements for using this output refer to “Field
Wiring” in the MicroTech III Installation Manual (IM 919). The Pump Start Output is turned
on whenever the economizer bypass valve is open, the unit is in the Econo or Cooling
operating state, economizer flush mode is active or a Freeze fault or Freeze problem alarm is
active or has been active within the past 10 minutes. Otherwise the Pump Start Output is off.
Supply Fan is a status only item which indicates whether or not the controller is commanding
the unit supply fan on.
Ret/Exh Fan is a status only item which indicates whether or not the controller is
commanding the unit RF/EF fan on.
VAV/FanOp is a status only item which indicates whether this output (MCB DO10) is On or
Off.
Supply Fan Speed Menu
Table 8: Supply Fan Speed Menu
Menu Display Name
Item Display Name
Default Setting
Range
Password Level
SAF Spd Control
SAF Speed=
Speed Cmd=
Duct Press=
DuctSP Spt=
SAF Ctrl=
1.0in
DSP
6
6
6
6
6
Rem SAF Cap=
25%
0-100%
0-100%
0.0-5.0in
0.2-4.0in
DSP
Speed
0-100%
6
SAF Speed is a status only item that indicates the current supply fan speed.
Speed Cmd is a status only item that indicates the current supply fan VFD commanded speed.
Duct Press is a status only item which indicates the current pressure of the supply air
ductwork. The duct pressure is measured at the location in which the duct static pressure tap
was field installed. This device is not factory installed.
DuctSP SPT is an adjustable item which sets the duct static pressure set point used for
controlling the VFD for the supply air fan. The VFD is modulated to maintain the duct
pressure at this value.
18
McQuay OM 920
Keypad/Display Menu Structure
SAF Ctrl is an adjustable parameter used to select how the supply fan is to be controlled. The
supply fan can be controlled by supply air fan by duct pressure or by a percentage of supply
air fan speed from 25% to 100%. The speed option is typically used with a building
automation system.
Remote SF Cap is an adjustable item for setting the supply fan speed by the keypad or by a
network control signal.
Return/Exhaust Fan Speed Menu
Table 9: Return/Exhaust Fan Speed Menu
Menu Display Name
Item Display Name
Default Setting
Range
Password Level
RF/EF Spd Control
RF/EF Speed=
Speed Cmd=
Min Speed =
Bldg Press=
BldgSP Spt=
RF/EF Ctrl=
5%
0.050in
Tracking
6
6
6
6
6
6
Rem RAF Cap=
Rem ExhF Cap=
5%
5%
0-100%
0-100%
0-100%
-0.25-0.25in
-0.25-0.25in
None
Tracking
BldgP
Speed
0-100%
0-100%
6
6
RF/EF Speed a status only item that indicates the current return/exhaust fan VFD speed.
Speed Cmd is a status only item that indicates the current return/exhaust fan VFD
commanded speed.
Min Speed is a status only item that indicates the minimum return/exhaust fan VFD speed.
Bldg Press is a status only item which indicates the building static pressure at the building
static pressure sensor location.
BldgSP Spt is an adjustable item which sets the building static pressure set point used for
controlling the VFD for the return/exhaust air fan. The VFD is modulated to maintain the
building pressure at this value.
RF/EF CP Ctrl is an adjustable parameter used to select how the return/exhaust fans are to be
controlled. The exhaust fans can be controlled by the building pressure or by a percentage of
return/exhaust air fan speed from 25% to 100%. The speed option is typically used with a
building automation system.
Remote RAF Cap is an adjustable item for setting the return fan speed by the keypad or by a
network control signal.
Remote EF Cap is an adjustable item for setting the exhaust fan speed by the keypad or by a
network control signal.
McQuay OM 920
19
Keypad/Display Menu Structure
Cooling Menu
Table 10: Cooling Menu
Menu Display Name
Item Display Name
Default Setting
Range
Password Level
Cooling
Zone Clg Spt=
Unocc Clg Spt=
DAT Clg Spt=
Min Clg Spt=
Min Clg Spt @
72.0°F
85.0°F
55.0°F
55.0°F
0/
NA
6
6
6
6
6
Clg Reset=
None
Max Clg Spt=
Max Clg Spt @
65.0°F
100/
NA
0.0-100.0°F
40.0-100.0°F
40.0-100.0°F
40.0-100.0°F
0-100/
NA
°F
°C
mA
%
None
Ntwrk
Space
Return
OAT
ExtmA
ExtV
Airflow
40.0-100.0°F
0-100/
NA
°F
°C
mA
%
6
6
6
Zone Clg Spt an adjustable item which sets the temperature in which the unit will go into the
cooling mode of operation.
Unocc Clg Spt is an adjustable item which sets the zone temperature at which the unit starts
up and provides unoccupied cooling (night setup) during unoccupied periods.
Note: Setting this to its minimum value will disable unoccupied cooling.
DAT Clg Spt is an adjustable item used by the controller to set the DAT cooling setpoint. This
value is adjustable only when it is not being set by a reset schedule.
Min Clg Spt is an adjustable item which sets the minimum cooling discharge set point for use
with a cooling discharge air temperature set point reset schedule.
Min Clg Spt @ is an adjustable item which sets the value of the sensor input, selected with
the Cooling Reset parameter, at which the DAT cooling setpoint parameter is reset to the
minimum DAT cooling setpoint value.
Clg Reset is an adjustable item used to set the type of cooling reset to be used.
Max Clg Spt is an adjustable item which sets the maximum cooling discharge set point for
use with a cooling discharge air temperature set point reset schedule.
Max Clg Spt @ is an adjustable item which sets the value of the sensor input, selected with
the Cooling Reset parameter, at which the DAT cooling setpoint parameter is reset to the
maximum DAT cooling setpoint value.
Figure 5 graphically shows the cooling reset operation. Example, The normal DAT cooling
setpoint is 55.0 F. The cooling reset scheme is set to airflow. The unit is to adjust the DAT
from 55.0 F to 65.0 F. When the unit is at 35% of the design airflow the discharge temperature
is to be 65.0 F. When the unit is at 80% of its airflow the DAT is to be 55.0F. This example
would give the following inputs:
Min Clg Spt = 55.0 F
Min Clg Spt @ = 80%
20
McQuay OM 920
Keypad/Display Menu Structure
Max Clg Spt = 65.0 F
Max Clg Spt @ = 35%
Based on the above, the unit will have a discharge air temperature setpoint of 55.0 F from 80%
to 100% of the airflow.
Figure 5: Cooling Setpoint
Head Pressure Menu
The Head Pressure menu contains parameters that are used to maintain head pressure control.
Table 11: Head Pressure Menu
Menu Display Name
Item Display Name
Default Setting
Range
Password Level
Head Pressure
WRV Pos=
Head P Circ 1=
Head P Circ 2=
Setpoint=
260psi
0-100%
0-750psi
0-750psi
230-340psi
6
6
6
6
WRV Pos is a status only item that indicates the current water regulating valve position.
Head P Circ 1 is a status only item that indicates the current refrigerant pressure for circuit
#1.
Head P Circ 2 is a status only item that indicates the current refrigerant pressure for circuit
#2.
Setpoint is an adjustable item that sets the refrigerant setpoint used for controlling the water
regulating valve. The water-regulating valve is modulated to maintain the refrigerant pressure.
Note – This section only applies to Self Contained units with a water regulating valve.
McQuay OM 920
21
Keypad/Display Menu Structure
Evap Condensing Menu
Table 12: Evap Condensing Menu
Menu Display Name
Item Display Name
Default Setting
Range
Password Level
Evap Condensing
Cond Fan Spd=
CFan Spd Cmd=
Min Fan Speed=
Stage Time=
Sump Temp=
Min Sump T=
Max Sump T=
Sump Dump Spt=
Pump Status=
25%
10min
75.0°F
85.0°F
3-5.0°F
-
6
6
6
6
6
6
6
6
6
Smp Pmp Delay=
Conductivity=
Dophin System=
30s
No
0-100%
0-100%
0-100%
0-100min
-50.0-150.0°F
0.0-100.0°F
0.0-100.0°F
0.0-100.0°F
Off
On
0-300s
0-5000S/cm
No
Yes
6
6
6
Cond Fan Speed is a status only item that displays the current VFD speed when the
evaporative condenser option includes a VFD to control the first condenser fan on each circuit.
Cond Fan Spd Cmd is a status only item that indicates the current Condenser fan VFD
commanded speed.
Min Fan Speed is an adjustable item used to set the minimum speed for the VFD speed when
the evaporative condenser option includes a VFD to control the first condenser fan on each
circuit.
Stage Time is an adjustable item used to set a minimum time period between condenser fan
stage changes.
Sump Temp is a status only item that displays the current evaporative condenser sump
temperature.
Min Sump T is an adjustable item used to set a minimum evaporative condenser sump
temperature set point. This value is used to determine when condenser fans are turned off.
Max Sump T is an adjustable item used to set a maximum evaporative condenser sump
temperature set point. This value is used to determine when condenser fans should be turned
on.
Sump Dump Spt is an adjustable item used to set a minimum sump temperature. The sump is
emptied to prevent freezing if the sump temperature drops below this set point.
Sump Pump Status is a status only item that displays the current evaporative condenser sump
pump status.
Smp Pmp Delay adjustable item used to set the amount of time the sump pump fail alarm is
delayed. If the Sump Pump status remains Off after the Sump Pump Output has been turned on
for more than the Sump Pump Delay time, a Sump Pump fail alarm is initiated.
Conductivity is a status only item that displays the conductivity level of the water in the sump
of an evaporative cooled condenser on rooftop units.
Dolphin System is an adjustable parameter that indicates to the controller whether or not a
Dolphin water treatment method is being used. When set to “yes” the controller assures the
sump pump is run every three days to reduce scaling.
22
McQuay OM 920
Keypad/Display Menu Structure
Economizer Menu
Table 13: Economizer Menu
Menu Display Name
Item Display Name
Default Setting
Range
Password Level
Economizer
Economizer Pos=
DAT Clg Spt=
Min OA Pos=
Chgover Temp=
EWT Diff=
55.0°F
55.0°F
3.0d°F
0-100%
40.0-100.0°F
0-100%
0.0-100.0°F
0.0-10.0d°F
6
6
6
6
6
Economizer Pos is a status only item that is used to indicate percentage that the economizer
dampers/waterside economizer valve is open.
DAT Clg Spt is an adjustable item used by the controller to set the DAT cooling setpoint. This
value is adjustable only when it is not being set by a reset schedule.
Min OA Pos is a status only item which indicates the current minimum position of the
outdoor air damper.
Chgover Temp is an adjustable item which sets the OA dry bulb temperature at which the
units changes over to the economizer operation.
EWT Diff is an adjustable item that sets a differential below the MAT at which waterside
economizer operation is enabled based on entering water temperature.
McQuay OM 920
23
Keypad/Display Menu Structure
Min OA Damper Menu
Table 14: Min OA Damper Menu
Menu Display Name
Item Display Name
Default Setting
Range
Password Level
Min OA Damper
Min OA Pos=
Vent Limit=
DCV Limit=
Min OA Reset=
20%
10%
None
6
6
6
6
DesignFlow=
Yes
OA @ MinV/mA=
OA @ MaxV/mA=
Min V/mA=
0%
100%
0.0/
V
Max V/mA=
10.0/
V
PPM @DCV Lmt=
PPM @Vnt Lmt=
PPM=
Min PPM=
Max PPM=
V/A @Min PPM=
800ppm
1000ppm
0ppm
2000ppm
0.0/
V
V/A @Max PPM=
10.0/
V
Min Fan Diff=
Max Fan Diff=
OA Flow=
MinOAFlw Spt=
Min Clg Spd=
LoFlo V Lmt=
20%
50%
2000CFM
40%
30%
0-100%
0-100%
0-100%
None
Network
Ext VDC
Ext mA
IAQ VDC
IAQ mA
No
Yes
0-100%
0-100%
0.0-20.0/
V
mA
0.0-20.0/
V
mA
0-5000ppm
0-5000ppm
0-5000ppm
0-5000ppm
0-5000ppm
0.0-20.0/
V
mA
0.0-20.0/
V
mA
0-100%
0-100%
0-60000CFM
0-60000CFM
0-100%
0-100%
6
6
6
6
6
6
6
6
6
6
6
6
6
6
6
6
6
6
Min OA Pos is a status only item which indicates the current minimum position of the
outdoor damper. This value does not go above a value called the Ventilation Limit and does
not go below a value called the Demand Control Ventilation Limit.
On CAV units the Ventilation Limit and the Demand Control Ventilation Limit are fixed
values set equal to the Vent Limit= and DCV Limit= parameters. On VAV units the OA
Damper Position increases from the Vent Limit= value to the LoFloVent Limit= value as the
VFD speed goes from 100% down to the Min Clg Spd= value. The Demand Control
Ventilation Limit in this VAV case is determined by the Ventilation Limit X DVC Limit=/Vent
Limit=. When the Min OA Reset= parameter is set to “None” the Min OA Pos= value is set to
the Ventilation Limit. If Min OA Reset= is set to Network, Ext VDC, Ext mA, IAQ VDC, or
IAQ mA, the Min OA Pos= varies between the Ventilation Limit and the Demand Control
Ventilation Limit as the reset signal varies from its maximum to minimum value.
Vent Limit is an adjustable item that sets the value of the Ventilation Limit on a CAV unit or
when a VAV unit is at 100% discharge fan speed.
DCV Limit is an adjustable item that sets the value of the Demand Control Ventilation Limit
on a CAV unit or when a VAV unit is at 100% discharge fan speed. This item is only used
when the “Min OA Reset=” is set to something other than “None.”
24
McQuay OM 920
Keypad/Display Menu Structure
Min OA Reset is an adjustable item that sets the type of minimum OA damper position reset
to be used. When this is set to “None” the Min OA Pos= parameter is set to the Ventilation
Limit. When this is set to “Network,” “Ext VDC,” “Ext mA,” “IAQ VDC,” or “IAQ mA” then
the Min OA Pos= parameter varies from the Ventilation Limit down to the Demand Control
Ventilation Limit as the reset signal goes from its maximum to minimum value.
Design Flow is an adjustable item used to turn the optional DesignFlow outdoor airflow
measuring reset function on and off. This is one of several available methods of automatically
resetting the Min OA Pos parameter.
OA @ MinV/mA is is an adjustable item used when Min OA Reset is set to “Ext VDC” or
“Ext mA” to define at what percent of the field input signal the Min OA Pos is to be at the
Demand Control Ventilation Limit value.
OA @ MaxV/mA is an adjustable item used when Min OA Reset= is set to “Ext VDC” or
“Ext mA” to define at what percent of the field input signal the Min OA Pos= is to be at the
Ventilation Limit value.
Min V/mA is an adjustable item used to set the minimum value of the field input signal.
Max V/mA is an adjustable item used to set the maximum value of the field input signal.
PPM @ DCV Limit is an adjustable item used when Min OA Reset= is set to “IAQ VDC” or
“IAQ mA” to define at what PPM value the Min OA Pos= is to be at the Demand Control
Ventilation Limit value.
PPM @ Vent Limit is an adjustable item used when Min OA Reset= is set to “IAQ VDC” or
“IAQ mA” to define at what PPM value the Min OA Pos= is to be at the Ventilation Limit
value.
PPM is a status only item which indicates the current reading from the CO2 sensor.
Min PPM is an adjustable item that sets the minimum PPM value.
Max PPM is an adjustable item that sets the maximum PPM value.
V/mA @ Min PPM is an adjustable item that sets the minimum PPM value and the minimum
DC voltage or mA value of the CO2 sensor used when Min OA Reset= is set to “IAQ VDC”
or “IAQ mA.”
V/mA @ Max PPM is an adjustable item that sets the maximum PPM value and the
maximum DC voltage or mA value of the CO2 sensor used when Min OA Reset= is set to
“IAQ VDC” or “IAQ mA.”
Min Fan Diff is an adjustable item which sets a differential between the discharge and return
fan capacities above which the minimum allowable Min OA Position begins to be reset
upwards from the Demand Control Ventilation Limit toward the Ventilation Limit.
Max Fan Diff is an adjustable item which sets a differential between the discharge and return
fan capacities at which the minimum allowable Min OA Position is fully reset up to the
Ventilation Limit.
OA Flow is a status only item which indicates the current outdoor airflow based on an
optional OA airflow sensor input used when the unit is equipped the DesignFlow OA control
feature.
Min OAFlw Spt is an adjustable item that is used to set the minimum design flow CFM's
when the unit is equipped with the optional DesignFlow OA control feature.
Min Clg Spd is an adjustable item that sets the discharge fan speed on a VAV unit at which the
Ventilation Limit reaches the LoFloVent= value.
LoFlo Vent Limit is an adjustable item that sets the maximum value for the Ventilation Limit
on a VAV unit.
McQuay OM 920
25
Keypad/Display Menu Structure
Heating Menu
The Heating menu provides a summary of the control parameters for units with heating. The
unit's heating mode of operation is controlled by the control temperature and the heating
setpoint temperature. The unit goes into the heating mode of operation by analyzing the
control temperature. The control temperature can be return temperature, space temperature or
outside air temperature. The unit goes into the heating mode of operation when the control
temperature is below the heating setpoint by more than ½ the deadband.
Table 15: Heating Menu
Menu Display Name
Item Display Name
Default Setting
Range
Password Level
Heating
Zone Htg Spt=
Unocc Htg Spt=
MWUSpt=
DAT Htg Spt=
Htg Reset=
68.0°F
55.0°F
70.0°F
100.0°F
None
6
6
6
6
6
Min Htg Spt=
Min Htg Spt @
55.0°F
0/
NA
0.0-100.0°F
40.0-100.0°F
40.0-100.0°F
40.0-140.0°F
None
Ntwrk
Space
Return
OAT
ExtmA
ExtV
40.0-140.0°F
0-100/
NA
°F
°C
mA
Max Htg Spt=
Max Htg Spt @
55.0°F
0/
NA
6
6
Min DAT Ctrl=
Min DAT Limit=
Occ Heating=
Yes
55.0°F
Yes
40.0-140.0°F
0-100/
NA
°F
°C
mA
Yes/No
0.0-70.0°F
No
Yes
6
6
6
6
6
Zone Htg Spt is an adjustable item which sets the control temperature at which the unit will
go into the heating mode of operation.
Unocc Htg Spt is an adjustable item which sets the zone temperature at which the unit starts
up and provides unoccupied heating (night setback) during unoccupied periods.
MWUSpt is an adjustable item which sets the heating setpoint to be used during morning
warm up on a discharge temperature control unit.
DAT Htg Spt is an adjustable parameter which sets the heating discharge set point.
Htg Reset is an adjustable item used to set the type of heating reset to be used.
Min Htg Spt is an adjustable item which sets the minimum heating discharge set point for use
with a heating discharge air temperature set point reset schedule.
Min Htg Spt @ is an adjustable item which sets the value of the sensor input, selected with
the heating reset parameter, at which the heating setpoint is reset to the Min Htg Spt value.
Max Htg Spt is an adjustable item which sets the maximum heating discharge set point for
use with a heating discharge air temperature set point reset schedule.
Max Htg Spt @ is an adjustable item which sets the value of the sensor input, selected with
the heating reset parameter, at which the heating setpoint is reset to the Max Htg Spt value.
Min DAT Ctrl is an adjustable item used to activate or deactivate the low discharge
temperature limit function available on units equipped with modulating or multistage heat.
26
McQuay OM 920
Keypad/Display Menu Structure
Min DAT Limit is a status only item which indicates the discharge air low limit temperature
on CAV zone control units. Heating will be activated to maintain this setting when the
discharge temperature falls below it during the Fan Only operating state. On VAV or CAV
discharge control units, the minimum discharge temperature limit is the DAT Clg Spt.
Occ Heating is an adjustable item which enables and disables the “daytime” heating mode of
operation. If the Occ Heating parameter is set to No, the unit will only go into heating during
the initial morning warm-up cycle. If the Occ Heating parameter is set to Yes, the unit can go
into the heating mode of operation any time during the day.
Energy Recovery
The Energy Recovery menu contains parameters that relate to or are used to control the
enthalpy wheel and exhaust fan when a unit is equipped with an optional energy recovery
wheel system.
Table 16: Energy Recovery
Menu Display Name
Item Display Name
Default Setting
Range
Password Level
Energy Recovery
Energy Rec=
Yes
6
Wheel Speed=
Whl Spd Cmd=
ER DAT=
ER ExhT=
Min ExhT Diff=
Max ExhT Diff=
Stage Time=
Min Off Time=
Rel Humidity=
2.0°F
6.0°F
5min
20min
-
No
Yes
0-100%
0-100%
-50.0-200.0°F
-50.0-200.0°F
1.0-10.0°F
1.0-10.0°F
1-100min
1-100min
0-100%
6
6
6
6
6
6
6
6
6
Energy Rvcy is an adjustable item which turns the optional energy recovery system on /off.
Wheel Speed a status only item that indicates the energy wheel VFD speed.
Wheel Spd Cmd is a status only item that indicates the current energy wheel VFD
commanded speed.
ER DAT is status only item which displays the current discharge air temperature leaving the
optional energy recovery wheel.
ER Exh T is status only item which displays the current exhaust air temperature leaving the
optional energy recovery wheel. Note: This sensor is present only when the unit is equipped
with the energy recovery wheel frost protection option
Min Exh T Diff is an adjustable item that sets a differential below the calculated potential
energy recovery exhaust air frosting point. When the ER Exh T falls below the calculated
frosting point by more that this value the energy wheel will be driven to its minimum speed to
prevent frosting.
Max Exh T Diff is an adjustable item that sets a differential above the calculated potential
energy recovery exhaust air frosting point. Once the wheel is drive to minimum speed to
prevent frosting it driven back to maximum speed only when ER Exh T rises back above the
calculated frosting point by more that this value.
Stage Time is an adjustable item used to set a minimum time period for operating at either the
minimum or maximum speed before action is taken to change speed during the frost protect
mode of operation.
Min Off Time is an adjustable item used to set the minimum amount of time the energy wheel
will remain off after being turned off due to a frosting/condensation condition.
Rel Humidity is a status only item that indicates the current relative humidity reading of the
sensor.
McQuay OM 920
27
Keypad/Display Menu Structure
Dehumidification Menu
Table 17: Dehumidification Menu
Menu Display Name
Item Display Name
Default Setting
Range
Password Level
Dehumidification
Dehum Status=
-
6
Rel Humidity=
Dewpoint=
Dehum Method=
None
RH Setpoint=
Dewpoint Spt=
Reheat Spt=
Reheat Cap =
50%
50°F
-
Disabled
Enabled
0-100%
-50-150°F
None
Rel Hum
DewPt
0-100%
0-100°F
40.0-100.0°F
0-100%
6
6
6
6
6
6
6
Dehum Status is a status only item that indicates whether dehumidification is enabled or
disabled.
Rel Humidity is a status only item that indicates the current relative humidity reading of the
sensor.
DewPoint is a status only item that indicates the current value that is calculated by the
controller using the Rel Humidity value and either the Space Temp or Return Air value,
depending on the setting of the Humidity Sensor Location. This parameter can either be set to
“Space” or “Return.”
Dehum Method is an adjustable item used to set the dehumidification method to either “RH”
or “DewPt.” When this parameter is set to “RH,” dehumidification operation is controlled to
maintain the Rel Humidity value at the Relative Humidity Set Point. When this parameter is
set to “DewPt,” dehumidification operation is controlled to maintain the Dew Point= value at
the Dew Point Set Point.
RH Setpoint is an adjustable item used to set the relative humidity value at which the relative
humidity will be controlled to during dehumidification operation.
Dewpoint Spt is an adjustable item used to set the Dewpoint value at which the dewpoint with
will be controlled to during dehumidification operation.
Reheat Spt is a status only item which is used to indicate the DAT temperature to which the
HGRH valve will be controlled to in the Cooling and Fan Only operating states while
dehumidification operation is active. The Reheat Setpoint equals the DAT Cooling Setpoint
for DAT controlled units and will vary in between the minimum and maximum reheat setpoint
for Zone Controlled units.
Reheat Cap is a status only item that indicates the current reheat capacity value.
Daily Schedule Menu
The Daily Schedule sets the start and stop times for each of the days of the week. One start and
one stop time can be set for each day.
Table 18: Daily Schedule Menu
28
Menu Display Name
Item Display Name
Default Setting
Range
Password Level
Daily Schedule
Mon=
Tue=
Wed=
Thu=
Fri=
Sat=
Sun=
Hol=
00:00 – 00:00
00:00 – 00:00
00:00 – 00:00
00:00 – 00:00
00:00 – 00:00
00:00 – 00:00
00:00 – 00:00
00:00 – 00:00
00:00 – 23:59
00:00 – 23:59
00:00 – 23:59
00:00 – 23:59
00:00 – 23:59
00:00 – 23:59
00:00 – 23:59
00:00 – 23:59
6
6
6
6
6
6
6
6
McQuay OM 920
Keypad/Display Menu Structure
One Event Schedule Menu
The One Event Schedule is used to set the start and stop times for one event.
Table 19: One Event Schedule Menu
Menu Display Name
Item Display Name
Default Setting
Range
Password Level
One Event Schedule
Beg=
00/00/00 @ 00:00
6
End=
00/00/00 @ 00:00
00/00/00-12/31/99
@ 00:00 – 23:59
00/00/00-12/31/99
@ 00:00 – 23:59
6
Holiday Schedule Menu
The Holiday Schedule is used to set the start and stop times for up to 16 different holidays.
Table 20: Holiday Schedule Menu
Menu Display Name
Item Display Name
Default Setting
Range
Password Level
Holiday Schedule
Hol 1=
Hol 2=
Hol 3=
Hol 4=
Hol 5=
Hol 6=
Hol 7=
Hol 8=
Hol 9=
Hol 10=
00/00/00-00/00/00
00/00/00-00/00/00
00/00/00-00/00/00
00/00/00-00/00/00
00/00/00-00/00/00
00/00/00-00/00/00
00/00/00-00/00/00
00/00/00-00/00/00
00/00/00-00/00/00
00/00/00-00/00/00
00/00/00-12/31/99
00/00/00-12/31/99
00/00/00-12/31/99
00/00/00-12/31/99
00/00/00-12/31/99
00/00/00-12/31/99
00/00/00-12/31/99
00/00/00-12/31/99
00/00/00-12/31/99
00/00/00-12/31/99
6
6
6
6
6
6
6
6
6
6
Optimal Start Menu
The Optimal Start menu is used to set up the unit so it starts at the most efficient time before
building occupancy.
Note – Even though these parameters are adjustable, other than perhaps the Design Htg OAT
and the Design Clg OAT they generally do not require adjustment as they will be
automatically adjusted during normal optimal start operation.
Table 21: Optimal Start Menu
Menu Display Name
Item Display Name
Default Setting
Range
Password Level
Optimal Start
Enable=
No
6
Htg Rate=
Htg OAT=
Des Htg OAT=
Clg Rate=
Clg OAT=
Des Clg OAT=
0.4°F/min
35°F
0°F
0.4°F/min
85°F
95°F
No
Yes
0.0-1.0°F/min
-40-60°F
-40-60°F
0.0-1.0°F/min
-60-140°F
-60-140°F
6
6
6
6
6
6
Enable is an adjustable item that turns on the optimal start feature. Setting the value to yes
will activate this function.
Htg Rate is an adjustable item that sets the rate of temperature rise in degrees per minute
when the unit was last started optimally in heating.
Htg OAT is an adjustable item that sets the outdoor air temperature when the unit was last
started optimally in heating.
Design Htg OAT is an adjustable item that sets the outdoor air temperature at which the
heating system could just hold the load. The rate of temperature rise would equal zero.
Clg Rate is an adjustable item that sets the rate of temperature drop in degrees per minute
when the unit last started optimally in cooling.
Clg OAT is an adjustable item that sets the outdoor air temperature when the unit was last
started optimally in cooling.
Design Clg OAT is an adjustable item that sets the outdoor air temperature at which the
cooling system could just hold the load. Rate of temperature rise would equal zero.
McQuay OM 920
29
Keypad/Display Menu Structure
Operating Hours Menu
The Operating Hours menu gives a summary of the hours of operation for each of the supply
fans, return/exhaust fans, compressors, heating and economizer operation.
Table 22: Operating Hours Menu
Menu Display Name
Item Display Name
Operating Hours
Supply Fan=
Ret/Exh Fan=
Mech Cool=
Comp # 1=
Comp # 2=
Comp # 3=
Comp # 4=
Comp # 5=
Comp # 6=
Comp # 7=
Comp # 8=
Heating=
Economizer=
Tnt Override=
Dehum=
ER Wheel=
Default Setting
Range
Password Level
0-50000H
0-50000H
0-50000H
0-50000H
0-50000H
0-50000H
0-50000H
0-50000H
0-50000H
0-50000H
0-50000H
0-50000H
0-50000H
0-50000H
0-50000H
0-50000H
6
6
6
6
6
6
6
6
6
6
6
6
6
6
6
6
Supply Fan is a status item which gives the number of hours the supply fan has operated.
Return/Exhaust Fan is a status item which gives the number of hours the return/exhaust fans
have operated.
Mech Cool is a status item which gives the number of hours that mechanical cooling has
operated.
Comp #1 is a status item which gives the number of hours that compressor #1 has operated.
Comp #2 is a status item which gives the number of hours that compressor #2 has operated.
Comp #3 is a status item which gives the number of hours that compressor #3 has operated.
Comp #4 is a status item which gives the number of hours that compressor #4 has operated.
Comp #5 is a status item which gives the number of hours that compressor #5 has operated.
Comp #6 is a status item which gives the number of hours that compressor #6 has operated.
Comp #7 is a status item which gives the number of hours that compressor #7 has operated.
Comp #8 is a status item which gives the number of hours that compressor #8 has operated.
Heating is a status item which gives the number of hours that the heating mode has operated.
Economizer is a status item which gives the number of hours that the economizer has
operated.
Tnt Override is a status item which gives the number of hours that the unit has operated in
the Tenant Override mode of operation.
Dehum is a status item which gives the number of hours that the dehumidification has
operated.
ER Wheel is a status item which gives the number of hours that the energy recovery wheel
has operated.
Extended Menus
The Extended Menus are menu items are used to set up the unit for its HVAC application
30
McQuay OM 920
Keypad/Display Menu Structure
Accessing the Extended Menus requires the operator to enter the four-digit Level 4 password,
(2526) using the keypad buttons located on the controller interface.
Table 23: Extended Menus
Menu Display Name
Item Display Name
Extended Menus
Unit Setup
Timer Settings
Time/Date
SAF Spd Setup
RF/EF Spd Setup
Zone Temp Setup
Compressor Setup
Head Press Setup
Chilled Water Setup
Economizer Setup
Design Flow Setup
Heating Setup
Dehum Setup
Alarm Out Config
Alarm Limits
Manual Control
Default Setting
Range
Password Level
4
4
4
4
4
4
4
4
4
4
4
4
4
4
4
4
Unit Setup Menu
Table 24: Unit Setup Menu
Menu Display Name
Item Display Name
Default Setting
Range
Password Level
Unit Setup
RAT Sensor=
Yes
4
100% OA=
No
OAT Sensor=
Yes
MAT Sensor=
Yes
Space Sensor=
Yes
Eng Units=
English
No
Yes
No
Yes
No
Yes
No
Yes
No
Yes
SI
English
4
4
4
4
4
RAT Sensor is an adjustable item used to select whether or not the Return Air sensor input
will be used.
100% OA SCU is an adjustable item used to select whether or not a self contained unit will be
configured for 100% outside air operation.
OAT Sensor is an adjustable item used to select whether or not the Outside Air Temperature
sensor input will be used.
MAT Sensor is an adjustable item used to select whether or not the Mixed Air Temperature
sensor input will be used.
Space Sensor is an adjustable item to indicate if a space sensor is connected to the unit
controller.
Eng Units is an adjustable item to indicate if the unit is to display English or Metric units of
measure.
McQuay OM 920
31
Keypad/Display Menu Structure
Timer Settings Menu
Table 25: Timer Settings Menu
Menu Display Name
Item Display Name
Default Setting
Range
Password Level
Timer Settings
Service Time=
Start Up=
Recirculate=
Zero OA Time=
Tnt Override=
Post Heat=
Password=
Low DAT=
ClgStateDelay=
Bypass Valve=
0min
180s
180s
0min
120min
0s
10min
6min
300s
300s
0-240min
1800s
3600s
0-240min
0300min
0-180s
3-30min
0-60min
0-600s
0-600s
4
4
4
4
4
4
4
4
4
4
Service Time is an adjustable item that sets the amount of time the internal control timers can
be temporarily sped up.
Startup is an adjustable item that sets the time in seconds that the unit will perform its startup
operation.
Recirculate is an adjustable item that sets the time in seconds that the unit operates with only
the fan, recirculating the building air upon unit start up.
Zero OA Time is an adjustable item that sets the time in minutes that the outdoor air damper
stays at a zero position upon unit start up.
Tnt Override is an adjustable item that sets the amount of time that the unit will go into
operation when the tenant override function is activated. Tenant override can be activated by
the space sensor button, the network occupancy mode parameter or the keypad Occ Mode=
parameter.
Post Heat is an adjustable item that sets the duration of the post heat function available on
VAV units.
Password is an adjustable item that sets the amount of time in minutes that the controller will
allow access to applicable menus without re-entering the necessary password. If the keypad
display remains idle for this time period, the display will revert to the “main menu” requiring a
re-enter of the password.
Low DAT is an adjustable item that sets the duration of a time period upon unit start up during
which the Low Discharge Temperature fault is ignored. This may be particularly important in
colder climates when a unit has been off for a significant time period during which the unit,
including the discharge air temperature sensor, has become very cold. This time period allows
the unit to run long enough to turn the unit heat on and warm the discharge sensor above the
alarm limit, preventing nuisance unit alarm shutdown. This time period begins when the
supply fan starts.
ClgStateDelay is an adjustable item that sets the amount of time between the fan only
operating state and the mechanical cooling state. The unit will not enter the mechanical
cooling state until this time has passed. This only applies on discharge control units following
morning warm up heating operation.
Bypass Valve is an adjustable item that sets the duration of time the bypass valve is to be
opened prior to entering the economizer (waterside) or cooling operating state on unit with a
water cooled condenser. This is to allow enough time for the water flow switch and the
entering water temperature to be checked before the unit begins economizer or cooling
operation.
32
McQuay OM 920
Keypad/Display Menu Structure
Time/Date Menu
Table 26: Time/Date Menu
Menu Display Name
Item Display Name
Time/Date
Time=
Date=
Default Setting
Range
Password Level
HH:MM:SS
MM/DD/YYYY
4
4
Time = is an adjustable item that sets the current time.
Date= is an adjustable item that sets the current date.
Supply Fan Setup Menu
Table 27: Supply Fan Setup Menu
Menu Display Name
Item Display Name
Default Setting
Range
Password Level
Supply Fan Setup
DSP Ctrl Dly=
Min Speed =
DSP DB=
VFD Ramp Time=
Min Period=
Max Spd Chg=
30s
25%
0.1in
60s
5s
15%
0-999s
0-100%
0-0.5in
0-999s
0-999s
0-100%
4
4
4
4
4
4
DSP Ctrl Dly is an adjustable item that sets the duration of time that the minimum speed
signal is sent to the VFD after the supply fan is started via a digital output. Control reverts to
either duct pressure or speed after the fan has been on for the DSPCtrlDelay (default 30
seconds).
Min Speed is an adjustable item which is used to set the minimum supply fan speed (default
25%).
DSP DB is an adjustable item which sets a dead band around the DuctSP Spt parameter. No
duct static pressure control action is taken when the current duct static pressure input is within
this dead band.
VFD Ramp Time is an adjustable item that sets the amount of time it will take for the VFD to
drive from its minimum to maximum settings as well as its maximum to minimum settings.
The VFD Ramp Time value on the keypad must be changed whenever the Ramp Time of the
VFD is changed. The Ramp up Time must equal the Ramp down Time to provide stable
operation.
Min Period is an adjustable item that sets the duration of the sample time between VFD speed
changes. A counter is reset to zero whenever a speed change is added to the speed or duct
static pressure control is not active.
Note – The sample time must be long enough to allow the static pressure to get very close to its
steady state value before another calculation is made.
Max Spd Chg is an adjustable item that sets the maximum value for a VFD speed increase or
decrease. This speed change (either a positive or negative value) is added to the current fan
speed whenever the duct static pressure is outside of the deadband, and a counter exceeds the
sample time.
McQuay OM 920
33
Keypad/Display Menu Structure
Return/Exhaust Fan Setup Menu
Table 28: Return/Exhaust Fan Setup Menu
Menu Display Name
Item Display Name
Default Setting
Range
Password Level
Ret/Exh Fan Setup
BSP Ctrl Dly=
BSP DB=
BSP Period=
BSP Gain=
Max Spd Chg=
Sup Fan Max=
RF @ SF Max
Sup Fan Min=
RF @ SF Min=
Min Speed=
MinExStrtTime=
MinExStopTime=
MinExhOAPos=
MinExhSAFCap=
30s
0.01in
5s
0.2
4%
100%
95%
30%
25%
5%
120s
120s
5%
10%
0-999s
0.0-0.1in
0-999s
0.0-100.0s
0-100%
0-100%
0-100%
0-100%
0-100%
0-100%
60-300s
60-300s
0-100%
0-100%
4
4
4
4
4
4
4
4
4
4
4
4
4
4
BSP Ctrl Delay is an adjustable item that sets the duration of time that the minimum speed
signal is sent to the VFD after the return fan is started via a digital output. Control reverts to
either building pressure or speed after the fan has been on for the BSPCtrlDelay (default 30
seconds).
BSP DB is an adjustable item which sets a dead band around the BldgSP Spt parameter. No
building static pressure control action is taken when the current building static pressure input
is within this dead band.
BSP Period is an adjustable item which sets the “sampling period” used in the PI control
function that modulates the return air or exhaust fan VFD.
BSP Gain is an adjustable item which sets the “gain” used in the PI control function that
modulates the return air or exhaust fan VFD.
Max Spd Chg is an adjustable item that sets the maximum value for a VFD speed increase or
decrease. This speed change (either a positive or negative value) is added to the current fan
speed whenever the building static pressure is outside of the deadband, and a counter exceeds
the sample time.
Sup Fan Max is an adjustable item used with the RF@SF Max parameter described below to
set the SAF/RAF tracking offset at the high end.
RF@SF Max is an adjustable item that sets the speed of the return/exhaust fan when the
supply fan is at the Sup Fan Max value.
Sup Fan Min is an adjustable item used with the RF@SF Min parameter described below to
set the SAF/RAF tracking offset at the low end.
RF@SF Min is an adjustable item that sets the maximum speed of the return/exhaust fan
when the supply fan is at its minimum speed.
Min Speed is an adjustable item the sets the minimum speed of the RF/EF fan.
MinExStrtTime is an adjustable item that sets the Minimum Exhaust Fan On Time (Default =
120 seconds).
MinExStopTime is an adjustable item that sets the Minimum Exhaust Fan Stop Time (Default
= 120 seconds).
MinExhOAPos is an adjustable item that sets the Minimum Exhaust OA Position (default
5%). %). The outdoor air dampers must be open more that this value for prop exhaust fan
operation.
MinExhSAFCap is an adjustable item that sets the Minimum Exhaust SAF capacity (default
10%). The supply air fan speed must be higher than this value for prop exhaust fan operation.
34
McQuay OM 920
Keypad/Display Menu Structure
Zone Temperature Setup Menu
Table 29: Zone Temperature Setup Menu
Menu Display Name
Item Display Name
Default Setting
Range
Password Level
Zone Temp Setup
Ctrl Temp Src=
RAT
4
Use Tstat Spt=
No
Zone Clg DB=
Clg Period=
Clg Gain=
Clg PAT=
Max Clg Chg=
Zone Htg DB=
Htg Period=
Htg Gain=
Htg PAT=
Max Htg Chg=
2.0d°F
60s
0.1
600s
5.0d°F
2.0d°F
60s
0.1
600s
5.0d°F
RAT
Space
MAT
OAT
No
Yes
0.0-10.0d°F
0-999s
0.0-100.0
0-999s
0.0-50.0d°F
0.0-10.0d°F
0-999s
0.0-100.0
0-999s
0.0-50.0d°F
4
4
4
4
4
4
4
4
4
4
4
Ctrl Temp Src is an adjustable item which selects the temperature sensor input to be used for
the unit heating/cooling changeover or zone cooling and heating capacity change decisions.
For example, if the CtrlTemp Src parameter is set to “Return,” then the Control Temp
parameter reads the same value as the Return Air parameter.
Use Tstat Spt is an adjustable item used to set whether to use the Tstat setpoint adjustment
value for the Zone Clg Spt and Zone Htg Spt.
Zone Clg DB is an adjustable item which sets a dead band around the Zone Cooling Setpoint
parameter. For example, if the Zone Cooling Setpoint parameter is set to 75ºF and the Clg
Deadband parameter is set to 2ºF the dead band around the set point would be from 76.0ºF to
74.0ºF.
Clg Period is an adjustable item which sets the “sampling time” used in the PI control
function to vary the DAT Clg Spt in zone control applications.
Clg Gain is an adjustable item which sets the “proportional band” used in the PI control
function to vary the DAT Clg Spt in zone control applications.
.Clg PAT is an adjustable item which sets the “project ahead” used in the PI control function
to vary the DAT Clg Spt in zone control applications.
Max Clg Change is an adjustable item that sets the maximum value for an increase or
decrease of the DAT Clg Spt in zone control applications.
Zone Htg DB is an adjustable item which sets a dead band around the Zone Heating Setpoint
parameter. For example, if the Zone Heating Setpoint parameter is set to 70ºF and the Htg
Deadband parameter is set to 2ºF the dead band around the set point would be from 69.0ºF to
71.0ºF.
Htg Period is an adjustable item which sets the “sampling time” used in the PI control
function to vary the DAT Htg Spt in zone control applications.
Htg Gain is an adjustable item which sets the “proportional band” used in the PI control
function to vary the DAT Htg Spt in zone control applications.
Htg PAT is an adjustable item which sets the “project ahead” used in the PI control function to
vary the DAT Htg Spt in zone control applications.
Max Htg Chg is an adjustable item that sets the maximum value for an increase or decrease of
the DAT Htg Spt in zone control applications.
McQuay OM 920
35
Keypad/Display Menu Structure
Compressor Setup Menu
Table 30: Compressor Setup Menu
Menu Display Name
Item Display Name
Default Setting
Range
Password Level
Compressor Setup
Clg DB=
Lead Circuit=
2.0°F
#1
4
4
Staging Type=
Standard
Stage Time=
CFanOut1 Spt=
CFanOut2 Spt=
CFanOut3 Spt=
Cond Fan Diff=
OAT Clg Lock=
OATDiff=
Min EWT=
5min
105°F
105°F
105°F
5°F
55°F
2d°F
55°F
1.0-10.0°F
Auto
#1
#2
Standard
Alternate
5-60min
0-105°F
0-105°F
0-105°F
5-20°F
0-100°F
0-10d°F
20-100°F
4
4
4
4
4
4
4
4
4
Clg DB is an adjustable item which sets a dead band around the discharge cooling setpoint
parameter. For example, if the discharge cooling setpoint parameter is set to 55ºF and the Clg
Db parameter is set to 2ºF the dead band around the set point would be from 56.0ºF to 54.0ºF.
Lead Circuit is an adjustable item used to set which circuit will be the Lead Circuit.
Staging Type is an adjustable item used to set the type of compressor staging to be used. If
dehumidification is active, Alternate Staging is used regardless of the Staging Type setting.
Stage Time is an adjustable item used to set a minimum time period between compressor
stage changes.
CfanOut1 Spt is an adjustable item used to set the OAT temperature that the first “controlled”
condenser fan stage on each circuit is turned on. The first controlled condenser fan output is
turned on when any compressor is on and the OAT rises above the Condenser Stage 1 Set
Point. The first controlled condenser fan output is turned off when all compressors are off or
the OAT drops below the Condenser Stage 1 Set Point by more than the Condenser Fan
Differential (Default = 105°F).
CfanOut2 Spt is an adjustable item used to set the OAT temperature that the second
“controlled” condenser fan stage on each circuit is turned on. The second controlled condenser
fan output is turned on when any compressor is on and the OAT rises above the Condenser
Stage 2 Set Point. The second controlled condenser fan output is turned off when all
compressors are off or the OAT drops below the Condenser Stage 2 Set Point by more than the
Condenser Fan Differential (Default = 105°F).
CfanOut3 Spt is an adjustable item used to set the OAT temperature that the third
“controlled” condenser fan stage on each circuit is turned on. The third controlled condenser
fan output is turned on when any compressor is on and the OAT rises above the Condenser
Stage 3 Set Point. The third controlled condenser fan output is turned off when all
compressors are off or the OAT drops below the Condenser Stage 3 Set Point by more than the
Condenser Fan Differential (Default = 105°F)
Cond Fan Diff is an adjustable item used to set the Condenser Fan Differential (Default =
5°F).
OAT Clg Lock is an adjustable item which sets the low outdoor air temperature mechanical
cooling lockout point. Mechanical cooling operation is disabled when the outdoor air
temperature sensor input falls below this set point.
OATDiff is an adjustable item which sets a differential above the OAT Clg Lock parameter.
Mechanical cooling operation is re-enabled when the outdoor air temperature sensor input
rises above the OAT Clg Lock value by more than this differential.
36
McQuay OM 920
Keypad/Display Menu Structure
Min EWT is an adjustable item that sets the minimum allowable entering water temperature.
Mechanical Cooling is disabled when the entering water temperature sensor input falls below
this setpoint
Head Pressure Setup Menu
Table 31: Head Pressure Setup Menu
Menu Display Name
Item Display Name
Default Setting
Range
Password Level
Head Press Setup
Head Press DB=
WRV Period=
WRV Gain=
WRV PAT=
WRV Max Chg=
Init Op Time=
Min WRV Pos=
Min WRV Tmp=
Max WRV Tmp=
WRV Act Time=
Min WRV Time=
10psi
10s
3.6
10s
7%
60s
10%
58°F
105°F
60s
60s
0-50psi
0-999s
0.0-100.0
0-999s
0-100%
0-3600s
0-100%
20-150°F
20-150°F
0-300s
0-3600s
4
4
4
4
4
4
4
4
4
4
4
Head Press DB is an adjustable item that sets a deadband around the Head Pressure Setpoint
parameter.
WRV Period is an adjustable item which sets the “sampling time” used in the PI control
function of the water regulating valve.
WRV Gain is an adjustable item which sets the “proportional band” used in the PI control
function of the water regulating valve.
WRV PAT is an adjustable item which sets the “project ahead” used in the PI control function
of the water regulating valve.
WRV Max Chg is an adjustable item that sets the maximum value for an increase or decrease
of the water regulating valve.
Init Op Time The first compressor runs for an editable Initial Operation Time (InitOpTime)
with the WRV at an initial start up position (InitPos).
Min WRV Pos is an adjustable item used which sets the minimum WRV position (default
10%).
Min WRV Tmp is an adjustable item which is used to set the edited temperature where WRV
at a minimum position is OK.
WRV Act Time is an adjustable item which is used to set the time required for the WRV to be
driven from 0 to 100%.
Max WRV Tmp is an adjustable item which is used to set the edited temperature where WRV
at 100% is OK.
Min WRV Time is an adjustable item which sets the minimum WRV time (default 60
seconds.
McQuay OM 920
37
Keypad/Display Menu Structure
Chilled Water Setup Menu
Table 32: Chilled Water Setup Menu
Menu Display Name
Item Display Name
Default Setting
Range
Password Level
Chilled Water Setup
Clg DB=
Clg Period=
Clg Gain=
Clg PAT=
CW Max Chg=
Stage Time=
OAT Clg Lock=
OATDiff=
2.0d°F
20s
1
40s
15%
5min
55°F
2°F
1.0-10.0d°F
0-999s
0.0-100.0
0-999s
0-100%
5-60min
0-100°F
0-10°F
4
4
4
4
4
4
4
4
Clg DB an adjustable item which sets a dead band around the discharge cooling setpoint
parameter. For example, if the discharge cooling setpoint parameter is set to 55ºF and the Clg
Db parameter is set to 2ºF the dead band around the set point would be from 56.0ºF to 54.0ºF.
Clg Period is an adjustable item which sets the “sampling time” used in the PI control
function of the chilled water valve.
Clg Gain an adjustable item which sets the “proportional band” used in the PI control function
of the chilled water valve.
Clg PAT is an adjustable item which sets the “project ahead” used in the PI control function of
the chilled water valve.
CW Max Chg is an adjustable item that sets the maximum value for an increase or decrease
of the chilled water valve position.
Stage Time is an adjustable item used to set a minimum time period for staging between
minimum cooling operation and economizer operation.
OAT Clg Lock is an adjustable item which sets the low outdoor air temperature mechanical
cooling lockout point. Mechanical cooling operation is disabled when the outdoor air
temperature sensor input falls below this set point.
OAT Diff is an adjustable item which sets a differential above the OAT Clg Lock parameter.
Mechanical cooling operation is re-enabled when the outdoor air temperature sensor input
rises above the OAT Clg Lock value by more than this differential.
Economizer Setup Menu
Table 33: Economizer Setup Menu
Menu Display Name
Item Display Name
Default Setting
Range
Password Level
Economizer Setup
Econo DB=
Econo Period=
Econo Gain=
1.0-10.0d°F
0-999s
0.0-100.0
4
4
4
0-999s
4
0-100%
4
Flush Econo=
2.0d°F
30/40s (air/water)
1-Oct
(air/water)
60/40s
(air/water)
10/15%
(air/water)
Yes
4
Econo Diff=
2°F
No
Yes
0-10°F
Econo PAT=
Econo Max Chg=
4
Econo DB is an adjustable item which sets a dead band around the discharge cooling setpoint
parameter. For example, if the discharge cooling setpoint parameter is set to 55ºF and the Clg
Db parameter is set to 2ºF the dead band around the set point would be from 56.0ºF to 54.0ºF.
Econo Period is an adjustable item which sets the “sampling time” used in the PI control
function of the economizer actuator.Econo Gain is an adjustable item which sets the
“proportional band” used in the PI control function of the economizer actuator.
Econo PAT is an adjustable item which sets the “project ahead” used in the PI control function
of the economizer actuator.
38
McQuay OM 920
Keypad/Display Menu Structure
Econo Max Chg is an adjustable item that sets the maximum value for an increase or decrease
of the economizer actuator.
Flush Econo is an adjustable item used to initiate the waterside economizer flush mode
sequence.
Econo Diff is an adjustable item which sets a differential above the EconChgovrT parameter.
Economizer operation is disabled when the OA Temp parameter indicates a value above the
EconChgovrT= parameter by more than this differential.
Design Flow Setup Menu
Table 34: Design Flow Setup Menu
Menu Display Name
Item Display Name
Default Setting
Range
Password Level
Design Flow Setup
Des Flo DB=
DF Period=
Des Flo Gain=
DF Max Chg=
Design Flow=
LH Lvl Pos=
RH Lvl Pos=
3%
30s
0.1
5%
Yes
-
0-100%
0-999s
0.0-100.0
0-100%
Yes/No
0.00-100.00%
0.00-100.00%
4
4
4
4
4
4
4
Des Flo DB is an adjustable item which sets the “deadband” used in the control function that
modulates Min OA Pos parameter to maintain the OA Flow parameter at the MinOA Flow set
point when a unit is equipped with the optional DesignFlow outdoor airflow measuring
feature.
DF Period is an adjustable item which sets the “sampling time” used in the PI control function
that modulates the Min OA Pos parameter to maintain the OA Flow parameter at the MinOA
Flow set point when a unit is equipped with the optional DesignFlow outdoor airflow
measuring feature.
Des Flo Gain is an adjustable item which sets the “proportional band” used in the PI control
function that modulates the Min OA Pos parameter to maintain the OA Flow parameter at the
MinOA Flow set point when a unit is equipped with the optional DesignFlow outdoor airflow
measuring feature.
Des Flo Mx CH is an adjustable item which sets the “maximum step” used in the control
function that modulates the Min OA Pos parameter to maintain the OA Flow parameter at the
MinOA Flow set point when a unit is equipped with the optional DesignFlow outdoor airflow
measuring feature.
Design Flow is an adjustable item used to turn the optional DesignFlow outdoor airflow
measuring reset function on and off.
LH Lvl Pos is a status item which is used to calibrate the left-hand side (unit opposite drive
side) of the optional DesignFlow outdoor measuring apparatus. For details regarding
calibration of the DesignFlow apparatus, refer to the applicable model-specific installation and
maintenance manual.
RH Lvl Pos is a status item which is used to calibrate the right-hand side (unit drive side) of
the optional DesignFlow outdoor measuring apparatus. For details regarding calibration of the
DesignFlow apparatus, refer to the applicable model-specific installation and maintenance
manual
McQuay OM 920
39
Keypad/Display Menu Structure
Heating Setup Menu
Table 35: Heating Setup Menu
Menu Display Name
Item Display Name
Default Setting
Range
Password Level
Heating Setup
Htg DB=
Htg Period=
Htg Gain=
Htg PAT=
Htg Max Chg=
Stage Time=
OAT Htg Lock=
OAT Diff=
F&BP Method=
2.0d°F
60s
0.8
120s
10%
5min
55°F
2d°F
OpenVlv
4
4
4
4
4
4
4
4
4
F&BP ChgOvrT=
Warmup Period=
Heat Up Delay=
Hold Period=
37°F
240s
60s
240s
1.0-10.0°F
0-999s
0.0-100.0
0-999s
0-100%
2-60min
0-100°F
0-10°F
OpenVlv
ModVlv
0-60°F
0-999s
0-999s
0-999s
4
4
4
4
Htg DB is an adjustable item which sets a dead band around the discharge heating setpoint
parameter. For example, if the discharge heating setpoint parameter is set to 100ºF and the Htg
Db= parameter is set to 2ºF, the dead band around the set point would be from 101.0ºF to
99.0ºF.
Htg Period an adjustable item which sets the “sampling time” used in the PI control function
that modulates the heating valve.
Htg Gain is an adjustable item which sets the “proportional band” used in the PI control
function that modulates the heating valve.
Htg PAT is an adjustable item which sets the “project ahead” used in the PI control function
that modulates the heating valve.
Htg Max Chg is an adjustable item that sets the maximum value for an increase or decrease of
the heating valve position.
Stage Time is an adjustable item used to set a minimum time period between heating stage
changes.
OAT Htg Lock is an adjustable item which sets the high outdoor air temperature heating
lockout point. Heating operation is disabled when the outdoor air temperature sensor input
rises above this set point.
OAT Diff is an adjustable item which sets a differential below the OATHtg Lock parameter.
Heating operation is re-enabled when the outdoor air temperature sensor input falls below the
OATHtg Lock value by more than this differential.
F&BP Method is an adjustable item used to set the face and bypass control method. When a
unit equipped with steam or hot water and face and bypass damper, there are two methods
available for controlling the heating arrangement. These are the “Open Valve” and
“Modulating Valve” methods.
F&BP ChgOvrT is an adjustable item used to set the face and bypass changeover
temperature.
Warmup Period is an adjustable item which is used to set the amount of time the gas burner
will remain at a low fire position on 100% OSA units (default 240 seconds).
Heat Up Delay is an adjustable item which is used to set the amount of time the burner will
spend at its calculated position in order to heat up the heat exchanger prior to starting the fans
(default 60 seconds)on 100% OA units. Proper setting will result in discharge temperature that
is slightly above the low discharge alarm setting upon start up.
Hold Period is an adjustable item used to set the amount of time that the gas heating valve
remains at its calculated value on units equipped with 100% OA (default 240 seconds). This is
to allow the temperature to approach equilibrium with the modulating gas heating valve at a
fixed position.
40
McQuay OM 920
Keypad/Display Menu Structure
Dehumidification Setup Menu
Table 36: Dehumidification Setup Menu
Menu Display Name
Item Display Name
Default Setting
Range
Password Level
Dehum Setup
RH DB=
2%
0-10%
4
Dewpoint DB=
Reheat Period=
Reheat Gain=
Reheat PAT=
RH Max Chg=
RH Stg Time=
Dehum Method=
2°F
10s
1
20s
16%
10
None
4
4
4
4
4
4
4
Dehum Ctrl=
Occupied
Sensor Loc=
Return
2-10°F
0-999s
0.0-100.0
0-999s
0-100%
0-60m
None
Rel Hum
DewPt
Occupied
Always
Return
Space
OAT
Mn Lvg Coil T=
Mx Lvg Coil T=
Min Rheat Spt=
Max Rheat Spt =
RH Sens Type=
48.0°F
55.0°F
55.0°F
65.0°F
VDC
RH Min Signal=
0.0V
RH Max Signal=
10.0V
40.0-100.0°F
40.0-100.0°F
VDC
mA
0.0-20.0
V/mA
0.0-20.0
V/mA
4
4
4
4
4
4
4
4
4
RH DB is an adjustable item that sets a dead band around the relative humidity set point. For
example, if the RH Setpoint parameter is set to 50% and the RH Db parameter is set to 2% the
dead band around the set point would be from 49% to 51%.
Dewpoint DB is an adjustable item that sets a dead band around the dew point set point. For
example, if the DewPoint Spt parameter is set to 50ºF and the DewPntDb parameter is set to
2ºF the dead band around the set point would be from 49ºF to 51ºF.
Dehum Method is an adjustable item used to select whether dehumidification operation is
based on relative humidity or dew point.
Dehum Ctrl is an adjustable item used to select whether dehumidification as “always”
allowed or only during “occupied” modes of operation.
Sensor Loc is an adjustable item which is used to select the location of the humidity sensor.
The location is selected by setting the Sensor Location value on the keypad to Return, Space,
or OAT. The significance of the sensor location is that this determines which temperature
sensor is use to calculate the Dewpoint. OAT can only be selected for units with DAT control.
McQuay OM 920
41
Keypad/Display Menu Structure
Mn Lvg Coil T is an adjustable item which is used to set the minimum leaving coil
temperature (Default = 48°F).
Mx Lvg Coil T is an adjustable item which is used to set the maximum leaving coil
temperature (Default = 55°F).
Min Reheat Spt is an adjustable item which is used to set the minimum DAT during
dehumidification.
Max Reheat Spt is an adjustable item which is used to set the maximum DAT during
dehumidification.
Reheat Period is an adjustable item which sets the “sampling time” used in the PI control
function for controlling the reheat valve.
Reheat Gain is an adjustable item which sets the “proportional band” used in the PI control
function for controlling the reheat valve.
Reheat PAT is an adjustable item which sets the “project ahead” used in the PI control
function for controlling the reheat valve.
RH Max Chg an adjustable item that sets the maximum value for an increase or decrease for
controlling the reheat valve.
RH Stg Time is an adjustable item is an adjustable item which sets a stage time period
between the minimum and maximum cooling stages during dehumidification operation.
RH Sen Type is an adjustable item used to define the field supplied humidity sensor input
signal type.
RH Min Signal is an adjustable item used to define the minimum value of the field supplied
humidity sensor current or voltage signal.
RH Max Signal is an adjustable item used to define the maximum value of the field supplied
humidity sensor current or voltage signal.
Alarm Out Configuration Setup Menu
Table 37: Alarm Out Configuration Setup Menu
Menu Display Name
Item Display Name
Default Setting
Range
Password Level
Alarm Out Config
Faults=
Fast
4
Problems=
Slow
Warnings=
Off
On
Off
Fast
Slow
On
Off
Fast
Slow
On
Off
Fast
Slow
4
4
The digital alarm output indicates the alarm group that contains the highest priority active
alarm. This output is On when no alarms are active. The options for the action of this output
when an alarm in a group occurs are On, Fast Blink, Slow Blink, or Off. These can be edited
via the keypad/display. The default values for the three groups of alarms are:
• Warnings - Off
• Problems - Slow Blink
• Faults - Fast Blink
A user could eliminate any signal of a particular group of alarms through this output by
selecting On for that alarm group in the keypad/display.
42
McQuay OM 920
Keypad/Display Menu Structure
Alarm Limits Setup Menu
The Alarm Limits menu is used to set the limits of the discharge air temperature sensor and the
return air temperature sensor.
Table 38: Alarm Limits Setup Menu
Menu Display Name
Item Display Name
Default Setting
Range
Password Level
Alarm Limits
Hi Disch Temp=
Lo Disch Temp=
Hi Return Temp=
170°F
40°F
120°F
90-250°F
-50-50°F
90-150°F
4
4
4
Hi Disch Alm is an adjustable item that sets the high temperature limit for the DAT sensor.
When the discharge air temperature sensor reaches this set point the unit will go into the high
discharge air alarm.
Lo Disch Alm is an adjustable item that sets the low temperature limit for the DAT sensor.
When the discharge air temperature sensor reaches this set point the unit will go into the low
discharge air alarm.
Hi Return Alm= is an adjustable item that sets the high temperature limit for the return air
temperature. When the RAT sensor reaches this set point the unit will go into the high return
air temperature alarm.
McQuay OM 920
43
Keypad/Display Menu Structure
Manual Control Menu
The manual control of operation is a function that is used for operating the unit during a
service call only. The unit must not be operated in this mode for any extended period of time.
Table 39: Manual Control Manual
44
Menu Display Name
Item Display Name
Default Setting
Range
Password Level
Manual Control
Manual Ctrl=
Normal
4
Supply Fan=
Off
RF/EF VFD=
Off
SAF Spd Cmd=
RF/EF Spd Cmd=
OAD/Econo=
OAD OpCl=
0%
0%
0%
Close
Comp 1 =
Off
Comp 2 =
Off
Comp 3 =
Off
Comp 4 =
Off
Comp 5 =
Off
Comp 6 =
Off
Comp 7 =
Off
Comp 8 =
Off
CFan Outpt 1=
Off
CFan Outpt 2=
Off
CFan Outpt 3=
Off
BP/WR Valve=
CW Valve=
ECond VFD=
0%
0%
Off
ECFan Spd Cmd=
EC Drn Valve=
0%
Close
Sump Pump=
Off
Main Gas Vlv=
Close
Htg Valve=
F&BP Damper=
Htg Stg 1=
0%
0%
Off
Htg Stg 2=
Off
Htg Stg 3=
Off
Htg Stg 4=
Off
Normal
ManCtrl
Off
On
Off
On
0-100%
0-100%
0-100%
Close
Open
Off
On
Off
On
Off
On
Off
On
Off
On
Off
On
Off
On
Off
On
Off
On
Off
On
Off
On
0-100%
0-100%
Off
On
0-100%
Close
Open
Off
On
Close
Open
0-100%
0-100%
Off
On
Off
On
Off
On
Off
On
4
4
4
4
4
4
4
4
4
4
4
4
4
4
4
4
4
4
4
4
4
4
4
4
4
4
4
4
4
4
McQuay OM 920
Keypad/Display Menu Structure
Table 39: Manual Control Manual
Menu Display Name
Item Display Name
Default Setting
Range
Password Level
Manual Control
Htg Stg 5=
Off
4
Htg Stg 6=
Off
Reheat Valve=
Reheat Stage=
ERec Wheel=
0%
Off
Off
ER Whl Cmd=
ERBP Dmpr Cl=
0%
Off
ERBP Dmpr Op=
Off
Cond Wtr Pump=
Off
Alm Output=
Off
FanOp=
Off
Off
On
Off
On
0-100%
Off
Off
On
0-100%
Off
On
Off
On
Off
On
Off
On
Off
On
4
4
4
4
4
4
4
4
4
4
Manual Ctrl is an adjustable item that puts the unit into manual control. Major components of
the unit are turned on and off by this control. The units normal control sequences are
overridden in this state with the exception of all the “fault” alarms and the cooling circuit high
pressure and low pressure alarms.
Supply Fan is an adjustable item that turns on the supply fan.
RF/EF is an adjustable item that turns on the return/exhaust fan.
SAF Spd Cmd is an adjustable item only on VAV units that sets the speed of the supply air
fan.
RF/EF Spd Cmd is an adjustable item for units with VFD on the return/exhaust fans that set
the speed of the return/exhaust fan.
OAD/Econo is an adjustable item which is used to set the economizer damper position.
OAD OpCl is an adjustable item which is used to turn the OA damper output on. This output
is available only on self contained units.
Comp 1 OnOff is an adjustable item that turns on compressor #1.
Comp 2 OnOff is an adjustable item that turns on compressor #2.
Comp 3 OnOff is an adjustable item that turns on compressor #3.
Comp 4 OnOff is an adjustable item that turns on compressor #4.
Comp 5 OnOff is an adjustable item that turns on compressor #5.
Comp 6 OnOff is an adjustable item that turns on compressor #6.
Comp 7 OnOff is an adjustable item that turns on compressor #7.
Comp 8 OnOff is an adjustable item that turns on compressor #8.
CFan Outpt 1 an adjustable item that turns on the condenser fan output #1.
CFan Outpt 2 an adjustable item that turns on the condenser fan output #2.
CFan Outpt 3 an adjustable item that turns on the condenser fan output #3.
Note – Turning on any one of the compressors will automatically turn on the first condenser fan on
the circuit. Other condenser fans must be manually turned on to control the head pressure
of the unit. Refrigerant gauges must be connected to the unit for observation of the head
pressure in the manual control mode of operation. Additional condenser fans must be
turned on to maintain the head pressure.
BP/WR Valve is an adjustable item used to manually drive the bypass/water regulating valve
open and closed.
McQuay OM 920
45
Keypad/Display Menu Structure
CW Valve is an adjustable item used to manually drive the chilled water valve open and
closed.
ECond VFD is an adjustable item which is used to turn on/off the evaporative cooling
condenser fan VFD.
ECFan Spd Cmd is an adjustable item which is used to set the evaporative cooling condenser
fan VFD speed position.
EC Drn Valve is an adjustable item which is used to open/close the evaporative cooling drain
valve.
Sump Pump is an adjustable item which is used to turn on/off the evaporative cooling sump
pump.
Main Gas Vlv is an adjustable item used to manually turn the main gas valve output on/off.
Htg Valve is an adjustable item used to manually drive the modulating heating valve open and
closed.
F&BP Damper is an adjustable item used to manually drive the F&BP damper open and
closed.
Htg Stg 1 is an adjustable item that turns on the first stage of electric heat.
Htg Stg 2 is an adjustable item that turns on the second stage of electric heat.
Htg Stg 3 is an adjustable item that turns on the third stage of electric heat.
Htg Stg 4 is an adjustable item that turns on the fourth stage of electric heat.
Htg Stg 5 is an adjustable item that turns on the fifth stage of electric heat.
Htg Stg 6 is an adjustable item that turns on the sixth stage of electric heat.
Reheat Valve is an adjustable item used to manually drive the reheat valve open and closed.
Reheat Stage is an adjustable item that turns on the staged reheat output.
ERec Wheel is an adjustable item which is used to turn on/off the energy recovery wheel
output.
ERec Whl Cmd is an adjustable item is an adjustable item which is used to set the energy
recovery wheel VFD speed.
ERBP Dmpr Cl is an adjustable item which is used to close the energy recovery bypass
damper.
ERBP Dmpr OP is an adjustable item which is used to open the energy recovery bypass
damper.
Cond Wtr Pump is an adjustable item which is used to turn on/off the condenser water pump
output.
Alm Output is an adjustable item which is used to turn on/off the alarm output.
FanOp is an adjustable item which is used to turn on/off the FanOp output.
Note – When Manual Control is set to Yes, the Control Mode is set to Off so that the unit will not
restart automatically. When Manual Control is set to No all digital outputs in the Manual
Control menu are set to Off and all the analog outputs are set to 0.0% so that all outputs
are in the Off or minimum position when Manual Control is set to Yes.
46
McQuay OM 920
Keypad/Display Menu Structure
LON/BACnetIP/BACnetMSTP Setup Menu
See the Installation & Maintenance Manuals below for detailed instructions
IM 916
MicroTech III Rooftop unit controller - BACnet IP communications
IM 917
MicroTech III Rooftop unit controller - BACnet MSTP communications
IM 918
MicroTech III Rooftop unit controller - BACnet LON communications
Active Alarm Menu
All active alarms as well as the date and time that they were detected are displayed on the
Active Alarm menu. These alarms are displayed in order of group priority: Faults first,
Problems second, and Warnings last. Within each group, alarms are displayed in the order
that they were detected.
Table 40: Active Alarm Menu
Menu Display Name
Item Display Name
Default Setting
Range
Password Level
Active Alarms
Active Alm Count=
ClrAlms=
No
0-10
No
ClrFlts
ClrPrblms
ClrWrngs
ClrAllAlms
None
None
+Alarm 1:Alarm Type
+Alarm 2:Alarm Type
-
None
None
Alarm Log Menu
The last fifty alarms detected as well as the date and times that they were detected are
displayed on the Alarm Log menu. These alarms are displayed in the order that they were
detected. The alarm that was detected most recently is displayed first. Multiple occurrences of
the same alarm may appear.
Table 41: Alarm Log Menu
Menu Display Name
Item Display Name
Default Setting
Range
Password Level
Alarm Log
Log Alm Count=
ClrLog=
No
0-50
No
Yes
None
None
+Alarm 1:Alarm Type
+Alarm 2:Alarm Type
-
None
None
Note – Once an alarm is cleared there will be two entries in the Alarm Log. A (+) sign will be
shown next to the entry added when the alarm became active and a (-) sign will be shown
next to the entry added when the alarm has been cleared.
McQuay OM 920
47
Keypad/Display Menu Structure
Advanced Menus
The Advanced Menus should only be accessed by trained service personnel.
The Advanced Menus are menu items that are used to set up the unit for its specific
application. Accessing the Advanced Menus requires the operator to enter the four-digit level
2 password, (6363) using the keypad buttons located on the controller interface.
The following Menu items are meant to be used as a set up and/or troubleshooting tool and
should only be accesses by trained Service Technicians.
Table 42: Advanced Menus
Menu Display Name
Item Display Name
Advanced Menus
Unit Configuration
Save/Restore
LON Setup
BACnet MSTP Setup
BACnet IP Setup
Alarm Delays
Network Variables
Analog Input Status
Universal I/O Status
Digital Input Status
Digital Output Status
Adv Setup Settings
Adv Status Params
Unit Configuration Setup Menu
After the main control board application software is loaded into the MCB, it must be
“configured” for the specific control application. This consists of setting the value of 23
configuration variables within the MCB. These variables define things such as the type of
cooling, number of compressors and cooling stages and the type of heat. If all of these items
are not set appropriately for the specific unit, the unit will not function properly. The correct
settings for these parameters are defined for a given unit by the unit “Software Configuration
Code.”
The “Software Configuration Code” consists of a 26-character string of numbers and letters.
The code can be found on the Unit Software Identification Label located on the back side of
the control panel door. Only the first 23 characters of this code are used for software
configuration purposes.
The table shown on page ***(revise) lists the configuration code variables including the
position within the code, description of the parameter, and the applicable settings for each. The
default values are shown in bold font. The unit is configured at the factory however may also
be configured in the field by accessing the Unit Configuration Menu. Once changes have been
made to the Unit Configuration Menu, the Apply Changes flag must be changed from no to
yes in order for the controller to recognize the changes. Setting the Apply Changes flag to
YES will automatically rest the controller.
Table 43: Unit Configuration Menu
48
Configuration
Code Position
Description
Values (Default Bold)
RTU
SCU
1
Unit Type
•
•
2
Control Type
•
•
3
Cooling Type
0 = Rooftop (RTU)
1 = Self-Contained (SCU)
0 = Zone Control
1 = DAT Control
0 = None
1 = Compressorized Clg
2 = Chilled Water
3 = F&BP
•
•
McQuay OM 920
Keypad/Display Menu Structure
Table 43: Unit Configuration Menu
Configuration
Code Position
Description
Values (Default Bold)
RTU
SCU
4
Compressorized
Cooling
Configuration
•
•
5
Generic Condenser
Stages
Low Ambient
0 = None
1 = Generic Condenser
2 = 2Cmp/2Circ/3Stg
3 = 3Cmp/2Circ/4Stg
4 = 2Cmp/2Circ/2Stg
5 = 3Cmp/3Circ/3Stg_NoWRV
6 = 3Cmp/3Circ/3Stg_WRV
7 = 4Cmp/2Circ/4Stg
8 = 4Cmp/4Circ/4Stg_NoWRV
9 = 4Cmp/4Circ/4Stg_WRV
A = 6Cmp/2Circ/6Stg
B = 6Cmp/6Circ/6Stg_NoWRV
C = 6Cmp/6Circ/6Stg_WRV
1 – 8 Stages (default = 8)
0 = No
1 = Yes
0 = No Evap
1 = Evap _ No VFD
2 = Evap ABB
3 = Evap McQ21
0 = None
1 = Single Position 30%
2 = Single Position 100%
3 = Economizer Airside
4 = Economizer Waterside
0 = No Design Flow
1 = 018-030 (800)
2 = 036-040 (802)
3 = 045-075 (047)
4 = 080-135 (077)
0 = None
1 = F&BP Control
2 = Staged
3 = Modulated Gas, 3-1
4 = Modulated Gas 20-1
5 = Steam or Hot Water
1-8 Stages (Default = 1)
Three Digits (Default = 100)
0=Constant Volume
1=VFD/ABB
2=VFD/Graham
3=VFD/McQ21
4=VFD/McQ31
5=VFD/McQ61
0=CAV
1=RF_EF VFD/ABB
2=RF_EF VFD/Graham
3=RF_EF VFD/McQ21
4=RF_EF VFD/McQ31
5=RF_EF VFD/McQ61
6=PrpEx VFD/ABB
7=PrpEx VFD/Graham
8=PrpEx VFD/McQ21
9=PrpEx VFD/McQ31
A=PrpEx VFD/McQ61
B=None
•
6
McQuay OM 920
7
Evaporative
Condenser Control
8
Damper Type
9
Design Flow
10
Heating Type
11
12, 13, 14
15
Max Heating Stages
Max Heat Rise
Supply Fan Type
16
Return Fan Type
•
•
•
•
•
•
•
•
•
•
•
•
•
•
49
Keypad/Display Menu Structure
Table 43: Unit Configuration Menu
Configuration
Code Position
Description
Values (Default Bold)
RTU
17
Return/Exhaust Fan
Capacity Control
Method
•
18
Second Duct
Pressure Sensor
19
Entering Fan Temp
Sensor
20
Energy Recovery
21
Cooling Circuit Type
22
Head Pressure
Control
23
Bypass Valve Control
24, 25, 26
27
Unit Size
Refrigerant Type
28
HGRH Type
0 = None
1 = Tracking
2 = Building Pressure
3 = Position
0 = No
1 = Yes
0 = No
1 = Yes
0 = None
1=ConstSpdWhl
2=VarSpdWhl/Grhm
3=VarSpdWhl/McQ21
0 = Individual
1 = Dual Circ. Water Condenser
2 = Dual Circ. Air Condenser
0 = No
1 = Yes
0 = Slave
1 = Bypass
Three digits (default 050)
0 = R22
1 = R407C
2 = R410A
0 = None
1 = Staged
2 = Modulating
•
SCU
•
•
•
•
•
•
•
•
•
•
•
•
* Max Heat Rise represents positions 12, 13 and 14 of the Software Configuration Code.
Save/Restore Menu
The Save/Restore menu can be used to save or restore the user configured parameters as well
as reset the controller back to the factory default parameters.
Table 44: Save/Restore Menu
Menu Display Name
Item Display Name
Default Setting
Range
Password Level
Save/Restore
Save Params=
Rstr Params=
Rstr Factory=
No
No
No
No/Yes
No/Yes
No/Yes
2
2
2
Alarm Delays Setup Menu
The Alarm Delays Setup Menu can be accessed when a level 2 password has been entered.
The default settings are the result of many years of testing and should not be changed.
The Alarm Delay Setup Menu should only be accessed by trained service personnel.
Table 45: Alarm Delays Setup Menu
50
Menu Display Name
Item Display Name
Default Setting
Range
Password Level
Alarm Delays
OffHtClDelay=
Frz DelayTime=
LP Delay=
LP Comp Delay=
Aflw Ignr Tm=
Sens Alm Dly=
Temp Alm Dly=
120s
30s
2s
65s
120s
30s
30s
0-999s
0-180s
0-10s
0-300s
0-999s
0-300s
0-300s
2
2
2
2
2
2
2
McQuay OM 920
Keypad/Display Menu Structure
Analog Input Status Menu
The Analog Input Status Menu provides diagnostic information to qualified service personnel.
The items listed in this menu will provide current status information of the Units analog
inputs.
Table 46: Analog Input Status Menu
Menu Display Name
Item Display Name
Default Setting
Range
Password Level
Analog Input Status
MCB-AI1=
MCB AI2=
MCB AI3=
-
0-99999999
0-99999999
0-99999999
2
2
2
Universal I/O Status Menu
The Universal I/O Status Menu provides diagnostic information to qualified service personnel.
The items listed in this menu will provide current status information of the Universal inputs &
outputs.
Table 47: Universal I/O Status Menu
Menu Display Name
Item Display Name
Default Setting
Range
Password Level
Universal I/O Status
MCB X1=
MCB X2=
MCB X3=
MCB X4=
MCB X5=
MCB X6=
MCB X7=
MCB X8=
EMA X1=
EMA X2=
EMA X3=
EMA X4=
EMA X5=
EMA X6=
EMA X7=
EMA X8=
EMB X1=
EMB X2=
EMB X3=
EMB X4=
EMB X5=
EMB X6=
EMB X7=
EMB X8=
EMC X1=
EMC X2=
EMC X3=
EMC X4=
EMC X5=
EMC X6=
EMC X7=
EMC X8=
-
0-9999999
0-9999999
0-9999999
0-9999999
0-9999999
0-9999999
0-9999999
0-9999999
0-9999999
0-9999999
0-9999999
0-9999999
0-9999999
0-9999999
0-9999999
0-9999999
0-9999999
0-9999999
0-9999999
0-9999999
0-9999999
0-9999999
0-9999999
0-9999999
0-9999999
0-9999999
0-9999999
0-9999999
0-9999999
0-9999999
0-9999999
0-9999999
2
2
2
2
2
2
2
2
2
2
2
2
2
2
2
2
2
2
2
2
2
2
2
2
2
2
2
2
2
2
2
2
Universal I/O Status
McQuay OM 920
51
Keypad/Display Menu Structure
Digital Input Status Menu
The Digital Input Status Menu provides diagnostic information to qualified service personnel.
The items listed in this menu will provide current status information of the controller's digital
inputs.
Table 48: Digital Input Status Menu
Menu Display Name
Item Display Name
Default Setting
Range
Password Level
Digital Input Status
MCB DI1=
Off
2
MCB-DI2=
Off
MCB DI3=
Off
MCB DI4=
Off
MCB DI5=
Off
MCB DI6=
Off
Off
On
Off
On
Off
On
Off
On
Off
On
Off
On
2
2
2
2
2
Digital Output Status Menu
The Digital Output Status Menu provides diagnostic information to qualified service
personnel. The items listed in this menu will provide current status information of the
controller's digital outputs.
Table 49: Digital Output Status Menu
52
Menu Display Name
Item Display Name
Default Setting
Range
Password Level
Digital Out Status
MCB DO1=
Off
2
MCB DO2=
Off
MCB DO3=
Off
MCB DO4=
Off
MCB DO5=
Off
MCB DO6=
Off
Off
On
Off
On
Off
On
Off
On
Off
On
Off
On
2
2
2
2
2
McQuay OM 920
Keypad/Display Menu Structure
Table 49: Digital Output Status Menu
McQuay OM 920
Menu Display Name
Item Display Name
Default Setting
Range
Password Level
Digital Out Status
MCB DO7=
Off
2
MCB DO8=
Off
MCB DO9=
Off
MCB DO10=
Off
EMA DO1=
Off
EMA DO2=
Off
EMA DO3=
Off
EMA DO4=
Off
EMA DO5=
Off
EMA DO6=
Off
EMB DO1=
Off
EMB DO2=
Off
EMB DO3=
Off
EMB DO4=
Off
EMB DO5=
Off
EMB DO6=
Off
EMC DO1=
Off
EMC DO2=
Off
EMC-DO3=
Off
EMC-DO4=
Off
EMC DO5=
Off
EMC DO6=
Off
Off
On
Off
On
Off
On
Off
On
Off
On
Off
On
Off
On
Off
On
Off
On
Off
On
Off
On
Off
On
Off
On
Off
On
Off
On
Off
On
Off
On
Off
On
Off
On
Off
On
Off
On
Off
On
2
2
2
2
2
2
2
2
2
2
2
2
2
2
2
2
2
2
2
2
2
53
Keypad/Display Menu Structure
Adv Setup Settings Menu
The Advanced Setup Settings Menu should only be accessed by trained service
personnel.
The Advanced Setup Settings Menu can be accessed when a level 2 password has been
entered.
Table 50: Adv Setup Settings Menu
54
Menu Display Name
Item Display Name
Default Setting
Range
Password Level
Adv Setup Settings
0-30% OA Max =
Des Clg Spd=
Unocc Diff=
Service Time=
DLS Strt Mon=
30%
100%
3d°F
20s
Mar
2
2
2
2
2
DLS Strt Wk=
2ndWeek
DLS End Mon=
Nov
DLS End Week=
1stWeek
DLS Active=
Gas Derate V=
Max Purge Hld
Rapid Start=
Yes
10V
Rapid Start Tm=
Name
RH Sens Type
RH Min Signal
RH Min Signal
10min
POL687 ******
VDC
0.0V
10.0V
0-100%
0-100%
0-10d°F
0-300s
Jan
Feb
Mar
Apr
May
Jun
Jul
Aug
Sep
Oct
Nov
Dec
1stWeek
2ndWeek
3rdWeek
4thWeek
5thWeek
Jan
Feb
Mar
Apr
May
Jun
Jul
Aug
Sep
Oct
Nov
Dec
1stWeek
2ndWeek
3rdWeek
4thWeek
5thWeek
Yes/No
0-10V
10-180s
No
Yes
0-20min
No
VDC/mA
0.0-20V/mA
0.0-20V/mA
2
2
2
2
2
2
2
2
2
2
2
2
McQuay OM 920
Keypad/Display Menu Structure
Adv Status Parameters Menu
The Advanced Status Parameters Menu provides diagnostic information to qualified service
personnel. The items listed in this menu will provide current status information which may be
used to diagnose system performance issues.
Table 51: Adv Status Parameters Menu
McQuay OM 920
Menu Display Name
Item Display Name
Default Setting
Range
Password Level
Adv Status
PA Temp=
VAVBox Out=
DuctPress1=
DuctPress2=
DT Above Spt=
DT Below Spt=
Intersect Pt=
SF MB Status=
RF MB Status=
ER MB Status=
EC MB Status=
-
Heat/Cool
0.0-5.0in
0.0-5.0in
0-250
0-250
-50.0-150.0°F
Fault/OK
Fault/OK
Fault/OK
Fault/OK
2
2
2
2
2
2
2
2
2
2
2
55
Alarms
Alarms
Alarms provide the user with information about abnormal conditions that affect unit operation.
The cause of the alarm should be investigated and eliminated before the unit or any disabled
equipment in it is placed back into service.
Faults are conditions that are serious enough to shut down the unit. The alarm must be
manually cleared to allow unit operation.
Problems are conditions that result in some limitation of unit operation, but the unit is allowed
to continue to operate. Some of these alarms must be cleared manually, but others clear
automatically.
Warnings inform the user of conditions that should be addressed, but do not limit operation in
any way. The alarm condition needs to be fixed and the alarm must be manually cleared to
cause this alarm to no longer be active.
All active alarms as well as the date and time that they were detected are displayed on the
Active Alarm menu. These alarms are displayed in order of priority. Higher priority alarms are
displayed first. The last fifty alarm “events” detected as well as the date and times that they
were detected are displayed on the Alarm Log menu. An alarm “event” is either an alarm
becoming active or being cleared. A “+” symbol precedes the active alarm event and a “”symbol precedes the cleared alarm event. These alarms are displayed in the order that they
were detected. The alarm that was detected most recently is displayed first. Multiple
occurrences of the same alarm may appear.
Alarm Clearing
Active alarms can be cleared through the keypad/display or a BAS network. Alarms are
automatically cleared when power is cycled. Alarms are cleared only if the conditions required
to initiate the alarm do not exist. All alarms and groups of alarms can be cleared via the
network or keypad by setting the ClearAlms variable to a non-zero value as indicated in the
table below.
Note – The enumeration text is what shows up on the keypad/display not the number. The value
of this variable automatically reverts to zero when the alarms are cleared. This variable
may be set through the keypad at the end of the Active Alarm menu. It may be set via LON
using nviClearAlarms and via BACnet using the ClearAlarms object.
Table 52: Alarm Clearing
Value
Action
0
1
2
3
4
None
Clear All Faults
Clear All Problems
Clear All Warnings
Clear All Alarms
Warnings
Dirty Filter
If the pressure drop across the filter section in the unit exceeds the setting of the differential
pressure switch the Dirty Filter warning occurs. When the Dirty Filter warning occurs, unit
operation is not affected. The Dirty Filter warning must be manually cleared through the unit
keypad or via a network signal.
Airflow Switch
If the unit has been in the Off operating state for at least thirty minutes and the PC7 airflow
switch input to the main controller indicates airflow, the Airflow Switch warning occurs. This
normally indicates a problem with the PC7 airflow switch. When the Airflow Switch warning
occurs, unit operation is not affected. When the alarm condition is corrected, the Airflow
Switch warning must be manually cleared through the unit keypad or via a network signal.
56
McQuay OM 920
Alarms
Conductivity
If the unit is equipped with a Dolphin system and the Conductivity value rises above the alarm
setpoint value, the conductivity alarm occurs. When the alarm condition is corrected, the
conductivity warning must be manually cleared through the unit keypad or via a network
signal.
Problems
No Water Flow Problem (Self Contained only)
When a unit is equipped with a water flow switch WFS, the No Water Flow problem occurs
when lack of water flow is indicated by an open water flow switch or a network signal and all
of the following conditions are true:
• Lack of water flow is indicated by an open water flow switch or a Network signal AND
• Either of the following is true: AND
• The Bypass Valve has been opened greater than 50% for more than the Bypass Valve Timer
• A water side economizer is installed and its position is greater than 50%
• Unit is not in the Off, Start or Recirc operating state
When the No Water Flow problem occurs, the unit continues to operate however cooling
provided by compressors disabled. When the alarm condition is no longer present, the No
Water Flow problem automatically clears and normal unit operation resumes.
Water Regulating Valve Problem (Self Contained only)
When a unit is equipped with the head pressure control option, the Water Regulating Valve
Problem occurs when the greater of the two refrigerant pressure readings drops below the head
pressure setpoint by more than the deadband while at least one compressor is operating and
the entering water temperature is less than 58°F. These conditions have to be true for more
than 5 minutes for the alarm to become active. When the Water Regulating Valve problem
occurs, the unit continues to operate but mechanical cooling is disabled. Mechanical cooling
remains disabled until the Water Regulating Valve problem is manually cleared through the
unit keypad or via a network signal.
Low Pressure - Circuit 1, 2, 3,4,5,6
When a unit is equipped with individual cooling circuits, the Low Pressure Circuit 1 problem
occurs when the compressor on circuit #1 has been running longer than the low pressure alarm
delay (65 seconds factory default) and the low pressure switch LP1 remains open. The alarm
also occurs any time afterward if the low pressure switch opens up while the compressor on
the circuit is running. Note: The Low Pressure Circuit 2, 3, 4, 5, & 6 problems occur in the
same manner for cooling circuits 2, 3,4,5,6. Compressor #1 (2, 3, 4, 5 or 6) remains disabled
for at least one cooling stage time period. After the cooling stage time period expires, the
alarm automatically clears and the circuit is re-enabled. If the alarm occurs three times
between 2:00 a.m. of one day and 2:00 a.m. of the next, the alarm does not automatically clear
the third time but must be manually cleared through the unit keypad or via a network signal.
High Pressure - Circuit 1, 2, 3, 4, 5, 6
This alarm occurs on units equipped with compressorized cooling only. If the high pressure
switch opens indicating a high refrigerant pressure situation, the High Pressure Circuit 1, 2,
3,4,5,6 problems occurs.
When the High Pressure Circuit 1, 2, 3,4,5,6 problem occurs, the unit continues to operate but
cooling circuit is disabled. Note: The Circuit remains disabled until the high pressure switch
closes and the High Pressure Circuit 1 problem is manually cleared through the unit keypad or
via a network signal.
McQuay OM 920
57
Alarms
Sump Pump Fail
On evaporative cooling units if the sump pump is turned on but the pump status input remains
open after the Sump Pump Delay (default 30 seconds), the pump is turned off and cooling
remains off for one cooling stage time period before the controller tries again. If this condition
occurs three times between 2:00 AM of one day and 2:00 AM of the next day, the Sump Pump
Fail problem occurs. Mechanical cooling remains disabled until the Sump Pump Fail problem
is manually cleared through the unit keypad or via a network signal.
Entering Fan Temperature/Leaving Coil Temperature Sensor Problem
This alarm occurs when the Entering Fan Temperature/Leaving Coil Temperature sensor is
present and either shorted or open circuited for longer than the Sensor Alarm Delay (Default =
30 seconds). When this alarm occurs the unit continues to operate however dehumidification
operation is disabled until the sensor becomes reliable. The maximum DAT limit function
associated with Gas or Electric heat is also disabled until the sensor becomes reliable.
Return Air Sensor Problem
If the return air temperature sensor (RAT) is present and either shorted or open circuited for
longer than the Sensor Alarm Delay (default is 30 seconds), the Return Air Sensor problem
occurs. When the RAT Sensor problem occurs, the unit continues to operate with the following
modifications:
• Cooling Reset and Heating Reset revert to none if they are set to Return
• Control temperature source reverts from return to space if a space temperature sensor is
present and reliable
When the alarm condition is no longer present, the RAT Sensor problem automatically clears.
Space Sensor Problem
If the Space Sensor Present setting is set to Yes, a valid Space Temperature value is not
provided via a network signal and the local space sensor is shorted or open circuited longer
than the Sensor Alarm Delay (default is 30 seconds), the Space Temperature Sensor problem
occurs. When the Space Temperature Sensor problem occurs, the unit continues to operate
with the following modifications:
• Cooling Reset and Heating Reset revert to none they are set to Space
• Control Temperature Source reverts from space to return if a return air sensor is present and
reliable.
When the alarm condition is no longer present, the Space Temperature Sensor problem
automatically clears.
OAT Sensor Problem
If the outside air temperature sensor (OAT) is present, a valid OAT value is not provided via
the network and the OAT sensor is either shorted or open circuited for longer than the Sensor
Alarm Delay (default is 30 seconds), the Outside Air Sensor problem occurs. When the OAT
Sensor problem occurs, the unit continues to operate with the following modifications:
• Heating is not locked out due to High OAT
• Cooling is not locked out due to Low OAT
• Cooling Reset and Heating Reset revert to none if they are set to OAT
• Economizer is locked out due to high OAT
When the alarm condition is no longer present, the OAT Sensor problem automatically clears.
58
McQuay OM 920
Alarms
Entering Water Temperature Sensor Problem
If the entering water temperature sensor (EWT) is present and either shorted or open circuited
for longer than the Sensor Alarm Delay (default is 30 seconds), the EWT Sensor problem
occurs. When the EWT Sensor problem occurs, waterside economizer cooling is disabled.
Mechanical cooling is not locked out based on EWT. When the alarm condition is no longer
present, the EWT Sensor problem automatically clears.
Mixed Air Temperature Sensor Problem
If the Mixed Air Temperature Sensor (MAT) is present and either shorted or open circuited for
longer than the Sensor Alarm Delay (default is 30 seconds), the MAT Sensor problem occurs.
When the MAT Sensor problem occurs, waterside economizer cooling is disabled. When the
alarm condition is no longer present, the MAT Sensor problem automatically clears.
Freeze Problem
When a unit is equipped with a waterside economizer, chilled water, hot water, or steam coil,
the Freeze problem occurs when the optional freezestat contacts open as a result of detecting
an abnormally low water or steam coil temperature while the fans are off.
When the Freeze problem occurs, the controller opens the waterside economizer valve, chilled
water and heating valves and set a 10-minute timer. If the unit is equipped with a waterside
economizer, the pump output is also turned on. When the 10-minute timer expires, the
controller checks the freezestat input again. If the freezestat contacts are closed the pump
output is de-energized and the valves close. If the freezestat contacts are still open the pump
output remains energized, the valves remain open, and the 10-minute timer resets. This
continues while the unit remains off. Whenever the freezestat closes the Freeze problem
automatically clears. This feature protects the coil(s) and allows the system to start normally
when an occupied command is received.
Fan Retry Problem
On units equipped with a discharge fan VFD, the Fan Fail fault only occurs if the Fan Retry
problem described below has first occurred twice within the previous twenty-four hour period.
The conditions that cause the Fan Retry problem and the action taken are the same as for the
Fan Fail fault with the difference being that the Fan Retry alarm is an automatically clearing
alarm once the unit is shut off. This allows the unit to attempt to restart up to three times
within a twenty-four hour period.
The Fan Retry conditions are:
• The Supply Fan is controlled by a VFD
• No Faults that would shut down the unit are active
• Airflow Switch is Open AND the duct static pressure is less than half of the Duct Static
Pressure Setpoint
• The Supply Fan has been on for longer than the Airflow Timer (Default =120 seconds)
• The unit is not in Post Heat Operation and has not been in Post Heat Operation for longer
than 120 seconds. This means that this alarm is disabled during and after post heat operation
The Fan Fail alarm is initiated if these conditions are encountered three times between 2:00
am of one day and 2:00 am the following day. If the Fan Fail alarm is then cleared, the process
may be repeated so that the unit may be shut down up to three more times.
McQuay OM 920
59
Alarms
Faults
Airflow Fault
If differential pressure switch PC7 fails to detect airflow for longer than the airflow timer
(default = 120 seconds) after the unit leaves the Startup operating state or any time afterward,
while the unit is running, the Fan Fail fault occurs. When the Fan Fail fault occurs, the unit is
shut down. It remains shut down until the Fan Fail fault is manually cleared through the unit
keypad or via a network signal. On units equipped with a discharge fan VFD, the Fan Fail
fault only occurs if the Fan Retry problem described above has first occurred twice within the
previous twenty-four hour period. The conditions that cause the Fan Retry problem and the
action taken are the same as for the Fan Fail fault with the difference being that the Fan Retry
alarm is an automatically clearing alarm once the unit is shut off. This allows the unit to
attempt to restart up to three times within a twenty-four hour period.
Note – There is no Fan Retry function or three retry function when a unit has a CAV supply fan.
Low Discharge Air Temperature
If the unit is not in the Mechanical Cooling State and the Discharge Air Temperature is less
than the Low Discharge Temperature Limit (Default = 40°F) for longer than 30 seconds and
the supply fan has been on for longer than the LowDAT temperature alarm delay (Default = 6
minutes), the Low Discharge Air Temperature fault occurs. When the Low Discharge Air
Temperature fault occurs, the unit is shut down. It remains shut down until the Low Discharge
Air Temperature fault is manually cleared through the unit keypad or via a network signal.
High Discharge Air Temp
If the Discharge Air Temperature is greater than the High Discharge Temperature Limit
(Default = 170°F) and the supply fan has been on for longer than the temperature alarm delay
(Default = 30 seconds), the High Discharge Air Temperature fault occurs. When the High
Discharge Air Temperature fault occurs, the unit is shut down. It remains shut down until the
High Discharge Air Temperature fault is manually cleared through the unit keypad or via a
network signal.
High Return Air Temp
If the Return Air Temperature is greater than the Return Air Temperature Limit (Default =
120°F) and the supply fan has been on for longer than the temperature alarm delay (Default =
30 seconds), the High Return Air Temperature fault occurs. When the High Return Air
Temperature fault occurs, the unit is shut down. It remains shut down until the High Return
Air Temperature fault is manually cleared through the unit keypad or via a network signal.
Duct High Limit Fault
If the unit is Variable Air Volume, the contacts of the duct high pressure limit control (DHL)
open, and the Unit State is not Off or Startup, the Duct High Limit fault occurs. When the Duct
High Limit fault occurs, the unit is shut down. The unit remains shut down until the Duct High
Limit fault is manually cleared through the unit keypad or via a network signal.
Discharge Air Sensor Fault
If the discharge air temperature sensor (DAT) is open or short circuited for longer than the
Sensor Alarm Delay (Default= 30 seconds), the Discharge Air Sensor fault occurs. When the
Discharge Air Sensor fault occurs, the unit is shut down. It remains shut down until the
Discharge Air Sensor fault is manually cleared through the unit keypad or via a network
signal.
60
McQuay OM 920
Alarms
Control Temperature Fault
If the temperature sensor (ZNT1, RAT, OAT, MAT) selected as the Control Temperature
source is not reliable for longer than the Sensor Alarm Delay (Default= 30 seconds), a Control
Temperature Fault occurs. When the Control Temperature Fault occurs, the unit is shut down.
It remains shut down until the Control Temperature Fault is manually cleared through the unit
keypad or via a network signal.
Emergency Stop Fault
An Emergency Stop Fault will occur if either of the following conditions is true:
• Emergency Stop Input in the Alarm (Open) condition
• The Net Emrg Ovrd input is set to Off via a network signal or the keypad/display
Freeze Fault
When a unit is equipped with a waterside economizer, chilled water, hot water, or steam coil,
the Freeze Fault occurs when the optional freezestat contacts open as a result of detecting an
abnormally low water or steam coil temperature while the fans are running.
When the Freeze fault occurs, the controller shuts down the fans, opens the chilled water,
economizer, and heating valves and set a 10-minute timer. If the unit is equipped with a
waterside economizer, the pump output is also turned on. When the 10-minute timer expires,
the controller checks the freezestat input again. If the freezestat contacts are closed the pump
output is de-energized and the valves close. If the freezestat contacts are still open the pump
output remains energized, the valves remain open, and the 10-minute timer resets. This
continues until the fault is manually cleared through the keypad or via a network signal.
Note – Water valves remain open and Pump output remains on for 10 minutes after alarm
conditions disappear.
McQuay OM 920
61
Operator’s Guide
Operator’s Guide
The following “Operator's Guide” sections provide information regarding the day-to-day
operation of the MicroTech III Unit Controller. Topics covered are such common tasks as
scheduling, displaying and clearing alarms, and setting the controller for manual operation.
Figure 6: State Diagram
The transition from any operating state to another is graphically represented in this figure.
With a “start up” command from an Off State the unit will always go into the “Start Up” state
of operation for 3 minutes (adjustable). Next, it will transition into the “Recirculation” state of
operation for another 3 minutes (adjustable) before finally going into the Fan Only state of
operation. Then, based on sensor inputs it will go into any of the 4 remaining states of
operation - heating, cooling, economizer, or minimum discharge air heating.
Determining Unit State
The unit will operate in one of eight operating states. The current state will be displayed by the
Unit State parameter in the system summary menu.
In the Off State, all heating, cooling, and fans are off. The alarm output indicates the type of
alarm, if any, that is active.
62
McQuay OM 920
Operator’s Guide
In the Start Up state, the optional Fan Operation input is turned on to allow shut off dampers
to be opened before any the Supply Fan is turned on. A Fan Op/VAV output may be selected as
either the Fan Operation output or the VAV output via the keypad. The parameter is adjustable
via the following path: Extended Menus/Unit Setup/VAV/FanOut. The outdoor dampers
remain closed.
The Supply Fan is turned on when the unit enters the Recirculation state. The supply fan in
VAV units is controlled as described in the Supply Fan Capacity Control section. The outdoor
dampers remain closed.
A separate Morning Warm-up State is not provided, but an edited ZeroOATime is used to keep
the Outside Air damper closed when the unit first starts. The parameter is adjustable via the
following path: Extended Menus/Timer Settings/Zero OA Time.
The Minimum OA Position is set to zero as long as the as the fan has been on for less than the
ZeroOATime. This allows the Return Air type units to cool down the space with mechanical
cooling or to warm up the space with the dampers closed. If the ZeroOATime is set correctly,
the OA dampers will be open only during occupied periods. When Optimum Start is used Zero
OA Time is set equal to the time to occupancy when the unit starts so that the OA dampers
will open at occupancy time.
Neither heating nor cooling is provided when the unit is in the Fan Only state. The outdoor
dampers are opened to the minimum position in this state when the Fan On Time exceeds the
Zero OA Time.
In the other four states, temperature is controlled as describe in the appropriate sections of this
document. These states are Minimum DAT, Heating, Economizer, and Cooling. The outdoor
dampers are opened to at least the minimum position in these states when the Fan On Time
exceeds the Zero OA Time.
Off Operating State
In the OFF operating state there are five different reasons that explain the reason for the Off
status. If the controller is set to off for any reason the unit is shut down. The fans are off, the
outside air dampers are closed and any VFD's are driven to 0%. Cooling and heating are
disabled.
OFF Manual
The unit operating state is Off Manual when the Control Mode is set to OFF via the keypad.
The Control Mode can only be changed via the System menu.
OFF Manual Control
The unit operating state is Off manual control when the controller is set to manual control via
the Manual Control menu.
OFF Network
The unit operating state is Off Network when the control mode is set to Auto via the keypad
System menu, and the network Net App Mode is set to off.
OFF Alarm
The unit operating state is Off Alarm when an active alarm of the “fault” type has the unit
shutdown.
McQuay OM 920
63
Operator’s Guide
OFF Fan Retry
The unit operating state is Off Fan Retry when The Fan Retry conditions below indicate that
the unit should be shutdown and restarted after airflow is lost.
• The supply fan is controlled by a VFD
• The airflow switch (PC7) is open AND the duct static pressure is less than ½ the duct static
pressure setpoint
• There are no active faults that would shut down the unit.
Note – The unit may also be in the off operating state if any of the following are true:
• The unit is not enabled
• The unit is in the unoccupied mode and not configured for or requiring unoccupied
operation.
Start Up Operating State
When a unit is commanded to start it will always enter the Startup operating state from the Off
operating state. The unit remains in the Startup operating state for an adjustable time period
(default 180 seconds) before entering the Recirculating operating state. The parameter is
adjustable via the following path: Extended Menus/Timer Settings/Start Up.
During the Start up operating state the fans remain off, the outdoor air dampers are driven
closed, and VFD's remain at 0%. Cooling and heating are disabled.
Recirculating Operating State
Units with return air always enter the Recirculating operating state after the completion of the
Startup operating state. In the Recirculating operating state fans are started and operate while
the outdoor air dampers remain closed. This allows temperature conditions throughout the unit
and space to equalize before temperature control begins. Cooling and heating remain disabled.
The unit remains in the Recirculating operating state until the Recirculate State Timer (default
180 seconds) expires. This timer is adjustable from 0 to 30 minutes via the following path:
Extended Menus/Timer Settings/Recirculate.
Note – 100% outdoor air units do not transition through the Recirculating operating state.
Fan Only
The unit enters the Fan Only operating state after the recirculation timer expires. Units
configured for 100% outside air operation will transition directly from the Start up operating
state into the Fan Only operating state. Once entering the Fan Only state of operation the unit
will then, based on sensor inputs transition into any of the 4 remaining states of operation heating, cooling, economizer, or minimum discharge air heating.
Min DAT
If heating is enabled and there is no heating load (normally FanOnly operating state), the
controller activates the units heating equipment as required to prevent the discharge air
temperature from becoming too cool if the Min DAT Control Flag is set to yes via the Heating
menu (Standard Menus/Heating/Min DAT Ctrl). The unit enters the Min DAT operating state
during occupied operation when neither cooling nor heating is required based on the heat/cool
changeover function but the discharge temperature falls below a minimum discharge
temperature limit. If the discharge air temperature falls below the this minimum discharge
temperature limit by more than half the discharge heating deadband, the unit operating state
changes from Fan Only to Min DAT.
Note – On VAV or CAV discharge control units, the DAT cooling setpoint parameter in the Cooling
menu acts as the minimum discharge temperature limit. On CAV zone control units the Min
DAT Limit parameter in the Heating menu acts as the minimum discharge temperature
limit.
64
McQuay OM 920
Operator’s Guide
Heating
The unit enters the Heating operating state when the Control Temperature falls below the zone
heating setpoint by more than ½ the zone heating deadband. During the Heating operating
state, the outdoor air dampers are either 100% open if the unit is a 100% outdoor air unit or
controlled to the minimum outside air position. Cooling is disabled.
Economizer
If the unit is equipped with a 0-100% modulating economizer (waterside or airside) and the
conditions are suitable for free cooling, the unit attempts to satisfy the cooling load by using
either outdoor air or the waterside economizer before using mechanical cooling.
If the unit is configured for Zone Temperature Control the transition to economizer operation
will occur if all the following are true:
• The Control Temperature rises above the zone cooling setpoint by more that ½ the zone
cooling high deadband
• The discharge air temperature is greater than the Min DAT limit by more than ½ the DAT
heating deadband. This will prevent more cold air from being brought in when the DAT is
already cold
• The economizer operation is not disabled
If the unit is configured for Discharge Air Temperature Control the transition to Mechanical
cooling will occur if all the following are true:
• The Control Temperature rises above the zone cooling setpoint by more that ½ the zone
cooling deadband
• The discharge air temperature is greater than the DAT cooling setpoint by more than ½ the
DAT cooling deadband
• Post heat operation is complete
• Economizer operation is not disabled
Mechanical Cooling
The unit enters the mechanical cooling operating state when cooling is required and the
economizer is disabled, not present, or already fully open.
If the unit is configured for Zone Temperature Control the transition to Mechanical cooling
will occur if all the following are true:
• The control temperature rises above the zone cooling setpoint by more that ½ the zone
cooling deadband
• The discharge air temperature is greater than the Min DAT limit by more than ½ the DAT
heating deadband. This will prevent more cold air from being brought in when the DAT is
already cold
• The economizer operation is disabled or not present
If the unit is configured for Discharge Air Temperature Control the transition to Mechanical
cooling will occur if all the following are true:
• The control temperature rises above the zone cooling setpoint by more that ½ the zone
cooling deadband
• The discharge air temperature is greater than the DAT cooling setpoint by more than ½ the
DAT cooling deadband
• Post heat operation is complete
• Economizer operation is disabled
McQuay OM 920
65
Operator’s Guide
Determining Unit Status
Unit Status is a status only item which indicates whether or not the unit is enabled and if not
why. The current Unit Status can be viewed via the following path: Standard
Menu/System/Unit Status.
Enabled
Unit operation has not been disabled for any of the following reasons.
OFF Manual
The unit operating state is Off Manual when the control mode is set to OFF via the keypad.
The control mode can only be changed via the System menu on the keypad/display.
OffManCtrl
The unit operating state is Off manual control when the controller is set to manual control via
the Manual Control menu.
OFF Network
The unit operating state is Off Network when the control mode is set to Auto via the System
menu and the network Net App Mode is set to Off.
OFF Alarm
The unit operating state is Off Alarm when an active alarm of the “fault” type has the unit
shutdown.
Off Fan Retry
The unit operating state is Off Fan Retry when The Fan Retry conditions below indicate that
the unit should be shutdown and restarted after airflow is lost.
• The supply fan is controlled by a VFD
• The airflow switch (PC7) is open AND the duct static pressure is less than ½ the duct static
pressure setpoint
• There are no active faults that would shut down the unit
Determining Control Mode
The unit cooling and heating can be set up for automatic heat/cool, cool only, heat only, fan
only, or network cool/heat operation by setting the Control Mode via the following path:
Standard Menu/System/Ctrl Mode. The unit can also be manually disabled via the Control
Mode. The following are descriptions of the six available Control Mode selections.
Off
When the Control Mode is set to “Off,” the Unit Status is “Off Man” and the unit is
completely disabled.
Heat Only
When the Control Mode is set to “Heat Only,” heating operation is allowed to operate to
maintain the heating set points. Cooling operation is disabled (Cooing Status is “Off Man”).
Cool Only
When the Control Mode is set to “Cool Only,” cooling operation is allowed to operate to
maintain the cooling set points. Heating operation is disabled (Heating Status is “Off Man”).
Fan Only
When the Control Mode is set to “Fan Only,” the fans are allowed to operate but cooling and
heating operation is disabled (Cooling Status and Heating Status are “Off Man”).
66
McQuay OM 920
Operator’s Guide
Heat Cool
When the Control Mode is set to “Heat/Cool,” both cooling and heating operation are allowed
to operate as required to maintain the cooling and heating set points.
Auto
When the Control Mode is set to “Auto,” the heat/cool, cool only, heat only, and fan only
decision is determined by the network application mode parameter, which is set via a network
signal as described below. The NetApp Mode parameter has no effect on unit operation unless
the Control Mode is set to “Auto.”
Determining Cooling Status
Clg Status is a status item which indicates whether or not mechanical cooling is currently
allowed. If cooling is disabled, the reason is indicated. The current Cooling Status can be
viewed via the following path: Standard Menu/System/Clg Status.
The following are descriptions of cooling status states.
Enabled
Mechanical cooling is enabled if all the following are true:
• Cooling capability is provided
• Control mode is not set via the System Menu to fan only or heat only
• Control mode is set via the System Menu to auto and not disabled via a network command
• The outdoor air temperature (OAT) on air cooled units or the entering water temperature
(EWT) on water cooled units is high enough for operation
• Compressor operation is not disabled by an alarm condition
None
Cooling capability is not provided.
Off Ambient
The outdoor air temperature (OAT) on air cooled units or the entering water temperature
(EWT) on water cooled units is too low for operation.
The OAT becomes too low for operation when it drops below the OAT cooling lockout setting.
OAT becomes high enough for operation when it rises above the OAT cooling lockout setting
by more than 2°F (adjustable - OAT Diff).
Note – The OAT cooling lockout cannot be set lower than 40°F when the unit is equipped with an
evaporative condenser and should not be set lower than 50°F unless the unit is equipped
with low ambient capability. The EWT becomes too low for operation when it drops below
the minimum EWT set point. EWT becomes high enough for operation when it rises above
the minimum EWT set point by more than 2°F (adjustable - Econo Diff).
Off Alarm
The compressor operation is disabled by an alarm condition. This happens when either all
circuits are disabled by either a high or low pressure alarm, when applicable the water flow
switch alarm is active, when applicable sump pump fail alarm is active or applicable water
regulating valve alarm is active.
Off Network
Control mode is set via the keypad to auto and cooling is disabled via a network command.
Off Manual
Control mode is set to Fan Only or Heat Only via the System menu.
McQuay OM 920
67
Operator’s Guide
Determining Heat Status
Htg Status is a status item which indicates whether or not heating is currently allowed. If
heating is disabled, the reason is indicated. The current Heat Status can be viewed via the
following path: Standard Menu/System/Htg Status.
The following are descriptions of heating status states:
Enabled
Heating is enabled if all the following are true:
• Heating capability is provided
• Control mode is not set via the System Menu to fan only or cool only
• Control mode is set via the System Menu to auto and not disabled via a network command
• The outdoor air temperature (OAT) is low enough for operation
None
Heating capability is not provided.
Off Ambient
The OAT is too high for operation. The OAT becomes too high for operation when the OAT
rises above the OAT heating lockout set point. OAT becomes low enough for operation when
the OAT drops below the OAT heating lockout set point by more than the Heating Lockout
Differential.
Off Network
Control Mode is set via the System Menu to auto and the unit is disabled via a network
command.
Off Manual
Control mode is set to Fan Only or Cool Only via the System menu.
Determining Economizer Status
Econo Status is a status item which indicates whether or not economizer operation is currently
allowed. If economizer operation is disabled, the reason is indicated. The current Economizer
Status can be viewed via the following path: Standard Menu/System/Econo Status.
The following are descriptions of economizer status states.
Economizer is enabled if all the following are true:
• Economizer capability is provided
• Control mode is set via the System menu to auto and not disabled via a network command
• Dehumidification operation is not enabled
• The unit is configured for waterside economizer and the EWT is below the mixed air
temperature minus the EWT differential or the unit is configured for airside economizer, the
enthalpy switch input indicates low enthalpy, and the outdoor air temperature (OAT) is low
enough for operation
None
Economizer capability is not provided.
68
McQuay OM 920
Operator’s Guide
Off Ambient
The unit is configured for waterside economizer and the EWT exceeds the mixed air
temperature minus the EWT differential set point. OR
The unit is configured for airside economizer and the outdoor air temperature (OAT) is too
high for operation. OR
Unit is configured for waterside economizer and the Entering Water Temperature (EWT)
sensor is unreliable. OR
Unit is configured for airside economizer and the outdoor air temperature (OAT) sensor is
unreliable.
OffAlarm
The unit operation is disabled by an alarm condition.
Off Network
The unit is disabled via a network command.
OffMan
Control mode is set to Off via the System Menu.
Off Dehumidification
Economizer operation will be disabled if dehumidification operation is enabled.
Determining Cooling Capacity
Clg Capacity is a status item which indicates the percentage of the unit maximum cooling
capacity currently operating. The current Cooling Capacity can be view via the following
path: Standard Menus/System/Clg Capacity. When the unit is equipped with chilled water
cooling, 0-100% is displayed as the cooling valve actuator strokes from the closed to open
position. When the unit is equipped with compressorized cooling, the percentage value
changes incrementally based on the number operating cooling stages.
Determining Heating Capacity
Htg Capacity is a status item which indicates the percentage of the unit maximum heating
capacity currently operating. The current Heating Capacity can be view via the following path:
Standard Menus/System/Htg Capacity. When the unit is equipped with modulating heat, 0100% is displayed as the heating valve actuator strokes from the closed to open position.
When the unit is equipped with staged heat, the percentage value changes incrementally based
on the number operating heating stages.
Determining Supply Air Fan Capacity
SAF Speed is a status only item which indicates the Supply Air Fan capacity. The current SAF
Capacity can be view via the following path: Standard Menus/System/SAF Capacity. 0-100%
of VFD maximum speed is indicated if the unit is equipped with a Supply Air Fan VFD. 100%
is indicated if the supply fan is constant volume and is running.
Determining RF/EF Capacity
RF/EF Speed is a status only item which indicates the current return or exhaust fan capacity.
The current RF/EF Capacity can be view via the following path: Standard
Menus/System/RF/EF Capacity. 0-100% of VFD maximum speed is indicated if the unit is
equipped with a return or exhaust fan VFD. 100% is indicated if the return/exhaust fan is
constant volume and is running.
McQuay OM 920
69
Operator’s Guide
Determining Outside Air Damper Position
OAD/Econo Cap is a status only item which indicates the current outdoor air damper or
economizer valve position. The current OAD/Econo Cap can be view via the following path:
Standard Menus/System/OAD/Econo Cap.
Determining Emergency Mode
Emergency Mode is an adjustable only item which is normally used by a network system to
shutdown the unit in an emergency situation. The parameter is adjustable via the following
path: Standard Menu/System/Emerg Mode.
Determining Application Mode
The unit heating and cooling can be set up for automatic heat/cool, heat only, cool only or fan
only operation based on a network signal by setting the Control Mode parameter to “Auto.”
With the Control Mode parameters set to “Auto,” the heat/cool, cool only, heat only, and fan
only decision is determined by the Net App Mode. The Net App Mode is set by a network
signal. The following sections describe the five available Net App Mode selections.
Note – The Net App Mode has no effect on the unit operation unless the Control Mode parameter
is set to “Auto.”
Off
When the Net App Mode is set to “Off,” the Unit Status is “Off Net” and the unit is completely
disabled, including unoccupied heating (night set back) and unoccupied cooling (night set up)
operation.
Heat Only
When the Net App Mode is set to “Heat Only,” heating operation is allowed to operate as
required to maintain the heating set points. Cooling operation is disabled (Cooling Status is
“Off Net”).
Cool Only
When the Net App Mode is set to “Cool Only,” cooling operation is allowed to operate as
required to maintain the cooling set points. Heating operation is disabled (Heating Status is
“Off Net”).
Fan Only
When the Net App Mode is set to “Fan Only,” the fans are allowed to operate but cooling and
heating operation is disabled (Cooling Status and Heating Status are “Off Net”).
Auto
When the Net App Mode is set to “Auto” heating and cooling operation are allowed to operate
as required to maintain the heating and cooling set points.
70
McQuay OM 920
Operator’s Guide
Determining Occupancy Status
Occupancy is a status item which indicates whether the unit is in an occupied, unoccupied or
tenant override mode of operation. The current Occupancy status can be viewed via the
following path: Standard Menus/Occupancy/Occupancy. The following are descriptions of the
various “Occupancy” states.
Occ
The Occupancy parameter indicates “Occ” when the unit is in the occupied mode. In this
mode, the unit starts and runs continuously, cooling and heating as required to maintain the
occupied temperature set points. The unit is in the occupied mode if any of the following
conditions are true:
• The Occ Mode entry on the keypad is set to occupied
• The Occ Mode entry on the keypad is set to Auto, and a manual network occupancy
command is sent to the controller
• The Occ Mode entry on the keypad is set to Auto, a manual network occupancy command is
set to Auto, and any of the following is true:
• The External Start/Stop switch is closed
• A network schedule signal is set to Occupied or Standby
• The internal schedule function is in the Occupied condition
Unocc
The Occupancy parameter indicates “Unocc” when the unit is in the unoccupied mode. In this
mode, the unit remains off unless unoccupied operation becomes active. When unoccupied
operation is active the unit operates normally except that Minimum OA Position is set to zero.
See Unoccupied Operation below for information regarding when unoccupied operation is
activated.
TntOvrd
The Occupancy parameter indicates “TntOvrd” when the unit is in the tenant override mode.
In this mode, the unit starts and runs continuously, cooling and heating as required to maintain
the occupied temperature.
Tenant override operation is initiated when the Tenant Override Timer is greater than zero.
The Tenant Override Timer is set equal to the Local Tenant Override Time (Timer Settings
menu) if the unit is enabled and any of the following is true:
• The Space Temperature sensor is present and is shorted for less than 10 seconds. Nothing
happens if the button is pushed for more than 10 seconds but less than the time required to
initiate a shorted sensor alarm (30 seconds). Subsequent presses on the button resets the
Tenant Override Timer to the Local Tenant Override Time, i.e. the max time
• The Occ Mode entry on the keypad is set to Tenant Override. After the Tenant Override
Timer is set, the Occ Mode entry on the keypad reverts to auto after a 2 second time delay
• The Occ Mode entry on the keypad is set to Auto or Unocc, and a manual network
occupancy command is set to Bypass. After the Tenant Override Timer is set, the network
occupancy command reverts to Auto
Subsequent presses on the button, setting of the keypad occupancy entry to Tenant Override
again, or setting of the network occupancy command to Bypass again resets the Tenant
Override Timer to the Local Tenant Override Time.
The TOTime entry on the keypad can also be manually set to a non-zero value. In this case the
value begins timing down from the edited value.
Tenant Override Operation may be terminated by manually setting the Tenant Override
parameter on the keypad to zero or by disabling the unit.
McQuay OM 920
71
Operator’s Guide
Determining Occupancy Mode
Occ Mode is an adjustable item which sets the unit for manual occupied, unoccupied, tenant
override or automatic operation. The parameter is adjustable via the following path: Standard
Menu/Occupancy/Occ Mode.
Occ
When Occ Mode is set to “Occ,” the unit is manually placed in the occupied mode of
operation.
Unocc
When Occ Mode is set to “Unocc,” the unit is manually placed in the unoccupied mode of
operation.
TntOvrd
When Occ Mode is set to “TntOvrd,” the unit is manually placed in the tenant override mode
of operation.
Note – Once tenant override operation is activated the parameter automatically reverts back to
“Auto.”
Auto
When Occ Mode is set to “Auto” the automatically changes between occupied, unoccupied
and tenant override operation.
Determining Occupancy Source
When the Occupancy parameter indicates Occ, the Occupied Source is set to one of the
following values to indicate the function responsible for placing the unit into the occupied
mode of operation. The current Occupancy Source can be viewed via the following path:
Standard Menu/Occupancy/OccSrc.
None The Occ Src= parameter indicates “None” when the Occupancy= parameter indicates
“Unocc” or “Tnt Ovrd.”
NetSchedule The Occ Src= parameter indicates “Net Schd” when the Occupancy= parameter
indicates “Occ” due to a network schedule indicating an occupied period.
IntSchedule The Occ Src= parameter indicates “Int Sched” when the Occupancy= parameter
indicates “Occ” due to the unit internal Schedule.
OneEventSchedule The Occ Src= parameter indicates “Int Sched” when the Occupancy=
parameter indicates “Occ” due to the unit one event Schedule.
RemoteSwitch The Occ Src= parameter indicates “Remote Sw” when the Occupancy=
parameter indicates “Occ” due to a field supplied external time clock or a tenant override
switch signal in the form of a set of dry contacts is closed across terminals 101 and102 on the
unit field terminal block TB2.
OccManCmd The Occ Src= parameter indicates “OccManCmd” when OccMode is set to
Auto and the network manual occupancy command is set to Occupied.
OccMode The Occ Src= parameter indicates “Occ Mode” when the Occupancy= parameter
indicates “Occ” due to the Occupancy Mode being manually set to “Occ.”
TStatTO The Occ Src = parameter indicates “TStatTO” when the Occupancy= parameter
indicates “Occ” due to the tenant override button on the zone thermostat is pushed. The button
must be held for at least 1 second but not more than 30 seconds.
ManTO The Occ Src = parameter indicates “ManTO” when the Occupancy= parameter
indicates “Occ” due to the being manually set via the keypad/display. When the Tenant
Override Timer is set to a non-zero value, the unit starts and runs in the tenant override mode
regardless of any scheduling features. The unit stops when the timer expires. The Tenant
Override Timer can be set from 0-300 minutes.
72
McQuay OM 920
Operator’s Guide
Unoccupied Operation
During Unoccupied operation the unit operates normally except that Min OA Pos is set to zero
so that the damper is closed to the outdoor air.
Unoccupied Dehumidification
Dehumidification may be initiated in the unoccupied mode only if Dehumidification Control
is set to Always instead of Occupied on the keypad. When this is the case and the humidity
goes high the unit transitions in the normal manner through Start-up and Recirc to Fan Only
and then into the Dehumidification Mode.
Unoccupied Cooling (Night Setup)
Unoccupied Operation is initiated if the Space Sensor is reliable, the Space Temperature is
greater than the Unoccupied Cooling Setpoint, and the Unoccupied Cooling Setpoint is set
lower than its maximum setting.
Unoccupied Heating (Night Setback)
Unoccupied Operation is initiated if the Space Sensor is reliable, the Space Temperature is less
than the Unoccupied Heating Setpoint, and the Unoccupied Heating Setpoint is set higher than
its minimum setting.
Internal Optimal Start
Unoccupied operation is enabled due to an internal optimal start schedule being activated.
Network Optimal Start
Unoccupied operation is enabled due to a network optimal start schedule being activated.
None
The Unoccupied Source is set to “None” when Unoccupied operation is inactive.
Scheduling
The Air Handling unit can be scheduled for operation by using the following three methods:
• Unit internal time scheduling functions
• External time clock function
• Network time scheduling function
Provided the unit is not locally or remotely disabled, the unit operates when any of these
scheduling functions is calling for occupied operation. Conversely, the unit enters the
unoccupied mode when all of these scheduling functions are calling for unoccupied operation.
Therefore, any unused scheduling functions should be set for continuous unoccupied
operation.
The next four sections: “Setting Controller Date and Time,” “Internal Daily Scheduling,”
“Holiday Scheduling,” and “One Event Scheduling” describe functions related to the internal
unit scheduling functions. These are followed by a section describing the optimal start
function which can be use with internal scheduling and network scheduling. This is followed
by two sections that describe the external time scheduling and network time scheduling
functions.
McQuay OM 920
73
Operator’s Guide
Setting Controller Date and Time
The controller uses the date and time to execute its internal scheduling functions. The current
time and date will not be lost if the unit is turned off for up to forty-eight hours. The clock and
date are settable from the keypad via the following path: Extended Menus/Time/Date. The
time of day can be set by entering the hour (00-23), minute (00-59), and second (00-59) into
three fields of the Current Time. Note that MicroTech III uses “military” time. The current
date can be set by entering the date (00-31), month (01- 12) and year (1999-2155) into the
three fields of the Current Date.
Internal Daily Schedule
An internal Daily Schedule provides one start time and one stop time for each of the seven
days of the week and for holidays. When the Occ Mode= parameter is set to “Auto”, and the
unit is not disabled for other reasons, it starts and stops according to the controller internal
schedule. The parameter is adjustable via the following path: Standard Menus/Daily Schedule.
Holiday Scheduling
The operator may select the days when start and stop times for holidays are used by selecting a
start date and an end date for up to ten periods during the year by using the holiday scheduling
feature. Whenever a holiday period occurs, the controller uses the Holiday Schedule start and
stop time for the period. For example, assume that Christmas Eve occurs on a Thursday. The
building is shut down on both Christmas Eve and Christmas Day, but operates normally on the
weekend. This holiday period would be scheduled by setting the Holiday Schedule to “00:0000:00” and setting the Holiday Period to “12/24/08 - 12/25/08.” The parameter is adjustable
via the following path: Standard Menus/Holiday Schedule.
One Event Scheduling
A One-Event Schedule is provided so that one operating period can be scheduled without
affecting the regular internal schedule. A start date/time and an end date/time can be set.
The unit can be scheduled to operate during a specified period by using this feature. During
the specified period defined by the One Event Beginning Date/Time and One Event Ending
Date/Time parameters the unit starts up and runs continuously regardless of any other time
scheduling functions. For example, assume that a space served by the unit is occupied for a
special event on March 12 from 5:00 p.m. to 10:00 p.m. when the normal time scheduling has
the unit shut off after 4:00 p.m. on that date. This event can be accounted for by setting the
One Event Beginning Date/Time to “3/12/08 @ 17:00:00” and the One Event Ending
Date/Time to “3/12/08 @ 22:00:00.”
The parameter is adjustable via the following path: Standard Menus/One Event Schedule.
Optimal Start
When Optimal Start is active (Optimal Start = Yes), an early start time is determined before
each scheduled start. The parameter is adjustable via the following path: Standard
Menus/Optimal Start. The schedule must be based on an internal schedule or a signal via a
connected network that indicates time to occupancy. The controller uses start history, outdoor
air temperature and space temperature to determine when the unit should start. The unit may
start up to four hours before the scheduled occupancy time. Optimal start based on heating
operates when the space temperature is below the Zone Heating Spt by ½ the Zone Htg
Deadband. Optimal start based on cooling operates when the space temperature is above the
Zone Cooling Spt by ½ the Zone Clg Deadband. If space temperature is between the above
two points, the unit starts at the occupancy time.
External Time Scheduling
An external time clock can be used to schedule unit operation. This is accomplished by a field
supplied external time clock signal in the form of a set of dry contacts wired across terminals
101 and 102 on the unit field terminal block TB2. In this case, all internal daily schedules
should be set to “00:00-00:00” (default setting).
74
McQuay OM 920
Operator’s Guide
Temperature Control Configurations
Temperature control is based on a Control Type that may be set to either Zone or DAT.
When the Control Type is set to Zone temperature control, heating, compressors, and the
economizer are controlled to maintain the temperature of the zone at a desired setpoint. This
configuration is used on units equipped with constant volume supply fans. Compressors and
heating stages are staged to maintain space or return temperature. The number of compressors
is decreased when it is too cold and increased when it is too hot subject to stage timers. The
number of heat stages is decreased when it is too hot and increased when it is too cold subject
to stage timers.
When the Control Type is set to DAT, heating, compressors, and the economizer are controlled
to maintain the discharge air temperature at a desired setpoint. This configuration is typically
used on units equipped with variable air volume supply fans.
Heat/Cool Changeover
In general, a unit configured for discharge air temperature control either operates to deliver the
cooling discharge temperature set point using economizer and/or mechanical cooling or the
heating discharge air temperature set point using the heating equipment. Cooling and heating
never operate simultaneously. A unit configured for zone (or space comfort) control either
operates to maintain the Zone Cooling Set Point using economizer and/or mechanical cooling
or the Zone Heating Set Point using the heating equipment.
The Zone Cooling/Zone Heating setpoints can be set via the keypad/display or based on a
signal from an optional space temperature sensor with set point adjustment capability. The
following sections describe the unit heat/ cool changeover function.
Illustrative Heat/Cool Changeover Sequence
The following is an illustration of the heat/cool changeover function.
When the Control Temperature is below the zone heating setpoint by more than ½ the
deadband (point A), heating operation is enabled. Heating operation then remains enabled
until the control temperature begins to rise and rises above the zone heating setpoint by more
than ½ the deadband (point B), at which point heating operation is disabled and the unit enters
the fan only (or Min DAT) operating state. If the control temperature rises above the zone
cooling setpoint by more than ½ the deadband (point C) cooling operation is enabled. Cooling
operation remains enabled until the control temperature begins to fall below the zone cooling
setpoint by more than ½ the deadband (point D), at which point the unit returns or fan only (or
Min DAT) operating state.
Figure 7: Heat/Cool Changeover
C
Cooling Enabled
Control Temperature
Clg
Db
Cooling SPT
D
B
Fan Only
Heating SPT
Htg
Db
Heating Enabled
A
Time
McQuay OM 920
75
Operator’s Guide
Control Temperature
The “Control Temperature” is defined as the unit temperature input used to make the heat/cool
changeover decision. This determines whether or not cooling or heating is enabled.
The user may select Space Temperature, Return Temperature, or Outdoor Air Temperature for
both Rooftop units and Self Contained units and the Mixed Air Temperature for Self
Contained units. Normally either the Return or Space Temperature is selected as the Control
Temperature. Outdoor Air Temperature may be used as the Control Temperature for units with
DAT Cooling only or for units with both DAT Cooling and DAT Heating, but not for units
with either Zone Cooling Control or Zone Heating Control. The Mixed Air Temperature on
Self Contained units may be used as the Control Temperature for 100% Outdoor Air units with
DAT Cooling only or for 100% Outdoor Air units with both DAT Cooling and DAT Heating,
but not for units with Zone Cooling Control, Zone Heating Control, or Return Air Control.
The Mixed Air Temperature should not be selected as the Control Temperature for Self
Contained units with Return Air Control as erratic operation could result.
The Control Temperature Source automatically reverts from Return to Space if:
• The Return Air Sensor is not present and reliable AND
• A network or local Space Sensor is present and reliable
The Control Temperature Source automatically reverts from Space to Return if:
• The Space Sensor is not Reliable (A valid Space Temperature value is not provided via the
network and the Space Temperature sensor is either In alarm OR Not Present) AND
• The Return Air Sensor is Reliable (Present and Not in Alarm)
The Control Temperature Source automatically reverts from either Outdoor Air or Mixed Air
to Return if the Control Type is Zone (Not DAT). If the Return Air Temperature is not reliable,
the Control Temperature may then revert to Space as described above.
The Control Temperature Source automatically reverts from Mixed Air to Outdoor Air if Unit
Type is not SCU.
A Control Temperature Fault that shuts down the unit is initiated if any of the following is
true.
• The Return Air Sensor is not present and reliable AND
• Return Air is selected as the Control Temperature
• A network or local Space Sensor is not present and reliable AND Space is selected as the
Control Temperature
• The OAT Sensor is not present and reliable AND Outdoor Air is selected as the Control
Temperature
• The Mixed Air Temperature Sensor is not present or reliable AND Mixed Air is selected as
the Control Temperature
Zone Temperature Set Points
When the Use Tstat Setpoint parameter is set to No, the Zone Cooling Set points and the Zone
Heating Set points may be set through the keypad or via a network signal (all units). In this
case these set points are changed whenever the network or keypad value changes. When the
Use Tstat Setpoint parameter is set to Yes these set points can only be adjusted through the
zone thermostat (Zone control units). The parameter is adjustable via the following path:
Extended Menus/Zone Temp Setup/Use Tstat Spt. Heating and cooling set points must not
overlap. The Zone Heating Set points must be equal to or less than the Zone Cooling Set
points. If a conflict occurs from values entered via the keypad or network, the Zone Heating
Set point is automatically adjusted down to eliminate the conflict. When the Zone Cooling Set
point is changed by more than 0.5 degrees through the wall mounted sensor, the Zone Heating
Set point is raised or lowered the same amount so that the difference between the Cooling and
Heating set points do not change.
76
McQuay OM 920
Operator’s Guide
OA/EWT Lockout
Heating is disabled whenever the outdoor air temperature is greater than the Outdoor Air
Ambient Heating Lockout Set Point. When the outdoor air temperature drops below the
Outdoor Air Ambient Heating Lockout Set Point by more than the Heating Lockout
Differential, heating operation is re-enabled. Cooling is disabled if outdoor air temperature or
entering water temperature is too low for operation. The outdoor air temperature becomes too
low for operation when it drops below the Outdoor Air Ambient Cooling Lockout Set Point.
Outdoor air temperature becomes high enough for operation when it rises above the Outdoor
Air Ambient Cooling Lockout Set Point by more than the Cooling Lockout Differential. The
entering water temperature becomes too low for operation when it drops below the Minimum
Entering Water Temperature Setpoint. Entering water temperature becomes high enough for
operation when it rises above the Minimum Entering Water Temperature Setpoint by more the
Cooling Lockout Differential. The parameter for setting the OA Clg Lock is located via the
path Extended Menus/Compressor Setup/OAT Clg lock (or Min EWT). The parameter for
setting the OAT Htg Lock is located via the path Extended Menus/Heating Setup/OAT Htg
Lock.
Tenant Override
The tenant-override button provided with the optional zone temperature sensor packages is
used to override unoccupied operation for a pre programmed time period. This time period is
set with the Tenant Override Time Increment. This value can be adjusted from 0 to 300
minutes (default is 120 minutes). When an occupant presses and releases the tenant override
button on the zone temperature sensor (ZNT1), the Tenant Override Timer is set equal to the
Tenant Override Time Increment. (The button must be held for at least 1 second but not more
than 30 seconds.) The unit then starts and runs in the tenant override mode which is the same
as occupied mode except that it is temporary.1 The Tenant Override Timer begins timing out
and the unit runs until the timer expires. If the tenant override button is pressed again while the
unit is operating in tenant override mode, the Tenant Override Timer is reset to the Tenant
Override Time Increment and the unit continues to operate. For example, assume that the
Tenant Override Time Increment is 120 minutes. One press of the override button provides at
least 120 minutes of unit operation. If the button is pressed again 60 minutes later, the Tenant
Override Timer is reset to 120 minutes, and a total of 180 minutes of uninterrupted operation
results.
Note – The same operation occurs if, instead of pressing the override button on a zone
temperature sensor, the Occupancy Mode is set to “Tnt Ovrd.” Once set to “Tnt Ovrd”, the
Occupancy Mode automatically reverts to the “Auto” setting once the Tnt Ovrd Timer is set
to the Tnt Ovrd Time Increment. The same operation will also occur if the network
occupancy manual command it set to bypass
Zero OA Time (Morning Warm-up)
A separate Morning Warm-up State is not provided, but an edited ZeroOATime is used to keep
the Outside Air damper closed when the unit first starts. The Minimum OA Position is set to
zero as long as the as the fan has been on for less than the ZeroOATime. This allows the
Return Air type units to cool down the space with mechanical cooling or to warm up the space
with the dampers closed. If the ZeroOATime is set correctly, the OA dampers will be open
only during occupied periods. When Optimum Start is used ZeroOATime is set equal to the
time to occupancy when the unit starts so that the OA dampers will open at occupancy time.
The parameter is adjustable via the following path: Extended Menus/Timer Settings/Zero OA
Time.
McQuay OM 920
77
Operator’s Guide
Post Heat Operation
After leaving the Recirc or Heating operating state and entering either the Fan Only or Min
DAT operating state, the unit performs “post heat” operation if the Post Heat Timer is set to a
non zero value. “Post heat” operation occurs within the Fan Only or MinDAT operating state.
During “post heat” operation, the VAV Box Output remains open (heat) while the discharge
fan capacity is forced to a minimum value (default 25% speed for VFD). By forcing the
discharge fan capacity to a minimum value before the VAV Box Output closes (cool), “post
heat” operation is designed to prevent duct over-pressurization by decreasing the duct pressure
before the VAV boxes can close.
“Post heat” operation remains active until either the discharge fan capacity reaches the
minimum value or until the Post Heat Timer expires, whichever occurs first. When “post heat”
operation ends, normal duct static pressure or position control resumes.
Note – Note: During “post heat” operation and for 120 seconds afterward, the proof of airflow input
is ignored. This is to prevent nuisance Fan Fail fault alarms that may occur if the airflow
switch opens during or following “post heat” operation. The unit cannot leave the Fan Only
or Min DAT operating state while the airflow switch input is being ignored. The parameter is
adjustable via the following path: Extended Menus/Timer Settings/Post Heat.
Dehumidification
In the dehumidification mode, mechanical cooling is used to cool air low enough to wring
moisture out of it. Hot Gas Reheat is used to raise the temperature of this cooled air to a
desirable value. No other heating type is used when the unit operates in the dehumidification
mode.
Dehumidification Initiation
An analog sensor is mounted in the return duct, the space, or outdoor to sense Relative
Humidity. The location is selected by setting the Sensor Location value on the keypad to
Return, Space, or OAT.
Note – Note: This setting is used to dictate which temperature sensor is used to calculate the
dewpoint. OAT can only be selected for units with DAT control. The Relative Humidity and
a calculated Dew Point temperature are both displayed on the keypad. The calculated dew
point temperature is based on the Relative Humidity and Return, Space, or OAT value
depending on the location of the humidity sensor. Humidity control is disabled if cooling is
disabled for any reason. Dehumidification operation is initiated when Humidity Control is
set to either Relative Humidity or Dew Point and that value rises above the appropriate
setpoint by more than half its deadband.
Dehumidification Termination
Dehumidification is terminated if the selected variable, Relative Humidity or Dew Point,
drops below the appropriate humidity setpoint by more than half its deadband.
Dehumidification is also terminated if cooling is disabled for any reason. Other ways that
dehumidification may be terminated are if Dehum Method is set to “None” on the keypad, or
if the unit goes to Off Net, Off Sw, Off Alm, or Off Man Ctrl. The Dehum Method parameter
is adjustable via the following path: Extended Menus/Dehumidification Setup/Dehum
Method.
When Dehumidification is terminated, all mechanical cooling is turned off except when the
unit is in the Cooling state. Modulated cooling reverts to normal control when
dehumidification is terminated in the Cooling state. For units with compressors, the number of
cooling stages is reduced by one and control reverts to normal control when dehumidification
is terminated in the Cooling state. Another compressor stage change could then occur after one
Cooling Stage Time has elapsed
78
McQuay OM 920
Operator’s Guide
Dehumidification Mechanical Cooling Control
During Dehumidification, control of Mechanical Cooling is based on the following two
editable values of the Leaving Coil Temperature setpoint. The Leaving Coil Temperature
setpoint parameter is adjustable via the following path: Extended Menus/Dehum Setup/Mn
Lvg Coil T or Mx Lvg Coil T.
• Mx Lvg Coil T (Default = 55°F)
• Mn Lvg Coil T (Default = 48°F)
For compressorized units, the number of Compressor Stages increases when:
• The time since the last stage change exceeds the Clg Stage Time AND
• Leaving Coil Temperature is greater than the Mx Lvg Coil T AND
• The current cooling stage is less than the available number of stages
During the dehumidification mode, the number of Compressor Stages decreases when:
• The time since the last stage change exceeds the Clg Stage Time AND
• Leaving Coil Temperature is less than Mn Lvg Coil T Spt AND
• The current cooling stage is greater than zero
Units with modulated cooling are controlled by a PI Loop to maintain the temperature leaving
the coil at the Mn Lvg Coil T. The normal DAT Cooling Deadband and PI Loop parameters
are used in this PI Loop.
Hot Gas Reheat Control
During Dehumidification control an analog Hot Gas Reheat (HGRH) output is controlled as
described below.
• Cooling/Fan Only: In the Cooling and Fan Only states, a PI Loop is used to control the
HGRH valve to maintain the Discharge Air Temperature at the Dehumidification Reheat
Setpoint. The deadband for this loop is the same one used for other control of heating to
maintain the DAT Heating setpoint.
• Cooling: In the Cooling state, the Dehumidification Reheat Setpoint equals the DAT
Cooling Setpoint. For DAT units, this is the normal DAT setpoint resulting from any reset.
For Zone Control units, this setpoint is the result of a PI Loop based on the Control
Temperature as is done in the Economizer state or with modulated cooling in the Cooling
state.
• Fan Only: In the Fan Only state, the Dehumidification Reheat Setpoint equals an editable
MaxReheatSpt (Default = 65°F) when the Control Temperature drops to the Zone Heating
setpoint and equals an editable MinReheatSpt (Default = 55°F) when the Control
Temperature rises to the Zone Cooling setpoint. The Dehumidification Reheat Setpoint
varies linearly between these two points.
This means that no matter what the Control temperature is, including OAT, the temperature
leaving the unit is at a maximum just before the unit needs to go into heating and at a
minimum just before the unit needs to go into Cooling. This reduces opportunity for unit to go
into heating or cooling during Dehumidification. The Dehumidification Reheat Setpoints are
editable via the path, Extended Menus/Dehum Setup/Min Rheat Spt or Max Rheat Spt.
Staged HGRH Control
In the Cooling and Fan Only states, a staged output is turned on and off to control the HGRH
valve to maintain the Discharge Air Temperature at the Dehumidification Reheat Setpoint.
The deadband for this setpoint is the same one used for other control of heating to maintain the
DAT Heating setpoint. When the DAT is above the Dehumidification Reheat Setpoint by more
than half the deadband, cooling capacity is greater than 0% and the Dehumidification Reheat
Timer is expired, the reheat output is turned on. When the DAT is below the Dehumidification
Reheat Setpoint by more than half the deadband and the Dehumidification Reheat Timer is
expired, or if the cooling capacity is 0%, the reheat output is turned off.
McQuay OM 920
79
Operator’s Guide
Energy Recovery
Energy recovery is provided by drawing outside air across half of an Enthalpy Wheel and
drawing exhaust air across the other half. Latent and sensible heat is transferred from the
hotter, moister exhaust air to the colder dryer outside air in winter. Latent and sensible heat is
transferred from the hotter more moist outside air to the cooler dryer air exhaust in summer.
Control consists of starting and stopping an exhaust fan, modulating the speed of the exhaust
fan, starting and stopping the Enthalpy Wheel, and optionally controlling the speed of the
Enthalpy Wheel. The outdoor dampers are controlled in the normal manner. The current
statuses as well as editable parameters associated with Energy Recovery are located in the
Standard Menus/Energy Recovery menus.
Enthalpy Wheel
The Enthalpy Wheel is turned on when all of the following are true.
• The Exhaust Fan is on
• The OA Dampers are at the minimum position
• The unit is not in the Economizer State
• The wheel has not been turned off due to Frosting/Condensation
Note – When turned on the speed of the enthalpy wheel is set to the maximum speed for units
with a VFD controlling the speed of the Enthalpy Wheel.
The Enthalpy Wheel is turned off when any of the following is true
• The Exhaust Fan is off OR
• The OA Damper Position is driven above the Minimum OA Damper Position by more than
3%
Additional control is provided for units with a VFD controlling the speed of the Enthalpy
Wheel to prevent Frosting/Condensation on the Enthalpy Wheel. This control is based on an
Intersection Point described in paragraphs that follow.
The Enthalpy Wheel VFD speed is set to zero so it will operate at its internally edited
minimum speed when both of the following are true:
• The wheel has been operating at maximum speed for longer than the edited Wheel Stage
Time
• The exhaust air temperature leaving the Enthalpy wheel is below the Intersection Point plus
an edited Minimum Temperature Difference
To prevent Frosting/Condensation on the Enthalpy Wheel, the Enthalpy Wheel is turned off
when both of the following are true:
• The exhaust air temperature leaving the Enthalpy wheel is below the Intersection Point plus
an edited Minimum Temperature Difference
• The wheel has been operating at its internally edited minimum speed for longer than an
edited Wheel Stage Time
The Enthalpy Wheel is turned on at minimum speed when:
• The Wheel has been off due to Frosting/Condensation for longer than an edited Minimum
off Time
• The exhaust air temperature leaving the Enthalpy wheel is above the Intersection Point plus
an edited Maximum Temperature Difference
The Enthalpy Wheel speed will be increased to its maximum speed when:
• The exhaust air temperature leaving the Enthalpy wheel is above the Intersection Point plus
an edited Maximum Temperature Difference
• The Wheel has been operating at Minimum Speed for longer than the edited Wheel Stage
Time
80
McQuay OM 920
Operator’s Guide
When there is a threat of frost on the enthalpy wheel, the wheel is slowed down or stopped so
that less enthalpy transfer occurs and frosting of the wheel is avoided. Frosting can occur on
the enthalpy wheel when the exhaust air leaving the wheel is saturated. This condition occurs
when two lines intersect on a psychometric chart, and it does not occur when these two lines
do not intersect. One of these lines is the Humidity Ratio versus the dry bulb temperature for
saturated air. The other line is the exhaust air process line. The exhaust air process is defined
by two points on a psychometric chart (Figure 8).
Figure 8: Exhaust Air Psychometric Chart
The first point on this line is the outdoor air temperature at 95% relative humidity (point 1 in
Figure 8) and the second point on the line is the return air temperature at the return air relative
humidity (point 2 in Figure 8). One exhaust air process line showing frosting conditions and
another showing no frost condition is shown in Figure 8. The controller makes a continuous
calculation to determine if and at what temperatures the saturated air and exhaust air process
lines intersect. When they do not intersect, the enthalpy wheel runs at full speed. When they
do intersect, the enthalpy wheel is controlled to a slower speed to maintain the dry bulb
temperature of the exhaust air leaving the enthalpy wheel above the higher of the two
intersecting dry bulb temperatures (point ST2 in Figure 8). This is referred to as the
“Intersection Point.” This prevents the wheel from operating under frosting conditions.
The following describes the details involved in the frost protection function that affect the
speed and start/stop of the enthalpy wheel:
When the enthalpy wheel has been operating at maximum speed for at least the Enthalpy
Wheel Stage Time and the exhaust air temperature leaving the wheel drops below the
Intersection Point plus the Minimum Temperature Difference, the enthalpy wheel will be
slowed to its minimum speed.
If the enthalpy wheel has been operating at minimum speed for at least the Enthalpy Wheel
Stage Time and the exhaust air temperature leaving the wheel is still below then Intersection
Point plus the Minimum Temperature Difference, the enthalpy wheel will be stopped. If the
exhaust air temperature leaving the wheel then rises above the Intersection Point plus the
Maximum Temperature Difference and the enthalpy wheel has been off for longer than the
Enthalpy Wheel Minimum Off Time, the wheel will be restarted and will run at its minimum
speed.
McQuay OM 920
81
Operator’s Guide
Exhaust Fan
A variable speed exhaust fan controlled by a VFD is provided for all Economizer units with
either Constant Volume or VAV Supply Fans and on 100% Outside Air units with VAV Supply
Fans. Either a constant volume exhaust fan or a variable speed exhaust fan controlled by a
VFD may be provided on 100% Outside Air units with Constant Volume Discharge Fans.
The exhaust fan is turned on when one of the following sets of conditions is true:
All four of the following are true:
• The Exhaust Fan is controlled by a VFD
• The OA Dampers are at least open to the Minimum OA Position
• The Minimum OA Position is greater than 0%
• The building static pressure is above the building static pressure setpoint by more than the
deadband for longer than the Minimum Exhaust Fan Start Time (Default = 120 seconds)
OR
All four of the following are true:
• The Exhaust Fan is controlled by a VFD
• The OA Dampers are at least open to the Minimum OA Position
• The Minimum OA Position is greater than 0%
• The Exhaust Fan capacity is commanded to a value above the minimum value (Default =
5%) by a BAS for longer than the Minimum Exhaust Fan Start Time (Default = 120
seconds)
OR
• The Exhaust Fan is Constant Volume AND
• The Supply Fan has been commanded on for at least 4 seconds
The exhaust fan is turned off when one of the following sets of conditions is true:
All three of the following are True:
• The Exhaust Fan is controlled by a VFD
• The building static pressure is below the building static pressure setpoint by more than the
deadband
• The Exhaust Fan capacity is at or below its minimum value (Default = 5%) for longer than
the Min Exhaust Fan Stop Time (Default = 120 seconds)
OR
Both of the following are True:
• The Exhaust Fan is controlled by a VFD
• The Exhaust Fan capacity is commanded to less than or equal to its minimum value (Default
= 5%) by the BAS for longer than the Minimum Exhaust Fan Stop Time (Default = 120
seconds)
OR
• The Supply Fan is Off
Whenever a variable speed exhaust fan is on, its capacity will be modulated using a VFD. The
speed of the fan will be either (1) modulated to maintain the building static pressure at a
desired value or (2) set at a fixed speed provided by a Building Automation System via a
network.
82
McQuay OM 920
Operator’s Guide
Bypass Dampers (Not Applicable for 100% OA Units)
• The Bypass Dampers are driven closed (Bypass Damper Closed output is energized)
whenever the OA Damper position is less than or equal to the Minimum OA Position
• The Bypass dampers are driven open (Bypass Damper Open output is energized) whenever
the OA Damper Position exceeds the Minimum OA Damper Position by more that 3%
Outside Air Damper Control
Minimum Outside Air Damper Control
Control of the dampers in the Economizer state is described in the Economizer Control
section. The outdoor air dampers are driven open in the Mechanical Cooling State if
economizer operation is enabled and to the Minimum OA Position if economizer operation is
disabled. For all other operating conditions, the outdoor air dampers are set to the Minimum
OA Position. The Minimum OA Position is set to zero or closed position when the Supply Fan
is off, the unit is in the Recirculation state, Occupancy is set to Unocc, or the fan has been on
for less than the Zero OA Time.
As a result, the OA dampers are driven closed in night setback, night setup, morning warm-up,
and morning cool down situations unless economizer operation is required. In all other
conditions the Minimum OA Position is equal to or below a Ventilation Limit and equal to or
above a Demand Control Ventilation limit. For CAV units, the Ventilation Limit equals the
keypad editable Vent Limit and the Demand Control Ventilation limit equals the keypad
editable DCV Limit. For VAV units, the Ventilation Limit varies with VFD speed between the
editable Vent Limit at 100% Supply Fan speed and the editable LoFlo Vent Limit at the Min
Clg Spd. For VAV units, the Demand Control Ventilation Limit equals the Ventilation Limit
times the ratio of the editable DCV Limit to the editable Vent Limit.
The editable parameters are to be determined when the airflow for the unit is balanced and are
located in the Standard Menu/Min OA Damper menus.
Note – The MinClgSpd is prevented from being set equal to the Design Cooling Speed. The DCV
Limit is prevented from being set greater than the Vent Limit. If the VentLimit or the
LoFloVent Limit is set to 0, the Ventilation Limit is overridden to 0.
McQuay OM 920
83
Operator’s Guide
Examples of typical Min OA reset schedules.
If IAQ VDC is selected as the Min OA Reset, the Minimum OA Position is calculated based
on a 0-10V CO2 sensor input. The CO2 level is expressed as Parts per Million. The minimum
and maximum sensor input values (0-10V) and the corresponding minimum and maximum
PPM values are user editable. This calculated Minimum OA Position varies linearly from the
Demand Control Ventilation Limit at the value labeled “PPM @ DCV Limit” to the
Ventilation Limit at the value labeled “PPM @ VentLimit”. The “PPM @ DCV Limit” is not
allow to be set equal to or greater than the “PPM @ VentLimit”.
Example #1 Min OA reset type = IAQ VDC
This example assumes a CO2 sensor with a 0-2000PPM value over a range of 0-10VDC.
If the requirement is to have the OA damper be at its minimum (DCV Limit) when the CO2
levels are less than 800PPM and to be at its maximum (Vent Limit) when the CO2 levels are
greater than 1000PPM, the controller would be set up as follow:
• Vent Limit = 100%
• DCV Limit = 10%
• Min OA reset type = IAQ VDC
• Min V/mA = 0
• Max V/mA = 10
• PPM@DCV Limit = 800
• PPM@Vent Limit = 1000
• Min PPM = 0
• Max PPM = 2000
In Figure 9 the Minimum OA Position would vary linearly from 10% outside air damper
position at 800PPM or less to 100% outside air damper position at 1000PPM or greater. This
would assume that the supply air fan speed remained at a constant 100%.
If EXT VDC is selected as the Min OA Rest, the Minimum OA Position is calculated based
on an external 0-10 VDC signal. If EXT mA is selected as the Min OA Reset, the Minimum
OA Position is calculated based on an external 0-20 mA signal. This calculated Minimum OA
Position varies linearly from zero % the editable minimum external signal to 100%at the
editable maximum external signal, but it is set no lower than the Demand Control Ventilation
Limit and no higher than the Ventilation Limit. If the editable minimum external signal is set
equal to the editable maximum external signal the external reset % reverts to the Ventilation
Limit.
Figure 9: Min OA Reset Type = IAQ VDC Example
OA Damper Position %
Damper Position vs. Fan Speed Chart
Vent Limit =
(Default 20%)
Lo Flow Vent Limit =
(Default 30%)
Min Clg Speed =
(Default 40%)
40%
(Minimum)
100%
Airflow – Min OA
Type = None
84
McQuay OM 920
Operator’s Guide
Example #2 Min OA reset type = EXT VDC
If the requirement is to have the OA damper be at its minimum (DCV Limit) when the field
supplied signal is at its minimum (0VDC) and to be at its maximum (Vent Limit) when the
field supplied signal is at its maximum (10VDC), the controller would be set up as follow:
• Vent Limit = 100%
• DCV Limit = 10%
• Min OA reset type = EXT VDC
• Min V/mA = 0
• Max V/mA = 10
• OA@MinV/mA = 0%
• OA@MaxV/mA = 100%
In Figure 10, the Minimum OA Position would vary linearly from 10% outside air at 0 VDC
to 100% outside air at 10 VDC. This would assume that the supply air fan speed remained at a
constant 100%. This is an example of a direct acting field supplied signal, if a reverse acting
field supplied signal is required set the OA@MinV/mA = 100% and the OA@MaxV/mA =
0%.
Figure 10: Example #2 Min OA Reset Type = EXT VDC
OA Damper Position %
Damper Position vs. Fan Speed Chart
Minimum Outdoor Air
Damper Position
Vent Limit =
(Default 20%)
Lo Flow Vent Limit =
(Default 30%)
Demand Control
Ventilation OA
Damper Postion
Min Clg Speed =
(Default 40%)
40%
(Minimum)
DCV Limit =
(Default 10%
100 %
Airflow – Min OA Type = Something
other than None
Outside Air Damper Control, Two Position
Two position actuators are controlled by a digital output for SCU unit and by a modulating
analog output for RTU units. These outputs are controlled differently depending on whether
the unit is a 100% OA or a Return Air.
• Digital Output - The OA damper is driven fully open when the digital output is On and fully
closed when the digital output is Off
• Analog Output (Return Air Units) - The OA damper is driven to its fully open position when
the OA damper analog output is at its maximum value and it is driven closed when the OA
damper analog output is at its minimum value. The desired minimum open position between
0% and 30% normally is set by an editable keypad menu. If a valid value is provided via the
network, that position is used as the desired minimum open position instead of the keypad
value
• Analog Output (100%OA Units) - The OA damper is driven to its 100% open position when
the OA damper analog output is at its maximum value and it is driven closed when the OA
damper analog output is at its minimum value
McQuay OM 920
85
Operator’s Guide
In Return Air applications, a two position damper is driven closed position when the Supply
Fan is off, the unit is in the Recirculation state, Occupancy is set to Unocc, or the fan has been
on for less than the Zero OA Time. As a result the OA dampers are driven closed in night
setback, night setup, morning warm-up, and morning cool down situations. In Return Air
applications, a two position is driven to the desired minimum open position in all other
conditions.
For 100% outside air applications, the OA damper is open during the Start Initial period, and it
remains open during all operating states. The OA damper remains open after the fan is turned
off until 30 seconds after the Airflow Switch digital input indicates loss of airflow. This keeps
the outside air dampers open in case there is a failure or external override that keeps the fan
running after it is turned off by MicroTech. If the fan is turned on by bypassing MicroTech
controls that have it off, the Damper Output is NOT turned on.
Airside Economizer
If a unit is equipped with a 0-100% modulating economizer, and the outdoor air is suitable for
free cooling, the unit attempts to satisfy the cooling load by using outdoor air before using
mechanical cooling. When the control temperature is above the Zone Cooling Set Point by
more than half the Zone Cooling Dead Band and the discharge air temperature is above the
Discharge Cooling Set Point by more than half the Discharge Cooling Dead Band, the
controller enters the Econo state. When the unit is in the Econo operating state, the outdoor air
dampers are modulated as required to maintain the Discharge Cooling Set Point.
Economizer to Cooling Operating State
The transition from the Econo to Cooling operating state occurs when the economizer is
unable to satisfy the cooling load and mechanical cooling is available. This will occur when
the commanded economizer position indicates more than 95% open and the discharge air
temperature (DAT control units) or Control Temperature (Zone control units) is above the
applicable Cooling Setpoint by more than half the applicable Cooling Deadband for longer
than the Cooling Interstage Timer.
Waterside Economizer
If a unit is equipped with a 0-100% modulating waterside economizer, and the conditions are
suitable for free cooling, the unit attempts to satisfy the cooling load by using waterside
economizer before using mechanical cooling. When the control temperature is above the
Cooling Enable Set Point by more than half the Cooling Enable Dead Band and the discharge
air temperature is above the Discharge Cooling Set Point by more than half the Discharge
Cooling Dead Band, the controller enters the Econo state. When the unit is in the Econo
operating state, the economizer valve is modulated as required to maintain the Discharge
Cooling Set Point.
Bypass Valve Control
This section describes the operation of an analog output used to control a valve that allows
water to bypass a waterside economizer and flow directly into a condenser.
When the Bypass Valve is closed, all water flows through the waterside economizer before it
flows through the condenser. When the Bypass Valve is open, all water that flows into the selfcontained unit flows directly to the condenser without any water going through the waterside
economizer.
86
McQuay OM 920
Operator’s Guide
Slave Control
Slave control can not be selected unless a water economizer is installed. When the unit is
configured for slave control, the Bypass Valve position is set to 100% minus the Economizer
Valve Position except in the Manual Mode. This provides nearly constant flow of water
through the unit regardless of the requirements of the economizer. When the unit is in Manual
Control mode, the Bypass Valve and Economizer Valve are controlled independently.
Bypass Control
When the unit is configured for Bypass control, the Bypass Valve operates independently of
the waterside Economizer Valve. When it is closed, no water flows through the unit if there is
no economizer or if an airside economizer is used. When it is closed in Waterside Economizer
applications, all water flowing through the unit flows through the economizer before flowing
through the condenser.
The Bypass Valve is open for units with compressors whenever the unit is in dehumidification.
In normal operation of units with compressors, the Bypass Valve may be open or closed as
described below in the Fan Only, Mechanical Cooling, and Economizer states. It is closed in
all other states.
In the Fan Only state, the Bypass Valve is opened when cooling is required so that the
controller can determine an accurate entering water temperature and whether water flow is
established. The Bypass Valve is opened in the Fan Only state whenever:
• Waterside economizer is installed AND
• EconStatus=Enabled or Off Ambient AND
• Control Temperature is greater than the Zone Cooling Setpoint by more than ½ the Zone
Cooling deadband
OR
• Waterside economizer is installed AND
• EconStatus = Enabled or Off Ambient AND
• ClgStatus= Enabled or Off Ambient
• Control Temperature is greater than the Zone Cooling Setpoint by more than ½ the Zone
Cooling deadband
OR
• Waterside economizer is NOT installed AND
• EconStatus = Enabled AND
• ClgStatus= Enabled or Off Ambient
• Control Temperature is greater than the Control Temperature is greater than the Zone
Cooling Setpoint by more than ½ the Zone Cooling deadband
When the Bypass Valve is opened in the Fan Only state, a Bypass Valve Timer is set to an
adjustable value (Default of Five Minutes). The parameter is adjustable via the following path:
Extended Menus/Timer Setting/Bypass Valve. The unit remains in the Fan Only state at least
until the Bypass Valve Timer expires so that Water Flow and Entering Water Temperature can
be checked before the unit enters a cooling state. The Waterside Economizer and Mechanical
Cooling operation are disabled until the Bypass Valve Timer expires.
In the Fan Only state, the Bypass Valve is closed if:
• All Cooling is disabled (other than due to Off-Ambient or Off No Flow)
OR
• Control Temperature less than or equal to the Zone Cooling Setpoint by more than ½ the
Zone Cooling deadband
In Mechanical Cooling states, the Bypass Valve is closed when:
McQuay OM 920
87
Operator’s Guide
• A waterside economizer is installed AND
• Economizer operation is enabled.
In Mechanical Cooling states, the Bypass Valve is open under all other circumstances.
In the Economizer state, the Bypass Valve is normally closed. It is opened in the Economizer
state only if:
• The unit has an Airside economizer AND
• ClgStatus= Enabled or Off Ambient AND
• Economizer Position is greater than or equal to 95.0% AND
• Discharge Air Temperature is greater than the DAT Clg Spt by more than ½ the DAT Clg
deadband
Water Regulating Valve Control
The water flow to the condenser can be modulated in response to refrigerant pressure signals
when the unit is equipped with the water regulating valve option. This option is only available
when a unit is not equipped with a waterside economizer. When mechanical cooling is active
(unit is in the Cooling operating state), the water regulating valve is modulated to maintain the
refrigerant system head pressure within the Water Regulating Valve Deadband of the Head
Pressure Setpoint. There are two refrigerant pressure sensors included with this option. The
water regulating valve is modulated to maintain the higher of the two pressure readings at the
Head Pressure Setpoint. The editable parameters used for Head Pressure Control are located in
the Extended Menus/Head Press Setup menus.
The following Startup Sequence is followed when a stage up from stage zero is required and
the Water Regulating Valve is closed:
• The Water Regulating Valve is set to an editable minimum water regulating valve position
(MinWRVPos). (Default = 10%)
• The Entering Water Temperature (EWT) is measured after the WRV has been at
MinWRVPos for a MinWRVTime (Default = 60 seconds)
An Initial Position (InitPos) is calculated based on the measured EWT using the following
formula:
• InitPos = MinWRVPos + (EWT - MinWRV@Tmp) x (100% - MinWRVPos) / (100%@ MinWRV@Tmp)
The MinWRV@Tmp is the edited temperature where MinWRVPos is OK
The 100%WRV@Tmp is the edited temperature where WRV at 100% is OK
A Time to Initial Position (ToInitPosTime) is calculated using the following formula:
• ToInitPosTime = (InitPos - MinWRVPos) x WRVRampTime/100
The WRVRampTime is the time required for the WRV to be driven from 0 to 100%
The Unit transitions to Cooling and the first compressor is started when the ToInitPosTime has
passed since the command was given to drive the actuator to InitPos and ClgStatus=Enabled
or Off Ambient.
The first compressor runs for an editable Initial Operation Time (InitOpTime) with the WRV
at InitPosControl reverts to normal PI control when the first compressor has been on for the
InitOpTime.
In the Cooling state, the Water Regulating Valve stays at its last commanded position when the
last compressor is turned off. When all compressors are off and a compressor needs to be
turned on, the Water Regulating Valve must be driven open long enough to prevent the
compressor from being locked out due to high pressure, but not so long that it is locked out
due to low pressure. This is required when transitioning to the Cooling state from the Fan
Only or Economizer state.
88
McQuay OM 920
Operator’s Guide
The Water Regulating Valve is driven closed in all states except the Fan Only, Economizer,
and Mechanical Cooling states, and during Dehumidification.
Before the unit will transition from the Fan Only to Cooling operating state when mechanical
cooling is required, the water regulating valve is opened for an adjustable minimum to allow
time for water to flow through the condenser before a compressor starts. This occurs when
ALL of the following conditions are true:
• Cooling status is enabled or off ambient
• Airside economizer operation is disabled or not installed
• The Control Temperature is calling for cooling operation. This occurs when the Control
Temperature is above the Zone Cooling Setpoint by more than the Zone Cooling Deadband.
When the unit is equipped with and airside economizer and before the unit will transition from
the Econo to Cooling operating state when mechanical cooling is required, the water
regulating valve start up start up sequence is initiated to allow time for water to flow through
the condenser before a compressor starts. This occurs when the following conditions are true:
• Airside economizer position is equal to or greater than 95% open for longer than the cooling
stage timer
• The discharge air temperature is warm is above the Discharge Cooling Setpoint by more
than half the Discharge Cooling Deadband for longer than the cooling stage timer
OR
• Cooling is enabled AND
• Economizer is disabled
Special Procedures for Units with WRV and More Than Two Circuits.
• When the unit enters Cooling, either Compressor # 1 or # 2 must start first if one or both of
them are enabled because the pressure sensors are on circuits # 1 and # 2
• If both compressor # 1 and #2 are disabled due to High Pressure or Low Pressure alarms, the
cooling stage is set to stage 2 when the unit enters Cooling and, the appropriate compressor
(# 3 or higher) is turned on
• If both Compressor # 1 and Compressor # 2 are disabled, The WRV will be controlled based
on the EWT and the InitPos formula above
• Control of the WRV reverts to normal PI control if either Compressor # 1 or Compressor # 2
is enabled and turned on
• All compressors are disabled if EWT drops below the MinWRV@ value by more than the
OATClgLkDiff. Compressors are re-enabled if EWT rises above the MinWRV@Tmp value
McQuay OM 920
89
Operator’s Guide
Water Pump Control
The Pump output is in the on position if:
• The Bypass Valve output is being driven Open
OR
• The Water Regulating Valve output is being driven Open
OR
• A waterside economizer is installed AND
• The unit is in the Economizer state
OR
• The unit is the Mechanical Cooling state
OR
• The Unit is in the Start Initial state AND
• Flush Mode is set to Yes
OR
• The unit has a waterside economizer and a Freeze Fault or Freeze Problem is active
OR
• The unit has a waterside economizer and 10 minutes have not yet passed after a Freeze Fault
or Freeze Problem has disappeared
Cooling: Multistage
Compressor Staging
The staging sequences named Std-1 through Std-6 or Alt-1 through Alt-6 in the tables below
indicate what compressors will be on when cooling stage is set to each stage. A single staging
sequence will be active at any one time. The method for deciding which staging sequence is
active is described for each compressor configuration below.
Two Unequal Sized Compressors, Two Circuits, Three Stages
Only one sequence is provided so the user makes no selections.
•
•
•
•
•
Total cooling stages is 3
If neither circuit is disabled, Maximum Cooling stages is set to 3.
If circuit 2 is disabled, Maximum Cooling stages is set to 1.
If circuit 1 is disabled, Maximum Cooling stages is set to 2.
If circuit is disabled, it is not re-enabled until the stage timer clears.
Table 53: Standard Staging
Staging Sequence
Std-1
StgdClgCap
Standard Staging
Stage 1 Compressor
Stage 2 Compressors
1
33%
2
67%
Stage 3 Compressors
1,2
100%
Two Small Comps on Circuit # 1, One Large Comp on Circuit # 2, Four Stages
Only one sequence is provided so the user makes no selections.
• Total cooling stages is set to 4.
• If neither circuit is disabled, the staging sequence is Std-1 if compressor # 1 has fewer hours
than compressor # 3, and the staging sequence is Std-2 if compressor # 1 does not have
fewer hours than compressor # 3
• Maximum cooling stages is set to 4.
90
McQuay OM 920
Operator’s Guide
• If Circuit #1 is disabled, the staging sequence is set to Alt-1 after the stage timer, unless
Comp #2 is already on. Then the switch to Alt-1 happens immediately. Maximum cooling
stages is set to 1.
• If Circuit #2 is disabled, the staging sequence is set to Std-1 if comp #1 has fewer hours than
comp #3, and the staging sequence is set to Std-2 if comp #1 does not have fewer hours than
comp #3, after the stage time. Maximum cooling stages is set to 2.
• Any comp on a disabled circuit stays off if it is already off and is turned off if it is on.
• The staging sequence is changed based on Run Time only when the number of stages stage
is zero or Maximum cooling stages. This means that disabling and re-enabling the
compressors or turning the unit off and on may be necessary to cause sequence changes.
• Alt-1 is used if circuit # 1 is disabled.
• If a circuit is disabled, Maximum cooling stages is set to 2.
Table 54: Standard Staging
Staging Sequence
Std-1
Std-2
StgdClgCap
Stage 1
Standard Staging
Stage 2
Stage 3
Stage 4
Compressor
Compressors
Compressors
Compressors
1
3
25%
1,3
3,1
50%
2,3
1,2
75%
1,2,3
1,2,3
100%
Table 55: Alternate Staging
Staging Sequence
Alt-1
StgdClgCap
Stage 1
Standard Staging
Stage 2
Stage 3
Stage 4
Compressor
Compressors
Compressors
Compressors
0
0%
2
50%
1,2
75%
1,2,3
100%
Two Equal Sized Compressors, Two Circuits
The user selects the following:
• Lead Circuit = Auto, # 1 or # 2
• A separate Alternate circuit is not provided for this configuration
•
•
•
•
•
•
Total cooling stages = 2
If Lead Circuit is set to Auto and neither circuit is disabled, the compressor
sequence is Std-1 if compressor # 1 has fewer hours than compressor # 2,
and the staging sequence is Std-2 if compressor # 1 does not have fewer
hours than compressor # 2. Maximum cooling stages is set to 2.
If Lead Circuit is set to # 1 or Circuit # 2 is disabled, sequence Std-1 is used.
If Lead Circuit is set to # 2 or Circuit # 1 is disabled, sequence Std-2 is used.
The Compressor Sequence changes only when the compressor stage is
Maximum cooling stages or zero. This means that disabling and re-enabling
the compressors or turning the unit off and on may be necessary to cause
sequence changes.
If a circuit is disabled, Maximum cooling is set to one. The compressor on
the disabled circuit stays off if it is already off and is turned off if it is on.
Table 56: Standard Staging
McQuay OM 920
Staging Sequence
Standard Staging
Stage 1 Compressor
Stage 2 Compressors
Std-1
Std-2
StgdClgCap
1
2
50%
1,2
1,2
100%
91
Operator’s Guide
Three Equal Sized Compressors, Three Circuits, No WRV
Only one sequence is provided so the user makes no selections
• Total cooling stages = 3.
• Maximum cooling stages is always set to 3.
• The Staging sequence is the Standard sequence that contains the enabled Stage 1
Compressor with the fewest run hours. Compressors in disabled circuits are ignored when
only enabled compressor run hours are compared.
• The Compressor Sequence changes only when the compressor stage is Maximum cooling
stages or zero. This means that disabling and re-enabling the compressors or turning the unit
off and on may be necessary to cause sequence changes.
• The same staging sequence is used whether a circuit is disabled or not. This means that units
will remain at a stage for an extra stage time when staging up if a disabled circuit is added at
that stage. It also means that units will remain at a stage for an extra stage time when staging
down if a disabled circuit is turned off at that stage.
• Any compressor on the disabled circuit stays off if it is already off and is turned off if it is
on.
Table 57: Standard Staging
Staging Sequence
Standard Staging
Stage 1 Compressor
Stage 2 Compressors
Std-1
Std-2
Std-3
StgdClgCap
1
2
3
33%
1,2
2,3
1,3
67%
Stage 3 Compressors
1,2,3
1,2,3
1,2,3
100%
Three Equal Sized Compressors, Three Circuits, Water Regulating Valve
Only one sequence is provided so the user makes no selections
• Total cooling stages = 3.
• Maximum cooling stages is always set to 3.
• If both circuit # 1 and circuit # 2 are enabled, the staging sequence is Std-1 if compressor # 1
has fewer hours than compressor # 2, and the staging sequence is Std-2 if compressor # 1
does not have fewer hours than compressor # 2.
• If Circuit # 1 is disabled, the staging sequence is Std-2.
• If Circuit # 2 is disabled, the staging sequence is Std-1.
• If both circuit # 1 and circuit # 2 are disabled, the staging sequence is Std-1. Only
compressor # 3 is used.
• The Compressor Sequence changes based on Run Time only when the compressor stage
equals Maximum Cooling stage or zero. This means that disabling and re-enabling the
compressors or turning the unit off and on may be necessary to cause sequence changes.
• In order to keep either compressor # 1 or # 2 on, the compressor sequence changes
immediately if a circuit is disabled. This will result is compressors being turned off and
others being turned on in this emergency condition.
• The same staging sequence is used whether a circuit is disabled or not. This means that units
will remain at a stage for an extra stage time when staging up if a disabled circuit is added at
that stage. It also means that units will remain at a stage for an extra stage times when
staging down if a disabled circuit is turned off at that stage.
• Any compressor on a disabled circuit stays off if it is already off and is turned off if it is on.
Table 58: Standard Staging
Staging Sequence
Std-1
Std-2
92
Standard Staging
Stage 1 Compressor
Stage 2 Compressors
1
2
1,3
2,3
Stage 3 Compressors
1,2,3
1,2,3
McQuay OM 920
Operator’s Guide
Table 58: Standard Staging
Staging Sequence
Standard Staging
Stage 1 Compressor
Stage 2 Compressors
StgdClgCap
33%
Stage 3 Compressors
67%
100%
Four Equal Sized Compressors, Two Circuits
The user selects the following:
1. Staging Type = Standard or Alternate Staging
2. Lead Circuit = Auto, # 1 or # 2.
• Total cooling stages = 4.
• If Lead Circuit is set to Auto and neither circuit is disabled, the Staging sequence is the
Standard or Alternate sequence that contains the Stage 1 Compressor with the fewest run
hours. Maximum cooling stages is set to 4.
• If Lead Circuit is set to # 1 and Circuit # 2 is enabled, the Staging sequence is Std-1 or Std-3
that contains the Stage 1 Compressor with fewer run hours.
• If Lead Circuit is set to # 1 and Circuit # 2 is disabled, the Staging sequence is Alt-1 or Alt3 that contains the Stage 1 Compressor with fewer run hours.
• If Lead Circuit is set to # 2 and Circuit # 1 is enabled, the Staging sequence is Std-2 or Std-4
that contains the Stage 1 Compressor with fewer run hours.
• If Lead Circuit is set to # 2 and Circuit # 1 is disabled, the Staging sequence is Alt-2 or Alt4 that contains the Stage 1 Compressor with fewer run hours.
• The Compressor Sequence changes only when the compressor stage equals Maximum
cooling stages or zero. This means that disabling and re-enabling the compressors or turning
the unit off and on may be necessary to cause sequence changes.
• If a circuit is disabled, Maximum cooling stages is set to two. Any compressor on the
disabled circuit stays off if it is already off and is turned off if it is on.
• If dehumidification is active, Alternate Staging is used regardless of the Staging Type=
setting.
Table 59: Standard Staging
Staging Sequence
Std-1
Std-2
Std-3
Std-4
StgdClgCap
Stage 1
Standard Staging
Stage 2
Stage 3
Stage 4
Compressor
Compressors
Compressors
Compressors
1
2
3
4
25%
1,2
2,3
3,4
1,4
50%
1,2,3
2,3,4
1,3,4
1,2,4
75%
1,2,3,4
1,2,3,4
1,2,3,4
1,2,3,4
100%
Table 60: Alternate Staging
Staging Sequence
Alt-1
Alt-2
Alt-3
Alt-4
StgdClgCap
McQuay OM 920
Stage 1
Alternate Staging
Stage 2
Stage 3
Stage 4
Compressor
Compressors
Compressors
Compressors
1
2
3
4
25%
1,3
2,4
1,3
2,4
50%
1,2,3
1,2,4
1,3,4
2,3,4
75%
1,2,3,4
1,2,3,4
1,2,3,4
1,2,3,4
100%
93
Operator’s Guide
Four Equal Sized Compressors, Four Circuits, No WRV
Only one sequence is provided so the user makes no selections
• Total cooling stage = 4.
• Maximum cooling stages is always set to 4.
• The Staging sequence is the Standard sequence that contains the enabled Stage 1
Compressor with the fewest run hours. Compressors in disabled circuits are ignored when
only enabled compressor run hours are compared. Maximum cooling stages is set to 4.
• The Compressor Sequence changes only when the compressor stage equals Maximum
cooling stages or zero. This means that disabling and re-enabling the compressors or turning
the unit off and on may be necessary to cause sequence changes.
• The same staging sequence is used whether a circuit is disabled or not. This means that units
will remain at a stage for an extra stage time when staging up if a disabled circuit is added at
that stage. It also means that units will remain at a stage for an extra stage times when
staging down if a disabled circuit is turned off at that stage.
• Any compressor on the disabled circuit stays off if it is already off and is turned off if it is
on.
Table 61: Standard Staging
Staging Sequence
Std-1
Std-2
Std-3
Std-4
StgdClgCap
Stage 1
Standard Staging
Stage 2
Stage 3
Stage 4
Compressor
Compressors
Compressors
Compressors
1
2
3
4
25%
1,2
2,3
3,4
1,4
50%
1,2,3
2,3,4
1,3,4
1,2,4
75%
1,2,3,4
1,2,3,4
1,2,3,4
1,2,3,4
100%
Four Equal Sized Compressors, Four Circuits, Water Regulating Valve
Only one sequence is provided so the user makes no selections
• Total cooling stages = 4.
• Maximum cooling stages is always set to 4.
• If neither circuit # 1 nor circuit # 2 is disabled, the staging sequence is Std-1 if compressor #
1 has fewer hours than compressor # 2, and the staging sequence is Std-2 if compressor # 1
does not have fewer hours than compressor # 2.
• If Circuit # 1 is disabled, the staging sequence is Std-2.
• If Circuit # 2 is disabled, the staging sequence is Std-1.
• If both circuit # 1 and circuit # 2 are disabled, the staging sequence is Std-1. Only
compressors 3 and 4 are used.
• The Compressor Sequence changes based on Run Time only when the compressor stage
equals Maximum cooling stages or zero. This means that disabling and re-enabling the
compressors or turning the unit off and on may be necessary to cause sequence changes.
• The compressor sequence changes immediately if a circuit is disabled to keep either
compressor # 1 or # 2 on. This will result in compressors being turned off and others being
turned on in this emergency condition.
• The same staging sequence is used whether a circuit is disabled or not. This means that units
will remain at a stage for an extra stage time when staging up if a disabled circuit is added at
that stage. It also means that units will remain at a stage for an extra stage time when staging
down if a disabled circuit is turned off at that stage.
94
McQuay OM 920
Operator’s Guide
• Any compressor on a disabled circuit stays off if it is already off and is turned off if it is on.
Table 62: Standard Staging
Stage 1
Standard Staging
Stage 2
Stage 3
Stage 4
Compressor
Compressors
Compressors
Compressors
1
2
25%
1,4
2,3
50%
1,3,4
2,3,4
75%
1,2,3,4
1,2,3,4
100%
Staging Sequence
Std-1
Std-2
StgdClgCap
Six Equal Sized Compressors, Two Circuits
The user selects the following:
1. Staging Type = Standard or Alternate Staging
2. Lead Circuit = Auto, # 1 or # 2.
•
•
•
•
•
•
•
•
•
Total cooling stages = 6.
If Lead Circuit is set to Auto and neither circuit is disabled, the Staging
sequence is the Standard or Alternate sequence that contains the Stage 1
Compressor with the fewest run hours. Maximum cooling stages is set to 6.
If Lead Circuit is set to # 1 and Circuit # 2 is enabled, the Staging sequence is
Std-1, Std-3, or Std-5 that contains the Stage 1 Compressor with the fewest
run hours.
If Lead Circuit is set to # 1 and Circuit # 2 is disabled, the Staging sequence
is Alt-1, Alt-3, or Alt-5 that contains the Stage 1 Compressor with the fewest
run hours.
If Lead Circuit is set to # 2 and Circuit # 1 is enabled, the Staging sequence is
Std-2, Std-4, or Std-6 that contains the Stage 1 Compressor with the fewest
run hours.
If Lead Circuit is set to # 2 and Circuit # 1 is disabled, the Staging sequence
is Alt-2, Alt-4, or Alt-6 that contains the Stage 1 Compressor with the fewest
run hours.
The Compressor Sequence changes only when the compressor stage equals
Maximum cooling stages or zero. This means that disabling and re-enabling
the compressors or turning the unit off and on may be necessary to cause
sequence changes.
If a circuit is disabled, Maximum cooling stages is set to three. Any
compressor on the disabled circuit stays off if it is already off and is turned
off if it is on.
If dehumidification is active, Alternate Staging is used regardless of the
Staging Type= setting.
Table 63: Standard Staging
Staging Sequence
Std-1
Std-2
Std-3
Std-4
Std-5
Std-6
StgdClgCap
McQuay OM 920
Stage 1
Stage 2
Comps
Comps
1
2
3
4
5
6
17%
1,2
2,3
3,4
4,5
5,6
1,6
33%
Standard Staging
Stage 3
Stage 4
Comps
Comps
1,2,3
2,3,4
3,4,5
4,5,6
1,5,6
1,2,6
50%
1,2,3,4
2,3,4,5
3,4,5,6
1,4,5,6
1,2,5,6
1,2,3,6
67%
Stage 5
Comps
Stage 6
1,2,3,4,5
2,3,4,5,6
1,3,4,5,6
1,2,4,5,6
1,2,3,5,6
1,2,3,4,6
83%
1,2,3,4,5,6
1,2,3,4,5,6
1,2,3,4,5,6
1,2,3,4,5,6
1,2,3,4,5,6
1,2,3,4,5,6
100%
Comps
95
Operator’s Guide
Table 64: Alternate Staging
Staging Sequence
Alt-1
Alt-2
Alt-3
Alt-4
Alt-5
Alt-6
StgdClgCap
Stage 1
Stage 2
Comps
Comps
1
2
3
4
5
6
17%
1,3
2,4
3,5
4,6
1,5
2,6
33%
Alternate Staging
Stage 3
Stage 4
Comps
Comps
1,3,5
2,4,6
1,3,5
2,4,6
1,3,5
2,4,6
50%
1,2,3,5
1,2,4,6
1,3,4,5
2,3,4,6
1,3,5,6
2,4,5,6
67%
Stage 5
Comps
Stage 6
1,2,3,4,5
1,2,3,4,6
1,3,4,5,6
2,3,4,5,6
1,2,3,5,6
1,2,4,5,6
83%
1,2,3,4,5,6
1,2,3,4,5,6
1,2,3,4,5,6
1,2,3,4,5,6
1,2,3,4,5,6
1,2,3,4,5,6
100%
Comps
Six Equal Sized Compressors, Six Circuits, No WRV
Only one sequence is provided so the user makes no selections.
• Total cooling stages = 6.
• Maximum cooling stages is always set to 6.
• The Staging sequence is the Standard sequence that contains the enabled Stage 1
Compressor with the fewest run hours. Compressors in disabled circuits are ignored when
only enabled compressor run hours are compared.
• The Compressor Sequence changes only when the compressor stage is Maximum cooling
stages or zero. This means that disabling and re-enabling the compressors or turning the unit
off and on may be necessary to cause sequence changes.
• The same staging sequence is used whether a circuit is disabled or not. This means that units
will remain at a stage for an extra stage time when staging up if a disabled circuit is added at
that stage. It also means that units will remain at a stage for an extra stage times when
staging down if a disabled circuit is turned off at that stage.
• Any compressor on the disabled circuit stays off if it is already off and is turned off if it is
on.
Table 65: Standard Staging
Staging Sequence
Std-1
Std-2
Std-3
Std-4
Std-5
Std-6
StgdClgCap
Stage 1
Stage 2
Comps
Comps
1
2
3
4
5
6
17%
1,2
2,3
3,4
4,5
5,6
1,6
33%
Standard Staging
Stage 3
Stage 4
Comps
Comps
1,2,3
2,3,4
3,4,5
4,5,6
1,5,6
1,2,6
50%
1,2,3,4
2,3,4,5
3,4,5,6
1,4,5,6
1,2,5,6
1,2,3,6
67%
Stage 5
Comps
Stage 6
1,2,3,4,5
2,3,4,5,6
1,3,4,5,6
1,2,4,5,6
1,2,3,5,6
1,2,3,4,6
83%
1,2,3,4,5,6
1,2,3,4,5,6
1,2,3,4,5,6
1,2,3,4,5,6
1,2,3,4,5,6
1,2,3,4,5,6
100%
Comps
Six Equal Sized Compressors, Six Circuits, Water Regulating Valve
Only one sequence is provided so the user makes no selections.
•
•
•
•
•
•
•
96
Total cooling stages = 6.
Maximum cooling stages is always set to 6.
If both circuit # 1 and circuit # 2 are enabled, the staging sequence is Std-1 if
compressor # 1 has fewer hours than compressor # 2, and the staging
sequence is Std-2 if compressor # 1 does not have fewer hours than
compressor # 2.
If Circuit # 1 is disabled, the staging sequence is Std-2.
If Circuit # 2 is disabled, the staging sequence is Std-1.
If both circuit # 1 and circuit # 2 are disabled, the staging sequence is Std-1.
Only compressors 3, 4, 5, and 6 are used.
The Compressor Sequence changes based on Run Time only when the
compressor stage equals Maximum cooling stages or zero. This means that
McQuay OM 920
Operator’s Guide
disabling and re-enabling the compressors or turning the unit off and on may
be necessary to cause sequence changes.
• The compressor sequence changes immediately if a circuit is disabled to
keep either compressor # 1 or # 2 on. This will result is compressors being
turned off and others being turned on in this emergency condition.
• The same staging sequence is used whether a circuit is disabled or not. This
means that units will remain at a stage for an extra stage time when staging
up if a disabled circuit is added at that stage. It also means that units will
remain at a stage for an extra stage times when staging down if a disabled
circuit is turned off at that stage.
• Any compressor on a disabled circuit stays off if it is already off and is
turned off if it is on.
Table 66: Standard Staging
Staging Sequence
Std-1
Std-2
StgdClgCap
Stage 1
Stage 2
Comps
Comps
1
2
17%
1,4
2,3
33%
Standard Staging
Stage 3
Stage 4
Comps
Comps
1,4,5
2,3,6
50%
1,4,5,6
2,3,5,6
67%
Stage 5
Comps
Stage 6
1,3,4,5,6
2,3,4,5,6
83%
1,2,3,4,5,6
1,2,3,4,5,6
100%
Comps
Eight Equal Sized Compressors, Two Circuits
The user selects the following:
1. Staging Type = Standard or Alternate Staging
•
•
•
•
•
•
•
•
•
•
McQuay OM 920
Lead Circuit = Auto, # 1 or # 2.
Total cooling stages = 8
If Lead Circuit is set to Auto and neither circuit is disabled, the Staging
sequence is the Standard or Alternate sequence that contains the Stage 1
Compressor with the fewest run hours. Maximum cooling stages is set to 8.
If Lead Circuit is set to # 1 and Circuit # 2 is enabled, the Staging sequence is
Std-1, Std-3, Std-5 or Std-7 that contains the Stage 1 Compressor with the
fewest run hours.
If Lead Circuit is set to # 1 and Circuit # 2 is disabled, the Staging sequence
is Alt-1, Alt-3, Alt-5,or Alt-7 that contains the Stage 1 Compressor with the
fewest run hours.
If Lead Circuit is set to # 2 and Circuit # 1 is enabled, the Staging sequence is
Std-2, Std-4, Std-6 or Std-8 that contains the Stage 1 Compressor with the
fewest run hours.
If Lead Circuit is set to # 2 and Circuit # 1 is disabled, the Staging sequence
is Alt-2, Alt-4, Alt-6, or Alt-8 that contains the Stage 1 Compressor with the
fewest run hours.
The Compressor Sequence changes only when the compressor stage equals
Maximum cooling stages or zero. This means that disabling and re-enabling
the compressors or turning the unit off and on may be necessary to cause
sequence changes.
If a circuit is disabled, Maximum cooling stages is set to four. Any
compressor on the disabled circuit stays off if it is already off and is turned
off if it is on.
If dehumidification is active, Alternate Staging is used regardless of the
Staging Type= setting.
97
Operator’s Guide
Table 67: Standard Staging
Staging
Sequence
Stage 1
Comps
Stage 2
Comps
Stage 3
Comps
Std-1
Std-2
Std-3
Std-4
Std-5
Std-6
Std-7
Std-8
ClgCap
1
2
3
4
5
6
7
8
13%
1,2
1,2
3,4
3,4
5,6
5,6
7,8
7,8
25%
1,2,3
1,2,8
2,3,4
3,4,5
4,5,6
5,6,7
1,7,8
6,7,8
38%
Standard Staging
Stage 4
Stage 5
Comps
Comps
1,2,3,4
1,2,7,8
1,2,3,4
3,4,5,6
3,4,5,6
5,6,7,8
1,2,7,8
5,6,7,8
50%
1,2,3,4,5
1,2,3,7,8
1,2,3,4,8
2,3,4,5,6
3,4,5,6,7
1,5,6,7,8
1,2,6,7,8
4,5,6,7,8
63%
Stage 6
Comps
Stage 7
Comps
Stage 8 Comps
1,2,3,4,5,6
1,2,3,4,7,8
1,2,3,4,7,8
1,2,3,4,5,6
3,4,5,6,7,8
1,2,5,6,7,8
1,2,5,6,7,8
3,4,5,6,7,8
75%
1,2,3,4,5,6,7
1,2,3,4,5,7,8
1,2,3,4,6,7,8
1,2,3,4,5,6,8
1,3,4,5,6,7,8
1,2,3,5,6,7,8
1,2,4,5,6,7,8
2,3,4,5,6,7,8
88%
1,2,3,4,5,6,7,8
1,2,3,4,5,6,7,8
1,2,3,4,5,6,7,8
1,2,3,4,5,6,7,8
1,2,3,4,5,6,7,8
1,2,3,4,5,6,7,8
1,2,3,4,5,6,7,8
1,2,3,4,5,6,7,8
100%
Stage 6
Comps
Stage 7
Comps
Stage 8 Comps
1,2,3,5,6,7
1,2,3,4,6,8
1,3,4,5,7,8
1,2,3,4,6,8
1,2,3,5,6,7
2,4,5,6,7,8
1,3,4,5,7,8
2,4,5,6,7,8
75%
1,2,3,4,5,6,7
1,2,3,4,5,6,8
1,2,3,4,5,7,8
1,2,3,4,6,7,8
1,2,3,5,6,7,8
1,2,4,5,6,7,8
1,3,4,5,6,7,8
2,3,4,5,6,7,8
88%
1,2,3,4,5,6,7,8
1,2,3,4,5,6,7,8
1,2,3,4,5,6,7,8
1,2,3,4,5,6,7,8
1,2,3,4,5,6,7,8
1,2,3,4,5,6,7,8
1,2,3,4,5,6,7,8
1,2,3,4,5,6,7,8
100%
Table 68: Alternate Staging
Staging
Sequence
Stage 1
Comps
Stage 2
Comps
Stage 3
Comps
Std-1
Std-2
Std-3
Std-4
Std-5
Std-6
Std-7
Std-8
ClgCap
1
2
3
4
5
6
7
8
13%
1,3
2,4
1,3
2,4
5,7
6,8
5,7
7,8
25%
1,3,5
2,4,6
1,3,7
2,4,8
1,5,7
2,6,8
3,5,7
4,6,8
38%
Standard Staging
Stage 4
Stage 5
Comps
Comps
1,3,5,7
2,4,6,8
1,3,5,7
2,4,6,8
1,3,5,7
2,4,6,8
1,3,5,7
2,4,6,8
50%
1,2,3,5,7
1,2,4,6,8
1,3,4,5,7
2,3,4,6,8
1,3,5,6,7
2,4,5,6,8
1,3,5,7,8
2,4,6,7,8
63%
Eight Equal Sized Compressors, Eight Circuits, No WRV
Only one sequence is provided so the user makes no selections.
• Total cooling stages = 8.
• Maximum cooling stages is always set to 8.
• The Staging sequence is the Standard sequence that contains the enabled Stage 1
Compressor with the fewest run hours. Compressors in disabled circuits are ignored when
only enabled compressor run hours are compared.
• The Compressor Sequence changes only when the compressor stage is Maximum cooling
stages or zero. This means that disabling and re-enabling the compressors or turning the unit
off and on may be necessary to cause sequence changes.
• The same staging sequence is used whether a circuit is disabled or not. This means that units
will remain at a stage for an extra stage time when staging up if a disabled circuit is added at
that stage. It also means that units will remain at a stage for an extra stage times when
staging down if a disabled circuit is turned off at that stage.
• Any compressor on the disabled circuit stays off if it is already off and is turned off if it is
on.
Table 69: Standard Staging
98
Staging
Sequence
Stage 1
Comps
Stage 2
Comps
Stage 3
Comps
Std-1
Std-2
Std-3
Std-4
Std-5
Std-6
Std-7
Std-8
ClgCap
1
2
3
4
5
6
7
8
13%
1,2
1,2
3,4
3,4
5,6
5,6
7,8
7,8
25%
1,2,3
1,2,8
2,3,4
3,4,5
4,5,6
5,6,7
1,7,8
6,7,8
38%
Standard Staging
Stage 4
Stage 5
Comps
Comps
1,2,3,4
1,2,7,8
1,2,3,4
3,4,5,6
3,4,5,6
5,6,7,8
1,2,7,8
5,6,7,8
50%
1,2,3,4,5
1,2,3,7,8
1,2,3,4,8
2,3,4,5,6
3,4,5,6,7
1,5,6,7,8
1,2,6,7,8
4,5,6,7,8
63%
Stage 6
Comps
Stage 7
Comps
Stage 8 Comps
1,2,3,4,5,6
1,2,3,4,7,8
1,2,3,4,7,8
1,2,3,4,5,6
3,4,5,6,7,8
1,2,5,6,7,8
1,2,5,6,7,8
3,4,5,6,7,8
75%
1,2,3,4,5,6,7
1,2,3,4,5,7,8
1,2,3,4,6,7,8
1,2,3,4,5,6,8
1,3,4,5,6,7,8
1,2,3,5,6,7,8
1,2,4,5,6,7,8
2,3,4,5,6,7,8
88%
1,2,3,4,5,6,7,8
1,2,3,4,5,6,7,8
1,2,3,4,5,6,7,8
1,2,3,4,5,6,7,8
1,2,3,4,5,6,7,8
1,2,3,4,5,6,7,8
1,2,3,4,5,6,7,8
1,2,3,4,5,6,7,8
100%
McQuay OM 920
Operator’s Guide
Eight Equal Sized Compressors, Eight Circuits, WRV
Only one sequence is provided so the user makes no selections.
• Total cooling stages = 8.
• Maximum cooling stages is always set to 8.
• If both circuit # 1 and circuit # 2 are enabled, the staging sequence is Std-1 if compressor # 1
has fewer hours than compressor # 2, and the staging sequence is Std-2 if compressor # 1
does not have fewer hours than compressor # 2.
• If Circuit # 1 is disabled, the staging sequence is Std-2.
• If Circuit # 2 is disabled, the staging sequence is Std-1.
• If both circuit # 1 and circuit # 2 are disabled, the staging sequence is Std-1. Only
compressors 3 through 8 are used.
• The Compressor Sequence changes based on Run Time only when the compressor stage
equals Maximum cooling stages or zero. This means that disabling and re-enabling the
compressors or turning the unit off and on may be necessary to cause sequence changes.
• The compressor sequence changes immediately if a circuit is disabled to keep either
compressor # 1 or # 2 on. This will result is compressors being turned off and others being
turned on in this emergency condition.
• The same staging sequence is used whether a circuit is disabled or not. This means that units
will remain at a stage for an extra stage time when staging up if a disabled circuit is added at
that stage. It also means that units will remain at a stage for an extra stage times when
staging down if a disabled circuit is turned off at that stage.
• Any compressor on a disabled circuit stays off if it is already off and is turned off if it is on.
Table 70: Standard Staging
Staging
Sequence
Stage 1
Comps
Stage 2
Comps
Stage 3
Comps
Std-1
Std-2
ClgCap
1
2
13%
1,4
2,3
25%
1,4,5
2,3,6
38%
Standard Staging
Stage 4
Stage 5
Comps
Comps
1,4,5,7
2,3,6,8
50%
1,4,5,7,8
2,3,6,7,8
63%
Stage 6
Comps
Stage 7
Comps
Stage 8 Comps
1,4,5,6,7,8 1,2,3,4,5,6,8 1,2,3,4,5,6,7,8
2,3,5,6,7,8 2,3,4,5,6,7,8 1,2,3,4,5,6,7,8
75%
88%
100%
Staging - DAT Control
In the Cooling state, compressor stages are turned on and off to maintain an average Discharge
Air Temperature near the Discharge Cooling Setpoint. This control sequence causes the unit to
operate longer at the stage that produces the discharge air temperature that is closer to the
setpoint which results in an average discharge air temperature that is very close to the
Discharge Cooling Setpoint. This setpoint may be fixed or reset as described in the Cooling
DAT Reset section. External devices such as VAV boxes maintain the desired space
conditions. The unit may be a Constant Volume unit, but it is normally a Variable Air Volume
unit. If the Discharge Air Temperature is approaching the setpoint, the number of stages
continues to increase or decrease until the actual temperature gets within half the deadband.
Control of cooling stages is based on two values, the Degree Time Above and the Degree
Time Below the cooling DAT setpoint. The difference between the actual discharge air
temperature and the Discharge Cooling Setpoint is added to one of the Degree Time values
every ten seconds. If the Discharge Air Temperature exceeds Discharge Cooling Setpoint, the
difference is added to the Degree Time Above Value. If the Discharge Air Temperature is
below the Discharge Cooling Setpoint, the difference is added to the Degree Time Below
value. These values are limited to a maximum value of 250 to prevent getting stuck in one
stage because one value or the other became very large.
When the unit enters the Cooling state the unit goes directly to Cooling Stage # 1 so that the
first compressor is turned on immediately unless the unit is configured for Evaporative
Condensing. In this case, the sump pump must be turned on before any compressor is turned
on. If there is a sump pump fail condition, cooling will stay in stage 0.
McQuay OM 920
99
Operator’s Guide
The number of compressor stages increases when:
• The time since the last stage change exceeds the cooling stage timer AND
• Discharge air temperature is greater than the Discharge Cooling Setpoint by more than half
the deadband AND
• The current cooling stage is less than the number of available stages AND
• The last stage change was a stage up AND
• Dehumidification is not active
OR
• The time since the last stage change exceeds the cooling stage timer AND
• Discharge air temperature is greater than the Discharge Cooling Setpoint by more than half
the deadband AND
• The current cooling stage is less than the number of available stages AND
• The last stage change was a stage down AND
• The Degree Time Above Value is greater than or equal to the Degree Time Below value
AND
• Dehumidification is not active
OR
• The time since the last stage change exceeds the cooling stage timer AND
• Dehumidification is active AND
• Leaving Coil Temp is greater than the Maximum leaving coil Setpoint AND
• Current Stage is less than the available number of stages
The number of compressor stages decreases when:
• The time since the last stage change exceeds the Cooling stage timer AND
• Discharge air temperature is less than the Discharge Cooling Setpoint by more than half the
deadband AND
• The current cooling stage is greater than zero AND
• The last stage change was a stage down AND
• Dehumidification is not active
OR
• The time since the last stage change exceeds the Cooling stage timer AND
• Discharge air temperature is less than the Discharge Cooling Setpoint by more than half the
deadband AND
• The current cooling stage is greater than zero AND
• The last stage change was a stage up AND
• The Degree Time Below Value is greater than or equal to the Degree Time Above value
AND
• Dehumidification is not active
OR
• The time since the last stage change exceeds the Cooling stage timer AND
• Dehumidification is active AND
• Leaving Coil Temperature is less than the Minimum leaving coil Setpoint AND
• Current Stage is greater than 0
100
McQuay OM 920
Operator’s Guide
The Degree Time Below Value and Degree Time Above value change whenever a stage
change occurs. If the previous stage change was a stage up and the number of stages increases
again, both Degree Time Above and Degree Time Below are set to zero.
If dehumidification is active, both Degree Time Above and Degree Time Below are set to
zero. If the previous stage change was a stage down and the number of stages decreases again,
both Degree Time Above and Degree Time Below are set to zero.
If the last stage change was a stage up and the stage decreases due to the Degree Time Below
exceeding the Degree Time Above, the Degree Time Below is reduced by an amount equal to
Degree Time Above and then the Degree Time Above is set to zero.
If the last stage change was a stage down and the stage increases due to the Degree Time
Above exceeding the Degree Time Below, the Degree Time Above is reduced by an amount
equal to Degree Time Below and then the Degree Time Below is set to zero.
Average Discharge Control Method Illustration
Figure 11 is an illustration of the “Average” compressor staging control method and is meant
to show a variety of staging possibilities not normal unit operation. Figure 11 shows nine
points on a graph of the discharge air temperature changing with time. The Cooling Interstage
Timer setting is 5 minutes.
Point 1 Assume that the controller has just staged up and that DTA and DTB are zero. As a
result, the discharge air temperature drops and the Cooling Interstage Timer is reset.
Point 2 DTA (Area A) equals DTB (Area B). The discharge air temperature is below the
Effective Discharge Cooling Set Point by more than half the Discharge Cooling Dead Band.
However, since the Cooling Interstage Timer has not yet expired, no staging action occurs.
Point 3 The Cooling Interstage Timer has expired. DTB (Area B + Area C) is greater than
DTA (Area A) and the discharge air temperature is below the Effective Discharge Cooling Set
Point by more than half the Discharge Cooling Dead Band. Therefore, cooling is staged down.
As a result, the discharge air temperature rises, the Cooling Interstage Timer is reset, and DTA
is subtracted from both DTA and DTB. This zeros DTA and leaves DTB equal to Area C.
Point 4 The Cooling Interstage Timer has expired. The discharge air temperature is above the
Effective Discharge Cooling Set Point by more than half the Discharge Cooling Dead Band.
However, since DTA (Area E) is not yet equal to DTB (Area C + Area D), no staging action
occurs and the discharge air temperature continues to rise.
Point 5 The Cooling Interstage Timer has expired. The discharge air temperature is above the
Effective Discharge Cooling Set Point by more than half the Discharge Cooling Dead Band
and DTA (Area E + Area F) is equal to DTB (Area C + Area D). Therefore, cooling is staged
up. As a result, the discharge air temperature drops, the Cooling Interstage Timer is reset, and
DTB is subtracted from both DTB and DTA. This zeros both DTA and DTB since they are
equal. Note that the elapsed time since the last stage change in Figure 11 is 6.3 minutes.
Point 6 The Cooling Interstage Timer has expired. Because the cooling load is now
increasing, the discharge air temperature does not fall below the Effective Discharge
Cooling Set Point by more than half the Discharge Cooling Dead Band. No staging action
occurs for two reasons: (1) the discharge air temperature is within the Discharge Cooling
Dead Band and (2) DTB (Area H) is not yet equal to DTA (Area G). Even if the discharge air
temperature falls below the Effective Discharge Cooling Set Point by more than half the
Discharge Cooling Dead Band (as shown just after Point 6), a stage down does not occur
because DTB remains less than DTA. The discharge air temperature starts rising again because
the load is increasing.
McQuay OM 920
101
Operator’s Guide
Point 7 The discharge air temperature is again above the Effective Discharge Cooling Set
Point by more than half the Discharge Cooling Dead Band. Since the Cooling Interstage
Timer expired at Point 6, cooling is staged up. As a result, both DTA and DTB are zeroed and
the Cooling Interstage Timer is reset. Note that DTA and DTB are both zeroed since two
consecutive stage increase actions occurred. The discharge air temperature continues to rise,
however, because the cooling load is still increasing. Note that the elapsed time since the last
stage change in this illustration is 11.0 minutes.
Point 8 The Cooling Interstage Timer has expired. Since the discharge air temperature is still
above the Effective Discharge Cooling Set Point by more than half the Discharge Cooling
Dead Band, another stage-up occurs. As a result, DTA (Area K) is again zeroed out (DTB
remains zeroed) and the Cooling Interstage Timer is reset. The cooling load has leveled out,
and the discharge air temperature drops.
Point 9 The Cooling Interstage Timer has expired at the same time that DTB (Area M)
becomes equal to DTA (Area L). Therefore, cooling is staged down, the Cooling Interstage
Timer is reset and DTA is subtracted from both DTA and DTB. This zeros both DTA and DTB
since they are equal.
Figure 11: Cooling Interstage Timer
Staging - Zone Control
In the Cooling state, Compressor Stages are turned on and off to maintain the Control
Temperature close to the Zone Cooling Setpoint. Use of the Projected Control Temperature
reduces overshoot during cool down. See the Project Ahead section for a description of how
the Project Ahead Temperature is calculated.
When Dehumidification is active, Compressor stages are controlled to maintain the leaving
coil temperature between the minimum leaving coil setpoint and the maximum leaving coil
DAT Setpoint.
When the unit enters the Cooling state or dehumidification operation begins the unit goes
directly to Cooling Stage # 1 so that the first compressor is turned on immediately.
The number of Compressor Stages increases when:
• The time since the last stage change exceeds the Cooling stage timer AND
• Projected Control Temperature is greater than the Zone cooling Setpoint by more than half
the deadband AND
102
McQuay OM 920
Operator’s Guide
• Control Temperature is greater than the Zone cooling setpoint by more than half the
deadband AND
• Discharge Air Temperature is greater than the minimum DAT cooling setpoint AND
• The current cooling stage is less than the available number of stages AND
• Dehumidification is not Active
OR
• The time since the last stage change exceeds the Cooling stage timer AND
• Dehumidification is active AND
• Leaving Coil Temp is greater then the maximum leaving coil setpoint AND
• Current Stage is less than the available number of stages
The number of Compressor Stages decreases when:
• The time since the last stage change exceeds the Cooling stage timer AND
• Projected Control Temperature is less than the Zone cooling Setpoint by more than half the
deadband AND
• Control Temperature is less than the Zone cooling setpoint by more than half the deadband
AND
• The current cooling stage is greater than zero AND
• Dehumidification is not Active
OR
• The time since the last stage change exceeds the Cooling stage timer AND
• Discharge Air Temperature is less than the minimum DAT Cooling setpoint AND
• The current cooling stage is greater than zero AND
• Dehumidification is not Active
OR
• The time since the last stage change exceeds the Cooling stage timer AND
• Dehumidification is active AND
• Leaving Coil Temperature is less than the minimum leaving coil setpoint AND
• Current Stage is greater than 0
Project Ahead
This section provides the Projected Control Temperature used to turn on and off stages of
heating and cooling for Zone Control units. It is not used in DAT units.
In Zone Control cooling and heating operation, the Projected Control Temperature, reduces
overshoot as the zone temperature approaches a setpoint after startup. It does this by causing
stages to stop increasing before the actual Control Temperature reaches the setpoint. The rate
of change of the Control Temperature is calculated once per minute by the controller and
equals the change during the last sixty seconds. This rate of change is multiplied by the
Effective Project Ahead Time and is added to the current Control Temperature. The rate of
change may be negative or positive so the Projected Control Temperature may be higher or
lower than the Control Temperature. This value, the Projected Control Temperature, is the
temperature that would exist after the Project Ahead Time passes if the Control Temperature
were to continue to change at the same rate for the Effective Project Ahead Time. The
Effective Project Ahead Time is set equal to the Cooling Project Ahead Time when a unit with
compressorized cooling is in Cooling State. The Effective Project Ahead Time is set equal to
the Heating Project Ahead Time when a unit with staged heating is in the Heating State. It is
set equal to zero under all other conditions causing the Projected Control temperature to equal
the Control Temperature
McQuay OM 920
103
Operator’s Guide
Cooling: Modulating
Modulating Cooling Control: Chilled Water
When the unit's cooling type is set to chilled water and is in the Cooling operating state, or in
the dehumidification operating state the chilled water valve is modulated to maintain the
discharge air temperature at the Discharge Cooling Set Point (or Leaving Coil Temperature if
in the dehumidification operating state).
Modulating Cooling Control: Face & Bypass
When the unit's cooling type is set to Face & Bypass and is in the Cooling operating state, or
in the dehumidification operating state, the chilled water valve is driven fully open and the
face and bypass dampers are modulated to maintain the discharge air temperature at the
Discharge Cooling Set Point (or Leaving Coil Temperature if in the dehumidification
operating state).
Discharge Air Temperature Setpoint Reset - Cooling
The Cooling DAT Setpoint may be reset for units with DAT Cooling Control. The Discharge
Air Temperature Setpoint will never be set below the Minimum DAT Cooling Setpoint or
above the Maximum DAT Cooling Setpoint on the Standard Menus/Cooling/Cooling Reset
menu. The reset type may be set to one of the following:
• None Discharge Cooling Spt = User Adjustable
• Network Discharge Cooling Spt = Network DAT Clg Setpoint when it is valid.
• Space Discharge Cooling Spt is based on the Space Sensor
• Return Discharge Cooling Spt is based on the Return Air Sensor
• OAT Discharge Cooling Spt is based on the Outdoor Air Temperature
• Ext mA Discharge Cooling Spt is determined by a 0-20 mA signal
• Ext V Discharge Cooling Spt is determined by a 0-10 VDC signal
• Airflow Discharge Cooling Spt is based on the airflow as indicated by the variable
frequency drive speed
Reset reverts from Return to None when a Return Air Sensor opens or shorts. Reset reverts
from Space to None when a Space Sensor opens or shorts. Reset reverts from OAT to None
when an Outdoor Air Sensor opens or shorts.
When Space, Return, OAT, Airflow, Ext mA, or Ext V is selected, the Discharge Cooling Spt
equals the Max Clg Spt when the selected value equals the Max Clg Spt @ value. Similarly,
the Discharge Cooling Spt equals the Min Clg Spt when the selected value equals the Min Clg
Spt @ value.
When Space, Return, OAT, or Airflow is selected, it only makes sense for the DAT Cooling
setpoint to decrease as the selected temperature increases as shown in the graph below.
Figure 12: Cooling Setpoint
Max Clg Spt
Min Clg Spt
Max Clg Spt @
104
Min Clg Spt @
McQuay OM 920
Operator’s Guide
When Airflow is selected, the values “Min Clg Spt @” and “Max Clg Spt @” are entered as
percentage values. When Ext mA is selected, the values “Min Clg Spt @” and “Max Clg Spt
@” are entered as mA values. When Ext VDC is selected, the values “Min Clg Spt @” and
“Max Clg Spt @” are entered as VDC values.
If Ext mA or Ext V is selected as the type of reset, the Min Clg Spt @ value may be set above
the Max Clg Spt @ value to cause a decrease in the DAT setpoint as the external signal or the
Min Clg Spt @ value may be set below the Max Clg Spt @ value to cause an increase in the
DAT setpoint as the external signal increase.
Actually, the Min Clg Spt @ value can be set below the Max Clg Spt @ value for all types of
reset, but it only makes sense for external reset.
When ever the Clg Reset Type or Engineering Units is changed, the Min Clg Spt @ and Max
Clg Spt @ values revert to default values as follows:
• None: Min Clg Spt @=0NA, Max Clg Spt @=100NA
• Network: Min Clg Spt @=0NA, Max Clg Spt @=100NA
• Space, Return: Min Clg Spt @=73.0F, Max Clg Spt @=71.0F
• OAT: Min Clg Spt @=90.0F, Max Clg Spt @=70.0F
• ExtmA: Min Clg Spt @=4.0mA, Max Clg Spt @=20.0mA
• ExtVDC: Min Clg Spt @=0.0V, Max Clg Spt @=10.0V
• Airflow: Min Clg Spt @=0%, Max Clg Spt @=100%
Condenser Fan Control
There are up to four condenser fans per circuit. The first fan on each circuit is always turned
on when any compressor on the circuit is turned on through auxiliary switches on the
compressor contactors. The second two fans on each circuit (if applicable) are controlled by
outputs from the Main Controller. These are controlled via Condenser Fan Output A (MCBDO7) and Condenser Fan Output B (MCB -DO8). The last fan on each circuit (if applicable)
is controller by an external refrigerant pressure switch.
Cond Fan Output A is turned on when any compressor on is on and the OAT rises above the
Condenser Fan A Set Point. Cond Fan Output A is turned off when all compressors are off or
the OAT drops below the Condenser Fan A Set Point by more than the Condenser Fan
Differential (Default = 5°F). External relays allow operation of condenser fans associated with
a specific circuit only when a compressor on that circuit is on.
Cond Fan Output B is turned on when any compressor on is on and the OAT rises above the
Condenser Fan B Set Point. Cond Fan Output B is turned off when all compressors are off or
the OAT drops below the Condenser Fan B Set Point by more than the Condenser Fan
Differential (Default = 5°F). External relays allow operation of condenser fans associated with
a specific circuit only when a compressor on that circuit is on.
Note – During the phase in/out period of R22 to R410A there will be a time period in which a third
condenser fan output will be required on R22 units. This output will be designated Cond
Fan Output C (EMA-DO3).
Cond Fan Output C is turned on when any compressor on is on and the OAT rises above the
Condenser Fan C Set Point. Cond Fan Output C is turned off when all compressors are off or
the OAT drops below the Condenser Fan C Set Point by more than the Condenser Fan
Differential (Default = 5°F). External relays allow operation of condenser fans associated with
a specific circuit only when a compressor on that circuit is on.
McQuay OM 920
105
Operator’s Guide
Evaporative Condensing Control (RTU)
The evaporative condensing option for Rooftop units uses the heat absorbed by evaporating
water as well as air drawn across a bank of tubes with refrigerant flowing through them to
condense hot refrigerant to a liquid. Water is pumped from a sump beneath the condenser
tubes to nozzles above the coil that spray water onto the bank of tubes. The refrigerant in the
tubes is cooled and condensed as some of this water is evaporated when it strikes the hot tubes
and is carried away by condenser fans. Using this method, the refrigerant can be cooled to a
lower temperature than is the case with a normal finned condenser that transfers heat directly
to the air.
A unit equipped with evaporative condensers can not operate in the cooling state below 40°F.
If the OAT Compressor Lockout Temperature on units with evaporative condensing is lowered
below 40°F, it will immediately be set back up to 40°F.
Condenser fan # 1 on each circuit is turned on and off via ModBus communications with a
single VFD. The speed of these two fans is controlled via ModBus communications with the
VFD. These two fans will always operate at the same speed.
Condenser fans #2 and # 3 on each compressor circuit is turned on and off using the two
outputs on the Main Board that are used for standard condenser fans. Relays are driven by
each of these outputs so that fans associated with a circuit that is not operating will not be
turned on.
Sump Pump Control
The pump output is turned on whenever the unit is in the Cooling state and the Sump Pump
Fail condition described below is false. The Sump Pump is turned on before any compressor
or condenser fan is turned on.
A Sump Pump Fail condition exists if the Sump Pump status is open after the Sump Pump
Output has been turned on for more than the Sump Pump Delay time (Default equals 30
seconds). The Sump Pump Fail condition remains for one cooling stage time. The Sump Pump
is turned off and the maximum Cooling Stage is set to zero when the Sump Pump Fail
condition exists. A Sump Pump Fail Problem that disables cooling becomes active if Cooling
has been limited to Stage Zero due to Sump Pump Fail conditions three times between 2:00
AM of one day and 2:00 AM of the next day.
If the unit is equipped with a Dolphin system, the sump pump is run every three days to reduce
scaling. The Pump output is turned on for one hour if all of the following are true:
• Dolphin System= Yes
• Sump Pump has been off for more than 72 hours but less than 120 hours
• The OAT is greater than 35°F
• The Freeze Protection Valve is Closed
Sump Temperature Control
All condenser fans are off when all compressors are off. Whenever any compressor is turned
on, Condenser Fan # 1 (the lead condenser fan) on both circuits is turned by sending a signal
to the VFD via the ModBus network internal to the unit. Condenser fan # 1 for both
compressor circuits are on even if no compressors are operating on one of the circuits.
Condenser Fan # 1 on both circuits are turned off when all compressors are off, and they are
turned off as described in paragraphs that follow when the sump temperature gets low.
The VFD is controlled and monitored by the main controller via ModBus network internal to
the unit. Whenever any condenser fan is on, signals are sent to the VFD to control connected
fans to a calculated setpoint. The speed varies from a minimum value (25% default) to 100%
as the sump temperature varies from the Min Sump Temp to the Max Sump Temp setting.
106
McQuay OM 920
Operator’s Guide
In addition to the fans controlled by the VFD there are up to three staged condenser fan output
that are controlled based on sump temperature. The condenser fan outputs controlled by these
outputs are mechanically prevented from operating when no compressors on that circuit are
operating. When compressors are operating on both circuits, the number of fans operating on
the two circuits is the same since these output are wired to turn on the same fans on each
circuit.
The number of staged condenser fan outputs operating will increase if the time since the last
change in the number of operating fans exceeds the Evap Condensing Stage Time and the
Sump Temperature exceeds the Max Sump T. The number of fans operating per circuit will
decrease if the time since the last change in the number of operating fans exceeds the Evap
Condensing Stage Time, and the Sump Temperature drops below the Min Sump T.
After the two lead condenser fans are turned off via the VFD, they are turned back on as soon
as the Sump Temperature rises above the Maximum Sump Temperature. This transition from
Stage zero to stage one is the only transition that does not require the Stage Timer to expire.
All of the condenser fans need to be run periodically when evaporative condensing is used to
prevent damage to the motors due to their high humidity environment. As indicated above, the
condensing fans controlled by the VFD always run when evaporative operation is in effect so
no special control of these fans is required. The fan motors controlled directly through the
staged condenser fan outputs are turned on and off based on time on and time off. When a
condenser fan output must be turned on for normal operation, the output that has been off for
the longest period of time is started. When condenser fan must be turned off for normal
operation, the output that has been on for the longest period of time is turned off.
A unit equipped with evaporative condensers can not operate in the cooling state below 40°F.
If the OAT Compressor Lockout Temperature on units with evaporative condensing is lowered
below 40°F, it will immediately be set back up to 40°F.
Freeze Protection Valve Control
When the Sump Temperature for Evaporative Condensing units gets too cold, the sump needs
to be emptied to prevent freezing. The Sump Dump output is used to control a Freeze
Protection Valve. This output is turned on if the sump temperature drops below the Freeze
Protection Setpoint, default = 35°F.
This output is turned back off if the sump temperature rises above this setpoint by more than
the Sump; Dump Differential, (default 3°F) and the unit is in the Mechanical Cooling State.
The requirement for Mechanical Cooling prevents the unit from continuously be emptied and
filled as the ambient temperature as measured by the sump temperature sensor varies below
35°F and above 38°F even when cooling was is not required.
If the unit is equipped with a Dolphin system and the pump does not run for five days, the
sump needs to be emptied. This would occur when cooling is not required and the OAT
remains below 35°F. Sump heaters are used to keep the sump temperature above 35°F when
the OAT drops below that value so an additional means of turning on the Freeze Protection
Valve is required. In addition to the requirement that the Sump Pump output be turned on to
open the valve when the sump temperature drops below 35°F, the Sump Pump output is to be
turned on if both of the following are true:
• Dolphin System= Yes
• The Sump Pump has been off for 120 hours or more
McQuay OM 920
107
Operator’s Guide
Heating Control
Entering Heating Operating State
The unit enters the Heating operating state from the Fan Only operating state when the control
temperature falls below the Zone Heating Set Point by more than half the Zone Heating Dead
Band. The unit transitions from heating to Fan only when the control temperature rises above
the Zone Heating Set Point by more than half the Zone Heating Dead Band. The unit will also
transition from the Heating to Fan only operating state if heating operation is disabled due to
OA ambient lockout.
Heating: Staged Zone Control
When the unit first enters the Heating operating state the unit goes directly to Stage # 1.
The number of Heating Stages increases when:
• The time since the last stage change exceeds the Stage Time AND
• Projected Control Temperature is less then the Zone Htg Spt (minus ½ the deadband). AND
• CtrlTemp is less than the Zone Htg Spt (minus ½ the deadband) AND
• DAT is less than the Max DAT Htg Spt. AND
• The current heating stage is less than the number of available stages
The number of Heating Stages decreases when:
• The time since the last stage change exceeds the Stage Time AND
• Projected Control Temperature is greater then the Zone Htg Spt (plus ½ the deadband) AND
• CtrlTemp is greater than the Zone Htg Spt (plus ½ the deadband) AND
• The current heating stage is greater than zero
OR
• The time since the last stage change exceeds the Stage Time AND
• DAT is greater than the DATSpt AND
• The current heating stage is greater than zero
OR
• The current heating stage is more than the number of available heating stages.
Heating DAT Staging or MinDAT Staging
When the unit enters the Heating or Minimum DAT states and all heating is off, the unit goes
directly to Heating Stage # 1 so that the first stage of heat is turned on immediately.
The number of Heating Stages increases when either of the following combinations is true:
• The current heating stage equals zero AND
• DAT is less than the effective DAT setpoint (DAT staging) or the MIN DAT limit (MinDAT
staging) by ½ the deadband
OR
• The time since the last stage change exceeds the Htg Stage Time AND
• The current heating stage is less than the number of available stages AND
• DAT is less than the effective DAT setpoint (DAT staging) or the MIN DAT limit (MinDAT
staging) by ½ the deadband
The number of Heating Stages decreases when either of the following set of conditions is
True:
• The time since the last stage change exceeds the Htg Stage Time. AND
• The current heating stage is greater than zero AND
108
McQuay OM 920
Operator’s Guide
• DAT is greater than the effective DAT setpoint (DAT staging) or the MIN DAT limit
(MinDAT staging) by ½ the deadband
OR
• The current heating stage is more than the number of available heating stages
The unit enters the Min DAT operating state during occupied operation when neither cooling
nor heating is required based on the unit heat/cool changeover function but the discharge air
temperature falls below a minimum discharge temperature limit by more than ½ the deadband.
The Min DAT operating state prevents cold discharge air temperatures during what would
normally be the Fan Only operating state.
Modulating
Entering Heating Operating State
The unit enters the Heating operating state from the Fan Only operating state when the control
temperature falls below the Zone Heating Set Point by more than half the Zone Heating Dead
Band. The unit transitions from heating to Fan only when the control temperature rises above
the Zone Heating Set Point by more than half the Zone Heating Dead Band. The unit will also
transition from the Heating to Fan only operating state if heating operation is disabled due to
OA ambient lockout. When the unit is in the Heating operating state, heating capacity is
modulated to maintain the discharge air temperature at the Discharge Heating Set Point.
There are several different modulating heating types available with this equipment. There are
some differences in the control sequence depending on the heat type installed. The different
types are described in the following sections.
Steam or Hot Water Heat: Face and Bypass Damper Control
When a unit is equipped with steam or hot water with face and bypass damper heating there
are two different methods used for controlling the heating arrangement. These are the “Open
Valve” and “Modulating Valve” methods and are described in the following sections. The
parameter is adjustable via the following path: Extended Menus/Heating Setup/F&BP
Method.
Open Valve
When the unit enters the Heating operating state, the steam or hot water valve is driven fully
open. The face and bypass dampers are then modulated to maintain the discharge air
temperature at the discharge heating set point.
Modulating Valve
When the Outdoor Air Temperature is below the F&BP changeover temperature by the
amount of the differential, the Heating valve is driven to 100% open to protect the coil. The
face and bypass dampers are then modulated to satisfy the heating load. At warmer
temperatures, the Face and Bypass Dampers are set at 100% open to the face of the coil and
the Heating valve is modulated to satisfy the heating load. Operation changes from “warm” to
“cool” when the outdoor air temperature drops below the changeover temperature. It changes
from “cool” to “warm” when the outdoor air temperature rises above the F&B Changeover
temperature by a differential of 2.0ºF. The default value for the changeover temperature is
37°F.
McQuay OM 920
109
Operator’s Guide
Gas Heat
When a unit is equipped with modulating gas heating and is in the Heating operating state, the
gas valve is modulated to maintain the discharge air temperature at the Discharge Heating Set
Point. Differences in the control of modulating gas heat are described in the following
sections. On units equipped with modulating gas heat, the Discharge Heating Set Point is
limited according to a maximum heat exchanger temperature rise limit. This factory set limit
varies depending on the unit burner model and can be found on the gas heat data plate attached
to the unit. The controller does not allow the Discharge Heating Setpoint to be set above the
current temperature entering the discharge fan by more than this maximum heat exchanger
temperature rise limit.
Min DAT
If heating is enabled and there is no heating load (normally Fan Only operating state), the
controller activates the units heating equipment as required to prevent the discharge air
temperature from becoming too cool if the Min DAT Control Flag is set to yes via the Heating
menu. The unit enters the Min DAT operating state during occupied operation when neither
cooling nor heating is required based on the heat/cool changeover function but the discharge
temperature falls below a minimum discharge temperature limit. If the discharge air
temperature falls below the this minimum discharge temperature limit by more than half the
discharge heating deadband, the unit operating state changes from Fan Only to Min DAT.
Note: On VAV or CAV discharge control units, the DAT cooling setpoint parameter in the
Cooling menu acts as the minimum discharge temperature limit. On CAV zone control units
the Min DAT Limit parameter in the Heating menu acts as the minimum discharge
temperature limit.
Typical Sequence of Operation (20-1 gas burner)
When 120V power is furnished through the system on/off switch (S1), through the burner
on/off switch (S3), and through the high limit control (FLC), terminal #6 on the flame
safeguard (FSG) is powered on a call for heat. Whenever power is restored to the flame
safeguard, the flame safeguard will go through a 10 second initiation period before the
prepurge period will begin. The burner air control valve will be at minimum position during
off cycles. Upon a call for heat or any other time that a prepurge cycle occurs, the air control
valve will be repositioned to the maximum position for prepurge and then returned to the
minimum position for low fire start.
Upon a call for heat, the controller will close digital output (EXPB-DO1) and energize the
R20A relay. Once the normally open contacts of the R20A relay close 120V power is supplied
to terminal # 6 on the FSG. The FSG then energizes its terminal #4, which powers the burner
combustion air blower motor (BM) and starts the 90 second prepurge cycle. The controller
will reposition the burner air valve to its maximum open position via analog output EXPBAO_X7 for prepurge. When the burner air valve reaches the full open position switch (LS2)
will 'make' and provide a digital input to the controller (EXPB-DI_X3). This digital input will
initiate a 20 second (adjustable) timing period in the controller. At the completion of the
timing period, the controller will begin to drive the burner air valve to its minimum (low fire)
position. When the valve reaches the minimum position switch LS1 will 'make' and provide a
digital input to the controller (EXPB-DI_X2) indicating the controller's prepurge sequence is
complete. As soon as the FSG prepurge time expires FSG terminal #8 will energize relay R22
which will turn on a digital input to the controller (EXPB-DI-X1). As soon as this digital input
is 'made' the controller will close digital output (EXPB-DO2) allowing the combination gas
valve(s) (GV1) to be energized.
110
McQuay OM 920
Operator’s Guide
After completion of the FSG prepurge period there will be a 10 second trial for ignition during
which terminal #8 (combination gas valve - GV1) and terminal #10 (ignition transformer - IT)
will be energized. If flame is being detected through the flame rod (FD) at the completion of
the 10 second trial for ignition period, terminal #10 (ignition transformer - IT) will be deenergized and terminal #9 (main gas valves - GV4 and GV5 depending on burner size) will be
energized and the control system will be allowed to control the firing rate once the heating
stage timer (default 5 minutes) has passed. After the flame has lit and been proven and the
heating stage time has passed, the controller will modulate (VM1) to the required firing rate
via analog output EXPB-AO_X7. In the event the flame fails to ignite or the flame safeguard
fails to detect its flame within 10 seconds, terminals #4, 8, 9, and 10 will be de-energized, thus
de-energizing the burner. The FSG will then lockout and would require manual resetting. If the
FSG lockout occurs, FSG terminal #3 will energize the R24 alarm input status relay which
will 'make' a digital input to the controller (EXPB-DI_X4). When this digital input is 'made'
the controller will drive VM1 to the closed position, de-energize digital output EXPB-DO2
and the prepurge sequence will be disabled and reset. If the FSG terminal # 8 de-energizes
R22 (EXPB-DI_X1) after having it turned on and the FSG is not off on safety lockout, the
prepurge sequence will start over. If an attempt is made to restart the burner by resetting the
FSG or if an automatic restart is initiated after flame failure the earlier described prepurge
cycle with the wide open air valve will be repeated. If the unit overheats, the high limit control
(FLC) will cycle the burner, limiting furnace temperature to the limit control set point. The
flame safeguard contains 'LEDS' (lower left corner) that will glow to indicate operation.
Typical Sequence of Operation (3-1 Gas)
When 120V power is furnished through the system on/off switch (S1), through the burner
on/off switch (S3), and through the high limit control (FLC), terminal #6 on the flame
safeguard (FSG) is powered on a call for heat. Whenever power is restored to the flame
safeguard, the flame safeguard will go through a 10 second initiation period before the
prepurge period will begin. The burner air control valve will be at minimum position during
off cycles.
Upon a call for heat, the controller will close digital output (EXPB-DO1) and energize the
R20A relay. Once the normally open contacts of the R20A relay close, 120V power is
supplied to terminal # 6 on the FSG. The FSG then energizes its terminal #4, which powers the
burner combustion air blower motor (BM) and starts the FSG prepurge cycle.
After completion of the FSG prepurge period there will be a 10 second trial for ignition during
which terminal #8 (combination gas valve - GV1) and terminal #10 (ignition transformer - IT)
will be energized. If flame is being detected through the flame rod (FD) at the completion of
the 10 second trial for ignition period, terminal #10 (ignition transformer - IT) will be deenergized and terminal #9 (main gas valves - GV4 and GV5) will be energized and the control
system will be allowed to control the firing rate once the heating stage timer (default 5
minutes) has passed. After the flame has lit and been proven and the heating stage time has
passed, the controller will modulate (VM1) to the required firing rate via analog output EXPBAO_X7. In the event the flame fails to ignite or the flame safeguard fails to detect its flame
within 10 seconds, terminals #4, 8, 9, and 10 will be de-energized, thus de-energizing the
burner. The FSG will then lockout and require manual resetting. If the FSG lockout occurs,
FSG terminal #3 will energize the R24 alarm input status relay which will 'make' a digital
input to the controller (EXPB-DI_X4). When this digital input is 'made' the controller will
drive VM1 to the closed position. If the FSG terminal 8 de-energizes relay R22 (EXPBDI_X1) after having it turned on and the FSG is not off on safety lockout the controller will
drive VM1 to the closed position. If an attempt is made to reset the FSG or if an automatic
restart is initiated after flame failure, the FSG prepurge cycle will be repeated. If the unit
overheats, the high limit control (FLC) will cycle the burner, limiting furnace temperature to
the limit control set point. The flame safeguard contains 'LEDS' (lower left corner) that will
glow to indicate operation.
McQuay OM 920
111
Operator’s Guide
Special Start Sequence for 100% Outdoor Air units with Gas Heat
A special start sequence is used for units 100% outdoor air units with gas heat. The special
start sequence applies to both Zone Control and DAT control units. If heat is required at unit
startup, the furnace enters a special burner startup sequence as the unit enters its Startup
operating state. Pre-firing the burner allows the gas heat pre-purge sequence to occur and the
burner to fire and warm up so that tempered air is available immediately when the fans start.
Once a 100% Outdoor Air unit equipped with Gas Heat completes one of the start up
sequences described below the gas heat operates the same for both return air units and 100%
Outdoor Air units.
The sequence described in the following paragraphs is initiated for a 100% OA Unit any time
during the Startup operating state when:
• Heating is enabled AND
• CtrlTemp is less than the Effective Zone Heating Setpoint* by ½ the ZoneHtgDeadband OR
• Heating is enabled AND
• OAT is less than the Min DAT Limit by the amount of the DAT Htg Deadband AND
• CtrlType = Zone
OR
• Heating is enabled AND
• Min DAT is set to Yes via the keypad AND
• OAT is less than the DATClgSpt by the amount of the DAT Htg Deadband
• CtrlType = DAC
*The Effective Zone Heating Setpoint equals the Zone Heating Setpoint if any of the
following three conditions are true. Otherwise it equals the Morning Warmup Heating
Setpoint:
• CtrlType = Zone
• Unit enters the Fan Only state with the CtrlTemp is equal to or greater than the
MWUHtgSetpoint
• Unit enters the Fan Only state with heating disabled.
The special start up sequence is initiated during Start Up period. The fans will remain off. The
main gas valve is energized so the burner starts during the Warmup Time (default = 240
seconds) and operates at Low Fire.
At the end of the Warmup Time, the modulating gas heating valve is set to a calculated
position. This calculated position is based on the “Application Discharge Air Temperature
Setpoint”, the Outdoor Air Temperature, and the Maximum Temperature Rise of the Gas Heat
Exchanger using the following formula:
Gas Heat Actuator Position = 100% x (Setpoint - Outdoor Air Temp) / Temp Rise
The Application Discharge Air Temperature Setpoint is the Zone Heating setpoint if the
Control Temperature initiated the Special Start sequence. If the OAT initiated the Special Start
sequence, the setpoint is the Min DAT Limit for Zone units and the Eff DAT Clg Spt for DAT
units. The Temp Rise is the Maximum Temperature Rise of the Gas Heat Exchanger that is
entered at the factory for the specific unit.
After the modulating gas heating valve is set to the calculated position, there is a HeatUpDelay
(default = 60 second) to allow the heat exchanger to heat up. After this delay, since the unit is
100% Outside Air, the unit immediately transitions from Recirculation to the Fan Only state.
As soon as the unit enters the Fan Only state, the unit will immediately transition to either the
Heating state or the MinDAT state.
112
McQuay OM 920
Operator’s Guide
The unit remains in either Heating or Minimum DAT Control for the duration of the
LowFireTime (Default = 240 seconds). The gas heating valve does not modulate from its
calculated value to allow the temperature to approach equilibrium with modulating gas heating
valve at a fixed position.
The unit reverts to normal modulation of the gas heating valve when the LowFireTime has
elapsed since the unit entered Heating or MinDAT.
Return Air Units
When the unit enters the Heating operating state, the controller first holds the gas valve at the
minimum fire position (5% or 33% depending on the burner model) until the Heating
Interstage Timer expires. Then, the controller modulates the gas valve to maintain the
discharge air temperature at the Discharge Heating Set Point.
Discharge Air Temperature Setpoint Reset - Heating
The Heating DAT Setpoint may be reset for units with DAT Heating Control. The Discharge
Air Temperature Setpoint will never be set below the Minimum DAT Heating Setpoint or
above the Maximum DAT heating Setpoint on the Heating Reset menu. The reset type may be
set to one of the following:
• None Discharge Heating Spt = User Adjustable
• Network Discharge Heating Spt = Network DAT Htg Setpoint (NetDAClSP) when it is valid
• Space Discharge Heating Spt is based on the Space Sensor
• Return Discharge Heating Spt is based on the Return Air Sensor
• OAT Discharge Heating Spt is based on the Outdoor Air Temperature
• Ext mA Discharge Heating Spt is determined by a 0-20 or 4-20 mA signal
• Ext V Discharge Heating Spt is determined by a 0-10 or 2 - 10 VDC signal
Reset reverts from Return to None when a Return Air Sensor opens or shorts. Reset reverts
from Space to None when a Space Sensor opens or shorts. Reset reverts from OAT to None
when an Outdoor Air Sensor opens or shorts.
When Space, Return, OAT, Ext mA, or Ext V is selected, the Discharge Heating Spt equals the
Max Htg Spt when the selected value equals the Max Htg Spt @ value. Similarly, the
Discharge Heating Spt equals the Min Htg Spt when the selected value equals the Min Htg Spt
@ value.
When Space, Return, or OAT is selected, it only makes sense for the DAT Heating setpoint to
decrease as the selected temperature increases as shown in the graph below.
When Ext mA is selected, the values “Min Htg Spt @” and “Max Htg Spt @” are entered as
mA values. When Ext VDC is selected, the values “Min Htg Spt @” and “Max Htg Spt @”
are entered as VDC values.
If Ext mA or Ext V is selected as the type of reset, the Min Htg Spt @ value may be set above
the Max Htg Spt @ value to cause a decrease in the DAT setpoint as the external signal or the
Min Htg Spt @ value may be set below the Max Htg Spt @ value to cause an increase in the
DAT setpoint as the external signal increase.
When ever the Clg Reset Type or Engineering Units is changed, the Min Clg Spt @ and Max
Clg Spt @ values revert to default values as follows:
• None: Min Clg Spt @=0NA, Max Clg Spt @=100NA
• Network: Min Clg Spt @=0NA, Max Clg Spt @=100NA
• Space, Return: Min Clg Spt @=73.0F, Max Clg Spt @=71.0F
• OAT: Min Clg Spt @=90.0F, Max Clg Spt @=70.0F
• ExtmA: Min Clg Spt @=4.0mA, Max Clg Spt @=20.0mA
• ExtVDC: Min Clg Spt @=0.0V, Max Clg Spt @=10.0V
McQuay OM 920
113
Operator’s Guide
An example of discharge temperature reset based on outdoor air temperature is illustrated in
Figure 13 (Cooling Reset Type Flag is set to “OAT” in this example). When the current
outdoor air temperature is greater than or equal to the Minimum Cooling Set Point Reset Value
(90°F in this example), the Discharge Cooling Set Point is set equal to the Minimum
Discharge Cooling Set Point (55°F in this example). This is shown as Point C in Figure 13.
When the current outdoor air temperature is less than or equal to the
Maximum Cooling Set Point Reset Value (70°F in this example), the Discharge Cooling Set
Point is set equal to the Maximum Discharge Cooling Set Point (65°F in this example). This is
shown as Point A in Figure 13. When the current outdoor air temperature is between the
Minimum Cooling Set Point Reset Value and the Maximum Cooling Set Point Reset Value,
the Discharge Cooling Set Point varies linearly between the Minimum Discharge Cooling Set
Point and Maximum Discharge Cooling Set Point. This is shown as Point B in Figure 13.
Figure 13: Discharge Temperature Reset Based on Temperature
Indoor Air Fan - On/Off Control
A Supply fan is provided on every unit. That may be the only fan, but either a Return Fan or
an Exhaust Fan can be provided also. The start/stop signal and the speed signal for fans that
are controlled by variable frequency drives are provided via an internal ModBus network.
Constant volume Supply and Return fans are started and stopped through a digital output.
Exhaust Fans are always controlled by variable frequency drives.
Supply Fan
The Supply Fan is turned on when the unit enters the Recirculation state. The Supply Fan is
turned off when the unit transitions to the Off state, but it stays on for a OffHtClDelayTime
(Default- 120 seconds) if the unit is turned off while DX cooling or Staged heating is active.
The OffHtClDelayTime function is overridden when and Emergency Off or Duct High Limit
fault is active.
Return Fan
A Return fan driven by a variable frequency drive is started four seconds after the Supply Fan
is started to reduce the amp draw peak on startup. A constant volume Return Fan is turned on
through the same output as the Supply Fan. An external Fan Delay Relay is used to provide a
delay between startups if required.
114
McQuay OM 920
Operator’s Guide
Supply Fan Capacity Control (VAV)
The speed of a modulating Supply Fan is controlled by an analog signal provided to the VFD.
Supply Fan Capacity Control for a modulating fan is controlled to either:
• Maintain the duct static pressure at a desired value
OR
• Maintain a fixed speed based on a signal provided via a network.
The choice of control method, SF Cap Ctrl, may be set to Duct Press or Speed via the keypad.
After the Supply Fan is started, a speed signal of 25% is sent to the variable frequency drive
for the DSPCtrlDelay (Default=30 seconds) and the VFD will increase its speed to the larger
of 25% or it's internally programmed minimum speed. Control reverts to either duct pressure
or speed after the fan has been on for the duration of the DSPCtrlDelay time. The VFD speed
is not controlled below the minimum SAF speed setting (default 25%) while the fan is
operating.
Duct Static Pressure Control
The supply air fan speed is controlled by a VFD. The control parameter for the fan speed is the
duct static pressure setpoint. If the duct static pressure is below the duct static pressure
setpoint by more than ½ the deadband, the fan speed will increase. Likewise if the duct static
pressure is above the duct static pressure setpoint by more than ½ the deadband the fan speed
will decrease. Example - if the duct static pressure setpoint is 1.2" and the deadband is 0.1",
the duct static pressure must reach 1.14 before the fan will increase in speed. The Duct Static
Pressure setpoint may be set through the keypad or via a network signal. The active setpoint is
changed whenever either of these values changes so it equals whichever value was changed
most recently.
Speed Control
When speed control is selected, the fan operates at the larger of its minimum speed or a value
provided via a connected network or the keypad/display. This value reverts to zero when the
unit is off and remains at that value after startup until a non zero value is written via the
network or the keypad/display.
Exhaust Fan - Building Static Pressure Control
An Exhaust fan driven by a variable frequency drive is started based on building static
pressure. A constant volume Exhaust Fan is turned on through the same output as the Supply
Fan. An external Fan Delay Relay is used to provide a delay between startups if required.
A VAV exhaust fan is turned on when all four of the following are true:
• The Exhaust Fan is controlled by a VFD
• The OA Dampers are at least open to the Minimum Exhaust OA Position (default 5%)
• The SAF capacity is above the Minimum Exhaust SAF capacity (default 10%)
• The building static pressure is above the building static pressure setpoint by more than the
deadband for longer than the Minimum Exhaust Fan Start Time (Default = 120 seconds)
A VAV exhaust fan is turned off when the Supply Fan is turned off or when all three of the
following are true:
• The Exhaust Fan is controlled by a VFD
• The building static pressure is below the building static pressure setpoint by more than the
deadband OR the OA Dampers are open less than the Minimum Exhaust OA Position
(default 5%). OR the SAF capacity is below the Minimum Exhaust SAF capacity (default
10%)
• The Exhaust Fan capacity is at or below its minimum value (Default = 5%) for longer than
the Min Exhaust Fan Stop Time (Default = 120 seconds)
McQuay OM 920
115
Operator’s Guide
Exhaust Fan - Speed Control
When speed control is selected, the fan operates at the larger of its minimum speed or a value
provided via a connected network or the keypad/display. This value reverts to zero when the
unit is off and remains at that value after startup until a non zero value is written via the
network or the keypad/display.
The exhaust fan is turned on when all four of the following are true:
• The Exhaust Fan is controlled by a VFD
• The OA Dampers are at least open to the Minimum Exhaust OA Position (default 5%)
• The SAF capacity is above the Minimum Exhaust SAF capacity (default 10%)
• The Remote Exhaust Fan capacity is commanded to a value above the minimum value
(Default = 5%) by a BAS for longer than the Minimum Exhaust Start Time (Default = 120
seconds)
The exhaust fan is turned off when the Supply Fan is turned off or when both of the following
are true:
• The Exhaust Fan is controlled by a VFD
• The Remote Exhaust Fan capacity is commanded to less than or equal to its minimum value
(Default = 5%) for longer than the Minimum Exhaust Stop Time (Default = 120 seconds)
Modulating Return\Exhaust Fan Capacity Control
Three different approaches may be used to maintain the building static pressure at acceptable
levels. An analog signal is provided to the VFD to control return or exhaust fan to:
• Maintain the speed of a Return Fan based on Supply Fan speed (Fan tracking)
OR
• Maintain the building static pressure at a desired value
OR
• Maintain a fixed speed based on a signal provided by a Building Automation System via a
network
Any of the three methods may be selected for a Return fan. Either Building Static Pressure or
Speed may be selected for an Exhaust Fan.
When the unit is in an Off or Start Initial state, the variable frequency drive for the Return or
Exhaust is driven to 0% or closed.
After the Return or Exhaust Fan is started, a speed signal of 5% is sent to the variable
frequency drive for the BSPCtrlDelay (Default=30 seconds) and the VFD will increase its
speed to the larger of 5% or it's internally programmed minimum speed. Control reverts to one
of the methods below after the fan has been on for the BSPCtrlDelay. The VFD speed is not
controlled below 5% while the fan is operating.
During non-Off modes when the outdoor air damper is closed, the speed of the return Fan is
set equal to the supply fan speed. Under these conditions, the return fan is set to 100% if the
supply fan is a constant volume fan. To provide a “bumpless transfer” when the outdoor air
damper opens, the return fan will start to control building static pressure from its speed when
the damper was closed. Exhaust fans do not use this feature.
116
McQuay OM 920
Operator’s Guide
Fan Tracking Control
For units with variable frequency drives, the return fan may be controlled such that the return
fan speed tracks up and down with the supply fan speed. The user defines the position of the
return fan with respect to the supply fan for minimum and maximum positions. When the
supply fan is between the minimum and maximum positions, the fan varies proportionally
between its minimum and maximum values. There are four adjustable parameters to define
this relationship. They are:
Supply Fan (DF) Value Return Fan (RF) Value
Supply Fan Max
Return Fan @ Supply Fan Max
Supply Fan Min
Return Fan @ Supply Fan Min
To set the four parameters described above, the airflow and return vane positions are adjusted
until Maximum Airflow and proper indoor conditions are met. The Supply Fan is controlled
normally as the VAV boxes are adjusted to obtain maximum airflow. The Return Fan is
adjusted using the Remote RF/EF setting on the keypad. The user then uses the key to set the
Supply Fan Max values and Return Fan @ Supply Fan Max to the observed values. The
process is repeated at minimum airflow to set Supply Fan Min and Return Fan @ Supply Fan
Min values. The user may choose Outdoor Air Minimum reset to function with the building
static control. If the building static continues to drop after the variable frequency drives are at
25%, the Outdoor Air Damper minimum will be reset upwards from the initial value to a
maximum set by the user. When this method is chosen, the user may also choose to have a
Low Limit prevent the minimum from being set too high. This low limit can use the discharge
or the entering fan temperature sensor.
Building Static Pressure Control
A PI control loop is used to modulate the variable frequency drive of the exhaust fans to
maintain a measured building static pressure at a setpoint. The BSP Gain, Project Ahead Time,
and Sample Time are editable via the keypad
The Building Static Pressure setpoint may be set through the keypad or via a network signal.
The active setpoint is changed whenever either of these values changes so it equals whichever
value was changed most recently.
Speed Control
When speed control is selected, the fan operates at the larger of its minimum speed or a value
provided via a connected network or the keypad/display. This value reverts to zero when the
unit is off and remains at that value after startup until a non zero value is written via the
network or the keypad/display. The exhaust fan does not start until a value greater than the
minimum value is written by the network or keypad/display.
McQuay OM 920
117
McQuay Training and Development
Now that you have made an investment in modern, efficient McQuay equipment, its care should be a high priority.
For training information on all McQuay HVAC products, please visit us at www.mcquay.com and click on training, or
call 540-248-9646 and ask for the Training Department.
Warranty
All McQuay equipment is sold pursuant to its standard terms and conditions of sale, including Limited Product
Warranty. Consult your local McQuay Representative for warranty details. Refer to Form 933-43285Y. To find your
local McQuay Representative, go to www.mcquay.com.
This document contains the most current product information as of this printing. For the most up-to-date product
information, please go to www.mcquay.com.
© 2008 McQuay International • www.mcquay.com • 800-432-1342