1
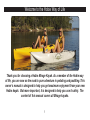
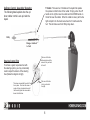
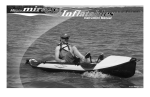
Hobie Mirage Kayaks
®
®
Owner’s Manual
Hobie Mirage® Revolution
Welcome to the Hobie Way of Life
Thank you for choosing a Hobie Mirage Kayak. As a member of the Hobie way
of life, you are now on the road to pure adventure in pedaling and paddling. This
owner’s manual is designed to help you get maximum enjoyment from your new
Hobie kayak. But more important, it is designed to help you use it safely. The
content of this manual covers all Mirage kayaks.
1
About the Design of your Kayak
Hull Design
The long center “keel” area encourages the kayak to track
straight when pedaling, paddling and coasting. Under
moderate paddling conditions, the wider “shoulder” area
of the hull rides high at the surface of the water without
compromising speed. If the kayak is fully loaded with gear
or is being paddled and braced in rough conditions, the
“shoulder” areas provide secondary buoyancy and stability.
Maneuverability
Most new Mirage Kayaks come with the patented Twist- andStow rudder system. This system comes pre-installed by our
factory. This new rudder is designed to flip out of the way
during land transport and has an optional larger rudder blade
for more turning authority.
Scupper Hole(s)
Drain holes (scuppers) in the cockpit or cargo well allow any
water that enters the cockpit to immediately flow back out.
Sit-on-top Cockpit
Hobie Mirage Kayaks are open-top cockpit designs. This
allows the kayaker to enter and exit the kayak easily
from the shore, dock or water. Scupper hole(s) make the
kayak self-bailing. The design also eliminates the need
to perform an “Eskimo roll” (advanced kayak technique).
The contoured seat is fitted with an adjustable backrest for
added comfort.
Graphics
Graphics are molded into the kayaks, so they will not peel or
flake off for the life of the boat.
2
Drive Installation
1. The Hobie MirageDrive® must be
lowered into the opening of the hull
near the footwells so it is facing forward
and evenly front to back. The front of
the MirageDrive can be determined by
the location of the fin masts. Tipping
the drive forward or aft when lowering
can cause it to wedge into the well and
possibly cause damage to the hull and/
or fins. The MirageDrive alignmenet pin
helps prevent this, so make sure that it
properly seats in the groove.
Hobie MirageDrive
Stainless
Steel Masts
Alignment
Pin
1.
Squeeze the adjuster
handles located on the pedal
cranks.
2.
While squeezing the
adjuster handle, move the
pedal crank to the most
comfortable position. Similar
to a bicycle, it is best to adjust
the pedals so your legs do
not fully extend causing your
knees to lock. Make sure that
the metal pin on the crank fully
engages the adjustment hole.
FORWARD
2. To lock the MirageDrive into the hull, lower it into the hull
so that the drum shaft posts drop down into the Click and Go
cams and lock into place.
3. To remove the MirageDrive, flip the
Click and Go cam back and pull the drive
out. The cams should automatically reset
themselves for installation, but if they do
not, just flip the cam forward.
Pedal Adjustment
The pedals of the Hobie MirageDrive are adjustable to
accommodate different leg lengths of kayakers. To adjust
the pedals:
3. Hobie Cat® recommends new
users have the pedal length adjustment set in the middle
(number 4) to help while installing it into the hull correctly.
Once installed you can select your preferred length setting.
3
Drum Casting
Washing
When turning the nut with a 7/16 inch
open-end wrench, only giving it one half
a turn at a time, then do the same to
the remaining three nuts. Re-check the
tension and adjust accordingly.
After using in salt water or dirty water, wash the Hobie
MirageDrive with fresh water. Allow to dry, then spray metal
parts with WD-40™ or equivalent. Special attention should
be paid to threaded cable ends, lock nuts, chain, shafts, pedals, and adjustment pins.
Note: Keep the pedal shafts and masts parallel. When the
shafts are together, both masts must be straight down. The
idler pulley cable (see item B in the illustration below) will
be tightened automatically when the front chain assembly is
tightened.
Miscellaneous maintenance
Cable Adjustments
Determining if adjustment is needed...
Occasionally the cables may need to be
re-tightened. The cables should be kept
taut; however, the front chain should be a
little tighter than the rear chain. Push with
your thumbs at the points marked (A)
with moderate pressure (see the image
to the right). The side of the chain should
not go beyond the inside edge of the
drum casting.
Periodically check for loose screws or frayed cables. If a
cable has a broken strand, replace it with new cable.
B
A
CAUTION
Care should be taken to avoid striking objects with the
Hobie MirageDrive. If you bend a mast, it usually can be
straightened. To straighten, remove the MirageDrive from
the boat and insert the Drive into something solid, such as
a vise. Remove the fin, then carefully bend the mast until
straight. To test for "true", roll the mast on a flat surface and
straighten as needed until the masts roll evenly. If the mast
cannot be straightened or becomes cracked or fatigued,
replace the mast.
A
4
Twist and Stow Rudder System
Twist And Stow Rudder Features
The Hobie Twist and Stow rudder system is pre-installed
and adjusted at the factory. With extensive use, the rudder
system may need to be adjusted. The following information is intended to familiarize you with the rudder and how it
works.
The left steering
control line is tied
off at the screw
here.
The left steering control line
passes up through the hole in
the hex head bolt.
These bolts give you the ability
to change between a larger or
smaller rudder blade.
The right steering
control line passes
up through the hole
here and is tightened down with
the small screw
alongside it.
For improved performance with the
kayak sailing option, an optional
larger rudder blade is available.
5
Up/Down Control Assembly/ Operation
The following detail explains how the up/
down rudder control is set up inside the
kayak.
T Handle: There are two T-handles on the kayak that operate
the up/down control funtion of the rudder. Simply pull on the UP
handle on the right to raise the rudder and the DOWN handle on
the left to lower the rudder. When the rudder is down, pull the line
tight and pull it into the cleat near where the T-handle exits the
hull. This will make sure that it firmly stays down.
Pulley
Bungee® Attached
to Cord
Steering Control Trim
To achieve a good, responsive feel with
the steering system, you may occasionally
need to adjust the tension of the steering
lines (follow the diagram at right).
These two screws hold the end of the
line in place. Turn back the screw a
couple of times to release the end of
the line and tighten the screws back
down to hold the line.
Pull more of this line
and wrap it around the
screw to trim your boat
to the left.
Pull more of this line
to trim your boat to
the right.
6
Basic Kayak Information
All Hobie kayaks are made of linear polyethylene, making
them repairable and recyclable.
Recommended Equipment for Specific Types of Pedaling
and Paddling
Basic Boating: Life Jacket, Paddle, Paddle Leash, Backrest,
Safety Whistle, Filled Water Bottle, Appropriate safety equipment depending on weather and location.
Hobie Mirage Oasis
Longer Distance Touring: Dry Bags, Chart, Compass.
Basic Kayak Features
Additional Equipment for Diving: Dive Flag, Anchor.
The front of the boat is the “bow” and the rear is the “stern”.
When looking forward to the bow, the left side of the boat is
“port” and the right side is “starboard”. The hull ID number
can be found on the bottom of the boat, at the stern.
Fishing: Rod Holders, Rod Leash, Rod Holder Extensions
Gear Bags, Livewell, Anchor or Stakeout Pole, Fish Grips,
Visibility Flag.
Safety
In the middle of the boat, there is a cockpit area, with the
seat (toward the stern) and footwells (toward the bow). Inside
the cockpit are scupper hole(s) that go all the way through
the boat. These scuppers allow the boat to drain. All Hobie
Mirage kayaks have hatches that allow access to the inside
of the boat for gear storage.
Kayaking can be dangerous and physically demanding. The
user of this product should understand that participating in
kayaking may involve serious injury or death. Observe the
following safety standards when using this product. These
are basic safety rules that all boaters should follow. Always
use common sense and follow all safety rules at all times.
Alongside the cockpit are a series of small “U” straps, called
padeyes. These are used to attach accessories such as
backrests.
7
Safety Checklist
·Hobie Kayaks were not designed for fast moving water.
· Follow the manufacturer’s recommendations for use of this product.
· If additional outfitting is added to this craft, use manufacturerapproved materials only; do not impair entry or exit access.
· Read owner’s information package prior to using this product.
· The user of this product acknowledges both an understanding
and assumption of the risk involved in paddle/pedal sports.
· When paddling in a new area, check with the locals regarding currents, shoreline conditions and weather patterns. Plan an
“escape route” -- an alternative place to get off the water should
environmental conditions dictate. Beware of offshore winds that
may make it difficult to return to shore.
· DO NOT use alcohol or mind-altering drugs prior to or while
using this product.
· To avoid damage to the Hobie MirageDrive, push either pedal
completely forward before beaching or in shallow water. Use
small, partial pedal strokes with one pedal nearly all the way forward until there is adequate water depth for the MirageDrive to
have complete clearance in the water.
· Consult your physician prior to beginning
paddle/pedal sports.
· Always carry the spare paddle provided with the boat.
· Obtain paddle/pedal sports instructions from your dealer specific
to this type of craft.
· Obtain certified first aid training and carry first aid and rescue/
safety equipment.
· Always properly wear a Coast Guard approved personal flotation device.
· Wear a helmet where appropriate.
· Dress appropriately for weather conditions; cold water and/or
weather can result in hypothermia.
· Check your equipment prior to each use for signs of wear or
failure.
· Never pedal or paddle alone and file a float plan.
· Always tie a leash to your paddle.
· Do not pedal or paddle in flood conditions.
· Care must be made to ensure that the access hatches on your
kayak remain closed while on the water. Water can enter a hatch
that is left open and possibly flood the hull making the boat unstable or cause inadequate flotation for the passenger(s).
· Be aware of appropriate river water levels, tidal changes, dangerous currents, obstacles in and above the water and weather
changes.
· Scout unfamiliar waters; portage where appropriate.
· Do not exceed your paddling/pedaling ability; be aware of your
limitations.
The Shakedown Cruise
As with any new product, it is important that you become familiar
with the craft and all its features. It is also important to determine
if the kayak is sound before long trips. We recommend that you
do what we call a “shakedown cruise” when the kayak is new,
after shipping or transport, before long trips and after installing any
through-hull fittings. This test is typically done in shallow, calm
conditions where you can familiarize yourself with the boat or test
the boat before taking any long trips into open water. Things that
you should check or practice are:
· Rudder Operation
· MirageDrive Adjustment
· Getting in and out of the kayak from a capsized state
· Drain plug locations to make sure they are properly installed
· Closing the hatches properly
· Taking the kayak sail down on the water (if applicable)
8
How to Perform a Self Rescue
If your kayak turns over with the kayak sail up, it can be very
difficult to turn the kayak over by rolling just the kayak. Make
sure that the mainsheet is loose so that the sail is free to
move around.
If you fall out of your boat, don’t panic. Stay with the boat.
You should be wearing a life jacket which will keep you afloat.
There are many ways to get back up on the boat.
If the boat is upside-down, it will need to be turned over.
To do this, reach across the bottom of the boat and grab
the scupper hole or Hobie MirageDrive™ and pull the boat
upright.
Pedaling
First, adjust the pedals to accommodate your size as shown
earlier in these instructions. Adjustments can be made for a
variety of leg lengths. Adjust the pedal positions equally. Sit
with one pedal all the way forward so your knee stays slightly
bent when your leg is fully extended. Then you simply pedal
back and forth to propel the boat forward. For pedaling in
shallow water, partial strokes with one pedal forward and one
aft allow for retractment of the sails in shallow water. When
there is adequate water for clearance of the fins, full strokes
can be used. For additional speed you can paddle as well
as pedal.
Position yourself so your head is near the cockpit area of the
boat and you are facing the boat. You will want to be between
the seat and the footwell areas of the boat.
Reach across the boat to the far edge with one hand. Place
the other hand on the near-side rail, then kick with your feet,
pulling yourself up and onto the boat, so your belly is across
the center line of the boat. (Your belly should end up between
the footwells and the seat.)
Before beaching or launching, push one pedal completely
forward to retract the Hobie MirageDrive fins up against the
hull and pull up the rudder. To take off from the beach, push
out to deeper water or paddle out before putting the rudder
down and pedaling the MirageDrive.
Next, roll over onto your backside toward the seat, which
should place your backside in the seat. Sit up, swing your
feet into the footwells and you’re ready to go.
The key to this method is to keep your center of gravity low
and near the centerline of the boat. Your body and head
should stay close to the boat.
CAUTION: While righting the Hobie Mirage or climbing back
aboard, stay clear of the pedals, pedal shafts, sails and
adjustment straps. Avoid being hit by them or getting them
hooked on your life jacket.
If launching from a rocky or wavy shore, paddle into
deeper water before installing it to avoid damage to your
MirageDrive. (Be sure to tether the MirageDrive to you kayak
when it is not installed.) You may also prefer to remove the
drive before beaching.
9
paddling
along the paddle shaft that will help keep your “control” hand
in a fixed position. However, a special technique must be
used to get each blade in the water. If the paddle is righthand controlled (when the right blade is held vertical, the left
blade “scoop” is pointed mostly up), the right hand will stay
tight and the left hand loose. To learn the process, hold the
paddle tight in your right hand and loose in your left. Using
the right hand, rotate the paddle blade back and forth; it
should spin in your left hand. Now take a stroke on your right,
then cock your right wrist back (left hand staying loose and
somewhat open) and take a stroke on your left. If using a
left-hand control paddle, reverse the process. The left hand
stays tight and the right hand loose.
You can choose to paddle,
pedal or combine the two.
These guidelines will help you
to get started.
To start, sit in your kayak.
Your backside should be all
the way back in the seat and
your knees comfortably bent.
To find the proper footwell,
straighten your legs all the
way out and then bring them
back one footwell. If your legs
are too outstretched, you may experience strain on your
lower back. If your knees are bent too much, you may end
up knocking your kneecaps while paddling.
The basic paddle stroke will give you forward power. Place
a paddle blade in the water near your toes. Pull the paddle
blade back alongside the boat to approximately your hip area
while your opposite hand and paddle blade move forward.
Then lift the first paddle blade out of the water while lowering
the second blade into the water and take a stroke with the
other side.
For proper hand placement on your paddle, start with your
hands about a shoulder’s width apart. If you place the center
of the paddle on top of your head, your elbows should form
slightly less than a 90 degree angle. There should be an
equal amount of paddle shaft beyond each of your hands.
If you pull the paddle out and away from the hull in an arc, it
will force the bow of the boat to swing away from the paddle
blade. This is called a “sweep stroke” and is used to turn the
boat.
Some paddles may have the blades offset, or “feathered”,
at some degree from parallel. A feathered paddle presents
less surface area for the wind to catch as that blade moves
forward through the air. Some paddles have a flattened spot
10
Mirage Cassette Plug
Storing Your Hobie Kayak
You Hobie Mirage kayak is shipped with a Mirage Cassette
Plug. The plug is provided as standard equipment in the
Mirage Kayak package and is used to fill the space where the
Mirage fits into the hull. It is inserted when the MirageDrive
is removed to provide added safety and to “fair” the bottom
of the hull when paddling.
Hobie has chosen a blend of plastic that has an added
measure of ultraviolet inhibitors to provide superior protection from ultraviolet light. However, to ensure extra years of
use and bright colors, avoid storing the boat where it will be
exposed to weather or in direct sunlight.
Kayaks should be stored upside down on the cockpit rails, or
suspended in the air. When hanging your kayak, make sure
that the ropes or straps support most of the weight on the
cockpit rails or the side of the boat. A word of caution: hanging by the scupper hole(s) may cause distortion, and hanging
from the handles may place undue strain on them. Storing
the boat bottom-side down may also cause distortion. Kayak
storage systems are available from your dealer. Padeyes are
NOT intended for hanging or for use as tie-downs.
To install the cassette plug, simply place the plug in the hole
for the MirageDrive mechanism and lock it down using the
Click and Go cams.
To help prevent theft of your kayak, simply run a cable
through a scupper hole and lock it to something secure.
11
Plug-In Seatbacks
Hobie Mirage seatbacks use
a locking plug-in method of
attaching to the hull.
variety of attachments from kayak saddles to stackers. The
racks can be used without the attachments but the racks
should be padded. To help prevent distortion, place the
kayak, cockpit side down, on top of the rack. Straps can
then be laid across the boat and tied to the bars. Saddles
cradle the boat and often come with their own straps.
1.
Line up the plugs
underneath the vencro flap on
the seat so that they are in line
as shown here. Press them
into the plugs in the seat area.
An alternative to traditional rack systems are soft racks. They
tend to be less expensive and will work with most cars. These
are pads mounted on straps that sit between the kayak and
the roof of your car. Some styles have a strap that wraps
around the kayak and others strap the pad to the roof. To tie
the boat to the car, straps are run through the car doors and
the boat is tied to the roof as well as the bumpers, front and
rear. Over-tightening the straps may cause dents in the roof
of the car. Be sure to first consult your owner’s manual for
the car and roof rack system to ensure that you comply with
all of their recommendations, precautions and specifications.
2. Press in and turn the seat
pegs 90 degrees clockwise to
lock them in place.
3. Fold down the plug handles
and lay the velcro flap over
the plug.
We recommend that the
seatbacks be removed while
car-topping your kayak.
A line run from the bow and stern of the boat to each
bumper is required. If your bumpers do not have a gap to
pass a rope around, look underneath. There should be a loop
of metal, which is used by car transports such as tow trucks.
Many people like to use the scupper holes to tie the boat to
the car. This helps prevent the boat from sliding back and
forth or the tie-down rope from slipping off the kayak. (This is
a perfectly acceptable method for tying the boat down.
Transporting Your Hobie Kayak
The easiest way to transport your Hobie kayak is to purchase a roof rack from your dealer. They come with a wide
12
Frequently Asked Questions
How can I replace the screw-in fittings (if equipped)?
Is my boat recyclable?
You may find it necessary to replace some of the padeyes
or hooks if they are damaged. To replace them, follow the
instructions below.
Yes, Hobie will recycle your boat when you are done with
it. To recycle a Hobie Kayak, it must be cut up so it fits in a
box with the following dimensions (for UPS): may not exceed
130” length plus girth, and 108” in height. Ship the boat to:
1. Drill two 3/16” holes opposite one
another on the top surface of the screwin fitting. Be careful not to go all the way
through the part and into the kayak.
Hobie Cat Company
4925 Oceanside Blvd.
Oceanside, CA 92056
It is our hope that no Hobie Kayak will ever end up in
a landfill!
2. Insert the two prongs of a pair of
needle nose pliers into the two holes
and rotate the part counterclockwise.
What is the best way to use the scupper plugs?
The scupper plugs are useful when
you would like to keep the inside of
your boat dry and is most helpful
in calmer water conditions. Simply
press the plug firmly into the scupper
hole from the top side of the boat. To
prevent loss of the plugs, lanyards are
provided with the plugs so that you can
attach them to the boat.
3. Grip the new part with your pliers
and install it into the hole. Be sure to
put a little pressure into the hole so that
the threads on the new part install in
properly.
Is my boat repairable?
Hobie kayaks are very durable; however, on occasion they
may need some minor repairs. Linear polyethylene is repairable. Check with your dealer concerning repairs for your
kayak.
13
Attach lanyard here
Warranty Information
It is very important that you fill out and send us your Warranty Registration Card as soon as possible. This information
enables Hobie Cat Company to contact you should there be important product information that needs to be shared with you in
a timely manner. Please complete the Warranty Registration Card in your Owner’s Packet, or take advantage of our hasslefree online option at;
http://www.hobiecat.com/support/warranty-registration/
To file a warranty claim for a product defect, please see your Authorized Hobie Cat Dealer. They will be able to assess
the problem, assist with a repair and file a warranty claim with Hobie Cat Company if needed. All warranty claims must go
through your Authorized Hobie Cat Dealer. The Warranty Registration Card and Warranty Policies are included with each
model in the Owner’s Packet.
14
HOBIE CAT COMPANY
4925 Oceanside Blvd.
Oceanside, CA 92056
Phone (760) 758-9100
Fax (760) 758-1841
REV D 6/2011
PN 89500