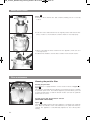
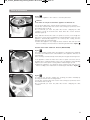
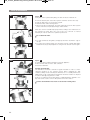
1
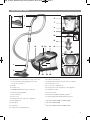
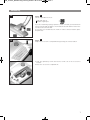
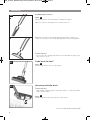
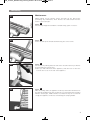
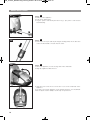
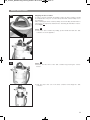
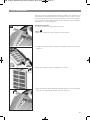
GB_internet_BGS60:GB_internet_BGS60 08.02.2010 10:39 Seite 1 ?K8¦88Aglmkn\mbhgl8_hk8nl^ 8 GB 8 8 IRL 8 ?K8¦8 @hmebg^ 888 @hmebg^ 8 GB_internet_BGS60:GB_internet_BGS60 08.02.2010 10:39 Seite 2 Thank you for buying the new GS-60 Power bagless cleaner from Bosch. The instructions contain valuable information about the unique features of this product. Please visit www.bosch-home.co.uk for more product information or to register your product, just follow the link to the online guarantee registration. Please keep this instruction manual in a safe place. If you pass the vacuum cleaner on to someone else, please also pass on this instruction manual. Intended use This vacuum cleaner is intended for domestic use and not for commercial purposes. Only use this vacuum cleaner in accordance with the instructions in this instruction manual. The manufacturer will not accept any responsibility for damage caused by improper use or incorrect operation. Therefore, please note the following points. The vacuum cleaner must only be operated with: Manufacturer’s original replacement parts, accessories or special accessories In order to prevent injuries and damage, the vacuum cleaner must not be used for: Vacuum-cleaning persons or animals Vacuuming up: – insects (e.g. flies, spiders, etc.). – hazardous, sharp-edged, hot or glowing substances. – damp or liquid substances – highly flammable or explosive substances and gases – ash, soot from tiled stoves and central heating systems. – toner dust from printers and copiers. Safety information This vacuum cleaner complies with all recognised rules of technology and relevant safety regulations. Always observe the information on the rating plate when connecting the vacuum cleaner to the power supply and during operation. Never vacuum without the dust container and particulate filter. => This can damage the appliance. Only allow children to use the vacuum cleaner under supervision. This appliance must not be used by children or persons with limited physical, sensory or mental abilities or with a lack of experience and knowledge (including children) unless they have been instructed in the use of the appliance by a responsible person. Do not vacuum close to the head when using a nozzle and tube. => This could cause injury! When vacuuming stairs, the appliance must always be positioned below the user. Do not use the power cord or the hose for carrying or transporting the vacuum cleaner. Fully extend the power cord when using the vacuum cleaner continuously for several hours. When disconnecting the appliance from the mains, pull on the plug itself to remove it; do not pull on the power cord. Do not pull the power cord over sharp edges or allow it to become trapped. 2 Never use a damaged turbo brush. Do not reach into the running brush roller. Do not drive over the supply while the brush roller is running. Do not leave the turbo brush standing on the carpet when the brush roller is rotating, it must be kept moving (could damage the pile). Wool or velour carpets, particularly those with a loose pile, should only be cleaned occasionally with the turbo brush, must leave sufficient intervals in between. Pull out the mains plug before carrying out any work on the vacuum cleaner. Do not operate the vacuum cleaner if it is damaged. Unplug the appliance from the mains if a fault is detected. For safety reasons, only authorised after-sales service personnel are permitted to carry out repairs and fit replacement parts to the vacuum cleaner. Protect the vacuum cleaner from climatic influences, moisture and sources of heat. Do not pour flammable substances or substances containing alcohol onto the filters (dust bag, motor protection filter, exhaust filter, etc.). The vacuum cleaner is not suitable for use on construction sites. => Vacuuming up building rubble could damage the appliance. Switch off the appliance when it is not in use. At the end of its life, the appliance should immediately be rendered unusable, then disposed of in an appropriate manner. Please note ! The mains socket must be protected by at least a 16 amp fuse. If a fuse is tripped when you switch on the vacuum cleaner, this may be because other electrical appliances which have a high current draw are connected to the same power circuit. To prevent the fuse from tripping, select the lowest power setting before switching the appliance on, and increase the power only once it is running. Disposal information Packaging The packaging is designed to protect the vacuum cleaner from being damaged during transport. It is made of environmentally friendly materials and can therefore be recycled. Dispose of packaging that is no longer required at an appropriate recycling point. Used vacuum cleaners Used vacuum cleaners still contain many valuable materials. Therefore, please take appliances that have reached the end of their service lift to your retailer or recycling centre so that they can be recycled. For current disposal methods, please enquire at a retailer or your local council. GB_internet_BGS60:GB_internet_BGS60 08.02.2010 10:39 Seite 3 Your vacuum cleaner 4 5 6 7 3 8 9 10 11 15 14 16 13 12 21 2 22 1 17 18 19 20 1 Adjustable floor tool with accessory connection 14 Power level indicator 2 Telescopic tube with adjusting sleeve and 15 On/off button with electronic suction regulator accessory connection 16 Exhaust filter cover 3 Handle 17 Accessories compartment 4 Flexible hose 18 Storage aid on the underside of the appliance 5 TURBO-UNIVERSAL brush for carpets1 19 Upholstery nozzle 6 Pivoting carrying handle 20 Crevice nozzle 7 Dust container 21 Filtercleaning with "SelfClean System" 2 8 Power cord 22 Filtercleaning with "RotationClean System" 3 9 Parking aid on the side of the appliance 10 Cleaning brush 1 only models BGS6225GB and BGS6235GB 11 Plate filter 2 only models BGS6235GB 12 Fluff filter 3 only models BGS6220GB and BGS6225GB 13 “Clean” filter cleaning button 3 GB_internet_BGS60:GB_internet_BGS60 08.02.2010 10:39 Seite 4 Replacement parts and special accessories A TURBO-UNIVERSAL® brush for upholstery BBZ42TB Brushing and vacuuming of upholstered furniture, mattresses, car seats, etc. in one operation. Especially suitable for picking up pet hair. The brush roller is driven by the suction air flow of the vacuum cleaner. No separate electrical connection is needed. B TURBO-UNIVERSAL® brush for floors BBZ102TBB Brushing and vacuuming of rugs and carpets and all hard floor coverings in one operation. Especially suitable for picking up pet hair. The brush roller is driven by the suction air flow of the vacuum cleaner. No separate electrical connection is needed. C Hard floor brush BBZ123HD For vacuuming hard floors (parquet flooring, tiles, terracotta, etc.) D Hard floor brush BBZ124HD With 2 rotating brush rollers, for caring for expensive hard floors and better collection of coarse dirt 4 GB_internet_BGS60:GB_internet_BGS60 08.02.2010 10:39 Seite 5 Starting up 1 1 Figure ● Push the flexible tube adapter into the air intake opening on the appliance. Check for correct seating – the moulded hook on the tube adapter must fit into the recess in the air intake opening and audibly click into place. Click! 2 2 Figure ● Push the handle into the telescopic tube until it engages. To release the connection, squeeze the locking collar and pull out the handle. 3 3 Figure ● Push the telescopic tube into the connecting piece of the floor tool until it engages. Press the locking collar and pull out the telescopic tube to release the connection. 5 GB_internet_BGS60:GB_internet_BGS60 08.02.2010 10:39 Seite 6 Starting up 4 4 Figure ● Unlock the telescopic tube by moving the sliding switch in the direction of the arrow and adjust to the desired length. 5 5 Figure ● Holding the power cord by the plug, pull out to the required length and insert the plug into the mains socket. 6 6 Figure ● To switch the vacuum cleaner on or off, press the ON/OFF button. 7 7 Figure Controlling the suction level The suction level can be infinitely adjusted to the level required by turning the control knob in the direction of the arrow. => Low suction range For vacuuming delicate fabrics, e.g. curtains. => Medium suction range For daily vacuuming of lightly soiled surfaces. => High suction range For vacuuming durable floor coverings, hard floors and heavily soiled surfaces. 6 GB_internet_BGS60:GB_internet_BGS60 08.02.2010 10:39 Seite 7 Vacuuming 8 8 Figure Set the adjustable floor tool: Rugs and carpets Hard floors/parquet => => If you are vacuuming up larger particles, make sure that you vacuum them up successively and carefully to ensure that the vacuum channel of the floor tool do not become blocked. If necessary, you should raise the nozzle in order to better vacuum up the dirt particles. 9 9 Figure ● Open the accessories compartment by pressing the release button. ● Take the upholstery nozzle and crevice nozzle out of the accessories holders. ● Close the accessories compartment. 7 GB_internet_BGS60:GB_internet_BGS60 08.02.2010 10:39 Seite 8 Vacuuming 10 Vacuuming with accessories a 10 Figure Attach the nozzles to the suction pipe or handle as required: a)Crevice nozzle for vacuuming crevices and corners, etc. b b)Upholstery nozzle for vacuuming upholstered furniture, curtains, etc. After use, stow the crevice nozzle and upholstery nozzle in the appliance. ! 11 Please observe! Do not leave the running turbo brush in the immediate vicinity of long hair, scarves, ties etc. Turbo brush for floor1 11 Figure ● Fit the turbo brush onto the suction pipe. 12 Vacuuming with the brush ! Please observe! Only vacuum using the brush on full suction power, i.e. max. performance of the vacuum cleaner. 12 Figure ● Only brush the fringes in the direction of the arrow. 1 8 only models BGS6225GB and BGS6235GB GB_internet_BGS60:GB_internet_BGS60 08.02.2010 10:39 Seite 9 Vacuuming 13 Maintenance Always switch off the vacuum cleaner and pull out the plug before performing any maintenance work. Remove the turbo brush from the suction / telescopic pipe. 13 Figure ● Cut off any wrapped around hair or threads using a pair of scissors. 14 15 16 14 Figure ● Then vacuum up the threads and hair using the corner nozzle. 15 Figure You can use the parking aid on the side of the vacuum cleaner if you wish to stop vacuuming for a short time. ● Once you have switched off the appliance, slide the hook on the floor tool into the recess on the side of the appliance. 16 Figure When vacuuming stairs, the appliance must be positioned at the bottom of the stairs. Depending on the type of staircase, you can vacuum 12 to 16 stairs with the suction pipe, handle and floor tool fitted. If they do not reach far enough, the appliance can also be carried using the carrying handle. 9 GB_internet_BGS60:GB_internet_BGS60 08.02.2010 10:39 Seite 10 When work is done 17 17 Figure ● Switch off the appliance. ● Pull out the mains plug. ● Tug the power cord briefly and then let go (the power cord retracts automatically). 18 18 Figure ● Unlock the telescopic tube by moving the sliding switch in the direction of the arrow and slide one tube into the other. 19 19 Figure To store the appliance, use the storage aid on the underside. ● Align the appliance with the hose. ● Slide the hook on the floor tool into the recess on the underside of the appliance. If you have stored your appliance in the upright position, you should take hold of it by the suction adapter to tilt it up or reposition it. 10 GB_internet_BGS60:GB_internet_BGS60 08.02.2010 10:39 Seite 11 When work is done 20 Emptying the dust container In order to achieve optimum vacuuming results, the dust container should be emptied after every use or, at the latest, when dirt or dust visibly covers the fluff filter. When emptying the dust container, always check how dirty the fluff filter is and clean it as required as detailed in the “Cleaning the fluff filter” instructions. Figure 28 20 Figure ● Unlock the dust container by folding up the handle and take the dust container out of the appliance. 21 21 Figure ● Release the filter unit of the dust container by pressing the release button. ● Take the filter unit out of the dust container and empty the dust container. 11 GB_internet_BGS60:GB_internet_BGS60 08.02.2010 10:39 Seite 12 When work is done 22 22 Figure ● Insert the filter unit into the dust container, making sure it is correctly seated. ● Push the release button back into its original position until it clicks into place, in order to ensure that the container has been closed properly. ● When re-inserting the dust container into the appliance, make sure it is correctly seated. ● Fold back the handle to lock the dust container in the vacuum cleaner. Filter maintenance 23 Cleaning the particle filter Cleaning the plate filter Your appliance is equipped with a “Sensor Control” Function. Figure 23 + Figure 25 This function constantly monitors whether your vacuum cleaner is reaching its optimum power level. The indicator light lets you know when you need to clean the plate filter, so that the vacuum cleaner can reach its optimum power level once more. Vacuum cleaner with “RotationClean” function (BGS6220GB + BGS6225GB) 23 Figure The indicator lights up blue when the appliance is working at its optimum level. Once the indicator turns red and flashes, the plate filter must be cleaned. The appliance is automatically adjusted to the lowest power setting. 12 GB_internet_BGS60:GB_internet_BGS60 08.02.2010 10:39 Seite 13 Filter maintenance 24 24 Figure ● Switch the appliance off in order to clean the plate filter. Caution: ! The filter can only be cleaned if the appliance is switched off. ● To clean the plate filter, turn the knob at least three turns clockwise. You can also clean the filter if the suction is becoming less powerful, even if the indicator has not lit up. We recommend you clean the plate filter before emptying the dust container: It must be cleaned at the latest when the “Sensor Control” indicator lights up. If the indicator flashes three times in quick succession, even though the plate filter is clean, this is probably due to a dirty fluff filter. In this case, the appliance automatically adjusts to the lowest power setting and the indicator lights up red permanently. ● Switch the appliance off, empty the dust container and clean the fluff filter according to the instructions in “Cleaning the fluff filter”. Figure 28 Vacuum cleaner with “SelfClean” function (BGS6235GB) 25 25 Figure The indicator lights up blue when the appliance is working at its optimum level. Once the indicator turns red and flashes, the appliance switches off automatically Filter cleaning is activated and performed by the integrated cleaning motor. If the appliance cleans the filter three times in quick succession, this is probably due to a dirty fluff filter. In this case, the appliance automatically adjusts to the lowest power setting and the indicator lights up red. ● Switch the appliance off, empty the dust container and clean the fluff filter according to the instructions in “Cleaning the fluff filter”. Figure 28 26 26 Figure If required, you can also activate the cleaning procedure manually by pressing the “Clean” filter cleaning button. You can also clean the filter if the suction is becoming less powerful, even if the indicator has not lit up. We recommend you clean the plate filter before emptying the dust container. 13 GB_internet_BGS60:GB_internet_BGS60 08.02.2010 10:39 Seite 14 Filter maintenance 27 27 Figure If the plate filter is particularly dirty, the dirt can also be washed off. ● ● ● ● Turn the bottom part of the filter system clockwise as far as the stop. Take the plate filter out of the filter system. Wash the filter under running water. When it has dried completely, insert the plate filter into the filter system and lock the bottom part by turning it anticlockwise. When the cleaner is handled properly and according to the instructions in this manual, the plate filter does not need to be removed or cleaned manually in order to achieve its optimum power level. ! Do not brush the filter. 24h 28 ● To clean it without using water, simply tap the filter around the edge of its cap. ● For a more thorough cleaning, rinse the filter from the outside with water, and allow it to dry completely before using it in the vacuum cleaner again. 28 Figure ● Unlock the dust container and take it out of the appliance. ● Take the filter unit out of the dust container. ● Clean the fluff filter. Cleaning the fluff filter The fluff filter should be cleaned at regular intervals in order to ensure optimum operation of the vacuum cleaner. When emptying the dust container, always check how dirty the fluff filter is. It is usually sufficient to lightly shake or tap out the filter housing when the dust container is emptied in order to dislodge any particles of dirt. If this is not sufficient, the brush which is supplied with the appliance or a dry cloth can be used to remove dirt particles from the surface. ! Caution: the fluff filter must not be cleaned under running water. 14 GB_internet_BGS60:GB_internet_BGS60 08.02.2010 10:39 Seite 15 Filter maintenance When the cleaner is handled properly and according to the instructions in this manual, the Hepa filter does not need replacement. In order to ensure that the machine works at its optimum performance level, please wash the filter every three years. Whilst the filter surface may discolour, the filtration performance is not affected by this. 29 Rinsing the Hepa filter To remove the filter just follow these four steps: 29 Figure ● Open the exhaust grille by pressing the release button. ● Unclip the Hepa filter by pressing the locking tab and remove it from the appliance. ● Rinse the Hepa filter under running water to clean it. ● Once the filter has dried completely (minimum 24 hours), re-insert the Hepa filter, close the lid and your vacuum cleaner is ready to use. 15 GB_internet_BGS60:GB_internet_BGS60 08.02.2010 10:39 Seite 16 Central-Service-Depots GB Great Britain BSH Home Appliances Ltd. Customer Service Grand Union House Old Wolverton Road Wolverton Milton Keynes MK12 5PT www.bosch-home.co.uk 0844 892 8979 To arrange an engineer visit please visit: www.bosch-home.co.uk Or call: 0844 892 8979 For replacement spare parts or accessories please visit: www.bosch-eshop.co.uk Or call: 0844 892 8979 16 GB_internet_BGS60:GB_internet_BGS60 08.02.2010 10:39 Seite 17 Cleaning instructions Cleaning instructions Always switch off the vacuum cleaner and disconnect the power cord from the mains before cleaning the vacuum cleaner. The vacuum cleaner and plastic accessories can be cleaned with a commercial plastic cleaner. not use a scourer, glass-cleaning agent or all-purpose cleaning pro! Do duct. Never immerse the vacuum cleaner in water. Subject to technical modifications. 17 GB_internet_BGS60:GB_internet_BGS60 08.02.2010 10:39 Seite 18 Disposal „This appliance is labelled in accordance with the European directive 2002/96/EG concerning waste electrical and electronic equipment - WEEE. The directive provides the framework for the return and recycling of used appliances as applicable throughout the EU.“ Warranty GB Warranty The guarantee conditions as set out by our representatives in the country of sale apply to this appliance. Details regarding this may be obtained from whom the appliance was purchased. For claims under guarantee the sales receipt must be produced. Robert Bosch Hausgeräte GmbH Carl-Wery-Str. 34 / 81739 München // Germany 18 GB_internet_BGS60:GB_internet_BGS60 08.02.2010 10:39 Seite 19 19 GB_internet_BGS60:GB_internet_BGS60 08.02.2010 10:39 Seite 20 printed on recycling paper A GA 9000 517 586B The design of this product is environmentfriendly. All plastic parts are identified for recycling purposes.