1
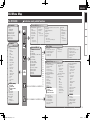
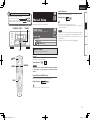
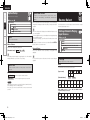
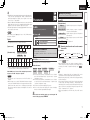
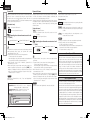
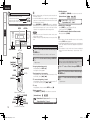
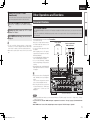
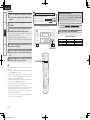
AV SURROUND RECEIVER
AVR-4308
AVR-3808
Owner’s Manual GAdditional functions editionH
The AVR-4308 / AVR-3808 Owner’s manual is organized in the following two
volumes.
•GThe original versionH and GAdditional functions editionH (This version)
This version contains descriptions of additional and changed functions only.
The additional and changed functions are items indicated by“ ” in the GUI Menu Map.
GUI Menu Map : AVR-4308 (vpage 3), AVR-3808 (vpage 4)
NOTE
Where the GAdditional functions editionH and GThe original versionH contain items with the same
name, please refer to the GAdditional functions editionH.
AVR4308ACI-3808ACI_E2A_2nd.indd
1
2008/08/25
10:12:58
ENGLISH
A NOTE ABOUT RECYCLING:
This product’s packaging materials are recyclable and can be reused. Please
dispose of any materials in accordance with the local recycling regulations.
When discarding the unit, comply with local rules or regulations.
Batteries should never be thrown away or incinerated but disposed of in
accordance with the local regulations concerning battery disposal.
This product and the supplied accessories, excluding the batteries, constitute
the applicable product according to the WEEE directive.
nContents
GUI Menu Map
For AVR-4308···················································································3
For AVR-3808···················································································4
Manual Setup
nAdditional functions
1.Corresponding with New DENON control dock for
iPod ASD-11R
ou can enjoy iPod playback (music / photos / movies) by
Y
connecting ASD-11R.
HDMI Setup······················································································5
a HDMI Control·············································································5
Option Setup····················································································6
a GUI·····························································································6
s 232C Port···················································································6
d Add New Feature·······································································6
hile constantly monitoring the sound source, Audyssey
W
Dynamic Volume delivers optimum volume adjustment
without losing dynamic range.
3.Addition of Audyssey Dynamic EQ
Audyssey Dynamic EQ assures there is no loss of sound
quality even at low volume.
Preparations·····················································································9
Turning the Power On·····································································9
iPod® Playback················································································9
Basic Operation···············································································9
Listening to Music········································································ 10
Viewing Videos (Browse mode)···················································· 10
Viewing Still Pictures or Videos (Remote mode)··························11
Other Operations and Functions
Convenient Functions··································································· 11
HDMI Control Function································································· 11
Quick Select Function··································································· 12
Source Select
Settings Related to Playing Input Sources···································6
a Assign························································································6
2.Addition of Audyssey Dynamic Volume
Playback
Parameter
Other Information· ··························································13
Troubleshooting· ······························································13
Audio································································································7
a Surround Parameters·································································7
s Audyssey Settings·····································································7
4.HDMI control function included
y connecting a HDMI compatible TV or recorder with HDMI
B
cable, you can operate the power on/off, volume control and
other main functions via the TV’s remote control unit.
AVR4308ACI-3808ACI_E2A_2nd.indd
2
2008/08/25
10:12:59
ENGLISH
For AVR-4308
GUI Menu Map
GUI Menu Map
indicates newly added function.
Setup
Source Select (vpage6,7)
Information
n PHONO
• InputMode
• Rename
• Other
· VideoSelect
· SourceLevel
Surround Mode
n STEREO
n DIRECT
n STANDARD
n DOLBY PLIIx, DOLBY PLII or
DOLBYPL
n DTSNEO:6
n 7CHSTEREO
n WIDESCREEN
n SUPERSTADIUM
n ROCKARENA
n JAZZCLUB
n CLASSICCONCERT
n MONOMOVIE
n VIDEOGAME
n MATRIX
n VIRTUAL
n NET/USB
• Play
• PlaybackMode
• StillPicture
• InputMode
• Rename
• Other
· VideoSelect
· SourceLevel
Troubleshooting
(vpage7,8)
n Audio
• SurroundParameters
· Mode
· CinemaEQ
· DRC
· D.COMP
· LFE
· CenterImage
· Panorama
· Dimension
· CenterWidth
· DelayTime
· Effect
· EffectLevel
· RoomSize
· AFDM
· SBCHOut
· SubwooferAtt.
· Subwoofer
· Default
• Tone
· ToneDefeat
· Bass
· Treble
•• Audyssey Settings
·· Room EQ
·· Dynamic EQ
·· Dynamic Volume
·· Setting
• RESTORER
• NightMode
• AudioDelay
n PictureAdjust
• Contrast
• Brightness
• ChromaLevel
• Hue
n CD,DVD,HDP,TV/CBL,SAT,VCR,DVR,V.AUX
• Play(iPod)
• PlaybackMode(iPod)
• Assign
• InputMode
• Rename
• Other
· VideoSelect
· VideoConvert(ExcludingCD)
· SourceLevel
Information
Parameter
n TUNER(FM/AM)
• Play
• AutoPreset
• PresetSkip
• PresetName
• InputMode
• Rename
• Other
· VideoSelect
· SourceLevel
Playback
n Status
• MAINZONE
• ZONE2/3/4
n AudioInputSignal
n HDMIInformation
n AutoSurroundMode
n QuickSelect
n PresetStation
Auto Setup
n AutoSetup
• STEP1:SpeakerDetection
• STEP2:Measurement
• STEP3:Calculation
• STEP4:Check
• STEP5:Store
n Option
• DirectMode
• MicSelect
n ParameterCheck
• SpeakerConfigurationCheck
• DistanceCheck
• ChannelLevelCheck
• CrossoverCheck
• EQCheck
• Restore
Manual Setup (vpage5,6)
n SpeakerSetup
• SpeakerConfiguration
• SubwooferMode
• Distance
• ChannelLevel
• CrossoverFrequency
• SurroundSpeaker
n HDMISetup(vpage5)
• i/pScaler
• Resolution
• ProgressiveMode
• Aspect
• ColorSpace
• RGBRange
• AutoLipSync
• Audio
• MonitorOut
• HDMI Control
· Control
· Control Monitor
· Power Off Control
n AudioSetup
• EXT.INSetup
· SurroundSpeaker
· SubwooferLevel
• 2chDirect/Stereo
• DownmixOption
• AutoSurroundMode
• ManualEQ
n NetworkSetup
• NetworkSetup
• Other
· PowerSaving
· Character
· PCLanguage
• NetworkInformation
n ZoneSetup
• ZONE2/ZONE3
· Bass
· Treble
· HPF
· LchLevel
· RchLevel
· Channel
· VolumeLevel
· VolumeLimit
· PowerOnLevel
· MuteLevel
n OptionSetup(vpage6)
• AmpAssign
• VolumeControl
· VolumeLimit
· PowerOnLevel
· MuteLevel
• SourceDelete
• GUI
· Screensaver
· WallPaper
· Format
· Text
· MasterVolume
· NET/USB
· iPod
· Tuner
• QuickSelectName
• TriggerOut1
• TriggerOut2
• DigitalOut
• RemoteID
• 232C Port
• Dimmer
• SetupLock
• MaintenanceMode
• FirmwareUpdate
• AddNewFeature
n Language
3
AVR4308ACI-3808ACI_E2A_2nd.indd
3
2008/08/25
10:13:13
ENGLISH
GUI Menu Map
For AVR-3808
indicates newly added function.
Source Select (vpage6,7)
Information
Setup
Playback
nStatus
•MAINZONE
•ZONE2/3
nAudioInputSignal
nHDMIInformation
nAutoSurroundMode
nQuickSelect
nPresetStation
nTUNER(FM/AM)
•Play
•AutoPreset
•PresetSkip
•PresetName
•InputMode
•Rename
•Other
·VideoSelect
·SourceLevel
nPHONO
•InputMode
•Rename
•Other
·VideoSelect
·SourceLevel
nCD,DVD,HDP,TV/CBL,SAT,VCR,DVR,V.AUX
•Play(iPod)
•PlaybackMode(iPod)
•Assign
•InputMode
•Rename
•Other
·VideoSelect
·VideoConvert(ExcludingCD)
·SourceLevel
nNET/USB
•Play
•PlaybackMode
•InputMode
•Rename
•Other
·VideoSelect
·SourceLevel
Information
Parameter
(vpage7,8)
Troubleshooting
nAudio
•SurroundParameters
·Mode
·CinemaEQ
·DRC
·D.COMP
·LFE
·CenterImage
·Panorama
·Dimension
·CenterWidth
·DelayTime
·Effect
·EffectLevel
·RoomSize
·AFDM
·SBCHOut
·SubwooferAtt.
·Subwoofer
·Default
•Tone
·ToneDefeat
·Bass
·Treble
• Audyssey Settings
•AudysseySettings
· Room EQ
·RoomEQ
· Dynamic EQ
·DynamicEQ
· Dynamic Volume
·DynamicVolume
· Setting
·Setting
•RESTORER
•NightMode
•AudioDelay
nPictureAdjust
•Contrast
•Brightness
•ChromaLevel
•Hue
Surround Mode
nSTEREO
nDIRECT
nSTANDARD
nDOLBY PLIIx, DOLBY PLII or
DOLBYPL
nDTSNEO:6
n7CHSTEREO
nWIDESCREEN
nSUPERSTADIUM
nROCKARENA
nJAZZCLUB
nCLASSICCONCERT
nMONOMOVIE
nVIDEOGAME
nMATRIX
nVIRTUAL
Auto Setup
nAutoSetup
•STEP1:SpeakerDetection
•STEP2:Measurement
•STEP3:Calculation
•STEP4:Check
•STEP5:Store
nOption
•DirectMode
•MicSelect
nParameterCheck
•SpeakerConfigurationCheck
•DistanceCheck
•ChannelLevelCheck
•CrossoverCheck
•EQCheck
•Restore
Manual Setup (vpage5,6)
nSpeakerSetup
•SpeakerConfiguration
•SubwooferMode
•Distance
•ChannelLevel
•CrossoverFrequency
•SurroundSpeaker
nHDMISetup(vpage5)
•i/pScaler
•Resolution
•ProgressiveMode
•Aspect
•ColorSpace
•RGBRange
•AutoLipSync
•Audio
•HDMIControl
• HDMI Control
·Control
· Control
· Power Off Control
·PowerOffControl
nAudioSetup
•EXT.INSetup
·SurroundSpeaker
·SubwooferLevel
•2chDirect/Stereo
•DownmixOption
•AutoSurround
•ManualEQ
nNetworkSetup
•NetworkSetup
•Other
·PowerSaving
·Character
·PCLanguage
•NetworkInformation
nZoneSetup
•ZONE2/ZONE3
·Bass
·Treble
·HPF
·LchLevel
·RchLevel
·Channel
·VolumeLevel
·VolumeLimit
·PowerOnLevel
·MuteLevel
nOptionSetup(vpage6)
•AmpAssign
•VolumeControl
·VolumeLimit
·PowerOnLevel
·MuteLevel
•SourceDelete
•GUI
·Screensaver
·WallPaper
·Format
·Text
·MasterVolume
·NET/USB
·iPod
·Tuner
•QuickSelectName
•TriggerOut1
•TriggerOut2
•RemoteID
•232CPort
• 232C Port
•Dimmer
•SetupLock
•MaintenanceMode
•FirmwareUpdate
•AddNewFeature
nLanguage
4
AVR4308ACI-3808ACI_E2A_2nd.indd
4
2008/08/25
10:13:27
ENGLISH
Buttonlocatedonboththemainunit
andtheremotecontrolunit
Buttononlyonthemainunit
Buttononlyontheremotecontrolunit
BUTTON
<BUTTON>
[BUTTON]
Manual Setup
HDMI Setup
MakesettingsforHDMIvideo/audiooutput.
Manual Setup
HDMI Setup
•Thiscanbesetwhen“Control“issetto“ON“.
•Pleaseconsulttheoperatinginstructionsforeachconnecteddevice
tocheckthesettings.
NOTE
•Whenthe“Control”settinghasbeenchanged,alwaysturnoffthe
powertotheconnectingdevicesafterwardsandthenturnbackon.
•The HDMI control function does not work when the power to the
equipmentisoff.
•Fordetails,see“HDMIControlFunction”(vpage11).
Troubleshooting
a HDMI Control
a HDMI Control
<p>
Information
F Menu tree F
ON OFF
Playback
ROOM EQ
[Selectable items]
Setup
STANDARD <STATUS>
InterlockpowerOFFwithHDMIcontrol.
Makedetailsettingsforvariousparameters.
<Illustration:AVR-4308>
GUI Menu Map
Power Off Control
Symbols used to indicate buttons in this manual
MakesettingsforHDMIcontrolfunction.
Control
[
AMP]
SetHDMIcontrolfunctionON/OFF.
[Selectable items]
ROOM EQ
STANDARD
ON OFF
NOTE
If you set “Control” to “ON”, the “HDMI” and “Digital” assignment
in “Source Select” – “Assign” (vpage 6, 7) under the GUI menu
changes.
Control Monitor (AVR-4308 only)
[PARA]
SelecttheinterlockingmonitorwiththeHDMIcontrol.
[Selectable items] Monitor1 Monitor2
Thiscanbesetwhen“Control“issetto“ON“.
5
AVR4308ACI-3808ACI_E2A_2nd.indd
5
2008/08/25
10:13:29
ENGLISH
GUI Menu Map
Option Setup
Makevariousothersettings.
F Menu tree F
d Add New Feature
Display the new features (payment required) which can be
purchased for downloading to the AVR-4308 / AVR-3808 and
upgrade.
Whenyoupurchaseanewfeatureandregisteryouruserinformation,
“Registered”isdisplayedonthismenuandyoucanproceedwiththe
upgrade.
Setup
Manual Setup
Option Setup
a GUI
Playback
s 232C Port
d Add New Feature
Information
a GUI
MakeGUIrelatedsettings.
Troubleshooting
Master Volume
Mastervolumedisplayduringadjustment.
[Selectable items]
Bottom Top OFF
If the Master Volume display is superimposed on the film subtitles
makingitdifficulttosee,selectthe“Top”setting.
When“NotRegistered”isdisplayedontheAddNewFeaturescreen,
youcannotupgrade.
Tousetheupgradefunction,youshouldpurchaseanupgradepackage
fromtheDENONwebsite.
Topurchasethepackage,youwillneedtheIDnumbershownonthis
screen.
TodisplaytheIDnumberonthescreen,holdthe<p>and<STATUS>
buttonsdownfor3secondsormore.
Source Select
Usethisproceduretoselecttheinputsourceandmakethesettings
relatedtoplayinginputsources.
Settings Related to Playing
Input Sources
F Menu tree F
Source Select
TUNER
PHONO
CD, DVD, HDP, TV/CBL, SAT, VCR, DVR, V.AUX
Upgrade Status
a Assign
NET/USB
A list of the additional functions provided by the Upgrade will be
displayed.
Donotturnoffthepowerordisconnectfromthenetworkduringan
upgrade.
a Assign
Assigninputsourcestoinputconnectors.
s 232C Port
HDMI
Set when external controller or 2-way remote control unit is
connected.
SelectHDMIconnectortoassigntothissource.
[Input source]
DVD HDP TV/CBL SAT VCR DVR V.AUX
[Selectable items]
1 2 3 4 None
[Selectable items]
etwhenusinganexternalcontroller.
Serial Control : S
etwhenusinga2-wayremotecontrolunit.
2Way Remote : S
NOTE
Whenusinga2-wayremotecontrolunit(RC-7000CIandRC-7001RCI,
soldseparately),setthisto“2WayRemote”.
Inthiscase,youcannotusetheRS-232Cconnectorasanexternal
controller.
Input
source
Default
setting
DVD
HDP
TV/CBL
SAT
VCR
DVR
V.AUX
HDMI1
HDMI2
HDMI3
None
None
HDMI4
None
When “HDMI Control” is set to “ON”, the HDMI connector
assignment changes as follows.
Input
DVD
HDP
TV/CBL
SAT
VCR
DVR
V.AUX
source
Default
HDMI1 HDMI2 None HDMI3 None HDMI4 None
setting
6
AVR4308ACI-3808ACI_E2A_2nd.indd
6
2008/08/25
10:13:31
ENGLISH
s Audyssey Settings
SelectRoomEQ,DynamicEQandDynamicVolume.
Parameter
Parameter
Selectdigitalinputconnectortoassigntothissource.
[Selectable items]
a Surround Parameters
Coaxial1 ~ 3 Optical1 ~ 4 DENON LINK z None
Adjustsurroundsoundparameters.
The adjustable parameters differ for the different surround
modes.
z: When a DENON DVD player and the DENON LINK have been
connected,besuretomakeasettingto“DENONLINK”.
When “HDMI Control” is set to “ON”, the digital input connector
assigned to ”TV/CBL” changes to “Optical3”.
NOTE
•This cannot be set for input sources for which “iPod dock” is
assigned.
•Whenaninputsourcetowhich“DENONLINK”hasbeenassigned
isselectedintheMAINZONE,thePCMsignalandnetworkaudio
signal (Internet radio, music server or USB) input from the digital
inputconnectorcannotbeoutputtotheanalogRECOUTconnector
ormulti-zone.
Manual
: Apply frequency response set with “Manual
EQ”.
OFF
s Audyssey Settings
CD DVD HDP TV/CBL SAT VCR DVR V.AUX Input
CD
DVD
HDP TV/CBL SAT
VCR
DVR V.AUX
source
Default Coaxial Coaxial
Coaxial Optical Optical Optical Optical
None
setting
3
1
2
1
3
2
4
: Optimizefrequencyresponseofallspeakers
toflatresponse.
: Turnequalizeroff.
Operating from the main unit or main remote
control unit
PressROOM EQ.
OFF
Audyssey
Manual
Audyssey Byp. L/R
Audyssey Flat
SB CH Out(forMulti-channelsources)
•When “Audyssey”, “Audyssey Byp. L/R” or “Audyssey Flat” is
selected,“
”lights.
Selectplaybackmodeforsurroundbackchannels.
•After running Auto Setup, if the Speaker Configuration, Distance,
Channel Level, and Crossover Frequency have changed without
increasing the number of speakers measured, only “
”
lights.
[Selectable items]
NON MTRX MTRX ON PLIIx CINEMA z1 PLIIx MUSIC z2
ES MTRX z3 ES DSCRT z4 DSCRT ON OFF
z1:Thiscanbeselectedwhen“SurroundBack”issetto“2spkrs”
attheGUImenu“ManualSetup”–“SpeakerSetup”–“Speaker
Configuration”setting.
z2:Thiscanbeselectedwhen“SurroundBack”issetto“2spkrs”
or“1spkr”attheGUImenu“ManualSetup”–“SpeakerSetup”
–“SpeakerConfiguration”setting.
z3:ThiscanbeselectedwhenplayingDTSsources.
z4:This can be selected when playing DTS sources including a
discrete6.1-channelsignalidentificationsignal.
Troubleshooting
[Input source]
a Surround Parameters
exceptfrontLandRspeakers.
Audyssey Flat
Information
F Menu tree F
Audyssey Byp. L/R : Optimize frequency response of speakers
Playback
Adjustvariousaudioparameters.
: Optimizefrequencyresponseofallspeakers.
Setup
Audyssey
Audio
Audio
Digital
Room EQ
[Selectable items]
NOTE
When“HDMIControl”(vpage5)issetto“ON”,HDMIcannotbe
assignedto“TV/CBL”.
GUI Menu Map
•WithHDMI,thevideoandaudiosignalsaretransferredsimultaneously.
To play the video signal assigned at “HDMI” combined with the
audio signal assigned at “Digital”, select “Digital” at GUI menu
“SourceSelect”–“InputMode”.
•WhentheAVR-4308/AVR-3808andmonitorareconnectedwithan
HDMIcable,ifthemonitorisnotcompatiblewithHDMIaudiosignal
playback,onlythevideosignalsareoutputtothemonitor.
•Theaudiosignalsinputfromtheanalog,digitalandEXT.INconnectors
arenotoutputtothemonitor.
•“Audyssey”, “Audyssey Byp. L/R” and “Audyssey Flat” can be
selectedaftertheautosetupprocedurehasbeenperformed.
•Afterperforming“AutoSetup”,the“RoomEQ”settingautomatically
becomes“Audyssey”.
•Ifthesettingsofspeakersforwhich“None”hasbeendetermined
at “Auto Setup” are changed, “Audyssey”, “Audyssey Byp. L/R”
and“AudysseyFlat”cannotbeselected.EitherperformAutoSetup
again,orreturntothesettingafterrunningAutoSetupwith“Auto
Setup”–“ParameterCheck”–“Restore”.
•When using headphones or EXT. IN mode, “Room EQ” cannot
used.
When using the surround back speaker, you can change the “SB
CH Out” setting by pressing STANDARD.
7
AVR4308ACI-3808ACI_E2A_2nd.indd
7
2008/08/25
10:13:32
ENGLISH
GUI Menu Map
Setup
Dynamic EQ
Dynamic Volume
Setting
Audyssey Dynamic EQ™ solves the problem of deteriorating sound
quality as volume is decreased by taking into account human
perception and room acoustics. Audyssey Dynamic EQ works in
tandem with Audyssey MultEQ® XT to provide well-balanced sound
for every listener at any volume level.
Audyssey Dynamic Volume™ solves the problem of large variations
in volume level between television programs, commercials, and
between the soft and loud passages of movies.
Audyssey Dynamic EQ is integrated into Dynamic Volume so that as
the playback volume is adjusted automatically, the perceived bass
response, tonal balance, surround impression, and dialog clarity
remain the same.
Can be set when “Dynamic Volume” is set to “ON”.
Set Dynamic Volume effect.
[Selectable items]
Playback
ON
: Use Dynamic EQ function.
OFF
: Do not use Dynamic EQ function.
[Selectable items]
Information
Operating from the main remote control unit
Press [PARA].
Dynamic EQ / Volume : ON
Dynamic EQ : ON / Volume : OFF
Troubleshooting
Dynamic EQ / Volume : OFF
ON
OFF
: Use Dynamic Volume.
The Dynamic Volume effect will be at the level of the
“Setting”.
: Do not use Dynamic Volume.
Operating from the main remote control unit
Press [PARA].
Dynamic EQ / Volume : ON
•“Dynamic EQ” can only be set when auto setup has been performed.
•After performing “Auto Setup”, the “Dynamic EQ” setting
automatically becomes “ON”.
•“Dynamic EQ” cannot be set in the following situations.
⋅ If “Auto Setup” fails to be completed.
⋅ After running Auto Setup, when the number of used speakers has
increased from the number of measured speakers.
•When “Room EQ” is set to “OFF” or “Manual”, “Dynamic EQ” is
automatically set to “OFF”.
•Before running Auto Setup and after running Auto Setup, if the
number of speakers has increased or you pressed [PARA], “Run
Audyssey” is displayed. In this case, either perform Auto Setup or
return to the setting after running Auto Setup with “Auto Setup”
– “Parameter Check” – “Restore”.
NOTE
When you set ”Dynamic EQ” to ”ON”, “Tone” and “Night Mode”
cannot be used.
nOperating conditions for each function
•Dynamic EQ : When “Room EQ” is set to “Audyssey”,
“Audyssey Byp. L/R” or “Audyssey Flat”
•Dynamic Volume : When “Dynamic EQ” is set to “ON”
•Setting : When “Dynamic Volume” is set to “ON”
Room EQ
Dynamic EQ
Dynamic Volume
Setting
Dynamic EQ : ON / Volume : OFF
Dynamic EQ / Volume : OFF
•“Dynamic Volume” can only be set when auto setup has been
performed.
•“Dynamic Volume” cannot be set in the following situations.
⋅ If “Auto Setup” fails to be completed.
⋅ After running Auto Setup, when the number of used speakers has
increased from the number of measured speakers.
•When “Room EQ” is set to “OFF” or “Manual”, “Dynamic Volume”
is automatically set to “OFF”.
•Before running Auto Setup and after running Auto Setup, if the
number of speakers has increased or you pressed [PARA], “Run
Audyssey” is displayed. In this case, either perform Auto Setup or
return to the setting after running Auto Setup with “Auto Setup”
– “Parameter Check” – “Restore”.
NOTE
“Dynamic Volume” and “Night Mode” cannot be used jointly.
[Selectable items]
Midnight : High setting affects volume the most, causing all sounds
to be of equal loudness.
Evening : Middle setting prevents loud and soft sounds from
being much louder and softer respectively than average
sounds.
Day
: Low setting provides the least adjustments to the
loudest and softest of sounds.
NOTE
•“Setting” can only be set when auto setup has been performed.
•“Setting” cannot be set in the following situations.
⋅ If “Auto Setup” fails to be completed.
⋅ After running Auto Setup, when the number of used speakers has
increased from the number of measured speakers.
⋅ If “Dynamic Volume” setting is “OFF”.
About Dynamic EQ
Audyssey Dynamic EQ™ solves the problem of deteriorating sound
quality as volume is decreased by taking into account human
perception and room acoustics. Dynamic EQ selects the correct
frequency response and surround levels moment-by-moment at
any user-selected volume setting. The result is bass response, tonal
balance, and surround impression that remain constant despite
changes in volume. Dynamic EQ combines information from
incoming source levels with actual output sound levels in the room,
a prerequisite for delivering a loudness correction solution. Audyssey
Dynamic EQ works in tandem with Audyssey MultEQ XT to provide
well-balanced sound for every listener at any volume level.
About Dynamic Volume
Audyssey Dynamic Volume™ solves the problem of large variations
in volume level between television programs, commercials, and
between the soft and loud passages of movies.
Dynamic Volume looks at the preferred volume setting by the user and
then monitors how the volume of program material is being perceived
by listeners in real time to decide whether an adjustment is needed.
Whenever necessary, Dynamic Volume makes the necessary rapid
or gradual adjustments to maintain the desired playback volume
level while optimizing the dynamic range. Audyssey Dynamic EQ is
integrated into Dynamic Volume so that as the playback volume is
adjusted automatically, the perceived bass response, tonal balance,
surround impression, and dialog clarity remain the same whether
watching movies, flipping between television channels, or changing
from stereo to surround sound content.
AVR4308ACI-3808ACI_E2A_2nd.indd
8
2008/08/25
10:13:33
ENGLISH
Symbols used to indicate buttons in this manual
BUTTON
<Illustration:AVR-4308>
Turning the Power On
–GUIscreen–
Press <POWER>.
Music
The power indicator lights red and the power is set to the
standbymode.
(WhenusinganASD-1R)
iPod is a trademark of Apple Inc., registered in the U.S.
andothercountries.
[ iPod]
[QUICK SELECT]
bTheiPodmayonlybeusedtocopyorplaycontentsthatarenot
copyrighted or contents for which copying or playback is legally
permittedforyourprivateuseasanindividual.Besuretocomply
withapplicablecopyrightlegislation.
Basic Operation
1
Make the necessary preparations.
[SEARCH]
[iPod]
[SOURCE
SELECT]
q SettheiPodintheDENONControlDockforiPod.
(vSeetheControlDockforiPod’soperatinginstructions.)
wAssigntheControlDockforiPod’sinput.
: ”Source Select” – “(input source)” – “Assign”–
”iPod dock”
(WhenusinganASD-11R)
b WhenusingtheASD-11R,“Music”and“Videos”foldersappear
intheTopmenu.
b WhencommunicationbetweenAVR-4308/AVR-3808andiPodis
complete,therelevantGUIscreenisdisplayed.Ifthescreenisnot
displayed,theiPodmaynotbeproperlyconnected.Tryconnecting
again.
: ”Source Select” –“(inputsource)” –“Play”
3
4
To operate using the main remote control unit, set the
remote control unit to the iPod mode.
[SEARCH] and hold it down for a 2 seconds or
more to select the display mode.
Press
Toswitchbetweenmodes,pressandholddownthebutton.
Whenremotemodeisactive,“Remote”isdisplayed.
[Selectable mode]
Displaylocation
[POWER ON]
Troubleshooting
ThemusiconaniPodcanbeplayedbyusingtheControlDockfor
iPod(ASD-1RorASD-11R,soldseparately).
Theoperationcanalsobeperformedusingthebuttonsonthemain
unitorremotecontrolunitwhilewatchingtheGUImenus.
[1/2]
Music
Videos
Thepowerindicatorflashesgreenandthepowerturnson.
iPod® Playback
<ON/STANDBY> <POWER>
iPod
[1/6]
Playlists
Artists
Albums
Songs
Genres
Composers
Information
1
2
bAlsopress [SOURCE SELECT]wheninstandbymode,thepower
turnson.Inthiscasetheinputsourceisselectedbymainremote
controlunit.
bAlso press [QUICK SELECT] when in standby mode, the power
turnson.InthiscaseQuickSelectisselected.
AMP]
mode) to select the input source assigned in step 1-w
above.
Press <ON/STANDBY> or [POWER ON].
<SOURCE SELECT>
[
Either turn <SOURCE SELECT> or press [iPod] (AMP
Playback
<BUTTON>
[BUTTON]
2
Setup
Buttonlocatedonboththemainunit
andtheremotecontrolunit
Buttononlyonthemainunit
Buttononlyontheremotecontrolunit
Preparations
GUI Menu Map
Playback
Playable
files
Active
buttons
Audiofile
Videofile
Remote
controlunit
(AVR-4308/
AVR-3808)
iPod
Browse mode
Remote mode
Mainunitdisplay
iPoddisplay
S
Sz1
S
Sz2
S
S
A
S
z1:WhenusinganASD-11RcontroldockforiPod.
z2:Video may not be output, depending on the combination of
ASD-1RandiPod.
9
AVR4308ACI-3808ACI_E2A_2nd.indd
9
2008/08/25
10:13:36
ENGLISH
GUI Menu Map
Symbols used to indicate buttons in this manual
Buttonlocatedonboththemainunit
andtheremotecontrolunit
Buttononlyonthemainunit
Buttononlyontheremotecontrolunit
BUTTON
<BUTTON>
[BUTTON]
Setup
<Illustration:AVR-4308>
Playback
ENTER
<STATUS>
•With the default settings, the iPod can be used connected to the
VCR(iPod)connector.
•Use the RESTORER mode to expand the low and high frequency
componentsofcompressedaudiofilesandachievearichersound.
Thedefaultsettingis“Mode3”.
•Press <ON/STANDBY> or [POWER OFF] and set the AVR-4308 /
AVR-3808’s power to the standby mode before disconnecting the
iPod.AlsoswitchtheinputsourcetoonetowhichtheGUImenu
“iPoddock”isnotassignedbeforedisconnectingtheiPod.
NOTE
Information
•Depending on the type of iPod and the software version, some
functionsmaynotoperate.
•DENONwillacceptnoresponsibilitywhatsoeverforanylossofiPod
data.
Troubleshooting
Listening to Music
<ON/STANDBY>
1 ENTERui p
Use
uio p
to select the search item or folder, then press
or .
n Shuffling playback
Press[CHANNEL +]or[RANDOM]onthesubremotecontrolunit.
[Selectable items] Albums Songs OFF
: ”Source Select” –“(inputsource)” –
”Playback Mode (iPod)” –“Shuffle”
n Searching up or down pages
Press[SEARCH],thenpresso(down)orp(up).
Tocancel,pressuior[SEARCH].
n To switch between the Browse and Remote modes
Eitherpressandhold[SEARCH].
•The title name, artist name and album name can be checked by
pressing<STATUS>duringplayback.
•OntheAVR-4308/AVR-3808,folderandfilenamescanbedisplayed
astitles.Anycharactersthatcannotbedisplayedarereplacedwith
“.(period)”.
•Thetime(default:30sec)forwhichtheGUImenusaredisplayed
canbesetatGUImenu“ManualSetup”–“OptionSetup”–“GUI”
–“iPod”.
b WhenusingtheASD-11R,select“Music”ontheTopmenu.
[ iPod]
2p
Use ui to select the music file, then press ENTER or
[8], [9],
[6], [7],
[1], [2]
ENTER
.
Playbackstarts.
[POWER OFF]
n Stopping playback temporarily
Duringplayback,pressENTERor[1].
uio p
n Fast-forwarding or fast-reversing
Pressagaintoresumeplayback.
[SEARCH]
Duringplayback,eitherpressandholdu(tofast-reverse)ori(to
fast-forward),orpress[6]or[7].
[CHANNEL + –]
n To cue to the beginning of a track
Duringplayback,eitherpressu(tocuetotheprevioustrack)ori
(tocuetothenexttrack),orpress[8]or[9].
Viewing Videos (Browse mode)
WhenyouconnectaniPodequippedwithavideofunctiontothe
ASD-11R,videofileswillbevisibleinBrowsemode.
1 ui
2 ENTERui p
3 p ui
Use
to select “Videos”, then press ENTER or p.
Use
to select the search item or folder, then press
or .
Use
to select the video file, then press ENTER or
.
Playbackstarts.
n To stop
Duringplayback,eitherpressandholdENTERorpress[2].
(Mainremotecontrolunit)
[2]
[8]
[REPEAT]
10
AVR4308ACI-3808ACI_E2A_2nd.indd
[SEARCH]
[9]
[1/3]
[RAMDOM]
n Playing repeatedly
Press[CHANNEL –]or[REPEAT]onthesubremotecontrolunit.
[Selectable items] All One OFF
: ”Source Select” –“(inputsource)” –
”Playback Mode (iPod)” –“Repeat”
(Subremotecontrolunit)
10
2008/08/25
10:13:40
ENGLISH
Photo and video data on the iPod can be viewed on the monitor.
(Only for iPod equipped with slideshow or video functions.)
Remote iPod” is displayed on the AVR-4308 / AVR-3808’s
“
display.
ui to select
“Photos” or “Videos”.
Press
ENTER until the image you want to view is
displayed.
Convenient Functions
HDMI Control Function
When AVR-4308 / AVR-3808 is connected to a TV and player compatible with HDMI control function, you can perform the following
operations.
Settings other than AVR-4308 / AVR-3808 settings must be made on the respective devices. (Check the operating instructions of each
device for details.)
• AVR-4308 / AVR-3808 power off can be linked
Connections
Player compatible
with HDMI
control function
Television compatible with
HDMI control function
Troubleshooting
•“TV Out” at the iPod’s “Slideshow Settings” or “Video Settings”
must be set to “On” in order to display the iPod’s photo data or videos
on the monitor. For details, see the iPod’s operating instructions.
•When unable to operate by the remote control unit, use the iPod
unit.
to the TV power off step.
When you set “Output audio from amp” in
the TV audio output setup operation, you can
switch the amp power on.
• You can switch audio output devices with a
TV operation.
(When outputting from the TV speakers,
output switches from speakers connected to
AVR-4308 / AVR-3808.)
• You can adjust AVR-4308 / AVR-3808 volume
in the TV volume adjustment operation.
• You can switch AVR-4308 / AVR-3808
functions through linkage to TV input function
switching.
• When playing the player, the AVR-4308 / AVR3808 input function switches to the function
of that player.
"6%*0
)%.*
065
)%.*
*/
"6%*0
065
3
L
R
L
R
Playback Information
2
3
Watching the iPod’s screen, use
Other Operations and Functions
Setup
1
Press and hold [SEARCH] to set the Remote mode.
GUI Menu Map
Viewing Still Pictures or Videos
(Remote mode)
015*$"065
•When you want to listen to TV audio by AVR4308 / AVR-3808, connect optical digital or
analog.
If the TV you are using has both connection
jacks, use the optical digital connection.
•When using these functions set as follows:
GUI menu “Manual Setup” – “HDMI Setup”
– “HDMI Control” – “Control” set to “ON“
(vpage 5).
NOTE
<Illustration : AVR-4308>
•When using the HDMI control function, you can not assign HDMI input to “TV/CBL” by setting “Source Select” – “(input source)” – “Assign”
– “HDMI” in the GUI menu.
•If you set “Control” to "ON", the “HDMI” and “Digital” assignment in “Source Select” – “Assign” (vpage 6, 7) under the GUI menu
changes.
•When “HDMI Control” is set to “ON”, the digital input connector assigned to ”TV/CBL” changes to “Optical3”.
11
AVR4308ACI-3808ACI_E2A_2nd.indd
11
2008/08/25
10:13:41
ENGLISH
GUI Menu Map
Operations
1
Connect the HDMI to the AVR-4308 / AVR-3808
Setup
Playback
2
3
with equipment compatible with the HDMI control
function.
Put the power on for all the equipment connected to
Symbols used to indicate buttons in this manual
Buttonlocatedonboththemainunit
andtheremotecontrolunit
Buttononlyonthemainunit
Buttononlyontheremotecontrolunit
BUTTON
<BUTTON>
[BUTTON]
the HDMI.
Check the settings for all the equipment connected to
<Illustration:AVR-4308>
Withthisfunction,thecurrentlyplayinginputsource,inputmode,
surround mode, room EQ, Dynamic EQ, Dynamic Volume
settingsandvolumecanbestoredinthememory.
1
Set the input source, input mode, surround mode,
room EQ, Dynamic EQ, Dynamic Volume settings
and volume to the conditions you want to store.
2
Press and hold the desired QUICK SELECT.
the HDMI and make HDMI available to them.
Information
bPlease consult the operating instructions for the connected
equipmenttocheckthesettings.
bSteps1~3donothavetoberepeatedoncestarted.
bCarryoutsteps2and3shouldanyoftheequipmentbeplugged
out.
Troubleshooting
4
5
Quick Select Function
Keeppressingthebuttonuntilthequickselectindicatorlights.
[Quick Select Defaults]
Quick Select 1
Quick Select 2
Quick Select 3
Switch the television input to the HDMI connected to
the AVR-4308 / AVR-3808.
Input Source
DVD
TV/CBL
VCR
Volume
–40dB
–40dB
–40dB
QUICK SELECT
Switch the AVR-4308 / AVR-3808 input to the HDMI
6
input source and check if the picture from the player
is ok.
Put the television power on standby and check if the
AVR-4308 / AVR-3808 goes into standby.
QUICK SELECT
If the AVR-4308 / AVR-3808 does not work please check the
following.
•IstheGUImenu“ManualSetup”–“HDMISetup”–“HDMIControl”
–“Control”(vpage5)setto“ON”?
•Is the GUI menu “Manual Setup” – “HDMI Setup” – “HDMI
Control”–“ControlMonitor”(vpage5)setforthemonitoroutput
connectedtotelevision?(AVR-4308only)
•IstheGUImenu“ManualSetup”–“HDMISetup”–“HDMIControl”
–“PowerOffControl”(vpage5)setto“ON”?
•Is the control function used for the television HDMI properly set?
(Checkthetelevisionoperatinginstructionsfordetails.)
•Shouldanyoftheoperationsbelowbeperformed,theinterlocking
functionmaybereset,inwhichcase,repeatstep’s2and3.
• GUImenu“SourceSelect”–“(inputsource)”–“Assign”–“HDMI”
(vpage6)settinghaschanged.
• Thereisachangetotheconnectionbetweentheequipmentand
theHDMI,oranincreaseinequipment.
1
AVR4308ACI-3808ACI_E2A_2nd.indd
12
2008/08/25
10:13:43
ENGLISH
Audyssey
Audyssey Dynamic Volume™
Audyssey Dynamic Volume solves the problem of large variations in volume level between television
programs, commercials, and between the soft and loud passages of movies.
Audyssey Dynamic EQ is integrated into Dynamic Volume so that as the playback volume is adjusted
automatically, the perceived bass response, tonal balance, surround impression, and dialog clarity remain
the same.
Countermeasure
is •Set “Manual Setup” – “HDMI
Setup” – “HDMI Control” –
“Control” to “OFF”.
When you only want to operate
the power on/off each device, set
“Power Off Control” to “OFF”.
Page
5
Troubleshooting
Audyssey Dynamic EQ solves the problem of deteriorating sound quality as volume is decreased by
taking into account human perception and room acoustics. Audyssey Dynamic EQ works in tandem with
Audyssey MultEQ XT to provide well-balanced sound for every listener at any volume level.
Symptom
Cause
When performing •HDMI Control function
operating.
the following
operations on a
connected device,
AVR-4308 / AVR3808 has the
same operations.
⋅ Power ON/OFF
⋅ Switching audio
output devices
⋅ Adjust volume
⋅ Switch input
source
Information
Audyssey Dynamic EQ™
GHDMI ControlH
Playback
Audyssey MultEQ XT is a room equalization solution that calibrates any audio system so that it can achieve
optimum performance for every listener in a large listening area. Based on several room measurements,
MultEQ XT calculates an equalization solution that corrects for both time and frequency response problems
in the listening area and also performs a fully automated surround system setup.
If a problem should arise, first check the following:
1. Are the connections correct?
2. Is the set being operated as described in the owner’s manual?
3. Are the other components operating properly?
If this unit does not operate properly, check the items listed in the table below. Should the problem persist,
there may be a malfunction.
In this case, disconnect the power immediately and contact your store of purchase.
Setup
Audyssey MultEQ® XT
Troubleshooting
GUI Menu Map
Other Information
Manufactured under license from Audyssey Laboratories. U.S. and foreign patents pending. Audyssey
MultEQ® XT is a registered trademark of Audyssey Laboratories. Audyssey Dynamic EQ™ is a
trademark of Audyssey Laboratories. Audyssey Dynamic Volume™ is a trademark of Audyssey
Laboratories.
13
AVR4308ACI-3808ACI_E2A_2nd.indd
13
2008/08/25
10:13:43
AVR4308ACI-3808ACI_E2A_2nd.indd
14
2008/08/25
10:13:43
AVR4308ACI-3808ACI_E2A_2nd.indd
15
2008/08/25
10:13:43
www.denon.com
Denon Brand Company, D&M Holdings Inc.
Printed in Japan 5411 10157 007D
AVR4308ACI-3808ACI_E2A_2nd.indd
16
2008/08/25
10:13:44