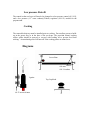
1
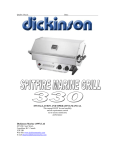
Dickinson Marine
#407-204 Cayer St Coquitlam
BC Canada V3K 5B1
www.dickinsonmarine.com
[email protected]
T: 800 659 9768
F: 604 525 6417
SINCE 1932
ROUND
Operator’s Manual
This manual must be read and the requirements carried out
to ensure satisfactory performance.
DICKINSON RESERVES THE RIGHT TO MAKE CHANGES TO PRODUCTS
OR DOCUMENTS AT ANY TIME
QUALITY INSPECTED BY-
Doug & Don
DATE-
Jul 15/2008
Contents
00-SBQ-R
SEA-B-QUE ROUND
- Top Lid and Main Body Assembly
c/w Burner Assy, and Regulator
- 2 Porcelain Enamel Grill Sections
- Deck Leg Feet
- Drip Tray
- Manual c/w Warranty Form
Warnings and Disclosures
Follow all installation and operating procedures.
The sea-b-que is designed for lpg only
IMPORTANT:
Read this owner’s manual carefully and completely before trying to
assemble, operate, or service this barbeque. Improper use of this gas
appliance can cause serious injury or death from burns, fire, explosion,
carbon monoxide poisoning and oxygen depletion.
WARNING:
Do not install this appliance in spaces containing internal combustion
engines, their fuel tanks, or joints and fittings of their fuel systems.
Test all propane lines and connections for leaks with a soapy water solution.
Do not flame test for leaks.
WARNING:
If the information in this manual is not followed exactly, a fire or explosion
may result causing property damage, personal injury, or loss of life.
— Do not store or use gasoline or other flammable vapors and liquids in the
vicinity of this or any other appliance.
• Do not try to light any appliance.
• Do not touch any electrical switch..
.
Close the lpg cylinder valve when sea-b-que is not in use
Close the lpg cylinder valve in the event of an emergency
Close the sea-b-que regulator valve before opening the lpg cylinder valve
Save this manual for future reference.
Sea-B-Que Feet Assembly Instructions
Most of the assembly for your new BBQ has been done for you. You will need to attach
the feet of the BBQ to the rest of the unit. The two feet of the sea-b-que slide on to the
inserted studs on the base. The flanges are to point outwards. Use the four 10 x 32 nuts
and #10 lock-washers to secure the legs to the base.
Regulator Control & Propane Fuel Supply
Propane must be supplied from a standard or disposable propane bottle. High pressure
propane is required. The sea-b-que gas control is also the pressure regulator. If your
boat has a regulated propane source the fuel line to the sea-b-que must be T’d off before
any regulators on the main fuel supply. The T type connector is available from
Dickinson for this purpose (# 15-178). If replacing the regulator control or the sea-b-que
is not getting hot enough, the regulator may need to be adjusted. If so use a bottle that is
more than ½ full and light the burner and turn the control on high, peel the shiny sticker
off the front of the control knob. There will be a Phillips screw or a 5/64 Allen screw.
Turn clockwise to increase the flame, at about ½ turn at a time (no more than 2 full
turns).
NOTE- this will affect the low setting as well. If decreasing the flames, turn the screw
counterclockwise in small increments to make sure the flames do not go out on the low
setting on a windy day. Contact Dickinson Marine to receive the new sticker.
[email protected] Tel 800 659 9768
Use the new sticker to cover the adjusting screw after you are sure it is adjusted to your
liking.
Igniter
The electrode for the igniter has already been installed for you. Simply plug the end of
the wire into the igniter button assembly and screw the assembly bracket to the left deck
leg . (See Diagram)
• Attach igniter bracket to base assembly with 2 3/8” screws
• Push the igniter body, electrode end first, into the bracket. It will click into place.
• Attach electrode to lead wire
Igniters seldom fail but if yours stops working try cleaning the probe. Built up grease
may have coated the probe, preventing the spark.
Burner Orifice
The orifice has a tiny hole in the burner that controls the maximum amount of fuel into
the burner. From time to time salt or other debri may plug the hole changing the flame
and / or the sea-b-que will not get hot, and a blocked orifice may be the reason. To clean
the orifice in the burner remove the grills and unscrew the flame spreader (top of burner)
counterclockwise. Now remove the 2 very small screws to take off the burner top cap.
Use a small metric socket to unscrew and remove the orifice. Clean with a very small
wire like the kind in a (twist tie) (actual size .031 dia). Do not expand the hole or the
sea-b-que will get too hot. Assemble in reverse order.
Mounting
Important Note: Barbecues get hot and will splash, leak grease, and for
safety reasons it is therefore advisable to mount the unit outboard.
Optional Mounting
#15-150A
#15-150F
#15-187
#15-150P
Universal Rail Mount Kit
Fishing Rod Holder Mount Kit
Taff Rail Mount Kit
Scotty Mount Kit
Visit www.dickinsonmarine.com for pics and details
Low pressure Retrofit
The control on the sea-b-que will need to be changed to a low pressure control (#15-193),
and a low pressure (11” water column)(27mbar) regulator (#19-151) needed for the
propane tank.
Cooking
The removable drip tray must be installed prior to cooking. Do not allow grease to buildup in the grease tray or in the base of the sea-b-que. The porcelain enamel cooking
surface plates should be sprayed or covered with cooking oil to prevent food from
sticking. Accumulated grease will burn off if the cooking plates are turned over.
Diagrams
Lower Base
#10 nuts
#10 L’washers
Igniter
Top Cap Knob
#8-32 screws & nuts
Accessories
#15-170
#15-202
#15-186-P
#15-186-S
#15-081
#15- 062
#15- 075
#15-103
#15-110
#15-193
#19-151
#15-194
Cover (black)
Aussie Griddle
Replacement porcelain Grills
Replacement Stainless steel Grills
Drip Tray
Burner
Orifice
Igniter
Regulator Control
Retrofit Low pressure Control
Retrofit Low pressure Regulator
Adapter for European Gas Canisters (High Pressure)
Hoses
#15-188
#15-189
#15-191
#15-192
#15-178
#19-100-10
#19-100-20
6 ft. Propane Hose (Certified connections – High Pressure)
8 ft. Propane Hose (Certified connections – High Pressure)
6 ft. Propane T Type Hose (Certified connections – High Pressure)
8 ft. Propane T Type Hose (Certified connections – High Pressure)
“T” type Connector (To adapt a high pressure fuel line to an onboard
Low pressure system).
10 ft. Low Pressure Hose (Certified connections)
20 ft. Low Pressure Hose (Certified connections)
Test all propane lines and connections for leaks with a soapy water solution before
lighting. Do not flame test for leaks.
Lighting
1)
2)
3)
4)
sea-b-que control regulator in LOCK-OFF position
Open Lid and turn on LPG gas supply at source
Turn Control Regulator ON to the medium level. Press Igniter several times, or
use a long bbq lighter.
Check to make sure the propane is burning.
Warnings
If the burner does not light immediately turn control regulator to lock-off position and do
not attempt to light the burner for at least 60 seconds
Close the lpg cylinder valve when sea-b-que is not in use
Close the lpg cylinder valve when the boat is unattended
Close the lpg cylinder valve in the event of an emergency
Close the sea-b-que regulator valve before opening the lpg cylinder valve
Operation
When the burner is lit the Control Regulator setting may be selected. With the lid closed
the sea-b-que will quickly reach cooking temperatures (5 minutes).
Do not leave the control regulator at high and the lid closed for long periods of time or
damage may be caused to the sea-b-que. High gas settings are only recommended for a
short pre-heat period and barbequing with the lid open, or lid closed but at a moderate
setting. After cooking turn the sea-b-que off at the LPG source. Once the burner has
extinguished turn the Control Regulator to the LOCK-OFF position. This will depressurize the fuel line.
Cleaning and Maintenance
1)
Clean grease from the drip tray and the base of the sea-b-que regularly
2)
Clean burner and burner orifice seasonally. The burner orifice can be removed
for thorough cleaning with hot water and a bronze wire brush.
3)
The stainless sea-b-que top lid and main body will discolor with the heat.
Stainless steel has a chromium layer that makes it corrosion resistant. When the
metal is heated more of the chrome reacts with the oxygen in the atmosphere and
becomes this chromium oxide. The discoloration is a by-product but it is not rust
or corrosion. An acidic compound known as pickling paste can remove the
tinting.
4)
The use of oven cleaner to remove cooking stains and maintain appearance is
recommended. Using a non-metallic abrasive pad on the exterior is also
recommended. Stainless steel Polish if available will also enhance the look of
your sea-b-que.
5)
Igniter: A defective igniter is uncommon. If the igniter does not work it will be
caused by grease build-up on the wire electrode OR the igniter mount is not
grounded to the body of the barbecue during assembly. The igniter can be cleaned
with hot water and a cloth.
Limited Warranty
WARRANTY PROVISIONS : Dickinson warrants this product to be free of defects in workmanship and materials for
a period of one year. This warranty is limited to claims submitted in writing within a one-year period following the
date of purchase. If any part of your new product fails because of a manufacturing defect within the warranty period
Dickinson offers to replace said parts free of charge, provided, however, that such parts have not been improperly
repaired, altered or tampered with or subjected to misuse, abuse or exposed to corrosive conditions. This warranty,
however, is limited by certain exclusions, time limits and exceptions as listed below. Read these limitations and
exclusions carefully.
TIME LIMIT : This warranty is given too and covers only the original purchaser. Coverage terminates one year from
the date of purchase for parts replacement. EXCLUSIONS : This warranty does not cover or include : (a) Any normal
deterioration of the product and appearance of items, due to wear and/or exposure; (b) any guarantees, promises,
representations, warranties or service agreements given or made by an authorized distributor or other person selling this
product, other than those specifically stated herein; (c) any damage or defect due to accident, improper repair,
alteration, unreasonable use including failure to provide reasonable and necessary maintenance, misuse or abuse of the
equipment, or exposure to corrosive conditions. This warranty is conditioned upon normal use, reasonable and
necessary maintenance and service of your product, and written notice being given promptly upon Buyer's discovery of
a warranty claim, pursuant to paragraph 6 below. Reasonable and necessary maintenance is maintenance which you
are expected to do yourself or have done for you. It is maintenance, which is necessary to keep your product
performing its intended function and operating at a reasonable level of performance.
DAMAGE LIMITATION WARNING : IN NO EVENT SHALL Dickinson BE LIABLE FOR ANY INCIDENTAL
OR CONSEQUENTIAL DAMAGES, INCLUDING (BUT NOT LIMITED TO) LOSS OF USE OF THE PRODUCT,
LOSS OF TIME, INCONVENIENCE, EXPENSES FOR TRAVEL, LODGING TRANSPORTATION CHARGES,
LOSS BY DAMAGE TO PERSONAL PROPERTY OR LOSS OF INCOME, PROFITS OR REVENUE.
ORAL OR IMPLIED WARRANTY LIMITATIONS : The foregoing warranty is exclusive and in lieu of all other
warranties, written or oral, expressed or implied, including but not limited to any warranty or merchantability or fitness
for a particular purpose.
TRANSFER LIMITATIONS : This warranty is not assignable or transferable. It covers only the original purchaser.
CLAIM PROCEDURE : In the event of a defect, problem or that a breach of this warranty is discovered, in order to
protect any warranty rights you must promptly notify Dickinson. Give name, address, and model name, location of
unit, description of problem and where you can be reached during business hours.
RESERVED RIGHT TO CHANGE : Dickinson reserves the right to make changes or improvements to products it
produces in the future without imposing on itself any obligations to install the same improvements in the products it has
previously manufactured.
SECOND OR SUBSEQUENT OWNER : Dickinson does not give any warranty to secondary or subsequent
purchasers, and it disclaims all implied warranties to such owners.
INSPECTION : To assist you in avoiding problems with your product and to validate this warranty you are required to
do the following : (a) read the warranty; (b) inspect the product. Do not accept delivery until you have examined the
product with your supplier; (c) ask questions about anything you do not understand concerning the product.
OWNER REGISTRATION : Fill out the WARRANTY CARD within 30 days from the date of delivery.
WARRANTY : RETURN OF THE CARD IS CONDITION PRECEDENT TO WARRANTY COVERAGE AND
PERFORMANCE. IF YOU DO NOT FILL OUT AND MAIL THE CARD AS DIRECTED, YOU WILL NOT
HAVE A WARRANTY.
LEGAL RIGHTS : This warranty gives you specific legal rights and you may also have other rights, which may vary
within different government jurisdictions.
Return to:
SINCE 1932
#407 – 204 Cayer Street, Coquitlam, B.C. Canada V3K 5B1
WARRANTY FORM
I have read and understand the Limited Warranty and the Instruction Manual
and agree to the terms and condition
(please print)
Date……………………………………………………………………………
Purchaser’s Name……………………………………………………………..
Address………………………………………………………………………..
………………………………………………………………………………...
Model Name……Sea-B-Que - Round……………………………………
Serial Number…………………………………………………………………
Date Of Purchase……………………………………………………………..
Signature……………………………………………………………………..
Name of Seller…………………………………………………………….....
Seller Location……………………………………………………………….
Note: The warranty form can be filled out and sent from the
website: www.dickinsonmarine.com