1
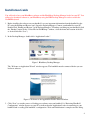
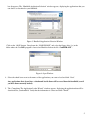
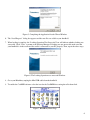
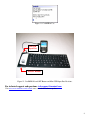
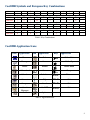
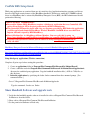
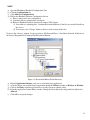
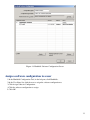
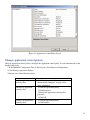
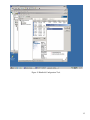
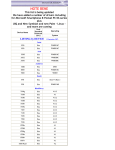
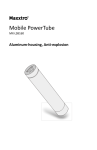
Cool Series BlackBerryTM Keyboard
CoolMIR V2
User Manual and Installation Guide
Version 2
Man & Machine, Inc.
CoolMIR V2 User Manual
Featuring an ergonomic thin design with full tactile
feedback, this good-to-the-touch keyboard is made to the
highest standards and is easy to use and clean. This flexible
keyboard can be loosely rolled and carried with you in a
handy carrying pouch (supplied). The keyboard works with
RIM OS version 4.0 or higher RIM BlackBerryTM 6210,
6220, 6230, 6280, 6510, 7100g, 7100r, 7100t, 7100v,
7100x, 7100i, 7105t, 7130e, 7210, 7230, 7270, 7280, 7290,
7510, 7520, 8700r and 8700c. Currently NOT compatible
with 7700 series including 7730,7750 and 7780 and does
NOT work with 6700/5700 series including 5790, 6710,
6720 and 6750.
How to charge the battery
PLEASE CHARGE THE COOLMIR KEYBOARD BATTERY FOR AT LEAST TWO HOURS BEFORE
USE. CoolMIR uses the same charger cable as the BlackBerryTM. To charge the battery, plug the USB cable Bmini connector to the Mini USB Input Port on the CoolMIR and the A connector of the USB cable to your PC
or AC adaptor (see Figure 12). The keyboard can be used while it is charging if the charger cable is connected
to an AC adaptor. The CoolMIR will have 15 hours continuous usable battery life when it is fully charged. Red
light on the left side of the keyboard means the keyboard is charging. Yellow light means the keyboard has less
than 20% battery life. Green light means the keyboard has more than 20% battery life.
How to Turn CoolMIR Keyboard On and Off
Press and Hold the “ON/OFF Button” for one second to turn CoolMIR keyboard on and for three seconds to
turn it off. The keyboard turns itself off to save battery power if it is unused for more than three minutes. To
disable the software on the BlackBerryTM, open CoolMIR as shown in step 9 and select “Turn off”.
For BalckBerry TM Enterprise Server (BES) Users
CoolMIR software must be given permission by the BES administrator. For instruction on how to allow the
CoolMIR driver on BES 4.0 or higher please refer to the “CoolMir BES Setup Guide” at the end of this
manual. For instructions provided by RIM BlackBerry visit www.blackberry.com/knowledgecenterpublic
(Search for “KB-04219”). The keyboard program doesn’t work on BlackBerrys that are on BES version 3.6 or
less. The BES must be upgraded to 4.0 or higher to support the keyboard program.
How to Carry and Clean the Keyboard
DO NOT FOLD THE KEYBOARD, doing so could damage the unit. When placing the CoolMIR
in it’s carrying pouch make certain to roll it loosely from left to right. The one-year warranty does
not cover damage due to folding or misuse. The rubber of CoolMIR can be cleaned with water, soap,
alcohol, 10% bleach solutions, and a variety of chemical disinfectants. DO NOT USE PETROLEUM BASED
CLEANERS OR SOLVENTS.
2
Technical Specifications of the Keyboard
Weight:
Approximately 170 g (0.4 lb.)
Dimensions:
330 mm x 114 mm x 13 mm
13” x 4.5” x 0.5”
Cable length:
Approximately 0.3 m (12”)
Storage temperature:
-20 °C - 70 °C
-4 ° F - 158 °F
Operating temperature:
0 °C - 70 °C
32 °F – 158 ° F
Power:
Rechargeable Battery Powered.
Guaranteed period:
One year limited warranty
Composition:
100% Silicone Rubber
PVC Cable
Latex free keyboard
System requirements:
Operating system 4.0 or higher
BlackBerryTM 6210, 6220, 6230, 6280,
6510, 7100g, 7100r, 7100t, 7100v, 7100x,
7100i, 7105t 7130e, 7210, 7230, 7270,
7280, 7290, 7510, 7520, 8700r and 8700c.
Currently NOT compatible with 7700
series including 7730,7750 and 7780 and
does NOT work with 6700/5700 series
including 5790,6710,6720,6750.
Number of keys:
72 US Layout keys with 18 shortcut keys
to your favorite programs including
Calendar, Search, Phone, Email, Internet,
Menu, Escape, etc…
DO NOT FOLD THE KEYBOARD, doing so could damage the unit. When placing the CoolMIR in it’s
carrying pouch make certain to roll it loosely. The one-year warranty does not cover damage due to folding or misuse.
3
Installation Guide
You will need to have your BlackBerry software and the BlackBerry Desktop Manager loaded on your PC. You
will need to download software to your BlackBerry using the RIM Desktop Manager in order to enable the
CoolMIR keyboard
1. Before installing the software on your handheld, save any important information from the handheld to the
PC using the Backup and Restore tool. (Open the Desktop Manager. Connect your handheld to your PC.
Double-click “Backup and Restore” in the Desktop Manager. To backup everything on your handheld, click
the “Backup” button. In the “Select File for Full Backup” window, select the name and location of the file
as desired and click “Save”.)
2. In the Desktop Manager, double-click “Application Loader”.
Figure 1. Blackberry Desktop Manager.
The “Welcome to Application Wizard” window appears. The handheld must be connected before you can
load new software.
Figure 2. Welcome to the Application Loader Wizard Window.
3. Click “Next” to start the process of loading new software onto your handheld. A “Retrieving Handheld
Configuration” window appears on your PC to indicate that the Application Loader is connecting to your
handheld and is reading your handheld’s configuration. Wait until initialization is complete and the dialog
4
box disappears. The “Handheld Application Selection” window appears, displaying the applications that you
can choose to download to your handheld.
Figure 3. Handheld Application Selection Window
Click on the “ADD” button. Drop down the “LOOK IN BOX” and select the floppy drive (A:) or the
folder where the CoolMIR program is located and Double-click on the file “CoolMIR.ALX”.
Figure 4. Open Window.
4. Select the check boxes next to the names of the applications you want to load and click “Next”.
Any applications that do not have a checkmark beside them will be erased from the handheld (even if
you have them currently loaded).
5. The “Completing The Application Loader Wizard” window appears, displaying the application that will be
downloaded to your handheld. Verify that the information is correct and click “Finish”.
5
Figure 5. Completing the Application Loader Wizard Window
6. The “Load Progress” dialog box appears and the new files are added to your handheld.
7. When loading is complete, the “Loading Operation Was Successful” box will indicate whether loading was
successful. Click “Close” to return to the Desktop Manager. If loading was not successful, make sure that
your handheld is in the cradle and the cradle is connected to your PC properly. Then, repeat the above steps.
Figure 6. The Loading Operation was successful Window
8. Go to your Blackberry unplug the Mini USB cable from the handheld.
9. To enable the CoolMIR software select the icon for the CoolMIR driver using the roller then click.
Figure 7. BlackBerry Home Page
6
The CoolMIR page will come up.
Figure 8. CoolMIR Home Page
Click the roller and select “Turn On” from the menu then click the roller to turn on the software.
Figure 9. CoolMIR Menu.
10. Plug the CoolMIR keyboard Mini USB cable into your handheld and turn the keyboard on by pressing the
button on the left bottom of the keyboard. You will see a green light on the keyboard when the keyboard is
turned on.
Figure 10. CoolMIR When the Software is On.
11. You can now use your CoolMIR keyboard.
7
Figure 11. CoolMIR in Use.
Mini USB
Input Port
ON/OFF Button
Figure 12. CoolMIR ON and OFF Button and Mini USB Input Port Positions.
For technical support and questions: [email protected]
Visit www.man-machine.com/coolmir once a month for software updates.
8
CoolMIR Symbols and European Key Combinations
Alt +
Character
1
§
2
é
3
£
4
€
5
«
6
»
8
Ø
9
Ç
0
ă
^
SYM +
Character
Q
[
W
<
E
{
R
<<
T
~
Y
=
U
_
I
“
O
^
P
%
SYM +
Character
A
]
S
>
D
}
F
>>
G
\
H
;
J
¬
K
“
L
&
SYM +
Character
Z
$
X
€
C
¥
V
£
B
·
N
|
M
§
=
°
Table 1. Key Combinations
CoolMIR Application Icons
Icon
Application
Home
Icon
Application
Keys
MemoPad
Application
Roller Click
Messages
Alarm
Roller Up
Phone
Profiles
Roller Down
Address book
Game
Escape
Esc
Calendar
Calculator
FN+P
Pictures
Internet
Help
FN+K
N/A
Compose
Search
FN+W
N/A
Saved
Messages
Tasks
CoolMIR
FN+O
N/A
Options
Table 2. Application Icons
9
Troubleshooting your CoolMIR
1. CoolMIR green light is on but nothing shows up when I type.
1.1 Check to see if your CoolMIR software is loaded. If not follow the Installation Guide.
1.2 Make sure your software is turned on as shown in Step 9 of the Installation Guide.
1.3 Make sure CoolMIR Mini USB cable is connected to the Blackberry.
1.4 If you still have a problem, turn off the CoolMIR keyboard and turn it back on.
2. I can’t turn CoolMIR keyboard on.
2.1 Make sure your CoolMIR battery is charged. Plug the Mini USB charger cable and
turn the CoolMIR keyboard on by pressing the ON/OFF Button for 1 second.
2.2 If you still have a problem, go to the back of the CoolMIR keyboard and push the
“RESET” button using a thin pen. The reset button is inside a very small hole at the
back of the CoolMIR keyboard on the left upper side of the right middle screw.
3. I can’t turn CoolMIR keyboard off.
3.1 Press and hold the ON/OFF Button for 3 second.
3.2 If you still have a problem, go to the back of the CoolMIR keyboard and push the
“RESET” button using a thin pen. The reset button is inside a very small hole at the
back of the CoolMIR keyboard on the left upper side of the right middle screw.
All specifications are subject to change without notice.
BlackBerry is a registered trademark of Research In Motion Limited.
10
CoolMir BES Setup Guide
Third party applications are restricted from use of certain low-level application interface programs and drivers
because of the high security features of the BlackBerry handheld. Therefore to enable the CoolMIR keyboard
driver on a BlackBerry that is activated by BlackBerry Enterprise Server (BES), the BES administrator should
perform the following.
Note to the BES Administrator :
• Research In Motion (RIM) BlackBerry requires a third party application that uses Controlled APIs
such as Event Injector API to be given permission by the BES administrator.
• This Controlled API must be signed with a key, or signature, provided by RIM before the application
.cod files can be loaded onto the BlackBerry Wireless Handheld. CoolMIR driver uses this Event
Injector API and is signed by RIM BlackBerry.
• Man & Machine, Inc. is a BlackBerry Alliance Member. You can verify this by going to
https://www.blackberry.com/ThirdParty/searchProduct.jsp?compID=1000813&productID=1028441.
• If you have any question or concern you can contact us using [email protected] or
(301) 341-4900.
BlackBerry Enterprise Server for Microsoft Exchange version 4.0 Handheld Management Guide
http://www.blackberry.com/knowledgecenterpublic/livelink.exe/fetch/2000/8067/645045/7963/7965/729294/729295/Ha
anagement_Guide.pdf?nodeid=729296&vernum=0
Setup third-party applications (Wireless connection)
Complete all prior steps before starting this procedure.
1. Create an applications folder in Program Files\Common Files\Research In Motion\Shared\
2. Create a subfolder under the Program Files\Common Files\Research In Motion\Shared\applications\
directory for each third-party application. Copy the handheld installation files (.ALX & .COD) files to
this directory.
3. Index the applications by specifying the loader /index command from the command prompt. [See
command below: ]
Go to: C:\Program Files\Common Files\Research In Motion\Apploader
Type the command: Loader.exe /Index
Share Handheld Software and upgrade tools
1.Verify that the handheld upgrade software is installed in <drive:>\Program Files\Common Files\Research
In Motion as described above.
2. Share <drive:>\Program Files\Common Files\Research In Motion.
3. Set the permission attributes to Read-only.
11
NEXT:
a)
b)
c)
d)
Open the BlackBerry Handheld Configuration Tool.
Click the Configuration tab.
Click Add New Configuratrion.
Fill out the Handheld Software Configuration Screen.
i) Enter a name for the new configuration
ii) Optionally fill in a configuration description
iii) Enter the Handheld Software Location in standard UNC format:
(1) You could use something like: \localhost\Research In Motion (if the files are installed locally on
the server)
(2) You can press the “Change” button to browse to the location of the files.
If you use this “browse” method, be sure to point to “My Network Places,” then Entire Network, drill down to
the shared \Program Files\Common Files\Research In Motion.
Figure 13. Research In Motion Folder Directory
e)
f)
g)
h)
Expand Application Software, and you see your third-party applications.
As shown below, for each third-party application change the Delivery column to Wireless or Wireline.
Click on the Policy column drop-down tab to specify your new software policy.
From the Application Control Policy window, change the Event Injection setting from Not Allowed to
Allowed.
i) Click OK to accept the changes.
12
Frigure 14. Handheld Software Configuration Screen
Assign a software configuration to a user
1.In the Handheld Configuration Tool, in the left pane, click Handhelds.
2.In the User Name list, click the user to assign the software configuration to.
3.Click Assign Software Configuration.
4.Click the software configuration to assign.
5.Click OK
13
Figure 14. Application Control Policy Screen
Manage application control policies
When an application control policy is changed, the application control policy is resent automatically to the
handheld wirelessly.
1.In the Handheld Configuration Tool, in the left pane, click Software Configurations.
2.Click Manage Application Policies.
3.Perform one of the following actions:
Action
Add an application
control policy.
Modify an application
control policy.
Remove an application
control policy.
Procedure
See “Deploying handhelds using the
administration computer” on page 16 for
more information.
1.Click the application policy.
2.Click Properties.
3.Modify the application control policy
properties.
4.Click OK.
1.Click the application policy.
2.Click Remove.
14
Figure 15 Handheld Configuration Tool.
15
Federal Communications Commission (FCC) Statement
This equipment has been tested and found to comply with the limits for a Class B digital device, pursuant to Part 15 of the FCC Rules.
These limits are designed to provide reasonable protection against harmful interference in a residential installation. This equipment
generates, uses, and can radiate radio frequency energy and, if not installed and used in accordance with the instructions, may cause
harmful interference to radio communications. However, there is no guarantee that interference will not occur in a particular
installation. If this equipment does cause harmful interference to radio or television reception, which can be determined by turning the
equipment off and on, the user is encouraged to try to correct the interference by one or more of the following measures:
Reorient or relocate the receiving antenna.
Increase the separation between the equipment and receiver.
Connect the equipment into an outlet on a circuit different from that to which the receiver is connected.
Properly shielded and grounded cables and connectors must be used in order to meet FCC emission limits. Man & Machine, Inc. is not
responsible for any radio or television interference caused by using other than recommended cables and connectors or by unauthorized
changes or modifications to this equipment. Unauthorized changes or modifications could void the user's authority to operate the
equipment.
This device complies with Part 15
cause harmful interference, and (2)
operation.
This device complies with Part 15
cause harmful interference, and (2)
operation.
of the FCC Rules. Operation is subject to the following two conditions: (1) this device may not
this device must accept any interference received, including interference that may cause undesired
of the FCC Rules. Operation is subject to the following two conditions: (1) this device may not
this device must accept any interference received, including interference that may cause undesired
Responsible Party:
Man & Machine, Inc
3706 West St.
Landover, MD 20785
Telephone: 1-301-341-4900
http://www.man-machine.com/
Copyright Man & Machine, Inc. 2005
16