1
Owner’s Manual !"#$%&'"()&*+&,-.#,,%&/0.12"
!"#$%&'()*+#),#)-**
Installation, Operation, Maintenance *456789&403.$:"&78;&9%0<<&
.(/'0*10$22*+#),#)-**
Instructions & Parts List *4=>&78?&=11"@@&>,,%@&&
&4>AB78)&78?&A"$<"#&B$3.%(&
&4>>!)&&!,CD,&>%$E"%@&F&>,
3//$)$,(42*5%)$,(*6%47'87#),#)*&4/'*,
4GH!&&G%$@2IH"1(1<"&!,CD03$.0,3&J30.&&
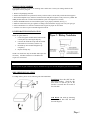
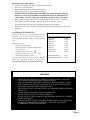
For Outdoor Use Only MODEL
SIGCEDARKEY
DESCRIPTION
6' Outdoor Kitchen
Black Granite Tiles and Abbey Grey Stucco
DLR
$1,255
MAP
$1,67
A$30D"<)&K+&,-.#,,%&/0.12"3&E
5$1/@M<$@2&
MODELS:
!"#$%&'()*+#),#)-**
*4567*9&,%&4567*AN9&403.$:
VBQ-30BG, VBQ-30G, VBQ-30SZG
&4A5O9&403.$:"&>,-D<"&A0#"&5
VBQ-36G, VBQ-36SZG,.(/'0*10$22*+#),#)-**
VBQ-42G
VBQ-42SZG, VBQ-56SZG *4=>7*&P&7*?&=11"@@&>,,%@&,%&
&4>AB7*&P&7*?&A"$<"#&B$3.%(&
.(/'0*6$/'*;#0('0*+#),#)-**
Page 1
*4=>QK&QK?&4"%.01$<&>,,%&,%&&
&4JO>H&J."3@0<IO&#%$E"%&1,C
Table of Contents
Safety
Safety Instructions................................................................................. 3
Basic Rules……………….................................................................... 4
Safe Location for Grill Use....................................................................5
Grill Assembly
Built In Models…………………..........................................................6
Free Standing Models…… ...................................................................7
Igniter Battery Installation…..………………………………………...7
Side Shelf Installation…...………….....................................................7
Powering Halogen Lights……………………………………………..8
Gas Requirements & Connections..............................................9, 10, 11
Leak Testing………………………………………………………….12
Operation
Lighting the Main Burners ...................................................................13
Match Lighting .....................................................................................13
Preheating Grill and IR Burner.............................................................13
Burner Adjustment ...............................................................................14
Low Heat Setting Adjustment...............................................................15
Cooking Tips.........................................................................................15
Before Using Your Grill..…..................................................................16
Controlling Flare-Ups…………………………………………………16
Care &
Maintenance
Cleaning Information……………………………………………….…17
Grill Rack ..............................................................................................17
Drip Tray………….…...........................................................................17
Grill Burners .........................................................................................17
IR Burners .............................................................................................17
Orifice Cleaning ....................................................................................17
Briquette Holder ....................................................................................17
Stainless Steel ........................................................................................18
Troubleshooting Guide .........................................................................................................18-19
Warranty
Information.............................................................................................................................19-20
Message to the Proud Owner…
Congratulations on the purchase of your high quality, high performance grill.
Read this manual carefully to understand all the instructions about how to
install, operate and maintain for optimum performance and longevity. Keep this
manual in a safe place for future reference. For any assistance, contact us. Make
sure to provide the Model Number and Serial Number of the grill. Thank you for
buying our grill. We wish you years of cooking pleasure.
Page 2
Safety Instructions
IMPORTANT!!!
Read these instructions carefully before installing or
operating this gas barbecue. These instructions should be left
with the homeowner for future reference.
!!!WARNING!!!
If the information in this manual is not followed exactly, a
fire or explosion may result causing property damage,
personal injury or loss of life.
FOR YOUR SAFETY
Do not store or use gasoline or other flammable
vapors and liquids in the vicinity of this or any other
appliance.
An LP cylinder not connected for use shall not be
stored in the vicinity of this or any other appliance.
WARNING-FOR OUTDOOR USE ONLY
IMPORTANT!!!
Installation and service must be performed by a qualified
installer, service agency or the gas supplier.
Your VINTAGE Grill is designed for outdoor use
only and must not be installed in or on recreational
vehicles and /or boats.
TESTED IN ACCORDANCE WITH ANSI Z21.58a-1995 STANDARD FOR OUTDOOR
COOKING GAS APPLIANCES.
Check your local building codes for the proper method of installation. In the absence of local codes, this unit
should be installed in accordance with the National Fuel Gas Code No. Z223.1 1988, or CAN/CGA-B149-1
National Gas Installation code, or CAN/CGA-BI49.2, Propane Installation code. All components must be
grounded in accordance with local codes or with the National Electrical Code ANSI/NFPA 70-990 or Canadian
Electrical code CSA C22.1
CALIFORNIA PROPOSITION 65
!!! WARNING !!!
The Burning of gas cooking fuel generates some by-products which are on the list of substances which are
known by the State of California to cause cancer or reproductive harm. California law requires businesses to
warn customers of potential exposure to such substances. To minimize exposure to these substances, always
operate this unit according to the use and care manual, ensuring you provide good ventilation when cooking
with gas.
IF YOU SMELL GAS
IMPORTANT!
If you smell gas:
1. Shut off gas to the appliance.
1. Extinguish any open flames.
2. Open grill lid.
3. If odor continues, immediately
call your gas supplier or local
fire department
The installer should leave these instructions
with the consumer who should retain for
local inspector’s use and for future
reference.
The consumer should read all these
instructions carefully and keep in a safe
place for future reference.
C
US
3061910
Page 3
Basic Rules
When properly cared for, your VINTAGE Grill will give safe, reliable service for many
years. However, extreme care must be used since the grill produces intense heat, which can
increase accident potential.
When using this appliance, for safety, READ all rules carefully and check local codes.
Basic safety practices must be followed, including the following:
• Begin by ensuring proper assembly. A qualified technician should perform all other service.
• Do not repair or replace any part of the grill unless specifically recommended in this manual. All other service
should be referred to a qualified technician.
• For personal safety, wear proper apparel. Loose fitting garments or sleeves should never be worn while using
this appliance. Some synthetic fabrics are highly flammable and should not be worn while cooking. Never let
clothing, pot holders or other flammable materials come in contact with or too close to any grate, burner or hot
surface until it has cooled. Fabric may ignite and result in personal injury.
• Use only dry potholders: moist or damp potholders on hot surfaces may cause burns from steam. Do not use a
towel or bulky cloth in place of potholders. Do not let potholders touch hot portions of the grill rack.
• Grease is highly flammable. Allow hot grease to cool down before attempting to handle it. Clean grease tray
often so that grease does not accumulate and stay in it.
• Do not use aluminum foil to line the grill racks or grill bottom, nor to line the drip tray. This can severely
upset combustion airflow or trap excessive heat in the control area. The result of this can be melted knobs,
igniters and increased chance of personal injury.
• Never grill without the drip pan in place and pushed all the way to the back of the grill. Without the drip pan,
hot grease can leak downward creating a fire or explosion hazard.
• Children should be carefully supervised when they are in the vicinity of the grill. Do not allow them to
get close while in use. Items of interest to children should not be stored in or around the grill in the cabinet or
in the masonry enclosure. Portions of the grill can be extremely hot while in use and can cause severe burns.
• Only certain types of glass, heatproof glass ceramic, earthenware, or other glazed utensils are suitable for grill
use. Use of these types of materials may break with sudden temperature changes. Use only on low or medium
heat settings according to the manufacturer's directions.
• Do not heat unopened food containers as a build-up of pressure may cause the container to burst.
• Protect your hand with a glove or mitt when opening and operating the grill. Open grill lid slowly to allow
heat and smoke to escape before fully opening.
• Never lean over an open grill. When lighting a burner, always pay close attention to what you are doing. Be
certain you are depressing the correct igniter button labeled for the burner you intend on using.
• When using the grill: do not touch the grill rack, burner grate, hood or immediate surrounding area as these
areas become extremely hot and could cause burns. Use only the handles and knobs provided for operation of the
grill.
• For proper lighting and performance of the burners keep the ports clean. It is necessary to clean them
periodically for optimum performance. The burners will only operate in one position and must be mounted
correctly for safe operation.
• Clean the grill with caution. Avoid steam burns; do not use a wet sponge or cloth to clean the grill while it is
hot. Some cleaners produce noxious fumes or can ignite if applied to a hot surface.
• Insect Warning - Spiders and insects can nest in the burners of this or any other grill, and cause the gas to flow
from the front of the burner. This is a very dangerous condition, which can cause a fire to occur behind the valve
panel, thereby damaging the grill and making it unsafe to operate. Inspect the grill at least twice a year.
• Be sure all grill controls are turned off and the grill is cool before using any type of aerosol cleaner on or
around the grill. The chemical that produces the spraying action could, in the presence of heat, ignite or cause
metal parts to corrode.
Page 4
• Do not operate the grill under unprotected combustible construction. Use only in well ventilated areas. Do not
use in buildings, garages, sheds, breezeways or any enclosed areas.
• Keep the areas surrounding the grill free from combustible materials, trash, or combustible fluids and vapors
such as gasoline or charcoal lighter fluids. Do not obstruct the flow of combustion and ventilation air. Keep the
back of the cart free and clear from debris.
• If the unit is stored indoors ensure that it is cool. If propane is used, the cylinder must be unhooked and the
propane cylinder stored outside in a well ventilated area, out of reach of children.
• Never use the grill in windy conditions. If located in a consistently windy area (oceanfront, mountaintop, etc.)
a windbreak will be required. Always adhere to the specified clearance.
• Keep any electrical supply cord, or the rotisserie motor cord away from the heated areas of the grill. Do not
use the grill for cooking excessively fatty meats or products, which promote flare-ups.
• Do not operate at high heat settings for extended periods of time with the lid down.
IMPORTANT
!!!WARNING!!!
Do NOT try lighting this appliance without reading
the “LIGHTING INSTRUCTIONS” section of this
manual.
CLEARANCE
NON COMBUSTIBLE CONSTRUCTION:
A minimum of 3 5/8" clearance from the back of the
grill to non-combustible construction is required to
allow the lid to be opened fully.
COMBUSTIBLE CONSTRUCTION:
This appliance should not be located under overhead
unprotected cornbustible construction.
To prevent harm and ensure proper operation
of your grill, it is imperative that the burners
are properly installed with respect to the gas
orifices. Be certain that the orifice is inserted
completely into the burner's inlet and that the
burner rests firmly on its support bracket. The
burner should not rock side to-side nor top-tobottom if properly installed. If excessive burner
movement is present, reseat burner or contact
your authorized service provider.
Safe Locations for Use of the Outdoor Grill
• Never install a free-standing outdoor propane Grill in an “island” configuration, (i.e. where it is
enclosed in any type of construction), to prevent a fire or gas explosion.
• Never use this outdoor Grill inside any building, garage, shed or breezeway, or inside any boat,
trailer or recreational vehicle, to prevent a possible fire and to prevent the possibility of carbon
monoxide poisoning or asphyxiation.
• Never attempt to light the Grill while the lid is closed, to prevent the accumulation of gas and a
possible fire or explosion.
• Never stand directly over the Grill while lighting it to avoid exposure to a possible flare-up.
IMPORTANT
Proper clearances from combustible construction and materials must be maintained from all sides, top, and
bottom of this appliance. This appliance should never be placed near a combustible surface
Page 5
Grill Assembly
BUILT-IN MODELS
Before locating your Vintage Grill into your Non-Combustible enclosure, complete the following steps:
1. Remove all packaging materials.
2. Ensure that the burners are positioned correctly on their orifices, and are fully seated onto their supports.
3. Position the Briquette trays onto their locating pins and place briquettes evenly across tray.
4. Ensure that NEW batteries are fitted and the igniter cap is properly installed. (See Fig. 1).
5. Make the connection to the gas regulator according to the instructions on pages 8 & 9 for your gas type.
6. To comply with safety and service requirements, main gas shut off valve must be accessible from front of
grill without using any tools.
BUILT-IN INSTALLATION INSTRUCTIONS
Appliance Cut-Out Dimensions:
MODEL #
VBQ-30BG&
VBQ-30G&
VBQ-30SZG
VBQ-36G &
VBQ-36SZG
VBQ-42G &
VBQ-42SZG
VBQ-56SZG
WIDTH
DEPTH
HEIGHT
28 1/2”
23 1/16”
10 3/16”
34 ½”
23 1/16”
10 3/16”
40 1/2”
23 1/16”
10 3/16”
54 1/2”
23 1/16”
10 3/16”
IMPORTANT
Please verify by measuring actual appliance from box. **MEASURE TWICE, CUT ONCE**
Page 6
FREE STANDING MODELS
Your Vintage Grill has provision for mounting onto a mobile cart. Contact your Vintage dealer for the
appropriate cart for your grill.
1. Remove all packaging materials.
2. Ensure that tile burners are positioned correctly on their orifices, and are fully seated onto their supports.
3. Position the Briquette trays onto their location brackets and place briquettes evenly across tray. (Note: The
XBBQ models utilize the V-Flame heat distribution system. No briquettes are needed)
4. Ensure that NEW batteries are fitted and the igniter cap is properly installed. (See Fig. 1).
5. Make the connection to the gas regulator according to the instructions on pages 8 & 9 for your gas type.
6. Allow a minimum of 3" clearance around all sides of grill for proper air movement.
7. Lock the rear casters to prevent unwanted grill movement.
IGNITER BATTERY INSTALLATION
Install 9V igniter batteries
1. Locate the igniter modules at the bottom of the
control panel by removing the drip tray.
2. Unscrew the round black cap from the module
and install a new 9V battery into the cap.
3. Reinstall cap into module and tighten cap
completely.
4. Replace the drip tray
Figure 1- Battery Installation
NOTE: 30” Grills have only one module and require one
9V battery. All other Grills have two modules and
require two 9V batteries.
!!!WARNING!!!
Never operate the grill without the drip tray installed as hot grease can leak through the grill and cause a hazard.
SIDE SHELF INSTALLATION
For VBQ models, please use the following side shelf installation:
Installation: Insert the shelf into the
side shelf brackets. Push the side
shelf down so that the pin on the
bracket is secured into the notch of
the side shelf.
Fold Down: Lift shelf up following
the tracks and then fold the shelf
down 90 degrees.
Page 7
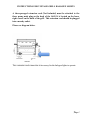
INSTRUCTIONS FOR VINTAGE GRILL HALOGEN LIGHTS
A three-pronged extension cord (Not Included) must be attached to the
three prong male plug on the back of the Grill. It is located on the lower
right corner on the back of the grill. This extension cord should be plugged
into a nearby outlet.
Please see diagram below.
This extension cord connection is necessary for the halogen lights to operate.
Page 8
Gas Requirements & Connections
Your grill is setup to use either propane (LP) or natural gas (NAT). Before proceeding, ensure the unit is
fitted for the gas supply to be used. Connecting to an improper gas type will result in poor performance
and increased risk of damage or injury. Do not attempt to operate the grill on any gas other than what the
grill is orificed for and what the regulator is set for. Should you need to convert your grill for use with a
different gas type, make sure you use the conversion kit to convert the grill to the proper gas type.
A conversion should always be performed by a qualified technician!
The installation of this appliance must conform with local codes or, in the absence of local codes, to the
national fuel gas code, ANSI Z223.1a-1988. Installation in Canada must be in accordance with the
Standard CAN/CGA-B149.1 Natural Gas Installation or CAN/CGA- B 149,2, Propane Installation Code.
CONNECTING THE GRILL TO A PROPANE (LP) GAS CYLINDER
1. Before proceeding, ensure the unit is fitted for LP gas.
2. Always secure the propane tank in the tank locator hole in the bottom pan of the cylinder-compartment.
(Portable gas grill only.)
3. Always confirm that all burner control knobs are in the OFF position before activating the gas supply.
4. Always connect the gas supply regulator by first inserting the nipple of the valve coupling into the tank
valve and then tightening the connection collar by turning it clockwise with one hand while holding the
regulator with the other.
5.
Manifold pressure with LP (operating): 10" W.C., (non-operating): 11.2" W.C.
L.P. TANK REQUIREMENTS
Use only a standard 20 lb. (5 gal) Propane gas cylinder (18 1/4" H x 12 1/4" dia.). The tank must be installed in
the upright position. Do not use a dented or rusty L.P. tank as it may be hazardous and should be checked by
your L.P, supplier. Never use a cylinder with a damaged valve.
The L.P. gas cylinder must be constructed and marked in accordance with the
specifications for L.P, gas cylinders of the U.S. Department of Transportation
(DOT). The cylinder must be provided with a shut off valve terminating in an
L.P. gas supply cylinder valve outlet specified, as applicable, for connection
type Qccl in the standard for compressed gas cylinder valve outlet and inlet
connection ANSI/CGA-V-I.
!!!WARNING!!!
Never use a unregulated gas line
to the appliance.
L.P. GAS CONNECTION:
Your VINTAGE Grill for use with L.P. gas comes equipped with its own
regulator, which MUST NOT be removed. There is also a secondary high
capacity, hose/regulator assembly for connection to a standard 20 lb. L.P.
cylinder. The L.R gas pressure regulator and hose supplied with this unit must
be used without alteration, If this assembly needs to be replaced use only the
type specified by VINTAGE Grills for this appliance. 30" grills require a
90,000 BTU min. regulator/hose assembly. All other sizes require a 160,000
BTU min. two-stage regulator/hose assembly.
1)
2)
3)
!!!WARNING!!!
Ensure that the gas supply hose
does not come into contact with
the grill body or the heat shield.
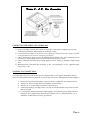
Remove the rear panel from tile BBQ to gain access to the regulator and Gas connection point.
Attach a 1/2" male-to-female elbow to the regulator as shown in Fig. 2.
Fasten the hose connection to a 1/2" x 3/8" flare fitting connected to the elbow as shown in Fig. 2.
Page 9
Figure 2- L.P. Gas Connection .
CONNECTING THE GRILL TO NATURAL GAS
1) Before proceeding, ensure the unit is fitted for natural gas. Connecting to an improper gas type will
result in poor performance and increased risk of damage or injury.
2) For Natural Gas installations, an installer must supply a gas shutoff valve that is easily accessible to the grill with ease of access for emergency gas shutoff. 3) Always disconnect the Grill and close its individual manual shutoff valve, when conducting pressure
tests of the gas supply piping system at pressures which exceed 1/2 psi (3.5 kPa).
4) Always isolate the Grill from the gas supply piping system by closing its individual manual shutoff
valve
5) Manifold pressure with natural gas (operating): 4" W.C. (non-operating): 4.5" W.C. Optimum supply
line pressure: 7" W.C. NATURAL GAS CONNECTION:
Your VINTAGE Grill for use with Natural Gas comes equipped with it own regulator which MUST NOT be
removed. If this regulator needs to be replaced use only the type specified by VINTAGE Grills for this appliance.
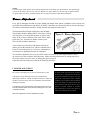
1) Remove the rear panel from the BBQ to gain access to the regulator and Gas connection point.
2) Attach a 1/2" male-to-female elbow to the regulator as shown in Fig. 3.
3) .Attach a 1/2" x 1/2' flare fitting to the elbow as shown in Fig. 3.
4) Connect flare fitting to gas supply using a 1/2" min. dia. flexible stainless steel gas hose, no more
than 48" in length.
5) To ensure proper heating performance of this appliance, verify that the gas line supply pressure is
adequate (7” W.C supply pressure is preferred) to maintain 4.5" W.C, manifold pressure. Use a
minimum 1/2" ID flex hose to prevent gas starvation.
Page 10
Figure 3- Natural Gas Connection
Page 11
Leak Testing
GENERAL INFORMATION
Although all gas connections on
your VINTAGE Grill are leaked
tested at the factory prior to
shipment, a complete gas tightness
check must be performed at the
installation site due to possible
mishandling in shipment, or
excessive pressure unknowingly
being applied to the unit.
Periodically check the whole
system for leaks, or immediately
check if the smell of gas is
detected.
BEFORE TESTING
Make sure that all packing material is
removed from the grill including the
burner tie-down straps.
• Check all gas supply fittings before
each use.
• Do not smoke while leak testing.
• You will need a spray bottle or brush
to apply the solution to all connection
points to test for gas leaks. Make a
soap solution of one part liquid
detergent and one part water.
• L.P. units, check with full cylinder.
• Grills must be leak tested outdoors in
a well-ventilated area, away from any
ignition sources such as gas fired or
electrical appliances. During leak
test, keep grill away from open flames
or sparks.
**Never leak test with an open flame**
TESTING
1) Always confirm that all burner control
knobs are in the OFF position.
2) Always connect the gas supply hose first
and then open the gas shutoff valve.
Turn on fuel supply. For natural gas, turn
valve handle ¼ turn to align with gas flow.
For LP turn cylinder valve knob counter
clockwise one full rotation.
3) Use a spray bottle or brush to apply 50/50
solutions of liquid soap and water to all
connection points.
4) It is key to look for bubbles to appear, as
the appearance of bubbles will indicate a gas
leak. If a leak is present, immediately turn
off gas supply valve and tighten any leaking
fittings, or by replacing the faulty part with a
replacement part recommended by the
manufacturer. DO NOT attempt to repair the
LP cylinder valve if it should become
damaged; the cylinder MUST be replaced.
Then turn gas on, and recheck.
5) Always repeat the following procedure
until no further gas leaks are detected before
lighting the Grill. NEVER attempt to light
this grill if a leak cannot be stopped.
6) If a leak cannot be stopped, turn off the
gas supply and call your dealer where you
purchased your Grill.
7) Only those parts recommended by the
manufacturer should be used on the grill.
Substitution can void the warranty. Do not
use the Grill until all connections have been
checked and do not leak.
Areas to test for leaks
IMPORTANT SAFETY CONSIDERATIONS
•
•
•
•
•
IT IS IMPORTANT THAT LEAK TESTS MUST BE REPEATED EACH TIME LP CYLINDER IS
EXCHANGED OR REFILLED.
If a leak is present, or if the connection hose shows signs of wear, these conditions must be corrected prior to using
your grill.
Disconnected L.P. cylinders must have threaded valve plugs tightly installed, and must NOT be stored in a building,
garage or any other enclosed area.
The gas must be turned off at the supply cylinder when the unit is not in use.
If the appliance is stored indoors, the cylinder must be disconnected and removed from the appliance. Cylinders
must be stored outdoors in a well-ventilated area out of reach of children.
Page 12
Lighting Instructions
BEFORE LIGHTING
Check gas line/hose for signs of wear, abrasion or cuts. If evidence
of deterioration is visible, replace the part prior to use. The pressure
regulator and hose assembly supplied with the unit must be used.
Never substitute regulators for those supplied with the grill. If a
replacement is necessary, contact the factory for proper replacement.
Screw the regulator (Type QCC1) into the tank. If you smell gas,
check for leaks. Leak check the hose and regulator connections with
a soap and water solution before operating. If odor continues,
immediately call for service.
!!!WARNING!!!
Never attempt to light grill if odor
of gas is present. Hood must be
open when lighting. Keep face and
body parts as far from grill as
possible when lighting. Always
wait at least 5 minutes before
attempting to relight a hot burner
GRILL BURNER LIGHTING:
ALL MODELS
1) Open lid before lighting. Make sure all burners are in the “OFF” position. Always keep your face
and body as far away from the grill as possible when lighting.
2) Depress the igniter button for the burner you are trying to light, and immediately turn the burner
control knob counter-clockwise to the light position and wait for the burner to light. NOTE: The
first burner may take longer to light while air is purged from the gas supply system.
3) If there is no ignition, turn the knob back to the “OFF” position an wait 5 minutes before repeating
steps #2 to allow accumulated gas to dissipate. If the burner will not light after several attempts, then it
can be match lit.
MATCH LIGHTING
1) Keep your face as far away from the grill as possible and pass a lit, long stem match through the
notch in the grill rack to the ports of the burner you are trying to light. If attempting to light the
right burner first, ensure that only the right burner control knob is
used.
!!!WARNING!!!
2) Position the match near the burner ports.
3) Push and turn the control knob to "lite".
Do not attempt to light the
grill if the odor of gas is
4) Repeat procedure on the center and left burner if necessary.
present. Call for service
5) If the burner does not light in 4 seconds turn the knob off, wait 5
minutes and try again. If the burner will not light after several
attempts see Troubleshooting section.
PRE-HEATING THE GRILL
Preheating the grill is important for best performance. To preheat when cooking
with the U-burners, after lighting the burners as described above, close the hood
and allow the grill to preheat with the control knobs set to "HI" for a maximum of
15 minutes. DO NOT operate grill with all burners on high with lid down as
serious damage to electrical components can occur.
PRE-HEATING THE GRILL- IR BURNERS
!!!WARNING!!!
In sunny environments, the
flame from an IR burner may
be impossible to see. To
assure that an IR burner is
lit, very carefully place your
hand 8-10 inches away from
the burner surface.
Preheating the IR burners is important to protect them from food drippings. After lighting the IR burners as
described above, allow to preheat on "HI" for four minutes before beginning to grill. If your grill is equipped
with a Sear Zone, light and preheat the U-burners first as described above, then light and preheat the Sear Zone
burner.
Page 13
NOTE:
To ensure proper spark ignition, do not change gap between the electrode wire and the burner. The optimum gap
is preset at the factory between 1/8" and 3/16.' Replace 9V igniter batteries at the first sign of spark weakness.
30" grills require one battery, all others require two. See page 3 for battery replacement instructions.
Burner Adjustment
Every grill is thoroughly checked for proper lighting and burner flame pattern. Conditions at the location may
necessitate minor adjustment of the burner air intake, if the flames are not steady/stable as shown in the figure.
The flames of the burners should be visually checked and compared with Figure 4.
The flame should be full length of the burner, blue and stable.
The air intake should be adjusted ONLY if the flame is lifting
off of the ports or has noticeable amounts of yellow in the
flame. If any of these conditions exist, check if dirt, debris,
spider webs, etc., block the air shutter or burner ports.
Proceed with air shutter adjustment.
Figure 4- Burner Adjustment
A sheet metal cup at the inlet of the burner called an air
shutter governs the amount of air, which is entrained into a
burner. It is locked in place by a set-screw, which must be
loosened prior to lighting the burner for adjustment.
The air shutter adjustment screws are accessible with a screwdriver by removing the burner. Loosen
the lock screw of the air shutter. Refit the burner. Make certain that the burners are sitting properly on
the orifices taking care not to move or damage the igniter electrode.
Light the burners and adjust according to the following directions:
!!!WARNING!!!
U BURNER ADJUSTMENT
Be careful, as the burner may be and/ or will become very hot.
If the flame is noisy and tends to lift away from the burner,
indicating too much air, turn the air shutter clockwise to reduce the
amount of air to the burner. The screw should be loosened before
turning the air shutter.
If the flame has more yellow than blue, indicating insufficient air, the
air shutter should be turned counter clockwise allowing more air in. This
will stabilize the flame.
To prevent harm and ensure proper operation
of your grill, it is imperative that the burners
are properly installed with respect to the gas
orifices. Be certain that the orifice is inserted
completely into the burner's inlet and that the
burner rests firmly on its support bracket. The
burner should not rock side to-side nor top-tobottom if properly installed. If excessive
burner movement is present, reseat burner or
contact your authorized service provider.
Make sure to tighten the screw after adjustments are made.
Page 14
LOW HEAT SETTING ADJUSTMENT
Figure 5- Low Heat
Adjustment
The low heat setting on your grill is preset at the factory. Adjust only if
altitude or environmental factors are causing poor low heat performance.
Never adjust the burner so low that it may go out during use. Do not operate
the grill with the low heat screw removed. Gas can escape and cause a
potentially hazardous condition.
1. Follow lighting instructions and allow grill to preheat for three minutes.
2. Turn the control knob to Low and wait for the burner temperature to drop
and stabilize. Attempting adjustment at any setting other than Low can create a dangerous condition.
3. Remove knob by pulling straight away from control panel (see Fig. 5).
4. Insert a small (3/32" dia.) blade screwdriver into the valve stem. Turn counter-clockwise to increase low heat,
using pliers to hold the stem securely.
5. Once proper adjustment is reached, reattach knob by pushing onto stem.
Operation
Each U-burner is rated at 27,500 BTU.
The grill burners encompass the entire
cooking area and are side ported to
minimize blockage from falling grease
and debris. Above the burners are
stainless steel briquette trays and
ceramic briquettes. The briquette tray is
a fundamental part for the performance
of the grill. Make sure briquette tray is
installed so that tile pins at the rear of the
grill are inserted into the holes of the
tray. Each grill burner has its own
igniter. The igniter push buttons are
located on the sides of the front control
panels.
COOKING TIPS:
Grilling requires high heat (or searing) and proper browning. Most
foods are cooked at the "HI" heat setting for the entire cooking time.
When grilling chicken, roasts, well-done steaks or chops and thick
pieces of meat, sear on “HI”. Then reduce the heat setting to prevent
excessive flare-up. This will allow the food to cook through without
burning on the outside. Turn the meat over only once. Juices are lost
when steaks, chops or hamburgers are turned several times. The best
time to turn the meat is after the juices have begun to bubble to the
surface.
After steaks, chops or hamburgers have been allowed to sear for
approximately 1 minute, you can use a spatula to turn it 90° to create
the restaurant quality waffle pattern seared onto the food.
Searing, locks in flavor and juices while allowing the outer
surface to absorb smoke. The result is a crisp, flavorful
outside with a tender juicy inside. The longer the pre-heat
period, the faster the meat browns and the darker the sear
marks.
Indirect cooking is achieved by placing the food only on one side of the
grill. Leave the burner below the food “OFF” and an adjacent grill
burner on “HI”. The grill hood should always be closed when
employing the indirect cooking method. With the grill lid closed,
reflected heat surrounds the food, cooking it more evenly.
Page 15
BEFORE USING THE GRILL:
Make sure the grill has been leak tested and is properly located
Remove any packing material.
Read and understand the instructions in this manual.
Light the grill burners using the lighting instructions.
NEVER COOK WITH THE LID DOWN WHEN THE MAIN BURNERS ARE LIT.
DOING SO CAN CAUSE THE DELICATE ELECTRONICS ON THE FRONT OF
YOUR GRILL TO MELT AND CREATE SERIOUS DAMAGE ON YOUR GRILL.
Before each use, turn the control knobs to “High” and preheat the grill for 10-15 minutes.
Allow grill to cool before cleaning. (Drip tray should be cleaned after each use.)
The button on the left of your grill control panel controls all burner ignition.
The button on the right of your grill control panel controls all halogen lights when your grill is
plugged in.
CONTROLLING FLARE-UPS:
“Flare-ups” sometimes occur when food drippings fall onto
the burners or hot sear plates and ignite. With proper care,
flare-ups should not present a problem with your VINTAGE
Grill.
Minimize flare-ups by:
Properly pre-heating the grill.
Ensuring grill grids are properly installed with the
U-shape facing up.
Trimming excess fat from meat.
Cleaning grill regularly to avoid grease build-up.
Repositioning meat during cooking.
In the event that a flare-up occurs, move meat to a different
portion of the grill until the flare-up is under control.
NEVER USE WATER TO CONTROL FLARE-UPS.
Vintage Grill BTU Ratings (Per Burner)
VBQ-30BG
27,500
VBQ-30G
27,500
VBQ-30SZG
27,500
VBQ-36G
27,500
VBQ-36SZG
27,500
VBQ-42G
27,500
VBQ-42SZG
27,500
VBQ-56SZG
27,500
SMOKER BURNER
SEAR ZONE BURNER
7,000
15,000
WARNING •
•
•
•
•
•
•
•
NEVER ALLOW THE GRILL TO OPERATE UNATTENDED TO PREVENT
UNCONTROLLED GREASE FIRES FROM ERUPTING.
ALWAYS MONITOR THE GRILL CAREFULLY WHILE COOKING. TURN
THE FLAME LEVEL DOWN TO LOW OR OFF IF FLARE-UPS INTENSIFY.
HOOD MUST BE OPEN WHEN LIGHTING GRILL.
HOOD SHOULD NOT BE CLOSED FOR LONG PERIODS WHEN IR BURNERS
ARE IN USE.
AVOID MOVING THE GRILL DURING OPERATION.
NEVER USE WATER TO CONTROL FLARE-UPS.
WATER CONTACT WILL DAMAGE THE BURNERS AND IS NOT COVERED
UNDER WARRANTY.
IT IS IMPORTANT TO KEEP THE AREA SURROUNDING THE GRILL FREE
FROM ALL COMBUSTIBLE MATERIALS, GASOLINE AND OTHER
FLAMMABLE VAPORS AND LIQUIDS.
Page 16
Cleaning & Maintenance
GRILL RACK
GRILL BURNERS
The round wire grill grates are easily cleaned
immediately after cooking is complete and before turning
off the flame. Cleaning will be more difficult when the
grill has cooled down. Wear a barbeque mitt to protect
your hand from the heat. Dip a brass bristle barbeque
brush in a bowl of hot soapy water frequently and scrub
the hot grill rack. Steam is created as the water contacts
the hot grate. The steam assists the cleaning process by
softening any food particles. For further cleaning, allow
the grates to cool and then soak 15-30 minutes in hot
water and detergent solution. Note: Before removing
grates for cleaning, make sure the gas supply is off and
the knobs are in the “OFF” position.
Before removing the burners, ensure the gas supply is OFF and the
knobs are in the OFF position. Allow the grill to be completely
cooled before proceeding, then lift off the grill racks and briquette
trays. To remove burners, lift the rear of the burner to clear the pin
or bracket. Angle
the burner slightly to clear the igniter electrode and opening at the
front of the grill. Slide burner straight off the orifice tip. It is
critical when installing a burner, as it must be correctly centered
and secured on
The U grate used for the IR burner will generally selfclean during the 5 minute IR burner cleaning period (see
burner cleaning
at right). Remove the U grate from the grill and brush off
any burner debris once the grate has cooled.
NOTE: Never clean the U-grate with any type of
liquid while it is on the grill. Liquid falling onto the IR
Burner can cause permanent damage.
DRIP TRAY
The drip tray is located under the burner pan in the
bottom of the grill body to catch excess cooking fats and
juices. The drip tray should be cleaned after every usage
of the grill. DO NOT ALLOW EXCESS GREASE OR
LIQUIDS TO ACCUMULATE IN THE DRIP TRAY AS
THIS WILL CREATE A FIRE HAZARD. Note: Allow
the grill to cool completely before attempting to clean.
Remove the drip tray by pulling it out from the grill until
it stops, then lifting the front edge about 45° to remove
from grill. Place the tray in hot, soapy water to clean,
rinse and dry. Reinstall by placing rear of tray into
guides, then lifting front edge 45° to re-insert the tray.
Slide completely into grill. NEVER USE GRILL
WITHOUT DRIP TRAY BEING PROPERLY
INSTALLED.
CLEANING BRIQUETTE HOLDER
Although they normally burn clean with use, you can
clean the trays occasionally. Allow the grill to cool off
completely and set the trays upside-down onto their
mounting points. Set the grill on “HI” for 20-30 minutes
to burn the briquettes clean. The trays can also be
scrubbed clean.
Make sure the trays are cooled
completely.
CLEANING OF U- BURNERS:
To maximize grill performance, clean the exterior of the burner
with a brass wire brush. Clear any stubborn scale with a metal
scraper. Always keep all ports on the sides of the burner open by
periodically cleaning them with a thin stiff wire or paper clip.
Never use a wooden toothpick as it may break off and clog the port.
Shake out any debris through the air shutter.
Use a flashlight to inspect the burner inlet to make sure it is not
blocked. If obstructions can be seen, use a stiff wire (hanger) to
clean out the burner throat.
CLEANING OF IR- BURNERS:
AFTER EACH USE, IT IS IMPORTANT TO BURN ALL IR
BURNERS WITH THE HOOD OPEN FOR AT LEAST FIVE
MINUTES TO VAPORIZE ANY FOOD DRIPPINGS OR
PARTICLES. FAILURE TO PERFORM THIS STEP WILL
DAMAGE THE IR BURNER. Occasionally it may be necessary to
brush, blow or vacuum accumulated ash from the burner surface.
Hold carefully and make sure the burner is cool.
RE-ASSEMBLING BURNERS:
Replace the burner by sliding the air shutter over the brass orifice,
centering it in the hole and resting the rear of the burner onto its
supporting bracket.
TAKE SPECIAL CARE TO CENTER THE BURNER ON
THE ORIFICE PROPERLY.
Be careful not to upset the air shutters' original position (unless
readjusting). Ensure the burner is level and does not rock from side
to side. It is important
not to hit or damage the electrode wire while replacing the burners.
The right gap must be maintained to ensure a proper spark. The gap
should be 1/8" to 3/16." To adjust gap, hold the base of the wire rod
tightly with a pair of pliers, and with another set of pliers, twist the
tip of the wire to achieve the correct gap. Igniter batteries should be
replaced at least once a year, following the instructions on page 7.
NOTE: Rough handling of the electrode can crack the ceramic
body, causing all of the igniters to fail. Install the briquette tray and
make sure they sit level and do not rock. Lastly light all of the
burners and check all proper flame characteristics.
ORIFICE CLEANING
First remove the burner and then remove the orifice and shine a
flashlight through the openings to ensure there are no obstructions.
Use a needle to clear any debris. Be extremely careful not to
enlarge the hole or break off the needle.
Page 17
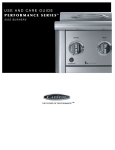
STAINLESS STEEL
ADDITIONAL INFORMATION
Your VINTAGE grill is made from commercial quality,
stainless steel. After initial usage, areas of the grill may
discolor from the intense heat emitted by the burners.
This is normal. Minor surface rust may occur in the
presence of salt (ocean) water or some cleaning agents
that contain chlorine.
Wash with warm soapy water and wipe dry with a soft
cloth after each use.
Due to the nature of its brushed surface, minor scratches
may appear with normal use and handling. To clean the
stainless steel, purchase a mild stainless steel cleaner and
use a fine to medium grade Scotch-Brite polishing pad.
Never use steel wool on stainless steel.
Always keep the area around the grill free of obstructions and
debris. Maintain at least 3" of space around grill to ensure proper
airflow, and keep all ventilation openings clear and free of debris.
Visually check flame characteristics and compare to description on
page 12. Adjust if needed. Clean appliance after each use, and
check for blockages, especially at the burner orifices, after periods
of prolonged non-use.
ALWAYS SCRUB IN THE DIRECTION OF THE
GRAIN.
DO NOT SCRUB IN CIRCULAR
MOTION.
To maintain the appearance of your VINTAGE Grill for many
years, keep it covered when not in use. Backyard environments are
harsh on your grills' finish. Long exposure to sun, water, yard
chemicals and the elements will reduce the appearance of the
stainless steel. This is especially applicable in ocean front locations,
or locations subject to sea mists. VINTAGE Grills strongly
recommends that you cover your Grill when not in use.
Troubleshooting
WHEN TO LOOK FOR SPIDERS
SPIDER AND INSECT INSPECTION
Sometimes spiders and other small insects
spin webs and build a home in the burner
and venturi. The webs or nests can be
small, but they can be very strong and
block the flow of gas. This can result in a
very
dangerous
condition
called
“flashback” (a fire in the burner tubes)
thereby damaging the grill and making it
unsafe to operate. The grill may still light,
but the obstruction does not allow full gas
to flow to the burners.
To prevent the flashback from occurring, you should inspect
the burners at least once a year or immediately if any of the
following conditions occur:
1. The smell of gas along with the burner flames appearing
yellow. (Flames should generally be blue.)
2. The Grill does not reach temperature.
3. Burner(s) will not light.
4. The Grill heats unevenly.
5. Fire coming from around or behind control knob.
6. The burners make popping noises.
STOP! Turn off gas at LP cylinder. Wait for grill to cool and follow the U-Burner Cleaning instruction in the Care & Maintenance section. Page 18
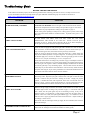
Troubleshooting Guide
BEFORE CALLING FOR SERVICE If the Grill does not function properly use the following checklist before contacting your dealer for service, You may save the cost of a
service call and the inconvenience of being without your grill. Additional troubleshooting tips can be found on our website at
Http://www.vintageluxuryappliances.com
PROBLEM FLAME IS YELLOW / GAS SMELL GRILL GETS TOO HOT
LOW / INSUFFICIENT HEAT
BURNER BLOWS OUT
GRILL WON'T LIGHT
IGNITERS CLICK CONTINUOUSLY
SOLUTION IF YOU SMELL GAS WHILE THE GRILL IS OPERATING, IMMEDIATELY
TURN OFF ALL BURNERS. Wait for the grill to cool and check the burner inlet for
obstructions and perform a leak test according to the procedure on page 10. Also check
the air shutter for proper adjustment according to the procedure on page 12.
NOTE: If the grill is operating in a dusty area or if heavy grease is present, some orange
tips on the burner flame should be considered normal. If possible move grill to a less
dusty area.
IN THE EVENT THE GRILL GETS TOO HOT, TURN OFF THE GRILL
IMMEDIATELY AND ALLOW IT TO COOL OFF. Perform a leak test per the
procedure on page 10. If links cannot be detected, call for service before attempting to
use the grill. Do not operate all burners on high with the lid down.
Check for kinks in supply line and pre-heat grill with U-burners for at least 15 minutes
with hood closed. IR burners should allow 5 minutes to pre-heat with the hood open. If
only one burner appears low, clean burner and clear port of any obstructions.
Check for proper gas supply and pressure. Make sure tank is full. A mostly empty tank
may not have sufficient pressure to run grill at high heat. On natural gas units, ensure that
the flexible supply line is at least 1/2" diameter. Check the gas supply pressure to ensure
at least 7" W.C. (0.25 psi) for natural gas, 11" W.C. (0.4 psi) for LP.
Check flame characteristics according to the procedure on page 12 and adjust air shutter if
needed. Check also that there is no pressure being applied to the regulator attached to the
back of the grill. This regulator contains a flexible diaphragm and should not be allowed
to touch the grill body or any surrounding objects. Check to make sure that the burners
and the drip tray are clean and free from obstructions. Clean if necessary. NOTE: With the
exception of the drip pan, no part of the grill should ever be lined with aluminum foil as it
will interfere with airflow and can cause a low heat condition.
First determine if the problem is being caused by strong winds. Always shelter your grill
from strong winds. Reposition your grill so that the back of the grill is toward the wind.
Second, it could be that your LP tank is running out of fuel. Weigh your propane
cylinder. A standard 20 lb tank will weigh about 39 lbs when it is 80% full and 19 lb
when it is empty. Check to ensure that the burners are correctly positioned in the grill.
Correctly installed burners should be seated firmly with no side-to-side movement.
Make sure the gas supply is turned on, the LP tank is full and there are no leaks. (see pg
10) Match-light a burner according to the procedure on page 11. If the burner will light
with a match, then the spark igniter may not be functioning correctly, or may not be
adjusted correctly. You should hear a rapid snapping sound when the igniter button is
pushed. If there is no sound, first replace igniter batteries (pg 7). If it still does not work,
make sure there is proper gap between the burner and electrode wire. Adjust according to
accordingly or call for service.
If the burner will not match light, and the gas supply has been confirmed, then check the
burner for blockages.
Unscrew one battery cap, rotate battery 180 degrees, and screw battery cap back in. (Only
affects units 42” and larger because those units utilize two battery packs)
Page 19
VINTAGE GAS GRILL - OUTDOOR APPLIANCE
WARRANTY
LIMITED ONE-YEAR WARRANTY
Outdoor Gas Grills and all their component parts, except as detailed below “**” are warranted to be free from
defective materials or workmanship when subjected to normal domestic use for a period of twelve (12) months
from the date of original retail purchase. Vintage agrees to repair or replace, at its option, any part which fails or
is found to be defective during the warranty period. **: Any painted or cosmetic items are warranted to be free
of defective material or workmanship for a period of seven (7) days from the date of the original retail purchase,
ANY DEFECTS MUST BE REPORTED TO THE SELLING DEALER WITHIN SEVEN (7) DAYS OF
THE ORIGINAL DATE OF THE RETAIL PURCHASE. Vintage uses the latest and most up to date
processes and materials to produce all the different items and SEVEN
parts on your
(7) Vintage product. There may however
be slight variations noticed, due to inherent differences as well as differences in lighting, product locations and
other factors.
LIMITED FIVE-YEAR WARRANTY
Infrared burners, grates and drip pans which fail due to defective materials or workmanship when subjected to
normal domestic use and service, will be repaired or replaced, free of charge for the part itself, with the owner
paying all other costs, including labor. Scratching, corrosion and discoloration due to improper use and care of
the outdoor product is excluded from this warranty.
LIMITED LIFETIME WARRANTY
U-Burners and any stainless steel body housings or parts which rusts through due to defective materials or
workmanship when subjected to normal domestic use during the lifetime of the grill of the original purchaser,
will be repaired or replaced free of charge for the part itself, with the owner paying for all other costs. This
warranty excludes surface scratches, discoloration and corrosion which may occur during regular use.
This warranty is only applicable to products purchased in the United States and Canada, and is only available to
the original owner of the product and is not transferable. Product must be purchased in the country where service
is requested. Manufacture requires reasonable proof of your date of purchase, therefore, you should retain your
sales slip or invoice and return via mail the Product Registration information. If registration information is not
available, the proof of purchase will be required. Owner shall be liable for proper installation, providing normal
maintenance and care. Warranty shall not apply to damage resulting from abuse, natural disaster and improper
operation and installation by anyone other than an authorized Vintage Corporation service agency or
representative. If the product or one of its component parts contains a malfunction or defect during the warranty
period, after reasonable number of attempts by the warrantor to remedy the defects or malfunctions, the owner is
entitled to either a refund or replacement of the product or component part or parts. Warrantor’s liability on any
claim of any kind, with respect to the goods covered hereunder, shall in no case exceed the cost of the goods or
part thereof which gives rise to the claim.
Specifications are subject to change without notice.
EXCLUSIONS & LIMITATIONS:
•
•
•
•
•
•
•
•
Warranty only applies to the original purchases and may not be transferred.
Warranty shall not apply and Vintage is not responsible for damage resulting from abuse, alteration or tampering
with the grill, misuse, flare-up fires, improper installation and accidents.
Installation, start-up damages or problems resulting from improper installation or use.
Limited to the replacement of defective parts with the owner responsible for all other costs including labor.
Service, damage or repair by an unauthorized service provider.
Display models are generally sold “as is.” If you have purchased a display model, any missing components will be
replaced at consumer’s expense; major handling damage to manifold, valve and ignition system will be serviced at
consumer’s expense. All other standard warranty will remain in effect.
Light bulbs are not covered under warranty. Light bulbs will burn out from time to time but can be replaced using
a 120 volt, 20 watt bulb with a GY6.35 base.
If a grill requires service and the home is 50 miles or more away from the nearest servicer, an additional travel fee
may apply.
Page 20
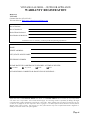
VINTAGE GAS GRILL - OUTDOOR APPLIANCE
WARRANTY REGISTRATION
MAIL TO:
VINTAGE
Customer Service: (973) 255-1515
You can visit us at: Http://www.vintageluxuryappliances.com
Date of Purchase:
Date of Installation:
Dealer Whom Purchased:
Serial Number & Model No:
To obtain service or warranty, you must provide the following information.
CUSTOMER INFORMATION
NAME:
STREET ADDRESS:
CITY, STATE AND ZIP CODE:
TELEPHONE NUMBER:
PLEASE RATE THE CONDITION OF YOUR GRILL AT TIME OF DELIVER:
Excellent
Very Good
Good
Poor
ANY ADDITIONAL COMMENTS OR PRODUCTION SUGGESTIONS…
Replacement will be FOB VINTAGE GRILLS Pine Brook, NJ. VINTAGE GRILLS will not be liable for any transportation
costs, labor costs or export duties. This warranty shall not apply, nor can Vintage assume responsibility for damage that might
result from failure to follow manufacturers instructions or local codes. Where appliance has been tampered or altered in any way
or which, in our judgment, has been subjected to misuse, negligence or accident, implied warranty shall not extend beyond the
duration of this written warranty. This warranty is in lieu of all warranties expressed or implied and all other obligations or
liability in connection with the sale of this appliance.
Page 21