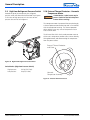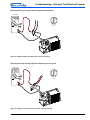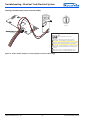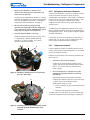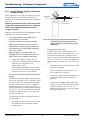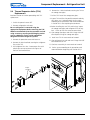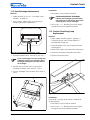
1
Bunk Cooler BlueCool Truck Service and Repair Manual This manual covers BlueCool Truck models with part number: • BCT010300A (06/2005 to 06/2006) • BCT010300B (06/2006 to 07/2006) • BCT010300C (07/2006 to 06/2007) – Improper installation or repair of Webasto heating and cooling systems can cause fire or the leakage of deadly carbon monoxide leading to serious injury or death. – Installation and repair of Webasto heating and cooling systems requires special Webasto training, technical information, special tools and special equipment. – NEVER attempt to install or repair a Webasto heating or cooling system unless you have successfully completed the factory training course and have the technical skills, technical information, tools and equipment required to properly complete the necessary procedures. – ALWAYS carefully follow Webasto installation and repair instructions and heed all WARNINGS. – Webasto rejects any liability for problems and damage caused by the system being installed by untrained personnel. ™ Table of Contents Contents Page 1. Introduction 3 1.1 1.2 1.3 1.4 Safety and General Information . . . . . . . . . . . . . . . . . . . . . . . . . . . . . . . . . . . . . . . . . . . . . . . . . . . . . . . . . . . . . . . . Warning Symbols in this Manual . . . . . . . . . . . . . . . . . . . . . . . . . . . . . . . . . . . . . . . . . . . . . . . . . . . . . . . . . . . . . . . . General Information . . . . . . . . . . . . . . . . . . . . . . . . . . . . . . . . . . . . . . . . . . . . . . . . . . . . . . . . . . . . . . . . . . . . . . . . . Vehicle Requirements (Installation Review) . . . . . . . . . . . . . . . . . . . . . . . . . . . . . . . . . . . . . . . . . . . . . . . . . . . . . . . . 1.4.1 Electrical Tests - Prior to Troubleshooting and Servicing . . . . . . . . . . . . . . . . . . . . . . . . . . . . . . . . . . . . . . . . . 1.4.2 Electrical Tests - After Servicing or Repairs . . . . . . . . . . . . . . . . . . . . . . . . . . . . . . . . . . . . . . . . . . . . . . . . . . . 1.5 Recommended Service Tools . . . . . . . . . . . . . . . . . . . . . . . . . . . . . . . . . . . . . . . . . . . . . . . . . . . . . . . . . . . . . . . . . . . 2. General Description 2.1 2.2 2.3 2.4 2.5 2.6 2.7 2.8 2.9 2.10 3 3 3 4 4 4 4 5 Refrigeration Unit Assembly . . . . . . . . . . . . . . . . . . . . . . . . . . . . . . . . . . . . . . . . . . . . . . . . . . . . . . . . . . . . . . . . . . . Cold Storage Assembly . . . . . . . . . . . . . . . . . . . . . . . . . . . . . . . . . . . . . . . . . . . . . . . . . . . . . . . . . . . . . . . . . . . . . . . Air-handler Assembly . . . . . . . . . . . . . . . . . . . . . . . . . . . . . . . . . . . . . . . . . . . . . . . . . . . . . . . . . . . . . . . . . . . . . . . . Cold Transfer System . . . . . . . . . . . . . . . . . . . . . . . . . . . . . . . . . . . . . . . . . . . . . . . . . . . . . . . . . . . . . . . . . . . . . . . . DC to AC Power Inverter . . . . . . . . . . . . . . . . . . . . . . . . . . . . . . . . . . . . . . . . . . . . . . . . . . . . . . . . . . . . . . . . . . . . . Control Module . . . . . . . . . . . . . . . . . . . . . . . . . . . . . . . . . . . . . . . . . . . . . . . . . . . . . . . . . . . . . . . . . . . . . . . . . . . . Digital Core Temperature Sensor . . . . . . . . . . . . . . . . . . . . . . . . . . . . . . . . . . . . . . . . . . . . . . . . . . . . . . . . . . . . . . . . Ambient Temperature Thermostat. . . . . . . . . . . . . . . . . . . . . . . . . . . . . . . . . . . . . . . . . . . . . . . . . . . . . . . . . . . . . . . High/Low Refrigerant Pressure Switch . . . . . . . . . . . . . . . . . . . . . . . . . . . . . . . . . . . . . . . . . . . . . . . . . . . . . . . . . . . . External Thermal Protector – Hermetic Compressor Motor . . . . . . . . . . . . . . . . . . . . . . . . . . . . . . . . . . . . . . . . . . . . 3. Functional Description 5 5 6 6 6 6 7 7 8 8 9 3.1 3.2 General Information . . . . . . . . . . . . . . . . . . . . . . . . . . . . . . . . . . . . . . . . . . . . . . . . . . . . . . . . . . . . . . . . . . . . . . . . . 9 Charging Mode (Operation with 30 Minute Delayed Start Feature) . . . . . . . . . . . . . . . . . . . . . . . . . . . . . . . . . . . . . . 9 3.2.1 Key On Signal (KOS) with 12V reference signal to control module. . . . . . . . . . . . . . . . . . . . . . . . . . . . . . . . . 9 3.3 Discharge Mode (Bunk Cooling) . . . . . . . . . . . . . . . . . . . . . . . . . . . . . . . . . . . . . . . . . . . . . . . . . . . . . . . . . . . . . . . 10 3.3.1 Vehicle Key OFF - no 12V reference signal present at control module. . . . . . . . . . . . . . . . . . . . . . . . . . . . . . 10 3.3.2 Operation . . . . . . . . . . . . . . . . . . . . . . . . . . . . . . . . . . . . . . . . . . . . . . . . . . . . . . . . . . . . . . . . . . . . . . . . . . 10 4. Technical Data 11 4.1 General Information . . . . . . . . . . . . . . . . . . . . . . . . . . . . . . . . . . . . . . . . . . . . . . . . . . . . . . . . . . . . . . . . . . . . . . . . 4.1.1 Technical Data of the BlueCool Truck System . . . . . . . . . . . . . . . . . . . . . . . . . . . . . . . . . . . . . . . . . . . . . . . . 4.1.2 Technical Data of the Refrigeration Compressor. . . . . . . . . . . . . . . . . . . . . . . . . . . . . . . . . . . . . . . . . . . . . . 4.1.3 Technical Data of the Circulating Pump . . . . . . . . . . . . . . . . . . . . . . . . . . . . . . . . . . . . . . . . . . . . . . . . . . . . 4.2 Dimensions. . . . . . . . . . . . . . . . . . . . . . . . . . . . . . . . . . . . . . . . . . . . . . . . . . . . . . . . . . . . . . . . . . . . . . . . . . . . . . . 4.2.1 Refrigeration/Cold Storage Assembly. . . . . . . . . . . . . . . . . . . . . . . . . . . . . . . . . . . . . . . . . . . . . . . . . . . . . . 4.2.2 Air-handler Assembly . . . . . . . . . . . . . . . . . . . . . . . . . . . . . . . . . . . . . . . . . . . . . . . . . . . . . . . . . . . . . . . . . 5. Troubleshooting – BlueCool Truck Electrical System 5.1 5.2 5.3 14 General Information . . . . . . . . . . . . . . . . . . . . . . . . . . . . . . . . . . . . . . . . . . . . . . . . . . . . . . . . . . . . . . . . . . . . . . . . 14 Malfunctions with System in Charging Mode (Vehicle Key ON or Vehicle Engine Running) . . . . . . . . . . . . . . . . . . . 14 Malfunctions with System in Discharge Mode and Vehicle Key OFF (Sleeper Cooling) . . . . . . . . . . . . . . . . . . . . . . . 23 6. Troubleshooting – Refrigerant Compressor 6.1 6.2 11 11 11 12 12 12 13 26 General Information . . . . . . . . . . . . . . . . . . . . . . . . . . . . . . . . . . . . . . . . . . . . . . . . . . . . . . . . . . . . . . . . . . . . . . . . General Service and Safety Precautions Concerning Refrigerant Compressors . . . . . . . . . . . . . . . . . . . . . . . . . . . . . 6.2.1 Introduction . . . . . . . . . . . . . . . . . . . . . . . . . . . . . . . . . . . . . . . . . . . . . . . . . . . . . . . . . . . . . . . . . . . . . . . . 6.2.2 Trained Personnel Only . . . . . . . . . . . . . . . . . . . . . . . . . . . . . . . . . . . . . . . . . . . . . . . . . . . . . . . . . . . . . . . . 6.2.3 Terminal Venting and Electrocution . . . . . . . . . . . . . . . . . . . . . . . . . . . . . . . . . . . . . . . . . . . . . . . . . . . . . . . 6.2.4 Fire Hazard from Terminal Venting with Ignition. . . . . . . . . . . . . . . . . . . . . . . . . . . . . . . . . . . . . . . . . . . . . . 6.2.5 Troubleshooting Table – Refrigerant Compressor and Related Components . . . . . . . . . . . . . . . . . . . . . . . . . 6.2.6 Refrigerants and Other Chemicals . . . . . . . . . . . . . . . . . . . . . . . . . . . . . . . . . . . . . . . . . . . . . . . . . . . . . . . . 6.2.7 Compressor Removal. . . . . . . . . . . . . . . . . . . . . . . . . . . . . . . . . . . . . . . . . . . . . . . . . . . . . . . . . . . . . . . . . . www.webasto.us 1 26 26 26 26 26 26 30 27 27 Webasto Product N.A., Inc. ™ Table of Contents 6.2.8 System Flushing, Purging, and Pressure Testing for Leaks . . . . . . . . . . . . . . . . . . . . . . . . . . . . . . . . . . . . . . . 6.2.9 System Charging . . . . . . . . . . . . . . . . . . . . . . . . . . . . . . . . . . . . . . . . . . . . . . . . . . . . . . . . . . . . . . . . . . . . . 6.2.10 Prevention of System Explosions . . . . . . . . . . . . . . . . . . . . . . . . . . . . . . . . . . . . . . . . . . . . . . . . . . . . . . . . . 6.2.11 Start Capacitor Overheating. . . . . . . . . . . . . . . . . . . . . . . . . . . . . . . . . . . . . . . . . . . . . . . . . . . . . . . . . . . . . 6.2.12 System Evacuation . . . . . . . . . . . . . . . . . . . . . . . . . . . . . . . . . . . . . . . . . . . . . . . . . . . . . . . . . . . . . . . . . . . . 6.2.13 Follow the Labels . . . . . . . . . . . . . . . . . . . . . . . . . . . . . . . . . . . . . . . . . . . . . . . . . . . . . . . . . . . . . . . . . . . . . 6.3 Troubleshooting Table – Refrigerant Compressor and Related Components . . . . . . . . . . . . . . . . . . . . . . . . . . . . . . . 6.4 Identifying Compressor Electrical Problems . . . . . . . . . . . . . . . . . . . . . . . . . . . . . . . . . . . . . . . . . . . . . . . . . . . . . . . 6.4.1 Checking for a Ground Fault (a Short to Ground). . . . . . . . . . . . . . . . . . . . . . . . . . . . . . . . . . . . . . . . . . . . . 6.4.2 Checking for Continuity and Proper Resistance . . . . . . . . . . . . . . . . . . . . . . . . . . . . . . . . . . . . . . . . . . . . . . 6.4.3 Checking for Other Electrical Problems in Single Phase Motors. . . . . . . . . . . . . . . . . . . . . . . . . . . . . . . . . . . 7. Compressor Replacement and System Service 7.1 28 29 29 29 29 29 30 31 32 33 34 36 System Cleanup and Compressor Replacement After Compressor Failure . . . . . . . . . . . . . . . . . . . . . . . . . . . . . . . . 36 8. Circuit Diagrams 38 9. Component Replacement - Refrigeration Unit 39 9.1 9.2 9.3 9.4 9.5 9.6 9.7 General Information and Safety Precautions . . . . . . . . . . . . . . . . . . . . . . . . . . . . . . . . . . . . . . . . . . . . . . . . . . . . . . Compressor Replacement . . . . . . . . . . . . . . . . . . . . . . . . . . . . . . . . . . . . . . . . . . . . . . . . . . . . . . . . . . . . . . . . . . . . Condenser Replacement . . . . . . . . . . . . . . . . . . . . . . . . . . . . . . . . . . . . . . . . . . . . . . . . . . . . . . . . . . . . . . . . . . . . . Thermal Expansion Valve (TXV) Replacement . . . . . . . . . . . . . . . . . . . . . . . . . . . . . . . . . . . . . . . . . . . . . . . . . . . . . . Pressure Switch Replacement . . . . . . . . . . . . . . . . . . . . . . . . . . . . . . . . . . . . . . . . . . . . . . . . . . . . . . . . . . . . . . . . . Condenser Fan Replacement . . . . . . . . . . . . . . . . . . . . . . . . . . . . . . . . . . . . . . . . . . . . . . . . . . . . . . . . . . . . . . . . . . Ambient Temperature Switch Replacement . . . . . . . . . . . . . . . . . . . . . . . . . . . . . . . . . . . . . . . . . . . . . . . . . . . . . . . 10.Component Replacement Air-handler Assembly 10.1 10.2 10.3 10.4 44 Operation Panel Replacement . . . . . . . . . . . . . . . . . . . . . . . . . . . . . . . . . . . . . . . . . . . . . . . . . . . . . . . . . . . . . . . . . Air-handler Cover Removal . . . . . . . . . . . . . . . . . . . . . . . . . . . . . . . . . . . . . . . . . . . . . . . . . . . . . . . . . . . . . . . . . . . Control Unit Replacement . . . . . . . . . . . . . . . . . . . . . . . . . . . . . . . . . . . . . . . . . . . . . . . . . . . . . . . . . . . . . . . . . . . . Fan Replacement. . . . . . . . . . . . . . . . . . . . . . . . . . . . . . . . . . . . . . . . . . . . . . . . . . . . . . . . . . . . . . . . . . . . . . . . . . . 11.Coolant Circuit 44 44 44 45 46 11.1 Bleeding System After Repair . . . . . . . . . . . . . . . . . . . . . . . . . . . . . . . . . . . . . . . . . . . . . . . . . . . . . . . . . . . . . . . . . 11.1.1 Energizing the Circulating Pump . . . . . . . . . . . . . . . . . . . . . . . . . . . . . . . . . . . . . . . . . . . . . . . . . . . . . . . . . 11.2 Heat Exchanger Replacement . . . . . . . . . . . . . . . . . . . . . . . . . . . . . . . . . . . . . . . . . . . . . . . . . . . . . . . . . . . . . . . . . 11.3 Coolant Circulating Pump Replacement. . . . . . . . . . . . . . . . . . . . . . . . . . . . . . . . . . . . . . . . . . . . . . . . . . . . . . . . . . 12.Warranty www.webasto.us 39 39 40 41 42 42 43 46 46 47 47 49 2 Webasto Product N.A., Inc. ™ Introduction 1. Introduction 1.1 Safety and General Information Read this manual in its entirety before installing / servicing / repairing this equipment. Failure to follow the instructions and the notes contained therein will lead to all liability being refused by Webasto. The same applies if repairs are carried out incorrectly or with the use of parts other than genuine Webasto service parts. 1.2 Warning Symbols in this Manual The purpose of safety symbols is to attract your attention to possible hazardous conditions. This manual uses a series of symbols and signal words which are intended to convey the level of importance of the safety messages. The progression of symbols is described below. Remember that safety messages by themselves do not eliminate danger and are not a substitute for proper accident prevention measures. DANGER WARNING CAUTION Indicates a potentially hazardous situation which, if not avoided, COULD result in death or serious injury. Indicates a potentially hazardous situation which, if not avoided, MAY result in minor or moderate injury or property damage. It may also be used to alert against unsafe practices. These symbols are used to alert the technician to important or useful information about proper installation / service / repair of the equipment. OR 1.3 Indicates an imminently hazardous situation which, if not avoided, WILL result in death or serious injury. General Information Webasto Product North America, Inc. is pleased to provide this installation manual with the BlueCool Truck parking cooler system. When used according to the guidelines stated in this manual, you can expect to provide years of trouble-free, enjoyable operation for your customer. This manual represents our latest effort to produce the best technical documentation possible. In our efforts towards continuous, ongoing product improvement, we encourage our customers to write to us with their comments or criticisms concerning this manual and the BlueCool parking cooler system. Please write to us at: Webasto Product North America, Inc. Technical Documentation Group 15083 North Road Fenton MI 48430 You are also invited to fill out our online questionnaire concerning our technical documentation and web site at: www.techwebasto.com If you have any immediate questions concerning this manual, the procedures within or the product itself, please call us at: (800) 555-4518 www.webasto.us or send a fax to: (810) 593-6001 3 Webasto Product N.A., Inc. ™ Introduction 1.4 Vehicle Requirements (Installation Review) An alternator rated 30Amps above original equipment is required to provide sufficient power to the existing truck electrical system, installed accessories, and the additional 60 to 67 ampere load of the BlueCool system during system charging mode. 1.4.1 Electrical Tests - Prior to Troubleshooting and Servicing Batteries must be in good condition. Start engine (engine equipped with an alternator 30 amps larger than original equipment) 1) Turn on truck A/C system (front and rear units) 2) Turn on vehicle head lights 3) Turn on any other significant loads used during normal truck operation (accessories) The DC generator (alternator) output must be a minimum of 14.0 VDC and the difference between Generator (alternator) and battery voltage measurements must not be greater than 0.5 volts. A difference greater than 0.5 volts between the generator (alternator) and batteries indicates that the vehicle electrical system (charging and/or starting) could have potential problems and further tests and services should be performed. Trucks, other than new, will likely require additional services such as: • Cleaning of battery connections • Cleaning of jumpers (bottom of connector typical weak connection point) • Cleaning of cable connections at starter and DC generator (alternator) • Cleaning ground connections at frame rails and other points of contact • Load testing of batteries 1.4.2 Electrical Tests - After Servicing or Repairs Insure batteries are fully charged prior to starting the BlueCool Truck system. Batteries may have become significantly discharged due to interior lights on while working in the bunk or due to parasitic loss from live accessories. Perform voltage drop tests with engine running, all truck accessories turned on and with BCT unit on charge mode. The difference between battery voltage and the input terminals of the DC to AC power inverter must not be greater than 0.5 volts. 1.5 Recommended Service Tools • AC Recovery / Charging Machine - Must be R134a compliant. • R134a Leak Detector - Must be R134a compliant. • Dry Nitrogen Gas (Bottled) with Regulator and Safety Relief Device - for Pressure Tests • Digital Multi-Meter - Should be a good quality V A O meter. • Digital Thermometer Tester - Core temp. sensor - Now available from Webasto under part # BCT010249A. • Basic Mechanic’s Tools Webasto Product N.A., Inc. 4 www.techwebasto.com ™ General Description 2. General Description 2.1 The BlueCool Truck system is based on the refrigeration principle and the simple storage of cold energy. The refrigeration unit is comprised of an electric refrigeration compressor, a condenser core with an electric automotive type radial fan, an evaporator (inside the cold storage core) and a thermal expansion valve. The BlueCool Truck system essentially consists of the following – a refrigeration unit assembly – a cold storage assembly – an air-handler assembly – a cold transfer system – a power inverter Refrigeration Unit Assembly Figure 2. Refrigeration Unit Assembly 2.2 Figure 1. BlueCool Truck System The cold storage assembly is comprised of multiple layers of a freeze medium in the form of a vacuum sealed, water saturated, patented graphite matrix which is interlaced with a refrigeration evaporator core and a coolant circulation core. The entire storage assembly is encapsulated with approximately 2.5 in. (65mm) of urethane foam insulation. There are no serviceable items inside. To control and monitor it, the BlueCool system uses – a system control module with temperature sensor – a cold storage core temperature sensor (digital) – an ambient temperature sensor – a vehicle key on signal circuit – a High/Low refrigerant pressure cutout switch – a compressor overheat/overload cutout switch Cold Storage Assembly The power supply to operate the BlueCool Truck System is supplied externally via the vehicle batteries or an optional “Shore-power accessory kit”. The power inverter converts 12 volts DC supplied by the vehicle batteries into 110 volts AC required to drive the refrigeration compressor. Where the vehicle is equipped with the optional shorepower accessory kit, the power inverter will be bypassed whenever the shore-power accessory kit is active. Figure 3. Cold Storage Assembly www.webasto.us 5 Webasto Product N.A., Inc. ™ General Description 2.3 Air-handler Assembly 2.5 The air-handler assembly is mounted inside the sleeper compartment. The air-handler is comprised of a liquid to air heat exchanger, four air circulation fans, cover with directional louvers, and the system control module with operator interface during discharge. DC to AC Power Inverter A power inverter to change 12 volts DC vehicle power into 110 volts AC is utilized to supply power to drive the electric refrigeration compressor. ON DC PO TO AC W PO ER I E NV RT ER W ER OF F Figure 4. Air-handler Assembly 2.4 Revision D Cold Transfer System The cold transfer system is comprised of a circulation pump, coolant hose, coolant reservoir and a transfer medium of 50/50 premixed water and glycol antifreeze mixture. Figure 6. Power Inverter The system is active during system discharge. The temperature control knob of the control module is used to adjust bunk temperature. 2.6 The control module is central to ensuring the correct function of the BlueCool Truck System. A temperature sensor is mounted on the control module circuit board to monitor the temperature level in the bunk. The control module switches the circulation pump on and off according to the cooling requirements. 1 During the charging mode (vehicle in motion), the control module monitors and controls the refrigeration process and the freezing of the freeze medium contained within the cold storage core. A digital core temperature sensor is an integral part of the control module’s ability to monitor the system. 1 – Coolant Reservoir 2 – Tee Connector (5/8”x 5/8”x 5/8”) 3 – Reducer (3/4”x 5/8”) 4 – Coolant Circulating Pump 5 – Inlet to Cold Storage Unit (3/4”) 6 – Outlet from Cold Storage Unit (5/8”) 7 – Cold Coolant Supply Hose 8 – Air Handler Heat Exchanger 9 – Warm Coolant Return Hose 8 During the discharge mode (bunk cooling), the control module allows manual control of the temperature output and the fan speed. Temperature is monitored via a sensor mounted on the control module’s circuit board. Temperature is regulated by controlling the circulation pump. 7 9 Control Module 2 3 4 3 3 6 5 Figure 5. Cold Transfer System Figure 7. Control Module with Plate and Knobs Shown Webasto Product N.A., Inc. 6 www.techwebasto.com ™ General Description 2.7 Digital Core Temperature Sensor 2.8 Ambient Temperature Thermostat Located on the back wall of the cold storage assembly, the sensor measures the temperature of the cold storage core. The control module evaluates the signal and adjusts the charging process accordingly. Located behind the compressor, an ambient temperature thermostat is provided for the purpose of deactivating the BlueCool Truck System during cooler weather periods when bunk cooling is not desired. The switching point is 30 °F (–1 °C). The charging mode is active at temperatures greater than 30 °F (–1 °C) and inactive at temperatures less than or equal to 30 °F (–1 °C). The thermostat contacts open at 45 °F (7.2 °C) thus, deactivating the system during cold weather. The thermostat contacts remain open until the ambient temperature reaches 60 °F (15.5 °C) at which point the contacts close and the system is allowed to operate. The digital core temperature sensor’s performance can only be analyzed through the use of a special tool available from Webasto. 2A 1009 0 BTC Figure 9. Ambient Temperature Thermostat Figure 8. Digital Core Temperature Sensor www.webasto.us 7 Webasto Product N.A., Inc. ™ General Description 2.9 High/Low Refrigerant Pressure Switch 2.10 External Thermal Protector – Hermetic Compressor Motor Located on top of the compressor, the refrigerant pressure switch will deactivate the BlueCool Truck System in the event of high pressure or in the event of low pressure due to a loss of refrigerant. WARNING 110 VAC Device! Lethal current may be present. Switch off the DC to AC power inverter before servicing! The compressor motor is protected from overheating by a thermal protector mounted on top and in firm contact with the compressor housing. The thermal protector device quickly senses any unusual temperature rise or excess current draw. The bi-metal disc within the thermal protector reacts to either excess temperature and/or excess current draw by flexing downward, and disconnecting the compressor from the power source. External Thermal Protector and Cover Figure 10. High/Low Refrigerant Pressure Switch Switch Points (High/Low Pressure Switch) High pressure: Low pressure: 326 psi (22.5 bar) 29 psi (2.0 bar) Hermetic Compressor Assembly Figure 11. External Thermal Protector Webasto Product N.A., Inc. 8 www.techwebasto.com ™ Functional Description 3. Functional Description 3.1 General Information The control module is designed with a 30 minute delayed start feature. When a 12 volt positive signal is applied to the pink wire (connector X1, position 3), the control module begins the 30 minute time delay count down. However, if during this 30 minute period, the key is cycled OFF and ON regardless the number of times, the 30 minute countdown sequence will not be interrupted. Once 30 minutes have elapsed, the control module will check for: • KOS 12V positive reference signal • Digital temperature sensor signal (located in the cold storage core) • A closed circuit through the ambient temperature thermostat and high/low refrigerant pressure switch 3.2 3.2.1 Charging Mode (Operation with 30 Minute Delayed Start Feature) Key On Signal (KOS) with 12V reference signal to control module. Condition 1: With the key ON (engine running) and the internal storage core temperature < 30 ºF (–1 °C) the power output from the control module (connector X1, position 5) to the control relay IS NOT provided, unless during driving time the temperature is 30 ºF (–1 °C). If during vehicle operation (engine running) of a sufficient amount of time to drop the internal storage core temperature below 30 ºF the control module will initiate a new 30 minute delayed start countdown after which, based on the temperature in the storage unit, WILL or WILL NOT provide a signal to the control relay. Approximate time to completely recharge (freeze) the storage core is approximately 6 hours depending on the ambient temperature. Condition 2: With the key ON (engine running) and the internal storage core temperature 30 ºF (–1 °C) the power output from the control module (connector X1, position 5) to the control relay IS provided. If during vehicle operation (engine running) of a sufficient amount of time to drop the internal storage core temperature below 30 ºF (charge complete) the control module will initiate a new 30 minute delayed start countdown after which, based on the temperature within the storage core, WILL or WILL NOT provide a signal to the control relay. Approximate time to completely recharge (freeze) the storage core is approximately 6 hours depending on the ambient temperature. System Monitoring: The storage core is considered fully charged when the internal core temperature is less than 30 ºF (–1 °C). To ensure the temperature is maintained below 30 ºF (–1 °C), the control module will continually repeat the 30 minute delay countdown and temperature sampling and based on the temperature within the storage core, WILL or WILL NOT provide a signal to the control relay. Key OFF: With the key OFF (engine stopped), regardless the internal storage core temperature, power output from the control module (connector X1, position 5) to the control relay IS NOT provided. (See Section 3.3, “Discharge Mode”) www.webasto.us 9 Webasto Product N.A., Inc. ™ Functional Description 3.3 Discharge Mode (Bunk Cooling) 3.3.1 Vehicle Key OFF - no 12V reference signal present at control module. Whenever the Vehicle key is switched off (engine stopped), the discharge cycle (bunk cooling) is automatically available on demand to the vehicle operator when desired. Two control dials on the face of the control module are provided for climate control within the sleeper area. One controls fan speed and the other controls the temperature to maintain a desired comfort level between 68 and 78 degrees Fahrenheit (20 - 25.5 °C). I O AIR CONDITIONING Figure 12. Control Panel 3.3.2 Operation The chilled coolant mixture is circulated by way of a small coolant pump from the storage unit to the air-handler unit (heat exchanger) in the cab and back to the storage unit. The air-handler fans draw in warm bunk area air and forces it across the exchanger where it gives up it’s heat to the chilled mixture circulating through the exchanger. The cooled air is returned to the bunk area of the vehicle through four adjustable openings on the air-handler. The maximum allowable runtime during discharge mode is 10 hours at which time, the control module will automatically switch the system off. C B A A. Sleeper Air-handler Cover B. Fully Adjustable Cool Air Outlet Vents - Position as desired. C. Control Panel D. Temperature Control E. Fan Speed Control F. Warm Air Inlet Grid D E F Figure 13. Air-handler Webasto Product N.A., Inc. 10 www.techwebasto.com ™ Technical Data 4. Technical Data 4.1 General Information Unless tolerances are shown within the technical data table, a tolerance of ± 10% applies at an ambient temperature of +20 °C (+68 °F) and at the rated voltage and conditions. 4.1.1 Technical Data of the BlueCool Truck System Specifications BlueCool Truck Parking Cooler Thermal Storage (parking A/C) 17,000 Btu (5 kWh) Power Consumption during Sleeper Cooling Coolant circulating pump and fans 3.5 - 6.5 Amps @ 12 Volts System Weight Refrigeration and cold storage assembly Cab mounted air chiller/handler 300 lb. (136 kg) 26 lb. (13.6 kg) Storage System Design Maintenance free with patented graphite matrix (no additional batteries required) System Refrigerant R134a Refrigeration/ Cold Storage Unit Dimensions H 26” x W 24” x D 28” (660 x 610 x 711 mm) Refrigerant Charge Capacity 1.85 lb. (0.84 kg) Refrigerant Oil POE Oil (Polyol Ester) R134a compatible Refrigerant Oil Charge Capacity 10 fl oz. (295.7 ml) Air Flow Variable at Maximum Setting 150 cfm (255m3/h) Cooling Output 1,000 - 6,000 Btu/hr (0.30 - 1.75 kW) Frame Rail Space Required for Mounting 24 inches (60.96 cm) Noise < 62 db (A) Temperature Operating environment temperature Sleeper temperature control range 50... 110 °F (10... 43.3 °C) 68... 78 °F (20... 25.5 °C) Table 1. Technical Data - BlueCool System 4.1.2 Technical Data of the Refrigeration Compressor Specifications A/C Compressor BTU/hr 7040 BTU/hr (2.06 kW) Rated Voltage 115 Volts Maximum Continuous Current 12.6 amp. @ 115 Volts Table 2. Technical Data - A/C Compressor www.webasto.us 11 Webasto Product N.A., Inc. ™ Technical Data 4.1.3 Technical Data of the Circulating Pump Specifications U 4846 Coolant Circulating Pump Flow rate against 0.0 PSI (0.0 Bar) 528 g/hr (2,000 l/hr) Rated Voltage 12 Volts Power Consumption during operation 28 Watts @ 12 Volts Dimensions L 7.08” x W 2.9” x H 4.4” (180 x 74 x 112 mm) Weight 1.53 lb. (0.692 kg) Table 3. Technical Data - Circulating Pump 4.2 4.2.1 Dimensions Refrigeration/Cold Storage Assembly 559 mm (22 in.) 660.5mm (26 in.) 648 mm (25.5 in.) 711 mm (28 in.) 127mm (5 in.) 838mm (33 in.) Figure 14. Dimensions - Refrigeration/Cold Storage Assembly Webasto Product N.A., Inc. 12 www.techwebasto.com ™ Technical Data 4.2.2 Air-handler Assembly 616.4 mm (24.26 in.) 179.8 mm (7.04 in.) 498.5 mm (19.62 in.) 623.6 mm (24.55 in.) 203.94 mm (8.03 in.) 509.22 mm (20.05 in.) Figure 15. Dimensions - Air-handler Assembly www.webasto.us 13 Webasto Product N.A., Inc. ™ Troubleshooting – BlueCool Truck Electrical System 5. Troubleshooting – BlueCool Truck Electrical System 5.2 5.1 The following tables list the possible error symptoms. General Information This section describes how to identify and remedy faults on the BlueCool Truck System. If the actions listed in the following tables do not restore proper operation, consult your authorized Webasto dealer. Troubleshooting work demands precise knowledge of the structure and theory of operation of the various components and must be carried out by trained personnel only. CAUTION ATTENTION The BlueCool control system has a built-in delayed operation feature. The engine must run 1/2 hour before the BlueCool Truck system will begin the charging mode operation. The troubleshooting guide is restricted to the localization of defective components. The following potential sources of malfunctions have not been included and should always be checked so that they can then be excluded as the cause of the particular fault: CAUTION • Tripped fuses • Corrosion on plugs • Loose plug contacts • Poor crimp contacts on plugs • Corroded cables and fuses • Corroded battery terminals Malfunctions with System in Charging Mode (Vehicle Key ON or Vehicle Engine Running) ATTENTION During the half hour period before system activation occurs, the “Key On Signal (KOS) with 12V reference signal to control module” can be checked for a 12 volt positive signal. Refer to Fig. 17, on pg. 17. A function test must be conducted in the vehicle after rectifying a fault. Table 4. Symptom: System does not begin operation after 1/2 hour delay period expires under normal operating conditions. Possible Cause/Reason Inspection Remedy Storage unit internal temperature at 30 °F (–1 °C) or lower. This is normal - unit will not begin operation until cold storage unit internal temperature climbs above 30 °F (–1 °C). Outside (ambient) temperature at 45 °F (7.2 °C) or lower. This is normal - unit will not begin operation until outside (ambient) temperature climbs above 60 °F (15.5 °C). Webasto Product N.A., Inc. 14 www.techwebasto.com ™ Troubleshooting – BlueCool Truck Electrical System Table 5. Symptom: System does not begin operation after 1/2 hour delay period expires and anytime thereafter. Condenser fan, power inverter and refrigerant compressor DO NOT respond. Symptom/Malfunction Inspection Remedy IMPORTANT! Storage core temperature must be above 30 °F (–1 °C) and ambient temperature above 60 °F (15.5 °C). Check 10 amp. fuse at fuse holder X2. 12 volts negative and/or positive not present at control module. Check for power on pin-1 (red wire) and ground on pin-2 (brown wire) of control module connector X1. Refer to Fig. 16, on pg. 17. “Key On Signal” from vehicle key on power source not present Check connection of pink wire to vehicle key on power source. Replace blown/defective fuse Damaged or open circuit. Repair wiring or connections. No ground connection. Repair wiring or connections. Repair as necessary. Check for power on pin-3 (pink wire) and ground on pin-2 Damaged or open circuit. Repair wiring or (brown wire) of control module connector X1. Refer to Fig. 17, connections. on pg. 17. 12 volts positive not present at Check for power on pin-5 (purple wire) and ground on pin-2 (brown wire) of connector X1. Refer to Fig. 18, on pg. 18. control module output to system control relay. If no output on pin-5 after more than 30 minutes, replace control module. System control relay not responding. Check 20 amp. fuse at fuse holder X4. Replace Blown or defective fuse. Check for power on pin-87 (red wire) and ground on pin-85 (brown wire). Refer to Fig. 20, on pg. 19. Damaged or open circuit. Repair wiring or connections. Check for power on pin-86 (purple wire) and ground on pin85 (brown wire). Refer to Fig. 19, on pg. 18. Inspect ambient temperature and or high/low pressure switches for continuity. Damaged or open circuit. Repair wiring or connections. Check for power output on pin-30 (blue wires) of relay socket X10. Refer to Fig. 21, on pg. 19. If no output on pin-30, replace relay. Ambient temperature sensor - Check for continuity across terminals of ambient temperature Replace if damaged or defective. open circuit. sensor. Sensor will be open at temperatures less than 45 °F (7.2 °C) and closed above 60 °F (15.5 °C). Refer to Fig. 24, on pg. 21. Cold storage unit digital temperature sensor - open circuit or defective Inspect sensor wiring for corrosion, damage or open circuit. Test sensor using Sensor Reader Tool P/N BCT010249A High/Low refrigerant pressure Check for continuity across terminals of the pressure switch. switch - open circuit. Switch will be open at pressures less than 29 psi (2.0 bar) or above 326 psi (22.5 bar). Refer to Fig. 25, on pg. 21. Low refrigerant pressures with discharged cold storage core. Low pressure or no refrigerant. A reading of “T: ERROR”, indicates there is a fault with the digital temperature sensor or damage to the connector or wiring. Repair or replace as necessary. Replace if damaged or defective. See “Low pressure or no refrigerant.” Using an electronic leak detector, check for refrigerant leaks at refrigerant connections, fittings and pressure sensor within the charge unit. See “Special Instructions” item 1”. Repair leaks and service refrigeration system. Check cold storage core unit in the area of the TXV for leaks. See Special Instructions” item 2. Special instructions: 1. If no refrigerant pressure is detected, fill system with 0.25 lb. of refrigerant to enable leak detection with electronic leak detector. 2. For refrigerant leaks found in the area of the Thermal Expansion Valve located on the storage core unit, contact Webasto Product North America at 1-800-432-8371 for further information concerning the repair or replacement of the storage core assembly. www.webasto.us 15 Webasto Product N.A., Inc. ™ Troubleshooting – BlueCool Truck Electrical System Table 6. Symptom: System begins operation after 1/2 hour delay period expires. Condenser fan DOES respond but refrigerant compressor DOES NOT respond. Symptom/Malfunction Inspection Remedy Power inverter switched off Switch power inverter on. Note: Green LED indicator will only illuminate during an active system charge cycle. Power inverter switching relay Check for power on pin-86 (blue wire) and ground on pin-85 If no reading, repair open circuit, terminals or damaged wiring between relay socket X10 and not responding. (brown wire) of relay socket X11. Refer to Fig. 22, on pg. 20. X11. Check for continuity across pin-87 and pin-30 of relay socket X11. Note: Power inverter switch must be in the OFF position and the charging mode active in order to perform this check. If open circuit (OL), replace relay. Power inverter on, green LED on, no 110 volt AC output. Check AC output at 110 Volt AC connector. Refer to Fig. 26, If no output, replace inverter (internal fault). on pg. 22. Power inverter on, green LED off, no 110 volt AC output. Perform function test on switching relay. 110 volt AC wiring harness contacts or open circuit. Switch OFF power inverter. Check physical condition of 110 V Repair as necessary. AC harness for loose/corroded connections and open circuits. Compressor overheat/ overload limiter defect Switch OFF power inverter. Remove protection cap from top of compressor and check wiring connections. Repair as necessary. Perform continuity test across limiter terminals. Refer to Fig. 34, on pg. 34. If open circuit (OL), replace limiter. Check compressor function and electrical diagnosis. Refer to Section 6 “Troubleshooting – Refrigerant Compressor” Repair or replace as defined in Section 6 “Troubleshooting – Refrigerant Compressor” If relay is functioning normally, replace inverter (internal fault). Table 7. Symptom: System begins operation after 1/2 hour delay period expires but shuts down shortly after without completing a full charge cycle. Symptom/Malfunction Power inverter switches off during charging cycle Inspection Remedy Low battery voltage. Charge batteries. Check all control circuit connections for loose terminals. Refer Repair or replace as necessary. to Table 5 on pg 15 and Table 6 on pg 16 for check points. Clean battery posts, cables and frame ground connections Load-test batteries. Repair or replace as necessary. Check power inverter battery cables and connections for looseness or corrosion. Check voltage drop between batteries If voltage drop is greater than 0.5 volts, repair or and inverter. replace as necessary. Ensure inverter battery cables are installed as recommended in Correct cable connections as recommended by the BlueCool Installation manual P/N BCT010031B Webasto. If inverter continues to fault out, call Webasto Product N.A., Inc. at 1-800-555-4518 Compressor overheat/ overload limiter responds Check refrigerant pressures. Possible over-charge or blockage. Switch system off and allow compressor to cool. (Cooling may take up to 1 hour before limiter will self-reset). Service/repair refrigerant system and recharge to specifications. Check operation of condenser fan. Refer to Fig. 27, on pg. Repair or replace defective component. 22. Check compressor function and electrical diagnosis. Refer to Section 6 “Troubleshooting – Refrigerant Compressor” Webasto Product N.A., Inc. 16 Repair or replace as defined in Section 6 “Troubleshooting – Refrigerant Compressor” www.techwebasto.com ™ Troubleshooting – BlueCool Truck Electrical System Checking for battery voltage (constant) at control module connector. Volts DC V DC V + _ LEGEND 4 3 2 1 8 7 6 5 X1 Viewed from wire insertion side 1 Red 14GA - Constant Power Positive (Fused 10 amp.) 2 Brown 14GA - Constant Negative to all Components 3 Pink 16GA - 12V Positive Reference Signal to Control Module 4 Orange 14GA - 12V Switched Positive to Coolant Pump 5 Purple 16GA - 12V Switched Positive to Pressure Sensor (X6), Ambient Thermostat (X7) and System Control Relay (X10) 6 Not Used 7 Black 20GA - Storage Core Digital Temperature Sensor 8 White 20GA - Storage Core Digital Temperature Sensor Figure 16. Constant battery voltage at control module - charging mode Checking for a 12 volt positive reference signal with the vehicle key ON or engine running Volts DC OFF C AC ON V DC V Key Switch Position + _ LEGEND 4 3 2 1 8 7 6 5 X1 Viewed from wire insertion side 1 Red 14GA - Constant Power Positive (Fused 10 amp.) 2 Brown 14GA - Constant Negative to all Components 3 Pink 16GA - 12V Positive Reference Signal to Control Module 4 Orange 14GA - 12V Switched Positive to Coolant Pump 5 Purple 16GA - 12V Switched Positive to Pressure Sensor (X6), Ambient Thermostat (X7) and System Control Relay (X10) 6 Not Used 7 Black 20GA - Storage Core Digital Temperature Sensor 8 White 20GA - Storage Core Digital Temperature Sensor Figure 17. 12 volt positive reference signal to control module - charging mode www.webasto.us 17 Webasto Product N.A., Inc. ™ Troubleshooting – BlueCool Truck Electrical System Checking for a 12 volt switched output signal at control module (vehicle key ON or engine running) Volts DC OFF AC C ON V DC V > 30 min. Key Switch Position + _ LEGEND 4 3 2 1 8 7 6 5 X1 Viewed from wire insertion side 1 Red 14GA - Constant Power Positive (Fused 10 amp.) 2 Brown 14GA - Constant Negative to all Components 3 Pink 16GA - 12V Positive Reference Signal to Control Module 4 Orange 14GA - 12V Switched Positive to Coolant Pump 5 Purple 16GA - 12V Switched Positive to Pressure Sensor (X6), Ambient Thermostat (X7) and System Control Relay (X10) 6 Not Used 7 Black 20GA - Storage Core Digital Temperature Sensor 8 White 20GA - Storage Core Digital Temperature Sensor Figure 18. 12 volt switched output signal at control module - charging mode Checking 12 volt input signal from control module to system control relay Volts DC LEGEND X10 87 86 87a 85 ON Viewed from wire insertion side V DC PO W ER OF F 30 V 30 Blue 12GA - 12V Switched Output to Condensor Fan (X9) 85 Brown 14GA - Ground to Battery Negative Post 86 Purple 16GA - 12V Input from Control Module (X1), Pressure Sensor (X6) and Ambient Thermostat (X7) + _ 87 Red 12GA - Constant Power Positive (Fused 20 amp.) 87a Not Used X11 ON AC C OFF X10 > 30 min. Key Switch Position To Inverter ON/OFF Circuit Figure 19. 12 Volt input signal from control module to system control relay (through pressure sensor and ambient thermostat) Webasto Product N.A., Inc. 18 www.techwebasto.com ™ Troubleshooting – BlueCool Truck Electrical System Checking 12 volt constant positive from batteries (20 amp. fuse) to system control relay X10 LEGEND 87 86 87a 85 Volts DC X10 Viewed from wire insertion side ON 30 V DC PO W ER OF F V 30 Blue 12GA - 12V Switched Output to Condensor Fan (X9) 85 Brown 14GA - Ground to Battery Negative Post 86 Purple 16GA - 12V Input from Control Module (X1), Pressure Sensor (X6) and Ambient Thermostat (X7) 87 Red 12GA - Constant Power Positive (Fused 20 amp.) + _ 87a Not Used X11 X10 To Inverter ON/OFF Circuit Figure 20. 12 volt constant positive from batteries (20 amp. fuse) to system control relay Pin-87 and ground on Pin-85 (DC Voltage) Checking switched 12 volt output from relay X10 Volts DC LEGEND X10 87 86 87a 85 ON Viewed from wire insertion side V DC PO W ER OF F 30 V 30 Blue 12GA - 12V Switched Output to Condensor Fan (X9) and Inverter Switching Relay (X11) 85 Brown 14GA - Ground to Battery Negative Post 86 Purple 16GA - 12V Input from Control Module (X1), Pressure Sensor (X6) and Ambient Thermostat (X7) + _ 87 Red 12GA - Constant Power Positive (Fused 20 amp.) 87a Not Used AC X11 ON C OFF X10 > 30 min. Key Switch Position To Inverter ON/OFF Circuit Figure 21. Switched 12 volt output from Pin-30 of relay X10 to condenser fan Pin-1 of connector X9 and Pin-86 of inverter switching relay X11 (ground on Pin-85 of relay X10 and X11) www.webasto.us 19 Webasto Product N.A., Inc. ™ Troubleshooting – BlueCool Truck Electrical System Checking power inverter switching relay activation circuit Volts DC LEGEND 87 X11 86 87a 85 V DC PO ON Viewed from wire insertion side W ER OF 30 V F 30 On/Off Switch Circuit to Power Inverter 85 Brown 16GA - Ground 86 Blue 16GA - 12V Switched Output from System Control Relay (X10) + _ 87 On/Off Switch Circuit to Power Inverter 87a Not Used OFF AC C ON X11 X10 > 30 min. Key Switch Position To Inverter ON/OFF Circuit Figure 22. Power inverter switching relay activation circuit check Checking power inverter switching relay function (continuity through relay) Continuity LEGEND 87 X11 ON 86 87a 85 PO W ER Viewed from wire insertion side OF F 30 30 On/Off Switch Circuit to Power Inverter or 85 Brown 16GA - Ground 86 Blue 16GA - 12V Switched Output from System Control Relay (X10) + _ 87 On/Off Switch Circuit to Power Inverter 87a Not Used OFF AC C ON > 30 min. X11 X10 Key Switch Position NOTE! The power inverter must be switched OFF before testing for continuity through the relay. The relay must be energized or the system must be active when preforming this test. To Inverter ON/OFF Circuit Figure 23. Power inverter switching relay function check (continuity) Webasto Product N.A., Inc. 20 www.techwebasto.com ™ Troubleshooting – BlueCool Truck Electrical System Checking continuity through ambient temperature thermostat Continuity OFF AC C ON Key Switch Position or + _ Figure 24. Ambient temperature thermostat checks (continuity) Checking continuity through high/low refrigerant pressure switch Continuity OFF AC C ON Key Switch Position or + _ Figure 25. High/low refrigerant pressure switch checks (continuity) www.webasto.us 21 Webasto Product N.A., Inc. ™ Troubleshooting – BlueCool Truck Electrical System Checking 110 volts AC output of power inverter Volts AC V AC V + _ PO O A W E ER TE R OFF W ER ON AC C ON T DC O CP NV RI OFF Key Switch Position Inverter ON Allumez l'inverter To Refrigerant Compressor WARNING > 30 min. High Voltage! 115 Volts AC Haut Voltage! Courant alternatif de 115 volts Figure 26. DC to AC power inverter performance check (AC voltage) Checking condenser fan circuit Volts DC V DC V + _ AC ON C OFF Key Switch Position > 30 min. To Main System Harness To Condenser Fan Figure 27. Condenser fan circuit checks (DC voltage) Webasto Product N.A., Inc. 22 www.techwebasto.com ™ Troubleshooting – BlueCool Truck Electrical System 5.3 Malfunctions with System in Discharge Mode and Vehicle Key OFF (Sleeper Cooling) The following table lists the possible malfunctions. With the vehicle key in the OFF position, check operation of the air-handler by turning both knobs of the control panel on. A small green LED should illuminate. If the green LED does not illuminate and there is no air circulation through the air-handler, check fuses and battery connections. Repair as necessary. If this does not remedy the malfunction, follow the troubleshooting procedures listed in Table 8. If the LED does illuminate but air circulating fans and/or water pump do not function, follow the troubleshooting procedures listed in Table 8. Table 8. Malfunction of components during discharge mode (sleeper cooling) with key OFF Symptom/Malfunction Inspection Remedy Check 10 amp. fuse at fuse holder X2. 12 volts negative and/or positive not present at control module. Check for power on pin-1 (red wire) and ground on pin-2 (brown wire) of control module connector X1. Refer to Fig. 16, on pg. 17. Replace blown/defective fuse. Damaged or open circuit. Repair wiring or connections. No ground connection. Repair wiring or connections. No output to circulation fans at control module. With fan control turned on, check for output voltage at the 4 Replace control module. 2-pin connectors of the control module. Refer to Fig. 28, on pg. 23. One or more circulation fans not operating. Power present at 2-pin connector? Replace fan. With fan control turned on, check for power at the 2-pin connectors on the control module of the suspect fan. Refer to Power not present at 2-pin connector? Replace control module. Fig. 28, on pg. 23. Coolant circulation pump not With fan control on and cooling control on full, check for power at pin-4 (orange wire) and ground at pin-2 (brown operating. Control module wire) at control module connector X1. Refer to Fig. 29, on pg. malfunction suspected. 24. Power present at pin-4? Check circulation pump and wiring. Power not present at pin-4? Ensure there is a ground circuit at pin-2. If present, replace control module. Coolant circulation pump not With fan control on and cooling control on full, check for operating. Circulation pump power at circulation pump connector X8 (orange wire) and ground at (brown wire). Refer to Fig. 30, on pg. 25. malfunction suspected. Power and ground present? Replace circulation pump. Power or ground not present? Open circuit. Repair or replace harness. Checking air circulation fan circuits Volts DC OFF AC C ON V DC V Key Switch Position + _ Figure 28. Air circulation fan circuit checks (variable output DC voltage) www.webasto.us 23 Webasto Product N.A., Inc. ™ Troubleshooting – BlueCool Truck Electrical System Checking circulation pump circuit at control module Volts DC AC ON C OFF V DC V Key Switch Position + _ LEGEND 4 3 2 1 8 7 6 5 X1 Viewed from wire insertion side 1 Red 14GA - Constant Power Positive (Fused 10 amp.) 2 Brown 14GA - Constant Negative to all Components 3 Pink 16GA - 12V Positive Reference Signal to Control Module 4 Orange 14GA - 12V Switched Positive to Coolant Pump 5 Purple 16GA - 12V Switched Positive to Pressure Sensor (X6), Ambient Thermostat (X7) and System Control Relay (X10) 6 Not Used 7 Black 20GA - Storage Core Digital Temperature Sensor 8 White 20GA - Storage Core Digital Temperature Sensor Figure 29. Control module output to circulation pump circuit checks (DC voltage) Webasto Product N.A., Inc. 24 www.techwebasto.com ™ Troubleshooting – BlueCool Truck Electrical System Checking circulation pump circuit at pump Volts DC V DC OFF AC C + _ ON V Key Switch Position To Main System Harness To Circulation Pump X8 Figure 30. Circulation pump circuit checks (DC voltage) www.webasto.us 25 Webasto Product N.A., Inc. ™ Troubleshooting – Refrigerant Compressor 6. Troubleshooting – Refrigerant Compressor 6.1 6.2.2 Refrigeration and air conditioning devices are extremely complicated by nature. Servicing, repairing, and troubleshooting these products should be done only by those with the necessary knowledge, training, and equipment. General Information WARNING 110 VAC Device! Lethal current may be present. Switch off the DC to AC power inverter before servicing! Never service, repair, or troubleshoot unless you are a professional air conditioning/refrigeration service person. Improper servicing can lead to serious injury or death from fire, electric shock, or explosion. WARNING The BlueCool Truck System uses a specifically designed refrigerant compressor for this assembly. The compressor electrical motor is the type, PSC with external surface mounted thermal and current overload protection. This system also uses a run capacitor and a start capacitor with an internal relay. 6.2.3 6.2.1 Terminal Venting and Electrocution Improperly servicing, repairing, or troubleshooting a compressor can lead to electrocution or fire due to terminal venting with ignition. Follow the precautions below to avoid serious injury or death from electrocution or terminal venting with ignition. The electrical system of this type of compressor motor is shown in Fig. 34, on pg. 34. 6.2 Trained Personnel Only General Service and Safety Precautions Concerning Refrigerant Compressors 6.2.4 Fire Hazard from Terminal Venting with Ignition Oil and refrigerant can spray out of the compressor if one of the terminal pins is ejected from the hermetic terminal. This “terminal venting” can occur as a result of a ground fault (also known as a short circuit to ground) in the compressor. The oil and refrigerant spray from terminal venting can be ignited by electricity and produce flames that can lead to serious burns or death. When spray from terminal venting is ignited this is called “terminal venting with ignition.” Introduction The following information and procedures are courtesy of Tecumseh Products Company. Certain information that does not pertain to the BlueCool Truck System may have been intentionally omitted from the original text for purposes of clarity. In the interest of promoting safety in the refrigeration and air conditioning industry, Tecumseh Products Company has prepared the following information to assist service personnel in safely installing and servicing equipment. This section covers a number of topics related to safety. However, it is not designed to be comprehensive or to replace the training required for professional service personnel. 6.2.5 Terminal Venting and Electrocution Precautions To reduce the risk of electrocution, serious burns, or death from terminal venting with ignition: • Disconnect ALL electrical power before removing the protective terminal cover. Make sure that all power legs are open. (NOTE: The system may have more than one power supply, e.g. Auxiliary Shore Power.) • Never energize the system unless: 1) the protective terminal cover is securely fastened, and 2) the compressor is properly connected to ground. Fig. 31 and Fig. 32, on pg. 27 illustrates the means of fastening the protective terminal cover. Webasto Product N.A., Inc. 26 www.techwebasto.com ™ Troubleshooting – Refrigerant Compressor • 6.2.6 Never reset a breaker or replace a fuse without first checking for a ground fault (a short circuit to ground). Contact with refrigerant, mixtures of refrigerant and oil, or other chemicals can cause a variety of injuries including burns and frostbite. For example, if refrigerant contacts skin or eyes it can cause severe frostbite. Also, in the event of a compressor motor failure, some refrigerant and oil mixtures can be acidic and cause chemical burns. An open fuse or tripped circuit breaker is a strong indication of a ground fault. To check for a ground fault, use the procedure outlined in “Identifying Compressor Electrical Problems” on page 31. • • Be alert for sounds of arcing (sizzling, sputtering or popping) inside the compressor. If you hear these sounds, IMMEDIATELY move away from the area of the compressor. To avoid injury, wear appropriate protective eye wear, gloves, and clothing when servicing an air conditioning or refrigeration system. Refer to your refrigerant supplier for more information. Disconnect power before servicing. Always disconnect power before servicing, unless it is required for a specific troubleshooting technique. In these situations, use extreme caution to avoid electric shock. 1 Refrigerants and Other Chemicals If refrigerant or mixtures of refrigerant and oil come in contact with skin or eyes, flush the exposed area with water and get medical attention immediately. 6.2.7 2 Compressor Removal Failure to properly remove the compressor can result in serious injury or death from electrocution, fire or sudden release of refrigerant and oil. Follow these precautions when removing a compressor from a system: • Disconnect ALL electrical power. Disconnect all electrical power supplies to the system, making sure that all power legs are open. (NOTE: The system may have more than one power supply.) • Figure 31. Compressor with protective cover (1) held in place by a hex-nut (2) Be sure refrigerant is recovered using the appropriate equipment before removing compressor. Attempting to remove the compressor before removing all refrigerant from the system can cause a sudden release of refrigerant and oil. Among other things, this can: 3 • Cause a variety of injuries including burns and frost bite. • Expose service personnel to toxic gas. 4 To avoid serious injury or death, be sure to remove and recover all refrigerant before removing the compressor. Figure 32. Thermal protection (3) and hermetically sealed terminals (4) shown with protective cover removed. www.webasto.us 27 Webasto Product N.A., Inc. ™ Troubleshooting – Refrigerant Compressor 6.2.8 System Flushing, Purging, and Pressure Testing for Leaks Gauges Failure to properly flush, purge, or pressure test a system for leaks can result in serious injury or death from explosion, fire or contact with acid-saturated refrigerant or oil mists. Regulating Valve To System DRY NITROGEN Webasto recommends that the system be serviced using a flush and purge station such as a Robinair® unit or similar equipment designed for R134a refrigerant systems. Relief Device 175 PSIG Setting Follow these precautions when flushing/purging a system or pressure testing a system for leaks: • Use flushing products according to the manufacturer’s instructions. • To purge a system, use only dry nitrogen. • When pressure testing for leaks, use only regulated dry nitrogen or dry nitrogen plus trace amounts of the serial label refrigerant, in this case, R134a. • • • Oxygen can explode on contact with oil. • Acetylene can decompose and explode when exposed to pressures greater than approximately 15 PSIG. Use a pressure relief valve. In addition to a pressure regulating valve and gauges, always install a pressure relief valve. This can also be a frangible disc type pressure relief device. This device should have a discharge port of at least 1/2” MPT size. The valve or frangible disc device must be set to release at 175 PSIG (see Fig. 33). When purging or pressure testing any refrigeration or air conditioning system for leaks, never use air, oxygen or acetylene. • • Figure 33. Dry nitrogen cylinder with attached pressure regulating and relief valves and pressure gauges needed for pressure testing for leaks and purging. • Combining an oxidizing gas, such as oxygen or air, with an HCFC or HFC refrigerant under pressure can result in a fire or explosion. Do not pressurize the system beyond 150 PSIG field leak test pressure. When field testing a system for leaks, 150 PSIG is adequate test pressure. Use a pressure regulating valve and pressure gauges. • Commercial cylinders of nitrogen contain pressures in excess of 2000 PSIG at 70°F. At pressures much lower than 2000 PSIG, compressors can explode and cause serious injury or death. To avoid over pressurizing the system, always use a pressure regulating valve on the nitrogen cylinder discharge (see Fig. 33). The pressure regulator must be able to reduce the pressure down to 1 or 2 PSIG and maintain this pressure. Disconnect nitrogen cylinder and evacuate the system before connecting the refrigerant container. Disconnect the nitrogen cylinder and release the pressure in the system before connecting a refrigerant container to the system. The higher pressure gas in the system can explode the refrigerant container. The regulating valve must be equipped with two pressure gauges: • one gauge to measure cylinder pressure, and • one gauge to measure discharge or down stream pressure. Webasto Product N.A., Inc. 28 www.techwebasto.com ™ Troubleshooting – Refrigerant Compressor 6.2.9 System Charging the vicinity. Failure to properly charge the system can result in serious injury or death from explosion or fire. Water-utilizing systems that have single-wall heat exchangers may present a risk of explosion. Such systems may include: Follow these precautions when charging a system. • Do not operate the compressor without a charge in the system. Operating the compressor without a charge in the system can damage the hermetic terminal. As always, to avoid serious injury or death from terminal venting with ignition, never energize the compressor unless the protective terminal cover is securely fastened. • water source heat pump/air conditioning systems, and • water cooling systems, such as ice makers, water coolers, and juice dispensers. ATTENTION Although the BlueCool Truck System does not apply to this category of systems, it is still possible to inadvertently introduce water into the refrigerant circuit during repair. Therefore, it is extremely important that proper care is used whenever refrigerant lines are opened during repair. Lines should be temporarily blocked to avoid water incursion. Always practice proper purging and evacuation procedures when recharging the system. Use proper refrigerant. Use only R134a refrigerant when charging the system. Using a different refrigerant can lead to excess system pressure and an explosion. Use of a refrigerant other than the serial label refrigerant will void the compressor warranty. • • Do not overcharge a refrigerant or air conditioning system. 6.2.11 Start Capacitor Overheating An overheated start capacitor can burst and spray or splatter hot material which can cause burns. Applying voltage to a start capacitor for more than a few seconds can cause the capacitor to overheat. Overcharging a refrigeration or air conditioning system can result in an explosion. To avoid serious injury or death, never overcharge the system. Always use proper charging techniques. Limit charge amounts to those specified in the original equipment manufacturer’s service information. In the case of the BlueCool Truck system, the maximum refrigerant charge capacity using R134a is 1.85 lb (0.84 kg). Check capacitors with a capacitance meter, and never check a capacitor with the power on. 6.2.12 System Evacuation Never use a compressor to evacuate a system. Instead, use a high vacuum pump specifically designed for that purpose. Overcharging the system immerses the compressor motor, rotor, and related parts in liquid refrigerant. This creates a hydraulic block preventing the compressor from starting. The hydraulic block is also known as locked rotor. Never start the compressor while it is under deep vacuum. Always break a vacuum with refrigerant charge before energizing the compressor. Continued supply of electricity to the system causes heat to build in the compressor. This heat will eventually vaporize the refrigerant and rapidly increase system pressure. If, for any reason, the thermal protector fails to open the electrical circuit, system pressure can rise to high enough levels to cause a compressor housing explosion. Failure to follow these instructions can damage the hermetic terminal. As always, to avoid serious injury or death from terminal venting with ignition, never energize the compressor unless the protective terminal cover is securely fastened. 6.2.10 Prevention of System Explosions 6.2.13 Follow the Labels In certain water-utilizing refrigeration systems, water can leak into the refrigerant side of the system. This can lead to an explosion of system components, including but not limited to, the compressor. If such an explosion occurs, the resulting blast can kill or seriously injure anyone in Tecumseh Products Company compressors have labels and markings with important information. For your safety and the safety of others, read the labels and markings on the product. www.webasto.us 29 Webasto Product N.A., Inc. ™ Troubleshooting – Refrigerant Compressor 6.3 Troubleshooting Table – Refrigerant Compressor and Related Components For your safety, read and follow the “General Service and Safety Precautions Concerning Refrigeration Compressors” on page 26. This section provides information to assist service personnel in identifying compressor problems. It provides a general troubleshooting table that relates complaints or problems to possible causes and solutions. This section also provides greater detail about specific compressor problems. This Troubleshooting Table is not designed to replace the training required for a professional air conditioning/ refrigeration service person, nor is it comprehensive. Table 9. Troubleshooting Table – Refrigerant Compressor and Related Components Symptom Possible Causes Compressor will not start – Thermal protector not working properly. no audible hum Remedy See “Identifying Compressor Electrical Problems” on page 31. Wiring improper or loose. Check against wiring diagram and wire properly. Compressor motor has a ground fault (also known as a short circuit to ground). See “Identifying Compressor Electrical Problems” on page 31. Compressor will not start – Improperly wired. hums but trips on thermal Low voltage to compressor. protector Compressor electrical problems: a. Compressor motor has a winding open or shorted. b. Start capacitor not working properly. c. Relay does not close. Internal mechanical troubles in compressor. Improperly wired. Compressor starts, but does not switch off of start Low voltage to compressor. winding Compressor electrical problems: a. Compressor motor has a winding open or shorted. b. Relay failing to open. c. Run capacitor not working properly. Check against wiring diagram and wire properly. Turn off system until proper voltage is restored. See “Identifying Compressor Electrical Problems” on page 31. Same as “a”. Same as “a”. See “Checking for Adequate Compressor Pumping” on page 35. Check against wiring diagram and wire properly. Turn off system until proper voltage is restored. See “Identifying Compressor Electrical Problems” on page 31. Same as “a”. Same as “a”. Discharge pressure too high. Internal mechanical trouble in compressor. Compressor starts and runs, but short cycles on thermal protector Too much current passing through thermal protector: a. Extra sources of current draw. b. Compressor motor has winding shorted. See “Checking for Adequate Compressor Pumping” on page 35. Check for extra sources of current passing through thermal protector, such as fan motors, pumps. (This would be extremely rare as the BCT system is not designed for such use.) See “Identifying Compressor Electrical Problems” on page 31. Low voltage to compressor. Turn off system until proper voltage is restored. Compressor electrical problems, such as thermal protector or run capacitor not working properly. See “Identifying Compressor Electrical Problems” on page 31. Discharge pressure too high. Suction pressure too high. Return gas too warm. Webasto Product N.A., Inc. Check condenser fan for malfunction 30 www.techwebasto.com ™ Troubleshooting – Refrigerant Compressor Table 9. Troubleshooting Table – Refrigerant Compressor and Related Components Symptom Possible Causes Remedy Unit runs OK, but run cycle System components, such as digital temperature sensor, is shorter than normal (due control module, relays, not functioning properly. to component (s) other High pressure cut-out due to: than thermal protector) a. Insufficient air or coolant supply. b. Overcharge or refrigerant. c. Air in system. Unit operates long or continuously System rattles or vibrates during operation. 6.4 Refer to the BCT “Troubleshooting - BlueCool Truck Electrical System” starting on page 14. Refer to the BCT service information. Same as “a”. Same as “a”. Low pressure cut-out due to: a. Refrigerant leaking. b. Undercharge of refrigerant. c. Restriction in Thermal Expansion Valve. Refer to the BCT service information. Same as “a”. Same as “a”. Undercharge of refrigerant. Refer to the BCT service information. System components, such as digital temperature sensor, control module, relays, not functioning properly. Refer to the BCT service information. Restriction in refrigeration circuit. Refer to the BCT service information. Dirty condenser. Refer to the BCT service information. Loose parts or mountings, tubing rattle, bent fan blade causing vibration, fan motor bearings worn, etc. Refer to the BCT service information. Identifying Compressor Electrical Problems by electricity and produce flames that can lead to serious burns or death. If this spray is ignited it is called “terminal venting with ignition”. This section describes procedures for checking the compressor’s electrical circuits and components. Before doing so, follow the BlueCool Truck System service information under “Troubleshooting – BlueCool Truck Electrical System” starting on page 14 to make sure the system is getting proper voltage and that the digital temperature sensor, control module, and relays are working properly. To reduce the risk of electrocution, serious burns or death from terminal venting with ignition: • Disconnect ALL electrical power before removing the protective terminal cover. • Never energize the system unless: Whenever you suspect that there is an electrical problem with the compressor (for example, there has been a tripped circuit breaker): • FIRST, check for a ground fault (also known as a short circuit to ground) in the motor using a megohmmeter (“megger”) or a Hi-Potential Ground Tester (“Hi-Pot”) (Section 6.4.1). • SECOND, check the motor windings for proper continuity and resistance (Section 6.4.2). • THIRD, check the compressor’s electrical components (Section 6.4.3). • the protective terminal cover is securely fastened, and • the compressor is properly connected to ground. • Never reset a breaker or replace a fuse without first checking for a ground fault. An open fuse or tripped circuit breaker is a strong indication of a ground fault. • Be alert for sounds of arcing (sputtering or popping) inside the compressor. If you hear these sounds, IMMEDIATELY move away from the area of the compressor. When checking for electrical problems, it is important to follow all safety precautions (see warning below) and use the proper equipment and procedures. WARNING Oil and refrigerant can spray out of the compressor if one of the terminal pins is ejected from the hermetic terminal. This can occur as a result of a ground fault in the compressor. The oil and refrigerant spray can be ignited www.webasto.us 31 Webasto Product N.A., Inc. ™ Troubleshooting – Refrigerant Compressor 6.4.1 Checking for a Ground Fault (a Short to Ground) fault. Do not reconnect the power leads. Tape and insulate each power lead separately. Step 1: Disconnect Power Disconnect all electrical power supplies to the system, making sure that all power legs are open. (NOTE: The system may have more than one power supply.) If a ground fault does not exist, leave the power off and all external components disconnected from the terminal pins. Check for continuity and proper resistance using the procedure in Section 6.4.2. Step 2: Check for a Ground Fault Remove the protective terminal cover. If there is any evidence of overheating at any lead, this is a good indication that a compressor motor problem exists. At this time, do not replace or attach leads or connectors that have been damaged by overheating. Disconnect leads and/or remove all components (such as relays and capacitors) from the terminal pins. CAUTION If a capacitor is present, using a 20,000 ohm resistor, discharge it before removing it from the system to avoid damage to measuring devices and risk of electric shock. When removing a current type relay, keep it upright. Check the compressor for a ground fault using either a megohmmeter (“megger”) or a Hi-Potential Ground Tester (“Hi-Pot”). WARNING To reduce the risk of electrocution, always follow the manufacturers’ procedures and safety rules when using these devices. Connect one lead of either the megger or Hi-Pot to the copper suction line. Connect the other lead to one of the terminal pins. Repeat this procedure for the two remaining terminal pins. If the instrument indicates any resistance less that 2 megohms between any pin and the housing (copper suction line), a ground fault exists. WARNING To avoid electric shock, electrocution, and terminal venting with ignition do not energize a compressor that has a ground fault. If a ground fault exists, keep the power off and replace the compressor. See “System Cleanup and Compressor Replacement After Compressor Failure” starting on page 36. If the compressor is not replaced immediately, mark and red tag the compressor to indicate there is a ground Webasto Product N.A., Inc. 32 www.techwebasto.com ™ Troubleshooting – Refrigerant Compressor 6.4.2 Checking for Continuity and Proper Resistance heater element of the thermal protector is open. Use the procedure in Table 10, “Checking for Proper Continuity and Resistance,” on page 33 to check the single phase motor. If no ground fault has been detected using the procedures in Section 6.4.1, determine whether there is an open or short circuit in the motor windings or if the Table 10. Checking for Proper Continuity and Resistance Step 1: Allow Thermal Protector to Reset When servicing single compressors with internal thermal protectors, be sure to allow time for the thermal protector to reset prior to starting these electrical wiring checks. For some compressors, the internal thermal protector may take as long as an hour to reset. Step 2: Check Continuity Check the start winding by measuring continuity between terminal pins C and S. (See “Identification of Hermetic Terminal” on page). If there is no continuity, replace the compressor. See “System Cleanup and Compressor Replacement After Compressor Failure” starting on page 36. Check the run winding by measuring continuity between terminal pins C and R. If there is no continuity, replace the compressor. Step 3: Measure the Resistance Measure the resistance (ohms) between each pair of terminal pins: C and S, C and R, and S and R. Add the resistance between C and S to the resistance between C and R. This sum should equal the resistance found between S and R. A small deviation in this comparison is acceptable. Proper resistance may also be confirmed by comparing measured resistance to the resistance specifications for the specific compressor model. Call 1800-211-3427 to request resistance specifications. If the resistance is not correct, replace the compressor. See “System Cleanup and Compressor Replacement After Compressor Failure” starting on page 36. If the resistance is correct, leave the leads off and follow the instructions in the next section to check other compressor electrical components. www.webasto.us 33 Webasto Product N.A., Inc. ™ Troubleshooting – Refrigerant Compressor Checking for Other Electrical Problems in Single Phase Motors mounted thermal and current overload protection. This system also uses a run capacitor and a start capacitor with an internal relay. This section provides procedures for checking the components such as the thermal protector, relay and capacitor in a single phase compressor. The electrical system of this type of compressor motor is shown in Fig. 34. Overheat/Overload Protector Line 1 + 60 VAC (Black) Black C Start Winding DC/AC Power Inverter The BlueCool Truck System uses a specifically designed refrigerant compressor for this assembly. The compressor electrical motor is the type, PSC with external surface Line 2 – 60 VAC (White) Ground (Green) Red/Black Stripe Run Capacitor S Black Start Capacitor (with relay) Main Motor Winding 6.4.3 Black White White R Green Compressor Housing Compressor Unit Ground Figure 34. PSC Compressor Motor with External Thermal/ Current Protector, Run Capacitor and Start Capacitor Table 11. Troubleshooting PSC Compressor Circuits Step 1: Before Continuing with Troubleshooting... WARNING All electric power should be disconnected and you should have already made sure that the compressor does not have a ground fault (see “Checking for a Ground Fault” on page 32). You should have also checked the windings for continuity and proper resistance (see “Checking for Continuity and Proper Resistance” on page 33) making sure the system is getting proper voltage and that all controls, thermostats, etc. are working properly. Step 2: Check Wiring Confirm that there is continuity between C and the thermal protector common lead wire. Step 3: Check External Thermal Protector Check for continuity across the thermal protector. If there is no continuity, then the thermal protector may be tripped. Wait at least 5 minutes, then check continuity again. If there is still no continuity, replace the thermal protector. Webasto Product N.A., Inc. 34 www.techwebasto.com ™ Troubleshooting – Refrigerant Compressor Table 11. Troubleshooting PSC Compressor Circuits Step 4: Check Run Capacitor CAUTION Using a 20,000 ohm resistor; discharge the capacitor before removing it from the system to avoid damage to measuring devices and risk of electric shock. Disconnect the run capacitor from the system. Use a capacitance meter to check capacitor. Capacitance should be ±10% of the marked capacitor value. As an alternative, check the run capacitor by measuring continuity across the capacitor terminals: a. Rx1 scale: If there is continuity, then the capacitor is shorted out and needs to be replaced. b. Rx100,000 scale: If a digital multi-meter (DMM) indicates infinite resistance, then the run capacitor is open and needs to be replaced. Possible reasons that a run capacitor is not working properly include: • Use of incorrect run capacitor. Replace with proper run capacitor. • Line voltage is too high (greater than 110% of rated voltage). • Rust-through of capacitor housing or severe corrosion of terminals. Replace with new capacitor (Webasto now offers a weather protected replacement). Step 5: Reconnect Run Capacitor Reconnect the run capacitor into circuit as before. (See wiring schematic in Fig. 35, on pg. 38.) Observe color code markings on schematic. Step 6: Continue Troubleshooting If all the above tests prove satisfactory and unit still fails to operate properly, check for adequate compressor pumping as outlined in the procedure on page 35. 6.5 Checking for Adequate Compressor Pumping In the field, it can be determined if a compressor is eligible for return under warranty by FIRST checking for adequate compressor pumping. If the compressor passes all electrical troubleshooting tests and pumps adequately, the compressor is operating properly and the problem lies elsewhere in the system. Before checking for adequate compressor pumping, you should have already checked for compressor electrical problems as outlined in “Identifying Compressor Electrical Problems” starting on page 31. A. Check the Compressor for Electrical Problems To check for adequate pumping, connect service gauges to system. Then turn on power to system. If the system has an adequate refrigerant charge, the compressor should maintain at least 200 psig pressure differential between the suction and discharge. If the compressor does not pump adequately, it must be replaced with no further testing. 6.6 Using the procedures in “Identifying Compressor Electrical Problems” starting on page 31, check the compressor for electrical problems. B. Check for Adequate Compressor Pumping Connect services gauges to the system. Turn on power to system. If the system has an adequate refrigerant charge, the compressor should maintain at least 200 psig pressure differential between the suction and discharge. If the compressor does not pump adequately, it must be replaced with no further testing. Is Your Compressor Eligible for Return Under Warranty? Authorized Tecumseh wholesalers are asked to test every in-warranty compressor that is returned to them. The Tecumseh factory tears down and examines a representative sample of compressors returned by authorized wholesalers and notes the reason for failure. www.webasto.us 35 Webasto Product N.A., Inc. ™ Compressor Replacement and System Service 7. Compressor Replacement and System Service 7.1 evidence of contamination, the compressor was running at the time of the motor failure and contaminants were pumped throughout the system (System Contamination). If System Contamination has occurred, several changes of the liquid and suction line filter-driers will be needed to cleanup the system. In addition, the thermal expansion valve will need to be replaced. System Cleanup and Compressor Replacement After Compressor Failure B. Install Replacement Compressor and Components Once you determine that a compressor needs to be replaced you must then determine whether the system has been contaminated. Compressor motor failure can lead to such contamination. (While compressor motor failure is sometimes referred to as motor “burnout”, it does not mean that a fire actually occurs inside a hermetic compressor.) Even small amounts of contamination must be removed from the system to avoid damaging the replacement compressor. Therefore, it is important to thoroughly clean a refrigeration/air conditioning system if system contamination is present. WARNING 1. Install the replacement compressor with new external electrical components (capacitors, relay, overload, etc., where applicable). 2. Install an oversized liquid line filter-drier. 3. Install a generously sized suction line filter-drier immediately upstream of the compressor. The drier when permanently installed in a clean system must have a pressure drop not more than 2 psi, or initially installed in a dirty system temporarily, must have a pressure drop not more than 9 psi. Pressure taps must be supplied immediately before and after the suction filter-drier to permit the pressure drop to be measured. If a compressor motor failure has occurred, refrigerant or mixtures of refrigerant and oil in the system can be acidic and cause chemical burns. As always, to avoid injury, wear appropriate protective eye wear, gloves and clothing when servicing an air conditioning or refrigeration system. If refrigerant or mixtures of refrigerant and oil come in contact with skin or eyes, flush the exposed area with water and get medical attention immediately. If a suction line accumulator is present and System Contamination has occurred, it must be thoroughly flushed to remove any trapped sludge and thus prevent if from plugging the oil return hole. The filter-drier should be installed upstream of the accumulator and the compressor. The following outlines a process for compressor replacement and system clean-up for a system equipped with a Tecumseh compressor. You should refer to the original equipment manufacturers (OEM) service information. In case of Compressor Housing Contamination, the filter-drier should be installed between the compressor and the suction line accumulator. Rubber refrigeration hoses are not satisfactory for temporarily hooking up the suction line filter-drier to the system since the acid quickly breaks down the rubber and plastic. A. Determine Extent of System Contamination Following the precautions in “Refrigerants and Other Chemicals” and “Compressor Removal” on page 27, remove the compressor. 4. Follow the Precautions in “System Flushing, Purging, and Pressure Testing for Leaks” on page 28, to purge the system and pressure test for leaks. Use the following guidelines to determine whether contamination, if any, is limited to the compressor or extends to the system. C. Evacuate the System Evacuate the system to less than 1000 microns, using a good vacuum pump (not a compressor) and an accurate high vacuum gauge. Operate the pump at 1000 microns, or less, for several hours to be sure the vacuum is maintained. If the discharge line shows no evidence of contamination and the suctions tub is clean or has only light carbon deposits, then the contaminants are limited to the compressor housing (Compressor Housing Contamination). A single installation of liquid and suction line filter-driers should clean up the system. Alternate method of removing moisture and noncondensable material from the systems is: If, however, the discharge line or the suction line shows Webasto Product N.A., Inc. 36 www.techwebasto.com ™ Compressor Replacement and System Service Compressor and Components” on page 36. 1. Evacuate the system to 29 inches vacuum. Break vacuum with refrigerant to be used for final charging of system and vapor charge to 35-50 pounds gauge pressure. Leave vapor charge in system for a minimum of five minutes. Reduce pressure to 0 gauge pressure. On the other hand, where Systems Contamination occurred, an increased pressure drop will be measured. Change the suction filter-drier and the liquid line filterdrier whenever the pressure drop approached or exceeds 9 psi allowed for temporary operation during cleanup. 2. Repeat step 1. Keep changing both the suction and liquid line filterdriers until the pressure drop stabilizes at or below 2 psi for permanent operations in a system (see “Install Replacement Compressor and Components” on page 36). At this point, it is the service person’s option as to whether to leave the suction drier in the system or remove it from operation. 3. Evacuate system to 29 inches vacuum. Charge system with the specified kind and quantity of refrigerant. WARNING Never use a compressor to evacuate a system. Instead, use a high vacuum pump specifically designed for that purpose. If the system is to be opened to permit the permanent removal of the suction filter-drier then the liquid line filter-drier should be changed once more. Never start the compressor while it is under deep vacuum. Always break a vacuum with refrigerant charge before energizing the compressor. F. Test for Acidity if Multiple Motor Failures Have Occurred Failure to follow these instructions can damage the hermetic terminal and may result in terminal venting. As always, to reduce the risk of serious injury or death from fire due to terminal venting, never energize the compressor unless the protective terminal cover is securely fastened. If the system has suffered multiple motor failures, it is advisable that the oil of the replacement be tested after Section E and judged acid free before the system is considered satisfactorily cleaned. An oil sample may be taken from a hermetic system if at the time the replacement compressor was installed an oil trap is installed in the suction line (see Fig. XXX). D. Charge the System and Check the Pressure Drop Charge the system and place in operation. Follow the safety precautions outlined in “System Charging” on page 29. Immediately after startup, check the pressure drop across the suction line filter-drier. This will serve two purposes: • Verify that the drier selection was correct; that is, large enough. When the trapped oil level appears in the sight glass (less than an ounce is needed) the oil may be slowly transferred to the beaker of the acid test kit as available from several manufacturers. A reading of less that 0.05 acid number is an indication that the system is free of acid. A reading of higher than 0.05 means continued cleaning is required. Return to B2 on page 36. • Serve as a base point to which subsequent pressure checks can be compared. G. Monitor the System The above procedure for the cleanup of hermetic systems after motor failure through the use of suction line filterdrier will prove satisfactory in most instances provided the system is monitored and kept clean by repeated drier changes, if such are needed. The failure to follow these minimum cleanup recommendations will result in an excessive risk of repeat motor failure. Because the permissible pressure drop across the drier is relatively small, it is suggested that a differential pressure gauge be used for the measurement. E. Measure the Pressure Drop After the system has been operating for an hour or so, measure the pressure drop across the suction line filterdrier. In the case of Compressor Housing Contamination, little change should be noted. The pressure drop will, in most instances, be below that tolerable for a permanent installation as described in “Install Replacement www.webasto.us 37 Webasto Product N.A., Inc. SIGNAL "ON" FROM CONTROLLER (30MIN DELAY) X1 1 2 X7 X6 HI/LOW PRESSURE LIMITER X6 X7 AMBIENT SENSOR 5 VIOLET p t A B X5 BLACK RED 1 2 M BLUE X9 CONDENSER FAN BATTERY - BATTERY + DIGITAL THERMOMETER STORAGE/CHARGE X8 COOLANT PUMP M B A 8 7 2 4 CONTROL UNIT (IN AIR HANDLER) KEY ON SIGNAL +12VDC BY INSTALLER BATTERY - 8 7 6 5 REAR VIEW 4 3 2 1 3 PINK BROWN VIOLET BATTERY + ORANGE X2 10A BROWN RED BLACK BATTERY + AC BLUE 120VAC 60HZ 85 30 86 87 87a X11 BLACK BROWN ON/OFF SWITCH 12V DC RELAY 12 VOLT COIL INVERTER CONDENSER FAN SWITCHED 30 85 86 87 87a X10 F3 DC 10 - 15VDC INVERTER INTERNALLY FUSED BLACK C R COMPRESSOR RUN CAPACITOR V V S START CAPACITOR LINE V -60VAC LINE V +60VAC GROUND WHITE X4 20A BLACK RED BLACK WHITE WHITE BLACK 38 BROWN BLUE WHITE BLACK Webasto Product N.A., Inc. RED/BLACK STRIPE RED BLACK V V GREEN TEMPERATURE/ CURRENT LIMITER V V Circuit Diagrams ™ 8. Circuit Diagrams Figure 35. Wiring Schematic (Early Version) www.techwebasto.com ™ Component Replacement - Refrigeration Unit 9. Component Replacement Refrigeration Unit • Be sure refrigerant is recovered using the appropriate equipment before removing any of the refrigeration circuit components. Attempting to remove components before removing all refrigerant from the system can cause a sudden release of refrigerant and oil. Among other things, this can: • Cause a variety of injuries including burns and frost bite. • Expose service personnel to toxic gas. To avoid serious injury or death, be sure to remove and recover all refrigerant before removing components of the refrigeration circuit. 9.2 Replace the compressor only after all other possible causes for compressor malfunction have been ruled out according to the troubleshooting procedures in Section 5 and Section 6. Figure 36. Refrigeration Unit 9.1 General Information and Safety Precautions Before beginning work, refer to “Compressor Replacement and System Service” on page 36. Refrigeration and air conditioning devices are extremely complicated by nature. Servicing, repairing, and troubleshooting these products should be done only by those with the necessary knowledge, training, and equipment. Before replacement of components, a thorough troubleshooting and diagnosis of the BlueCool Truck system must be conducted to identify the reason for the component failure and the correct remedy. WARNING WARNING 1. Switch the power inverter OFF. 2. Remove refrigeration unit cover. Be sure refrigerant is recovered using the appropriate equipment before removing the compressor. Webasto recommends that the system be serviced using a recovery, recycling and recharging station such as a Robinair® unit or similar equipment designed for R134a refrigerant systems. Never service, repair, or troubleshoot unless you are a professional air conditioning/refrigeration service person. Improper servicing can lead to serious injury or death from fire, electric shock, or explosion. 3. Remove protection cap on top of compressor. 4. Disconnect wiring. Refer to Fig. 35, on pg. 38 when reconnecting wires after compressor replacement. 5. Disconnect refrigerant lines from compressor. Protect open lines with plastic caps or wrap to prevent the ingress of moisture and contaminates. Failure to properly remove the compressor and related components can result in serious injury or death from electrocution, fire or sudden release of refrigerant and oil. 6. Remove the band clamp securing the compressor to the enclosure. 7. Remove the 3 hex-nuts holding the compressor to the enclosure base. Follow these precautions when removing components from the refrigeration circuit: • 8. Remove compressor. 9. Inspect compressor for possible contamination by dirt, water, etc. If contaminated, service system according to the precautions and recommendations in Section 6.2.8 after replacing the compressor. Disconnect electrical power. Switch the power inverter OFF. Ensure it remains off while working on and around the compressor. (NOTE: The system may have more than one power supply.) www.webasto.us Compressor Replacement 39 Webasto Product N.A., Inc. ™ Component Replacement - Refrigeration Unit 9.3 10. Install new compressor in reverse order of removal and service system according to the precautions and recommendations beginning with Section 6.2.9. Condenser Replacement Read over Section 9.1 before proceeding with condenser replacement. Torque 6.0 lb-ft. 1. Switch the power inverter OFF. 2. Remove refrigeration unit cover. Be sure refrigerant is recovered using the appropriate equipment before removing the condenser. Webasto recommends that the system be serviced using a recovery, recycling and recharging station such as a Robinair® unit or similar equipment designed for R134a refrigerant systems. Torque 11.0 lb-in. 3. Disconnect refrigerant lines from condenser. Protect open lines with plastic caps or wrap to prevent the ingress of moisture and contaminates. 4. Remove the top plate over the condenser (4 screws). 5. Remove the 2 screws and 2 nuts holding the right side support to the base. 6. Remove the 3 screws holding the condenser to the feft side support and pull condenser free. 7. Inspect condenser for possible contamination by dirt, water, etc. If contaminated, service system according to the precautions and recommendations in Section 6.2.8 after replacing the condenser. Torque 27.5 lb-ft. 8. Install new condenser in reverse order of removal and service system according to the precautions and recommendations beginning with Section 6.2.9. Torque 28.5 lb-ft. Torque 27.5 lb-ft. Torque 12.5 lb-ft. Figure 38. Condenser replacement Figure 37. Compressor replacement Webasto Product N.A., Inc. 40 www.techwebasto.com ™ Component Replacement - Refrigeration Unit 9.4 Thermal Expansion Valve (TXV) Replacement 6. Remove the 2 allen head bolts securing the TXV to the storage core pipes. 7. Pull the TXV free of the storage core pipes. Read over Section 9.1 before proceeding with TXV replacement. 8. Inspect TXV and lines for possible contamination by dirt, water, etc. If contaminated, service system according to the precautions and recommendations in Section 6.2.8 after replacing the condenser. 1. Switch the power inverter OFF. 2. Remove refrigeration unit cover. 9. Before installing the new TXV and O-rings, inspect the storage core pipes and refrigerant lines for any burs. Clean up with fine emory or crocus cloth. Be sure refrigerant is recovered using the appropriate equipment before removing the TXV. Webasto recommends that the system be serviced using a recovery, recycling and recharging station such as a Robinair® unit or similar equipment designed for R134a refrigerant systems. 10. Coat storage core pipes and new O-rings with POE oil and place O-rings on storage core pipes. 11. Install new TXV in reverse order of removal. 3. Remove the protection cover and fasteners. 12. Coat refrigerant line ends and new O-rings with POE oil and connect to TXV. 4. Remove the allen head bolt securing the refrigerant lines to the TXV. 13. Continue reassembly in reverse order of removal 5. Pull refrigerant lines free. Protect open lines with plastic caps or wrap to prevent the ingress of moisture and contaminates. 14. Service system according to the precautions and recommendations beginning with Section 6.2.9. Torque 12.5 lb-ft. Figure 39. Thermal Expansion Valve replacement www.webasto.us 41 Webasto Product N.A., Inc. ™ Component Replacement - Refrigeration Unit 9.5 Pressure Switch Replacement 9.6 Read over Section 9.1 before proceeding with TXV replacement. Condenser Fan Replacement 1. Switch the power inverter OFF. 2. Disconnect the condenser fan connector. 1. Switch the power inverter OFF. 3. Remove refrigeration unit cover. 2. Remove refrigeration unit cover. 4. Remove the cover plate over the fan and condenser. Be sure refrigerant is recovered using the appropriate equipment before removing the pressure switch. Webasto recommends that the system be serviced using a recovery, recycling and recharging station such as a Robinair® unit or similar equipment designed for R134a refrigerant systems. 5. Remove the 4 bolts securing the condenser fan assembly to the back-wall of the enclosure. 6. Lift the fan assembly up and out. 7. Replace fan. 8. Reassembly in reverse order of removal. 3. Remove terminals from top of switch. 9. Perform system checks to ensure proper operation. 4. Remove switch. 5. Install the replacement switch using a NEW O-ring. 6. Torque to specification. 7. Apply an anti-corrosive electrical grease to the terminals and connect to switch. 8. Service system according to the precautions and recommendations beginning with Section 6.2.9. Close-in view Torque 15 lb-ft. O-ring Torque 10-12 lb-in. Figure 41. Condenser Fan Replacement Figure 40. Pressure switch replacement Webasto Product N.A., Inc. 42 www.techwebasto.com ™ Component Replacement - Refrigeration Unit 9.7 Ambient Temperature Switch Replacement 1. Switch the power inverter OFF. 2. Remove refrigeration unit cover. 3. Locate the ambient temperature switch. It will be in the area of the compressor, wire tied to the runcapacitor. Refer to Fig. 42. 4. Replace as required. 5. Apply an anti-corrosive electrical grease to the terminals and connect to switch. 6. If necessary, re-secure to the run-capacitor with a wire tie as before. 7. Perform system checks to ensure proper operation. Figure 42. Ambient temperature switch replacement www.webasto.us 43 Webasto Product N.A., Inc. ™ Component Replacement Air-handler Assembly 10.Component Replacement Air-handler Assembly 10.2 Air-handler Cover Removal 1. Pull 10 amp. fuse from fuse holder of BCT harness located at vehicle batteries. 2. Remove air-handler cover (M6 hex-nut X 6 places). 3. Carefully disconnect the 8-pin harness plug from control unit receptacle. 4. Move to a workbench for further work if necessary. Figure 43. Air-handler Before replacement of components, a thorough troubleshooting and diagnosis of the BlueCool Truck system must be conducted to identify the reason for the component failure and the correct remedy. Figure 44. Air-handler cover 10.1 Operation Panel Replacement Removal 1. Remove control knobs. Knobs are held on by a small set-screw. 10.3 Control Unit Replacement Removal 2. Remove the two panel nuts and washers from rotary switch shafts. 1. Follow directions in Sec. 10.2 "Air-handler Cover Removal". 3. Remove four screws holding panel to cover. 2. Carefully disconnect the four 2-pin fan plugs from control unit receptacles. 4. Remove panel. I O AIR COND ITION ING Installation Figure 45. Control unit removal - Step 1 1. Reassembly in reverse order of removal. Webasto Product N.A., Inc. 44 www.techwebasto.com ™ Component Replacement Air-handler Assembly 10.4 Fan Replacement 3. Turn cover over and remove control knobs. Knobs are held on by a small set-screw. Removal 4. Remove the two panel nuts and washers from rotary switch shafts. 1. Follow directions in Sec. 10.2 "Air-handler Cover Removal" on page 44. 2. Carefully disconnect the 2-pin fan wiring plug of the defective fan from control unit receptacle. 3. Remove the four screws holding the fan to the cover. 4. Remove fan from fan recess of cover. I Installation O AIR CON DIT 1. Reassembly in reverse order of removal. ION ING Figure 46. Control unit removal - Step 2 5. Control unit is now free to pull away from back-side of cover. Figure 48. Fan replacement Figure 47. Control unit removal - Step 3 Installation Before handling the new control unit, discharge any possible static electrical charge from your body by touching a grounded metal surface. 1. Reassembly in reverse order of removal. www.webasto.us 45 Webasto Product N.A., Inc. ™ Coolant Circuit 11.Coolant Circuit A UNDER NO CIRCUMSTANCES SHOULD CAUTION PURE WATER BE ALLOWED TO ENTER THE BLUECOOL COOLANT SYSTEM! Doing so will not ensure proper mixing with antifreeze which will lead to ice formation in the storage unit and possibly damaging internal components. ALWAYS purchase and use a 50/50 premixed glycol based antifreeze where possible. If a premixed antifreeze is not available, a pure antifreeze mixed with water at a 50/50 ratio may be used as long as it is premixed BEFORE filling the system. DO NOT rely on the coolant circulation system to mix water and antifreeze. 11.1 Bleeding System After Repair IN The coolant circuit must be refilled and bled of air after repairs or replacement of any components within the circuit. OUT Figure 49. Coolant circuit bleeding 1. Follow directions in Sec. 10.2 "Air-handler Cover Removal" on page 44. 11.1.1 Energizing the Circulating Pump 2. Remove fill cap from the reservoir and fill system directly with 50/50 premixed glycol antifreeze mixture. To further aid in purging trapped air from the system, the circulating pump can be energized to circulate coolant through the system. 3. Open the air bleeder valve on the air-handler’s exchanger. Refer to Fig. 49, item A. DO NOT leave this valve open unattended! 1. Connect the harness to the control unit. Do not install air-handler cover at this time. 4. Continue to replenish the reservoir as coolant is drawn in. 2. Restore system power. 5. Continue to bleed air out at the bleeder valve until coolant is evident at the valve. This may take several cycles to remove all trapped air in circuit. Be careful not to allow coolant to spill inside sleeper. Use a catch pan. Close bleeder valve. 4. Turn coolant pump control knob fully on. 3. Turn fan control knob slightly from off position. 5. Carefully bleed remaining air from the coolant system at the bleeder valve. 6. Once the system has been completely filled and purged of air, it should hold close to 1.5 - 2 US gallons depending on coolant hose lengths. 6. Check coolant level at reservoir. Top up as necessary. 7. Allow coolant pump to continue circulating coolant for 15 min. During this time, check hose connections for signs of leakage. 8. Turn system off and install air-handler cover. Webasto Product N.A., Inc. 46 www.techwebasto.com ™ Coolant Circuit 11.2 Heat Exchanger Replacement Installation 1. Reassembly in reverse order of removal. Removal AVOID DAMAGING HEAT EXCHANGER! Lubricate heat exchanger connection tubes and coolant hoses with silicone spray before connecting hoses to heat exchanger. 1. Follow directions in Sec. 10.2 "Air-handler Cover Removal" on page 44. 2. Drain sufficient coolant from system to prevent spillage inside sleeper compartment. 2. Refer to Sec. 11.1 "Bleeding System After Repair" on page 46 for circuit purging instructions. 11.3 Coolant Circulating Pump Replacement Removal 1. Locate coolant circulating pump. Typically, it is installed inside the frame member above the BlueCool cold storage unit. 2. Clamp off coolant lines near the pump with hose clamping pliers. 1 3. Loosen hose clamps and remove hoses from pump. 4. Disconnect circulation pump power connector. Figure 50. Heat exchanger replacement - Step 1 5. Unfasten pump from frame. 3. Disconnect coolant hoses. Refer to Fig. 50, item 1. If you are planning to reuse the existing heat exchanger, remove hoses carefully to avoid bending or twisting the connection tubes of the exchanger. 4. Remove four 10x32 UNF screws securing heat exchanger to shroud. Refer to Fig. 51, item 2. 5. Pull heat exchanger free of shroud. Refer to Fig. 51, item 3. 2 Figure 52. Circulation pump - installed 3 Installation Refer to Fig. 53, on pg. 48 for correct installation of circulating pump. 1. Reassembly in reverse order of removal. 2. Refer to Sec. 11.1 "Bleeding System After Repair" on page 46 for circuit purging instructions. Figure 51. Heat exchanger replacement - Step 2 www.webasto.us 47 Webasto Product N.A., Inc. ™ Coolant Circuit 85° 0° 0° Correct Wrong Figure 53. Circulating pump - orientation Webasto Product N.A., Inc. 48 www.techwebasto.com ™ Warranty 12.Warranty WEBASTO BlueCool ® TRUCK AIRCONDITIONING LIMITED WARRANTY Webasto warrants Webasto BlueCool Truck Products manufactured or supplied by Webasto, subject to qualifications indicated. Webasto warrants these products for the period set forth below, to be free from defects in workmanship and material, provided such products are installed, operated, and maintained in accordance with Webasto “BlueCool” written instructions. Terms and Conditions 1. The quality and operation of Webasto BlueCool products are warranted by Webasto for a period of (3) three years, beginning from the date of installation, and not to exceed (4) years from the date of invoice to the installer. 2. Service parts are warranted for 90 days or the original term of the warranty, whichever is longer. 3. This warranty is valid only for BlueCool products sold to and installed by a Webasto Authorized Dealer. 4. Webasto BlueCool products are warranted against defects in material and workmanship when used under normal working conditions and are valid only for all original components. 5. This warranty does not include expedition costs, travel expenses, or incidental or consequential damages. 6. Labor charges cannot exceed published standard repair times. 7. This warranty obligation is limited to repair and replacement. It does not cover: a) Incidental and or consequential damages. b) Failure of the Blue Cool equipment due to normal wear, accident, misuse, abuse, negligence, improper installation, lack of reasonable and necessary maintenance, alteration, civil disturbance, or act of God. 8. Transportation damages should be claimed directly with the forwarding company. 9. This limited warranty applies to components or accessories only and reimbursement or replacement is based on the smallest subassembly possible. 10. This limited warranty is extended only to the original installation and is not transferable. 11. Any intervention by a third person or company not specifically and previously authorized by Webasto to perform repair work will void all Webasto warranty and will not be reimbursed by Webasto. Reimbursement Reimbursement of components replaced under warranty will not exceed the original purchase price of the parts. Claim Procedure 1. Examination of defective parts and pre-approval of repairs or expenses shall be carried out by a Webasto Authorized Dealer. If no such service point or agent is available in the vicinity of the truck, the truck’s owner or owner’s representative should contact the Webasto country representative for analysis. To locate the nearest “Webasto Authorized Dealer” or country representative phone 1-800-555-4518. 2. If a conclusive analysis cannot be obtained from the Webasto Authorized Dealer or country representative, the defective products or parts should be shipped back to the Webasto country representative for final examination prior to replacement under this limited warranty. THE WARRANTY DESCRIBED IN THIS POLICY SHALL BE IN LIEU OF ANY OTHER WARRANTY, EXPRESSED OR IMPLIED, INCLUDING BUT NOT LIMITED TO, ANY IMPLIED WARRANTY OF MERCHANTABILITY OR FITNESS FOR A PARTICULAR PURPOSE. LAWS OF LOCAL JURISDICTION MAY PROVIDE LESSER OR GREATER RIGHTS. www.webasto.us 49 Webasto Product N.A., Inc. ™ Warranty Webasto Product N.A., Inc. 50 www.techwebasto.com ™ Warranty www.webasto.us 51 Webasto Product N.A., Inc. Webasto Product N.A., Inc. 15083 North Road Fenton, MI 48430 Technical Assistance Hotline USA: (800) 860-7866 Canada: (800) 667-8900 Org. 02/2007 Rev. 2/2012 Ver. BCT_ABC © 2012 Webasto Product N.A., Inc. www.webasto.us www.techwebasto.com