1
Second Printing, August 1987
-•
This instruction manual is intended to guide you, the user,
in the use and care of your new Minicom TOO. It is not all
inclusi e, cannot cover all situations or uses , and may contain
technical in accuracies or typographical errors .
The warranty for your M inicom is stated in full on a separate
" Warranty Registration Card ." This manual contains no
additional warranties.
Tech nical improvements or changes in Minicom may be
made by Ultratec, Inc. fro m time to time, and without notice.
Your co mments can help U ltratec improve its products an d
services . A "User Comm ent Card" has been included with this
manual . Please fill it out an d send it to us to tel l us what you
think about your new Minicom and these instructions.
Shou ld you need any additional information about your
Minicom, send your request to:
Communications Depa rtm ent
Ultratec, Inc.
6442 Normandy Lane
Mad ison , W isconsin 53719-1119
BOOKM 3-2
-
-
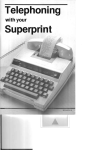
Telephoning
with your
MinicomTM
User Manual
Ultratec, Inc.
6442 Normandy Lane
Madison, WI 53719-1119
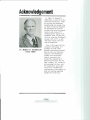
Acknowledgement In 1963, Dr. Robert H.
Weitbrecht, a physicist with a
profound hearing loss, made
an exciting and important
breakthrough for people who
are deaf or hearing impaired .
He developed an acoustic
coupler that could accurately
transmit and receive TTY
(Teletypewriter) signals over
telephone lines. For the fi rst
time, by using the Weitbrecht
coupler with a TTY, a deaf
individual could communi
cate by telephone .
Dr. Robert H. Weitbrecht
(1 920-1 983)
Now, in this age of micro
computer technology it is
possible to build small
po rtable telecommunication s
devices like your Minicom .
H owever, the Weitbrecht
modem was the techno
logical innovat ion that
marked the beginning of
telecommunications for the
deaf. U Itratec, InCo wishes to
acknowledge this fact, and
the significance and impor
tance of Dr. Weitbrecht 's
contribution to the welfare of
deaf and hearing impaired
people the world over.
Contents Congratulations
Section
You now own a
Minicom TOO .
Minicom comes in
two different models
- the Minicom III
and the Minicom IV.
Both Minicom
models are sturdy,
portable, reliable,
and easy to use
anywhere .
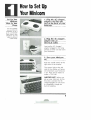
1 How to Set Up Your Minicom III or IV
The Minicom III has
a three-row
keyboard . The
Minicom IV has four
rows of keys and
includes a built-in
printer port . You can
use the printer port
to connect your
Minicom IV to a
printer to print your
TOO conversations .
Follow the instruc
tions in this manual
to learn how to use
your Minicom III or
M inicom IV .
2
How to Make and Answer TOO Calls
Page
2
Making a TOO Call
Answering a TOO Call
3 TOO Etiquette
4
How to Use the Rechargeable Batteries
4
5
Making a Call on Battery Power
Recharging the Batteries
Replacing the Batteries
5
How to Use a Printer With Your Minicom IV
7
6
Care and Service
8
Caring for Your Minicom
What to Do If ...
If Your Minicom Needs Repair
Minicom Specifications
9
H
Set Up Your
Minicom
Close To Your
Phone
You will probably
use your Minicom
frequently. So set it
up in a comfortable
place close to your
telephone. You will
need an eledri cal
out let nearby.
•
-
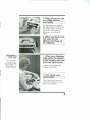
How to Set Up Your Min·com Set Up Your
Minicom
Close To Your
Phone
1. Plug the AC charger!
adapter cord into the
jack at the back of your
Minicom.
You will probably use your Mini com frequently. So set it up in a comfortable
place close to your
telephon e. You will
need an electrical
outlet nearby.
2. Plug the AC charger!
adapter into an
electrical outlet.
Leaving the AC charger/
adapter plugged in for long
periods of time will not harm
your Minicom.
3. Turn your Minicom
on.
'"
...
.,
4'
~
•
r
,. •
•
•
•
•
VOl.
, , .-,
. .....
D'
"
....... '
...
"'"
>
..
•
.. .
...
... .
Push the on/off switch at the
right side of the display.
_
&.
. . 1
The power light at the left
side of the display will glow
red whenever your Minicom
is on . Now you ' re ready to
make a TOO call.
IMPORTANT! When you
set up your Minicom for the
first time, connect the AC
charger/adapter for 24 hours
to completely charge the
built-in batteries.
1
-
How to Make
andAnswer TDD Calls
Making a
TDD Call
-
1. Turn your Minicom
on.
Watch the signal
light on the left side
of the display when
you make your TDD
call. The signal light
shows you the
sounds on the
telephone line so
you will know what
is happening.
The power light will glow
red .
j
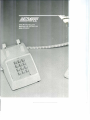
2. Place your telephone
handset in the Minicom
acoustic cups.
Make sure the telephone
cord is at your left.
Answering a
TDD Call
3. Watch the signal light
for a dial tone.
The signal light will glow
steadily red when there is a
dial tone. If the signal light
blinks, hold down the
telephone receiver button for
3 or 4 seconds, then release
it.
4. Dial the number you
want to call. Watch the
signal light for a ring.
You may need a
signaling device,
such as the Ultratec
Phone Master™, to
tell you when your
phone is ringing.
1
.1
The signal light will flash
slowly as the telephone rings.
It wi II flash fast if the phone
is busy.
2
-
5. When the person you
are calling answers,
start typing.
,
If a hearing person answers,
the signal light will flicker as
he or she speaks. Push the
space bar a few times to
show you are calling by
TDD .
.l 6. When you finish your
call, turn off your
Minicom and hang up
the telephone.
J
#
"
"I
,
•
..
("l
F
xc",
Answering a
TOO Call
You may need a
signaling device,
such as the Ultratec
Phone Master™, to
tell you when your
phone is ringing .
,.
I
...
-.
...
o·
•
~
(
1'0
•
J
•
u
,
..
"
,
M
1. When your telephone
rings, place the handset
in the acoustic cups and
turn your Minicom on.
Make sure the telephone
cord is at your left.
)
2. Start typing your
conversation.
When you finish your call,
turn your Minicom off and
hang up the phone.
3
TDD Etiquette
.I.IGA" means GO
AHEAD.
Type "GA" when you want
the person you are talking to
to start typing. When you
read "GA," it is your turn to
type.
.I.IQ" is the same as a
QUESTION MARK(?).
.I.ISK" means STOP
KEYING.
Type " SK " when you want
to end your conversation. If
someone types " SK" to you,
type " SKSK" if you are
finished talking. When both
you and the person you are
talking to have typed "SK,"
hang up your phone and turn
off your Minicom .
.I.IGA or SK" is a short
way to say, .1.100 you
have anything else to
say? I'm done."
When you read "GA or SK"
you can type another
message, or finish with
"SKSK."
Watch for
GA, Q and SK
GA, Q and SK are important
signs to follow during a TDD
conversation . When you use
them, you will know when it
is your turn to type, and
when to end your
conversation .
Making a Call
on Battery
Power
W hen you r Mini com
batterie s are full y
charged, they ca n
suppl y pow er for up
to one and one-half
hours. Th e opti onal
heavy-duty batteri es
last even longer.
\
IMPORTANT!
Rechargeable
wo rk best if
th ey are run down
and recharged
frequentl y. If you
don 't use the
Minicom batteri es
very often , th ey ma y
run down too soo n.
See page 8.
b a tt e ri~ s
Recharging the Batteries -
The batteries recharge auto
matically whenever the AC charger/adapter is connected and your Minicom is turned off. Here is a TDD conversation
that uses GA, Q and SK:
Sue: HELLO DAD THIS IS
SUE I WILL BE HOME
AT 5 OK Q GA
Dad: FINE SEE YOU THEN
BYE GA OR SK
Sue : OK BYE NOW SKSK
4
-
-
How to Use the
Rechargeable Batteries
Making a Call
on Battery
Power
When your M inicom
batteries are fully
charged, th ey can
supply power for up
to one and one-half
hours. The optional
heavy-duty batteries
last even longer.
IMPORTANT!
Rechargeable
work best if
\\\e.'1 ale (Un down
batteri~s
and lecnalged
lrequently. If you
don't use the
Minicom batteries
vef\ often, they may
run down too soon.
See page 8.
Recharging
the Batteries
The b,ltteries
rfflldrge auto·
matlldlly whenever
the AC
d lll~
r/ildilr.(er is
onnt·c ted and your
Il1l1l n m i~ turned
oiL
1. Disconnect the AC
charger/adapter.
The adapter cord must be
unplugged from yo ur
Minicom for the batteries to
work.
2. Make your TD D call.
Follow the instructions on pages 2 and 3 of this manual.
NO TE: Rechargeab(e bat
teries last longer when they
are used and recharged
regularly .
1. The power light
blinks on and off when
the batteries are getting
weak.
Your Minicom will keep
working on battery power for
about 5 or 10 minutes after
the power light starts blinking .
2. To recharge the bat
teries, connect the AC
charger/adapter, and
turn your M inicom off
for 12 to 14 hours.
You ca n use your Minicom
while the batteries are
rechargi ng.
5
H
V
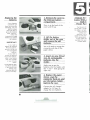
Replacing the
Batteries
1. Remove the cover to
the Minicom battery
compartment.
If you r batteries
consistently run
down too soon after
recharging, you may
need to replace
them. But fi rst try
giving the batteries
some "exercise."
Follow the
instructions on page
8 before you replace
the batteries.
Press in at the back of the
cover and lift up.
2. Lift the battery
holder out of the case
and remove the old
batteries.
IMPORTANT!
If you need to
replace the standard
Mi n icom batteries,
use only NiCad size
AA rechargeable
batteries.
If you need to
replace the optional
heavy-duty batteries,
order a new battery
pack from U Itratec
or your Ultratec
dealer .
Minicom IV™
Comes With a
Built-In
Printer Port
The Minicom IV
pri nter port is inside
the battery compart
ment. Use it to
connect your
Minicom IV to a
pri nter to print you r
TOO conversations
Printer cables are
available from your
U Itratec dealer.
You will need to unsnap the
connector and slip off the
paper sleeve.
3. Insert six new NiCad
size AA rechargeable
batteries into the
holder.
Using batteries other
that those specified
in this manual may
damage your
Minicom and will
void your warranty.
Make sure to put the
batteries into the holder with
the + and - ends going the
right way.
4. Replace the paper
sleeve, snap the
connector back on, and
put the battery holder
back in the case.
Connect the AC charger/
adapter for 24 hours to
charge the new batteries.
6
-
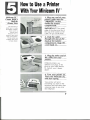
How toUse aPrinter With Your Minicom IV ™
Minicom IV ™
Comes With a
Built-In
Printer Port
The Minicom IV
printer port is inside
the battery compart
ment. Use it to
connect your
Minicom IV to a
printer to print your
TDD conversations.
Printer cables are
available from your
Ultratec dealer.
e
Rili.sed edge
" / at the top
1. Plug one end of your
printer cable into the
npRINTfR" socket
inside the battery
compartment.
IMPORTANT! The raised
edge of the plug must be at
the top of the socket so the
cable can go ou t the back.
2. Lead the cable
through the slot at the
back of the battery
compartment. Snap the
cover back on.
3. Plug the other end of
the cable into your
printer.
Different printers use
different size plugs. If the
plug on your cable doesn't
fit, contact you r U Itratec
dealer.
4. Turn your printer on.
Turn your Minicom on,
and start typing.
Your printer will print
everything you type on the
keyboa rd and everything that
someone types to you over
the telephone.
7
Care and Service
Caring for
Your Minicom
-
Your Minicom is a modern microcomputer-based
electronic device.
Ph]
s
Proted it from dust and dirt when you are not using it, and be
careful not to spill liquids on it. If the case gets dirty, use a
damp cloth to wipe it clean.
What to Do
If...
v
An incoming message is all numbers and punctuation.
The incoming message is probably stuck in "figures" mode.
This happens sometimes in TDD calls. Press the space bar
once or twice. The incoming message will change to words
and letters you can understand.
s
I-
The batteries run down too soon after recharging.
Ke;
The batteries are not necessari Iy worn out. They may run
down quickly if you don't use them very often. Follow Steps
1, 2, and 3 to give the batteries some "exercise."
1\
Step 1) Completely discharge the batteries. Unplug the AC
charger/adapter, turn your Minicom on and let it stand for
a few hours.
Step 2) Recharge the batteries. Conned the AC charger/adapter,
turn your Minicom off, and let it stand overnight. (See
page 5.)
(
Step 3) Repeat Steps 1 and 2 a few times. If your batteries still
run down quickly, replace them. (See page 6.)
If Your
Minicom
Needs
Repair
Pack up your Minicom and AC charger/adapter in the
original shipping box.
Put a note in the box that describes the problem you are having.
Tell the Post Office or shipping company you want insurance for
shipping your Minicom. Then, send it to your authorized Ultratec
repair center, or to:
Federal
Communications
Commission
Required
Information
You
Telt
o
o
o
ULTRATEC NATIONAL SERVICE CENTER
6442 Normandy Lane
Madison, WI 53719-1119
8
-
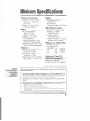
Minicom Specifications
Physical Dimensions
Size: 8.9" x 10" x 2.5"
(224 mm x 254.0 mm x
63.5 mm)
Weight: 2.5 Ibs. 0.1 kg)
including batteries
Power
AC charger/ad apter: 9VDC 500 ma (Barrel is positive) Adapter is U.L. listed,
CSA approved
Standard batteries: 6 size
AA NiCad rechargeable
Heavy-duty (optional): 6 size
sub-C NiCad rechargeable
Keyboard '
Minicom III : 3-row
keyboard, 33 keys
Minicom IV: 4-row
keyboard, 43 keys
Character set: A-Z, 0-9, Bksp,
Rtrn, Space, + - =!$'O"/:;?,.
Display
Blue/green vacuum
fluorescent
20-characters
Character height 0.25" (6mm)
Telecommunications
Baudot (45.5 baud) code
Sensitivity: -45dbm,
67dBSPL (min)*
Output: -12dbm,
100 dBSPL (Min)*
Coupler: Flexible - accepts
different size handsets
Minicom IV Printer-Port
Parallel interface Pin assignments: I DATA STROBE
2 DO
3 Dl
4 D2
5 D3
6 D4
7 D5
8 D6
9 D7
11 GROUND
12 GROUND
13 GROUND
14 GROUND
10 ACK
Minicom III and IV
Optional Equipment
Heavy-d uty batteries
Square acoustic cup adapters
' Sllbjeci 10 changes
Federal
Communications
Commission
Required
Information
In
com municati o ns slandards.
Your Minicom Generales and Uses Radio Frequency Energy and May Cause Radio or
Television Interference
o Your Minicom complies with the regulations for a Class B computing device as
specified in Subpart J of Part 1S of FCC Ru les. These rules are designed to minimize
radio frequency interferen ce in residential installations. However, there is no guarantee that
radio frequency interferen ce will not occur in any particular in stall ati on.
o Install and
use your Minicom in strict accordance with the instructions in this
manual.
o You can determine if your Minicom is causing interference to radio or television
reception by turning your Minicom on and off. Try to correct the interference:
-
Adjust the radio Or television antenna .
Move your Minicom away from the antenna. Move you r M inicom away from the radio or television. Plug your Minicom into another ou tlet so that It is on a different branch cirCllit from the radio o r telev ision .
- If necessary. consult an experienced radio/television technician for additi onal suggestion s.
9