1
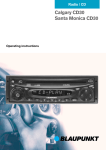
Radio / CD
Honolulu CD50
Operating instructions
Open here
Ouvrir s.v.p.
Por favor, abrir
Favor abrir
2
1
4
3
5
16 15
7
14
13
8
9
PORTUGUÊS
2
ESPAÑOL
6
12 11 10
3
FRANÇAIS
ENGLISH
OPERATING ELEMENTS
1
2
3
4
5
6
7
8
9
:
;
<
=
>
?
@
4
button to unlock release
panel
Volume control
ON button, switches the unit
on/off, mute
FM button, selects the FM
memory bank
AM button, selects the AM
waveband
Display
button, displays the time
DIS, changes display contents
MENU button, accesses the
menu for basic settings
button, opens the flip release
panel
Cursor button block
OK button, confirms menu selections and starts the SCAN
function
EQ button, adjusts the BASS
CENTER frequency
AUD button, adjusts bass, treble, balance and fader
LD, switches the Loudness function on/off
1 to 6 station buttons
TS button, starts the Travelstore
function
CD•C button, switches sound
source between radio, CD and
CD changer (if connected)
Theft protection system ................... 7
Removing the operating panel .......... 7
Replacing the operating panel ......... 7
Switching the car audio
system on/off ........................... 8
Volume control ......................... 9
Adjusting the power-on volume ........ 9
Mute ............................................... 9
Mute during telephone operation ..... 9
Adjusting the volume of the beep ... 10
Radio operation ...................... 10
Switching to the radio mode .......... 10
Selecting wavebands/memory
banks ............................................ 10
Tuning into radio stations ............... 10
Adjusting seek tuning sensitivity ..... 11
Storing radio stations ..................... 11
Storing radio stations automatically
(Travelstore) .................................. 11
Recalling stored radio stations ....... 11
Scanning the radio stations within
reception range (SCAN) ................ 11
Adjusting the scan time ................. 12
Tuner configuration ........................ 12
CD player operation ............... 13
Starting CD player operation ......... 13
Selecting tracks ............................ 13
Audible fast forward/reverse
(CUE/REVIEW) ............................. 13
CD changer operation ............ 14
Starting CD changer operation ...... 14
Selecting CDs ............................... 14
Selecting tracks ............................ 14
Audible fast forward/reverse
(CUE/REVIEW) ............................. 14
Switching the display mode ........... 14
Repeating individual tracks or
entire CDs (REPEAT) .................... 15
Playing tracks in random order
(MIX) ............................................. 15
Scanning all of the tracks on all
of the CDs (SCAN) ....................... 15
Interrupting playback (PAUSE) ...... 15
Clock ...................................... 16
Adjusting the tone and
balance/fader ........................ 17
Switching Loudness on/off .... 17
BASS CENTER frequency
adjustment ............................. 18
Adjusting the spectrometer ............ 18
External audio sources .......... 19
Switching the AUX output on/off .... 19
Specifications ........................ 19
Installation instructions .......... 71
5
FRANÇAIS
Removable front panel ............. 7
Playing tracks in random order
(MIX) ............................................. 13
Scanning tracks (SCAN) ............... 13
Repeating individual tracks
(REPEAT) ...................................... 14
Interrupting playback (PAUSE) ...... 14
Switching the display mode ........... 14
ESPAÑOL
Traffic safety .................................... 6
Installation ....................................... 6
Accessories .................................... 6
Guarantee ....................................... 6
International telephone information ... 6
PORTUGUÊS
Important information .............. 6
ENGLISH
CONTENTS
IMPORTANT INFORMATION
Important information
Before you use your car audio system
for the first time, please take the time to
read the instruction manual carefully
and make yourself familiar with the audio equipment. Keep this manual handy
in your car for future reference.
Traffic safety
Traffic safety is always the top
priority. Do not attempt to operate
your car audio system unless the traffic conditions permit. Familiarize
yourself with the equipment before
you start driving.
Always make sure that you are still
able to hear any warning signals
coming from outside the vehicle,
such as police or fire engine sirens,
at all times.
As a result, please always select a
moderate volume for playing your car
audio system while you are driving.
Installation
If you would like to install your new car
stereo yourself or add other audio components to the existing ones, then
please read the instructions on installation and connection at the end of this
manual carefully.
Accessories
Use only Blaupunkt-approved accessories.
Remote control unit
The optionally available RC 08 infrared
remote control unit allows you to conveniently operate the most important
system functions from the steering
wheel.
6
Amplifiers
All Blaupunkt amplifiers can be used.
CD changers
The following CD changers can be connected directly: CDC A 06, CDC A 08,
CDC A 072 and IDC A 09.
The CDC A 05 and CDC A 071 can be
connected with an adapter cable (Blaupunkt no. 7 607 889 093).
Guarantee
The scope of the guarantee is determined by the laws in the country where
the unit is purchased.
Regardless of the legal guarantee regulations, Blaupunkt affords a 12-month
guarantee.
If you have any questions about the
guarantee, please contact your authorised Blaupunkt dealer. Your cash register receipt is a valid guarantee coupon.
International telephone
information
Have you got any questions on the operation of this equipment or do you require more information?
Give us a call!
You will find the international telephone
and fax numbers on the last page of this
manual.
To prevent your car audio system from
being stolen, it has been equipped with
a removable front panel (flip release
panel). Without the front panel, the car
audio system is useless to thieves.
Protect your car audio system against
theft and take the operating panel with
you each time you leave the vehicle.
Never leave the release panel in the car,
even if it is well hidden. The panel has
been designed so that it is easy to remove.
Notes:
● Do not drop the release panel.
● Do not expose the release panel to
direct sunlight or other heat sources.
● Store the release panel in the case
supplied.
Removing the operating panel
➮ Press 1.
The release panel will unlock.
1
●
●
Replacing the operating panel
➮ Slide the operating panel into the
guides from left to right.
➮ Press the left-hand side of the panel onto the car audio system until it
locks into place.
Note:
● While replacing the panel, be careful not to press on the display.
If the car audio system was on when
you removed the panel, it will automatically switch back on using the same
settings when you replace it (radio, CD
player or CD changer).
➮ First pull the operating panel forward and then slide it to the left to
remove it.
7
FRANÇAIS
Theft protection system
When you remove the operating
panel, the car audio system will automatically switch off.
All of the settings will remain
stored.
A CD inserted into the car audio
system will remain in place.
ESPAÑOL
●
PORTUGUÊS
Removable front panel
ENGLISH
REMOVABLE FRONT PANEL
SWITCHING ON/OFF
Switching the car audio
system on/off
The car audio system can be switched
on/off in a number of ways.
Switching the car audio system on/
off with the ignition
If the car audio system has been connected to your vehicle ignition, it is possible to switch it on and off with the ignition.
You can also switch the car audio system on when the ignition is switched off.
➮ Press down and hold 3 until the
car audio system switches on.
Note:
To prevent the car battery from running
down, the radio will switch off again automatically after one hour.
Switching the car audio system on/
off with the removable front panel
➮ Remove the release panel.
The car audio system will switch off.
➮ Replace the release panel.
The car audio system will switch on
again. The last settings used (radio, CD
player or CD changer) will be activated.
Switching the car audio system on/
off by pressing 3
➮ Press 3 to switch the car audio
system on.
➮ Press 3 for longer than 2 seconds
to switch the car audio system off
again.
The system will then switch off.
8
Switching the car audio system on
by inserting a CD
If the system is switched off and there
is no CD in the CD player,
➮ press
9.
The flip release panel will open.
➮ Insert the CD into the CD player
with the label facing upwards until
you feel resistance. Do not use
force.
The CD will be pulled automatically into
the CD player.
Do not attempt to assist or prevent this
process.
➮ Press the operating panel closed
gently until you feel it click into
place.
The audio system will switch on. CD
playback will begin.
Volume control
Mute
The car audio system volume can be
adjusted to levels from 0 (off) to 66 (maximum).
You can reduce the volume of the car
audio system immediately (mute).
➮ To increase the volume, turn the
“MUTE” will appear in the display.
volume control knob 2 to the left.
Adjusting the power-on volume
It is possible to adjust the volume at
which the car audio system switches on.
➮ Press MENU 8.
➮ Press : repeatedly until “ON
VOLUME” appears in the display.
➮ Press
: to adjust the vol-
ume.
If you adjust this setting to “0”, the car
audio system will switch on at the volume used before it was switched off.
Warning of serious injury
If the power-on volume is set to the
maximum level, it may be extremely
loud when the car audio system is
switched on.
If the power-on volume is set to 0 and
the car audio system was played at
maximum volume before it was
switched off, it may be extremely loud
when the car audio system is
switched back on. This could result
in serious injury to your ears!
FRANÇAIS
Selecting the mute level
It is possible to select the mute level.
➮ Press MENU 8.
➮ Press : repeatedly until
“MUTE LEVEL” appears in the display.
➮ Press
: to select the mute
ESPAÑOL
➮ To decrease the volume, turn the
➮ Press 3 briefly.
PORTUGUÊS
volume control knob 2 to the
right.
ENGLISH
VOLUME CONTROL
level.
➮ Once you have made your selection, press MENU 8 or OK ;.
Mute during telephone
operation
If your car audio system has been
equipped with a mobile telephone, it will
automatically switch to mute when you
use the phone. This will not work unless the mobile phone is connected to
the car audio system as described in
the installation instructions.
The car audio system will be muted to
the mute level selected.
➮ Once you have selected the desired settings, press MENU 8 or
OK ;.
9
VOLUME CONTROL
Adjusting the volume of the
beep
For a number of functions you will hear
a beep if you press a key for longer than
2 seconds, e.g. if you want to store a
radio station on a station preset. You can
adjust the volume level of this beep.
➮ Press MENU 8.
➮ Press : repeatedly until
“BEEP” appears in the display.
: to adjust the volume. “0” means the beep volume is
off, “9” means the beep volume is
adjusted to the maximum volume.
➮ Press
➮ Once you have adjusted the settings, press MENU 8 or OK ;.
RADIO OPERATION
Radio operation
Switching to the radio mode
If you are currently using the CD player
or CD changer,
➮ press CD•C @ repeatedly until
“RADIO” appears in the display.
Selecting wavebands/memory
banks
Using this car audio system, you can
tune into radio stations on the FM and
AM wavebands. There are three memory banks for the FM waveband and one
memory bank for AM.
You can store six stations in each of
these memory banks.
➮ To switch between the different FM
memory banks , press FM 4.
➮ To select the AM waveband, press
AM 5.
Tuning into radio stations
You can tune into radio stations in a
number of different ways.
Automatic seek tuning
➮ Press
or
:.
The radio will tune into the next available station within reception range.
Manual station selection
You can also tune into radio stations
manually.
➮ Press
10
or
:.
“SENS” appears in the display.
➮ Press
:.
The currently selected setting will appear in the display. “SENS HI” indicates
the highest level of sensitivity, “SENS
LO” the lowest. If you select “SENS LO”,
“lo” will light up in the display.
➮ Press
: to adjust the desired
sensitivity.
➮ Once you have made your selection, press MENU 8 or OK ;.
Storing radio stations
Storing radio stations manually
➮ Select the desired memory bank
FM1, FM2 or FMT or the waveband AM.
➮ Tune the radio into the desired station.
➮ Press and hold down one of the
station preset buttons 1 to 6 > on
which you want to store the radio
station for longer than two seconds.
You can automatically store the six radio stations with the strongest reception
in your current reception area. These
stations will be stored in the FMT or AM
memory bank depending on the selected waveband.
Note:
Any stations stored previously in the
memory bank will be deleted.
➮ Press TS ? briefly.
The storing process will begin. “TRAVEL-STORE” will appear in the display.
After the stations have been stored, the
radio will automatically begin to play the
station stored on preset button 1 of the
respective memory bank.
Recalling stored radio stations
➮ Select the desired station memory
bank.
➮ Press the station button 1 to 6 >
on which you have stored the desired radio station.
Scanning the radio stations
within reception range (SCAN)
You can scan all of the radio stations
currently within your reception range.
The scan time can be set in the menu
to play from five to 30 seconds.
Starting SCAN
➮ Press and hold down OK ; for
longer than two seconds.
11
FRANÇAIS
➮ Press MENU 8.
➮ Press : repeatedly until
Storing radio stations
automatically (Travelstore)
ESPAÑOL
It is also possible to adjust the sensitivity of the seek tuning function to tune
the radio into stations with strong reception signals only, or to those with weaker reception signals as well.
PORTUGUÊS
Adjusting seek tuning sensitivity
ENGLISH
RADIO OPERATION
RADIO OPERATION
SCAN will begin. “SCAN” will appear
briefly in the display, followed by the
flashing frequency of the radio station
currently being scanned.
Stopping the SCAN function,
continuing to listen to the radio
station scanned
➮ Press OK ;.
SCAN will end and the last station
scanned will continue playing.
Adjusting the scan time
➮ Press MENU 8.
➮ Press : repeatedly until
“SCANTIME” appears in the display.
➮ Press
: to set the scan time
as desired.
➮ Once you have made your selection, press MENU 8 or OK ;.
Note:
The scan time selected also applies to
the SCAN function for CD player and
CD changer operation.
Tuner configuration
This unit is equipped with a multiband
tuner. This means that the tuner can be
configured to suit requirements that are
specific to various countries. The countries/regions available are: USA, Europe, Asia and Thailand. The tuner will
only function optimally if it is configured
for the country/region in which the unit
is being operated.
12
Configuring the tuner
➮ Press MENU 8.
➮ Press : repeatedly until “FM
TUNER” appears in the display.
➮ Press
or
: to set the country/
region.
➮ Once you have made your selection, press MENU 8 or OK ;.
Starting CD player operation
●
If there is no CD in the player,
➮ press
9.
The flip release panel will open.
➮ Insert a CD into the player with the
label facing up until you feel resistance. Do not use force.
The CD will be pulled into the player
automatically.
Do not attempt to assist or prevent this
process.
➮ Press the operating panel closed
gently until you feel it click into
place.
CD playback will begin.
● If there already is a CD inserted
into the player,
➮ press CD•C @ repeatedly until
“CD” appears in the display.
Playback will resume at the point where
it was interrupted.
Audible fast forward/reverse
(CUE/REVIEW)
To start Cue or Review,
➮ press and hold down either
FRANÇAIS
Danger of damage to the CD
player!
CD singles with a diameter of 8 cm
and contour CDs (shape CDs) are
not suitable for use with this CD player.
We assume no liability for any damage done to the CD player resulting
from the use of unsuitable CDs.
to select the next or the previous
track.
or
: once to restart the
Press
same track.
ESPAÑOL
The CD player in this car audio system
can be used to play conventional music CDs with a diameter of 12 cm.
Selecting tracks
➮ Press a key on the cursor block :
or
: until the process begins.
Playing tracks in random order
(MIX)
➮ Press 5 MIX >.
“MIX CD” will appear briefly in the display, the MIX symbol will light up in the
display. The next track played will be
selected at random.
Stopping the MIX function
➮ Press 5 MIX > again.
“MIX OFF” will appear briefly in the display and the MIX symbol will no longer
light up.
Scanning tracks (SCAN)
You can scan all of the tracks on the
CD.
➮ Press OK ; for longer than two
seconds. Scanning will begin with
the next track.
Note:
It is possible to adjust the scan time.
For more information, read the section
on “Adjusting the scan time” in the chapter on “Radio Operation”.
13
PORTUGUÊS
CD player operation
ENGLISH
CD PLAYER OPERATION
CD PLAYER OPERATION
CD CHANGER OPERATION
Stopping the SCAN function, continue
listening to the current track
CD changer operation
➮ To stop the SCAN function, press
OK ;.
The track currently scanned will continue playing.
Repeating individual tracks
(REPEAT)
➮ To repeat the track currently playing, press 4 RPT >.
“REPEAT TRCK” will appear briefly in
the display, the RPT symbol will light up
in the display. The track will continue to
repeat until RPT is deactivated.
Stopping the REPEAT function
➮ If you want to stop the REPEAT
function, press 4 RPT > again.
“REPEAT OFF” will appear briefly in the
display and the RPT symbol will no longer light up. CD playback will resume
normally.
Interrupting playback (PAUSE)
➮ Press 3 >.
“PAUSE” will appear in the display.
Stopping PAUSE
➮ Press 3
> during the pause.
Playback will resume.
Switching the display mode
➮ To switch the display between the
track number and time or the track
number and elapsed playing time,
/ DIS 7 for longer than
press
two seconds once or repeatedly as
required.
14
Note:
For information on how to handle CDs,
how to insert CDs into the changer and
how to operate the changer, please refer to the instructions included with the
CD changer.
Starting CD changer operation
➮ Press CD•C @ repeatedly until
“CHANGER” appears in the display.
Playback will begin with the first CD the
changer detects in the magazine.
Selecting CDs
➮ To select a CD up or down in the
magazine, press or : the required number of times.
Selecting tracks
➮ To select a different track on the
CD currently playing, press or
: the required number of times.
Audible fast forward/reverse
(CUE/REVIEW)
To start Cue or Review,
➮ press and hold down either
or
: until the process begins.
Switching the display mode
➮ To switch the display between the
track number and time or the track
number and elapsed playing time
or the CD number and track
/ DIS 7 for longnumber, press
er than two seconds once or repeatedly as required.
playing, press 4 RPT > again.
“REPEAT DISC” will appear briefly in the
display, RPT will light up in the display.
Scanning all of the tracks on all
of the CDs (SCAN)
➮ To scan all of the tracks on all of
Stopping the REPEAT function
the CDs in ascending order, press
OK ; for longer than two seconds.
“SCAN” will appear in the display.
➮ To stop the REPEAT function for
Stopping the SCAN function
the current track or CD, press 4
RPT > repeatedly until “REPEAT
OFF” appears in the display and
RPT no longer lights up.
Playing tracks in random order
(MIX)
➮ To play the tracks of the currently
selected CD in random order,
press 5 MIX > briefly.
“MIX CD” will appear briefly in the display, MIX will light up in the display.
➮ To play the tracks of all of the CDs
in random order, press 5 MIX >
again.
“MIX ALL” will appear briefly in the display, MIX will light up in the display.
➮ To stop the SCAN function, press
OK ; briefly.
The track currently scanned will continue playing.
Note:
It is possible to adjust the scan time.
For more information, read the section
on “Adjusting the scan time” in the chapter on “Radio Operation”.
Interrupting playback (PAUSE)
➮ Press 3 >.
“PAUSE” will appear in the display.
Stopping PAUSE
➮ Press 3
> during the pause.
Playback will resume.
Note:
The CDC A 08 and the IDC A 09 are
also able to play all of the CDs in the
changer in random order. The other CD
changers first play all of the tracks on a
CD in random order and then select the
next CD in the changer.
15
FRANÇAIS
➮ To repeat the entire CD currently
MIX > repeatedly until “MIX OFF”
appears briefly in the display and
MIX no longer lights up.
ESPAÑOL
ing, press 4 RPT > briefly.
“REPEAT TRCK” will appear briefly in
the display, RPT will light up in the display.
Stopping the MIX function
➮ To stop the MIX function, press 5
PORTUGUÊS
Repeating individual tracks or
entire CDs (REPEAT)
➮ To repeat the track currently play-
ENGLISH
CD CHANGER OPERATION
CLOCK
CLOCK
Displaying the clock briefly
➮ To display the time briefly, press
/ DIS 7 briefly.
Activating the clock for display
when the car audio system is
switched off
➮ To activate the clock for display
Setting the time
➮ To set the time, press MENU 8.
when the car audio system is
switched off, press MENU 8.
“MENU” will appear in the display.
“MENU” will appear in the display.
➮ Press
: until “CLOCKSET” appears in the display.
➮ Press
➮ Press
:.
The time will appear in the display. The
minutes will flash and can be altered.
➮ Press
or
: to alter the min-
utes.
➮ Once you have altered the minutes, press :. The hours will
begin to flash.
➮ Press
or
: to alter the
hours.
➮ Once you have set the time, press
MENU 8 or OK ; twice.
Selecting the 12/24-hour time
display mode
➮ Press MENU 8.
“MENU” will appear in the display.
: repeatedly until “24 H
MODE” or “12 H MODE” appears
in the display.
➮ Press
➮ Press
or
play mode.
: to switch the dis-
➮ Once you have selected the mode,
press MENU 8 or OK ;.
16
: repeatedly until “CLK
DISP OFF” or “CLK DISP ON” appears in the display.
or : to switch the
clock display on or off.
➮ Press
➮ Once you have made the setting,
press MENU 8 or OK ;.
Displaying the time briefly when
the car radio is switched off
To display the time briefly when the car
radio is switched off,
➮ press
/ DIS 7.
The time will then appear in the display
for eight seconds.
➮ Press
or
: to alter the bass.
Adjusting the treble
➮ To adjust the treble, press AUD /
LD =.
“BASS” will appear in the display.
: until “TREBLE” appears in the display.
➮ Press
➮ Press
or
: to alter the treble.
➮ Press AUD / LD = for approx. two
seconds.
LD will light up in the display to indicate
that Loudness is active.
Adjusting Loudness intensity
The Loudness boost can be set in
stages from one to six.
➮ Press MENU 8.
“MENU” will appear in the display.
: repeatedly until
“LOUDNESS” appears in the display.
➮ Press
Adjusting the balance
➮ To adjust the balance, press AUD /
➮ Press
LD =.
“BASS” will appear in the display.
➮ Once you have completed adjust-
: until “BALANCE” appears in the display.
➮ Press
➮ Press
or
or : to alter the Loudness setting.
ing the settings, press MENU 8 or
OK ;.
: to alter the bal-
ance.
Adjusting the fader
➮ To adjust the fader, press AUD /
LD =.
“BASS” will appear in the display.
: until “FADER” appears
in the display.
➮ Press
➮ Press
or
: to alter the fader.
17
FRANÇAIS
LD =.
“BASS” will appear in the display.
Loudness boosts the bass and treble
when the volume is low to create a more
natural sound.
ESPAÑOL
Adjusting the bass
➮ To adjust the bass, press AUD /
Switching Loudness on/off
PORTUGUÊS
Adjusting the tone and
balance/fader
ENGLISH
TONE AND BALANCE/FADER
BASS CENTER
BASS CENTER frequency
adjustment
The bass center frequency adjustment
allows you to adjust the bass mid-frequency to suit the sound system in your
automobile (50 Hz or 100 Hz).
➮ To set the bass mid-frequency,
press EQ <.
“BASS CENTER” will appear in the display.
or : to switch between “50 Hz” and “100 Hz”.
➮ Press
➮ Once you have completed adjusting the settings, press EQ < or
OK ;.
Adjusting the spectrometer
The spectrometer in the display uses
symbols to temporarily indicate what
adjustments are made to the volume,
the tone and balance/fader and the
equalizer settings.
If no adjustments are being made to the
system, the spectrometer displays the
output level of the car radio.
You can select the type of spectrometer you want displayed in the menu.
There are two different types available.
Selecting the spectrometer type
➮ Press MENU 8.
“MENU” will appear in the display.
: repeatedly until “EQ
DISPLAY” appears in the display.
➮ Press
or : to select either
“SPECTRUM 1”, “SPECTRUM 2”
or “EQ DISP OFF”.
➮ Press
➮ Once you have completed adjusting the settings, press MENU 8 or
OK ;.
18
Specifications
In place of the CD changer it is also
possible to connect other external audio sources to the line output. These
sources can include a portable CD player, MiniDisc player or MP3 player.
You must activate the AUX output in the
menu.
If you would like to connect another external audio source, you will require an
adapter cable. This adapter cable can
be ordered from any authorized Blaupunkt dealer.
Amplifier
“MENU” will appear in the display.
: repeatedly until “AUXIN-1 OFF” or “AUX-IN-1 ON” appears in the display.
➮ Press
➮ Press
or
: to switch AUX on
4 x 25 watts sinus
acc. to DIN 45 324
at 14.4 V
4 x 40 watts max.
power
Tuner
Wavebands:
FM :
AM :
87.5 – 107.9 MHz
530 – 1710 kHz
PORTUGUÊS
Switching the AUX output on/off
➮ Press MENU 8.
Output power:
FM frequency response:
30 - 15000 Hz
CD
Frequency response:
20 - 20000 Hz
or off.
➮ Once you have completed your selections, press MENU 8 or OK
;.
Preamp Out
4 channels:
FRANÇAIS
External audio sources
ENGLISH
SPECIFICATIONS
ESPAÑOL
EXTERNAL AUDIO SOURCES
4V
Note:
If the AUX input has been switched ON,
you can select it by pressing CD•C @.
Subject to technical modification!
19
Service numbers / Numéros du service après-vente /
Números de servicio / Número de serviço
Deutschland
Belgique / België
France
Nederland
Great Britain
Danmark
Sverige
Norge
Suomi
Österreich
EÏÏ¿˜
âeská republika
USA
Singapore
Slovensko
Tel.:
Fax:
0 18 05 00 02 25
0 25 25 54 44
014 010 70 07
023 565 63 48
018 958 383 66
44 89 83 60
08 750 15 00
66 81 70 00
094 359 91
01-6 10 39-0
015 762 241
026 130 04 41
800-266 25 28
006 535 054 47
042 175 873 212
0 51 21 49 40 02
0 25 25 54 48
014 010 73 20
023 565 63 31
018 958 383 94
44 89 86 44
08 750 18 10
66 81 71 57
094 359 92 36
01-6 10 39-391
015 769 473
026 130 05 14
708-681 71 88
006 535 053 12
042 175 873 229
Blaupunkt-Werke GmbH
Bosch Gruppe
02/00 TRO
K7/VKD 8 622 402 211


![60 (3) Change any myss[i] calls, where myss is a loop iteration, to](http://vs1.manualzilla.com/store/data/005660192_1-8eea2c3cfc95064c732d161dbe3c262f-150x150.png)