1
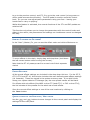
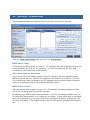
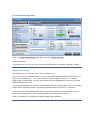
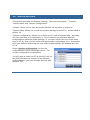
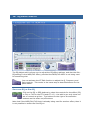
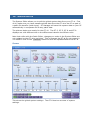
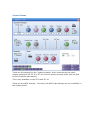
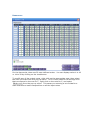
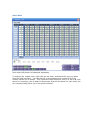
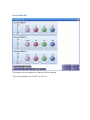
Please take the time to read this manual before contacting us for help!
1
INTRODUCTION
Congratulations on purchasing the Partheus Software GT Manager.
This software allows you to control your Boss GT-3, GT-5, GT-6, GT-8 or GT-10
multi-fx pedals from your PC.
Here is a brief summary of the features:
Transfer patches and system data to your PC
Transfer patches and system data to your GT-3, GT-5, GT-6, GT-8, GT-10
Save patches and system data to disk
Open patch, text and zip files
Integrated patch editor, hear the effect of changes as you make them
“Edit with GT” – edit whilst still playing
Copy/move/swap patches
Convert patch to text
Convert between some patch formats
This manual explains how to install, configure and use the software, and explains
what additional hardware you need to connect the PC to your Boss pedal. Most of
the information is based around answering common questions to do with using the
software, although we have done our best to make it easy and intuitive!
Throughout this document, the GT-3, GT-5, GT-6, GT-8 and GT-10 are referred to
collectively as the GT-.
This manual is formatted for A4 size paper, 210 x 297mm. If you want the manual
for US Letter paper, please open the one included in the installation of GT Manager.
Partheus Software
Software is subject to change without notice.
Partheus Software is not related to Roland or the Boss Corporation.
Visit us at : http://www.partheus.co.uk/
Contact us at : [email protected]
CONTENTS
The document contains the following sections:
1
2
Introduction
Installing and Registering the Software
3
4
5
Setting up the Hardware
Getting Started
General Features
6
7
8
Patch Files
Patch Editor
Data Transfers
9
10
11
12
Preset Files
Text and Zip Files
Settings - Connections
Settings
13 The Menus – control panel
14 The Menus – patch files
15 The Menus – text files
16 The Menus – zip files
17 EQ Adjust Add-in
18 System Editor
A
B
C
“It Doesn’t Work”
Un-install Details
Add-in Interface
CONVENTIONS IN THIS DOCUMENT
White on black text is used for buttons on the GT- – e.g. the Write button
Black on grey text is used for menus in GT Manager – e.g. the File and
Windows menu
2
INSTALLING AND REGISTERING THE SOFTWARE
INSTALLATION
Save the file you downloaded on your PC’s hard disk. You need to have
administrator privileges to be able to install GT Manager (unless you are running
Windows 98). You also need administrator privileges to enter the registration
information after installation.
Fresh installation
Click or double-click (depending on your Windows settings) on the downloaded file
to run the installation.
Upgrading from version 1.0.x
First, un-install your existing version. You can do this from the un-install shortcut
created when you installed the program, or from the Windows Control Panel
(Add/Remove Programs).
Then click or double-click (depending on your Windows settings) on the downloaded
file to run the installation.
The default installation folder is c:\Program Files\Partheus\ If you installed the old
version in a different folder, then change the default installation folder to be the
where the old version was installed. Failure to do this will result in the registration
being lost.
PURCHASE
Until the software is registered, it is not fully functional. Most features do work
however, so you can test that the software meets your needs and expectations
before committing to paying for it. Please pay for the software if you intend to
continue using it.
Note that if you save patch files to your PC during the evaluation period,
the data is deliberately modified slightly. This is intentional to encourage
you to either purchase the software or stop using it. But please be careful
not to send this modified data back to your GT-
, or your patches will not
be the way you wanted them.
To buy GT Manager, visit the purchase page on our website. After your online
purchase has been processed, you will receive a purchase confirmation email from
Kagi.
From the Tools and settings menu, select Registration and then Enter
registration . Copy and paste the purchase confirmation email you received from
Kagi into the box shown. This must be done within 10 days of purchase. You need
to have administrator privileges to be able to enter the registration data (unless you
are running Windows 98).
Finally, exit and then re-start GT Manager to complete the registration.
HOW DO I GET SEVERAL LICENCES?
If you want to have GT Manager running on several PCs, then simply copy the email
into GT Manager on each PC. You can transfer the email between PCs by saving it
as a plain text file, and then using a floppy disk or CDR or memory stick etc.
The terms of the licence allow you to install the software on as many PCs as you
personally own. Please respect this, and don’t use your Kagi email to activate the
software on someone else’s PC.
REMOVAL
To un-install GT Manager, select “Remove GT Manager” from the Start menu, or
select GT Manager from Add/Remove Programs in the Windows Control Panel.
Note that this will remove the main program files, but there will still be some data
left on your PC. This is intentional! GT Manager shares some settings with our
other software, so these settings are kept. Also, the registration data is kept; this
means you can re-install the software again, and the software will be fully functional.
3
SETTING UP THE HARDWARE
MIDI CONNECTIONS
Unless you are using the GT-10 USB connection, first make sure you have a
soundcard with MIDI output or some other MIDI interface unit!
If your soundcard has the MIDI connections on the gameport (a 25-way Dconnector), then you will need an adapter. Try and get an adapter that includes an
“opto-isolator” in the MIDI input. This is required to meet the MIDI specification,
but some adapters don’t include it as it adds cost to the adapter. Sometimes this
works, sometimes it doesn’t.
Connect one MIDI lead from the PC OUT to the GT- IN, and connect the second
MIDI lead from the PC IN to the GT- OUT.
CAN I DAMAGE ANYTHING?
No! The MIDI interface is robust. If you connect IN to IN and OUT to OUT by
mistake, no damage should occur.
If you send data intended for another device to your GT- (for example if you send
a GT-3 patch to your GT-6), then the data will be ignored.
If you send data from some other device to GT Manager, then the data will be
ignored.
AUDIO CONNECTIONS
If you want to get the audio from your GT- into your PC, then you will need to
make an audio connection in addition to the MIDI connections.
You can do this several ways.
Use a mono lead from the normal L+R output jack (0.25inch, 6.25mm) to the
soundcard input jack (usually 3.5mm).
Use a stereo lead from the normal L+R output jack and R output jack to the
soundcard stereo input jack (usually 3.5mm). You will need to make your own
cable to split the left and right signal wires to the two 0.25inch jacks. The
signals will be on the tip and ring of the stereo jack, with the sleeve being
ground. Please check which way round the left and right channels go.
For the GT-6, GT-8 and GT-10, use the SPDIF socket (phono) to connect to the
PC’s SPDIF input (usually phono). Although you can buy “special” SPDIF cables,
a standard audio grade phono cable should be perfectly adequate. This gives
the highest quality stereo signal to the PC since the connection is digital.
For the GT-10, use the USB connection. This also gives the highest quality
stereo signal to the PC since the connection is digital.
If you want to record the audio, then you will need another program (for example a
sequencer).
4
GETTING STARTED
BASIC PROGRAM SETTINGS
So you’ve installed the software and connected your effects pedal, now we can start.
In GT Manager, under the Tools and Settings menu, select Connections . GT
Manager shows the available MIDI input and output ports. Normally, the software
will have found the right settings for you, but check that the input and output port
settings are correct.
The Device ID and EXP / CTL CC numbers default to the same as the default
settings in the GT-. If you changed these in your GT-, then change them here to
match. Alternatively, if the Auto-detect options are enabled, then GT Manager will
learn the correct settings for you once some data has been sent from the GT- to
the PC.
From the Tools and settings menu, select User info . Enter your name in the
relevant box. This is saved in any patch files you make, so other people know you
made them.
REGISTER THE SOFTWARE
Please follow the instructions in the Purchase section above.
MAKE A GT-
BACKUP
First thing to do is to backup all your settings and patches from your GT-. You
don’t want to lose them!
From the File and Windows menu, select Load (bulk dump) . On your effects
pedal, go to MIDI Bulk Dump (the dialog box reminds you how to do this), select
“System” as the start point, and the last of your patches as the end point. Start the
transfer from the GT-.
You should see the byte count increasing as the data is transferred to GT Manager.
The program notices when the transfer is done, and puts the patch data in a new
file; you will see this on-screen.
Important: if you have upgraded from an old version of GT Manager (v1.x),
please transfer the system data from your GT-
to your PC again as these
previous versions did not save the system data properly. You can do this
by transferring just the System (and QuickFx if relevant) data without any
patch data. The system data is saved automatically when you exit GT
Manager.
So where did the system data go? All the system data is kept in a separate file, and
stored in either the same folder on your PC that GT Manager is installed in on old
versions of Windows, or in the “All Users\Application Data” area on Windows NT / XP
/ Vista. This way, you only have one copy of your system data on your PC. You can
of course make a copy of this file if you want, using Windows Explorer. You might
want to do this, just in case you need to undo some changes later on. The file is
called “GTinit.dat”. On Windows NT / XP / Vista there is a second copy of this file in
the folder where GT Manager is installed – this contains the default data.
Some patches need some of this system data – for example if the patch is using any
custom preamp or harmonist settings (except for the GT-10 where this is all in the
patch file). The patch file saved by GT Manager will always have a copy of the
relevant data in it.
Save your patch file.
Now you are ready to go!
HOW DO I RE-ORGANISE MY PATCHES?
If your patches are not in the locations you would like, you can easily move them
around.
See the Patch Files section to learn how to copy and move patches.
HOW DO I ADJUST MY PATCHES?
Maybe some of your patches need a bit of tweaking to get them right. For example,
maybe they’re not all at the same volume, or the EQ may need some adjustment.
See the Patch Editor section to learn how to adjust things.
5
GENERAL FEATURES
This section tells you about some of the useful features that GT Manager has that
are not covered in other sections of this guide.
USERNAME AND EQUIPMENT SET-UP
You can tell GT Manager your name, and describe your basic equipment set-up.
This information is included in any patch files you make.
This is useful if you have different sets of patches for different equipment set-ups,
and is also useful if you are going to share your patches with other people.
When you create a new patch file, the username and set-up is taken from the
default settings you make in the Tools and Settings User info menu. You can
edit the equipment set-up description in the patch file if you need to, but you can’t
change the username.
START-UP STATE
If you shut down GT Manager with one or more files still open, the program will start
up with these files again next time.
Often, you will want the same files open each time, so it is preferable to exit GT
Manager with the files open rather than closing each file before you exit.
If any of the patch files need saving when you exit, then you will be asked if you
want to save them or not.
WHAT’S NEW?
The main new feature in version 4 compared to version 3 is
Support for GT-10
The main new features in version 3 compared to version 2 are
Support for GT-8
Automatic setting of Device ID and CTL/EXP CC#
6
PATCH FILES
This section tells you how to manage your patch files. The patch editor is explained
in the next section.
ABOUT THE PATCH FILE WINDOW
The left side of the window lists the patches. Any in light grey are the defaults for
that patch location – this is not actually stored in the file. Note that the colour
settings can be altered so that these presets are not shown, so you may just see
empty “boxes”. You can scroll the list up or down with the scrollbar, or using the
mouse wheel.
To select a patch, left-click on it (the background of the patch “box” changes colour).
To add one of the default patches to the file, left-click it (left-click again if you also
want to select it).
The red and green shading to the left and right side of the patch “box” indicate
whether a patch has been edited or added to the file respectively. You can change
any of the colours used in the patch window – see section 12.
On the right side is summary information for the selected patch. This shows the
basic effect settings, and the date/time the patch was first loaded to the PC. At the
top right, there is space for some text that can be saved with the patch. You can
add any notes you want here.
Info button
Click on this to show further information about the patch. This includes the name of
the person who created it and who last saved it, and the associated date/times. It
also shows the equipment setup notes that are stored in the patch file (this is the
same for all patches in the file).
Globals button
Click on this to show the globals settings. These are stored in the patch file
HR button
This is only visible if the selected patch is using custom Harmonist settings.
Click on this to show the Harmonist settings used by this patch.
AR button
This is only visible if the selected patch is using custom Auto-Riff settings.
Click on this to show the Auto-Riff settings used by this patch.
Note that for the GT-10, the HR and AR views edit the data in the patch. For other
GT-, it only displays the relevant system data, and can’t be edited (use the system
editor instead).
HOW DO I OPEN A PATCH FILE?
From the File and Windows menu, select Open… . The normal Windows dialog box
appears, so you can choose the file you want to open.
You can also press Ctrl-O instead.
Normally, you will probably keep all your patches in the same folder on your PC.
You can tell GT Manager to use this as the default folder; select the Tools and
Settings Folder & File menu, and pick the folder from the folder list.
GT Manager uses a “.syx” file format by default. It can also read “.gxg” files from
the Boss GT-10 librarian, and “.mid” files.
WHAT FORMATS CAN I SAVE THE PATCH FILE IN?
GT Manager can save patch files in “.syx” format (the default), “.mid” format for
importing into other midi applications, “.gxg” format for loading into Boss’s GT-10
librarian and “.xls” format for generating a comprehensive listing of all the patch
settings.
The “raw .syx” format contains only the patch information: the other information
such as patch creation dates and user details.
HOW DO I SELECT A PATCH?
To select a patch that is in the patch file, left-click it once. The summary panel on
the right of the window will be updated, and the patch data will be sent to the GT-.
The patch data is not stored in the GT-
at this point, and none of your
patches have been overwritten. The data has in fact been sent to a temporary
memory area. This is the same as when you select a patch on the GT- – you get a
copy of the patch in the temporary memory area in the effects pedal. That’s why
you have to re-save the patch if you make any changes to the effects parameters.
So if you want to save the patch in the GT-, you need to press the Write button,
and then select a patch location to store the patch into.
HOW DO I CREATE A NEW FILE?
From the File and Windows menu, select New , and then choose GT-3 , GT5 , GT-6 , GT-8 or GT-8 , depending on which you want. A new window opens
showing only the default patch names.
You can also press F3, F5, F6, F8 or F10 respectively instead.
HOW DO I ADD PATCHES TO THE FILE?
If you want to add one of the default patches to the patch file, left-click it once. The
background colour changes to show it is now in the file. At this point, the patch is
not selected. To select it, left-click again – the patch summary information on the
right of the window will be updated, and the patch data sent to the GT-.
WHY IS THE PATCH FILE CORRUPTED WHEN I SAVE IT?
If you are running an un-registered version of the software, you can still save patch
files, but GT Manager will alter some of the data. This is ok for you to evaluate how
the software is working, but of course if you want to keep your patch data, then you
will need to register the software. Once the software is registered, the patch file will
be saved properly.
HOW DO I COPY AND MOVE PATCHES?
Copying and moving patches can be done two ways: either using the normal
Windows drag-and-drop method, or using the Cut, Copy and Paste commands on
the Edit menu or the corresponding buttons on the toolbar.
Drag & drop works the in a similar way as it does in Explorer:
Normal
Ctrl
Shift
Shift+Ctrl
Same file
Different file
Move
Copy
Move
Swap
Copy
Copy
Move
Swap
The first and second patches can be in the same or different patch files. If you drag
onto a window that is partly underneath another one, it comes to the top so you can
see it properly.
If you need to drag into a patch that has scrolled off the top or bottom of the
window, then drag into the area near the top or bottom of the window – this will
make the window scroll so you can see the other patch locations.
To use the Edit menu: select the patch you want to copy or move, then
select Copy or Cut on the Edit menu. Activate the patch you want to overwrite
then select Paste on the Edit menu. Note that once the patch is overwritten, you
will lose the previous data!
See also the patch pop-up menu item below.
You can also move and copy whole banks of patches by dragging the bank number
text at the left side of the patch window.
HOW DO I DELETE PATCHES?
First select the patch you want to delete by left-clicking on it. Then press the
“Delete” key on the PC keyboard or select Delete from the Edit menu.
You can also drag and drop the patch into the wastebasket at the bottom right of
the window.
See also the patch pop-up menu item below.
HOW DO I UN-DELETE PATCHES?
Deleted a patch by mistake? Don’t worry, just click on the wastebasket or
select Un-delete from the Edit menu, and a list of deleted patches is shown. You
can select which ones you want to put back into the patch file.
You can even un-delete patches after you saved the file as long as the patch file
window is still open. The deleted patches are not kept in the saved file.
See also the patch pop-up menu item below.
CAN I RE-SIZE THE WINDOW?
Yes. Click and drag the border of the window. You cannot make the window
smaller or wider than the default size, but you can make it taller so that you can see
more patches at once.
GT Manager remembers the last size you set, and uses this for any new patch file
windows.
PATCH POP-UP MENU
If you right-click on a patch, a pop-up menu appears giving you quick access to
common things you might want to do. These include:
Add
Adds this patch to the file
Select
Cut
Copy
Selects this patch
Cuts the patch so you can paste it somewhere else
Copies the patch so you can paste it somewhere else
Paste
Edit
Delete
Un-delete
Pastes a patch you cut or copied
Opens the patch editor
Deletes the patch
Restores the patch
Rename
Resend
Insert patch
Renames the patch
Bulk sends this one patch
Moves all the patches from this one along one position
Insert bank
Load one
Convert to text
Moves all the patches from this one down one bank
Loads this patch from the GT-
Gives a text listing of this patch
Please refer to the Menus section, where you will find further information on these in
the description of the Edit menu items.
PLUGINS
The EQ Adjust plugin can be found in the Tools menu and toolbar. See section 18
below.
CAN I HIGHLIGHT SPECIFIC PATCH CATEGORIES?
For the GT-10, click on the Filter button
on the toolbar, or select Show
category… from the View menu. This
opens the window shown here.
Select the categories to show, and
which to “hide”.
You can rename the user categories
from here by right-clicking on the name
and entering a new one. Press the Esc
key to cancel the rename
Remember that changes to the user
category names apply to all patches –
this is a global setting.
7
PATCH EDITOR
The picture here shows the preamp for the GT-8 -
HOW DO I OPEN THE EDITOR?
First select the patch by left-clicking on it. Then double-left-click the patch to open
the editor. Alternatively, click on the effect box in the right hand pane (where it
shows which effects are on/off etc) to open the editor and go straight to that effect.
HOW DO I SELECT AND VIEW EFFECTS?
This works the same way as the GT-. Click on the effect button for the effect you
want to see.
HOW DO I TURN EFFECTS ON AND OFF?
This works the same way as the GT-. If you press the effect button for an effect
that is already being displayed, then the effect is toggled on/off.
For the assigns (EXP, CTL, Assign 1 to Assign 8), first select the assign you want to
turn on or off,
and then click on the Assign button.
The “light” in the Assign button will be on if any of the individual assigns are on.
The assign select panel underneath shows which assigns are on by putting a red
background under the assign name/number.
HOW DO I SELECT SUB-EFFECTS?
For effects that are in groups (like MOD on the GT-3 and GT-5, or FX2 on the GT-6
and GT-8), a list of the sub-effects is shown in a panel underneath the effects
buttons. This has selection boxes next to each sub-effect name. Click on the
required sub-effect selection box.
In some cases, this list is too long to fit across the width of the display. In this case,
there are scroll arrows on the left (as above) and right. Click on these to show the
other available sub-effects.
DOES THE GT-
TRACK CHANGES?
Yes - whist the editor is open, any changes you make to the patch settings in GT
Manager are also made to the temporary patch in the GT-. The GT- should not
be in bulk mode.
HOW DO I UNDO CHANGES?
Either click on the Cancel button to quit the editor and lose all the changes, or click
on the Restore button to undo all the changes and keep the editor open.
You can’t undo individual changes.
WHAT IS “GT EDIT”?
Click on “GT Edit” to turn this feature on and off. Be sure to turn the feature off
when you’re done.
This function allows you to edit patch parameters whilst still playing your guitar.
This means you can get the sound you’re after more quickly.
When you activate this function, the CTL pedal on the GT- is used to select the
various on-screen control knobs. A short press takes you to onto the next control
knob; a longer press takes you back to the previous one. On the GT-10, use CTL 1
to go to the previous control, and CTL 2 to go to the next control (a long press on
either pedal reverses the direction). The EXP pedal is used to move the control
knob. So you can now adjust patch parameters using your feet – leaving your
hands free to carry on playing.
Whilst this feature is activated, the normal functions of the CTL and EXP pedals are
switched off.
This function only allows you to change the parameters with the control knobs and
sliders in the editor; the parameters and settings on checkboxes cannot be changed
this way.
HOW DO I CHANGE THE FX ORDER?
In the “Mstr” (Master) Fx, you can see the effect order and which effects are on.
To move effects in the chain, simply drag and drop them (hold down
the left mouse button whilst moving the mouse).
Note that the GT-10 preamps can’t be moved out of their separate
chains!
PRESET SETTINGS
All the preset effects settings are included in the drop-down list-box. For the GT-3,
GT-5, GT-8 and GT-10, this list also includes the user-defined preset effects settings
(U1 onwards). These are stored in the system memory area. If you didn’t bulk
dump your system data to GT Manager yet, the user-preset names will be blank.
For effects with sub-effects (like MOD on the GT-3 and GT-5, or FX2 on the GT-6),
the list includes all the presets for the whole set of sub-effects.
Save the current effect settings to one of the user locations by clicking on
the Save button.
QUICKLY GOING TO THE PREVIOUS / NEXT PATCH
Use the << and >> buttons to save changes to the current patch and display the
settings for the next patch.
WHY ARE SOME KNOB VALUES “OFF”?
For some effects, not all the controls are relevant. For example, in the Harmonist, if
you select 1-voice, then the controls for voice 2 are all turned off. On the GT-,
you will find that these are not listed when you scroll through the effect parameters.
CAN I RE-SIZE THE WINDOW?
No, the editor window size is fixed. All the controls for editing an effect fit into the
window.
8
DATA TRANSFERS
HOW DO I TRANSFER TO THE PC?
From the File and Windows menu, select Load (bulk dump) . On your effects
pedal, go to MIDI Bulk Dump (the dialog box reminds you how to do this), select the
first and last patches as the start and end points. Start the transfer from the GT-.
If you have changed the GT- System data (for example the custom settings) then
you should select “System” as the starting point. This will then update the copy of
the system data on your PC.
You should see the byte count increasing as the data is transferred to GT Manager.
The program notices when the transfer is done, and puts the patch data in a new
file; you will see this on-screen.
CAN I CANCEL THE TRANSFER?
Yes – just click on the Cancel button on the Bulk Dump progress dialog. The data
received for the complete transfer is discarded. The GT- will carry on doing a Bulk
Dump – there seems to be no way to stop it!
HOW DO I TRANSFER SOME BUT NOT ALL PATCHES?
If you just want to transfer a few of your patches to the PC, and they are not
consecutive ones, there are two methods.
You could transfer all the patches anyway, then delete the ones you don’t want from
the file.
Alternatively, in the MIDI Connections dialog, clear the “Auto-detect end of transfer”
checkbox. Then you can do a series of bulk dumps, and they will all end up in the
same file. You will need to click on the “Done” button on the Bulk Dump progress
form when you’re done.
CAN I TRANFER JUST ONE PATCH?
You can load just one patch from the GT- into an existing patch file using
the Load One command in the Edit menu.
The GT- needs to be in Bulk Receive mode (not Bulk Dump)! This may seem
confusing as the GT- is sending data rather than receiving it. In fact, the Bulk
Receive mode allows data to be sent or received. The difference is that in Bulk
Dump, you are controlling what is sent to the PC using the GT-. In Bulk Receive,
you are controlling what is sent to the PC using the PC. The GT- needs to be
receiving (listening) as the PC asks for the relevant data.
You can put the GT- in Bulk Receive either before or after you select Load
One from the Edit menu.
HOW DO I TRANSFER TO THE GT-
?
If you only want to transfer one patch, then simply select it. GT Manager sends the
patch data to the GT-. You can then save the data in any patch location (see
below).
For the GT-3, GT-5, GT-6 and GT-8, if you want to transfer all the patches in the file,
first put the GT- into Bulk Receive mode. Next, select Bulk send to GT-3 (for
GT-3 files) from the File menu. The menu will change to Bulk send to GT-5 for
GT-5 files, Bulk send to GT-6 for GT-6 files and to Bulk send to GT-8 for GT-8
files. The GT-10 can accept bulk data at any time (and in fact doesn’t have a Bulk
Receive mode).
Once the transfer is finished, press the Exit button on the GT- (except for the
GT-10).
The system data is not transferred with the patch data. You can send the system
data from the PC from the System Editor.
HOW DO I SAVE DATA IN THE GT-
?
If you have just transferred a single patch by selecting it from the patch window, it
will not be saved yet on the GT-. You need to press the Write button on the
GT-, and then select a patch location to save the data to.
If you did a bulk transfer to the GT-, press the Exit button on the GT- (except
for the GT-10). This will then exit bulk dump mode on the effects pedal and store
all the data.
9
PRESET FILES
HOW DO I ACCESS THE PRESETS?
The GT- include patches beyond the user-programmable locations that are fixed.
You can open a patch file containing all these presets. The file window looks very
similar to the normal patch file window.
From the GT System data Presets menu, select GT-3 Presets , GT-5 Presets ,
GT-6 Presets , GT-8 Presets . or GT-10 Presets .
You can click on these patches to select them in the same way as for a normal patch
file. The summary panel on the right shows the basic settings, and the patch data is
sent to the GT-.
You can copy any of these preset patches to a normal patch file using the drag-anddrop described above.
Although you can open the patch editor to view the settings of these patches, you
cannot make any changes to the patch file. If you want to make a new patch based
on one of these presets, then you should copy it to a normal patch file first, and
open the editor on that patch instead.
CAN I RE-SIZE THE WINDOW?
Yes. Click and drag the border of the window. You cannot make the window
smaller or wider than the default size, but you can make it taller so that you can see
more patches at once.
10 TEXT AND ZIP FILES
TEXT FILES
You can open and save text files from the File
Save As… menus.
Open and File
Save or File
You can’t change the text in the file, but you can copy it and then paste it into other
programs if you want. To do this, select the text you want to copy, then right-click
on the text, and choose Copy from the pop-up menu.
When converting between patch formats, if there are conversion problems then GT
Manager will open a text window. This text window lists what items failed to convert
properly. You can save this information if you want.
You can also convert a patch to text format – this is put into a text window for you
to save. Note that only one patch at a time can be converted to text; you can’t do a
complete patch file at once.
ZIP FILES
You can open zip files from the File
Open menu.
You can’t change or save zip files.
The zip file window lists all the files in the zip archive. You can open any patch file
or text file, or even another zip file from this window by clicking on the filename.
If you want to put several of your own patch files into a zip archive, then you need
another program to do this (for example WinZip).
CAN I RE-SIZE THE WINDOW?
Yes. Click and drag the border of the window. There is a minimum size you can
make the window, but no maximum.
11 SETTINGS - CONNECTIONS
This section describes the various parts of the MIDI connections display…
Click on Tools and Settings and then click on Connections .
MIDI INPUT PORTS
This lists all the MIDI inputs on your PC. GT Manager will have selected the first one
in the list when you first ran the program, or if you are using the GT-10’s USB
connection, it will select that automatically.
AUTO-DETECT END OF BULK DUMP
If you select this (the default setting), then GT Manager will automatically detect
that the bulk dump from your GT- is finished, and transfer the data to a new file.
If you clear this, then you need to tell GT Manager when the bulk dump is finished
(there is a button to click on the progress dialog for this).
MIDI OUTPUT PORTS
This lists all the MIDI outputs on your PC. GT Manager will have selected the first
one in the list when you first ran the program.
By default, only MIDI output ports are listed – your PC soundcard probably has one
or more MIDI synthesisers on it; these are not listed. If your MIDI port is not listed,
then this is because it is not describing itself to Windows properly. Enable the “List
all ports” checkbox. This makes the list show all MIDI ports, including synthesisers
etc.
If you select a MIDI output that is a synthesiser on your soundcard, then no data is
sent to the GT-. You will not hear anything either, as the MIDI data does not
include any music information.
LIST ALL PORTS
Shows all output ports – this will usually include software synths etc; use this if your
actual output port isn’t listed otherwise.
LOG MIDI IN AND MIDI OUT MESSAGES
Enabling these will make GT Manager write all Midi activity into a text window. You
don’t normally need to enable either of these.
DEVICE ID
This needs to match the Device ID set in the GT-. If you get it wrong, then
transfers to the PC still work, but transfers to the GT- will not. If you select the
Auto detect option, then GT Manager will detect the Device ID from data sent from
the GT- to the PC.
GT Manager can store individual device IDs
for each type of GT-, and each system
configuration. Normally, choose the “Global”
setting. If you have a number of GT- units
with different device IDs, then set the
individual device IDs by selecting the device
type and then clearing the “Use global setting” box, and finally setting the desired
device ID. If you have more than one of the same kind of GT- units, then load a
different system configuration for each one and make the right settings for each in
turn (see section 13).
CTL CC#
This needs to match the CTL CC# set in the GT-. If you get it wrong, then the GT
Edit function won’t work. For the GT-10, set the CC# of the CTL 1 pedal.
EXP CC#
This needs to match the CTL CC# set in the GT-. If you get it wrong, then the GT
Edit function won’t work. If you select the Auto detect option, then GT Manager can
detect the CTL CC# and EXP CC# during GT Edit mode. Once you have gone into
GT Edit mode (whilst editing a patch), first move the EXP pedal on the GT-, and
then press the CTL pedal.
If you select the Auto detect option, then GT Manager will detect the CTL and EXP
CC# when you enable GT Edit mode and then move the EXP pedal and then press
the CTL pedal (for the GT-10, press CTL 1 during auto-detect).
MIDI IN CHANNEL
This needs to match the MIDI Tx channel set in the GT-. If you get it wrong, then
the GT Edit function won’t work.
You can set GT Manager to accept input on any MIDI channel (Omni mode), in
which case it doesn’t matter what the MIDI In Channel setting is. This is ok if you
don’t have any other devices connected to the MIDI input.
MIDI OUT CHANNEL
This needs to match the MIDI Rx channel set in the GT-. If you get it wrong, then
the Keep selected patch number synchronised function won’t work.
KEEP SELECTED PATCH NUMBER SYNCHRONISED
This sets the patch and bank number on the GT- to the same as that selected in
GT Manager. This is useful if you often are just updating one patch, and want to
save it by pressing the Write button on the GT- to save the patch.
12 OTHER SETTINGS
This section describes the other Settings. There are three parts – “User info”,
“Folder & File” and “Colour scheme”.
USER INFO SETTINGS
Click on Tools and Settings and then click on User info .
Enter your username as information about your equipment setup. This information
is included in each patch file that you create. This is a useful reminder to yourself if
you have different patches for different setups, and is also useful to other people if
you share your patch files with them.
The “other info” part can be edited for each patch in a file, but the username can’t
be changed (so it will always show that you created it).
FOLDER & FILE SETTINGS
Click on Tools and Settings and then click on Folder & File .
DEFAULT FILE LOCATION
You will probably want to keep all your patch files in the same folder on your PC.
Set this folder here, then when you do a File Open or File Save As…, the folder will
be set automatically.
You can always change to a different folder in the File Open or File Save As… dialogs.
MISC OPTIONS
You can tell GT Manager whether you want to be prompted to save text and zip files
when you close them (or exit the program) if they are not already saved. You will
always be prompted to save patch files.
ZIPFILE CLICK SELECTION OPTIONS
This allows you to decide whether you prefer to single-left-click or double-left-click
on various items.
COLOUR SCHEME SETTINGS
Click on Tools and Settings and then click on Colour scheme .
PANEL SHADING
This allows you to set your own colour preferences for the panels (default is blue).
PATCH “BOX” STYLE
This allows you to set your own colour preferences.
If you don’t like the default colour, click on the patch boxes to change the colour for
each style of patch box. The usual windows colour dialog is shown. For empty
patch slots in patch files, you can also make the box transparent and not show the
default patch name text.
You can also change the colours of the shading at the left and right side of the patch
boxes which indicate whether a patch has been added to the file or modified.
If you don’t like the default font, click on the “Font” button to change the font for
each style of patch box. The usual windows font dialog box is shown.
Click on “Defaults” to restore the default patch box settings.
TASK PANEL STYLE
You can change the visual appearance of all the control panel (the panel with the
buttons for File and Windows , Tools and Settings etc. The default setting is
“Office 2003”.
KEEP MAIN PANEL ON TOP
This keeps the main control panel on top of other windows so you don’t lose it.
MENU & TOOLBAR STYLE
You can change the visual appearance of all the menus and toolbars. The default
setting is “Office 2003”. On versions of Windows other than Windows XP, you can
also then choose which XP emulation style you want. On Windows XP, GT Manager
uses the setting from the operating system.
You can show or hide the menus and toolbars separately for syx (patch) files, txt
(text) files and zip files. You can also change these settings from the menus and
toolbars of patch, text and zip windows respectively.
13 SYSTEM SETTINGS
This section describes the System Settings. There are three parts – “Presets”,
“System Data” and “System Configuration”.
“Presets” allows you to view the preset patches, as described in section 9.
“System Data” allows you to edit the system settings for the GT-, as described in
section 19.
“System Configuration” allows you to keep up to 5 sets of system data. Normally,
you can leave this on Configuration 1. If you need to store several different
configurations (different global settings, or you have more than one of the same
type of GT-), then you can select the appropriate configuration here. Remember
to do this before transferring any new system data between GT Manager and the
GT-.
Select Rename configurations to give the
configurations a more meaningful name. The
current configuration is highlighted.
You will have to reset the GT- device ID etc on
the MIDI Connections screen for the different
configurations if you have multiple devices with
different IDs.
14 THE MENUS – CONTROL PANEL
This section lists all the menu commands in the main control panel, with a brief
description of what each one does.
FILE AND WINDOWS : FILE
New
GT-3
GT-5
GT-6
GT-8
GT-10
F3
F5
F6
F8
F10
Opens a new GT-3, GT-5, GT-6, GT-8 or GT-10 file. The file lists all the default
(preset) patches, but will in fact contain no data.
Open…
Ctrl-O
Opens an existing file. This can be a patch file (*.syx), a text file (*.txt) or a zip file
(*.zip).
Load (bulk dump)
Ctrl-L
This tells GT Manager that you are going to do a Bulk Dump from the GT- to your
PC. You can merge data into a file already open, or send data to a new patch file.
Recent Files
Lists the last 10 files you have opened, so you can re-open them more quickly.
Exit
Closes GT Manager. If you have any files open that are not saved, GT Manager will
ask you if you want to save each of them.
FILE AND WINDOWS : WINDOW
Patch
Lists all the open patch files.
Text
Lists all the open text files.
Zip
Lists all the open zip files.
TOOLS AND SETTINGS : TOOLS
Check for updates
Retrieves information about the latest software versions from our website, and lists
what is available. An Internet connection is required for this.
Registration
Enter registration
Allows you to copy your purchase confirmation email from Kagi into GT Manager to
fully activate the software. This must be done within 10 days of purchase.
Registration
Registration
Restore from backup disk
Restores the registration data from a removable disk that you made before.
Add-ins
This lists what add-ins are installed. This includes both system data add-ins and
patch add-ins.
TOOLS AND SETTINGS : SETTINGS
Connections
Opens the MIDI Connections display. This allows you to set the MIDI input and
output ports, MIDI CC numbers etc used by GT Manager.
User info
Opens the user info display. This allows you to enter brief information about
yourself and your guitar setup. This is stored in your patch files.
Folder & file
Opens the folder & file display. This allows you to set the default folder to keep your
patch files in, and some other similar settings.
Colour scheme
Opens the colour scheme display. This allows you to change the colours used in
patch file windows, and the menu and toolbar styles.
GT SYSTEM DATA
Presets
GT-3 Presets
GT-5 Presets
GT-6 Presets
GT-8 Presets
GT-10 Presets
Opens up the chosen presets window listing all the patches that are not usermodifiable. You can only have one of these open.
Although you can’t modify these patches, you can copy them into a normal patch
file.
System Data
GT-3 System Data
GT-5 System Data
GT-6 System Data
GT-8 System Data
GT-10 System Data
Opens up the system data editor add-in (you can also do this from the add-in list).
HELP AND INFO : HELP
Contents
Opens the contents page of the help file for GT Manager.
About…
Shows information about GT Manager (software version, whether it is registered or
not).
Purchase
This opens our software purchase page in your web browser. This menu item is
only listed if you have not registered GT Manager.
HELP AND INFO : INFO
Partheus HomePage
Opens our homepage in your normal web browser.
Web pages
Lists some useful web pages, which you can then open in your browser by clicking
on them. The current version of GT Manager does not allow you to edit these
directly – this will be added later.
Documents
Lists some useful documents, which you can then open (like this one!). Text
documents will open in GT Manager. Word and Acrobat documents open in those
applications. If you add any other files with extensions of “.txt”, “.doc”, “.pdf” into
the folder where GT Manager is installed, then they will also be listed.
15 THE MENUS – PATCH FILES
FILE
Save
Ctrl-S
Saves the current file.
Save As…
Saves the current file, asking you for a new filename first.
Revert
Discards all changes made to the file since it was last saved.
Bulk send to GT-3 (or GT-5, GT-6, GT-8, GT-10)
This does a bulk transfer to the GT-. The menu changes depending on the format
of the patch file in the current window. You need to have the GT- in Bulk Receive
mode for it to accept the data.
Close
Closes the current file. If you have made any changes, GT Manager asks you if you
want to save the file first.
EDIT
Cut
Ctrl-X
Removes the selected patch from the file. The patch data is remembered so that
you can paste it somewhere else.
Copy
Ctrl-C
Takes a copy the selected patch data so that you can paste it somewhere else.
Paste
Ctrl-V
Pastes the patch data that was cut or copied.
Edit
Opens the patch editor for the selected patch.
Delete
Del
Removes the selected patch from the file.
Un-delete…
Shift-Del
Shows a list of patches deleted from the file so you can choose which ones to put
back again.
Rename…
Crtl-R
This allows you to rename the selected patch.
Insert patch
Moves all patches from the selected one along one position. If there is data in the
last patch in the file, it will be deleted.
Insert bank
Moves all the patches from the selected one down one bank. Any patches in the
last bank of the file are deleted.
Load one
Loads the selected patch from the GT-. The GT- needs to be in Bulk Receive
mode (not Bulk Dump)!
Re-send
Re-sends the patch data to the GT-. This is the same as clicking on the patch
again.
VIEW
Show patch map
Creates a text listing of all the patches in the file.
Show category…
GT10 only: highlights patches in the selected categories.
Theme
Sets the visual theme for the menu and toolbar for patch file windows.
Toolbar
Hides or shows the toolbar.
(only on the toolbar)
Hides or shows the menus.
Presets (only on the menu)
Shows the presets window.
TOOLS
<add-in list>
This is a list of the available add-ins that work on patch data. GT Manager is
supplied with the “EQ Adjust” add-in as standard.
Add Ins…
Shows you a list of compatible add-ins and their version numbers.
Convert to text
Converts the selected patch to text. The text is shown in a new text window.
Convert file format
to GT-3, GT-5, GT-6, GT-8, 0GT-10
Converts the whole patch file to the selected format.
If there are any problems during the conversion, a text window is opened listing
what didn’t work. You can save this if you want. The patch window also has an
additional “Info” button that you can click on to get details on individual patch
conversion problems. The conversion problem information is not stored in the patch
file – it is lost when you save the file.
Tools (only on the toolbar)
Lists the available add-ins.
HELP
Help Topics
Opens up the help file for GT Manager.
16 THE MENUS – TEXT FILES
FILE
Save
Ctrl-S
Saves the current file.
Save As…
Saves the current file, asking you for a new filename first.
Print
Ctrl-P
Prints the text file to the default printer. The current version of GT Manager does
not let you change the printer settings.
Close
Closes the current file. If you have made any changes, GT Manager asks you if you
want to save the file first.
VIEW
Theme
Sets the visual theme for the menu and toolbar for text file windows.
Toolbar
Hides or shows the toolbar.
Wrap text
Wraps long lines so they fit within the width of the window.
(only on the toolbar)
Hides or shows the menus.
17 THE MENUS – ZIP FILES
FILE
Close
Closes the current file.
VIEW
Theme
Sets the visual theme for the menu and toolbar for text file windows.
Toolbar
Hides or shows the toolbar.
(only on the toolbar)
Hides or shows the menus.
18 EQ ADJUST ADD-IN
The EQ Adjust add-in allows you to adjust the EQ effect settings, and also the SubEQ settings in the MOD/FX2 effect, provided the MOD/FX2 effect is not being used
for something else.
You can activate the GT Edit function to adjust the Q, Frequency and
Gain controls. This works in the same way as described above for the
patch editor.
SELECTING EQ OR SUB-EQ
Click on the EQ or SEQ buttons to select the controls for the effect (EQ
or FX1 or FX2 for the GT-8 and GT-10) – the add-in can only show one
set of controls at a time. The buttons to the right of the selection
buttons are the effect on/off buttons.
Note that if the MOD/FX1/FX2 block is already being used for another effect, then it
is not possible to switch the Sub-EQ on.
ADJUSTING THE SETTINGS
Adjust the sliders by dragging in the appropriate direction.
You can also left-click or right-click on the sliders value
text to increment or decrement the value.
CONTROLLING THE GRAPH
Select which graph lines to display by clicking the buttons in
the display control box. “EQ+SEQ” shows the combined
response of EQ and Sub-EQ. “Orig” shows the original
response corresponding to the effect settings when you
opened the EQ Adjust add-in, before you made any adjustments.
For the GT-8, SEQ shows both the FX1 and FX2 displays.
WHAT’S THIS Q, kHz AND dB STUFF?
Compared to “normal” tone controls, the EQ adjustments available are a bit more
complicated. This gives you more control over the guitar’s signal.
The Lo and Hi controls work in a similar way to standard tone controls, either cutting
or boosting the bass and treble frequencies respectively.
The cut and boost is measured in dB, which is similar to how we humans perceive
relative volume levels. Each +6dB is a doubling in signal power; so 12dB is twice
the power of 6dB, which is twice the power of 0dB. And –6dB is half the power of
0dB etc.
The mid controls have additional settings, which determine at what frequency the
cut/boost takes effect and how wide a range of frequencies is affected.
Most of the guitar’s signal is in the 300Hz to 3kHz (3000Hz) range. Human hearing
ranges from about 20Hz to 15-20kHz (depending on how old you are and how often
you’ve deafened yourself by cranking your amplifier up).
To learn what the frequencies sound like, turn on just the EQ, set the Lo and Hi to
0dB, the Hi-Mid Gain to 0dB, and the Lo-Mid Gain to +6dB. Set the Lo-Mid Q to 1,
and slide the Lo-Mid Freq left and right whilst playing your guitar. You will find this
easier if you use the GT Edit function! You will then hear the effect of boosting
different frequencies.
The Q control is a measure of how wide a range of frequencies is affected. The
higher the Q, the narrower the range of frequencies. This might seem the “wrong
way round”, but that’s just the way it is. High values of Q are really only useful for
cutting out very specific problem noises, like mains hum. Normally, you’ll find that a
Q of 1 gives you sensible results.
PRECISE MEASUREMENTS
If you click on the graph, EQ Adjust shows you the actual cut/boost values for EQ,
SEQ and EQ+SEQ at the frequency you clicked at.
A FINAL WORD ON EQ
The graph shown by EQ Adjust is believed to be pretty close to what the GT-
actually do.
Remember, there are other effects in the GT- that can have a big impact on the
overall tone, such as the PreAmp effect. EQ Adjust does not show you the response
of the various preamps and preamp tone controls – this is much more complex. It
also does not show you the tonal characteristics of your guitar. Rather, the aim is
to help you understand the interaction of the various controls in order to help you
get the tone you want.
19 SYSTEM EDITOR
The System Editor allows you to edit the global system data from your GT-. First
of all, make sure you have transferred this data from the GT- to the PC as part of
a patch file transfer (bulk dump). GT Manager will save this system data on your PC
automatically in a separate file to any patch data.
The pictures below are mostly for the GT-10. The GT-3, GT-5, GT-6 and GT-8
displays are a bit different due to the differences between the effects units.
Note that unlike with the Patch Editor, changes you make in the System Editor are
not updated on the GT- in real-time. This is because the GT- do not support it.
You need to click on the Transmit button to send the updated data to the GT-.
SYSTEM
This shows the global system settings. The GT-8 has two screens of system
settings.
MIDI
SYSTEM PREAMP
These are the settings for the “system preamp” which overrides all the patch
preamp settings if the GT-8 or GT-10 is set to system preamp mode (see the first
screen of system data above).
This is only available on the GT-8 and GT-10.
These are the MIDI settings. Currently, the MIDI map settings are not modifiable in
the System Editor.
HARMONIST
For the Harmonist, there are 29 user-defined scales. You can display scales 1 to 16
or 14 to 29 by clicking on the checkboxes.
To modify any of the output notes, right-click on the appropriate note, then select
the note you want from the pop-up menu. To fill-in the notes for Db through to B
that correspond to the one for C, right-click on the note for C, and select
Fill-in - >> from the pop-up menu. This saves you entering a lot of data for a
scale that does a basic transposition on all the input notes.
AUTO-RIFF
Each Auto-Riff phrase is displayed separately.
To change any output note, right-click on the note, and select the one you want
from the pop-up menu. You can also fill-in the sequence for notes Db to B by
clicking on the Fill-in button. This copies the step sequence from C to Db to B, and
saves you entering a lot of data for sequences that are the same for each note, but
at a corresponding pitch (as in the picture above).
CUSTOM OD/DS
This allows you to modify the Custom OD/DS settings.
This is not available on the GT-3 or GT-10.
CUSTOM PREAMP
This allows you to modify the Custom Preamp settings. For the GT-6, GT-8 and
GT-10, Preamps 1 to 3 are selectable from the checkboxes.
This is not available on the GT-3.
CUSTOM WAH
This allows you to modify the Custom WAH settings.
This is not available on the GT-3, GT-5 or GT-10.
INPUT
This allows you to modify the input levels and global EQ.
This is only available on the GT-10.
OUTPUT
This allows you to modify the output levels and phrase loop settings.
This is only available on the GT-10.
EXP
This allows you to modify the EXP pedal settings.
This is only available on the GT-10.
CTL
This allows you to modify the CTL pedal settings. Click on the Edit CTL 3-4 box to
show the settings for the external CTL pedals (3 and 4).
This is only available on the GT-10.
A
“IT DOESN’T WORK”
Problems, and some answers.
(Other parts of this document also cover a number of possible questions, so please
also look through the relevant sections above).
THE MIDI TRANSFER IS UNRELIABLE
This problem is usually noticed when transferring patches to the PC, and the patch
names seem to be garbled.
If the patch data transferred into the PC seems to be corrupted, but seems ok
sending out from the PC, then there is a problem with the MIDI interface. Some
adapters that plug into the 25-way joystick connector on the soundcard do not meet
the MIDI electrical specifications on the MIDI input (there is no “opto-isolator”
included. This causes unreliable data transfer. The solution is to use a better MIDI
interface, such as one of the USB-based ones.
WHY IS THE PATCH FILE CORRUPTED WHEN I SAVE IT?
If you are running an un-registered version of the software, you can still save patch
files, but GT Manager will alter some of the data. This is ok for you to evaluate how
the software is working, but of course if you want to keep your patch data, then you
will need to register the software. Once the software is registered, the patch file will
be saved properly.
I CAN’T ENTER THE REGISTRATION
On Windows NT / XP / Vista, you need to be logged onto the computer with
administrator rights (the same as you need to install GT Manager in the first place)
since the registration applies for all users on the computer.
I’VE LOST MY REGISTRATION
If you have re-formatted your hard disk, then any registration data will be lost.
That’s why you should keep a copy of your registration email.
If you didn’t keep your registration email, then please contact us (see page 1), or
return to the Kagi webpage, where you can request the original email be sent again.
B
UN-INSTALL DETAILS
This section is for information only.
WHAT FILES ARE REMOVED?
The uninstall program will remove the GT Manager program itself and various
support files that were part of the installation.
WHAT FILES ARE NOT REMOVED?
The un-install will not remove any of your patch files or backup of the GT- system
that you have on your PC. It will also not remove the files associated with the
software registration. This means you can re-install the same or a newer version,
and the registration data is not lost.
C
ADD-IN INTERFACE
This section is for developers only.
The capabilities of GT Manager can be added to using add-in modules. GT Manager
currently has three standard modules - the EQ adjust add-in, the System editor
add-in and a Webpage shortcut editor add-in.
GT Manager automatically recognises valid add-ins placed in the PlugIns folder, and
makes them available on the Tools menu.
If you are interested in making your own add-ins, then a add-in specification
document is available that describes the interface to GT Manager. A sample Visual
Basic add-in is also available.
The specification is available free of charge, and there are no licence fees or
royalties to pay for add-ins using this interface specification. However, the
specification must only be used for software intended for use with GT Manager, and
no other purpose.
To obtain a copy of this specification, please send an email to the address on page 1
of this document.
If you want, we can also feature your add-in on our website for other people to
download and use. Whether you choose to make your add-in free or require a
payment is up to you.