1
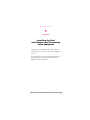
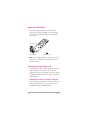
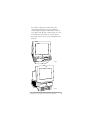
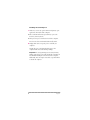
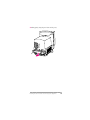
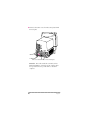
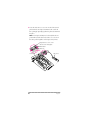
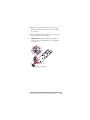
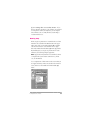
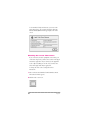
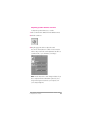
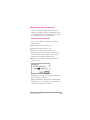
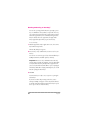
Apple Video System User’s Manual K Apple Computer, Inc. © 1996 Apple Computer, Inc. All rights reserved. Under the copyright laws, this manual may not be copied, in whole or in part, without the written consent of Apple. Your rights to the software are governed by the accompanying software license agreement. The Apple logo is a trademark of Apple Computer, Inc., registered in the U.S. and other countries. Use of the “keyboard” Apple logo (Option-Shift-K) for commercial purposes without the prior written consent of Apple may constitute trademark infringement and unfair competition in violation of federal and state laws. Every effort has been made to ensure that the information in this manual is accurate. Apple is not responsible for printing or clerical errors. Apple Computer, Inc. 1 Infinite Loop Cupertino, CA 95014-2084 (408) 996-1010 Apple, the Apple logo, LaserWriter, Macintosh, and QuickTime are trademarks of Apple Computer, Inc., registered in the U.S. and other countries. Adobe, Adobe Illustrator, Adobe Photoshop, and PostScript are trademarks of Adobe Systems Incorporated, and/or its subsidiaries and may be registered in certain jurisdictions. Helvetica is a registered trademark of Linotype-Hell AG and/or its subsidiaries. Simultaneously published in the United States and Canada. Mention of third-party products is for informational purposes only and constitutes neither an endorsement nor a recommendation. Apple assumes no responsibility with regard to the performance or use of these products. The Apple Publishing System This Apple manual was written, edited, and produced on a desktop publishing system using Apple Macintosh computers and QuarkXPress. Technical illustrations were drawn in Adobe™ Illustrator; screen shots were created and modified with system software, ExposurePro, and Adobe Photoshop. Final pages were output using PostScript™ technology. Text type is Apple Garamond, Apple’s corporate font. Display type is Helvetica® Black. Ornaments are custom symbols designed for Apple Computer. PostScript, the LaserWriter page-description language, was developed by Adobe Systems Incorporated. ii C O N T E N T S Communications regulation information iv Preface vii 1 Installing the Card and Software and Connecting Video Equipment 1 What you should have 2 Installing the video input card 2 Installing the software 41 Connecting video equipment 43 2 Learning About the Software 51 Opening the Apple Video Player 52 Getting help 53 Choosing the correct video source 54 Adjusting the sound 56 Adjusting the picture 58 Changing the video window size 59 Changing the window color 60 Setting the video input standard 61 Setting and using a “hot key” 62 3 Capturing Video Images 63 Capturing individual images 64 Capturing movies 66 4 Troubleshooting 71 5 Technical Information 77 Index 79 iii Communications regulation information FCC statement This equipment has been tested and found to comply with the limits for a Class B digital device in accordance with the specifications in Part 15 of FCC rules. See instructions if interference to radio or television reception is suspected. Radio and television interference The equipment described in this manual generates, uses, and can radiate radiofrequency energy. If it is not installed and used properly—that is, in strict accordance with Apple’s instructions—it may cause interference with radio and television reception. This equipment has been tested and found to comply with the limits for a Class B digital device in accordance with the specifications in Part 15 of FCC rules. These specifications are designed to provide reasonable protection against such interference in a residential installation. However, there is no guarantee that interference will not occur in a particular installation. You can determine whether your computer system is causing interference by turning it off. If the interference stops, it was probably caused by the computer or one of the peripheral devices. If your computer system does cause interference to radio or television reception, try to correct the interference by using one or more of the following measures: m Turn the television or radio antenna until the interference stops. m Move the computer to one side or the other of the television or radio. m Move the computer farther away from the television or radio. m Plug the computer into an outlet that is on a different circuit from the television or radio. (That is, make certain the computer and the television or radio are on circuits controlled by different circuit breakers or fuses.) If necessary, consult an Apple-authorized service provider or Apple. See the service and support information that came with your Apple product. Or, consult an experienced radio/television technician for additional suggestions. Important Changes or modifications to this product not authorized by Apple Computer, Inc., could void the FCC Certification and negate your authority to operate the product. iv This product was tested for FCC compliance under conditions that included the use of Apple peripheral devices and Apple shielded cables and connectors between system components. It is important that you use Apple peripheral devices and shielded cables and connectors between system components to reduce the possibility of causing interference to radios, television sets, and other electronic devices. You can obtain Apple peripheral devices and the proper shielded cables and connectors through an Apple-authorized dealer. For non-Apple peripheral devices, contact the manufacturer or dealer for assistance. DOC statement DOC Class B Compliance This digital apparatus does not exceed the Class B limits for radio noise emissions from digital apparatus as set out in the interference-causing equipment standard entitled “Digital Apparatus,” ICES-003 of the Department of Communications. Observation des normes—Classe B Cet appareil numérique respecte les limites de bruits radioélectriques applicables aux appareils numériques de Classe B prescrites dans la norme sur le matériel brouilleur : “Appareils Numériques”, NMB-003 édictée par le ministre des Communications. VCCI statement v P R E F A C E This manual tells you how to install and use the video input card and software, and connect video equipment, so that you can m view video from a variety of sources in a window that you can move or resize m adjust the color and sound m capture a single image or a series of images on disk vii C H A P T E R 1 Installing the Card and Software and Connecting Video Equipment This chapter covers installing the video input card and software. It also shows how to connect video equipment to the card. If you purchased your computer with the video input card already installed, go to the section “Connecting Video Equipment,” later in this chapter. 1 What you should have Check your package to make sure you have both the video input card and an attachment screw. Your package also contains floppy disks from which you will install the software later. Video input card Grounding clip Attachment screw The grounding clip may be a separate piece in your package. If so, you will attach it by following instructions later in the manual. Note: Installing the video input card You install the video input card by attaching the card to the computer and then connecting the card to your video equipment. The steps for attaching the card to the computer vary slightly depending on whether or not the computer has a built-in monitor. Installing the card in a compact computer If your system has a built-in monitor, continue with the steps in this section. Otherwise, go to the section that follows, “Installing the Card in a Modular Computer.” 2 Chapter 1 Your compact computer may look like either of the computers pictured below; the steps for installing the card vary slightly depending on which model you have. If your computer looks like Style A, follow the first set of steps to install the video input card. If your system looks like Style B, skip to the second set of steps, “Installing the Card in Style B.” Style A Style B Installing the Card and Software and Connecting Video Equipment 3 Installing the card in Style A 1 Make sure you save any open documents and quit any open applications. Then turn off the computer. m Choose Shut Down from the Special menu, or press the Power key on the keyboard. m Then press the power switch at the back of the computer. Press the side of the switch marked with the j symbol. 2 Unplug all the cables except the power cord from your computer. Leaving the power cord plugged in helps protect the computer from electrostatic discharge damage. To avoid generating static electricity that may damage components, do not walk around the room until you have finished installing the card and closed the computer. Additionally, move the logic board as little as possible while it is outside the computer. Important 4 Chapter 1 3 Use a screwdriver to remove the screws from the back panel. Your computer may have only two screws (on either side of the back panel) to remove. Even if the back of your computer looks different, all the ports should be in the same location as pictured here. Note: Remove these screws. (Your computer may have only two screws.) Installing the Card and Software and Connecting Video Equipment 5 4 With your fingertips, locate the two latches on the underside of the computer’s case. With your fingertips, locate the two latches on the underside of the computer’s case. 6 Chapter 1 5 Pulling gently, swing the panel up and slip it out. Pulling gently, swing the panel up and slip it out. Remember: Don’t walk around the room until you have finished installing the card and closed the computer. Move the logic board as little as possible while it’s outside the computer. Installing the Card and Software and Connecting Video Equipment 7 6 There is a wire handle on the back of the logic board. Swing it down and use it to pull the logic board toward you. Wire handle The logic board is plugged into a slot inside the computer. You may have to brace the computer with your other hand and pull firmly at first. Slide the entire logic board all the way out of the computer. 8 Chapter 1 7 Locate the video-in access cover on one side of the vertical plate attached to the logic board. Remove the cover from this opening by squeezing together the plastic tabs that hold it in place. Your logic board may not look exactly like the one pictured here, but the video-in slot and plastic access cover are in the same position regardless of the logic board you have. Note: The plastic access cover is on the other side of the vertical plate. Metal retainer Plastic tabs Vertical plate Video-in slot Installing the Card and Software and Connecting Video Equipment 9 8 Remove the video input card from its static-proof bag. Handle the card by its edges in order to avoid touching the connectors. 9 Attach the grounding clip to the S-video port of the video input card, if it isn’t attached already. Without the grounding clip attached, the S-video port may send insufficient power to equipment you connect to it. Important S-video port Grounding clip 10 Chapter 1 10 Making sure the grounding clip is on the card (as shown in step 9), plug the video input card firmly into the video-in slot on the logic board. Fit the three ports on the card into the port access hole. Make sure the card is firmly seated in the slot. Check to make sure the grounding clip is attached to the card before installing the card in the video-in slot. Ports Video-in slot Port access hole Vertical plate Installing the Card and Software and Connecting Video Equipment 11 11 Screw the card to the vertical plate on the logic board. (Use the provided attachment screw.) 12 Chapter 1 12 Swing the wire handle on the logic board back up into its storage position, securing it under its catch. Then fit the logic board into the guide rails on both sides of the computer’s interior. Make sure the logic board slides into the guides that are on both sides of the computer’s interior. Swing the handle up, into its storage position. Installing the Card and Software and Connecting Video Equipment 13 13 Press the reset button on the logic board. Then gently but firmly push the board back into place within the computer. You will need to push a little harder at the end to make sure the connectors at the back of the board are seated in their slot. If you can’t find the reset button, it may be in a different location on your logic board. Check the manual that came with your computer, in the section in the appendix about installing expansion cards. An illustration there shows where the reset button is for your computer. Note: 1 Press the reset button. 2 Gently but firmly push on the vertical plate until the logic board is solidly back in place. 14 Chapter 1 14 Slip the three tabs at the top of the back panel into the matching grooves in the computer case. Slip the three tabs on the back panel into the grooves in the computer case. 15 Snap the bottom of the panel into place, making sure it is flush with the back of the computer. Snap the plastic back panel into place. Installing the Card and Software and Connecting Video Equipment 15 16 Reinsert the screws in the back panel. As described earlier, your computer may have only two screws to reinsert, one on either side of the back panel. Note: Reinsert these screws. (Your computer may have only two screws.) 17 Reconnect any cables you disconnected at the start of this process. Because you pressed the reset button on the logic board earlier, some of your computer’s software settings may have changed. (For example, the date and time on your computer will need to be reset.) You may want to open the control panels for the date and time, keyboard, and mouse to make sure that they are set the way you want them. For more information about resetting these options, see the “Setting Options” or “Customizing Your Computer” topic of Macintosh Guide, available in the Guide (h) menu. (If you do not have Macintosh Guide on your computer, see the manuals that came with your computer.) 16 Chapter 1 18 Skip the steps that follow (“Installing the Card in Style B”), and the next section, “Installing the Card in a Modular Computer,” and go on to the section titled “Installing the Software.” Installing the card in Style B 1 Make sure you save any open documents and quit any open applications. Then turn off the computer. m Choose Shut Down from the Special menu, or press the Power key on the keyboard. m Then press the power switch at the back of the computer. Press the side of the switch marked with the j symbol. 2 Unplug all the cables except the power cord from your computer. Leaving the power cord plugged in helps protect the computer from electrostatic discharge damage. To avoid generating static electricity that may damage components, do not walk around the room until you have finished installing the card and closed the computer. Additionally, move the logic board as little as possible while it is outside the computer. Important Installing the Card and Software and Connecting Video Equipment 17 3 If there are screws securing the back panel, remove them with a screwdriver. Then press down with your thumbs to loosen the clips on either side of the back panel. 18 Chapter 1 4 Pulling gently, swing the panel down and slip it out. Installing the Card and Software and Connecting Video Equipment 19 5 Remove both retainer screws from the vertical plate behind the back panel. Remove both retainer screws from the vertical plate. Remember: Don’t walk around the room until you have finished installing the card and closed the computer. Move the logic board as little as possible while it’s outside the computer. 20 Chapter 1 6 There is a wire handle on the back of the logic board. Swing it down and use it to pull the logic board toward you. Swing down the wire handle, and slide the logic board out of the computer. The logic board is plugged into a slot inside the computer. You may have to brace the computer with your other hand and pull firmly at first. Slide the entire logic board all the way out of the computer. Installing the Card and Software and Connecting Video Equipment 21 7 Locate the video-in access cover on one side of the vertical plate attached to the logic board. Remove the cover from this opening by squeezing together the plastic tabs that hold it in place. Your logic board may not look exactly like the one pictured here, but the video-in slot and access cover are in the same position regardless of the logic board you have. Note: The plastic access cover is on the other side of the vertical plate. Metal retainer Plastic tabs Vertical plate 22 Video-in slot Chapter 1 8 Remove the video input card from its static-proof bag. Handle the card by its edges in order to avoid touching the connectors. 9 Attach the grounding clip to the S-video port of the video input card, if it isn’t attached already. Without the grounding clip attached, the S-video port may send insufficient power to equipment you connect to it. Important S-video port Grounding clip Installing the Card and Software and Connecting Video Equipment 23 10 Making sure the grounding clip is on the card (as shown in step 9), plug the video input card firmly into the video-in slot on the logic board. Fit the three ports on the card into the port access hole. Make sure the card is firmly seated in the slot. Check to make sure the grounding clip is attached to the card before installing the card in the video-in slot. Ports Video-in slot Port access hole Vertical plate 24 Chapter 1 11 Screw the card to the vertical plate on the logic board. (Use the provided attachment screw.) Installing the Card and Software and Connecting Video Equipment 25 12 Swing the wire handle on the logic board back up into its storage position, securing it under its catch. Then fit the logic board into the guide rails on both sides of the computer’s interior. Make sure the logic board slides into the guides that are on both sides of the computer’s interior. Swing the handle up, into its storage position. 26 Chapter 1 13 Press the reset button on the logic board. Then gently but firmly push the board back into place within the computer. You will need to push a little harder at the end to make sure the connectors at the back of the board are seated in their slot. 1 Press the reset button. 2 Gently but firmly push on the vertical plate until the logic board is solidly back in place. Installing the Card and Software and Connecting Video Equipment 27 14 Reinsert the retainer screws into the vertical plate on the logic board. Reinsert both retainer screws into the vertical plate. 28 Chapter 1 15 Slip the tabs at the bottom of the back panel into the matching grooves in the computer case. Then press down on the clips and snap the top of the panel into place, making sure it is flush with the back of the computer. Installing the Card and Software and Connecting Video Equipment 29 16 If you removed security screws from the back panel in step 3, reinsert them. 17 Reconnect any cables you disconnected at the start of this process. Because you pressed the reset button on the logic board earlier, some of your computer’s software settings may have changed. (For example, the date and time on your computer will need to be reset.) You may want to open the control panels for the date and time, keyboard, and mouse to make sure that they are set the way you want them. For more information about resetting these options, see the “Setting Options” or “Customizing Your Computer” topic of Macintosh Guide, available in the Guide (h) menu. (If you do not have Macintosh Guide on your computer, see the manuals that came with your computer.) 18 Skip the next section, “Installing the Card in a Modular Computer,” and go on to the one that follows, “Installing the Software.” 30 Chapter 1 Installing the card in a modular computer If your system has a separate monitor, like this one, continue with the steps below. If the monitor is built into your system, go back to the previous section, “Installing the Card in a Compact Computer.” To install the video input card in a computer with a separate monitor, follow these steps: 1 Press the Power key on the keyboard to shut down your computer. You can also choose Shut Down from the Special menu. 2 Unplug all the cables except the power cord from your computer. Leaving the power cord plugged in until you’re ready to remove the logic board from the computer helps protect the computer from electrostatic discharge damage. To avoid generating static electricity that may damage components, do not walk around the room until you have finished installing the card and closed the computer. Additionally, move the logic board as little as possible while it is outside the computer. Important Installing the Card and Software and Connecting Video Equipment 31 3 Place your thumbs on the two tabs at the top of the plastic panel, and press down. 4 Pulling gently, swing the panel down and slip it out. Remove the back panel. 32 Chapter 1 5 If there are security screws on the vertical plate on the back of the computer, remove them with a screwdriver. If there are security screws, remove both screws from the vertical plate. 6 Unplug the power cord from your computer. Remember: Don’t walk around the room until you have finished installing the card and closed the computer. Move the logic board as little as possible while it’s outside the computer. 7 Swing the handle out from its storage position, then grasp the handle and gently but firmly pull it toward you. The vertical plate and the logic board to which it’s attached slide all the way out of the computer. Pull out the logic board. Installing the Card and Software and Connecting Video Equipment 33 8 Squeeze the plastic tabs on the video input port’s access cover and pull the metal retainer so the access cover can come off. Your logic board may not look exactly like the one pictured here, but the video-in slot and plastic access cover are in the same position regardless of the logic board you have. Note: The plastic access cover is on the other side of the vertical plate. Metal retainer Plastic tabs Vertical plate 34 Video-in slot Chapter 1 9 Remove the video input card from its static-proof bag. Hold the card by its edges to avoid touching any connectors. 10 Attach the grounding clip to the S-video port of the video input card, if it isn’t attached already. Without the grounding clip attached, the S-video port may send insufficient power to equipment you connect to it. Important S-video port Grounding clip Installing the Card and Software and Connecting Video Equipment 35 11 Locate the video-in slot on the logic board. 12 Making sure the grounding clip is on the card (as shown in step 10), plug the video input card firmly into the video-in slot on the logic board. Fit the three ports on the card into the port access hole. Make sure the card is firmly seated in the slot. Check to make sure the grounding clip is attached to the card before installing the card in the video-in slot. Ports Video-in slot Port access hole Vertical plate 36 Chapter 1 13 Screw the card to the vertical plate on the logic board. (Use the provided attachment screw.) Installing the Card and Software and Connecting Video Equipment 37 14 Slip the base of the logic board into the guide rails inside the computer case and swing the handle back into its storage position. Make sure the logic board slides into the guides that are on both sides of the computer’s interior. Swing the handle up, into its storage position. 38 Chapter 1 15 Press the reset button on the logic board. Then gently but firmly push the board back into place within the computer. You will need to push a little harder at the end to make sure the connectors at the back of the board are seated in their slot. If you can’t find the reset button, it may be in a different location on your logic board. Check the manual that came with your computer, in the section in the appendix about installing expansion cards. An illustration there shows where the reset button is for your computer. Note: 1 Press the reset button. 2 Gently but firmly push on the vertical plate until the logic board is solidly back in place. Installing the Card and Software and Connecting Video Equipment 39 16 If you removed security screws, reinsert and tighten them now. Insert security screws here. 17 Slip the three hooks at the base of the plastic back panel into the grooves in the computer case. Slip the three hooks on the back panel into the grooves in the computer case. 18 Swing the plastic back panel up and snap it into place. Snap the plastic back panel into place. 40 Chapter 1 19 Reconnect the power cord and any cables you disconnected at the start of this process. Because you pressed the reset button on the logic board earlier, some of your computer’s software settings may have changed. (For example, the date and time on your computer will need to be reset.) You may want to open the control panels for the date and time, keyboard, and mouse to make sure that they are set the way you want them. For more information about resetting these options, see the “Setting Options” or “Customizing Your Computer” topic of Macintosh Guide, available in the Guide (h) menu. (If you do not have Macintosh Guide on your computer, see the manuals that came with your computer.) Installing the software The Apple Video Player application program lets you watch video on your computer. Follow these instructions to install the Apple Video Player application. 1 Start the computer. 2 Insert the first Video Software Installer Disk into the floppy disk drive. 3 Double-click the disk icon to open it. 4 Double-click the Installer icon. 5 Click Install. Installing the Card and Software and Connecting Video Equipment 41 6 Follow the instructions on the screen. 7 When the installation is complete, click Restart. You can now find the Apple Video Player icon in the Apple Video Player folder, in the Apple Extras folder on your hard disk. 42 Chapter 1 Connecting video equipment If you want to see video on your computer from a VCR, laserdisc player, video camera, or other video equipment, you need to connect the equipment to the ports on the video input card. You can connect one piece of equipment to the S-video port or one piece to the composite video port on the video input card. You can also connect two pieces of video equipment to the video input card simultaneously—one to the S-video input port on the card and another to the composite video input port on the card. For example, you can view a recording from a videocamera connected to the S-video port, then switch—using the Apple Video Player application, without having to disconnect cables—to viewing video from a VCR connected to the composite port on the card. However, you will hear sound only from that piece of equipment that is connected to the audio input ports on the card. Note: Preparing to connect video equipment Before you start, make sure that m both the Macintosh and the video equipment are turned off m you place the video equipment near enough your Macintosh for easy connection m you determine which type of video connector you need for your video equipment (see the next section) Installing the Card and Software and Connecting Video Equipment 43 Determining which video connector you need Check the Video Out port or ports on your video equipment. A Video Out port should look like one of the ports pictured below. (You may have both ports.) S-video port Composite video port (RCA-type) To connect to a composite Video Out port, use a composite (RCA plug) connector. See “Connecting Video Equipment If You Use a Composite (RCA Plug) Connector.” Composite connector (RCA plug) To connect to an S-video Video Out port, use an S-video connector. See “Connecting Video Equipment If You Use an S-video Connector,” later in this chapter. S-video connector 44 Chapter 1 Connecting video equipment if you use a composite (RCA plug) connector To connect your video equipment you need one video cable and two audio cables, all with RCA plugs at both ends. The cables can be separate or joined. You can purchase cables at electronics supply stores. RCA video RCA RCA audio RCA RCA audio RCA video RCA or RCA RCA 2 audio RCA or video RCA 2 audio RCA If you have only one Audio Out port on your video equipment, you can use a Y-adapter audio cable. This cable has a single plug on one end to plug into your equipment and a double plug (where it forms a Y) on the other end to plug into the two audio ports on the video input card. Note: Installing the Card and Software and Connecting Video Equipment 45 1 Make sure that both the Macintosh and the video equipment are turned off. 2 Attach one end of the video cable to the Video Out port on the video equipment. 3 Plug the other end of the video cable into the yellow composite video input port on the video input card. 4 Insert the RCA plugs on one end of the audio cables into the left and right Audio Out ports on the video equipment. If you’re using a Y-adapter audio cable: Plug the single end of the cable into the Audio Out port on your video equipment. 5 Insert the RCA plugs on the other end of the audio cables into the left (white) and right (red) sound input ports on the video input card. Be sure to plug the cable from the left Audio Out port on the video equipment to the left sound input port on the computer. Connect the right ports in the same way. If you’re using a Y-adapter audio cable: Plug the double end of it (where it forms a Y) into the right and left sound input ports on the video input card. 46 Chapter 1 The video input card ports are exactly the same on a computer with a built-in monitor, and the card itself is in about the same position on the back of the unit as in the illustration below of a computer without a built-in monitor. Video input port (yellow) Left sound input port (white) Right sound input port (red) Cables with RCA plugs Video Out port Left Audio Out port Right Audio Out port The ports on your video equipment may be arranged and labeled differently from those shown here. Your video equipment is now connected to the video input card. Installing the Card and Software and Connecting Video Equipment 47 Connecting video equipment if you use an S-video connector To connect your video equipment you need one video cable with S-video connectors on both ends and two audio cables with RCA plugs at both ends. The RCA cables can be separate or joined. You can purchase cables at electronics supply stores. S-video video S-video RCA audio RCA RCA audio RCA video S-video or S-video RCA 2 audio RCA If you have only one Audio Out port on your video equipment, you can use a Y-adapter audio cable. This cable has a single plug on one end to plug into your equipment and a double plug (where it forms a Y) on the other end to plug into the two audio ports on the video input card. Note: 48 Chapter 1 1 Make sure that both the Macintosh and the video equipment are turned off. 2 Attach one end of the video cable to the Video Out port on the video equipment. 3 Plug the other end of the video cable into the S-video input port on the video input card. About the S-video port: The S-video port accepts 4-pin and 7-pin connectors. If the connector doesn’t slide easily into the port, realign it and try again. Avoid using force, which could damage the card or the connector. 4 Insert the RCA plugs on one end of the audio cables into the left and right Audio Out ports on the video equipment. If you’re using a Y-adapter audio cable: Plug the single end of the cable into the Audio Out port on your video equipment. Installing the Card and Software and Connecting Video Equipment 49 5 Insert the RCA plugs on the other end of the audio cables into the left (white) and right (red) sound input ports on the video input card. If you’re using a Y-adapter audio cable: Plug the double end of the cable (where it forms a Y) into the right and left sound input ports on the video input card. The video input card ports are exactly the same on a computer with a built-in monitor, and the card itself is in about the same position on the back of the unit as in the illustration below of a computer without a built-in monitor. Right sound input port (red) Left sound input port (white) Right Audio Out port Left Audio Out port S-video port (7-pin) S-video port (4-pin) S-video cable The ports on your video equipment may be arranged and labeled differently from those shown here. Cables with RCA plugs Your video equipment is now connected to the video input card. 50 Chapter 1 C H A P T E R 2 Learning About the Software This chapter contains the information you need to set up and use the Apple Video Player application program. Topics include m opening the Apple Video Player and the video window m getting on-screen help for using the Apple Video Player m changing the video source m adjusting the sound and the picture m changing the size of the video window m changing the color of the windows m setting the video input standard (NTSC, SECAM, or PAL) m setting and using a keyboard shortcut (or “hot key”) to open and quit the application See also Chapter 3, “Capturing Video Images.” 51 Opening the Apple Video Player To use the Apple Video Player application program, open it by double-clicking its icon in the Apple Video Player folder, in the Apple Extras folder on your hard disk. When the Apple Video Player application opens, a video window appears. If you don’t get an image in the window right away, see Chapter 4, “Troubleshooting.” You can also open (and quit) the Apple Video Player application by using a keyboard shortcut. See the section at the end of this chapter, “Setting and Using a ‘Hot Key.’” Note: 52 Chapter 2 If you’re viewing video on a secondary monitor: If you have two monitors attached to your computer (one attached to an expansion card in your computer), you can drag the video window to the secondary monitor, but the image’s resolution will decrease. Getting help All the step-by-step instructions contained in the rest of this manual are also available in the Guide menu at the upperright corner of the screen, marked with the h icon. Make sure the video window is active and then choose Apple Video Player Guide from the Guide (h) menu. Apple Video Player Guide gives you step-by-step instructions for tasks whenever you need help using the application. Apple Video Player Guide is not available if you have a computer with system software earlier than 7.5; in that case, use this manual. Note: To see explanations of all the items on the screen when you use Apple Video Player, make sure that the video window is active, then choose Show Balloons from the Guide (h) menu. Learning About the Software 53 To be reminded of keyboard shortcuts you can use with Apple Video Player, choose Apple Video Player Shortcuts from the Guide h menu in the upper-right corner of the screen. Choosing the correct video source If you connected your video equipment to the S-video port on the video input card, you must select S-video in the Apple Video Player application. If you connected your equipment to the composite (RCA) port on the card, you must select Video in the Apple Video Player application. To change the video source setting, follow these instructions: 1 Choose Show Controls Window from the Windows menu. The Controls window appears. 2 Click the video screen icon. 54 Chapter 2 The screen controls appear. 3 Click the video source you want to use. Choose Video if your device is attached to the composite video input port on the video input card, or S-Video if your device is attached to the S-video input port on the video input card. You can also choose TV to view TV in the video window, if you have a TV tuner card in your computer. To learn about viewing TV on your computer, see the manual that comes with the TV tuner card. If you’re not sure whether or not a TV tuner card is already installed in your computer, check the illustration in Chapter 4, “Troubleshooting.” Note: The source change takes effect as soon as you make it. Learning About the Software 55 Adjusting the sound When you are watching video in the video window, you can adjust the sound’s volume, balance, and tone. Changing the sound volume There are three ways to change sound volume: m Use the volume buttons on the front of the computer. m Drag the slider next to the speaker icon on the video window. m Press the Up Arrow key or Down Arrow key on the keyboard. (Make sure Apple Video Player is the active application, or these keys won’t have any effect.) To make the sound mute, click the speaker icon on the video window or press x-M on the keyboard. To turn the sound back on, click the speaker icon or press x-M (or press the remote control’s muting button). The sound will also turn back on if you adjust the volume using any method. You can also click anywhere in a slider’s track to move the slider to that position. The sound adjustments take effect immediately, so you can monitor your changes. 56 Chapter 2 Adjusting speaker balance and tone To adjust the speaker balance, bass, or treble: 1 Choose Show Controls Window from the Windows menu. 2 Click the sound icon. 3 Drag the appropriate slider to adjust the sound. You can also click anywhere in a slider’s track to move the slider to that position. The sound adjustments take effect as you make them, so you can monitor your changes. You’ll only be able to hear changes in balance if you have a computer monitor with built-in speakers, if you’re using external speakers attached to your computer, or if you’re using headphones. Note: Learning About the Software 57 Adjusting the picture To adjust the brightness, sharpness, contrast, and color of the picture: 1 Choose Show Controls Window from the Windows menu. The Controls window appears. 2 Click the video screen icon. The screen controls appear. 3 Drag the appropriate slider to adjust the picture to your liking. You can also click anywhere in a slider’s track to move the slider to that position. The picture adjustments take effect as you make them, so you can monitor your changes. 58 Chapter 2 Changing the video window size There are several ways to change the size of the video window. You can make a choice from the Windows menu, use a keyboard shortcut for one of the three most common sizes, drag the size box, or click the zoom box. Choosing menu commands You can choose different video window sizes from the Windows menu: m Smallest Size uses about 1/16 of the screen. m Normal Size uses about 1/4 of the screen. m Largest Size uses as much of the screen as it can. On monitors that are 640 by 480 pixels or smaller, Largest Size hides both the menu bar and the screen controls. Moving the mouse makes the menu bar visible. m Other Size opens a dialog box in which you can enter a specific other size. Width must be in the range 160 to 640 pixels. Height must be in the range 120 to 480 pixels. Keep your proportions: The usual video window width-toheight ratio is 4 to 3. Setting other proportions distorts the video image and decreases its resolution. Learning About the Software 59 Using keyboard shortcuts There are three keyboard shortcuts for changing the video window size: m x-1 sets the smallest size. m x-2 sets normal size. m x-3 sets the largest size. You can also switch to the largest size by clicking the zoom box. Dragging the size box If you drag the size box, the horizontal and vertical dimensions of the screen change proportionally. If you drag the size box while holding down the Shift key, the image becomes distorted. (It stretches or shrinks in the direction that you drag.) Changing the window color You can set a new color for the border surrounding the video window by choosing Window Color from the Windows menu. The current color is checked. The choices are Dark Gray, Green, Blue, Magenta, Red, and Gold. “Window Color” is not the display color: The Window Color command has no effect on the colors you see in the video window. For information on setting the brightness, sharpness, contrast, and color in the video window, see “Adjusting the Picture” earlier in this chapter. 60 Chapter 2 Setting the video input standard The video input standard determines how the Apple Video Player application interprets video (S-video or composite) signals. This standard is preset to your region in the Apple Video Player software. In most cases, you won’t need to change it. NTSC is the standard video signal for most of the Americas and Japan. PAL is common in Western Europe, Australia, most of Asia, and parts of South America and Africa. SECAM is used in France, Eastern Europe, and parts of Asia and Africa. To change the video input standard, follow these steps: 1 Choose Preferences from the Setup menu. The Preferences dialog box appears. 2 Choose the Video Input Standard setting you need. If the setting you choose produces a strange image (for example, the picture is too small or the colors are odd), try another setting. Learning About the Software 61 Setting and using a “hot key” You can also open Apple Video Player by pressing a preset key or combination of keys. When you press this “hot” key, you switch to the Apple Video Player application no matter what other application you are currently in. If Apple Video Player is already the active application, the Apple Video Player application quits when you press the hot key. To set a hot key: 1 With the Apple Video Player application active, choose Hot Key from the Setup menu. The Hot Key dialog box appears. 2 Press the key or key combination you want to use for your hot key. You can use one or more (up to four) of the modifier keys— x, Option, Control, and Shift—plus any other key. Don’t use a key combination that is already used by other programs. For example, don’t use x-P, which is a keyboard shortcut for printing in most applications. If you use a keyboard shortcut like x-P to open or quit Apple Video Player, x-P will no longer print things for you—it will instead open Apple Video Player. Important 3 Click OK. Your new hot key is ready to use, to quit or to open Apple Video Player. If you discover later that pressing your hot key causes unexpected things to happen—or that a keyboard shortcut in another application launches Apple Video Player—repeat these steps to choose another hot key. 62 Chapter 2 C H A P T E R 3 Capturing Video Images This chapter gives instructions for using the Apple Video Player application program to capture m individual (still) images m sequences of moving images (as QuickTime movies) The images in the video window can come from any video equipment connected to your video card. You’ll need to open the Apple Video Player application before following the instructions in this chapter. (See “Opening the Apple Video Player” in Chapter 2.) 63 Capturing individual images You have two ways to capture a single image—by using the capture controls in the Controls window or by using the Copy Video Display command in the Edit menu. To learn how to record a sequence from a movie, see the section “Capturing Movies” later in this chapter. Capture controls When you use the capture controls in the Controls window, you can freeze the screen image before you save it. Additionally, the capture controls let you save the image directly on a disk. Follow these steps: 1 Choose Show Controls Window from the Windows menu. The Controls window appears. 2 Click the video camera icon. 64 Chapter 3 The capture controls appear. 3 Wait until you see the image you want to capture. The Controls window can remain open without affecting what happens in the video window. m To freeze the video image at the current frame, click Freeze. The video freezes, and you can decide if you want to save the current frame. To unfreeze the video, click Freeze again. m To save the current video frame on a disk, click Save. If the video isn’t already frozen, it freezes at the current frame until you complete the Save operation. A dialog box appears so you can specify where to save the image. When you click Save, the image is saved as a PICT file under the name that you supply. (A PICT file can be opened by most graphics programs.) Capturing Video Images 65 Copy Video Display command To capture the current screen image by copying, choose Copy Video Display from the Edit menu or press x-C. When you use Copy Video Display or press xC, the current screen image is copied to the Clipboard. The image is not saved on a disk. (To save an image that’s on the Clipboard, you must paste it into a document or the Scrapbook.) Important Capturing movies Before capturing a movie and saving it on a disk, you may want to choose a compression rate so that the movie takes up less disk space (but is of lesser quality), following the instructions in “Using Compression,” below. If you don’t want to choose a compression rate just yet, go on to “Recording” on the next page. Using compression With compression you can store movies in a much smaller space than they would normally require. To use compression, follow these steps before you record a movie: 1 Choose Preferences from the Setup menu. The Preferences dialog box appears. 66 Chapter 3 2 Click one of the buttons under Movie Compression. None means that no compression takes place. Normal, the preset choice, uses anywhere from 12% to 50% of the disk space that None uses; the less movement in each frame of the movie, the greater the savings. Most uses slightly less disk space than does Normal. To save the most space you can, choose the smallest size video window and the most compression. Compression affects picture quality: the more compression you use, the grainier the picture. Note: Recording You can capture video sequences (moving images) as QuickTime movies, which can be opened in any application that supports QuickTime, such as SimpleText. To capture video images, follow these steps: 1 Make sure networking or printing is not active and virtual memory is turned off. For best results recording video, you should quit networking or printing applications and turn off virtual memory. To check whether virtual memory is on or not, open the Memory control panel. If the On button for virtual memory is selected, click the Off button to turn virtual memory off. Capturing Video Images 67 2 Adjust the volume to your liking. Movies are captured at the current volume setting. For example, if the sound is muted, your recorded movie will not have any sound. 3 Choose Show Controls Window from the Windows menu. The Controls window appears. 4 Click the video camera icon. The capture controls appear. 5 Wait until the sequence that you want to capture begins. The Controls window can remain open without affecting what happens in the video window. 68 Chapter 3 6 Click Record. Recording begins and the Record button changes to a Stop button. 7 Click Stop when you’ve recorded as much as you want. If you don’t click the Stop button, recording continues until the hard disk is full. Important A dialog box appears, in which you can specify a name and location for your movie. You can also preview the QuickTime movie before you save it. Use as small a size as you can: The amount of disk storage that a movie takes is directly related to the size of the video window—the larger the window, the more disk space you use. By choosing Smallest Size from the Windows menu before you record, you may be able to save more than 50% in storage space. (A movie that uses about 75 megabytes per minute at the normal video window size will use only about 35 megabytes per minute at the smallest video window size.) See “Changing the Video Window Size” in Chapter 2. You can open the movie from inside any application that supports QuickTime, such as SimpleText. If you open the movie through SimpleText, for example, the SimpleText document plays the movie using QuickTime technology. Capturing Video Images 69 C H A P T E R 4 Troubleshooting This chapter suggests what to do if problems occur when you’re using the video input card hardware and software. If you have a problem with your Apple equipment and nothing presented in this chapter, or in the manual that came with your computer, solves it, consult the service and support information that came with your Apple equipment for instructions on how to contact an Appleauthorized service provider or Apple for assistance. If you attempt to repair the Apple equipment yourself, any damage you may cause to the Apple equipment will not be covered by the limited warranty on your Apple equipment. Contact an Apple-authorized dealer or service provider for additional information about this or any other warranty question. Warning 71 You see a blank screen when you change to video mode or when you first open Apple Video Player. m Be sure your video equipment is securely connected to the appropriate video port and your equipment is turned on. m You may have the wrong video source selected. Go to the screen controls in the Controls window and click the appropriate Video Source button. For further instructions on selecting the video source, see the section, “Choosing the Correct Video Source,” in Chapter 2. Apple Video Player suddenly opens while you’re working in another application, or unexpected things happen when you use your hot key. m The hot key you’ve chosen to open or quit Apple Video Player is a key combination also used in another application. (For instance, in most Macintosh programs, x-P sends a document to the printer. On the desktop, x-N creates a new untitled folder.) Change the keyboard shortcut for Apple Video Player by choosing Hot Key from the setup menu. You can’t see the volume slider on the video window. m The video window is too small or too large. Change the size by making a choice from the Windows menu or by dragging the size box. The image is too small or it’s filled with odd colors. m The video input standard is set incorrectly. Choose Preferences from the Setup menu and select a different setting. 72 Chapter 4 You don’t hear any sound. m Adjust the volume slider in the video window, or the volume controls on the front of your computer if you have them. m Check the sound-related control panel on your computer to see if the volume has been turned off. For instructions on using the control panel to turn on sound, choose Macintosh Guide from the Guide (h) menu. (Make sure that you’re in the Finder first.) If you don’t have Macintosh Guide, see the manuals that came with your computer for information on your computer’s sound-related control panel. The image is too white or too dark. m Adjust the video screen controls. (Choose Show Controls Window from the Windows menu and click the video screen icon.) m If you have a VCR connected to your video input card, make sure you’re not having a problem with the videotape or the VCR itself. (Connect the VCR back to your TV and play the tape to see if the image is still bad.) m The voltage output of your video equipment may be too high or too low for the video input card. Therefore your video equipment may be sending video signals that are too strong (causing a white picture) or too weak (causing a very dark picture) for the video input card. Try connecting different video equipment to the card. Troubleshooting 73 You have a dark or “rolling” picture. m Adjust the video screen controls. (Choose Show Controls Window from the Windows menu and click the video screen icon.) m If you have a VCR connected to your video input card, make sure you’re not having a problem with the videotape or the VCR itself. (Connect the VCR back to your TV and play the tape to see if the image is still bad.) m If your VCR is connected to a TV monitor and to the video input card, make sure that your cables go in this order: the first cable must go from the Video Out port on the VCR to the video in port on the TV monitor; the second cable must go from the TV monitor video out port (or loop-through video input port, whichever your TV monitor has) to the computer’s video input card. (The connection must end at the video input card, not the TV monitor.) Also check that your TV monitor is set to loop-through (also known as “Hi-Z”) input. The sound is intermittent or clipped. m Turn down the volume controls on your video equipment. They may be set too high for the video input card. m The voltage output of your video equipment may be too high for the video input card. Therefore your video equipment may be sending signals that are too strong for the video input card. Try connecting different video equipment to the card. The sound is full of static. m Be sure your video equipment is securely connected to the appropriate ports on the video input card. 74 Chapter 4 m Adjust the sound controls in the Controls window. (Choose Show Controls Window from the Windows menu and click the sound icon.) m Turn up the volume controls on your video equipment. You’re playing a video tape with closed captions, but the closed captions do not appear. m To view a videotape with closed captions, you must connect your VCR to a TV tuner port, not the video input card. If you do not have a TV tuner card in your computer, you can purchase one from an Apple-authorized dealer. Then follow the instructions that come with the TV tuner card to see how to view closed captions on videotape. If your computer has a built-in monitor, the TV tuner port (if you have one) is as shown in the computer on the left. If your computer has a separate monitor, the TV tuner port is as shown in the computer on the right. If this port is present, then a TV tuner card is installed. (The ports on your computer may look different.) Troubleshooting 75 76 Chapter 4 C H A P T E R 5 Technical Information Your video input card is suitable for use with home-quality video equipment. This chapter lists the specific technical characteristics of the video card. Input standards Video input standards are the same as the following television input standards: m NTSC: 525 lines per frame, 60 fields per second m PAL: 625 lines per frame, 50 fields per second m SECAM: 625 lines per frame, 50 fields per second External connections The external connections on your video input card include the following: m an S-video Video In port with a DIN-7 (Deutsche Industrie Normung) connector Maximum current from S-video: 0.5 Amperes m an RCA Video In port (with a yellow sleeve) m a left RCA Audio In port (with a white sleeve) m a right RCA Audio In port (with a red sleeve) 77 Internal connections The video input card can be used with the Apple MPEG Media System card or Apple’s TV tuner card, or both. Video input characteristics m Maximum input level: 2 volts peak-to-peak (Vpp) m Minimum input level: 0.5 Vpp m Impedance: 75 ohms (not a loop-through input) m Input bandwidth: -3 decibels (dB) at 6 megahertz (MHz) Audio input characteristics m Maximum input level: 2 Vpp m Impedance: 5,000 ohms m Input bandwidth: 50 to 15 kilohertz (kHz) 78 Chapter 5 I N A adjusting sound volume 56 speaker balance and tone 57 video image 58 Africa, standard video signal for 61 Americas, standard video signal for 61 Apple-authorized dealer 71 Apple Extras folder 42, 52 Apple Video Player application 52–62 adjusting sound volume with 56 adjusting speaker balance and tone with 57 adjusting video image with 58 changing video window size with 59–60 changing window color with 60 choosing the correct video source with 54–55 getting help in 53–54 installing 41–42 keyboard shortcuts in 60 opening 52–53 troubleshooting 72 with a hot key 62 D E X setting and using a hot key with 62 setting video input standard with 61 troubleshooting 72 Apple Video Player folder 42, 52 Apple Video Player Guide command (Guide menu) 53 Apple Video Player icon 42, 52 Apple Video Player Shortcuts command (Guide menu) 54 applications. See Apple Video Player application; printing applications arrow keys, adjusting sound volume with 56 Asia, standard video signal for 61 audio cables 45, 46, 48, 49 audio input characteristics 78 Audio Out ports on video equipment 45–47, 48, 49 audio ports on video input card 45, 50 Australia, standard video signal for 61 79 B back panel of a compact computer removing 6–7, 18–19 removing screws from 5, 18 replacing 15, 29, 40 replacing screws on 16, 28 back panel of a modular computer removing 32 replacing 40 balance of speakers, adjusting 57 C cables audio cable 45, 46, 48, 49, 50 S-video cable 50 video cable 45, 48, 49 Y-adapter audio cable 46, 48, 49, 50 Canada, standard video signal for 61 capture controls (Controls window) 64–65 capturing video individual video images 64–66 movies 66–69 Central America, standard video signal for 61 changing color of video window 60 sound 56–57 video source setting 54–55 80 video window size 59–60 by dragging size box 60 with keyboard shortcuts 60 with menu commands 59 Clipboard, copying current screen image to 66 closed captions, troubleshooting 75 color of video image 58 of video window 60 troubleshooting 72 commands Apple Video Player Shortcuts (Guide menu) 54 Copy Video Display (Edit menu) 66 Hot Key (Setup menu) 62 Preferences (Setup menu) 61, 66 Show Balloons (Guide menu) 53 Show Controls Window (Windows menu) 54, 57, 58, 64, 68, 73 Window Color (Windows menu) 60 compact computer with built-in monitor installing video input card into 2–30 removing back panel from 6–7, 18–19 replacing back panel on 15, 29, 40 composite (RCA plug) connector 44–47, 48, 49, 50 Index composite video input port on video input card 43, 46 composite Video Out port on video equipment 44 compression rate for movies 66–67 computers. See compact computer with built-in monitor; modular computer with external monitor connecting video equipment 43–50 using composite (RCA plug) connector 45–47 using S-video connector 48–50 connections external 77 internal 78 connectors composite (RCA plug) 44–47, 48, 49, 50 S-video 44, 48–50 types of 44 contrast adjusting 58 troubleshooting 73 control panels Memory control panel 67 resetting after installing card 16, 30, 41 Controls Window capture controls in 64–65 showing 54, 57, 58, 64, 68 sound controls in 75 viewing 73 copying video images 66 Copy Video Display command (Edit menu) 66 Index D dark images 73, 74 dealer, Apple-authorized 71 disk saving space on by compressing movies 66–67 saving video images on 64–65 space taken up on by movies 69 dragging the size box 60 E Eastern Europe, standard video signal for 61 Edit menu 66 electrostatic discharge, avoiding damage from 4, 7, 31 Europe, standard video signal for 61 external connections 77 F folders Apple Extras folder 42, 52 Apple Video Player folder 42, 52 frames. See video images France, standard video signal for 61 freezing and unfreezing video images 64–65 81 grounding clip appearance of 2 attaching to S-video port 10, 23, 35 checking before installing card 11, 24, 36 purpose of 10 Guide menu 53, 54 Guide menu icon 53 Installer icon 41 installing video input card in a compact computer 2–30 in a modular computer 31–41 Apple Video Player application 41–42 internal connections 78 H K G handling logic board 4, 7, 20 video input card 10, 23, 35 headphones 57 help in Apple Video Player application 53–54 Hi-Z input 74 Hot Key command (Setup menu) 62 hot keys setting and using 62 troubleshooting 72 I, J icons Apple Video Player icon 42, 52 Guide menu icon 53 Installer icon 41 sound icon 57 speaker icon 56 video camera icon 64 video screen icon 54, 58 images. See video images input standards 77 Installer 41 82 keyboard shortcuts in Apple Video Player application 54 for capturing current screen image 66 hot keys to open and quit Apple Video Player application 62 L light images 73 logic board handling 4, 7, 20 removing from a compact computer 8, 21 from a modular computer 33 replacing in a compact computer 13–14, 26–27 in a modular computer 38–39 reset button on 14, 27, 39 video-in slot on 11, 24, 36 loop-through (“Hi-Z”) input 74 Index M N Memory control panel 67 menus Edit menu 66 Guide menu 53, 54 Setup menu 61, 62 Windows menu 54, 57, 60, 64, 68, 73 modular computer with external monitor installing video input card into 31–41 removing back panel from 32 replacing back panel on 40 monitors external. See modular computer with external monitor internal. See compact computer with built-in monitor secondary troubleshooting 74 viewing video on 53 movies. See also video images capturing 66–69 compression rate for 66–67 disk space taken by 69 recording 67–69 volume setting for 68 muting sound 56 networking, turn off before recording video 67 North America, standard video signal for 61 NTSC video input standard 61 Index O opening Apple Video Player application 52–53 with a hot key 62 P PAL video input standard 61 PICT file, saving images as 65 pictures. See video images pixel ranges for video image 59 plugs. See connectors; RCA plug port access hole 11, 24, 36 ports Audio Out ports on video equipment 45–47, 48, 49 audio ports on video input card 45, 50 composite video input port on video input card 43, 46 composite Video Out port on video equipment 44 sound input ports on video input card 47, 50 83 S-video port on video input card 10, 23, 35, 43–44, 49–50, 54–55 TV tuner port 75 video input port on video input card 47 Video Out port on video equipment 44, 46, 47, 49 power, turning off 4 Preferences command (Setup menu) 61, 66 printing applications, turn off before recording video 67 problems. See troubleshooting programs. See Apple Video Player application; printing applications Q QuickTime movies 66–69 quitting Apple Video Player application with a hot key 62 R RCA plugs 44–47, 48, 49, 60 recording movies 67–69 removing back panel of a compact computer 6–7, 18–19 of a modular computer 32 84 logic board from a compact computer 8, 21 from a modular computer 33 screws from back of a modular computer 33 from back panel of a compact computer 5, 18 video-in access cover from a compact computer 9, 22 from a modular computer 34 repair 71 replacing back panel of a compact computer 15, 29, 40 of a modular computer 40 logic board in a compact computer 13–14, 26–27 in a modular computer 38–39 screws on back panel of a compact computer 16, 28 on back of a modular computer 40 reset button on logic board 14, 27, 39 rolling image 74 Index S saving video images as PICT files 65 on disk 64–65 screen controls 55, 73 screws removing from back of a modular computer 33 from back panel of a compact computer 5, 18 replacing on back panel of a compact computer 16, 28 on back of a modular computer 40 SECAM video input standard 61 selecting video source 54–55 service and support 71 Setup menu Hot Key command 62 Preferences command 61, 66 sharpness, adjusting 58 shortcuts in Apple Video Player application 54 Show Balloons command (Guide menu) 53 Show Controls Window command (Windows menu) 54, 57, 58, 64, 68, 73 SimpleText 67, 69 size box, dragging 60 Index size of video window, changing 59–60 software. See Apple Video Player application; printing applications; software options software options, resetting after installing card 16, 30, 41 sound adjusting movie volume 68 adjusting speaker balance and tone 57 adjusting sound volume 56 muting 56, 60 troubleshooting 73 sound controls 75 sound icon 57 sound input ports on video input card 47, 50 South America, standard video signal for 61 speaker icon 56 speakers adjusting balance and tone of 57 adjusting volume of 57 static electricity, avoiding 4, 7, 31 support 71 S-video cable 50 S-video connector 44, 48–50 S-video port on video input card appearance of 44 attaching grounding clip to 10, 23, 35 85 connecting video equipment to 43, 49–50 connectors accepted by 49 selecting as video source 54–55 T technical information 77–78 television. See TV tone, adjusting 57 troubleshooting 71–75 color 72 dark or rolling picture 74 hot keys 72 opening Apple Video Player 72 secondary monitor 74 sound 73 VCR 73, 74 video image too small or filled with odd colors 72 too white or too dark 73 video input standard setting 72 videotape closed captions fail to appear on 75 dark or rolling pictures on 74 voltage output of video equipment 73–74 volume slider does not appear on video window 72 86 turning the computer off 4 TV, viewing in video window 55 TV input standards 77 TV tuner card 55 TV tuner port 75 U United States, standard video signal for 61 V VCR, troubleshooting 73, 74 video cable 45, 48, 49 video camera icon 64 video connector, determining which you need 44 video equipment Audio Out ports on 45–47, 48, 49 composite Video Out port on 44 connecting 43–50 using composite (RCA plug) connector 45–47 using S-video connector 48–50 ports, location and appearance of 47, 50 Video Out port on 44, 46, 49–50 voltage output of 73–74 video images. See also movies adjusting sharpness, contrast, and color of 58 dark or rolling 74 Index capturing individual images 64–66 keyboard shortcut for 66 movies 66–69 copying 66 freezing and unfreezing 64–65 recording as movies 67–69 saving as PICT files 65 saving on disk 64–65 troubleshooting too small or filled with odd colors 72 too white or too dark 73 viewing on a secondary monitor 53 video-in access cover, removing from a compact computer 9, 22 from a modular computer 34 video input card. See also specific topic audio ports on 45, 50 composite video port on 43, 46 connecting video equipment to 43–50 handling 10, 23, 35 installing in a compact computer 2–30 in a modular computer 31–41 Index S-video port on 10, 23, 35, 43–44, 49–50 sound input ports on 47, 50 technical characteristics of 77–78 video input port on 47 voltage requirements for 73–74 video input characteristics 78 video input standard 77 incorrect setting of 72 setting 61 video-in slot connecting video input card to 11, 24, 36 position of 9, 22, 34 Video Out port on video equipment appearance of 44, 47 connecting video cable to 46, 49 video screen controls 73 video screen icon 54, 58 video source, choosing 54–55 videotape, troubleshooting 74, 75 video window changing color of 60 changing size of 59–60 pixel ranges for 59 speaker icon on 56 viewing TV on 55 volume slider does not appear on 72 width-to-height ration for 59 87 viewing TV in video window 55 video on a secondary monitor 53 virtual memory, turn off before recording video 67 voltage output of video equipment 73–74 volume adjusting 57, 74, 68 of movies 68 troubleshooting 73 volume controls 72, 74 Y, Z Y-adapter audio cable connecting to audio port of video equipment 46, 49 to sound input ports on video input card 50 description of 45, 48 W, X warranty 71 Western Europe, standard video signal for 61 Window Color command (Windows menu) 60 Windows menu choosing video window sizes in 59 Show Controls Window command 54, 57, 58, 64, 68, 73 Window Color command 60 88 Index Apple Computer, Inc. 1 Infinite Loop Cupertino, California 95014-2084 408.996.1010 030-8681-A Printed in U.S.A.