1
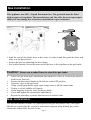
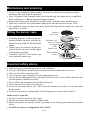
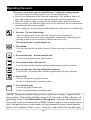
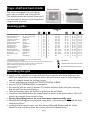
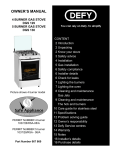
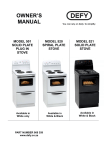
PAGE
INDEX
2
2
2
2
Introduction.
Unpacking.
Positioning.
Electrical Installation.
3
3
Gas installation.
Gas conversion
4
Safety Compliance.
5
5
The control panel.
LPG gas hob
6
6
6
Maintenance and servicing
Fitting the burner caps.
Important safety advice.
7
Operating the oven.
8
8
8
Trays, shelf and heat shield.
Cooking guide.
Operating the grill.
9
Cleaning
10
10
Important Do’s and Don’ts
Problem check.
11
Service Centres.
12
Warranty
YOU CAN RELY ON DEFY
Owner’s
Manual
DGS 122
Stainless steel, Electric oven
with 4 burner gas hob.
DGS 123
White, Electric oven,
with 4 burner gas hob
www. Defy.co.za
Part Number 065 614
Page 1
Introduction.
• Congratulations on the purchase of this quality product.
• We trust that you will enjoy many years of trouble free use.
• Please read these instructions carefully before use as they will pro-
vide you with information on how to operate and care for your
stove in order that you gain the maximum benefit from it.
Unpacking.
• Please ensure that packaging material is disposed of in a responsible manner.
• Plastic bags should be cut up to prevent children playing with them and accidentally
suffocating.
• If the appliance is damaged in any way, do not use it. Report the damage to your
dealer, who will take the necessary corrective action.
• A heat shield ( used when grilling with the oven door open) is taped to the rear of
the product. This must be removed and stored for later use.
Positioning.
• Room ventilation is vital for the efficient performance of the appliance and for the
•
•
•
•
safety of the occupants in the room in which the appliance is installed.
Cooking appliances generate considerable heat. The layout and materials of the surrounding cabinets should take account of these characteristics. Surfaces of cabinets immediately adjacent to the stove should be able to withstand temperatures of up to 100°
C without delaminating or discolouring.
Allow an unrestricted air space of at least 150mm at the sides and 750mm above the
stove.
The stove should be positioned on a stable and level surface.
The two front feet may be adjusted by turning them clockwise or counter-clockwise
until the product is level and in firm contact with the floor.
Electrical installation.
This appliance must be earthed. The manufacturer and the seller do not accept
responsibility for any damage due to incorrect installation or electrical connection.
• This product has an electrically operated oven and an electrical connection for the
•
•
•
•
flame ignition system. These require a 220V-250V. 50 Hz power supply.
The product is fitted with a 15 Amp 3 pin plug.
Insert the plug into an earthed 15 Amp wall socket.
The wall socket should be located where it is easily accessible but not above the stove.
If the mains power cord is damaged, it must be replaced by a qualified electrician.
Page 2
Gas installation.
This appliance uses LPG ( Liquid Petroleum Gas) The gas bottle must be fitted
with an approved regulator. The manufacturer and the seller do not accept responsibility for any damage due to incorrect installation or gas connection.
2
1
REG ULATOR
3
1. Soak the end of the plastic hose in hot water to soften it and then push the hose end
fully over the hose nozzle.
2. Secure the hose by tightening the hose clamp.
3. In a similar fashion, secure the other end of the hose to the regulator on the gas bottle.
Caution: Never use a naked flame to check for gas leaks.
•
•
•
•
•
•
•
•
Check for gas leaks after installation and whenever a new or re-filled gas bottle is
used for the first time.
Ensure that the control knobs on the hob are in the OFF position.
Open the valve on the gas bottle.
Using a small paint brush, apply some soapy water to all the connections.
If there is a leak, bubbles will appear.
If this happens, close the valve on the gas bottle.
Check and tighten the connections immediately.
Repeat the procedure to ensure that there are no further leaks.
Gas conversion.
The hob can operate on both LPG (liquid petroleum gas) and Natural Gas ( Town gas).
Should you require that the system be converted to operate using Natural gas, please
contact the nearest Defy Service Centre.
Page 3
Safety compliance with local requirements.
Flexible hose - Not supplied.
Any hose that is used to connect the stove to the gas system shall comply with SANS
1156-2 or BS 3212.
Temporary installation.
Flexible hose connection from the gas appliance to the cylinder can be made by the user.
Ensure that pipe clamps are tightened correctly and are of good quality.
Gas cylinder - Not supplied.
For best results we recommend that gas cylinders with a minimum capacity of 19kg be
used.
Regulator - Not supplied.
A 2,8 kPa LPG gas regulator which complies with SANS 1237 must be used.
Permanent installation.
The appliance may only be installed by a Qualified Gas Fitter who is registered with the
LPGSASA. (Liquid Petroleum Gas Association of Southern Africa) All registered Gas
Fitters are issued with an identity card which carries their registration number. Make a
note of this on the back page of this book
The Gas Fitter should also provide you with a written certificate after completion of the
work. Failure to comply with the above will render the warranty invalid.
Before the installer hands over the installed appliance be sure that you fully understand:
a) The position of the isolation or shut-off valve in the gas supply line to the appliance.
b) The requirements for safe operation of the appliance
Note.This appliance is supplied ex-factory with jets and air settings for use with
LPG gas only.
Installers details
INSTALLERS NAME.
to be filled in below
INSTALLERS REGISTRATION
NUMBER.
Page 4
HAVE YOU RECEIVED A
WRITTEN CERTIFICATE?
The control panel.
GAS BURNER
CONTROL KNOBS
LEFT
BACK
C
P
0
0
250
0
LEFT
FRONT
0
RIGHT
FRONT
0
RIGHT
BACK
POWER ON
INDICATOR
0
75
150
THERMOSTAT
CYCLE
INDICATOR
100
200
OVEN
THERMOSTAT
MULTIFUNCTION
SELECTOR KNOB
IGNITION
BUTTON
LPG Gas hob.
The glass lid.
• Never ignite the burners without first lifting the glass lid fully.
• Ensure that the lid leans back slightly when open as this will prevent it closing accidentally while cooking.
• Do not place any object on the lid in the closed position.
Operating the gas burners.
• To switch the burner on, push down slightly on the relevant control knob and then turn
it to the left ( counter – clockwise ) The large flame symbol on the knob indicates the
maximum and the small flame the lowest setting.
• Push and hold the ignition button down immediately after the control knob has been
set to the desired position.
• The gas will then be lit automatically.
• Release the button 3 to 5 seconds after the flame is observed at the burner.
• If the flame fails to continue burning, please repeat the sequence.
• The button will ignite any of the burners.
Important.
Flame failure –safety cut out.
• Should the flame extinguish for whatever reason, the flow of gas to the burner will
automatically be terminated.
Action to be taken in the event of a burn back.
• In the event of a burn back ( where the flame burns back into the jet ) immediately turn
off the control to the affected burner.
• Wait a few minutes and relight the burner in the normal manner.
• If the burn back occurs again, turn off the control knob to the affected burner, and consult the nearest Defy Service Centre, who will advise you .
Ventilation.
• Room ventilation is vital for the efficient performance of the appliance and for the
safety of the occupants in the room in which the appliance is installed.
Page 5
Maintenance and servicing.
• Every twelve months the hob should be serviced by a Defy Service agent to ensure
•
•
•
•
continued efficient and safe operation.
Note: If required, the cleaning of the valves should only be carried out by a qualified
Defy technician. i.e. Burner not functioning correctly.
Removable burner parts should be washed weekly with hot water and detergent.
Take care to remove any encrustations and ensure that the burner holes are clear.
The condition of the gas hose and valve should be inspected for leaks every time the
gas bottle is re-filled.
Fitting the burner caps.
Burner
Cap Cover
• Carefully align the 2 holes in the alu-
minium burner cap body with the ignition electrode and the flame failure
sensor.
• Gently lower the burner cap into position with the cut-out over the spigot
in the burner cap body.
• Centralise and level the burner cap
cover onto the burner cap.
Fit Burner Cap
cut-out over
the spigot
of the
Burner Cap
Burner
Cap
Burner
Cap
Body
Flame failure
sensor
Ignition
electrode
Important safety advice.
•
•
•
•
•
•
•
•
•
When using gas, ensure that the room is well ventilated.
Always keep children and infirm persons away from the product when it is in use.
Only use the hob for preparing food.
Use a deep pan, large enough to cover the appropriate burner.
Always dry food thoroughly before placing it in hot oil or fat. Frozen food in particular will
spit and splatter if added too quickly.
Never fill the pan more than one third full of fat or oil.
Never heat fat or fry with a lid on the pan.
Do not fry too much food at once. This lowers the temperature of the oil or fat and results
in fatty foods.
Do not leave hot fat or oil unattended. If overheating occurs, these could catch fire.
In the event of a pan fire
• Switch off the electrical and gas supply.
• Smother the flames with a blanket or damp cloth.
• Burns and injuries are usually caused by picking up the burning pan and rushing outside
with it.
• Do NOT use water to extinguish an oil or fat fire.
Page 6
Operating the oven.
The oven is electrically operated and features 7 different cooking options.
• Select the required cooking option (1 to 7 as described below.)
• Set the oven thermostat to the required temperature. The indicator light will
glow and remain on until the oven has reached the selected temperature.
• When the indicator light switches off, the food should be placed in the oven.
• During cooking, the indicator light will cycle on and off as the oven thermostat
maintains the selected temperature.
• After completion, the thermostat and multifunction knob must be returned to 0.
1 - Fan only– No heat (defrosting).
The oven light and the fan at the back of the oven are switched on.
The fan will circulate air at room temperature, substantially reducing the defrosting period required for frozen food placed in the oven.
Do not switch the oven thermostat on.
2 - Thermofan.
Uses the fan and the rear bake element. All the trays may be used simultaneously.
3 - Fan assisted bake—bottom element only.
Uses the fan and the bottom bake element.
4 - Conventional bake with top heat.
Uses the bottom bake element and the supplementary top heat element.
5 - Fan assisted bake with top and bottom elements.
Uses the fan, the bottom bake and the supplementary top heat element.
6 - Turbo Grill.
Uses the fan and the top grill element.
Set the oven thermostat to maximum heat.
7 - Conventional grill.
Uses the top grill element only.
Set the oven thermostat to maximum heat.
NOTE: During the manufacturing process a protective coating is applied to the
oven interior. This coating should be burned off. Proceed as follows: Remove all
packaging. Select Conventional bake with top heat - using the multifunction selector and set the oven thermostat to 250°C. Run the empty oven for about 30 minutes. During this process some smoke will be generated so please ensure that the
area is well ventilated. This is a once –off process and need not be repeated again.
Page 7
Trays, shelf and heat shield.
Shelf positions.
Heat shield.
The oven is equipped with two baking
trays, one wire shelf, and a heat shield.
The shield protects the controls from excessive heat and fits into two slots beneath the
control panel as shown
Cooking guide.
Food
Utensil
Shelf position
Cooking time (min)
Thermostat
°C
Short bread (serves 8)
Cake in mould (serves 5)
Cookies (serves12)
Flaky pastry (serves12)
Pastry (serves 8)
Yeasted dough (serves18)
Biscuits (serves10)
Cake (serves 20)
Lasagne (serves 8)
Pizza (serves 8)
Roast beef (serves 8)
Lamb shoulder (serves 8)
Roast chicken
Roast turkey (5.5 kg.)
Fish
24 - 26 cm. bread mould.
18 - 22 cm. cake mould
Baking sheet
Baking sheet
Big tray
Big tray
Cooking sheet
Big tray
Lasagne dish
Big tray
Roasting dish
Roasting dish
Roasting dish
Big tray
Roasting dish
3
3
4
4
4
4
4
4
4
4
4
4
4
4
4
2-3
2-3
2-3
2-3
2-3
2-3
2-3
2-3
2-3
2-3
2-3
2-3
2-3
2-3
2-3
3
3
3
3
3
3
3
3
3
3
3
3
3
3
3
* Start roasts at max. temperature for 15 minutes and then decrease
the temperature to 150°C thereafter.
The guide lists settings, times and utensils which have achieved excellent laboritory results.
However your tastes and customs may differ so feel free to experiment.
Recommended shelf positions during Thermofan cooking:
2 Trays on positions 4 and 6
1 Tray on position4
170 - 180
170 - 180
170 - 190
180 - 190
180 - 200
190 - 220
170 -180
170 - 180
170 - 180
200 - 220
250 - 15min*
250 - 15min*
250 - 15min*
250 - 15min*
200
15 - 25
20 - 30
20 - 30
20 - 30
34 - 45
25 - 35
15 - 25
20 - 30
35 - 45
20 - 30
90 - 120
65 - 85
55 - 65
170 - 220
15 - 20
25 - 35
25 - 35
25 - 35
25 - 35
40 - 50
35 -45
20 - 30
25 - 35
40 - 50
30 - 35
110 - 120
70 - 90
60 - 70
180 - 240
15 - 25
20 - 25
20 - 25
20 - 25
20 - 25
30 - 40
25 - 35
18 - 22
20 - 25
30 - 40
25 - 35
100 - 110
60 - 75
50 - 60
150 - 210
15 - 20
THERMOFAN
CONVENTIONAL BAKE WITH TOP HEAT
FAN ASSISTED BAKE WITH TOP HEAT
Operating the grill
• Apply a little vegetable oil to the grill shelf to prevent the meat from sticking to the
•
•
•
•
•
•
•
•
shelf bars and position a tray directly below the grill shelf in order to collect any fats
and oils released during the grilling process.
Set the multifunction selector to CONVENTIONAL GRILL.
Set the OVEN THERMOSTAT to maximum.
Pre-heat the grill for about 5 minutes. The amber indicator light will glow, showing
that the grill has been switched on.
After pre-heating, place the food to be grilled on the grill shelf.
Attach the heat shield below the control panel as shown in the sketch above. This will
protect the controls from excessive heat .
During the grilling process the oven door must remain partially open.
Monitor the grilling process and when completed , remove the grill shelf and the food
using oven gloves.
Accessible parts may become very hot when grilling and children and the infirm
should be kept well away from the oven to prevent accidental burns.
Page 8
Cleaning.
General:
• Switch the electricity off at the wall socket and remove the plug before attempting
any cleaning operation.
• Allow the oven, grill, and burners to cool down before cleaning.
• Never use sharp instruments, abrasive cleaners, chemical sprays, wire wool, acid or
chlorine based cleaners or steam cleaners on any part of the stove.
Exterior:
• The pot supports on the hob may be removed to allow easy access to the hob panel.
• Wash the stove exterior, glass lid, pot supports and burner caps with hot soapy water,
• Rinse and dry.
• Acidic spills such as lemon juice, should be cleaned as soon as possible as these tend
to etch the enamel of the hob panel if left unattended.
• Never wash the burner caps in a dishwasher.
• Stubborn stains on the burners may be cleaned using a metal cleaner.
Oven interior:
• Remove the trays and wire shelf.
• Use a hot damp soapy cloth to clean the oven cavity, trays and wire shelf.
• Stubborn stains may be removed using a liquid household cleaner.
• Commercially available oven cleaners may be used with due care.
• Steam cleaners may not be used to clean the oven.
• Ensure that the door gasket is dry after cleaning.
• Wipe the grill element with a damp soapy cloth to remove residual fat splatters.
Control panel:
• Do not use oven cleaners, aerosols, scouring pads or abrasive cleaners.
• Wipe the control panel with a damp cloth and dry with a dry lint free cloth.
• Do not attempt to remove any of the control knobs.
Oven door:
• Do not use oven cleaners, aerosols, scouring pads or abrasive cleaners.
• Wipe the door outer panel with a warm damp soapy cloth, rinse and wipe dry.
• Take care not to distort or damage the door gasket.
Replacing a faulty oven light bulb:
• Switch off the power at the wall switch.
• Remove the light cover by unscrewing it in an anticlockwise direction.
• Unscrew the faulty bulb and fit a new bulb of similar wattage and rated for 300°C.
• Refit the light cover.
• Restore the power.
Page 9
Important Do’s and Don’ts.
• Don’t leave children unsupervised when the stove is in use.
• Don’t store items above the cooker which are tempting to children.
• Don’t sit or stand on the hob or on the oven door when it is open or in the down posi•
•
•
•
•
•
•
•
•
•
•
•
•
tion.
Don’t use a pan large enough to cover two or more burners.
Don’t use water to extinguish fat or oil fires.
Don’t use the stove as a space heater or dryer.
Don’t heat up any unopened cans or containers as internal pressure build-up could
cause these to explode.
Don’t place flammable materials (plastics, cloth, paper, aerosols etc.) on or near the
hob.
Don’t use abrasive or aggressive chemical cleaners to clean any part of the stove.
Don’t cover or obstruct any ventilation slots.
Don’t use round bottomed pans such as woks when cooking n the hob. These are inherently unstable.
Don’t use the oven floor as a shelf or tray.
Do not cover the hob, burners, trays or oven shelves with aluminium foil.
Don’t grill with the oven door closed.
Don’t use the grill to warm plates or serving dishes.
Don’t use a steam cleaner to clean the oven.
• Do have the stove installed by a qualified technician.
• Do read all the instructions before using the stove.
• Do keep children away from the stove when it is in use as surfaces can get extremely
•
•
•
•
•
•
•
•
•
hot.
Do switch the electricity off before cleaning any part of the stove.
Do remember to switch the stove off after cooking is completed.
Do keep ventilation slots free of any obstructions.
Do take care when removing food from the oven. Use oven gloves whenever possible.
Do allow steam to escape after opening the oven door before removing any food.
Do select the correct tray and shelf position .
Do allow the stove to cool down before cleaning.
Do use good quality flat bottom pots and pans.
Do refer servicing to qualified service technicians.
Before calling a service technician to assist with a problem,
PLEASE CHECK THE FOLLOWING:
• Check house fuses or trip switches. (For non function of automatic ignition).
• Check if there is power to the unit by plugging another small appliance into the wall
socket.
• Check that there is gas in the bottle and that the valve is open.
Page 10
Service Centres.
If you have followed the instructions and still have a problem, contact the
nearest Defy Service Centre. They will be able to advise you on any aspect
of the product or send a qualified technician to repair it.
BLOEMFONTEIN
CAPE TOWN
EAST LONDON
JOHANNESBURG
DURBAN
P.O.Box 1691 Bloemfontein. 9300.
160 Long Street, Hilton,
Bloemfontein 9301.
Tel. 051 400 3900.
P.O.Box 953 Milnerton. 7435
5A Marconi Rd.
Montague Gardens, 7441.
Tel. 021 551 8314.
P.O.Box 7006 East London 5200.
16 Bowls Rd. Arcadia,
East London 5201.
Tel. 043 743 7100.
P.O.Box 27150 Benrose 2011.
Cnr. Mimetes & Kruger Sts. Denver ext.12
Johannesburg. 2094.
Commercial Head Office, Tel. Sales, Administration,
Distribution, Commercial Head Office, National Groups,
Contracts and Credit.
Tel. 011 621 0200 or 011 621 0300.
P.O.Box 12004 Jacobs 4026.
174 Teakwood Rd.
Jacobs 4052.
Tel. 031 460 9712.
POLOKWANE
P.O.Box 1719 Polokwane 0700.
87 Nelson Mandela Drive.
Superbia 0699.
Tel. 0152 92 1166 / 7 / 8 / 9.
PORT ELIZABETH
P.O.Box 2971 North End 6056.
3 Sidon Str.North End
Port Elizabeth.6001.
Tel. 041 401 6400.
PRETORIA.
P.O.Box 19768 Pretoria West 0117.
Block A1 Old Mutual Industrial Park.
Cnr. D.F.Malan Drive & Moot Str. Hermanstad. 0082.
Tel. 012 377 0061.
OTHER AREAS ARE SERVICED BY OVER 200 AUTHORISED SERVICE AGENTS.
PLEASE CONSULT THE NEAREST REGIONAL DEFY SERVICE CENTRE FOR DETAILS
Page 11
Warranty
This certificate is issued by DEFY APPLIANCES LIMITED manufacturers of Defy and Ocean
products, hereinafter the Company, to the original purchaser only, of the appliance described on the
certificate and shall constitute the only warranty given in respect of this appliance.
The Company warrants to the original purchaser that for a period of TWO YEARS from date of purchase the appliance is free from defect under normal domestic use, both in workmanship and material, subject to the following conditions.
1. Repair or replacement of any part of this appliance, found by the Company to be defective, shall
be at the election of the Company. The Company reserves the right to effect such service through
any of its Service Divisions or Authorised Service Dealers. The cost of such service shall be borne
by the Company in full, provided that the appliance is located no further than 50 km from a Company Service Centre or an Authorised Service Dealer. Where the appliance is located beyond the
50 km radius, the purchaser shall be liable for the standard travelling charges, as determined by the
Company.
CARRY IN SERVICE Microwave ovens, Compact cookers, Domino hobs and small appliances
are repaired in our service centres and are not collected from the customers home. Faulty units
should be delivered to the purchasing dealer or to the nearest Company Service Centre for warranty
repairs.
2. Rusted or corroded plates, vitreous enamelware, fuses and lamps are specifically excluded from
these warranties. It is an express condition of these warranties that the purchaser takes due care and
attention in the use and maintenance of the appliance. Abuse, misuse in conflict with operating instructions, connection to incorrect voltages and subjection to commercial use shall release the
Company from its obligations.
3. This warranty shall become void and cease to operate if the appliance is dismantled by, or any repairs to the appliance are effected by any persons not duly authorised by the Company, or if substitute parts not approved by the Company are used in the appliance, or if the serial number of the appliance is removed.
4. The Company shall not be responsible for damages resulting from fire, flood, civil disturbances or
any Act of God. The Company shall not, in terms of these warranties be responsible nor held liable
for any consequential loss or damage of any kind caused by or due to the failure or malfunction of
the appliance.
5. The Company shall not be responsible for transportation or other costs other than those incurred
within the provisions of Point 1 of this Certificate.
6. These warranties shall not apply to the appliance if it is purchased or used beyond the borders of
the Republic of South Africa, Namibia, Botswana, Swaziland and Lesotho.
7. Where service is requested under warranty and no fault or defect can be found by the Company,
all costs incurred will be for the purchaser's account.
8. This Certificate as well as your invoice will serve as proof of purchase. For the purpose of warranty, it will be essential to produce this Certificate and invoice. Failure to do so, will render the
purchaser liable for service costs.
KEEP THIS CERTIFICATE AND SALES INVOICE AS PROOF OF PURCHASE FOR
WARRANTY PURPOSES.
Page 12