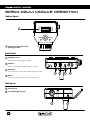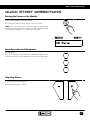
1
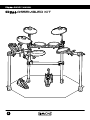
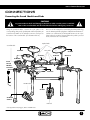
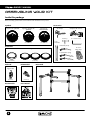
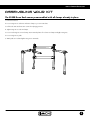
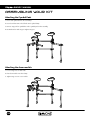
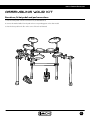
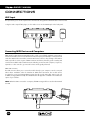
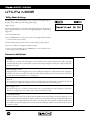
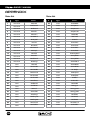
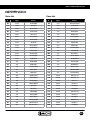
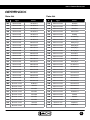
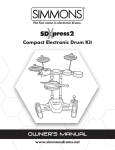
The first name in electronic drums.
SD
ELECTRONIC DRUM KIT
OWNER’S MANUAL
www.simmonsdrums.net
www.SimmonsDrums.net
SD
OWNER’S MANUAL
safety instructions
THE LIGHTNING FLASH WITH ARROWHEAD SYMBOL WITHIN AN EQUILATERAL TRIANGLE IS INTENDED TO ALERT THE USER TO THE
PRESENCE OF UNINSULATED DANGEROUS VOLTAGE WITHIN THE PRODUCT S ENCLOSURE THAT MAY BE OF SUFFICIENT MAGNITUDE
TO CONSTITUTE A RISK OF ELECTRIC SHOCK TO PERSONS.
THE EXCLAMATION POINT WITHIN AN EQUILATERAL TRIANGLE IS INTENDED TO ALERT THE USER TO THE PRESENCE
OF IMPORTANT OPERATING AND MAINTENANCE(SERVICING) INSTRUCTIONS IN THE LITERATURE ACCOMPANYING
THE PRODUCT.
APPARATUS SHALL NOT BE EXPOSED TO DRIPPING OR SPLASHING AND THAT NO OBJECTS FILLED WITH LIQUIDS, SUCH AS VASES, SHALL
BE PLACED ON THE APPARATUS.
1) Read these instructions.
11) Only use attachments/accessories specified by the manufacturer.
2) Keep these instructions.
6) Clean only with dry cloth.
12) Use only with the cart, stand, tripod,
bracket, or table specified by the
manufacturer, or sold with the
apparatus. When a cart is used,
use caution when moving the cart/
apparatus combination to avoid injury
from tip-over (Figure1).
7) Do not block any ventilation openings. Install in accordance
with the manufacturer’s instructions.
13) Unplug this apparatus during lightning storms or when unused
for a long periods of time.
8) Do not install near the heat sources such as radiators, heat
registers, stoves, or other apparatus (including amplifiers) that
produce heat.
14)Refer all servicing to qualified service personnel. Servicing
is required when the apparatus has been damaged in any
way, such as power-supply cord or plug is damaged, liquid
has been spilled or objects have fallen into the apparatus,
the apparatus has been exposed to rain or moisture, does not
operate normally, or has been dropped.
3) Heed all warnings.
4) Follow all instructions.
5) Do not use this apparatus near water.
9) Do not defeat the safety purpose of the polarized or groundingtype plug. A polarized plug has two blades with one wider
than the other. A grounding type plug has two blades and a
third grounding prong. The wide blade or the third prong are
provided for your safety, if the provided plug does not fit into
your outlet, consult an electrician for replacement of the obsolete
outlet.
10) Protect the power cord from being walked on or pinched
particularly at plugs convenience receptacles, and the point
where they exit from the apparatus.
Figure 1
WARNING: To reduce the risk of fire or electric shock, do not
expose this apparatus to rain or moisture. CAUTION: Apparatus
shall not be exposed to dripping or splashing and no objects filled
with liquids, such as vases, shall be placed on the apparatus.
CAUTION: Apparatus shall not be exposed to dripping or
splashing and no objects filled with liquids, such as vases, shall be
placed on the apparatus.
2
The first name in electronic drums.
www.simmonsdrums.net
Congratulations!
…on your purchase of Simmons’ SD500 Electronic Drum Kit. To get the most enjoyment from this kit,
we recommend that you skim through this manual at least once, then refer back to it to learn more about
specific functions.
Caring for Your SD500 Electronic Drum Set
Location
• Keep the drum kit away from direct sunlight, high temperature sources, and excessive
humidity to prevent deformation, discoloration, or more serious damage.
Power Supply
• Turn the power switch OFF when the SD500 is not in use.
• The AC adapter should be unplugged from the AC outlet if the SD500 is not to be used for
an extended period of time.
• Avoid plugging the AC adapter into an AC outlet that is also powering high-consumption
appliances such as electric heaters or televisions. Also avoid using multi-plug adapters,
since these can reduce sound quality, cause operation errors, and result in possible damage.
• To avoid damaging the unit, turn the SD500 and all related devices OFF prior to connecting
or disconnecting cables.
Handling and Transport
• Never apply excessive force to controls, connectors, and other parts.
• Unplug cables by gripping the plug firmly. Do not pull on the cable.
• Disconnect all cables before moving the module.
• Physical shocks caused by dropping, bumping, or placing heavy objects on the module can
result in scratches and more serious damage.
Cleaning
• Clean the module with a dry, soft cloth.
• A slightly damp cloth may be used to remove stubborn grime and dirt.
• Never use cleaners such as alcohol or thinner.
• To avoid discoloration, do not place vinyl objects on top of module.
Electrical Interference
• The module contains digital circuitry and may cause interference if placed too close to
radio or television receivers. If this occurs, move the SD500 further away from the affected
equipment.
Service and Modification
• There are no user serviceable parts in the drum module.
• Do not attempt to open the sound module or make any change in the circuits or parts of the
unit. This would void the warranty.
3
The first name in electronic drums.
SD
SD
OWNER’S MANUAL
ASSEMBLED KIT
4
The first name in electronic drums.
www.simmonsdrums.net
Table of Contents
SAFETY INSTRUCTIONS . . . . . . . . . . . . . . . . . . . . . . . . . . . . . . . . . . . . . . . . . . . . . . . . . 2
CONGRATULATIONS. . . . . . . . . . . . . . . . . . . . . . . . . . . . . . . . . . . . . . . . . . . . . . . . . . . . . 3
ASSEMBLED KIT . . . . . . . . . . . . . . . . . . . . . . . . . . . . . . . . . . . . . . . . . . . . . . . . . . . . . . . . . . . . 4
FEATURES
. . . . . . . . . . . . . . . . . . . . . . . . . . . . . . . . . . . . . . . . . . . . . . . . . . . . . . . . . . . . . . . . . . . .
6
CONNECTIONS . . . . . . . . . . . . . . . . . . . . . . . . . . . . . . . . . . . . . . . . . . . . . . . . . . . . . . . . . . . . 7
ASSEMBLING YOUR KIT
. . . . . . . . . . . . . . . . . . . . . . . . . . . . . . . . . . . . . . . . . . . . . . . .
8
CONNECTIONS
Connecting the Module and Pads . . . . . . . . . . . . . . . . . . . . . . . . . . . . . . . . . . 12
AC Adapter. . . . . . . . . . . . . . . . . . . . . . . . . . . . . . . . . . . . . . . . . . . . . . . . . . . . . . . . . . . . . . 12
Connecting Audio Equipment . . . . . . . . . . . . . . . . . . . . . . . . . . . . . . . . . . . . . . . 13
Connecting MIDI Devices and Computers . . . . . . . . . . . . . . . . . . . . . . . 14
SD500 DRUM MODULE OPERATION
Top Panel . . . . . . . . . . . . . . . . . . . . . . . . . . . . . . . . . . . . . . . . . . . . . . . . . . . . . . . . . . . . . . . . 15
Bottom Panel. . . . . . . . . . . . . . . . . . . . . . . . . . . . . . . . . . . . . . . . . . . . . . . . . . . . . . . . . . . . . 16
Back Panel . . . . . . . . . . . . . . . . . . . . . . . . . . . . . . . . . . . . . . . . . . . . . . . . . . . . . . . . . . . . . . . . 16
Side Panel. . . . . . . . . . . . . . . . . . . . . . . . . . . . . . . . . . . . . . . . . . . . . . . . . . . . . . . . . . . . . . . . . 16
QUICK START OPERATIONS
Turning the Power On. . . . . . . . . . . . . . . . . . . . . . . . . . . . . . . . . . . . . . . . . . . . . . . . . . . 17
Basic Operations . . . . . . . . . . . . . . . . . . . . . . . . . . . . . . . . . . . . . . . . . . . . . . . . . . . . . . . . 17
Listening to the Demo Songs . . . . . . . . . . . . . . . . . . . . . . . . . . . . . . . . . . . . . . . . . . 18
Selecting a Kit . . . . . . . . . . . . . . . . . . . . . . . . . . . . . . . . . . . . . . . . . . . . . . . . . . . . . . . . . . . 18
Selecting a Song . . . . . . . . . . . . . . . . . . . . . . . . . . . . . . . . . . . . . . . . . . . . . . . . . . . . . . . . 18
Playing a Song . . . . . . . . . . . . . . . . . . . . . . . . . . . . . . . . . . . . . . . . . . . . . . . . . . . . . . . . . . 18
Muting the Drum Part . . . . . . . . . . . . . . . . . . . . . . . . . . . . . . . . . . . . . . . . . . . . . . . . . . 18
KIT MODE - ADVANCED
Editing a Kit . . . . . . . . . . . . . . . . . . . . . . . . . . . . . . . . . . . . . . . . . . . . . . . . . . . . . . . . . . . . . . 19
Rename a Kit . . . . . . . . . . . . . . . . . . . . . . . . . . . . . . . . . . . . . . . . . . . . . . . . . . . . . . . . . . . . . 20
Saving a Kit . . . . . . . . . . . . . . . . . . . . . . . . . . . . . . . . . . . . . . . . . . . . . . . . . . . . . . . . . . . . . . 20
Kit Reset . . . . . . . . . . . . . . . . . . . . . . . . . . . . . . . . . . . . . . . . . . . . . . . . . . . . . . . . . . . . . . . . . . . 20
SONG MODE
Playing a Song . . . . . . . . . . . . . . . . . . . . . . . . . . . . . . . . . . . . . . . . . . . . . . . . . . . . . . . . . . 21
Muting the Drum Part . . . . . . . . . . . . . . . . . . . . . . . . . . . . . . . . . . . . . . . . . . . . . . . . . . . 21
Editing a Song. . . . . . . . . . . . . . . . . . . . . . . . . . . . . . . . . . . . . . . . . . . . . . . . . . . . . . . . . . . . 21
RECORDING A SONG
Recording Settings . . . . . . . . . . . . . . . . . . . . . . . . . . . . . . . . . . . . . . . . . . . . . . . . . . . . . . 22
Clicking Settings . . . . . . . . . . . . . . . . . . . . . . . . . . . . . . . . . . . . . . . . . . . . . . . . . . . . . . . . . 23
UTILITY MODE
Utility Mode Settings . . . . . . . . . . . . . . . . . . . . . . . . . . . . . . . . . . . . . . . . . . . . . . . . . .
Effects . . . . . . . . . . . . . . . . . . . . . . . . . . . . . . . . . . . . . . . . . . . . . . . . . . . . . . . . . . . . . . . . . . . . .
MIDI Settings . . . . . . . . . . . . . . . . . . . . . . . . . . . . . . . . . . . . . . . . . . . . . . . . . . . . . . . . . . . .
Pad MIDI Note Assignments . . . . . . . . . . . . . . . . . . . . . . . . . . . . . . . . . . . . . . . . .
Auto Power Mode. . . . . . . . . . . . . . . . . . . . . . . . . . . . . . . . . . . . . . . . . . . . . . . . . . . . . .
Factory Reset . . . . . . . . . . . . . . . . . . . . . . . . . . . . . . . . . . . . . . . . . . . . . . . . . . . . . . . . . . . .
Tempo. . . . . . . . . . . . . . . . . . . . . . . . . . . . . . . . . . . . . . . . . . . . . . . . . . . . . . . . . . . . . . . . . . . . .
24
25
25
26
26
27
27
APPENDIX Voice List . . . . . . . . . . . . . . . . . . . . . . . . . . . . . . . . . . . . . . . . . . . . . . . . . . . . . . . . . . . . . . . . .
Kit List . . . . . . . . . . . . . . . . . . . . . . . . . . . . . . . . . . . . . . . . . . . . . . . . . . . . . . . . . . . . . . . . . . . . .
Key Map . . . . . . . . . . . . . . . . . . . . . . . . . . . . . . . . . . . . . . . . . . . . . . . . . . . . . . . . . . . . . . . . .
Patterns . . . . . . . . . . . . . . . . . . . . . . . . . . . . . . . . . . . . . . . . . . . . . . . . . . . . . . . . . . . . . . . . . . .
MIDI Implementation Charts . . . . . . . . . . . . . . . . . . . . . . . . . . . . . . . . . . . . . . . .
28
33
34
35
36
Simmons
P.O. Box 5111
Thousand Oaks, CA 91359-5111
All trademarks and registered trademarks mentioned herein
are recognized as the property of their respective holders.
Made in China
1407-10156
5
The first name in electronic drums.
SD
OWNER’S MANUAL
features
New Features of the SD500 Kit
• Custom Sound Library. Completely new sample set based on the most popular classic and modern kits.
• Variable Attack Response. Significantly improved playback with dynamic response according to hit velocity,
combined with alternating sample playback by velocity zone.
• S500 Series Pads with increased sensitivity and greater isolation for multi-zone snare pad.
SD500 Sound Module General Features
Polyphony
Voices - 64
Sounds
Drum Voices - 328
Keyboard Voice-43
Drum Kits - 25 Preset / 10 User
Songs - 50 Preset / 10 User
Effects
Reverb - Hall1, Hall2, Room1, Room2, Room3, Stage1, Stage2,
Plate, Delay, Echo, Off.
Chorus - Chorus1, Chorus2, Chorus3, Chorus4, Feedback,
Flanger, Short Delay, Flanger2, Flanger3, Celeste1, Celeste2,
Celeste3, Off.
Trigger Inputs
1 x Kick, Single Zone
1 x Snare, Dual Zone
9” Dual zone Snare pad
8” Single zone Tom pads
10” Single zone Hi Hat pad
10” Single zone Crash Cymbal pad with Choke
12” Single zone Ride Cymbal pad
1 x Hi-Hat pedal
Hardware
Drum Rack and mounts
Kick pedal / Trigger module
9” Dual zone Snare pad
8” Single zone Tom pads
10” Single zone Hi Hat pad
10” Single zone Crash Cymbal pad with Choke
12” Single zone Ride Cymbal pad
1 x Hi-Hat pedal
External Connections
1/8” Headphone Output
2 ¼” Master Outputs
1/8” TRS Aux input
USB Connection for MIDI via computer
Sequencer
Preset Songs - 25
User Songs - 10
Tempo- 20-280 BPM
Click/Metronome- Click voice, Time Signature, Tempo,
Interval, Volume
Power: 9v, 600ma
Weight: 37.04 lbs / 16.8 kg
6
The first name in electronic drums.
www.simmonsdrums.net
Connections
Connecting the Sound Module and Pads
CAUTION!
To prevent electric shock and damage to the device, make sure the power is switched
OFF on the sound module and all related devices before making any connection.
The voice of the hi-hat pad is controlled by the hi-hat pedal. Plug
into the Hi-Hat pedal the plug that is labelled “Hi-Hat Control”.
Similar to a real drum kit, the hi-hat pad functions as an ‘open
hi-hat’ when the pedal is released. When the pedal is pressed
down, it functions as a ‘closed hi-hat’.
Using the provided cables, connect the 1/4” jacks to the
corresponding drum pads, cymbal pads and kick pad. The pin
connection will attach to the multi-pin connector serial port on
the bottom of the sound module. (See illustration below.)
Cymbal Pads
Sound Module
Drum Pads
To Crash
To Tom 1
To Ride
To Tom 2
To Tom 3
To Hi-Hat
From
Sound
Module
to 7 Pads
To Snare
Hi-Hat Pedal
To Kick
To Hi-Hat
Control
Kick Pad
*See Appendix for Pad, Triggers, Name and MIDI chart.
7
The first name in electronic drums.
SD
OWNER’S MANUAL
Assembling your Kit
Inside this package
Before assembly, please make sure that all the items listed below are present.
Cymbals
Accessories
Single Zone 12” Cymbal Pad
Single Zone with Choke 10”
Cymbal Pad
Single Zone 10”
Hi-hat Cymbal Pad
AC Adaptor
Multi-pin Cable Harness
Drum Key
(S500CYM12S)
(S500CYM10SC)
(S500CYM10S)
1 Pair
Drumsticks
Hi-Hat Arm (Short)
Drum Pads
Dual Zone 9” Snare Pad
10–Velcro
Cable Strips
Single Zone 8” Tom Pads
2 Cymbal Arms (Long)
(S500PAD8S)
(S500PAD9D)
Hi-Hat Pedal
Kick Pad
Bass Drum Pedal /
Trigger module
Foot Controller
(S500KPD1)
(S500HHC1)
Drum Rack
User Manual
Drum Module
The first name in electronic drums.
KIT
PAGE
SONG
TEMPO
UTIL
SAVE
SD
ELECTRONIC DRUM KIT
MUTE
PLAY / STOP
RECORD
CLICK
(SD500)
4 L–Rods for Pads
OWNER’S MANUAL
www.simmonsdrums.net
www.SimmonsDrums.net
8
The first name in electronic drums.
www.simmonsdrums.net
Assembling your Kit
The SD500 Drum Rack comes preassembled with all clamps already in place.
1. Pull rack out of box.
2.Loosen wing nuts on side arms and snare clamps so you can rotate bars.
3.Pull the side arms and snare arm out into their playing positions.
4.Tighten wing nuts on side arm clamps.
5.Loosen L-rod wing nuts on tom clamps. Insert textured plastic of L-rod into tom clamps and tighten wing nuts.
6.Loosen wing nuts on pads.
7. Attach pads to L-rods and tighten wing nut on Tom Pads.
9
The first name in electronic drums.
SD
OWNER’S MANUAL
Assembling your Kit
Attaching the Cymbal Pads
1. Insert each cymbal arm into the rack clamp.
2.Insert short hi-hat arm on the left-side arm’s cymbal clamp.
3.Remove wing nut from cymbal tilter. Place cymbal pad on tilter assembly.
4.Re-attach washer and wing nut. Tighten wing nut.
Attaching the drum module
1. Loosen wing screw on drum rack.
2.Place drum module into drum clamp.
3.Tighten wing screw to secure module
10
The first name in electronic drums.
www.simmonsdrums.net
Assembling your Kit
Bass drum, hi-hat pedal and pad connections
1. Place the hi-hat pedal on the floor and to the left, as illustrated below.
2.Connect the marked cables from the pads to their corresponding inputs on the drum module
3.Place the bass pedal on the floor in the center of the rack as illustrated.
11
The first name in electronic drums.
SD
OWNER’S MANUAL
Connections
Connecting the Module and Pads
Using the provided cables, connect the 1/4” jacks to the corresponding drum pads, cymbal pads
and kick pad. The pin connection will attach to the serial port of the sound module. (See illustration.)
NOTE: The voice of the hi-hat pad is controlled by the hi-hat pedal. Similar to a real drum kit, the
hi-hat pad functions as an ‘open hi-hat’ when the pedal is released. When the pedal is pressed
down, it functions as a ‘closed hi-hat’. Use cable strips to retain cable to rack.
AC Adapter
The SD500 module uses an external power supply called an AC Adapter. This plugs into the
back of the module.
Make sure the power is switched OFF on the module and connect the power adaptor with the
DC IN jack on the rear panel.
NOTE: To protect the speakers, amplifier and the drum module from damage, lower the volume
to the minimum level before switching the power ON.
Make sure the power is switched OFF when connecting the drum module with external devices.
12
The first name in electronic drums.
www.simmonsdrums.net
Connections
Connecting Audio Equipment
Mixers and Amplifiers
1. When you want to listen to the voices send the drum to a mixer or amplifier. Connect using the
Output L/MONO and R jacks on the rear panel (for monaural playback, use the L/MONO
jack; for stereo playback, connect both L/MONO and R jacks.)
2. The volume from the module is adjusted with the VOLUME knob.
You can connect a standard pair of headphones the SD500 module to listen to your electronic
drum set without disturbing others. Connect the headphones to the headphone jack located on
the side panel of the drum module. Adjust the volume to a comfortable level to avoid damaging
your hearing. The Headphone output is separate from the Master Volume output control knob.
13
The first name in electronic drums.
SD
OWNER’S MANUAL
Connections
AUX Input
This input allows you to mix the input from the external audio along with the SD500 module’s internal sounds.
1. Plug the audio output of MP3 player, or other audio source into the AUX IN jack on the back panel.
MP3
PLAYER
Connecting MIDI Devices and Computers
MIDI stands for Musical Instrument Digital Interface, which is a world-wide standard communication
interface that enables electronic musical instruments and computers (of all brands) to communicate with
each other. MIDI sends note and other communication between devices. This exchange of information
makes it possible to create a system of MIDI instruments and devices that offer greater versatility and
control than is available with isolated instruments. Whether you interface with computers, sequencers,
expanders or other controllers, your musical horizons will be greatly enhanced.
MIDI USB connection
The USB connector allows you to connect the module directly to your computer. It can be connected
without driver installation under the Windows & MAC OSX environment. The module will be
recognized to receive and transmit MIDI messages through a single USB cable, USB is used only
for MIDI messages (MIDI via USB). The SD500 module will appear as “SD500” in the USB device
options of your software.
NOTE: When the USB is connected to a computer, all MIDI messages will be received and transmitted
via USB.
14
The first name in electronic drums.
www.simmonsdrums.net
SD500 Drum Module Operation
Top Panel
1
2
3
8
KIT
PAGE
SONG
TEMPO
UTIL
SAVE
9
10
4
11
MUTE
5
6
12
PLAY / STOP
RECORD
CLICK
7
1 Kit Knob
2 Volume Button
3 Song Button
Access Song Mode
4 Utility Button
Access Utility Functions
5 Play/Stop Button
Starts or Stops the playback
of a Song
6 Record Buttons
Used to enter the Record mode
7 Click
Turns the Click/Metronome
function on/off
8 Page Button
Move through the Editing pages
after each button push
10 Save
Enters the Save menu when
it is available
11 +/- Buttons
Adjust the current parameter
on the screen
12 Power Switch
This is a soft switch. To turn off, press
and hold the button for 5 secs.
9 Tempo
Adjusts tempo
15
The first name in electronic drums.
SD
OWNER’S MANUAL
SD500 Drum Module Operation
Bottom Panel
1
1 Serial Connection Jack for the
pad trigger cables
Back Panel
1 AC Adapter Input
Connection for the 9V DC power adapter
2 USB Port
Used for connecting the SD500 module to a computer.
3 AUX Input
Stereo 1/8” jack to connect CD or MP3 players to the module.
1
2
3
4
4 Output
Stereo audio outputs to connect to external audio sources
Side Panel
1 Volume knob
2 1/8” TRS headphone jack
1
16
The first name in electronic drums.
2
UTIL
SAVE
www.simmonsdrums.net
Quick start operations
Turning the Power on the Module
MUTE
1. Connect the AC Adapter to the drum module.
2. Press the power switch on the top panel to turn on the module.
NOTE: There is an automatic power off functionPLAY
that/ STOP
turns off RECORD
the module
when the kit is not being used for a certain period of time. The default setting
is off. If this gets changed you can reset this in the Utility mode.
CLICK
Basic Operation and Navigation
Selecting Modes
There are 3 main modes for the module KIT, SONG and UTILITY. To enter
these modes press the corresponding buttons on the top panel of the module.
KIT
SONG
UTIL
Adjusting Values
1. Select the parameter to be adjusted.
2. Adjust the value using + / - buttons.
MUTE
PLAY / STOP
17
The first name in electronic drums.
RECORD
SD
OWNER’S MANUAL
Quick start operations
Listening to the Demo Songs
The demo songs help to show you the capabilities and sounds of the SD500
module. There are two demos in the module. The first demo song is an
extended drum solo that switches between various kits in the module. The
second demo sound plays a long song that has several patterns combined to
show the different genres of music that module can play.
1. Press KIT and SONG button simultaneously to enter Demo Mode. The first
song demo will start playing.
2. Press the PLAY/STOP button to stop the demo.
3. Press the + or - buttons to select a Demo to play; use Play button to play
the demos
4.After pressing STOP, press any of the Mode buttons (KIT, SONG or
UTILITY) to exit the Demo Mode
Selecting a Kit
Entering KIT Mode
1. Press the KIT button. The LCD displays the current Kit number and Kit name.
2. Press the – /+ buttons (Preset or User Kits).
Selecting a Song
1. Press the SONG button and the SONG screen appears with Song
Number and Name.
2. Press the –/+ buttons to select the song you want to play.
Playing Song
1. Press PLAY/STOP to play a song.
2. Press the PLAY/STOP button to stop playback of the song.
NOTE: You can temporarily change the tempo of a song while playback is in
progress. The song returns to its preset tempo when a different song is selected.
Muting the Drum Part
1.While a Song is playing press the PLAY/STOP and CLICK Button at the same time.
This will mute the drum sound. The screen will show the mute status “Mute On” or
“Mute Off”
2.To unmute the Drums press the PLAY/STOP and CLICK Buttons at the same time again.
3.The default setting is to mute the drum sound. It also mutes the accompaniments
track. See P.21 “Mute Select”.
18
The first name in electronic drums.
www.simmonsdrums.net
Kit Mode - Advanced
Editing a Kit
1.Press the KIT button.
2.Press the PAGE button to see the screen for the current sound
3.Strike a drum pad to view the Voice currently assigned
4.Press the PAGE button to move to the first parameter to be changed on the
current sound. Press the PAGE button repeatedly to step through all the
available parameters that can be changed on the voice.
5.Press the -/+ buttons to change the parameter
6.Press the SAVE/ENTER button to save the assignment to a User Kit.
(See Saving a kit)
Parameter
Definition
Parameter Range[-/+]
voice
Voice index
0-328
volume
volume
0-32
Pitch
Pitch
-8 ~ +8
Decay
Decay
0 ~ -5
Pan
Pan
L8 ~ R8/ Center
R.LVL
Reverb Level
0 ~ 32
C.LVL
Chorus Level
0 ~ 32
19
The first name in electronic drums.
SD
OWNER’S MANUAL
Kit Mode - Advanced
Renaming a Kit
1.Select a User Kit.( Preset Kits cannot not be renamed)
2.Press the -/+ buttons to choose the User kit for save.
3.Press the SAVE/ENTER button to rename the User Kit.
4.Press the PAGE button to move the cursor
5.Press [+/-] to change the character
6.Press the SAVE/ENTER confirmation
Saving a Kit
1.Press the SAVE/ENTER button to save the assignment to a User Kit.
2.Press the -/+ buttons to choose the User kit for save.
3.Press the SAVE/ENTER button to rename the User Kit.
4.Press the PAGE button to move the cursor
5.Press [+/-] to change the character
6.Press the SAVE/ENTER confirmation
Kit Reset
1.Select a Kit
2.Press the Page Button until you see Factory Reset.
3.Press the Save Button. The screen will show “Current Kit”
4.Press Save to reset just the one kit. If you want to reset all the kits go to the
next step.
5.Press the + button. The screen will show “All Kits”.
6.Press Save.
20
The first name in electronic drums.
www.simmonsdrums.net
Song mode
Playing a Song
1. Press PLAY/STOP to play a song.
2. Press the PLAY/STOP button to stop playback of the song.
NOTE: You can temporarily change the tempo of a song while playback is in
progress. The song returns to its preset tempo when a different song is selected.
Muting the Drum Part
1.While a Song is playing press the PLAY/STOP and CLICK Button at the
same time. This will mute the drum sound.
2.To unmute the Drums press the PLAY/STOP and CLICK Buttons at the same
time again.
Editing a Song
1.Press the SONG Button. The current song will be displayed.
2. If you wish to change to another song press the -/+ buttons until you get to
the Song you want to edit.
3.From the Song you have selected press the PAGE button. The first selection is
the Accompaniment Volume (Acc Vol).
4.Press the -/+ buttons to set the value for the volume. To move to the next
parameter press the PAGE button. Each time you press the PAGE button you
will come to the next parameter. See the list below of the parameters for Songs.
•Acc Volume
•Drum Volume
•Mute Select: Part Mute - Drums or Accompaniment
•Kit Link: Kit follows the song changes
•Erase Track - Erase Drums or Accompaniment track
(only user song)
Copy Song
You can copy Preset song to user song, then erase Drums or
Accompaniment track, Re-Recording.
1.Select a Song.
2.Press the SAVE/ENTER button to save the to a User song
3.Press the -/+ buttons to choose the User song for save
4.Press the SAVE/ENTER button to rename the User song.
5.Press the PAGE button to move the cursor
6.Press [+/-] to change the character
7.Press the SAVE/ENTER confirmation
If you want to rename user song, song save to the original position, then
use the rename instructions.
21
The first name in electronic drums.
SD
OWNER’S MANUAL
Recording a Song
Recording Settings
There are several settings for the Record mode. To enter the setup mode press
the RECORD and PAGE buttons.
1.The first page is the Track you wish to record to. The default is Drum.
The other setting is Acc (accompaniment).
To change between these Press the -/+ buttons.
To record an accompaniment track you must use an external MIDI device such as MIDI keyboard that is connected to your computer to
the USB input.
Accompaniment track: To record these parts you will need an external
MIDI keyboard or MIDI device that can output MIDI notes on MIDI
channels 11-16.
Channel 11: Percussion Part
Channel 12-16: Accompaniment Part
2.The next Page is Together.
If on, other track will play together with recording.
3.The next Page is Syn Start.
This determines if you want the recorder to start recording when you first play a note, rather than waiting for a count-in. When you press the Record button the metronome will play and the recorder will not start until you play.
4.The next page is Pre Count.
This determines the amount of measures you want to wait before recording. If Syn Start is on. This will be ignored. Press the -/+ buttons to change the parameter setting between 0-2 bars
22
The first name in electronic drums.
www.simmonsdrums.net
RECORDING A Song
To Record
1.Press the Song Button
2.Select a User Song
3.Press the Record button.
KIT
You will hear the Click metronome sound count in. Begin playing
the song after the count off.
4.
After you record your song you can also rename the song,
Press SAVE/ENTER button to save and rename.
SONG
UTIL
Click Settings
The CLICK is the metronome sound that is played when you are listening to
beat to play along with.
Press CLICK button on/off metronome.
1.To edit the Click settings press and hold the CLICK button for 2 seconds,
then press the PAGE button.
The first parameter is the time signature- “T Sig”.
3.Press the -/+ buttons to select the time signature that you want.
4.To get to the next parameter press the PAGE button. See the list below of
the parameters for the Click.
Definitions
Time Signature- Time Signature / T-Sig- For the preset songs, this parameter shows the current song’s default value.
For the user songs that have material already recording on them the default value is 4/4 and cannot be changed.
Interval- The refers to the note value interval for the click. Ex quarter note, eight note etc.
Click Voice- This refers to the sound for the Click
Click Vol- Click Volume
Reset- Resets the Click to the factory setup
23
The first name in electronic drums.
SD
OWNER’S MANUAL
Utility Mode
Utility Mode Settings
The Utility mode is for the main functions of the module such as trigger setup for
the pads, effects, MIDI setup and saving global settings.
Trigger Settings
You can set the parameters of each drum and cymbals pad in the Trigger menu.
While editing the settings, you can select each trigger by hitting the corresponding
trigger pad.
1.Press the UTILITY button.
2.Press the PAGE button to see the screen for the current trigger pad- The default
is the Snare pad center Sensitivity.
3.Strike the drum pad you want to edit to view the setting currently assigned
4.Press the -/+ buttons to change the parameter setting.
5.To get to the next parameter press the PAGE button. See the list below for the
other parameters and explanations.
Parameter definitions
Sensitivity
This adjusts the sensitivity of the pad trigger to control the pad response. Higher settings result in higher sensitivity,
so that the pad will produce a loud volume even when struck softly. Having the sensitivity set too high can affect the
dynamics of the pad.
Retrig-C (Retrigger cancel)
Retrigger Cancel prevents retriggering from occurring. Although setting this to a high value prevents retriggering,
it then becomes easy for sounds to be omitted when the drums played fast (roll etc.). Set this to the lowest value
possible while still ensuring that there is no retriggering.
Threshold
This setting allows a trigger signal to be received only when the pad is struck harder than a specified force. This can
be used to prevent a pad from sounding in response to peripheral vibrations from another pad.
Curve (Trigger curve)
This setting allows you to control the relation between the velocity (striking force) and changes in volume (the
dynamic curve.) Adjust this curve until the response feels as natural as possible.
X- Talk (Pad Crosstalk)
When two pads are mounted on the same stand, the vibration produced by hitting one pad may trigger the sound
from another pad unintentionally (This is called crosstalk.) You can avoid this problem by adjusting Crosstalk Cancel
on the pad that is sounding inadvertently. If the value is set too high, then when two pads are played simultaneously,
the one that is struck less forcefully will not sound. Be careful when setting this parameter to the minimum value required
to prevent crosstalk.
24
The first name in electronic drums.
www.simmonsdrums.net
Utility Mode
Effects
The SD500 module has built-in Reverb and Chorus which are adjustable in the
Utility Effects setup.
1.Press the UTILITY button. The first parameter is for the trigger settings.
2.Press the PAGE button until you see the screen for Reverb type
3.Press the -/+ buttons to change the parameter setting.
4.Press the PAGE button again to go to the screen for the Chorus type
5.Press the -/+ buttons to change the parameter setting.
The available parameters are available below:
Reverb
Hall1, Hall2, Room1, Room2, Room3, Stage1, Stage2, Plate, Delay, Echo, Off.
Chorus
Chorus1, Chorus2, Chorus3, Chorus4, Feedback, Flanger, Short Delay,
Flanger2, Flanger3, Celeste1, Celeste2, Celeste3, Off.
MIDI Settings
The SD500 module is a USB MIDI compatible device. There are no special
drivers required to use the module with your computer.
Local - When local is on the front panel buttons and the external MIDI device
sends MIDI data. In some cases you may want to turn off the front and remotely
send MIDI commands. In this case set the Local to Off. The default setting is set
to ON.
To change the Local On/Off.
1.Press the UTILITY button.
2.Press the PAGE button until you see the screen for MIDI Local “On”
3.Press the -/+ buttons to change the parameter setting.
25
The first name in electronic drums.
SD
OWNER’S MANUAL
Utility Mode
Pad MIDI Note assignments
The MIDI output notes from the SD500 are preset in the Module. The following
list has the MIDI notes that are sent from the module when the drum pads and
pedals are played.
MIDI Note
Pad
36
Kick
38
Snare – Center
40
Snare – Rim
48
Tom 1
45
Tom 2
43
Tom 3
46
Hi Hat- Open
42
Hi Hat – Closed
44
Hi Hat - Pedal
49
Crash
51
Ride
For more details on MIDI functionality please see the MIDI Implementation Chart
in the Appendix section of the manual.
Auto Power Mode
Auto Close
On: If you don’t use SD500 exceeding 30 min. It will Automatically shutdown
the module.
Off: The module will not shutdown Automatically. (default setting)
26
The first name in electronic drums.
www.simmonsdrums.net
Utility mode
Factory Reset
There may be occasions where you want the module to return to the factory
settings. This function will return the module back to factory setup.
To Reset the Module to Factory Setup
1.Press the UTILITY button.
2.Press the PAGE button until you see the screen for “Util Reset”*
3.Press the SAVE button to reset the module.
The module will go through the reset procedure and afterwards return to
the Kit mode screen.
* There are two types of resets. Utility reset just resets the module settings.
Reset All will reset all the sounds as well as the module settings.
(Press PAGE button again to Reset All.)
Tempo
To adjust tempo press the TEMPO button. The current tempo will be displayed.
You can adjust the tempo with the -/+ buttons. You can also change the
tempo by tapping on the drum pads. To do this press the SAVE/ENTER
button. The screen will show “Tap..” to indicate the module can accept your
tempo input from the drum pads.
27
The first name in electronic drums.
SD
OWNER’S MANUAL
appendix
Voice List
Voice List
#
Type
Voices
#
Type
Voices
1
Bass Drum
BD-Gated
32
Snare
SD-ClssRkRS
2
Bass Drum
BD-ClassRok
33
Snare
SD-DepBrass
3
Bass Drum
BD-EltroFnk
34
Snare
SD-DpBrssCS
4
Bass Drum
BD-Funk 1
35
Snare
SD-DpBrssRS
5
Bass Drum
BD-Funk 2
36
Snare
SD-ElctFkRS
6
Bass Drum
BD-GTRKick
37
Snare
SD-ElctrFnk
7
Bass Drum
BD-HvyMtl
38
Snare
SD-Funk1
8
Bass Drum
BD-Jazz
39
Snare
SD-Funk1CS
9
Bass Drum
BD-LAFunk
40
Snare
SD-Funk1RS
10
Bass Drum
BD-PhatFunk
41
Snare
SD-Funk2CS
11
Bass Drum
BD-Maple
42
Snare
SD-Funk2RS
12
Bass Drum
BD-Metal
43
Snare
SD-HeavyMetal
13
Bass Drum
BD-Studio
44
Snare
SD-HvyMtlCS
14
Bass Drum
BD-Old Funk
45
Snare
SD-HvyMtlRS
15
Bass Drum
BD-Vintage
46
Snare
SD-LAFnkRok
16
Snare
SD-Gated
47
Snare
SD-LAFkRkCS
17
Snare
SD-GatedCS
48
Snare
SD-LAFkRkRS
18
Snare
SD-GatedRS
49
Snare
SD- Maple
19
Snare
SD-Aluminum
50
Snare
SD-MapleCS
20
Snare
SD-AlummCS
51
Snare
SD-MapleRS
21
Snare
SD-AlummRS
52
Snare
SD-Metal
22
Snare
SD-BellBrass
53
Snare
SD-MetalCS
23
Snare
SD-BllBrsCS
54
Snare
SD-MetalRS
24
Snare
SD-BllBrsRS
55
Snare
SD-Reggae
25
Snare
SD-Brush
56
Snare
SD-ReggaeCS
26
Snare
SD-BrushRS
57
Snare
SD-ReggaeRS
27
Snare
SD-Bubinga
58
Snare
SD-ShllwBrs
28
Snare
SD-BubngaCS
59
Snare
SD-ShBrsCS
29
Snare
SD-BubngaRS
60
Snare
SD-ShBrsRS
30
Snare
SD-ClassRok
61
Snare
SD-ShalWood
31
Snare
SD-ClssRkCS
62
Snare
SD-ShWdCS
28
The first name in electronic drums.
www.simmonsdrums.net
appendix
Voice List
Voice List
#
Type
Voices
#
Type
Voices
63
Snare
SD-ShWdRS
94
Tom
TM-LA Funk Md
64
Snare
SD-Steel1
95
Tom
TM-PhtFnkHi
65
Snare
SD-Steel1CS
96
Tom
TM-MapleHi
66
Snare
SD-Steel1RS
97
Tom
TM-PhtFnkLo
67
Snare
SD-Steel 2
98
Tom
TM-MapleLo
68
Snare
SD-Steel2CS
99
Tom
TM-PhtFnkMd
69
Snare
SD-Steel2RS
100
Tom
TM-MapleMd
70
Snare
SD-Studio
101
Tom
TM-MetalHi
71
Snare
SD-StudioCS
102
Tom
TM-MetalLo
72
Snare
SD-StudioRS
103
Tom
TM-MetalMid
73
Snare
SD-Vintage
104
Tom
TM-StudioHi
74
Snare
SD-VintagCS
105
Tom
TM-StudioLo
75
Snare
SD-VintagRS
106
Tom
TM-StudioMd
76
Snare
SD-OldFunk
107
Tom
TM-OldFnkHi
77
Tom
TM-GatedHi
108
Tom
TM-VintagHi
78
Tom
TM-GatedLo
109
Tom
TM-OldFnkLo
79
Tom
TM-GatedMd
110
Tom
TM-VintagLo
80
Tom
TM-BrushHi
111
Tom
TM-OldFnkMd
81
Tom
TM-BrushLo
112
Tom
TM-VintagMd
82
Tom
TM-BrushMd
113
Hi Hat
HH-1Closed
83
Tom
TM-ClssRKHi
114
Hi Hat
HH-2Closed
84
Tom
TM-ClssRKLo
115
Hi Hat
HH-1Foot
85
Tom
TM-ClssRKMd
116
Hi Hat
HH-2Foot
86
Tom
TM-FunkHi
117
Hi Hat
HH-1Open
87
Tom
TM-FunkLo
118
Hi Hat
HH-2Open
88
Tom
TM-FunkMd
119
Hi Hat
HH-3Closed
89
Tom
TM-HvyMtlHi
120
Hi Hat
HH-3Foot
90
Tom
TM-HvyMtlLo
121
Hi Hat
HH-3Open
91
Tom
TM-HvyMtlMd
122
Hi Hat
HH-4Closed
92
Tom
TM-LA Funk Hi
123
Hi Hat
HH-4Foot
93
Tom
TM-LA Funk Lo
124
Hi Hat
HH-4Open
29
The first name in electronic drums.
SD
OWNER’S MANUAL
appendix
Voice List
Voice List
#
Type
125
Ride
126
Voices
#
Type
Voices
RD-Ping
156
Percussion
PR-QuicaDwn
Ride
RD-Bell1
157
Percussion
PR-QuicaHi
127
Ride
RD-Bell2
158
Percussion
PR-Shaker
128
Ride
RD-Bow1
159
Percussion
PR-Sleghbel
129
Ride
RD-Bow2
160
Percussion
PR-Surdo
130
Ride
RD-RideEdg1
161
Percussion
PR-TmbrnSlp
131
Ride
RD-Bell3
162
Percussion
PR-Tambourn
132
Ride
RD-Bow3
163
Percussion
PR-TimbleHi
133
Ride
RD-RideEdg2
164
Percussion
PR-TimbleLo
134
Crash
CY-China
165
Percussion
PR-TimbleRm
135
Crash
CY-Crash1
166
Percussion
PR-TimbleSm
136
Crash
CY-Crash2
167
Percussion
PR-Timbale
137
Crash
CY-Crash3
168
Percussion
PR-Timpani
138
Percussion
PR-AgogoLrg
169
Percussion
PR-TriangMt
139
Percussion
PR-AgogoSm
170
Percussion
PR-TrangM2O
140
Percussion
PR-Bell
171
Percussion
PR-TrangOpn
141
Percussion
PR-BongoLrg
172
Percussion
PR-TmbOpnSp
142
Percussion
PR-BongoSm
173
Percussion
PR-TumbaSlp
143
Percussion
PR-CabasaLg
174
Percussion
PR-Tumba
144
Percussion
PR-Cabasa
175
Percussion
PR-Vibraslp
145
Percussion
PR-Clave
176
Percussion
PR-WhstlLng
146
Percussion
PR-CongaSlp
177
Percussion
PR-Whstlsht
147
Percussion
PR-Conga
178
Percussion
PR-WdblokLo
148
Percussion
PR-CowbllOp
179
Percussion
PR-WdblokHi
149
Percussion
PR-CowbllMt
180
Electronic Kick
EK-808Kick
150
Percussion
PR-CowblM2O
181
Electronic Kick
EK-TekSynK
151
Percussion
PR-Guiro
182
Electronic Kick
EK-Hip Hop1
152
Percussion
PR-Marcas
183
Electronic Kick
EK-Hip Hop2
153
Percussion
PR-PandroOp
184
Electronic Kick
EK-Hip Hop3
154
Percussion
PR-PandroRk
185
Electronic Kick
EK-Techno1
155
Percussion
PR-PandrSlp
186
Electronic Kick
EK-Techno2
30
The first name in electronic drums.
www.simmonsdrums.net
appendix
Voice List
Voice List
#
Type
187
Electronic Kick
188
Voices
#
Type
Voices
EK-Techno3
218
Electronic Snare
ES-Tech9
Electronic Kick
EK-Techno4
219
Electronic Snare
ES-Tech10
189
Electronic Kick
EK-Techno5
220
Electronic Snare
ES-Tech11
190
Electronic Kick
EK-Techno6
221
Electronic Snare
ES-HouseSnr
191
Electronic Kick
EK-Techno7
222
Electronic Snare
ES-Kling
192
Electronic Kick
EK-Techno8
223
Electronic Snare
ES-TekCrazy
193
Electronic Kick
EK-Techno9
224
Electronic Snare
ES-TekCrzy2
194
Electronic Kick
EK-Techno10
225
Electronic Snare
ES-Hip Hop1
195
Electronic Kick
EK-Techno11
226
Electronic Snare
ES-Hip Hop2
196
Electronic Kick
EK-Techno12
227
Electronic Snare
ES-Hip Hop3
197
Electronic Kick
EK-Techno13
228
Electronic Snare
ES-Hip Hop4
198
Electronic Kick
EK-Techno14
229
Electronic Snare
ES-Techno1
199
Electronic Kick
EK-Techno15
230
Electronic Snare
ES-Techno2
200
Electronic Kick
EK-Techno16
231
Electronic Snare
ES-Techno3
201
Electronic Kick
EK-Techno17
232
Electronic Snare
ES-Hip Hop5
202
Electronic Kick
EK-Techno18
233
Electronic Snare
ES-Simmons1
203
Electronic Kick
EK-Techno19
234
Electronic Snare
ES-Simmons2
204
Electronic Kick
EK-Techno20
235
Electronic Snare
ES-Simmons3
205
Electronic Kick
EK-Techno21
236
Electronic Snare
ES-Simmons4
206
Electronic Kick
EK-Techno22
237
Electronic Snare
ES-Simmons5
207
Electronic Kick
EK-Simmons1
238
Electronic Snare
ES-Simmons6
208
Electronic Kick
EK-Simmons2
239
Electronic Snare
ES-Simmons7
209
Electronic Snare
ES-Electro!
240
Electronic Snare
ES-Simmons8
210
Electronic Snare
ES-Tech1
241
Electronic Snare
ES-Simmons9
211
Electronic Snare
ES-Tech2
242
Electronic Snare
ES-Simmns10
212
Electronic Snare
ES-Tech3
243
Electronic Snare
ES-Simmns11
213
Electronic Snare
ES-Tech4
244
Electronic Snare
ES-808
214
Electronic Snare
ES-Tech5
245
Electronic Snare
ES-DRAS
215
Electronic Snare
ES-Tech6
246
Electronic Snare
EP-808Snare
216
Electronic Snare
ES-Tech7
247
Electronic Tom
ET-Electro1
217
Electronic Snare
ES-Tech8
248
Electronic Tom
ET-Electro2
31
The first name in electronic drums.
SD
OWNER’S MANUAL
appendix
Voice List
Voice List
#
Type
249
Electronic Tom
250
Voices
#
Type
Voices
ET- Simmns1
280
Electronic Percussion
EC-ClsdHat5
Electronic Tom
ET- Simmns2
281
Electronic Percussion
EC-ClsdHat6
251
Electronic Tom
ET- Simmns3
282
Electronic Percussion
EC-OpenHat1
252
Electronic Tom
ET- Simmns4
283
Electronic Percussion
EC-OpenHat2
253
Electronic Tom
ET- Simmns5
284
Electronic Percussion
EC-OpenHat3
254
Electronic Tom
ET- Simmns6
285
Electronic Percussion
EC-OpenHat4
255
Electronic Tom
ET- Simmns7
286
Electronic Percussion
EC-OpenHat5
256
Electronic Tom
ET- Simmns8
287
Electronic Percussion
EC-OpenHat6
257
Electronic Tom
ET-Techno1
288
Electronic Percussion
EC-HpHpClH1
258
Electronic Tom
ET-Techno2
289
Electronic Percussion
EC-HpHpClH2
259
Electronic Tom
ET-Techno3
290
Electronic Percussion
EC-HpHpOpH1
260
Electronic Tom
ET-Techno4
291
Electronic Percussion
EC-HpHpOpH2
261
Electronic Tom
ET-Techno5
292
Electronic Percussion
EC-HpHpOpH3
262
Electronic Tom
ET-909
293
Electronic Percussion
EC-SimmnsRd
263
Electronic Percussion
EC-606Clsd1
294
Electronic Percussion
EC-SimmnsCr
264
Electronic Percussion
EC-606Clsd2
295
Electronic Percussion
EC-SimnsCH1
265
Electronic Percussion
EC-606Open
296
Electronic Percussion
EC-SimnsOH1
266
Electronic Percussion
EC-808
297
Electronic Percussion
EC-SimnsOH2
267
Electronic Percussion
EC-808Clsd
298
Electronic Percussion
EC-SimnsOH3
268
Electronic Percussion
EC-808Open
299
Electronic Percussion
EC-TechHHCl
269
Electronic Percussion
EC-909Crash
300
Electronic Percussion
EC-TechCrsh
270
Electronic Percussion
EC-909Open
301
Electronic Percussion
EC-TechChna
271
Electronic Percussion
EC-ClosdHat
302
Electronic Percussion
EC-TechOHH1
272
Electronic Percussion
EC-Crash1
303
Electronic Percussion
EC-TechOHH2
273
Electronic Percussion
EC-Crash2
304
Electronic Percussion
EC-TechRd1
274
Electronic Percussion
EC-Crash3
305
Electronic Percussion
EC-TechRd2
275
Electronic Percussion
EC-HHfoot
306
Electronic Percussion
EC-TechCrFX
276
Electronic Percussion
EC-ClsdHat1
307
Electronic Percussion
EP-NoiseClp
277
Electronic Percussion
EC-ClsdHat2
308
Electronic Percussion
EP-Sinetick
278
Electronic Percussion
EC-ClsdHat3
309
Electronic Percussion
EP-808Bleep
279
Electronic Percussion
EC-ClsdHat4
310
Electronic Percussion
EP-808Clap
32
The first name in electronic drums.
www.simmonsdrums.net
appendix
Voice List
Kit List
#
Type
311
Electronic Percussion
312
Voices
#
No.
Display Name
EP-808Clap2
1
K01:
Maple
Electronic Percussion
EP-808Clave
2
K02:
LA Funk Rok
313
Electronic Percussion
EP-808Conga
3
K03:
Funk 1
314
Electronic Percussion
EP-808Cowbl
4
K04:
Vintage
315
Electronic Percussion
EP-808Marca
5
K05:
Metal
316
Electronic Percussion
EP-808Rim
6
K06:
Bubinga Kit
317
Electronic Percussion
EP-Blip
7
K07:
Classic Rock
318
Electronic Percussion
EP-Crack
8
K08:
Funk 2
319
Electronic Percussion
EP-ElctrClp
9
K09:
Heavy Metal
320
Electronic Percussion
EP-FiltrSnp
10
K10:
Techno 1
321
Electronic Percussion
EP-Kling
11
K11:
Country
322
Electronic Percussion
EP-Ping
12
K12:
Hip Hop 1
323
Electronic Percussion
EP-Punch
13
K13:
Simmons
324
Electronic Percussion
EP-Sboing
14
K14:
Latin Perc
325
Electronic Percussion
EP-Sinetick
15
K15:
Studio
326
Electronic Percussion
SlpBasPhrse1
16
K16:
ElectroFunk
327
Electronic Percussion
SlpBasPhrse3
17
K17:
Jazz
328
Electronic Percussion
GitarPhrse2
18
K18:
Brushes
19
K19:
Reggae
20
K20:
80's Gated
21
K21:
Mental
22
K22:
Breakbeat
23
K23:
Funk 3
24
K24:
Crazy!
25
K25:
Hip Hop 2
33
The first name in electronic drums.
SD
OWNER’S MANUAL
appendix
Key Map
Key Map
#
PG#
1
0
2
Manual Name
#
PG#
Acoustic Piano
32
80
Synth 1
4
Electric Piano
33
81
Synth 2
3
7
Clavinet
34
82
Synth 3
4
16
Drawbar Organ
35
83
Synth 4
5
17
Percussion Organ
36
84
Synth 5
6
24
Nylon Guitar
37
85
Synth 6
7
25
Steel Guitar
38
86
Synth 7
8
27
Tweed Guitar
39
87
Synth 8
9
28
Muted Guitar
40
88
Synth 9
10
29
Distorted Guitar 1
41
89
Synth 10
11
30
Distorted Guitar 2
42
90
Synth 11
12
32
Acoustic Bass
43
91
Synth 12
13
38
Acoustic Bass Slap
14
39
Acoustic Bass Slide
15
33
Fingered Bass
16
40
Slap bass hardthumb
17
37
Muted Bass
18
34
Pick Bass
19
35
Rock Bass
20
36
Slap Bass
21
41
Slap Bass Softthumb
22
42
Slap Bass Phrase 1
23
43
Slap Bass Phrase 2
24
44
Slap Bass Phrase 3
25
45
Funk Guitar Phrase 1
26
46
Funk Guitar Phrase 2
27
47
Funk Guitar Phrase 3
28
48
Funk Guitar Phrase 4
29
49
Funk Guitar Phrase 5
30
50
Funk Guitar Phrase 6
31
61
Horn Section
34
The first name in electronic drums.
Manual Name
www.simmonsdrums.net
appendix
Patterns
Patterns
Display Name
Display Name
S01:
Bonz beat
S:32
Ballad Rock
S:02
Funky D
S:33
Rockin'Out
S:03
Blues Beat
S:34
UpBeat
S:04
HeadBanger
S:35
Stage Funk
S:05
Black Magic
S:36
Samba
S:06
Funky Fly
S:37
NightClub
S:07
Metalhead
S:38
70's Rock
S:08
MoreCowbell
S:39
New Reggae
S:09
RockShuffle
S:40
Last Dance
S:10
Hip Hoppin'
S:41
Big Rock
S:11
Tech Step
S:42
Steady 8's
S:12
Surf's Up
S:43
Funky Pop
S:13
Fusion Gruv
S:44
R&B
S:14
Alt Rock
S:45
B Invasion
S:15
Salsa
S:46
80's Pop
S:16
Funky Strut
S:47
Freaky
S:17
Texas Blues
S:48
Hard Trance
S:18
Big 70's
S:49
Maracas
S:19
ItsGt2BFnky
S:50
Texas2Stp
S:20
80's Rock
S:21
East Coast
S:22
Freakiness
S:23
SearchLite
S:24
Jazz Walk
S:25
B' Good
S:26
BreakDown
S:27
Train Groove
S:28
HVY Groove
S:29
PhatCheck
S:30
Rock Blues
S:31
LA Funk
35
The first name in electronic drums.
SD
OWNER’S MANUAL
appendix
MIDI Implementation Chart
Function
Transmitted
Recognized
Basic
Channel
Default
Changed
10 CH Only
X
1-16 CH
1-16CH
Mode
Default
Messages
Altered
Mode 3
X
**********
Mode 3
X
X
True voice
0~127
**********
0~127
0~127
Note ON
Note OFF
O 9nH,v=1-127
O 8nH,v=0
O 9nH,v=1-127
O 9nH,v=0 or 8nh
Affter Key’s
X
X
Pitch Bender
X
O
X
X
X
X
X
X
X
X
X
X
X
X
X
X
O
O
O
O
O
O
O
O
O
O
O
O
O (*1)
O
Program
Change : True
O 0-127
0-127
O 0-127
0-127
System Exclusive
X
O
System:
Song Position
Song Select
Tune
X
X
X
X
X
X
Local on/off
All Notes Off
Messages: Active Sense
Reset
X
X
X
X
O
O
X
X
Note
Number:
Velocity
Control Change
Common:
0,32
1
6
7
10
11
64
66
67
80, 81
84
91,93
100,101
121
Aux:
Mode1: OMNI ON, POLY
Mode2: OMNI ON, MONO
Mode3: OMNI OFF, POLY
Mode4: OMNI OFF, MONO
*1: Registered parameter number:
#0: Pitch sensivity
#1: Fine tuning in cents
#2: Coarse tuning in half-tones
36
The first name in electronic drums.
Remarks
Bank Select
Modulation
Data Entry
Volume
Pan
Expression
Sustain
Sostenuto
Soft pedal
DSP TYPE
Portamento
DSP DEPTH
RPN LSB,MSB
Reset all Controllers
O: Yes
X: NO