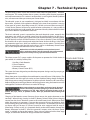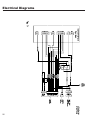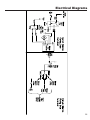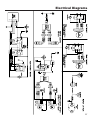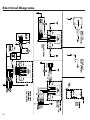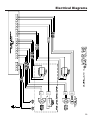
1
OWNERS MANUAL
Congratulations on your recent purchase of a Damon Motor Coach
Recreational Vehicle. We sincerely thank you for choosing and
putting your faith in Damon, and we would like you to know that
your satisfaction is of great importance to us. Our major goal is
to provide you with a quality recreational vehicle at a reasonable
price.
Your unit has been designed to provide you with many years of
carefree, comfortable travel and vacationing. We hope that it will
bring you that, along with many years of enjoyment and pleasant
memories.
This manual will help you better understand the features and
operating performances of your recreational vehicle. Please read
it and keep it in your vehicle for future reference.
Our customers are extremely important to us, and we want to
assure you that we will always strive to do everything possible to
continue to earn your trust and goodwill.
Welcome to the wonderful world of RVing and the Damon family.
Happy Travels!
Damon Motor Coach
Acknowledgement of Receipt of Warranty/Product Information
IMPORTANT: The customer is required to read this document before signing it.
We have listed several items which will help acquaint you with your new recreation vehicle. You the purchaser, should not submit this form until (1)
you have received and reviewed the limited warranty and owners manual;(2) you have had the opportunity to inspect and operate the vehicle;(3) all
items have been demonstrated and/or explained to you;(4) the dealer has answered any questions you may have, and ;(5) you find the vehicle in good
condition. The dealer is not authorized to deliver this vehicle until this has been done and both you and the dealer have signed this form.
Serial Number:
VIN Number:
Owner's Last Name:
First:
Address:
City:
State:
Country:
Phone:
Owner's E-Mail:
Zip:
Retail Delivery Date:
Owner/Dealer Inspection
1. Exterior and interior finish
7. Operate 120 Volt Generator (if so equipped)
2. Operate all appliances(electrical and gas)
8. Operate all air conditioner's,radio,entertainment
a. Furnace and thermostat(lighting and Maintainence)
system and televisions(if so equipped)
b. Range and oven (lightening and maintenance)
9. Complete review of owner's manual by dealer
c. Water heater( lighting and maintenance)
w/lowner
d. Refrigerator(operation and maintenance)
10. Test Drive
3. Review operation of manual or automatic Propane Gas regulator
11. Odometer reading as observed by customer:
4. Operate plumbing facilities including water faucets, shower,and toilet
5. Operate all doors and window's including locks
6. Observe or check to assure that all wheel lugs
Miles
or
Kilometers
and tire pressure is correct.
I have completed the above inspection on this recreation vehicle and have taken the test drive at the time of purchase. I noted:
I received and read a copy of the Damon Motor Coach Limited Warranty and the Chassis Limited Warranty before I purchased the vehicle. I
understand that it is to be used only for travel on improved roads. I also understand that the selling dealer is not an agent for Damon Motor Coach but
is an independent company with no authority to make any representation or promise for Damon Motor Coach.
I acknowledge that the chassis, component parts and appliances that are separately covered by another manufacturer's warranty are excluded from
coverage under the Damon Motor Coach Limited Warranty. I understand that this form is for product registration purposes and failure to return this
form does not diminish my warranty rights during the warranty period.
Purchaser Signature
Date
Dealer Signature
Date
The purchaser has: inspected, or been given the opportunity to inspect the vehicle:taken the test drive;supplied the information about his/her name
and address;been given the opportunity to make notations in the space provided;observed,or received satisfactory explanations about all items listed
above.
Salesperson First Name:
Selling Dealer:
Last Name:
Sales Split:
Salesperson E-mail:
Date:
Transaction Price:
Dealer is to assure this form is properly completed and returned to Damon Motor Coach within fifteen (15) days after delivery.
Return this page to: Damon Motor Coach 2950 Paul Drive - Elkhart, IN 46514
TAPE - PLEASE DO NOT STAPLE
FOLD HERE
PLACE
STAMP
HERE
DAMON MOTOR COACH
CUSTOMER SERVICE DEPARTMENT
PO BOX 2888
ELKHART, IN. 46515-2888
FOLD HERE
TAPE - PLEASE DO NOT STAPLE
Table of Contents
INTRODUCTION
Introduction
How to use this manual
Reporting Safety Defects
WARRANTY - CHAPTER 1
Damon Limited Warranty
Owner Responsibility Checklist
Major Equipment Suppliers
PLANNING AND PREPARATION - CHAPTER 2
License and Insurance
Inspect and Maintain
Loading and Weight
Controlling the Motorhome
Pre-travel Checklist
Opening Checklist
Weights
Federal Certification Label
Federal Weight Label
Capacity
Weighing Your Motorhome
Weight Distribution
Trailer Hitches and Towing
Towing and GCWR
ON THE ROAD SAFETY - CHAPTER 3
Safety Belts
Fuel System
Parking
Changing Tires
Tire Care
Air Pressure
SAFETY PROVISIONS - CHAPTER 4
Smoke Detector
Fire Extinguisher
Propane Gas Detector
CO Detector
Propane Safety
Emergency Exit
Generator Safety
Tire Safety
Tire Pressure
Tire Size
Tire Tread
Tire Balance & Alignment
Tire Rotation
HEALTH AND WELL-BEING - CHAPTER 5
Chemical Sensitivity
Formaldehyde
Ventilation
Smoking
Medical Advice
Tips to Control Condensation
Mold
Prolonged Occupancy
PLUMBING SYSTEM - CHAPTER 6
Water Pump and Filter
Fresh Water Fill / Fresh Water Tank
7
8
8
9
13
15
17
17
17
17
17
18
20
20
20
21
21
22
22
23
25
25
26
26
27
27
29
29
29
29
30
30
30
31
32
32
32
33
33
35
35
35
35
35
35
36
36
39
39
City Water Hook-up
Low Point Drains
Sanitizing the Fresh Water System
Heated Holding Tanks
Dumping Holding Tanks
Preventing Holding Tank Blockage
Termination Compartment Components
TECHNICAL SYSTEM - CHAPTER 7
Chassis Electrical
Coach Electrical
Converter/Inverter
GFCI
Battery Control Center (BCC)
Generator
Monitor Panel
Roof Air Conditioner
Propane System
Propane Tank
Propane Regulator
Home Theater Operation
Home Theater Troubleshooting Tips
INTERIOR SYSTEM - CHAPTER 8
Automotive Dash
Gear Selector
Dash Board Controls Steering Wheel
Backup Monitor
Temperature Control
Parking Brake
Leveling System
Digital Converter Box
Drop Down Bed
Living Room Television
Doors and Drawers
Extending the Slideroom
Retracting the Slideroom
Bedroom Door Latch
Roman Shades
Dinette Table
A/C & Furnace Thermostat
Water Heater Switch
Cabinets & Drawers
Range
Refrigerator
Microwave
Sink
Faucet
Bath Vent
Shower Head and Hose
Toilet
EXTERIOR SYSTEMS - CHAPTER 9
Main Entrance
Assist Handle
Electric Entry Step
Compartment Doors
Rear Ladder
39
39
39
40
40
41
42
43
43
43
44
44
45
45
45
46
46
47
47
48
49
49
49
50
50
50
50
50
51
51
51
51
52
52
53
53
53
53
53
53
53
53
53
53
53
54
54
54
55
55
55
55
55
Table of Contents
Awning
120 Volt Outlet
Power Cord
Generator Compartment
Furnace Door
Water Heater Access
Refrigerator Panel
Automotive Fuse Block
Exterior TV Hook-up
Fantastic Vent
CARE AND MAINTENANCE - CHAPTER 10
Batteries
Waste Water System
Fresh Water System
Electrical System
Generator Power System
Propane System
ABS Plastic Parts
Alignment
Awning
Chassis
Doors & Door Locks
Exterior Lights
Fiberglass
Wax
Graphics
Sidewalls
Roof
Roof Vents
Seals & Adhesives
Slideout
Tires
TV Antenna
Underbody
Windows
Hydraulic Fluid
Appliances
Bath Fixtures
Bathtub Seal
Bedspread & Drapes
Carpet
Countertops
Hardware
Kitchen Fixtures
Mini Blinds & Roman Shades
Sink
Solid Surface Countertop
Upholstery & Fabrics
Wall Coverings
Cabinets
Windows
WINTER USE AND STORAGE - CHAPTER 11
Water System
Food Storage
Propane System
Heating
55
56
56
56
56
56
56
56
56
56
58
58
58
58
58
58
59
59
59
59
60
60
60
60
61
61
61
62
62
62
63
63
63
63
64
64
64
64
64
64
64
64
64
65
65
65
65
65
66
66
67
67
67
67
Condensation
Winterization Procedure
Water Heater Bypass
Winterization Checklist
MAINTENANCE SCHEDULE
TRAVEL PREPARATION CHECKLIST
MAINTENANCE RECORD
FUEL / OIL RECORD
NOTES
TROUBLESHOOTING
Battery Control Center
Electrical Power
Furnace
Generator
Leveling Jacks
Propane Gas
Microwave Monitor Panel
Outside Receptacle
Oven
Inverter
Refrigerator
Roof Air Conditioner
Slideouts
Termination Valve
TV Antenna
Waste Tank
Water Heater
Water Pump
Water System
ELECTRICAL DIAGRAMS
INDEX
67
67
69
70
73
74
75
77
79
81
81
81
82
82
83
83
83
84
84
84
84
85
86
86
86
87
87
88
88
90
101
Introduction
This manual describes many features of your motorhome and provides a guide to operating procedures so that you
can obtain the best performance from those features. Your motorhome has been designed to conform with, or exceed,
the American National Standards Institute A 119.2, NFPA 1192, CANADIAN CAN/CSA-Z240 RV SERIES-99 (Canadianbuilt or units built for Canada), and applicable motor vehicle safety standards. These standards establish the plumbing,
heating, electrical and other requirements for quality and safety. The seal attached just outside the entry door indicates
compliance with these standards. This seal is the outward sign of internal quality.
Like all automotive equipment, your motorhome will require care and regular maintenance in order to retain its
maximum performance characteristics. This manual, along with the specific instructions provided by the leading
appliance manufacturers, are in your Owner’s Information Kit. The Chassis Operator’s Manual outlines important areas
of service and provides a maintenance schedule. Please follow them carefully to ensure a safe trouble-free service.
Study these instructions carefully. A good working knowledge of your unit and how to care for it will help you enjoy
many miles and years of recreational living.
If you have any questions regarding operation, maintenance, or service, please contact your dealer immediately so
they can assist you. Your dealer’s Service or Sales Department is equipped to handle most any problem that may
occur. Customer service is of the utmost importance to your dealer and is just as important to the manufacturer. This
manual contains a section outlining the warranty and explaining your rights and obligations, as well as the rights and
obligations of the dealer and manufacturer, under the terms of the warranty. Please read this section carefully. You will
be better informed in case you have a warranty related problem and your dealer will be better able to get you back on
the road again in a timely manner.
We sincerely believe that your dealer and the factory representative will be able to solve any problem which may arise.
If their combined efforts are not satisfactory, please send a letter describing the circumstances to:
Damon Motor Coach
Customer Service Department
PO Box 2888
Elkhart IN 46515-2888
You must include the dealer’s name, model and serial number of your motorhome. The Damon serial number is located
on the bottom of the federal sticker, which is located in the driver’s compartment area. Thank you for choosing our
product. Your dealer and we, the manufacturer, will continually strive to merit your confidence.
Some equipment and features described or shown in this manual may be optional on your model. This instructional manual is of a general nature only. Because of the continuous process of product improvement conducted by Damon Motor Coach, it is possible that recent product changes may not be included in this manual. Specifications may
change without notice. This manual is accurate as of the date of publication. The instructions included in this manual are intended as a
guide, and in no respect extend the responsibilities of the manufacturing subsidiary, parent company or affiliates beyond the standard
written warranty as presented in this manual.
Photographs or illustrations in this manual are representative of function and may or may not be specific in their depiction of actual equipment, fabrics, interior or exterior decor, or design options as installed
on or in your motorhome.
This product is designed to provide temporary living quarters for recreational, camping, or travel. Use of this product for long term or permanent occupancy may lead to premature deterioration of interior
finishes, fabrics, carpeting, drapes, or components. Damage or deterioration due to long term occupancy may not be considered normal,
and may under the terms of the warranty, constitute misuse, abuse, or neglect, and may therefore reduce or void certain warranty
protection.
Introduction
How to Use This Manual
Your motorhome has been thoroughly inspected before shipment to the dealer. Your selling dealer is responsible for
performing a complete pre-delivery inspection of all motorhome components as specified in the pre-delivery checklists
supplied by the manufacturer. You should receive a copy of these completed checklists from your dealer when the
motorhome is delivered to you.
Should a problem arise, your first step is to contact your selling Damon dealer who will be glad to handle your situation. This
Owner’s Manual is not intended for use as a service manual, but rather as a guide to help you become familiar with your
motorhome.
This manual is not model specific, which means that it is used for a variety of different models that Damon manufactures. It
is of a general nature, so the illustrations and descriptions may not be exactly as they are in your particular motorhome.
If you are unclear or unfamiliar with any procedure that is described in this manual, see your Damon dealer for further clarification before proceeding.
Damon Corporation uses the following notations to warn the user of possible safety concerns and to provide information
that will prevent personal injury to the user and/or damage to the motorhome.
A WARNING INDICATES A POTENTIALLY HAZARDOUS SITUATION THAT, IF NOT AVOIDED, MAY RESULT IN DEATH OR SERIOUS INJURY.
A CAUTION INDICATES A POTENTIALLY HAZARDOUS SITUATION THAT, IF NOT AVOIDED, MAY RESULT IN MINOR OR MODERATE INJURY.
A NOTICE INDICATES AN INSTRUCTION OR PROCEDURE THAT IS IMPORTANT FOR PROPER SERVICE. A NOTICE CAN ALSO SUPPLY INFORMATION THAT WILL HELP TO MAKE YOUR CAMPING EXPERIENCE MORE PLEASANT.
A DANGER INDICATES AN IMMINENTLY HAZARDOUS SITUATION THAT, IF NOT AVOIDED, WILL RESULT IN DEATH OR SERIOUS INJURY.
REPORTING SAFETY DEFECTS
If you believe that your vehicle has a defect, which could cause an accident, injury, or death, you should immediately inform
the National Highway Traffic Safety Administration (NHTSA) in addition to notifying Damon Motor Coach.
If NHTSA receives similar complaints, it may open an investigation, and if it finds that a safety defect exists in a group of
vehicles, it may order a recall and remedy campaign. However, NHTSA cannot become involved in individual problems
between you and your dealer or Damon Motor Coach.
To contact NHTSA, you may either call the Vehicle Safety Hotline toll free at 888-327-4236, TTY: 800-424-9153, or write to:
Administrator, NHTSA, 1200 New Jersey Avenue S.E., Washington DC, USA 20590. You can go to the NHTSA website, www.
safercar.gov. You can also obtain other information about motor vehicle safety from the Hotline.
Chapter 1 - Warranty
WHAT THE PERIOD OF COVERAGE IS:
This Limited Warranty provided by Damon Corporation® (“Warrantor”) covers those components, assemblies and systems of
your new motorhome not excluded under the section “What is Not Covered”, when sold by an authorized dealer, for twelve
(12) months from the first buyer’s retail purchase date or the first 12,000 miles of use, whichever occurs first. However, the
skeleton frame structure, only, of the sidewalls (excluding slide outs), roof, and rear and front walls is covered for twenty-four
(24) months from the first buyer’s retail purchase date or the first 24,000 miles of use, whichever occurs first.
If you purchase or register your new motorhome in a business name or use your motorhome for any rental, commercial or
business purposes whatsoever, the Limited Warranty provided by Warrantor covers your new motorhome when sold by an
authorized dealer for ninety (90) days from the first buyer’s retail purchase date or the first 12,000 miles of use, whichever
occurs first; and, the skeleton frame structure, only, of the sidewalls (excluding slide outs), roof, and rear and front walls is
covered for twelve (12) months from the first buyer’s retail purchase date or the first 12,000 miles of use, whichever occurs
first. A conclusive presumption that your motorhome has been used for commercial and/or business purposes arises if
you have purchased or registered the motorhome in a business name or have filed a federal or state tax form claiming any
business tax benefit related to your ownership of the motorhome.
LIMITATION AND DISCLAIMER OF IMPLIED WARRANTIES:
IMPLIED WARRANTIES, IF ANY, ARISING BY WAY OF STATE LAW, INCLUDING ANY IMPLIED WARRANTY OF MERCHANTABILITY
AND ANY IMPLIED WARRANTY OF FITNESS FOR A PARTICULAR PURPOSE, ARE LIMITED IN DURATION TO THE TERM OF THIS
LIMITED WARRANTY AND ARE LIMITED IN SCOPE OF COVERAGE TO THOSE PORTIONS OF THE MOTORHOME COVERED BY THIS
LIMITED WARRANTY. WARRANTOR DISCLAIMS ALL IMPLIED AND EXPRESS WARRANTIES, INCLUDING THE IMPLIED WARRANTY
OF MERCHANTABILITY AND THE IMPLIED WARRANTY OF FITNESS FOR A PARTICULAR PURPOSE, ON COMPONENTS AND
APPLIANCES EXCLUDED FROM COVERAGE AS SET FORTH BELOW. There is no warranty of any nature made by Warrantor
beyond that contained in this Limited Warranty. No person has authority to enlarge, amend or modify this Limited Warranty.
The dealer is not the Warrantor’s agent but is an independent entity. Warrantor is not responsible for any undertaking,
representation or warranty made by any dealer or other person beyond those expressly set forth in this Limited Warranty.
Some states do not allow limitations on how long an implied warranty lasts, so the above limitation may not apply to you.
WHAT THE WARRANTY COVERS:
Warrantor’s Limited Warranty covers defects in the manufacture of your motorhome and defects in materials used to
manufacture your motorhome. “Defect” means the failure of the motorhome and/or the materials used to assemble the
motorhome to conform to Warrantor’s design and manufacturing specification and tolerances. See also the section “What
the Warranty Does Not Cover” set out below.
WHAT WE WILL DO TO CORRECT PROBLEMS:
Warrantor’s sole and exclusive obligation is to repair and/or replace, at its option, any covered defect if: (1) you notify
Warrantor or one of its authorized servicing dealers of the defect within the warranty coverage period and within ten (10)
days of discovering the defect; and (2) you deliver your Motorhome to Warrantor or Warrantor’s authorized servicing dealer
at your cost and expense. It is reasonable to expect some service items to occur during the warranty period. The performance
of warranty repairs shall not extend the original warranty coverage period. Further, any performance of repairs after the
warranty coverage period has expired or any performance of repairs to component parts and appliances that are excluded
from coverage shall be considered “good will” repairs, which shall not alter the express terms of this limited warranty. If the
repair or replacement remedy fails to successfully cure a defect after Warrantor received a reasonable opportunity to cure
the defect(s), your sole and exclusive remedy shall be limited to Warrantor paying you the cost of having an independent
third party perform repairs to the defect(s). Warrantor may use new and/or remanufactured parts and/or components of
substantially equal quality to complete any repair. Defects and/or damage to interior and exterior surfaces, trim, upholstery
and other appearance items may occur at the factory during manufacture, during delivery of the motorhome to the selling
dealer or on the selling dealer’s lot. Normally, any such defect or damage is detected and corrected at the factory or by the
Chapter 1 - Warranty
selling dealer during the inspection process performed by the Warrantor and the selling dealer. If, however, you discover
any such defect or damage when you take delivery of the motorhome, you must notify your dealer or Warrantor within ten
days of the date of purchase to have repairs performed to the defect at no cost to you as provided by this Limited Warranty.
If two unsuccessful repair attempts have been made to correct any covered defect that you believe substantially impairs
the value, use or safety of your motorhome, or repairs to any covered defect(s), which you believe substantially impairs the
value, use or safety of your motorhome, have taken 20 or more days to complete, you must, to the extent permitted by law,
notify Warrantor directly in writing of the failure to successfully repair the defect(s) so that Warrantor can become directly
involved in exercising a final repair attempt for the purpose of performing a successful repair to the identified defect(s).
HOW TO GET SERVICE:
The “Acknowledgement of Receipt of Warranty/Product Information” form must be returned to Warrantor promptly upon
purchase to assure proper part replacement and repair of your motorhome. Failure to return the “Acknowledgement
of Receipt of Warranty/Product Information” form will not affect your rights under the Limited Warranty so long as you
can furnish proof of purchase. For warranty service simply contact one of Warrantor’s authorized service centers for an
appointment, then deliver your motorhome (at your expense) to the service center. If you need assistance in locating an
authorized warranty service facility, contact Warrantor’s Customer Service Department (1-574- 264-2900). The mailing
address is:
P.O. Box 2888
Elkhart, Indiana 46515-2888
WHAT THE WARRANTY DOES NOT COVER:
This Limited Warranty does not cover: any motorhome sold or registered outside of the United States or Canada; items
which are added or changed after the motorhome leaves Warrantor’s possession; items that are working as designed
but with which you are unhappy with because of the design; normal wear and usage, such as fading or discoloration of
fabrics, or the effects of moisture inside the motorhome; defacing, scratching, dents and chips on any surface or fabric of
the motorhome, not caused by Warrantor; owner maintenance, including by way of example replacement of wiper blades,
bulbs, filters, wheel alignments and resealing exterior sealant areas (see Care and Maintenance Section of Owner’s Manual);
the automotive chassis and power train, including, by way of example the engine, drive-train, steering, ride and handling,
braking, wheel balance, muffler, tire wear or failure, tubes, batteries and gauges; appliances and components covered
by their own manufacturer’s warranty including, by way of example the microwave, refrigerator, ice maker, stove, oven,
generator, roof air conditioners, hydraulic jacks, VCR, television(s), water heater, furnace, stereo, radio, compact disc player,
washer, dryer, inverter and cellular phone; or flaking, peeling and chips or other defects or damage in or to the exterior or
finish caused by rocks or other road hazards, the environment including chemical off-gassing, airborne pollutants, salt, tree
sap and hail causing any damage including but not limited to corrosion. Component part and appliance manufacturers issue
limited warranties covering those portions of the motorhome not covered by the Limited Warranty issued by Warrantor. To
learn more on what specific component parts and appliances are excluded from the Limited Warranty issued by Warrantor
please contact your selling dealership or Warrantor directly or review the warranty packet inside the Motorhome.
EVENTS DISCHARGING WARRANTOR FROM OBLIGATION UNDER WARRANTY:
Misuse or neglect, accidents, unauthorized alteration, failure to provide reasonable and necessary maintenance (see
Owner’s Manual), damage caused by off road use, collision, fire, theft, vandalism, explosions, overloading in excess of rated
capacities, and odometer tampering shall discharge Warrantor from any express or implied warranty obligation to repair
any resulting defect.
DISCLAIMER OF CONSEQUENTIAL AND INCIDENTAL DAMAGES:
THE ORIGINAL PURCHASER OF THE MOTORHOME AND ANY PERSON TO WHOM THE MOTORHOME IS TRANSFERRED, AND
ANY PERSON WHO IS AN INTENDED OR UNINTENDED USER OR BENEFICIARY OF THE MOTORHOME, SHALL NOT BE ENTITLED
10
Chapter 1 - Warranty
TO RECOVER FROM WARRANTOR ANY CONSEQUENTIAL OR INCIDENTAL DAMAGES RESULTING FROM ANY DEFECT IN THE
MOTORHOME, INCLUDING BY WAY OF EXAMPLE FUEL AND TRANSPORTATION EXPENSES TO DELIVER THE PRODUCT TO THE
SERVICING DEALER, HOTEL ROOMS, LOST WAGES AND MOISTURE DAMAGE SUCH AS MOLD AND MILDEW. THE EXCLUSION
OF CONSEQUENTIAL AND INCIDENTAL DAMAGES SHALL BE DEEMED INDEPENDENT OF, AND SHALL SURVIVE, ANY FAILURE
OF THE ESSENTIAL PURPOSE OF ANY LIMITED REMEDY. Some states do not allow the exclusion or limitation of consequential
or incidental damages, so the above exclusions may not apply to you.
LEGAL REMEDIES:
THIS LIMITED WARRANTY DOES NOT “EXTEND TO FUTURE PERFORMANCE”. ANY ACTION TO ENFORCE THIS LIMITED
WARRANTY OR ANY IMPLIED WARRANTIES SHALL NOT BE COMMENCED MORE THAN 90 DAYS AFTER THE EXPIRATION
OF THE WARRANTY COVERAGE PERIOD DESIGNATED ABOVE. IF YOU USE YOUR MOTOR HOME FOR COMMERCIAL OR
BUSINESS PURPOSES, ANY ACTION TO ENFORCE THIS LIMITED WARRANTY OR ANY IMPLIED WARRANTIES SHALL NOT BE
COMMENCED MORE THAN ONE YEAR AFTER THE EXPIRATION OF THE WARRANTY COVERAGE PERIOD DESIGNATED ABOVE.
THE PERFORMANCE OF REPAIRS SHALL NOT SUSPEND THIS LIMITATIONS PERIOD FROM EXPIRING. Some states do not allow
the reduction in the statute of limitations, so the above reduction in the statute of limitations may not apply to you. Warrantor
participates in the Consumer Arbitration Program for Recreational Vehicles (CAP-RV). This third-party dispute resolution
program is available at no charge to you to settle unresolved warranty disputes. To find out more about the program or to
request an application/brochure, please call the Arbitration Administration Office toll free (800) 279-5343. For motorhomes
purchased in California, the CAP-RV Program operates under the review of the California Arbitration Program. You must
utilize this program before claiming rights conferred by 15 USC Section 2310 (Magnuson Moss Warranty Act) or Civil Code
Section 1793.22(b) (Song Beverly Warranty Act). You are not required to use this Program if you choose to seek redress by
pursing rights and remedies not conferred by these laws.
THIS WARRANTY GIVES YOU SPECIFIC LEGAL RIGHTS. YOU MAY ALSO HAVE OTHER RIGHTS, WHICH VARY FROM STATE TO
STATE.
Julian Date: 111907
11
Chapter 1 - Warranty
12
Chapter 1 - Warranty
Damon reserves the right to make changes in Vehicles built and/or sold by it at any
time without incurring any obligations to make the same or similar changes on Vehicles
previously built and/or sold by Damon.
PRODUCTION CHANGES
As the proud owner of a Damon Motor Coach, you want to trust that your unit will
continue to perform at its peak. To ensure this Damon has provided you this checklist
of the responsibilities of the Damon owner. Please make sure that this list is carefully
observed and adhered to in order to maintain your Limited Warranty.
OWNER
RESPONSIBILITY
CHECKLIST
Please refer to the Maintenance Schedule (page 73) to determine when your inspections
should take place.
Check both house batteries and chassis battery and tighten connections if necessary.
Clean the terminals if necessary. Check to make sure that the batteries have the proper
water levels in them, and fill if necessary. Check the charge and recharge if necessary.
Keep connections clean and covered with a light coat of grease.
BATTERIES
There is a certain danger involved when working with batteries. If you are
unfamiliar with these dangers, contact a Damon dealer.
Just as in your home, it is the owner’s responsibility to periodically check the batteries in
the smoke detector, propane detector and carbon monoxide detector when applicable.
We recommend that you change the batteries every six months to ensure proper working
order.
BATTERY
REPLACEMENT
The owner is responsible for checking to ensure that the vehicle has as little condensation
in it as possible. The condensation in a motorhome is much greater than in most houses
because the insulated walls of the vehicle are much thinner than house walls, and the
small size and tight construction of the vehicle allow a quick buildup of high moisture
levels in the inside air. CONDENSATION
This can be reduced by always keeping the bathroom door closed and the window or
vents open when bathing, and for a period of time when you have finished bathing or
cooking, to allow for dissipation of all the moisture. Use your vent hood and fan when
cooking. Don’t hang wet clothes in your unit to dry. When left for prolonged periods of
time, condensation can cause considerable damage to your vehicle.
Most exterior parts of your motorhome are made of fiberglass, which is a very durable
material, but not indestructible. Exposure to the elements can cause premature
deterioration without routine maintenance, especially in hotter climates. The effects may
be; fading, yellowing, or chalking, however these are surface cosmetic changes, which do
not affect the strength of your unit. Simple maintenance through cleaning by washing
and waxing will ensure lasting beauty.
EXTERIOR/INTERIOR
The same fading may occur to carpeting and upholstering. Be sure to keep your shades
down in extremely sunny locations and maintain proper cleaning techniques for both
carpet and upholstery. The front suspension and steering system of this vehicle was factory aligned using highly
accurate equipment prior to delivery to the dealership. We recommend that the alignment
is checked after you have fully loaded the motorhome according to your personal needs.
If necessary, adjust alignment for the loaded motorhome. Thereafter, the alignment
should be inspected yearly to help prevent uneven tire wear.
ALIGNMENT
Sanitize the fresh water system at least once per year or whenever the motorhome is
unused for prolonged periods of time (see page 39). This will help keep your water system
fresh and discourage the growth of bacteria that can contaminate the water supply. Make
sure that the tanks are properly treated with the right chemicals for disinfection.
POTABLE TANK
13
Chapter 1 - Warranty
14
PROPER LOAD
BALANCE
Your motorhome is built to withstand a certain maximum load. Check the amount listed
on the Federal Certification Label in the driver’s area of your motorhome to determine
safe load limits. NEVER OVERLOAD THE MOTORHOME. Reference pages 20 - 23 for proper
loading and weight distribution.
SEALANTS
Weatherproofing sealants are used around the doors, windows, vents, and joints during
construction of your motorhome. These sealants are subject to deterioration from
exposure, and must be checked periodically to assure the weatherproof integrity of your
unit. If evidence of cracking or voids in the sealants is apparent, have your dealer reseal
these areas. Proper sealant coverage should be checked and resealed at least once every
six months. Please see Chapter 10 - “Care and Maintenance” for instructions on properly
sealing the roof area. Failure or neglect of proper sealant maintenance could result in
leakage, and may reduce or void your warranty protection.
SERVICE CALLS
It is important that the owner realize that Damon’s Limited Warranty covers warrantable
repairs that are performed by an authorized Damon dealer at their service center or
facility only. If you are unable to bring your unit in for repairs, Damon is not responsible
for the cost of the actual service call charged to come out to your unit.
SLIDEOUT
LUBRICATION
If your slide-out system becomes squeaky or makes any noises while operating, it is
permissible to apply a coat of lightweight oil to the drive shaft and roller areas located
below the main floor. Remove any excess oil so dirt and debris cannot build up.
STEP LUBRICATION
To maintain the integrity of the retractable step in your motorhome, you must periodically inspect it for rust or damage, also see that it is lubricated to function safely
and to ensure proper working order.
TIRE PRESSURE
The owner is responsible for maintaining proper tire pressure in the vehicle’s tires. Check
the tire specifications on the Federal Certification Label located in the driver’s area for
the proper pressure. You will ensure optimum driving standards by keeping your vehicle
maintained.
TRAVEL BARS
Never forget to remove your travel bars from your slide-out prior to opening. Failure to
do so could result in severe damage to yourself and/or your motorhome, which will not
be covered under the Limited Warranty.
WINDSHIELDS
Like most cars, your motorhome’s windshield is not covered under the Limited Warranty.
Items such as cracks, stone chips and holes are regarded as normal wear and tear, and will
not be considered as a manufacturing defect.
WINTERIZATION
Please make sure that your vehicle is properly winterized before long periods of storage.
To find a complete listing of the winterization procedures, refer to this manual’s section
called “Winterization Procedures” (page 67). Failure to properly winterize your vehicle
may result in damage to your motorhome which would not be covered under the Limited
Warranty.
Chapter 1 - Warranty
SUPPLIERS PROVIDING SEPARATE WARRANTIES
Please read your recreational vehicle warranty carefully. It is very important to know what Damon Motor Coach warrants,
and what is warranted by other suppliers’ warranties. Damon Motor Coach does not warrant some items within your vehicle.
Below you will find a list of manufacturers who can help you with these components. Please contact them should a need
arise.
ASA Electronics / Backup Monitor & Camera / TVs/ Digital Converter / Dash Radio
Atwood / Water Heater & Furnace & Entry Door
Bob Gunn / Velvac / ADTH /Exterior Mirrors Bristol Laminating / Corian / Countertops
Carrier Transport / Roof Air Conditioning
Cass Hudson / Dinette Table Mechanism
Coachstep / Electric Step
Dometic / Refrigertator
Evans / Dash Air Conditioning Fantastic Vent / Roof Vent with Rain Sensor
Flair International / Furniture
Flexsteel / Furniture
Future Sales / Automotive Lights
Hehr / Windows
Hoosier Wood / Freestanding Dinette / Buffet / Folding Chairs
Intellitec / Battery Control Center & Auto Energy Select Switch
Lippert Components / Slideouts & Leveling Systems
Magnum / Inverter / Converter
Midwest Sales / Microwave
Norco / Slideouts
Onan / Generator
Progressive Dynamics / Converter / Transfer Switch
Proto Fab / Dash Panels & Hallway Panels & Components
Putnam / Hitch
Sealand / Toilet
Shaw Industries / Carpet
Shurflo / Water Pump
SM Osgood / Diesel Equipment / Wipers
Thetford / Toilet (Michigan Residents 313-769-6000)
Ventline / Monitor Panel
Winegard / TV Antenna & Antenna Booster
815-877-5700
574-262-2518
574-848-4461
800-450-2211
800-423-1511
800-451-9245
574-294-2511
616-361-2681
800-521-0298
574-295-5688
563-556-7730
574-262-3688
517-845-3061
574-534-4474
630-268-0010
574-537-8900
425-353-8833
574-287-3385
574-262-3400
800-888-6626
269-781-4241
574-522-4245
517-369-2165
800-321-9886
574-264-9687
800-762-8094
952-937-2045
800-521-3032
574-848-4491
319-753-0121
This list may not be all inclusive. If you have any questions regarding other components, call Damon Customer Service at
574-264-2900. A complete listing of all your unit’s appliances along with their corresponding serial numbers is located on
the wall inside your wardrobe. Please refer to this list if you need to contact the manufacturer regarding the appliance.
15
Chapter 1 - Warranty
16
Chapter 2 - Planning and Preparation
A thorough working knowledge of your motorhome is important if you are going to get
the most out of the convenience and safety items built into your unit. Be as familiar with it
as you are with your personal car or truck. Study all the booklets included in your Owner’s
Information Kit. These booklets cover details of operation for the major appliances and
equipment built into your motorhome for your comfort, convenience and safety. Your
selling dealer should provide you with a complete walk through of your vehicle at the
time of purchase. Any questions and concerns should be addressed at that time.
READ THE BOOK
The vehicle licensing laws vary from state-to-state. Check with your state license bureau
or nearest branch office for the requirements of your state. Be sure to renew your license
if it has expired or will expire during your trip. Your motorhome is considerably larger and
heavier than your car, therefore certain precautions should be exercised. A CDL license
may not be required to operate your motorhome, but Damon Motor Coach recommends
you attend a CDL class to better understand the motorhomes driving and handling
characteristics. Damon Motor Coach wants your driving experience to be pleasant and
enjoyable.
LICENSES
Talk to your insurance agent about the appropriate coverage for your motorhome. Always
carry your policy card.
INSURANCE
Follow a consistent schedule of inspection and maintenance for your motorhome.
Your continuing safety and comfort depend on it. This manual includes recommended
maintenance intervals and instructions. Adherence to these schedules will minimize
the possibility of failure of any important system or part of your motorhome. The time
spent inspecting and maintaining your motorhome will provide you with many years of
recreational pleasure. Improper inspections or maintenance neglect may invalidate your
Limited Warranty.
INSPECT AND MAINTAIN
Proper loading is one of the most important considerations when traveling in a
motorhome. Your motorhome is built to withstand a certain maximum load. Check the
Federal Certification Label located in the driver’s area to determine the safe load limits.
For safety’s sake, NEVER OVERLOAD THE MOTORHOME. This chapter contains information
about proper loading and weighing of your motorhome.
LOADING AND WEIGHT
DISTRIBUTION
Know how to control your motorhome on the highway. Be familiar with passing and
stopping requirements, and problems that can develop. Know how to brake properly,
how to back up and how to turn. Practice in a secluded place until you become familiar
with the handling characteristics and techniques of your motorhome. Don’t overlook the
laws of your state that govern driving a motorhome. Your state Motor Vehicle Department
office can provide you with the applicable vehicle codes that spell out your rights and
responsibilities as a motorhome owner.
CONTROL OF THE
MOTORHOME
Whenever you depart, be it from your home, rest area, or campsite. You should perform
these pre-travel checks:
PRE-TRAVEL CHECK
Should be inspected before each trip for uneven wear, road damage, foreign objects,
peeling or bulging, and correct tire pressure. Heat generated by surface friction will
increase the tire’s air pressure, therefore do not bleed air out of a hot tire. Check tire pressure
after the vehicle has been parked for at least one hour. Inflate tires to recommended
pressure as indicated on the Federal Certification Label located above the Drivers area.
(See maintenance schedule on page 73.)
TIRES
Proper tire inflation is extremely important.
When purchasing a new tire, be certain it is the same size and has the same ply rating and load range as the original tire. DO NOT mix radial ply with bias or bias-belted tires.
17
Chapter 2 - Planning and Preparation
WHEEL LUGS
Must be tightened to the specifications in the Chassis Manufacturer’s Owner’s Manual.
WINDSHIELD
Should be clean, wiper blades inspected, and windshield washer reservoir filled.
LIGHTS
Should be tested, including brake lights, warning flashers, clearance lights, tail lights, turn
signals and headlights. Clean all lens covers.
REARVIEW MIRROR
Should be adjusted so the driver can see to the rear on both the right and left side of the
unit.
POWER CORD
(120 Volt shoreline) must be unplugged from the external source and properly stored for
transit, also making sure the cord hatch is secured.
WATER FILL
Hoses must be disconnected, properly drained and stored, and the caps and hatches
secured. Fill the fresh water tank as required prior to storing hoses.
SEWAGE
Should be emptied from the holding tanks before traveling. Termination valves must be
closed and locked. The sewer hose must be removed from the termination valve outlet
and stored. Termination cap must be securely fastened to the termination outlet.
ENTRY STEP
Must be returned to its travel position. Pay special attention to this every time you move
your unit. Severe damage may result if not retracted during transit.
PROPANE TANK
Levels at the monitor panel should be checked, and gas line connections should be
checked for leaks.
DOORS AND DRAWERS
Some states prohibit vehicles equipped with propane tanks from using tunnels. A few other states prohibit traveling with the service valve open and the pilot lights lit. Check the regulation of the states through which you intend to travel.
Should be closed and secured. Loose items should be secured or stored away.
Be sure all loose items are secured or properly stored while the vehicle is in motion. Possible overlooked items may include canned goods, small appliances (on countertop), cooking pans (on range), or free standing furniture. These items could become dangerous projectiles during a sudden stop.
COMPARTMENT DOORS
For storage and equipment should be closed and locked, also making sure that loose
items are secured or stored for transit.
REFRIGERATOR DOOR
Door should be secured with the travel latch, and the items inside made ready for
transit.
WINDOWS AND VENTS
Should be closed and secured or adjusted as desired.
OPENING
CHECKLIST
18
If the motorhome was properly and carefully prepared for storage, taking it out of storage
will not be difficult. The following checklist assumes that you stored your RV with care.
If you didn’t, and extensive freeze damage or other serious deterioration has occurred,
consult your dealer or an authorized service center for advice.
•
Thoroughly inspect the outside of your RV. Look for animal’s nests in wheel wells,
in engine, air cleaner, or in other out of the way places. Clean all appliance exhaust
vents, ceiling vents and air conditioning covers.
•
Changing the wiper blades on your motorhome is similar to your car. Remove the
screw, take off the old blade, and replace with a similar style and length blade.
Lubricating pivot points with thin lubricating oil is also recommended.
•
Check that all furnace, water heater and refrigerator openings are free of debris,
insect nests, webs, etc.
Chapter 2 - Planning and Preparation
•
Open all doors and compartments. Check for animal or insect intrusion, water
damage, or other deterioration.
•
Check charge level in batteries. Refill with distilled water and recharge if necessary.
Reinstall batteries if necessary. Be sure cable ends and terminals are clean and free of
corrosion. Turn the Battery Disconnect Switch off if applicable.
•
Check tire pressure. Inflate to the specified cold pressure.
•
Remove coverings from windows if necessary.
•
Open vents and windows for ventilation.
•
Drain, flush and sanitize the fresh water system. (See Chapter 6 - “Plumbing Systems”) Inspect drain lines for leaks. Replace if necessary. Do not try to repair, as this is usually
ineffective.
•
Install a new water filter (if your unit is equipped with this).
•
Operate all faucets and fixtures in the fresh water system. Check for leaks at all joints
and fittings. Repair if necessary.
•
Check 12 Volt circuit breakers and inspect all fuses.
•
Operate all 12 Volt lights and accessories.
•
Install new batteries in battery operated devices.
•
Test propane, smoke and carbon monoxide detectors. Replace the batteries if
necessary.
•
Check the monitor panel operation.
•
Open and operate all vents and vent fans. Remove any outside coverings if
applicable.
•
Inspect 120 Volt electrical system which includes power cord, converter, all outlets and
exposed wiring. If defects are found, consult your servicing dealer or an authorized
service center.
•
Operate 120 Volt appliances and air conditioner (s). Be sure to uncover air conditioner shroud(s).
•
Inspect the propane system and check for leaks. If propane tank shows signs of rust or
corrosion, have it inspected by a qualified propane technician. Refill if necessary.
•
Operate each propane appliance. Observe all burner/pilot flames for proper color
and size.
•
If necessary, have propane regulator adjusted for proper pressure by a qualified
technician.
•
Check sealants around all roof and body seams and windows. Reseal if necessary.
•
Lubricate all exterior locks, hinges, and latches.
•
Wash and wax exterior. Inspect body for scratches or other damage. Touch up or
repair as necessary. Flush underside of the motorhome thoroughly.
19
Chapter 2 - Planning and Preparation
•
Check all the chassis fluid levels including engine oil, coolant, power steering fluid,
brake fluid, transmission, rear axle oil and washer fluid. Top off if necessary.
•
Check all exterior lights; clearance, brake, turn, and reverse should be fully
functional.
Your motorhome should be ready for a new traveling season. Your dealer can check your
preparation and correct any defects or make any necessary adjustments.
These items are the absolute minimum requirements necessary for pre-travel.
WEIGHTS
A motorhome chassis (springs, wheels, tires, axles, and frame) is designed to carry a certain
maximum load. This load includes everything; the weight of the empty motorhome itself,
occupants, your belongings, fuel, fresh water, waste water and anything else that may be
in or attached to the motorhome.
FEDERAL
CERTIFICATION LABEL
The Federal Certification Label, found in the driver’s area, is installed in the vehicle as
required by federal standards. It contains information that will be helpful in determining
proper loading. The label will also list the date of manufacture, (GCWR), (GVWR), (GAWR)
(Front and Rear), tire size, rim size, tire pressure (PSI), Vehicle Identification Number (VIN),
and the type of unit.
FEDERAL WEIGHT
LABEL
The Federal Weight Label, found on the entrance door and in the driver’s area, is installed
in the vehicle as required by federal standards. It contains the Occupant and Cargo
Carrying Capacity (OCCC). The label will also list the Vehicle Identification Number (VIN),
the safety belt equipped seating capacity and the weight of a full load of fresh water.
MOTOR HOME OCCUPANT AND CARGO CARRYING CAPACITY
VIN: # # # # # # # # # # # # # # # # #
THE COMBINED WEIGHT OF OCCUPANTS AND CARGO SHOULD NEVER EXCEED:
XXX kg or XXX lbs
SAFETY BELT EQUIPPED SEATING CAPACITY: XXX
CAUTION:
A FULL LOAD OF WATER EQUALS XXX kg OR XXX lbs OF CARGO @ 1kg/L (8.3 lb/gal)
AND THE TONGUE WEIGHT OF A TOWED TRAILER COUNTS AS CARGO
The diagram above shows an example of a Federal Weight Label (Motorhome Occupant
and Cargo Carrying Capacity). Please reference your vehicle’s Federal Certification Label
for actual weight ratings.
These ratings are shown on the Federal Certification Label and the Federal Weight Label. They are MAXIMUMS for a fully loaded vehicle. You must compare the GVWR and the
GAWR to the actual loaded weight of your motorhome and make adjustments if necessary. The GAWRs do not necessarily add up to the GVWR.
20
Chapter 2 - Planning and Preparation
Neither the axle loads nor the vehicle loads must ever exceed their respective maximum weight ratings.
A properly loaded vehicle is safer and easier to drive. Distribute your cargo evenly from CAPACITY
side-to-side and front-to-back. Heavier items should be stowed on or near the floor
and be as centrally located as possible. They should be secured so they cannot slide
during a panic stop causing damage. Lighter items can be stored in overhead cabinets. Remember to leave space and weight allowance for souvenirs and other items you may
purchase during your travels. A properly loaded vehicle can help you conserve fuel and
prevent excessive wear on your vehicles’ automotive system.
During the design and development of your motorhome, the number and size of storage
compartments, the liquid tank capacities and the number of designated seating positions
are maximized for value and convenience. If the motorhome operator fills all liquid
tanks to capacity, fills all storage compartments, and cupboards to maximum volume
and fills all available, assigned seating positions with passengers, the motorhome could
be overloaded. Please use the Recreational Vehicle Industry Association’s figures shown
below to help you determine your weights.
•
Average vehicle occupant =
150 lbs. (68 kg)
•
One gallon of diesel fuel
=
7 lbs. (3.2 kg)
•
One gallon of water
=
8.3 lbs. (3.8 kg)
•
One gallon of propane
=
4.5 lbs. (2 kg)
The operator is responsible for analyzing the conditions in which the motorhome will WEIGHING YOUR
be utilized for each trip. The number of passengers and placement of cargo can affect LOADED MOTORHOME
the amount of water capacity that you carry. A smaller passenger capacity for camping
provides reasonable cargo capacity for trips and activities not involving overnight stays. It may be necessary to reduce the amount of water carried and unload some cargo items
normally carried for camping, in order to provide carrying capacity for the additional day
use passengers.
1. Drive the front wheels onto the scale platform and take a reading. This is the front
Gross Axle Weight. (Reading 1).
2. Drive the entire vehicle (all axles) onto the scale and take a reading. This is the Gross
Vehicle Weight. (Reading 2).
3. Drive forward until only the rear axle is on the platform and take a reading. This
reading is the rear Gross Axle Weight. (Reading 3).
4. Compare reading 2 with the GVWR (Gross Vehicle Weight Rating) of your vehicle
located on the Federal Certification Label. If the reading exceeds the GVWR rating,
you will have to reduce the total vehicle load.
5. Check readings 1 and 3 to verify that each is less than the GAWR (Gross Axle Weight
Rating) on the certification label. If either exceeds the GAWR for the axle(s), redistribute
enough of the load to ensure that loads on the front and rear axle(s) are within the required limit.
Do not exceed the gross axle weight ratings of any axle. Do not exceed the maximum hitch weight rating.
Do not exceed the gross vehicle weight rating of either the
motorhome or the towed vehicle. Do not exceed the gross combined weight rating of the
motorhome. Exceeding any of these ratings may cause unstable driving and handling
characteristics, damage to your motorhome chassis or towed vehicle and may void your
warranty protection.
Reading 1
Reading 2
Reading 3
21
Chapter 2 - Planning and Preparation
The following explains commonly used weight abbreviations.
•
GROSS VEHICLE WEIGHT RATING (GVWR) is the maximum permissible weight of
this fully loaded motorhome.
•
UNLOADED VEHICLE WEIGHT (UVW) is the weight of this motorhome as
manufactured at the factory with full fuel, engine oil, coolants, and propane.
•
OCCUPANT and CARGO CARRYING CAPACITY (OCCC) is equal to the GVWR minus
the UVW.
WEIGHT DISTRIBUTION
Dealer installed equipment and towed weight will reduce the OCCC.
•
GROSS VEHICLE WEIGHT RATING (GCWR) is the maximum loaded weight of this
motorhome and any towed trailer or towed vehicle.
•
GROSS COMBINED WEIGHT (GCW) is the total weight (including driver, passengers,
all cargo, fuels, and fluids) of the motorhome and the towed vehicle combined.
•
GROSS AXLE WEIGHT RATING (GAWR) is the maximum weight a specific axle is
designed to carry. Each axle has its own GAWR.
The distribution of weight in your motorhome is a very important factor. Too much
weight either on one side of the vehicle, or too much weight in the rear compared to
the front, can adversely affect the handling characteristics of the vehicle, and in some
cases can result in overloading the tires or axle components. When loading, you should
evenly distribute the weight to ensure the axle weight is equal to or less than the GWAR
indicated on your Federal Certification Label.
This type of balance provides the best handling characteristics of the vehicle. Small
percentage differences will not make a great deal of difference. A unit that is too light on
the front axle and too heavy on the rear axle can result in steering difficulties.
By knowing what your vehicle weighs, you can determine the best location for your
belongings. Simply because you can fit everything in one compartment for easy access,
does not mean that this is the best place for an item. Your home is now moving down the
road, so the little things like location of heavy items because more than an accessibility
standpoint.
TRAILER HITCHES AND
TOWING
If you expect to pull a vehicle or trailer with your motorhome, please use these guidelines
when choosing a vehicle or trailer:
1. Do not load over the weight indicated on the label on the hitch.
2. Hitch Classification: Class III and IV = See the label on the hitch to find your maximum
hitch weight and towing weight.
3. Vehicle/Trailer Weight: Do not tow a vehicle/trailer weight more than recommended by
the class rating of your hitch, or more than recommended by the chassis manufacturer,
whichever is less. The motorhomes braking system is rated for operation at the total
GVWR of the motorhome.
For your safety, Damon Corporation recommends that a separate functional braking system be used on any towed trailer or vehicle,
including those dolly towed or towbar towed.
22
If you plan to tow a vehicle or trailer with your motorhome, the tongue weight must not
exceed the maximum allowed hitch weight. The GVWR must not exceed the GCWR of
your chassis. To determine how much your vehicle can tow, have your vehicle weighed
when it is properly loaded, as you would have it when you are ready to depart from your
trip. Subtract this total weight from the GCWR weight on your Federal Weight Label. This
Chapter 2 - Planning and Preparation
is the total amount that you may safely tow behind your motorhome.
This Combined Vehicle Weight cannot exceed your motorhome’s specific GCWR.
Example: If you have a GVWR of 16,000 lbs., and your unit weighs 13,965 lbs.:
GVWR
=
16,000 lbs.
Subtract Unit weight
=
13,965 lbs.
2,035 lbs.
Total of 2,035 lbs. available for cargo in the motorhome providing you DO NOT overload
the individual GAWR’s.
Example: If you have a GCWR of 20,000 lbs., and your unit is fully loaded to its maximum
GVWR of 16,000 lbs.:
GCWR
=
20,000 lbs.
GVWR
=
16,000 lbs.
4,000 lbs.
Total of 4,000 lbs. available to tow a vehicle or trailer behind the motorhome. This will be
the MAXIMUM weight your unit is certified by the chassis manufacturer to safely pull. DO
NOT exceed the ratings of the label on the hitch or the GCWR of the chassis.
23
Chapter 2 - Planning and Preparation
24
Chapter 3 - On the Road Safety
Seat belts are an important safety feature of your vehicle. Each designated seat is designed
to carry passengers while the vehicle is in motion. Each Designated Seating Position is
equipped with either a type 1 (lap belt) or a type 2. (shoulder and lap belt) The number
of seats equipped with seat belts is to provide a choice of seating locations. This does
not necessarily mean that you may safely carry that many passengers. Refer to “Cargo
Carrying Capacity” (page 21) in the loading section for proper loading techniques.
SAFETY BELTS
To adjust your seat belt:
•
•
•
Pivot the buckle at a right angle to the belt and pull to the desired length.
Make sure the belt is not twisted, and press the tongue end into the buckle end. Be
sure the two are latched together, and adjust the belt snugly around your abdomen.
To release, simply depress the button on the buckle and remove the tongue.
Child restraint seats may be used with the lap belts provided. Check the restraint seat
instructions for proper installation and adjusting. Child restraint seats are required to
a certain age. Check with the states in which you will be traveling for the proper age
requirements.
While the motorhome is in motion, passengers should be seated with
seat belts fastened. Do not allow passengers to occupy any position that is not equipped with a seat belt.
Use only recommended fuel as specified by the chassis manufacturer. Do not overfill the
fuel tank, but allow for expansion of fuel (caused by rising temperatures) by stopping the
filling process when the pump automatically shuts off.
FUEL SYSTEM
Modern fuel systems may build up vapor pressure within the tank as the fuel warms during use, or in hot weather. Under certain conditions, sudden release of this pressure when removing the filler cap can spray fuel from the opening, causing a possible hazard. When removing the filler cap, rotate it slowly,
only far enough to allow pressure to release. After any hissing sounds die down, complete the
removal of the cap. To protect the gasoline system from excessive pressure or vacuum, or from
sudden release of pressure, replace lost caps with caps of the same design available from your
motorhome dealer.
When driving your motorhome, you’re driving a large vehicle, and you should become
accustomed to the feel of the controls and the reference points from the driver’s seat.
Become familiar with the position of the motorhome in traffic, and be cautious while
maneuvering to allow for the length and width of the vehicle. Always allow extra room to
corner and to change lanes. Learn to use the side mirrors to view the road behind. Check
them often.
DRIVING
Drive with consideration on the highway, observing all speed and safety regulations.
The best cruising speed of your motorhome will vary with road and weather conditions.
Remember that your motorhome is heavier than a car, making it less maneuverable and
harder to stop. Brake pedal pressure and travel may vary significantly from that of a car. Be
prepared to brake earlier than you normally would a car. Also, because of its greater side
surface area, it is more easily affected by cross winds. Allow extra distances for passing
and stopping, and drive at a moderate speed, particularly in traffic and in gusty wind
conditions.
Driving on winding or mountain roads is not difficult if done with reasonable care. Observe proper vehicle speeds when ascending or descending hills and always operate in
the proper transmission range. Downshift on hills to avoid overheating or undue engine
loads. Downshift before descending grades.
Road conditions, terrain, weather, and other driving factors are sometimes unpredictable, and mountain driving or desert temperatures can put extreme demands
25
Chapter 3 - On the Road Safety
on drive train components, especially the transmission. Under extreme heat conditions
you may need to turn off the vehicle air conditioner to improve engine and transmission
cooling.
Allow for the extra height of your motorhome and avoid areas having low overhead
clearance. Check for low hanging tree branches or other obstructions wherever you
drive or park. Avoid low roof heights when pulling in for service. This may be particularly
important if you drive with the overhead vents open or if the motorhome is equipped
with a roof air conditioner, roof rack, or TV/radio antenna. Check the total height for your
particular motorhome and make sure that you are aware of it when driving under bridges
or underpasses.
PARKING
When parking parallel to a curb, be sure to allow for poles or obstructions as the front and
rear portions of the motorhome will swing wider than an automobile. Remember that
your motorhome is larger than your automobile and will require more space. Be careful
your unit does not occupy road space or block driveways while parking. When parking on
an incline, turn the front wheels into the curb in the direction of the roll to aid the parking
brake. Always set the parking brake when parking.
Changing a tire on a motorhome is more difficult than an ordinary automobile.
Motorhome tires are larger and heavier than ordinary tires. Whenever possible, call for
roadside assistance to help you in changing your tires. This task should not be done alone
due to the weight of the unit. Motorhomes are extremely heavy. Changing a flat tire is
best left to a professional mechanic with the proper equipment.
CHANGING TIRES
If absolutely necessary, change the tire on a level and firm surface. If you are on the roadside,
activate the vehicle’s hazard warning flashers. Apply the parking brake. Set up flares and
or warning lights. See the chassis manufacturer’s owner’s manual for specific jacking and
tire removal, and replacement instructions, which pertain to your unit. Lug nuts vary
from chassis to chassis, and the GVW (Gross Vehicle Weight) of your motorhome. (See
Chassis Owner’s Manual for specific instructions on tightening lug nuts). After operating 50-100 miles, retighten to the same specification. If you don’t have proper equipment,
stop at the nearest service facility and have the torque of the lug nuts checked.
Never place the jack under a bumper or under the edge of the sidewall. Always place the jack as specified by the chassis owner’s
manual. Never use the rear differential as a jacking point. Use the jack only for changing
tires. NEVER get underneath the vehicle when using the jack; never start or run the engine
while the vehicle is on the jack.
TIRE CARE
The most important factor in maximizing the life of your tires is maintaining proper inflation pressure. An under inflated tire will build up excessive heat that may go beyond
the prescribed limits of endurance of the rubber and the radial cords. Over inflation
will reduce the tire’s footprint on the road, reducing the traction, braking capacity, and
handling of your vehicle. An over inflated tire will also cause a harsh ride and uneven tire
wear.
CHECK AIR PRESSURE
To determine the correct air pressure for your tires, load your motorhome as you would
normally for travel, including water and fuel. Determine the correct air pressure for the
weight on each axle and adjust the pressure according to the Federal Certification Label
when the tires are cool or have not been driven for more than one mile. Never reduce the
air pressure in a hot tire.
26
Never let air out of a hot tire.
Now that you have found what the correct air pressure per axle needs to be for your
motorhome when loaded, you need to know when to check your air pressure. You should
check the air pressure every two weeks or at least once a month and before any major
trip. Your motorhome’s air pressure should be checked every morning on long trips. On
short trips of a day or less of driving each way, your tires should be checked before you
Chapter 3 - On the Road Safety
start your trip home. If your vehicle is stored for any length of time, the air pressure should
be checked prior to storage, but more importantly, when it comes out of storage.
Check your tires when they are “cold” and have not been driven for more than one mile.
The stated load capacity for a given cold inflation pressure is based on ambient outside
temperature.
To maintain the inflation pressure in your tires you will need the proper equipment. It is
recommended that you purchase a quality truck tire air gauge, which has an angled dual
head. This type of gauge allows you to check inflation on the inner dual wheel which has
the valve stem pointed away from you. Nothing should restrict your ability to check your
tire’s air pressure daily when you are driving your motorhome. Pressure sealing valve caps
should always be used to prevent air from escaping from the valve stem. If you use valve
stem extension hoses, make sure they are good quality stainless steel braid reinforced,
and are securely anchored to the outer wheel. If your motorhome has wheel covers which
must be removed to check the inflation, then consider removing them as the extra time
and effort required may lead you to avoid checking your pressure.
When replacing your tires always make sure the proper size and rating is used. Check the federal certificate located in the drivers area for your model’s specific size and rating.
In a sudden stop or collision, loose equipment could strike someone. Storing a jack, a tire, or other equipment in the passenger compartment of the vehicle could cause injury. Store and secure all of these items in a proper place.
Damon does not provide jacks with our motorhomes.
27
Chapter 3 - On the Road Safety
28
Chapter 4 - Safety Provisions
Your motorhome has been supplied with various safety features and equipment for your
convenience and for safe operation. As with all areas in life, the chance for accidents is
possible, and the recreational life-style is no exception. Please take the time to familiarize
yourself with the safety features of your motorhome now to prevent any question of how
they are used if an emergency should arise.
Please refer to the smoke detector manual in the Owner’s Information Kit for operating
instructions.
SMOKE DETECTOR
Test smoke detector operation after vehicle has been in storage, before each trip, and at least once per week during use. Replace battery every six months.
The motorhome should never be operated or occupied unless the smoke detector is present and functioning properly.
Each motorhome is equipped with a portable fire extinguisher mounted close to the
main entry door. This fire extinguisher is rated for Class B (gasoline, grease, flammable
liquids) and Class C (electrical) fires. Test your extinguisher as recommended by the fire
extinguisher manufacturer, and replace after use. Be familiar with your fire extinguisher
location and its operation.
FIRE EXTINGUISHER
An propane detector, located near the floor in the galley area, will sense the presence of
propane leakage. The leak detector will sound an alarm if propane is detected. Test the
leak detector weekly. PROPANE GAS
DETECTOR
The propane detector gets its power from one of the circuits in the load center. Because
these circuits are on the load side of the battery-disconnect, the propane detector will
be disabled (along with all other 12 Volt house powered devices) when shore power is
removed and the battery disconnect is in the storage mode. While this is ideal when your
coach is in storage and the propane system is shutdown, there will be no warning if this
should happen while camping and an propane leak occurs. To warn you of this possible
hazard, a label is located near the propane leak detector.
The propane detector is operated by the 12 Volt house wiring and will be disabled when batteries are in the storage mode and shore power is removed.
The motorhome should never be operated or occupied unless the propane detector is present and functioning properly.
A carbon monoxide detector is installed in each vehicle. It is usually located in the CO DETECTOR
bedroom on the ceiling or wall about five feet from the floor. Test it before every trip to
ensure that it is functioning properly.
Carbon monoxide is a colorless, tasteless, odorless gas. It is a by-product of combustion
in the engine, generator and propane appliances. The engines in your motorhome and
generator system produce it constantly while they are running. CARBON MONOXIDE IS
DEADLY. Please read and understand the following precautions to protect yourself and
others from the effects of carbon monoxide poisoning.
Exhaust gases are deadly. Do not block the tail pipe or situate your vehicle or propane appliance exhaust systems in a place where the
exhaust gases have any possibility of accumulating either outside, underneath, or inside
your vehicle or any nearby vehicles. Outside air movements can carry exhaust gases inside
the vehicle through windows or other openings remote from the exhaust outlet. Operate
the engine only when safe dispersion of exhaust gases can be assured.
29
Chapter 4 - Safety Provisions
The motorhome should never be operated or occupied unless the CO Detector is present and functioning properly. Do not under any circumstances operate the vehicle or generator engine while sleeping.
BATTERY INSTALLATION
The carbon monoxide detector is installed without batteries. To install the batteries, press
the tab at the top of the CO detector and slide the detector upwards. Open the battery
compartment door by hinging the left lower side downward. This exposes the battery
compartment. Install the batteries as indicated. The detector should beep indicating
correct installation. Reverse the above procedure to reinstall the detector. Test the
detector before you start every trip.
PROPANE SAFETY
When lighting your propane appliances for the first time, or after refueling the propane
tank, trapped air will need to be purged from the system which could take a few seconds
or a few minutes, depending on the distance of the appliance from the tank. Follow
the appliance manufacturer’s lighting and operating instructions found in the Owner’s
Information Kit. Be sure that the water heater has water in it prior to igniting.
EXIT LOCATIONS
Every sleeping area in your recreational vehicle is provided with exits. These exits are
either in the form of an exit window (which will be labeled EXIT in red letters) or the main
entry door, which is not labeled, serves as an exit. The exit window handles will also be
red in color. Lift the handles and push the window open to exit. Make sure all occupants
are aware of the exit locations and their operation.
GENERATOR
Make sure to read and understand the generator owner’s manual before operating the generator. Observe all operating instructions and warnings as well as all recommended maintenance schedules and procedures.
The onboard generator makes your RV fully self-contained. It allows you access to 120
volts when there is no shore power available, but keep in mind that carbon monoxide is
deadly! Never sleep in the RV while the generator is running! Before you start and use
the generator inspect the exhaust system. Do not use it if the exhaust system is damaged. Test the carbon monoxide detector every time you use the RV. Know what the symptoms
of carbon monoxide poisoning are:
•
•
•
•
•
•
•
•
Dizziness
Vomiting
Nausea
Muscular twitching
Intense headache
Throbbing in the temples
Weakness and sleepiness
Inability to think coherently
If you or anyone else experiences any of these symptoms get to fresh air immediately. Shut the generator down and do not operate it until it has been inspected and repaired
by a professional. If the symptoms persist seek medical attention.
Carbon Monoxide is poisonous and can cause unconsciousness and death.
1. Do not operate the generator while sleeping. You would not be aware of exhaust
entering the RV, or alert to symptoms of carbon monoxide poisoning.
30
2. Never store anything in a generator compartment. Always keep the compartment
clean and dry.
Chapter 4 - Safety Provisions
3. Do not operate the generator in an enclosed building or in a partly enclosed area
such as a garage. It is also not recommended that you use the generator when there
are other vehicles nearby.
4. Review the safety precautions for fuel and exhaust fumes elsewhere in this manual.
5. Do not operate the generator when the RV is parked in high grass or brush. Heat
from the exhaust could cause a fire in dry conditions.
6. Never operate your chassis or generator engine, or the engine of any vehicle, longer
than necessary when the vehicle is parked.
7. Do not simultaneously operate generator and a ventilator which could result in
the entry of exhaust gas. When exhaust ventilators are used, we recommend that
a window on the opposite side of the unit “upwind” of exhaust gases be opened to
provide cross ventilation.
8. When parked, orient the vehicle so that the wind will carry the exhaust away from
the vehicle. Do not open nearby windows, ventilators, or doors into the passenger
compartment, particularly those which can be “down wind”, even part of the time.
9. Do not operate the generator when parked in close proximity to vegetation, snow,
buildings, vehicles, or any other object that could deflect the exhaust under or into
the vehicle.
10. Do not touch the generator when running, or immediately after shutting off. Heat
from the generator can cause burns. Allow the generator to cool before attempting
maintenance or service.
Studies of tire safety show that maintaining proper tire pressure, observing tire and vehicle
load limits (not carrying more weight in your motorhome than your tires or motorhome
can safely handle), avoiding road hazards, and inspecting tires for cuts, slashes, and
other irregularities are the most important thing you can do to avoid tire failure, such
as tread separation or blowout and flat tires. These actions, along with other care and
maintenance activities, can also:
•
•
•
•
TIRE SAFETY
Improve vehicle handling
Help protect you and other from avoidable breakdowns and accidents
Improve fuel economy
Increase the life of your tires
Use this information to make tire safety a regular part of your vehicle maintenance
routine. Recognize that the time you spend is minimal compared with the inconvenience
and safety consequences of a flat tire or other tire failure.
Properly maintained tires improve the steering, stopping, traction, and load-carrying
capability of your motorhome. Under inflated tires and overloaded vehicles are a major
cause of tire failure. Therefore, as mentioned above, to avoid flat tires and other types of
tire failure, you should maintain proper tire pressure, observe tire and vehicle load limits,
avoid road hazards, and regularly inspect your tires.
Tire information placards and vehicle certification labels contain information on tires and
load limits. These labels indicate the vehicle manufacturer’s information including:
•
•
Recommended tire size
Recommended tire inflation pressure
FINDING THE
RECOMMENDED TIRE
PRESSURE & LOAD
LIMITS
31
Chapter 4 - Safety Provisions
•
•
Vehicle capacity weight (VCW - the maximum occupant and cargo weight a vehicle
is designed to carry)
Front and rear gross axle weight rating (GAWR - the maximum weight the axle system
are designed to carry)
Both placards and certification labels are permanently affixed to the motorhomes interior
sidewall. Locate the placards and labels inside of a cabinet door, near to the driver’s
area.
UNDERSTANDING TIRE
PRESSURE & LOAD
LIMITS
Tire inflation pressure is the level of air in the tires that provides it with load-carrying
capacity and affects the overall performance of the vehicle. The tire inflation pressure
is a number that indicates the amount of air pressure - measured in pounds per square
inch (psi) - a tire requires to be properly inflated. (You will also find this number on the
vehicle information placard expressed in kilopascals (kPa), which is the metric measure
used internationally.)
Vehicle manufacturers determine this number based on the vehicle’s design load limit,
that is, the greatest amount of weight a vehicle can safely carry and the vehicle’s tire size. The proper tire pressure for your vehicle is referred to as the “recommended cold inflation
pressure.” (As you read below, it is difficult to obtain the recommended tire pressure if
your tires are not cold.)
Because tires are designed to be used on more than one type of vehicle, tire manufacturers
list the “maximum permissible inflation pressure” on the tire sidewall. This number is the
greatest amount of air pressure that should ever be put in the tire under normal driving
conditions.
TIRE PRESSURE
It is important to check your vehicle’s tire pressure before each trip for the following
reasons:
•
•
•
Most tires may naturally lose air over time
Tires can lose air suddenly if you drive over a pothole or other object or if you
strike the curb when parking
With radial tires, it is usually not possible to determine under inflation by visual
inspection
For convenience, purchase a tire pressure gauge to keep in your vehicle. Gauges can be purchased at tire dealerships, auto supply stores,
and other retail outlets.
The recommended tire inflation pressure that vehicle manufacturers provide reflects the
proper psi when a tire is cold. The term cold does not relate to the outside temperatures. Rather, a cold tires is one that has not been driven on for at least three hours. When you
drive, your tires get warmer, causing the air pressure within them to increase. Therefore,
to get an accurate tire pressure reading, you must measure tire pressure when the tires
are cold or compensate for the extra pressure in warm tires.
32
TIRE SIZE
To maintain tire safety, purchase new tires that are the same size as the vehicle’s original
tires or another size recommended by the manufacturer. Look at the tire information
placard, the chassis owner’s manual, or in a cabinet for replacing tires. If you have any doubt
about the correct size to choose, consult with your dealer and chassis manufacturer.
TIRE TREAD
The tire tread provides the dripping action and traction that prevent your vehicle from
slipping or sliding, especially when the road is wet or icy. In general, tires are not safe and
should be replaced when the tread is worn down to 1/16” of an inch.
Tires have built-in tread wear indicators that let you know when it is time to replace your
tires. These indicators are raised sections spaced intermittently in the bottom of the tread
Chapter 4 - Safety Provisions
grooves. When they appear “even” with the outside of the tread, it is time to replace your
tires.
Another method for checking tread depth is to place a penny in the tread with Lincoln’s
head upside down and facing you. If you can see the top of Lincoln’s head, you are ready
for new tires.
To avoid vibration or shaking of the vehicle when a tire rotates, the tire must be properly
balanced. This balance is achieved by positioning weights on the wheel to counterbalance
heavy spots on the wheel-and-tire assembly. A wheel alignment adjusts the angles of the
wheels so that they are positioned correctly relative to the vehicle’s frame. This adjustment
maximizes the life of your tires. These adjustments require special equipment and should
be performed by a qualified technician.
TIRE BALANCE &
WHEEL ALIGNMENT
Before rotating your tires check the chassis owner’s manual for rotation recommendations
for specific vehicles. If no rotation information is given, speak with a qualified service
technician or the chassis manufacturer.
TIRE ROTATION
33
Chapter 4 - Safety Provisions
34
Chapter 5 - Health and Well-being
After you first purchase your new recreational vehicle and sometimes after it has been
closed up for an extended period of time, you may notice a strong odor and chemical
sensitivity. This is not a defect in your recreational vehicle. Like your home, there are
many different products used in the construction of recreational vehicles, such as carpet,
linoleum, plywood, insulation, upholstery, etc. Formaldehyde is also the by-product
of combustion and numerous household products, such as some paints, coatings and
cosmetics. However, recreational vehicles are much smaller then your home and therefore
the exchange of air inside a recreational vehicle is significantly less than a home. These
products, when new or when exposed to elevated temperatures and/or humidity, may
“off-gas” different chemicals, including formaldehyde. This off gassing, in combination
with the minimal air exchange, may cause you to experience irritation of the eyes, nose,
throat and sometimes headache, nausea, and a variety of asthma-like symptoms. Elderly
persons and young children, as well as anyone with a history of asthma, allergies, or lung
problems, may be more susceptible to the effects of off-gassing.
CHEMICAL SENSITIVITY
Most of the attention regarding chemical off-gassing surrounds formaldehyde. FORMALDEHYDE
Formaldehyde is a naturally occurring substance. It is also a key industrial chemical
used in the manufacture of the numerous consumer products which were referred to
above and used in the construction of recreational vehicles. Trace levels of formaldehyde
are also released from smoking, cooking, use of soaps and detergents such as carpet
shampoos, cosmetics, and many other household products. Some people are very
sensitive to formaldehyde while others may not have any reaction to the same levels of
formaldehyde. Amounts released decrease over time.
To reduce or lessen exposure to chemicals from off-gassing it is of utmost importance
that you ventilate your recreational vehicle. Ventilation should occur frequently after
purchase and at times when the temperatures and humidity are elevated. Remember
off-gassing is accelerated by heat and humidity. Open windows, exhaust vents, and
doors. Operate ceiling and/or other fans, roof air conditioners, and furnaces and use a fan
to force stale air out and bring fresh air in. Please also follow the recommendations and
tips on how to avoid condensation problems. Many of the recommendations mentioned
there will assist in avoiding exposure to chemicals that off-gas.
VENTILATION
We recommend that you do not smoke inside your recreational vehicle. In addition to
causing damage to your recreational vehicle, tobacco releases formaldehyde and other
toxic chemicals.
SMOKING
If you have any questions regarding the health effects of formaldehyde, please consult
your doctor or local health department.
MEDICAL ADVICE
To avoid condensation problems, try to follow these tips to help alleviate excess
moisture.
TIPS TO CONTROLLING
CONDENSATION
•
Allow excess moisture to escape to the outside when bathing, washing dishes, hair
drying, laundering, and using appliances and non-vented gas burners.
•
Always use the vent hood when cooking.
•
Keep the bathroom door closed and the vent or window open when bathing and for
a period of time after you have finished.
•
Do not hang wet clothes in the vehicle to dry.
•
In hot weather, start the air conditioner early as it removes excess humidity from the
air while lowering the temperature.
•
Keep the temperature as reasonably cool during cold weather as possible. The warmer
the vehicle, the more cold exterior temperatures and warm interior temperatures will
35
Chapter 5 - Health and Well-being
collide on wall surfaces, thus creating condensation.
•
Use a fan to keep air circulating inside the vehicle so condensation and mildew cannot
form in dead air spaces. Allow air to circulate inside closets and cabinets (leave doors
partially open). Please keep in mind that a closed cabinet full of stored goods prevents
circulation and allows the exterior temperature to cause condensation.
•
The natural tendency would be to close the vehicle tightly during cold weather. This
will actually compound the problem. Simply put, you need to remove some of the
warm air, and allow some cool air to get inside the vehicle, so the furnace will not
recycle humid interior air.
•
Use fluorescent ceiling lights and minimize prolonged use of the incandescent lights,
which produce heat and contribute to condensation in the roof above the ceiling
lights.
WHAT ARE MOLDS?
Molds are microscopic organisms that naturally occur in virtually every environment,
indoors and out. Outdoors mold growth is important in the decomposition of plants. Indoors, mold growth is unfavorable. Left unchecked, molds break down natural
materials, such as wood products and fabrics. Knowing the potential ricks is important
for any type of owner to protect their investment.
WHAT FACTORS
CONTRIBUTE TO MOLD
GROWTH?
For mold growth to occur, temperatures, indoors and outdoors, must be between 40
degrees and 100 degrees Fahrenheit and also have a source of moisture, such as humidity,
standing water, damp materials, etc. Indoors, the most rapid growth occurs with warm
and humid conditions.
HOW CAN MOLD
GROWTH BE
INHIBITED?
By controlling relative humidity, the growth of mold and mildew can be inhibited. In warm
climates, use of the air conditioner will reduce the relative humidity. Vents are located
in the bathing and cooking areas and constant use is advised during food preparation
and bathing, even during colder weather. Additionally, opening a window during these
activities will assist in ventilation. In extremely humid conditions, the use of a dehumidifier
can be helpful. If using a dehumidifier, please read and follow all manufacturer instructions
and recommendations to the use and cleaning of the dehumidifier.
Frequent use of your RV or regular cleaning is an important preventative measure. Further, any spills should be wiped up quickly and dried as soon as possible. Avoid leaving
damp items lying about. On safe surfaces, use mold or mildew killing products. Check
sealants regularly, and reseal when necessary to avoid water leaks. Proper preventative
maintenance to the RV and its accessories, as described will provide the best protection
to the RV.
For more information, please see “Tips to Controlling Condensation” on page 33.
EFFECTS OF
PROLONGED
OCCUPANCY
36
Your motorhome was designed primarily for recreational use and short-term occupancy. If you expect to occupy the motorhome for an extended period, be prepared to deal with
condensation and the humid conditions that may be encountered. The relatively small
volume, and tight compact construction of modern recreational vehicles, mean that the
normal living activities of even a few occupants will lead to rapid moisture saturation of
the air contained in the motorhome, and the appearance of visible moisture, especially
in cold weather.
Just as moisture collects on the outside of a glass of cold water during humid weather,
moisture can condense on the inside surfaces of the motorhome during cold weather
when relative humidity of the interior air is high. This condition is increased because the
insulated walls of a recreational vehicle are much thinner than house walls. Estimates
indicated that a family of four can vaporize up to three gallons of water daily through
breathing, cooking, bathing, and washing. Unless the water vapor is carried outside by
ventilation, or condensed by a dehumidifier, it will condense on the inside of the windows
Chapter 5 - Health and Well-being
and walls as moisture, or in cold weather as frost or ice. It may also condense out of sight
within the walls or the ceiling where it will manifest itself as warped or stained panels. Appearance of these conditions may indicate a serious condensation problem. When
you recognize the signs of excessive moisture and condensation in the motorhome,
action should be taken to minimize their effects. For tips on controlling condensation
see “Tips to Controlling Condensation” section.
Your motorhome is not designed, nor intended, for permanent housing. Use of this product for long term or permanent occupancy may lead to
premature deterioration of structure, interior finishes, fabrics, carpeting, and drapes. Damage
or deterioration due to long-term occupancy may not be considered normal, and may under
the terms of the warranty constitute misuse, abuse, or neglect, and may therefore void certain
warranty protections.
37
Chapter 5 - Health and Well-being
38
Chapter 6 - Plumbing Systems
FRESH WATER
SYSTEM
Your motorhome is self contained, able to carry fresh water in the potable storage tank
and hold the waste water in dual holding tanks for dumping when convenient. Water
connections are also available for a city water hose hookup to an external pressurized
water source.
The fresh water storage tank supplies potable water to all fixtures within your motorhome
by means of a 12 Volt water pump. This pump is located close to the storage tank and is
equipped with a check valve that ensures directional flow away from the tank. The pump
has an on/off switch, which is located on the monitor panel. The pump will automatically
build up pressure and maintain that pressure when turned on. The pump should be
turned off when the fresh water tank is empty or when the motorhome will not be in
use. Continued operation with a dry tank may damage the pump. Your pump has a filter
on the inlet side. This filter should be cleaned after each tankful of water for the first few
uses. To remove the cover press in firmly and twist counterclockwise about one eighth
turn. Pull the screen out of the bowl and rinse clean. Reassemble in the reverse fashion.
For more information check your water pump Owner’s Manual located in your Owner’s
Information Kit.
FILTER / WATER
PUMP
Filter
Water Pump
The fresh water tank can be filled by an external hose through the potable water fill FRESH WATER FILL
located outside your unit. To fill, make sure that the tank and low point drains are closed.
Simply connect the external hose directly to the receptacle labeled “Potable Water” on
the outside of your motorhome. Turn on the external water source and the tank will fill
up. Check the monitor panel while filling the tank to determine how full the tank is. When
full, water may spill back out through the inlet or vent. There is no automatic shut-off for
the fresh water tank fill. When completely filling the tank to maximum water capacity, fill
all water lines and the water heater as well. When possible, traveling with an empty fresh
water tank will provide for more cargo carrying capacity and better gas mileage.
If you choose to use city water directly for your water source, simply attach the external
hose to the inlet labeled “City Water” located on an exterior side of your motorhome.
Now you have a pressurized water supply from the motorhome park or city water supply
hookup. The same water lines are utilized as with the fresh water storage tank and pump;
however, the pump’s check valve bypasses both the pump and the fresh water tank. Turn
on the water supply and open faucets to purge any air trapped in the water system.
CITY WATER HOOK-UP
Some water sources develop high water pressure, particularly in mountainous regions. These campgrounds or hookup locations may not
have regulated water pressure, which could be considered excessive. High pressure is anything
over 55 psi. Excessive pressure may cause leaks or damage to your water system. Water pressure
regulators are available to protect the water system against high pressures. Check with your dealer
for recommendations of water pressure regulators.
Low point drains are located either in the holding tank compartment. These drains are
used when the system is to be completely cleared of water.
LOW POINT DRAINS
You should sanitize and disinfect the fresh water system upon delivery of the unit and
at least once per year or whenever the motorhome is unused for prolonged periods of
time. This will help keep your water system fresh and discourage the growth of viral and
bacterial contamination, which may be contained in your water supply. Use a chlorine
and fresh water rinse as follows:
SANITIZING THE
SYSTEM
39
Chapter 6 - Plumbing Systems
1. Drain the fresh water tank by opening the drain valve. All of the faucets should be in the closed or off position.
2. Prepare a solution of 1/4 cup household liquid chlorine bleach (5% sodium hypochlorite) to one gallon of water for every 15 gallons of tank capacity. Do not
pour bleach straight into tank. Bleach must be diluted in water prior to filling.
Example: Add four 2/3 gallons solution to a 70 gallon tank.
Add five 1/3 gallons solution to a 80 gallon tank.
Add six 1 gallon solution to a 90 gallon tank.
Add six 2/3 gallons solution to a 100 gallon tank.
This mixture puts a 50 PPM (parts per million) residual chlorine concentration in the motorhome’s water tank. This will act as quick-kill dosage for some harmful bacteria, viruses, and slime-forming organisms. Concentrations higher than 50 PPM may damage water lines and/or tank.
3. Close all faucets and drains, and fill the fresh water tank with the rinse solution through the potable water fill.
4. Turn on the pump switch and circulate the rinse solution throughout the entire system.
5. Once the rinse solution has been circulated through the entire system, fill the fresh water tank until it is full.
6. Close all faucets and drains and let the system sit for approximately three (3) hours.
7. Drain the entire system.
8. Flush the complete system with fresh water until chlorine odor disappears.
9. Finally, close all drains and fill the fresh water tank as you normally would. Make sure the water heater has water in it prior to igniting.
WASTE WATER
SYSTEM
Chlorine is poisonous. Recap bottle and clean any appliances used with soap and water.
The waste water system is comprised of dual holding tanks with individual termination
valves. The holding (solid waste) tank as indicated on your monitor panel, collects all the
waste material from the toilet. The gray water tank collects all of the liquid waste material
from the sinks, drains, and showers. Both tanks are joined together after the termination
valve to provide a single termination outlet for convenient dumping of waste materials. A
flexible sewer hose ( which is not provided) is required to make the connection between
your unit’s termination valve and the approved dump station inlet.
The drainage system is very similar to that of your home. The system is trapped and
vented to prevent waste gases from entering your motorhome. The drain piping is made
of ABS material and is resistant to most chemicals. The “P” traps at the sinks, showers and
tubs are available for use as clean-outs if necessary.
HEATED HOLDING
TANKS
Your vehicle’s holding tank compartments are heated by the furnace duct work. It will
heat the tanks when the furnace is operating.
DUMPING THE HOLDING
TANKS
As mentioned previously, your holding tanks terminate together at one location for convenience in dumping your tanks. A twist-on cap is located at the terminal outlet to
help prevent leakage of materials.
40
Chapter 6 - Plumbing Systems
The holding tanks are enclosed sewer systems, and must be drained into an approved dump station. Tanks should be thoroughly drained and rinsed to prevent any accumulation on the interior of the tanks.
1. Twist off the termination cap counterclockwise. Some liquid may be trapped between the valves.
2. Connect the sewer hose by turning it clockwise, making sure that the connection end
levers are locked over the termination end.
3. Deposit the other end of the sewer hose into an approved dump station inlet.
4. Open the black termination valve first and drain.
5. Open the gray (smaller) tank valve to drain and flush out the hose.
6. Rinse the tanks and hose thoroughly with fresh water before disconnecting.
7. Close the termination valves.
8. Rinse the sewer hose with the faucet provided in the termination compartment.
9. Replace the sewer hose to the storage location.
10. Replace the termination cap on the outlet, making sure that it is secured and locked.
11. You may wish to add an approved deodorant chemical, approved for your sewer
system, to aid in the breakdown of solid wastes as well as making your system more
pleasant to use. Do not leave the termination valves in the open position or open them prior to having the sewer hose connected. Do not remove the termination cap with the termination valves in the open position.
The most common holding tank problem is blocking the drain lines, which can be
minimized by following a few simple suggestions:
•
Prior to dumping, make sure your tank is at least 1/3 full.
•
Keep the tank valves closed, and the termination cap on.
•
Fill and cover the bottom of the tank with water after dumping is complete and leave the water in the tank.
•
Use only approved, biodegradable, toilet tissue designed specifically for motorhome systems.
•
Always use plenty of water when flushing.
•
Do not put facial tissue, paper, or sanitary napkins into your holding tanks.
•
Do not put solid objects into the tank which could puncture or scratch your tanks.
HOW TO PREVENT
BLOCKAGE OF DRAIN
LINES
41
Chapter 6 - Plumbing Systems
TERMINATION
COMPARTMENT
COMPONENTS
The termination compartment has many operations. Listed below are the fixture call
outs and functions:
1. Gloves. 2. City Water Connection. Connect to direct water source.
3. Sewer holding tank flush attachment. Attach the city pressure hose and allow the
water to flow for three minutes. Be sure to open the termination valves and have the
sewer hose attached and draining into an approved waste disposal system.
4. Swan Valve. With the city water hose attached and the handle in the 12 o’clock
position, valve will provide pressurized water for the motorhome. With the handle in
the 9 o’clock position, the valve will pressure fill the fresh water tank. Be sure to check
the monitor panel for tank filling progress, and turn off that valve when tank is full.
5. Compartment light. This is controlled by the compartment light switch at the entry
door.
6. Soap Dispenser. To clean your hands and any other appliance in this area.
7. Exterior shower head. For washing animals, hands, sewer hose, or any exterior
cleaning job.
8. Termination cap. Remove this to install the sewer hose. Be sure that the termination
valves are closed before removing this cap.
9. Low point drains. Use these to drain your water tank and lines in preparation for
winterization.
10. Termination valve handle. To open, grab handle, and pull outward. Make sure that
the drain hose is connected.
11. Hatch cover. Open this and pass your city pressure hose through. Close with hose
passing through small opening in the cover.
1
8
42
2
3
9
4
5
6
10
7
11
Chapter 7 - Technical Systems
The basic utility systems in your unit can be classified under two general titles, Electrical,
and Propane. This section outlines these systems, describing their function, operation,
and simple maintenance. This section is not intended as a service guide. Should a problem
arise, we recommend that you contact your Damon dealer.
The electrical system in your motorhome is designed and built in accordance with the
latest codes, standards, and regulations effective at the time of construction. It consists
of two types of systems, alternating current (AC) 120 Volt service and direct current (DC)
12 Volt service. Because of the many model variations and options, it is not possible to
provide wiring diagrams in this manual. We recommend that any electrical work be done
by a Damon dealer or a qualified RV electrician.
The chassis electrical system is separate from the coach electrical system, except for the
emergency start which may provide power from the auxiliary batteries to the chassis
battery. The chassis system gets its power from the automotive battery, providing power
to all of the dash controls and their functions. If any chassis electrical system should fail,
first check the fuses at the circuit panel under the interior dash on the drivers’ side. These
are automotive type fuses, which are available at many service stations. The dash fuses
will be located either under the dash on the drivers’ side, or in the Battery Control Center
(BCC) in the compartment behind the drivers’ front tire.
Replace fuses or bulbs only with those of equivalent size and type as marked on the fuse or bulb. Incorrect sizing will not match component circuitry causing a possible electrical hazard.
The direct current (DC) system supplies all the power to operate the 12 Volt devices in
your vehicle. It is made up of four parts:
CHASSIS ELECTRICAL
COACH ELECTRICAL
1. Auxiliary Coach Batteries
2. Chassis Batteries
3. Converter/Inverter
4. Battery Control Center (BCC)
The system has been designed to provide adequate power during travel, dry camping or
campground use.
When shore power is unavailable, the coach batteries power all house 12 Volt devices. The
coach batteries are of the golf cart variety and are capable of being deeply discharged.
With a large reserve rating, the batteries are able to provide limited use for several days
before needing to be recharged. Because of the large power rating, the batteries must be
recharged for a minimum of 24 hours to reach a full charge.
Never expose batteries to open flame or electrical spark. Chemical action in the battery generates hydrogen gas which is flammable and explosive. Do not allow battery electrolyte (battery acid) to
contact skin, eyes, fabric, or painted surfaces. Wear eye protection when working with
batteries.
Charging of the batteries comes from one of two sources, the engine alternator or the
converter. When driving, circuitry in the BCC (Battery Control Center) directs charging
current from the chassis electrical system to the coach battery bank. When power from
either the campsite or generator is present, the converter charges the batteries while
also providing power for the house circuits. The converter is an electronic device with
an output rating of 70 amps DC (Direct Current) for units equipped with 50 amp AC
(Alternating Current) service. It is connected directly to the coach batteries through the
battery disconnect in the BCC. All of the converter’s output, minus the house power
needs, is available to charge the batteries. These units are equipped with a three-stage
charger, to control the demand for charge directed to the batteries.
CONVERTER/INVERTER
43
Chapter 7 - Technical Systems
The inverter converts 12 Volt power from your house batteries to 120 Volt power for your
motorhome. The inverter will power the entertainment circuits, which include, the TV and
DVD player. Be aware that batteries are a limited power source and will quickly discharge
under high loads.
ALTERNATING
CURRENT SYSTEM
The AC electrical system provides grounded electrical power to your 120 Volt electrical
appliances through the external shoreline or your power generator. The shoreline is a onepiece molded cord that provides a weatherproof cable assembly. Included in this cord is
a grounding pin. If any adapter or extension cord is used, ensure the wire is sufficiently
sized for the amperage of the motorhome. Be sure the grounding pin is maintained.
Electrical output devices, extension cords and adapters must be grounded and suitable for the electrical requirements of your
motorhome. Failure to provide sufficient electrical power can cause low voltage and/or damage
to your appliances and motorhome.
AC receptacles are located throughout your unit for your convenience. Certain circuits
are dedicated to individual appliances (i.e. air conditioners, microwave/ convection oven)
because of load requirements.
GFCI
Your motorhome is provided with a Ground Fault Circuit Interrupter (GFCI) receptacle
located in the bathroom which also provides protection to all outside receptacles. The
GFCI is designed to limit the time of exposure to an electrical shock caused by current
leakage to the ground.
1. Press the TEST button.
2. The RESET button will pop up. If the RESET button does not pop up, a loss of ground fault protection is indicated. DO NOT USE that outlet or other outlets on the same circuit until a qualified RV electrician has checked out the electrical system.
3. To restore power, push the RESET button.
BATTERY CONTROL
CENTER
44
The GFCI should be checked once a month to assure proper operation. To test the GFCI:
If the outside receptacles do not work, check the GFCI receptacle to make sure the reset button has not been tripped.
The Battery Control Center (BCC) houses all the fuses for your auxiliary coach circuits. The
BCC is located under the hood. Inside you will find a series of fuses for the extra circuits
not available on the automotive or interior house 12 volt fuse boards. These style fuses
are available at any automotive or RV store. If it should become necessary to replace any
of these fuses, be sure to replace them with the same style and amperage rating. The
circuit wiring is sized for that particular amperage. The BCC will sense when to charge
either set of batteries. If the voltage falls below the minimum requirements, the BCC will
switch the charge to that set of batteries. Terminals inside the BCC are available for testing
its functionality. This testing should be performed by a qualified RV technician.
Chapter 7 - Technical Systems
Your motorhome is equipped with a generator, it will provide independent AC power.
When the generator is in operation an automatic switch will change the AC appliances to
generator power from the previous AC source. A short delay occurs before the switching
process is complete to allow the generator to stabilize its output. The generator is mounted
to allow for easy access during service functions. Refer to the Generator Owner’s Manual
for necessary service requirements and operating instructions.
GENERATOR
EXHAUST GASES ARE DEADLY. Do not block the tail pipe or situate the vehicle in a place where the exhaust gases have any possibility
of accumulating either outside, underneath, or inside your vehicle or any other nearby
vehicles. Outside air movements can carry exhaust gases inside the vehicle through windows
or other openings remote from the exhaust outlet. Operate the generator only when safe
dispersion of exhaust gases can be assured, and monitor outside conditions to be sure that
exhaust gases continue to be dispersed safety.
Do not under any circumstances operate the generator engine while sleeping.
The monitor panel allows you a convenient check of the approximate levels of all systems
at the touch of a button. It is located above the entry door and includes:
MONITOR PANEL
The water pump switch
The level test button for:
Propane tank Fresh water tank
Holding tank 1 (black/toilet waste water)
Holding tank 2 (gray/sink and shower waste water)
Push and hold the button until the panel registers a reading.
The levels are registered as:
F (full)
2/3 full
1/3 full
The monitor panel gives its readings of the water and waste tanks by means of an electrical signal between the tank probes. If there is an
extremely low mineral content in the water, or if there is buildup or coating on the sensor probes
on the interior of the tank(s), the readings on the monitor panel may be incorrect.
Avoid pouring grease, oils, or similar substances down your drain or the toilet. If this should occur, the holding tanks may need to be washed out with soap and water. Inaccurate monitor panel readings could occur.
Your Damon Motor Coach is equipped with a roof mount air conditioner. The air
conditioner can be operated on either generator power or by an external power source.
Using this for heat will reduce your furnace propane consumption. Use the Remote to
select your appliance and set the temperature. There is a timer available for setting the
heat or A/C operating times. You may notice some delays while changing from heat to A/
C and back. This prevents damage to the compressor. When changing the batteries in the
remote, be sure to press the Reset button with a pen or pencil. See your Air Conditioner
Owner’s Manual in the Damon Owner’s Information Kit for more details.
ROOF AIR CONDITIONER
45
Chapter 7 - Technical Systems
This vehicle is designed with a propane system to provide a safe and reliable fuel source
for your range, furnace, water heater, and refrigerator. As with any flammable and volatile
material, proper handling and precautions should be exercised at all times. The following
warnings must be reviewed and adhered to for safe and trouble free operation.
Propane containers should not be placed or stored inside the vehicle. Propane containers are equipped with safety devices that
relieve excessive pressure by discharging gas into the atmosphere.
It is not safe to use cooking appliances for comfort heating. Cooking appliances need fresh air for safe operation. Before operation:
• Open overhead vent or turn on exhaust fan, and
• Open window.
A warning label has been located in the cooking area to remind the user to provide an
adequate supply of fresh air for combustion. Use proper ventilation when using the
cooking appliances to avoid the dangers of asphyxiation.
Do not fill containers to more than 80 percent of capacity. Over filling the propane container can result in uncontrolled gas flow,
which can cause fire or explosion. A properly filled container will contain approximately 80
percent of its volume as liquid propane.
Portable fuel burning equipment, including wood, charcoal grills, and propane stoves, should not be used inside the motorhome. The
use of this equipment inside the vehicle may cause fires and/or asphyxiation.
PROPANE SYSTEM
Do not bring or store propane containers, gasoline, or other flammable liquids inside the vehicle because fire or explosion may result.
Propane has a distinctive odor. If you are unaware of the nature of an odor contact a Damon dealer. If you smell propane:
• Extinguish any open flames, pilot lights, and all smoking materials.
• Do not touch any electrical switches.
• Shut off the gas supply at the tank valve or gas supply connection.
• Open doors and windows.
• Leave the area until the odor clears.
• Have the gas system checked immediately by a certified RV technician.
Annual maintenance should be conducted on the propane gas appliances and equipment
by an authorized dealer.
The propane tank is mounted to the chassis below the floor between the frame rails and
behind the lower compartment door of your motorhome. The tank needn’t be removed,
as it is accessible for filling through a remote fill under the lower compartment door in
the drivers side. The tank and fittings have been completely assembled; however, upon
initial filling, all connections should be checked for leakage by a certified RV technician.
PROPANE TANK
46
The propane is stored in the tank as a liquid under pressure and vaporizes under the
control of the pressure regulator for use with all of the propane appliances. The propane
in the tank is much colder than the air that surrounds the tank, but as the air temperature
drops closer to the temperature of the liquid in the tank, the liquid doesn’t vaporize as
easily. Consequently, the BTU value of the propane drops dramatically. The closer the
tank is to full during cold temperatures, the better the BTU value will be; however, do not
fill the tank to more than 80 percent (80%) of capacity.
Freezing of the propane system is a potential problem during cold temperatures because of moisture in the propane or supply system. Precautions should be taken to
keep your tank and system free of moisture. Check with your propane service station
about approved antifreeze or deicers, which may be available to reduce the possibility
of a freeze.
Chapter 7 - Technical Systems
The tank has a gauge installed to show the level of propane in the tank. The tank level
can be remotely read from the monitor panel. The monitor panel is usually located in the
hallway.
PROPANE REGULATOR
The propane tank has a regulator installed adjacent to the main shut-off valve. The
regulator controls the pressure to the appliances as required for proper operation. This
regulator has been preset by the regulator manufacturer and should not be adjusted
unless necessary, and then only by a qualified propane service technician.
The regulator has a vent to permit it to breath, allowing the diaphragm to move up and
down, and also allowing a release for excess pressure which may build up. This vent must
be facing downward and should be checked periodically to make sure that it is clean and
free from obstructions. Clogging from corrosion, dirt, insects and other debris is the most
common cause of regulator malfunction.
The propane regulator must always be installed with the diaphragm
vent facing downward. Regulators that are not in compartments have
been equipped with a protective cover. Make sure that the regulator vent faces downward
and that the cover remains in place to minimize vent blockage that could result in excessive
gas pressure, causing fire or explosion.
Your motorhome is equipped with a home theatre system. This home theatre system is
integrated into the dash radio system.
HOME THEATRE
SYSTEM
The DVD video cannot be displayed on the main dash screen unless the parking brake to your motorhome is applied. If you attempt
to play a DVD while the vehicle is moving, your screen will display “PARKING”. This is a safety
requirement. This display will not interfere with the other televisions in your motorhome.
To watch a DVD video on the living area televisions please follow these
instructions:
1.) Turn on living room television.
2.) Press the SOURCE button on the TV or from the remote.
3.) Select AV2.
4.) Press the OPEN button on the control panel at the dash radio or the OPEN/CLOSE
button on the remote to reveal the disc slot. Insert the disc, label side up into the slot. The front panel will close automatically, and the disc will begin to play on the living room
TV.
You cannot insert a disc if there is already a disc or if the power is turned off.
To access the DVD mode from the dash radio when a DVD is inserted:
1.) Press the SRC button on the front panel or on the remove until “DISC” appears at the
bottom of the screen.
2.) Press the title button on the remote control or touch the screen. Touch the ½ button
to show the second page of controls on-screen. Touch the TITLE button.
47
Chapter 7 - Technical Systems
To access the DVD menu from the dash radio when a DVD is inserted:
1.) Press the MENU button on the remote control to recall the main DVD menu. Use the
joystick on the main control to select a title from the menu or touch the title on screen.
2.) Press ENTER button to confirm your selection and begin playback.
TROUBLESHOOTING
TIPS
COMMON TROUBLESHOOTING TIPS. For a complete listing, check the products owners
manual.
Unit will not power on:
Fuse may be blown. Install a new fuse with the correct rating.
Component has preformed an illegal operation. Press the RESET button located in the bottom right corner of the front panel.
Extreme hot or cold temperatures are present. Allow the interior of the motorhome to cool down or warm up before using the player.
Remote does not function:
Battery may be depleted. Replace battery with new.
Battery installed incorrectly. Remove battery and install correctly.
No image on the monitor:
Motorhome may not be in park position. In a safe location safely park and apply the parking brake.
Flashing image or interference on the screen. DVD is not compatible with current TV system settings. Change setup to accommodate disc.
Can not insert CD/DVD:
Disc already in unit. Eject the current disc and insert a new one.
Disc does not play:
48
Disc is dirty or wet. Clean disc with soft cloth.
Disc rating exceed Parental Lock rating limit. Change Parental Lock settings to lower
restriction.
Disc is warped or scratched.
Chapter 8 - Interior Systems
Driving a motorhome is similar to driving a car. You have an ignition switch, gearshift
controls, turn signals, and dash components. As you sit in the driver’s seat the center of
the cluster includes tachometer, speedometer, fuel gauge, oil gauge, temperature gauge,
and amp meter. Switches may have symbols to describe their function. See pages 51 and
52 for more detailed information on the function of each switch. Switch locations may be
different from model to model.
AUTOMOTIVE DASH
The dash radio can be played without turning the ignition key “on” provided that the
battery disconnect is in the “use” position. The cruise controls are on the turn signal lever.
You can set, resume, and disengage the cruise control from this location.
The gear selector is located on the left side of the steering wheel. Some models have
an overdrive switch on the end. Press the button to engage/disengage to overdrive
function. Pull the lever toward you to place into the desired gear. Be sure the service
brake is applied when making this selection. See the Chassis Owner’s Manual for more
information.
GEAR SELECTOR
Below are descriptions of the various controls on your dashboard. Please keep in mind
that these controls may be located in different positions depending on the model of your
particular vehicle.
DASH CONTROLS
HEATED MIRRORS: Use this switch to defrost your mirrors.
WINDSHIELD WIPER/ WASHER LEVER: Your windshield wiper control is also your turn signal
controller. To turn on your windshield wipers, twist the end of the control to desired
position. To activate the washer push onto the washer tab.
REMOTE MIRRORS: This switch allows you to set the viewing angle of your mirrors from
the convenience of the driver’s seat. To adjust the driver’s side mirror, move the lever to
the left. For the passenger’s side, move the lever to the right and adjust as needed.
FOG LIGHTS: Are offered to provide more visibility. Fog lights will function with low
beams.
HEADLIGHTS: Press this button to turn on your headlights. The right button is for just
the parking lights. The left button is for your headlights. The knob will adjust the backlit
lighting for the dash board. (Set this according to your preference.)
SERVICE-LIGHTS: Provide under the hood lighting.
BATTERY BOOST: Permits using the auxiliary battery power to aid in starting the
motorhome engine if the vehicle battery has become discharged. When the ignition
key is turned to the start position and one or more clicking sounds are heard, it may be
necessary to use the auxiliary start system as follows:
Always set the parking brake prior to using the auxiliary start system.
1. Press and hold the AUX START switch located on the dash.
2. Turn the key and start the engine in the normal manner.
3. Release the AUX START switch and operate motorhome in a normal manner.
Do not hold the ignition key in the start position for more than 30 seconds. Be careful not to run down the auxiliary RV battery as this could leave you without any 12 Volt power.
49
Chapter 8 - Interior Systems
STEERING WHEEL
The steering wheel can be moved to allow additional room for entering and exiting the
driver’s seat, as well as for selected driving positions. Operate the tilt mechanism by lifting
the smaller lever on the left side of the steering column just below the directional signal
lever. Move the steering wheel to the desired position and release the lever to secure.
Never attempt to adjust the steering wheel while the vehicle is in motion. Loss of vehicle control could result.
BACK UP MONITOR
The monitor for the back up camera is located in the dash. It will turn on when the gear
selector is placed in reverse, or when you engage its power button. This is integrated into
the dash radio. It will allow you to see behind your vehicle as you back up or park. The
camera is located on the rear cap of the coach.
MEDIA LINK
Located near your back up monitor is the media link center. Use this “quick” connect for
external auxiliary devices such as an IPOD and digital camera. Select AUX1 on the radio
via SRC button. For complete instructions and available connections, see the products
owners manual.
TEMPERATURE
CONTROL
The climate controls in your motorhome are similar to the controls in many cars. You can
adjust the fan speed, cool/warm air mixture, and climate settings, with the turn of a knob.
Your climate control console includes settings for maximum A/C, normal A/C, vent, floor
heat, a mixture of floor and dash heat, and defrost. Setting controls to maximum A/C
circulates and cools interior air. Setting controls to normal A/C conditions outdoor air.
This chassis climate control is not intended to heat or cool the entire motorhome.
PARKING BRAKE
The parking brake is located under that dash to the left of the steering wheel. To set press
down on the foot petal. To release, pull on the parking brake lever.
LEVELING SYSTEM
Be sure the service brakes are engaged whenever applying or releasing the parking brakes.
The leveling jack control pad is located on the drivers left side panel. The parking brake
must be applied and the ignition system must be on before engaging the leveling jacks.
Be sure that the motor coach is on level ground before beginning to level the coach.
Using the control pad, push the ON/OFF switch pad. The system is now operational and
the electronic level lights will become active. Push the AUTO switch pad to begin the
automatic leveling cycle. To retract the jacks in automatic mode, press the RETRACT ALL
JACKS button. The jacks will then start to retract and return to the full retract position.
In automatic mode, the RETRACT ALL JACKS button needs only to be pressed once and released for the jacks to fully retract.
If further adjustment is necessary, please refer to the leveling jack system owners manual
provided with your motorhome.
50
•
Be sure to park the coach on solid, level ground.
•
Clear all jack landing locations of debris and obstructions. Locations should be also
free of depressions.
•
When parking the coach on extremely soft surfaces, utilize load distribution pads
under each jack.
Chapter 8 - Interior Systems
•
People and pets should be clear of the coach while operating leveling system.
•
Be sure to keep hands and other body parts clear of fluid leaks.
Never lift all the wheels off the ground to level the coach. The living room television may operate like the one that is in your home. The controls to
the TV are located on its side. You may need to program the TV prior to use. Please see
the products owners manual provided for complete instructions.
LIVING ROOM
TELEVISION
Your motorhome was provided with a digital converter box for the television. This will
allow you to receive digital stations without being connected to a satellite. For complete
setup instructions see products owners manual for step-by-step instructions. For more
information on digital television contact the Federal Communications Commission at:
1-800-CALL-FCC (1-800-225-5322), TTY: 1-888-TELL-FCC (1-888-835-5322) or by website:
www.dtv.gov. DIGITAL CONVERSION
BOX
To use the drop down bed first remove the bed ladder from the overhead. Locate and
unsnap the safety straps that secure the ladder. Place ladder out of the way until the bed
is in the down position. Return the ladder to its overhead when not in use.
DROP DOWN BED
Make sure the bed ladder is secured by the safety snaps before driving.
To use the bed first pull out the beds’ mechanism pins located on the left and right side
on the mechanism. Unlatch the safety straps. While standing in the center of the bed
frame, pull towards you and down on the bed frame, until bed has reached the lowest
position. To raise the bed to the “up” position, stand in the center of the bed, lift up on the
bed frame until bed reaches “up” position. Insert the locking pins on either side of the bed
on the mechanism and securely latch the safety straps.
The bed mechanism will stop when having made contact with the internal bumpers.
The bed will stay in the “down” position until manually lifted up.
Damon recommends to strip the bed of all bedding and pillows before returning the bed to the “up” position.
The maximum weight rating for the bed is 450 lbs.
Interior doors and drawers have travel latches to keep them closed while you are in transit.
To open drawers lift slightly to clear the catch, then pull open.
DOORS & DRAWERS
When storing articles:
•
Always keep tools and equipment stored in areas where they will not shift while
traveling.
•
Whenever possible, place heavy articles in storage compartments which are low and
near the axles for better weight distribution. Pack articles carefully in the storage
compartments to minimize shifting. If necessary, use straps to prevent movement.
•
Be sure liquid containers are capped and cannot tip or spill. Secure all glass containers
and dishes before traveling.
Additional storage is accessible directly beneath the bed. Simply unlatch and lift the foot
of the bed. The device is equipped with gas struts to assist with opening, holding, and
closing the bed storage lid.
UNDER BED STORAGE
51
Chapter 8 - Interior Systems
EXTENDING SLIDE
ROOM
1. Before operating the system, verify your coach batteries are fully charged.
2. Before extending slide room, verify the following:
•
Turn chassis ignition off. This system will not function with your key on. Level your
motorhome by utilizing the hydraulic leveling jacks.
•
Before extending the slide room, remove the travel locks from the slide room by
rotating and removing, and move the driver’s seat to the furthest forward position,
and place the seat back in the vertical position.
•
Verify that there are no objects (trees, electrical box, people, etc.) in the way of the
slide room before extending it.
3.
After the above steps have been verified, locate the switch for the slide room in the hallway, or bedroom of the motorhome. Turn the key to the ON position. As you press the switch to the OUT position, the room will begin to travel outward. (As a safety feature, if you let up on the switch, the room will stop moving).
4. As this slide room is designed to roll across the carpet, it may be necessary to vacuum the floor after each extension of the room.
5. It may be necessary to re-level your motorhome after the room is extended.
RETRACTING SLIDE
ROOM
1. Before operating the system, verify that your coach batteries are fully charged.
2. Before retracting the room, verify the following:
•
The driver’s seat in a motorhome is in the most forward position, and the seat back is
in the vertical position.
•
No debris is caught between the slide room roof and awning. Verify that any cargo
inside the motorhome during the retraction mode will not restrict the slide room.
3. Turn the key to the ON position. Press the slide room switch to the IN position. (As a safety feature, if you let up on the switch, the room will stop moving).
4. Turn the key to the OFF position. Insert the travel lock into the wall socket, two if provided. (The tension on the travel lock may be tightened by rotating the center portion of the travel lock clockwise, counter clockwise to loosen).
5. Retract leveling jacks before moving the motorhome.
6. Return driver seat to the driver’s preferred position.
Your slideout requires very little maintenance. To ensure the long life of the system, read
and follow these few simple procedures:
DINETTE TABLE
52
•
When the room is out, visually inspect the inner slide tube assemblies. Check for
excess build up of dirt or other foreign material; remove any debris that may be
present.
•
If the system squeaks or makes any noises, it is permissible to apply a think coat of
lightweight oil to the drive shaft and roller areas. Remove any excess oil so that dirt
and debris cannot build up.
Your dinette table folds up for “out of the way” space saving, when not in use. To use the
table, you need to release the latch that is located under the table top. Once the latch
is release, you may unfold the table for use. To return the table to the “space saving”
position reverse the above procedure.
Chapter 8 - Interior Systems
Your bedroom door slides conveniently out of the way beside the wall. Damon provides a
stainless steel pin located at the top of the door, to secure the door while the motorhome
is in motion. Pull out this pin to allow the bedroom door to close.
BEDROOM DOOR &
LATCH
For your comfort we have 13,500 BTU Carrier air conditioner with heat pumps. There is
a remote control for the air conditioners for your convenience. This remote also controls
the furnace. Simply point to the A/C, press heat on the remote and set your degree of
comfort level.
A/C & FURNACE
THERMOSTAT
You have two options when running the water heater; you can run the water heater on
propane or electric. Choose the best option to suit your needs. The hot water heater start
switch is located on the wall in the monitor panel area. The light illuminates when the
switch is turned on. The light goes off when the burner is on and the water is heating. If
the light comes back on, the burner is not yet lit. It may take several tries to light the water
heater burner. When the element is turned on the red light will glow. Be sure the tank is
full of water before using.
WATER HEATER SWITCH
For your convenience, there is plenty of storage above and around the range area for
canned goods, kitchen utensils, etc. Please ensure that the doors are closed and latched
before traveling to prevent the contents from falling out.
KITCHEN CABINETS
Drawers are designed to ensure that they do not open inadvertently during travel. To
open the drawers, pull out until catch releases. Until you get used to the operation of the
drawers, you may think that they are stuck.
KITCHEN DRAWERS
The range cover provides extra counter space and covers the burners when not in use.
When opened, it acts as a grease and splash guard. To raise the range cover, lift and push
back until it snaps into place. To return the cover to its counter flush position, lift straight
up to disengage the holding mechanism, and return it to the original position. The range
has a piezo lighter. To operate, turn the burner valve on, then turn the piezo lighter. At
that point, the pilot light will remain on for the oven until it is manually turned off. The
oven is not self cleaning, and will need routine cleansing. Please do not store anything in
your oven, and do not cook while the vehicle is in motion. For further instructions, please
refer to the Range Instruction Manual in your Owner’s Information Kit.
RANGE
The refrigerator in your motorhome runs on either propane gas or electric power. The REFRIGERATOR
controls are at the top of the unit. If you use the auto mode on your refrigerator, the
refrigerator will operate on 120 Volt power when available, and automatically switch to
propane when shoreline is removed. You can control how cold you want your refrigerator
to be with the thermostat control. Your refrigerator is equipped for large capacities with
plenty of storage shelves and a crisper. The refrigerator requires normal cleaning and
care. Please refer to the Refrigerator Owner’s Manual in your Owner’s Information Kit for
more information.
The microwave operates on 120 Volt power provided by the generator or shoreline. It will
de-program when the power is discontinued and must be reprogrammed when power
is restored. For usage instructions, please refer to the Microwave Owner’s Manual in your
Owner’s Information Kit.
MICROWAVE
The kitchen sink is much like the one in your home. It comes equipped with a sink
cover board which, when in place, increases counter space. Only waste water should be
disposed of down the drain. Never put grease, food, or other obstructions down the drain
because you may plug the holding tank.
KITCHEN SINK
53
Chapter 8 - Interior Systems
54
KITCHEN FAUCET
The faucet in your motor coach is a single lever faucet with sprayer. To use the sprayer,
pull out on the head of the faucet. Press the button on top to release the water. To
reinsert the hose, gently guide it back to the original position. If you are not hooked up to
a pressurized water system at the city water fill, you must turn the water pump switch on.
You can find the water pump switch on the monitor panel .The water pump is a demand
pump, so it will only operate when a faucet is opened to release the pressure.
BATH VENT
There is a power roof vent in the bathroom ceiling for use during shower and hot water
use. By opening the vent and turning the fan on, hot moist air will escape, reducing
condensation in the motorhome. It is extremely important that you use the fans and vent
every time you use the shower or tub to eliminate excess condensation.
SHOWER HEAD &
HOSE
The shower hose has a bracket that keeps the shower head from dropping and
contaminating the fresh water system. It also has a vacuum breaker to prevent the head
from siphoning water back into the fresh water system. The shower operates just like
the shower at your home with two knobs that control the mix and flow of water. You can
adjust the height of the shower head by sliding the shower head up or down the
TOILET
The toilet in your motorhome is a marine type toilet. It can be flushed by depressing the
foot pedal at the front of the toilet. The toilet comes with an attached hand sprayer. You
can use this to rinse out the bowl, as there is not a continuous flow of water, such as in
your home. Make sure that you use only biodegradable toilet paper. Also use plenty
of water to flush to prevent backups or blockages in the system. The toilet should be
cleaned regularly for sanitation and operational efficiency. See the product’s owners
manual for proper cleaning and maintenance procedures.
Chapter 9 - Exterior Systems
When locking and unlocking the main door, there is a dead bolt and a latch bolt which MAIN ENTRANCE
are keyed separately. Unlock both, pull the latch open, and pull out on the door handle. The main entry door is a two piece door. You can use the screen door separately from the
main door by unlatching it. Slide the screen handle cover closed to keep insects out of
your motorhome. If the door needs adjustment, see a Damon dealer for service.
Adjacent to each entry door is an entry assist handle for convenience and safety in
entering and exiting your unit.
ASSIST HANDLE
The electric step is automatic. When the ignition switch is activated, the step will
automatically retract. When the door is opened, the step will extend automatically even
if the engine is running. If the switch for the step is in the OFF position, the step will fail to
operate automatically. If the step malfunctions, check the battery voltage, fuses, switch
alignment, and verify that the step switch is in the ON position.
ELECTRIC STEP
The lower compartment doors have a pocket latch. To open, simply insert your fingers
under the flap and pull up. The door will continue to rise on the gas assisted struts until
fully open. Push down to close the compartment, and the latch will close automatically.
The doors under the slide-out and doors that are mounted below gas fired appliances
with exhaust may have a prop rod so the exhaust does not damage the door. Most models
have pass-through compartments for storing longer items. Always keep the doors locked
when traveling to prevent accidental opening or theft.
COMPARTMENT DOORS
Damon motor coaches have plywood reinforced roofs which are strong enough to walk
on. Use the two piece ladder to climb up on the roof for inspecting the roofing seal and
components. Remember to store and secure the lower section before traveling. Take the
ladder into consideration when backing up or parking your motorhome. REAR LADDER
Your motorhome is equipped with an electric awning. The electronic controls for the
awning are located on a switch panel, that may be near the entry door, or in an overhead
cabinet.
AWNING
The awning is a convenient way to extend your campsite to include a patio within your
location. When using the awning, always set one side lower than the other to allow for
water runoff. For complete instructions on the use of your awning, please refer to the
instructional guide in your Owner’s Information Kit. When used properly, your awning
provides a comfortable atmosphere during your camping excursions.
The manufacturer of the awning recommends the following:
If heavy wind and/or rain conditions exist, retract the awning and place it in the storage position.
55
Chapter 9 - Exterior Systems
120- VOLT OUTLET
Plug in 120 Volt AC devices here. The kitchen, bathroom, and outside receptacles are
protected by a ground fault current interrupter. If the appliance does not operate, check
the circuit breaker located in the 120 Volt breaker box. (See page 42)
POWER CORD
The 120 Volt power cord is stored in one of the rear compartments on the driver’s side of
the motorhome. Plug the shore end into a suitable 30 amp power receptacle to provide
external power to the motorhome and converter/charging system.
GENERATOR
COMPARTMENT
The generator compartment is located in a storage compartment on the side of
the motorhome. You can start/stop the generator from the generator switch on the
monitor panel. Refer to the Generator Owner’s Manual for operating and maintenance
information.
FURNACE DOOR
Damon furnaces have electronic ignition, and there is no need to access this panel except
for service. As with all appliances, service is best left for your dealer. To remove the panel
to check for insect nests, you will need a Square or a Phillips head screwdriver. For further
information, reference the furnace manufacturer’s manual provided with your vehicle.
WATER HEATER DOOR
You can gain access to the water heater control panel to check for insect nests by turning
the tab at the top and allowing the door to hinge down. Due to the electronic ignition,
it is no longer necessary to access this compartment for lighting the pilot. It has an
electronic module board, electronic ignition lighter, and a safety pop-off valve to relieve
the pressure, should it be necessary.
REFRIGERATOR DOOR
The refrigerator is an electronic ignition appliance and there is no need to access this
panel except for service or checking for insect nests. If a problem is encountered, follow
the guidelines for use as outlined in the Refrigerator Owner’s Manual located in the
Owner’s Information Kit. If the problem is not resolved, contact an authorized Damon
dealer.
FUSE BLOCK
The fuse block is located in the battery control center compartment behind the driver
front tire. These fuses control the automotive ignition and dash systems. To check the
fuse, pull straight out and remove from the fuse block. The fuse can then be checked
either visually or with an electrical tester.
TV HOOK-UP AREA
Your motorhome may have an exterior TV hook-up located in a storage compartment.
There is a coax cable located in this area to hook your satellite or TV antenna up to. There
is also an electrical outlet. You may use this as an exterior entertainment center.
FAN-TASTIC® POWER
VENT
Your motorhome came with a Fan-tastic® Power Vent. Select “AUTO” and the dome
lid will lift automatically. Then press and hold arrow buttons to select desired interior
temperature. This vent came installed with a rain sensor. If the vent is open and the rain
sensor detects moisture, the dome closes and turns off the fan blade. When the rain
sensor dries the vent will automatically reopen. For further information and instructions
please see the product owners manual.
56
Chapter 10 - Care and Maintenance
Periodic maintenance and cleaning of your recreational vehicle is necessary to retain the
dependability, safety, and appearance that will provide you with many miles of trouble
free operation, as well as protecting your investment.
GENERAL INFORMATION
Make sure you read and follow all the maintenance tips and schedules that appear not
only in this manual, which for your convenience we have provided for you; (reference
pages 73 - 75), but also in the manuals provided by the chassis manufacturer and various
component manufacturers. Keep good records of maintenance functions performed, and
make sure you perform all owner obligations as may be required to keep your warranty
in force.
It is also important to note that operating conditions will affect service timetables. Driving
in extreme conditions such as heavy dust, continuous short trips, or start and stop heavy
traffic means that service durations will be shortened. Discuss service timetables with
both your dealer and chassis service representative. Preventative maintenance will pay
for itself many times over by catching or preventing problems before they occur. Many
repair costs are greatly increased due to the fact that a small problem can begin to affect
other parts and systems of the motorhome if left unattended.
If a situation arises involving maintenance or cleaning activity for which you are not
sure of the proper procedure, do not hesitate to contact your dealer, or chassis service
representative for information.
The chassis battery is a 12 Volt automotive battery, which provides power for all vehicle
requirements. Have these batteries serviced when servicing other vehicle systems.
BATTERIES
Auxiliary battery (house battery) for motorhomes are a single auxiliary 12 Volt battery to
provide living area power requirements. Have the battery serviced when servicing other
vehicle systems.
When operating properly, the motorhome alternator will be able to handle normal vehicle driving requirements and also recharge the batteries in a reasonable time when
on the road.
•
•
•
Chassis Battery
Every 30 days check battery mounting. Tighten battery cables and clean terminals if
necessary.
Check and recharge as necessary. Keep connections clean and covered with a light
coat of grease.
Check the water level weekly and add distilled water if necessary.
Vehicles left in storage for extended periods of time require further provisions to maintain a proper state of charge of the vehicle batteries.
Parasitic loads (drains) from the radio, clock, powertrain control module, courtesy lights or other
accessories will discharge a battery if the vehicle is not used for an extended period of time.
A discharged battery can actually freeze in temperatures of 32 degrees F (32°F), resulting in
permanent damage to the battery. Batteries may also be permanently damaged if allowed to
stand for long periods of time in a state of discharge.
Auxiliary Battery
To alleviate battery discharge, during periods of storage of two weeks or less, disconnect
the battery by pressing the battery disconnect switch located by the entry steps to
the store mode. For extended periods of time the battery should be disconnected by
removing the negative cable from the battery.
A disconnected battery may also self-discharge, especially in high ambient temperatures, therefore every disconnected battery should be checked periodically and
recharged if necessary.
57
Chapter 10 - Care and Maintenance
WASTE WATER SYSTEM
The drainage system, including the tanks and associated drain piping should be
periodically inspected for loose fittings from vibrations. Any deterioration of the sealant
around joints and fittings should be repaired immediately.
Check the operation of the termination valves. If they pull or close with effort, lubricate the
shaft and slide valve with spray silicone. Termination valves that leak should be repaired
or replaced as soon as possible.
Sometimes, a buildup of paper or other material in the inside groove of the termination
valve can obstruct the valve and cause it to seat improperly. If you suspect that this is
occurring, the valve can be removed from the drainage line by removing the four screws
that hold it in place and sliding it out. The valve groove may then be cleaned out with a
screwdriver or similar tool. Replace the valve in the line and reinstall the screws to secure
it in place.
FRESH WATER SYSTEM
It is recommended that fresh water not be left in the storage tank for long periods of
time. The water should be drained when the unit is being stored or not in use. Drains
are located in a variety of compartments. To drain the tank and lines, simply open the
low point drains and allow water to run out. After water has drained, close the valves
to prevent pests from entering the system. See also “Sanitizing the System” in Chapter
6 - “Plumbing Systems” (page 39) for more information. Check all hoses, fittings, and
connections regularly for leaks and signs of wear. Make sure to keep the system sanitized,
and take care to winterize during cold weather.
ELECTRICAL SYSTEM
The electrical system requires minimal maintenance under normal circumstances. Most
electrical maintenance in the recreational vehicle involves the chassis and auxiliary
batteries. Keeping the batteries properly maintained will help to eliminate many
frustrating electrical problems. For example, 12 Volt power is needed for the furnace,
refrigerator, water heater, and some air conditioner functions.
The generator is another area in which simple preventive maintenance can head off
problems before they happen. Read the manual supplied with the generator in the
Owner’s Information Kit for the care and maintenance required on a regular basis.
If you experience electrical problems with your recreational vehicle, make sure to have it
checked by an authorized Damon dealer or a qualified RV technician.
GENERATOR POWER
SYSTEM
Generator power plant service, recommended by the generator manufacturer, should be
performed at an authorized service center. Routine or emergency service, such as adding
oil, changing filters, or replacing spark plugs, could be accomplished at an auto service
center, but must be done in accordance with the service instructions specified by the
generator manufacturer. Refer to the Generator Owner’s Manual for further information.
PROPANE SYSTEM
The propane system should be checked regularly for leaks and road damage. Follow
the lines, looking for kinks or flattened spots that may have occurred during travel or
maintenance on the recreational vehicle. A qualified propane service technician using
proper equipment should check the entire system annually or whenever you suspect a
problem.
The line pressure for propane appliances should be checked at least every six months.
Most propane suppliers have this equipment to do the test for you.
58
All service procedures should be performed only by a certified propane service technician.
Insects can build nests in the burners of the various appliances and equipment. The
burner and burner orifice of the propane appliances should be cleaned out by an
authorized dealer or repair facility anytime circumstances or conditions warrant, but no
less frequently than on an annual basis.
Chapter 10 - Care and Maintenance
Some components of the recreational vehicle are constructed of strong, lightweight
ABS plastic. Sometimes, it may be necessary to remove stains, or generally clean. A mild
solution of soap and water will clean many stains, and should be used initially. Tougher
stains may require stronger cleaners, but be sure to read the label to determine if the
product is recommended for use on plastics. Avoid abrasive cleansers (even the liquid
and cream types), alcohol based products, and solvents such as acetone and MEK.
Gasoline and kerosene should not be used because of the damaging effect they have
on the plastic surface, as well as the fire hazard they present. Often the damage caused
by solvents, alcohol, and oil based products may not be immediately noticeable, but the
plastic is made weaker, and thus more prone to stress cracking.
ABS PLASTIC PARTS
The front suspension and steering system of this vehicle was factory aligned using
highly accurate equipment prior to delivery to the dealership. However, we recommend
that alignment be checked and if necessary, adjusted after you have fully loaded the
motorhome according to your personal needs. Thereafter, the alignment should be
inspected annually to help prevent uneven tire wear. All alignments and incurred costs
are the responsibility of the retail owner.
ALIGNMENT
Check that the top and bottom bracket screws are tight at the start of each camping AWNING
season.
1. Lubricate the rafter arms and support arms using paraffin wax or silicone spray. Also lubricate the threads on the knobs.
2.
Periodically clean the awning fabric as follows: For a vinyl material use a mixture of 1/4 cup of dish soap and 1/4 cup of bleach mixed with 5 gallons of warm water. Liberally apply this mixture on the top of the fabric, then roll the awning up for 5 minutes. This will apply the mixture to the bottom as well. Roll the awning back out and hose off with fresh water. Repeat if necessary. Allow to dry before rolling back up. Avoid the use of caustic household cleaners, mildew removers or hard bristle brushes. Do not scrub!
For an acrylic material, periodically hose off the fabric with water then let dry completely
before rolling it back up. The acrylic material is water repellent, not water proof. The fabric
is pretreated with a water retardant finish. Mildew cannot form on the fabric, but rather
will form on dirt or dust on the fabric. The key is to keep the fabric clean. Do not scrub!
Whenever the awning is wet while rolled up, as soon as conditions allow, roll it out, hose
it off and let it dry completely before rolling it back up again.
If you get water streaking or seeping behind the awning rail, inspect the rail for loose
screws or peeled sealant. Always make sure the awning is extended high enough before
opening the entry door.
Lower one end of the awning for proper water run off and to avoid water pooling and
possible damage to the awning.
Refer to your awning users guide for complete instructions on the care and maintenance
of your awning.
Failure to lower one side of the awning could result in damage to the awning fabric and/or hardware due to the weight of water pooling.
Refer to your Chassis Operator’s Manual for information on chassis service CHASSIS
recommendations.
Have the engine coolant and engine oil level checked each time when refueling.
59
Chapter 10 - Care and Maintenance
Proper engine servicing and record of servicing may be mandatory to ensure chassis warranty protection. Follow the manufacturer’s instructions on periodic maintenance checks.
DOORS & DOOR LOCKS
Moving parts of the entrance door and lock should be adjusted and lubricated at least
once a year or as needed depending on use. Screws and fasteners should be checked and
tightened periodically. Check weather-stripping seals to assure proper fit and seal. Refer
to the Owner’s Manual from the door manufacturer for more in-depth instructions for
care and maintenance of the entrance door.
EXTERIOR LIGHTS
Make sure to check the operation of all exterior lights often. Check headlights, clearance,
turn signal, brake, and backup lights to make sure they are working correctly. Remember
to check any towed vehicle or trailer lights also. Replace burned out bulbs as soon as
possible.
FIBERGLASS
The care of fiberglass siding is essentially the same as any automotive finish. Take care to
avoid spraying water directly into any vents when washing the motorhome.
It is important to note that any finish will deteriorate with time. Dulling, fading and
yellowing will be increased by exposure to extreme sunlight, air pollutants, and excessive
moisture. Motorhomes located in warmer weather climates are more prone to this type
of premature fading. Surface weathering of fiberglass does not change the strength of
the fiberglass. Regular washing and waxing of exterior surfaces is the best insurance
against surface deterioration. If deterioration has occurred, check with your dealer for the
steps required to restore the finish. Buffing or even painting may be necessary in extreme
cases. Small cracks known as gel coat crazing are a common characteristic of the gel coat
finish (not warrantable defects).
WAX
Wax fiberglass surfaces at least once a year with a standard liquid or nonabrasive paste
wax. Make sure to follow the directions for use as outlined by the product manufacturer.
Make sure to wash and wax your unit out of the hot sun when the exterior surfaces are
cool.
Clean and wax all trim extrusions when waxing the recreational vehicle sidewalls, to
help avoid surface pitting. Special aluminum cleaners are available to restore the original
luster to aluminum surfaces. Make sure to follow the instructions for use as outlined on
the product package.
Storage of the recreational vehicle out of direct sun is also a primary way to help preserve
fiberglass finishes.
Physical damage to fiberglass should be taken care of immediately to avoid moisture from
entering through breaks or cracks, causing problems with interior walls and components.
Cover breaks in the fiberglass with plastic, sealing the edges with tape until the proper
repairs can be made.
DO:
•
Wash your RV with liquid detergents.
•
Wax the sidewalls using nonabrasive automotive waxes or cleaner/polishes developed
for use on fiberglass boats, showers, and tubs. Follow the directions on the package.
DON’T:
60
•
Use abrasive cleaners.
•
Use rubbing compounds.
•
Dry wipe surface; clean only with water and liquid detergent.
Chapter 10 - Care and Maintenance
Proper care and maintenance of vinyl graphics or paint is critical in maintaining its
appearance. The following cleaning and maintenance recommendations should be
followed to ensure the maximum appearance and performance of your vehicle’s custom
designed finish:
GRAPHICS
When washing, flush the surface with water to loosen large particles of dirt and grime.
SIDEWALLS
Fill a bucket with warm water (not to exceed 120 degrees F. (120°F)) and use a mild detergent
or a liquid car wash mixture. Follow manufacturer instructions on the container.
Using a clean soft cloth or sponge and the liquid car wash mixture, wipe the entire surface,
using horizontal motions until it is clean. Rinse off the detergent with clean water starting
from the top and rinse downward until it is clean.
Dry your vehicle with a clean soft cloth or let the vehicle air dry.
When waxing, ALWAYS use an automotive grade nonabrasive wax and cleaner. Use
EXTREME care when waxing your vehicle and ALWAYS rub in horizontal motions.
DO NOT use a pressure washer.
It is strongly recommended that you DO NOT use a rotating brush car wash as it can lift
the ends of your vinyl graphic or scratch your paint finish.
DO NOT use alcohol, strong solvents, bug remover, or tar remover on your painted or
vinyl surface as it may leave a foggy appearance in that area.
Minimize any fuel contact with your paint finish or vinyl graphics. Prolonged contact can
damage the finish.
Power buffers ARE NOT recommended.
Do not use petroleum solvents, harsh abrasives, or citric based cleaners.
Inspect the roof components at least twice a year to make sure that all the seals are
not cracked or worn. Proper maintenance of seals is necessary to keep moisture from
entering and causing severe damage such as rot, mold, or mildew. If you encounter
drying, cracked, or weathered seals, make sure to reseal as necessary. Remove the old
worn seals first before reapplying the new seals. Check with your dealer for the type of
caulking required for thermoplastic polyolefin (TPO) roofs and the correct methods of
resealing. Silicones and synthetic sealers cannot be used on the rubber roofs. Special
sealers are also required for the skylights. Your Damon dealer may perform the periodic
roof seals for you if desired.
ROOF
It is especially important to check the seals before and after periods of extended storage or
non-use. Fall and spring inspections are recommended. Check the membrane for possible
damage and check all accessories and fasteners. The roof may be cut or punctured by
sharp objects so care must be taken when parking and driving. If damage does occur, the
roof may be patched. Check with your dealer for additional information. Parking in areas
where fruits, nuts or tree sap may stay on the roof for extended periods of time may result
in irremovable stains.
For Normal Cleaning:
•
Use a mild laundry detergent.
•
Rinse the complete roof with clean water to remove any loose dirt or debris.
•
Use a medium nylon bristle brush along with your selected cleanser mixed with water
61
Chapter 10 - Care and Maintenance
and scrub the entire roof. Rinse thoroughly with clean water to avoid residue buildup
on the roof or sidewall of the unit.
•
For more difficult stains contact your Damon dealer for the correct heavy duty
cleansers. Do not use general-purpose cleaners containing petroleum solvents, harsh
abrasives, or citric based cleaners.
If your roof should somehow be punctured, cover the puncture to seal out moisture, and
have it repaired as soon as possible (check with your dealer).
The membranes used on the roof may have an extended warranty that is covered by the
membrane manufacturer. This is for manufacturing defects only and does not include
leaks or punctures due to improper sealing, normal wear and tear, or owner damage. See
membrane manufacturer’s warranty for details.
ROOF VENTS
Check roof vents regularly for debris that may block air flow or jam the cranking mechanism. Lubricate the cranking mechanism with light oil.
SEALS & ADHESIVES
It is important to maintain the seals and adhesives of your recreational vehicle to prevent
moisture from entering and destroying the components. When washing your recreational
vehicle, inspect the seals for signs of drying out, cracking and wear. You should inspect
and reseal, if necessary, every six months.
Check seals around doors, windows, vents and external seams. If a seal is cracked or dried
out, it should be replaced to prevent leakage.
Check roof seals every six months to see if they are cracked or peeling.
Check engine covers and firewall every six months to see if they are cracked or peeled.
Be aware that weather, sun, and road vibration will affect seals, causing them to dry,
crack, or separate. If you are unsure what to look for, have your dealer instruct you, and
also show you the correct method for renewing the seals. If you prefer, they will be able
to perform seal maintenance for your convenience.
The exterior of your motorhome is made of pre-finished aluminum and fiberglass. Wash it
frequently with a mild soap and soft rag in lukewarm water. If you travel roads that have
been salted for ice, wash your motorhome as soon as possible. The most common causes
of corrosion are accumulation of road salt, dirt, and moisture in hard to reach areas under
the motorhome. Make sure you wash the undercarriage and wheel wells as well as the
exterior of the motorhome. A good automotive cleaner should be used occasionally to
remove tree sap, road tar, insects and industrial pollution that may damage surfaces. Do
not use naphtha or turpentine. We recommend that you wash your motorhome about
every three weeks.
SLIDEOUT
Your motorhome may be equipped with a slide-out room for added space and comfort.
Proper care and maintenance is required to achieve the maximum performance. Follow
the guidelines listed below for your slide-out.
It may be necessary to lubricate the slide assembly (rollers, slide tubes, lever assembly)
once a month with light oil to prevent rust buildup. This may be required more frequently
due to road spray (salt, sand, dirt, etc.).
If you park your unit for long periods of time, run the room in and out 2–3 times to keep
the moving parts lubricated and the seals moving more freely.
62
Keep the slide room away from tree branches. Visually inspect the room and awning before retracting. Branches rubbing against the room while retracting could cause
damage to the seals.
Chapter 10 - Care and Maintenance
Whenever possible, wipe down the exterior walls before retracting the room to prevent
water from draining onto the carpet.
The rollers under the slide room are not sealed rollers, therefore, some residue may
appear on your carpet. This is a normal function, so be aware and take proper precautions.
Vacuum the carpet after each extension of the slide out room.
Verify that your house batteries are fully charged before operating the room.
In areas where the hot sun constantly beats down on the motorhome, shading the tires
by covering can reduce tire sidewall cracks from forming. Tire covers can be purchased
at any motorhome supply store. Check your Chassis Owner’s Manual for the tire rotation
requirements. Due to the weight of the motorhome you should have a qualified service
center rotate the tires if recommended by your chassis manufacturer.
TIRES
To lubricate the elevating gear, apply a liberal amount of silicone spray lubricant to the
elevating gear with the lift in the down position. Run the lift up and down a few times to
distribute the lubricant over the gears.
TV ANTENNA
If rotating the antenna becomes difficult, lubricating the bearing surface between the
rotating gear housing and the base plate can restore operation. Any spray type silicone
lubricant may be used.
Elevate the antenna and remove the set screw from the rotating gear housing. Spray
lubricant into the hole and around the edges of the gear housing. Rotate the gear housing
until the lubricant coats the bearing surfaces and the antenna rotates freely. Replace set
screw.
Buildup of mud under the body can cause rust, and can add unnecessary weight, which
contributes to the gross weight of the vehicle. This effectively reduces the amount of
cargo you can still carry and remain within your GVWR and GAWR limits.
UNDERBODY
Check the condition of the frame regularly. Keep it clean, and repaint as necessary to help
avoid rust. Corrosive materials such as those used for ice and snow removal accumulate
on the underside of the motorhome. These materials should be removed by flushing
the underbody regularly with water, especially in areas where mud and other foreign
materials collect.
Make sure that all windows remain operative by adjusting and lubricating latches and
moving parts annually. Use powdered graphite or light oil to lubricate moving parts on
windows.
WINDOWS
Vinyl seals around windows should be checked every six months, cleaned regularly
and kept pliable by use of a silicone spray (make sure to follow the directions of the
product).
Keep screens and window slides clean and free of debris to maintain proper operation
and to avoid component damage. Test the operation of all windows occasionally to make
sure they are working properly, making sure that they close flush and that the locks hold
tight.
Check with your dealer if you are unsure about the correct methods of lubrication and
adjustment.
Be aware that moisture can accumulate in locks and hinges of windows and doors, causing damage or faulty operation. Do not force the operation of these components in subfreezing weather.
63
Chapter 10 - Care and Maintenance
HYDRAULIC FLUID
Check fluid levels. If levels are low, take to your dealer to have the motorhome serviced
by a qualified RV technician.
The following instructions are guidelines for the care and maintenance of your motorhome.
Please refer back to the products Owner’s Manual for more information on the care and
maintenance of that product.
APPLIANCES
Be sure to remove all food and ice from the refrigerator at the end of each trip. Prop the
doors open slightly to keep the interior dry and free of mold, mildew, and odors.
Make sure to read all literature provided with each of the appliances and follow the
maintenance instructions included. Pay particular attention to any cautions or warnings
included.
BATH FIXTURES
BATHTUB SEAL
Clean your tub/shower, sinks, and toilets as you would at home. A nonabrasive cleaner
is recommended. When cleaning mirrors or shower doors, a vinegar and water solution
works very well to remove hard water spots and stains.
Inspect every 90 days and reseal as necessary. Use a clear silicone sealant.
BEDSPREAD &
DRAPERIES
We recommend dry cleaning for your bedspread and draperies just as you would for
your draperies and comforters at home. Although this is more expensive, proper care of
material will help ensure a longer life. Care of headboard and bedroom valance fabric
should be done with same instructions given for upholstery fabrics. Laundering and
improper cleaning may result in fabric shrinking, fading or deteriorating prematurely.
Read the label on the bedspread for proper cleaning.
CARPET
Professional cleaning is recommended for major cleaning. Frequent vacuuming is
recommended to remove daily accumulations.
CO DETECTOR
Test the detector operation after vehicle has been in storage, before each trip, and at
least once a week during use. Push the test button until a short beep (about 2 seconds)
is heard. Release the button. The detector then resumes normal operation. In normal
operation, the detector will flash the red LED once every thirty seconds.
HIGH PRESSURE
LAMINATE
COUNTERTOP
High-pressure laminate counter tops are quite easy to keep clean. Waxing is not necessary.
Glass rings, food spills, water spots and smudges usually wipe off with a damp cloth or
sponge. Stubborn stains can be removed with a spray cleaner. Laminated surfaces resist
alcohol, fruit acids, cosmetics and most household chemicals. It is better to avoid contact
with dyes, strong laundry bleaches and bluing solutions. Indelible inks used on food
packages may leave a stain so take care when unpacking groceries on a damp counter
top.
Sharp knives can damage the finish so confine slicing to a good cutting board. The
counter top resists moderate heat and boiling water. Pots and pans straight from the
oven or broiler should be placed on hot pads. Keep irons on an ironing board and lighted
cigarettes in an ashtray. For lasting beauty, avoid using harsh abrasives, scouring powders,
peroxides or bleaches. These can dull surfaces, making the counter top more likely to
accept stains.
64
HARDWARE
Wipe clean as you would for daily cleaning. Use a nonabrasive cleaner to avoid damaging
the finish.
KITCHEN FIXTURES
To clean, wipe with a soft damp cloth. Warm water will remove dry water spots. Do not
use cleansers which contain abrasive or harsh chemicals. Never use alcohol or other
organic solvents.
Chapter 10 - Care and Maintenance
Keep your blinds looking new by wiping with a soft cloth. Vacuum shades regularly. Use
a mild detergent to spot clean if necessary. Close the blinds and shades all the way to
properly clean inside and out.
MINI BLINDS & ROMAN
SHADES
Clean with hot soapy water or a good liquid cleaner. Avoid using abrasive cleaners. Never
use steel wool on stainless steel, since the steel particles left in the sink can rust and
become unsightly. Also, when cleaning stainless steel with a mild cleanser, rub gently
with the grain, and rinse well. Rinse after each use and wipe dry.
SINKS
Preserve the luster by cleaning with a damp cloth and any household detergent SOLID SURFACE
designed for that purpose. To remove most stains, hard water deposits, cigarette burns COUNTERTOP
and minor scratches use an abrasive cleanser or an abrasive pad such as 3M Scotch
Brite brand green “Kitchen Scrub” pads. To remove deep stains and scratches use fine
sandpaper (120 - 220 grit), then sand using (in the following order) 320, 400, and 600 grit
sandpaper to restore the standard finish. A satin sheen or high polish can be obtained
with polishing compounds.
Certain chemical substances can seriously mar surfaces even during brief periods
of contact. If spilling occurs, wipe area off immediately, and then rinse with water. Potentially harmful compositions include: Toilet bowl cleaners, rust removers, contact
adhesive solvent, ceramic cook top cleaners, paint or varnish removers, drain cleaners,
metal cleaners, tile cleaners, lacquer thinners, or oven cleaners. Contact the manufacturer
should you need further assistance.
Your RV is a small living area so soiling may occur more frequently and items will need
more attention than your furniture at home. Please follow these guidelines for cleaning
your upholstered fabrics:
•
Do not use water based cleaners.
•
If a spill does occur, blot up the spot, but do not rub it in. Some solvents are not
recommended since they may have an adverse reaction on specific backings of your
upholstery fabric. •
To prevent overall soiling, vacuuming or light brushing to remove dust and grime is
recommended.
•
Spot clean, using a mild water-free solvent or dry cleaning product.
•
Clean only in a well-ventilated area and avoid any product containing carbon tetrachloride or other toxic materials.
•
Pretest a small area before proceeding.
•
Use a professional furniture cleaning service for an overall cleaning.
Your upholstery fabrics have been manufactured with the same quality you would
expect to find in a furniture store. However, they are not completely resistant to possible
damage. Special care is needed when your motorhome is exposed to very humid, or very
hot climates or if it is closed up for an extended period of time. If you know you are going
to be away, cover upholstery and make sure window coverings are closed to protect
upholstery from any sun damage.
UPHOLSTERY &
FABRICS
Your decorative wall coverings are not much different from wallpaper that you may
have in your home. They should be cleaned with mild soap and water. They can easily be
maintained with proper care.
WALL COVERINGS
65
Chapter 10 - Care and Maintenance
66
WINDOWS
Any glass will develop water spots if glass is not cleaned properly. This spotting effect is
magnified when glass has a reflective finish. Use a squeegee immediately after washing
to reduce water spotting. To remove stubborn water stains from reflective glass, there are
several aftermarket specialty glass cleaners. The inside window track must be kept free of
debris to keep the drain holes clear.
WOOD CABINETRY
These products should be cared for as you would any fine piece of wood furniture. Apply
a furniture polish when you clean to maintain the natural beauty and luster of wood. This
will keep your cabinets looking new and keep wood from drying out. Murphy’s Oil Soap
is a good choice for wood cabinets.
Chapter 11 - Winter Use and Storage
Many people choose to use their motorhomes throughout the entire year. Extensive
usage is not recommended in severe cold weather. However, winter traveling can be
safe for you and your motorhome if you follow the precautions outlined in this chapter.
For those who choose to use their motorhomes only during the warmer months, winter
storage is necessary. This section will guide you through the proper steps to winterize
your motorhome, which is critical to maintain maximum durability over the life of your
vehicle.
TIPS FOR WINTER USE
The fresh water storage tank is located inside a lower storage compartment. The furnace
will heat the fresh and waste water compartments. In severe cold however, it is wise
to monitor the water temperature in the tank, and take appropriate steps to drain and
winterize if necessary. In severe cold weather, it may also be necessary to open the lower
cabinet doors at night in both the bath and kitchen areas to keep warmer air circulating
around the water fixtures.
WATER SYSTEM
If you are going to leave the coach unheated for any length of time in severe cold
conditions, it is best not to keep water in the fresh water system. It may work best to carry
cooking and drinking water with you in plastic jugs instead.
If you will be using your motorhome when conditions fall below the freezing level, it
may be necessary to protect the drainage system components from damage by the
addition of an approved antifreeze solution as outlined on the product directions. Any
drain lines exposed to external air temperatures are especially susceptible to freezing
and precautions should be taken to protect them from damage.
In the event that the motorhome is left for a period of time without the furnace in FOOD STORAGE
operation, canned goods and other foods packed in water should be stored as high
as possible, since heat rises. They might also be stored in the refrigerator as insulation
against the cold. Store dry foods, and other items that are not damaged by freezing
temperatures in the lower storage areas.
Make sure to use an propane that will vaporize properly in the colder temperatures. Check
with your propane representative for the proper fuel.
PROPANE SYSTEM
Use only the furnace to heat the recreational vehicle. It is properly vented to the HEATING
outside.
Never use the range for heating as carbon monoxide may build up inside the unit and asphyxiation could result.
Cooking produces large amounts of moisture, not just as steam from pots and pans, but
also as a product of combustion. Make sure to use the exhaust vents and open a window
slightly to control the humidity. At night, leave a roof vent and/or a window slightly
open.
CONDENSATION
When a motorhome is exposes to freezing temperatures, it could be severely damaged
by ice expansion. This is especially true of the water heaters, washer/dryer, ice maker,
holding tanks, and faucets, which are at risk for damage if not properly drained during
the winter. All water must be drained from the motorhome. The procedure to do so is as
follows:
WINTERIZATION
PROCEDURE
•
Drain the fresh water tank by opening the low point drain valve. Let the water drain
out until the tank is empty.
•
Drain both the black (waste) water tank and the gray (sink) water tanks and flush out
completely. (See complete instructions located in Chapter 6 - “Plumbing Systems”).
Drain the black tank first and allow the gray water tank to rinse out the flexible hose
drain line. You may now add a commercial holding tank chemical cleaner. Driving the
67
Chapter 11 - Winter Use and Storage
unit around for a few miles will allow the cleanser to circulate within the tanks and
drains. Drain and flush once more with fresh water.
•
Water Heater Drain Plug
After all the tanks have been drained, make sure that any water remaining in the
lines is either blown out, or replaced with a nontoxic RV antifreeze solution which will
prevent any water that remains from freezing. To blow out the water lines, proceed
as follows:
•
Open all faucets including the toilet flushing device and the shower head sprayer. Open any other water lines that are closed. You will need access to an air compressor along with an adapter that will connect the air to your unit. These adapters can be purchased at an RV supply store. Do not exceed 55 psi when hooked up to the water lines to avoid damage. If your vehicle is equipped with a water filter, remove and drain it before proceeding. Replace it with a diverter tube, which will come with the unit. This will create a bypass in the water line so that the antifreeze will not go into the filter assembly.
•
Turn on the water pump and allow it to run to clear all water from lines. Turn off the water pump.
•
Open all low point and water tank drains.
•
Open the water heater cover and remove the water heater drain plug located on the lower front side of the water heater (see photo).
•
Hook an air hose to the city water connection located in the termination compartment. Blow out the water lines (do not exceed 55 P.S.I.) until no more water can be seen coming out of the lines. Pause for several seconds and repeat until clear.
•
Put nontoxic RV antifreeze in the drains, p-traps, and water tanks.
•
If you do not have access to an air compressor, you may use the “wet” method of
winterization:
•
•
Pour 4-6 gallons of RV antifreeze into the fresh water tank and let the water pump circulate the mixture. Do not dilute.
68
After you have completely drained all the tanks, water heater and lines by opening the low point drains and switching the water heater bypass valves to the bypass position (if equipped-see page 69), close the low point, water tank and the water heater drains.
• Open the furthest faucet or water valve from the pump and work your way through the entire system. Turn on one (hot and cold) at a time until the antifreeze solution is observed, then close the valve. Allow at least 2 cups to pass through for complete protection. Make sure to include all water lines such as showers and tubs, toilet, washing machines, dishwashers, ice makers and outside shower faucets. The antifreeze should be left in the sink, washer and shower p-traps and toilets during storage to protect those lines. Open all faucets one half way to relieve pressure on the valve seats during storage. Wipe all fixtures clean to prevent staining.
Antifreeze must be nontoxic in nature and must be flushed from the fresh water system before human use. Automotive antifreeze is poisonous and SHOULD NOT be used in drinking water systems.
Chapter 11 - Winter Use and Storage
Draining the tanks and water lines in your motorhome is half the battle of winterization.
Complete the Storage and Winterization Checklist (page 70) to ensure protection of
your motorhome. An authorized Damon service dealer can help you in the winterization
process for your convenience.
A water heater bypass valve system is located inside your motorhome usually behind
the water heater. When the system is closed, water is shut off to the water heater. This
will eliminate circulating an additional six to ten gallons of antifreeze through the water
heater system when winterizing the system. Be sure to remove the drain plug from the
outside of the water heater to drain the water heater tank.
WATER HEATER
BYPASS
When storing your motorhome for the winter (or other extreme conditions), certain precautions need to be made to protect it until you open it up again for use. Make sure
to talk with your local dealer concerning any special requirements for storage in your
particular geographic area. The following steps are general, and your dealer can help you
choose those that are most appropriate for your needs.
Water Heater Drain Plug
69
Chapter 11 - Winter Use and Storage
WINTERIZATION
CHECKLIST
Chassis – Run engine for 30 minutes once a month if possible. Prepare as outlined in the
Chassis Owner’s Manual.
Generator – Prepare as outlined in the Generator Owner’s Manual.
Plumbing Lines – Drain and protect by filling with approved RV antifreeze. (See pages 67 - 69)
Water Heater – Drain. (Pages 67 - 69)
Toilet – Drain. Hold pedal down and pour RV antifreeze into bowl.
Fresh Water Tank – Drain, pour RV antifreeze solution and run through the fresh water
system, or use the dry method. (pages 67 - 69)
Water Filter – Remove and discard the filter. Install diverter tube in place of filter
assembly.
Body – Clean and wax. Oil locks and hinges. Seal roof trim as needed.
Tires – Block up motorhome with wooden blocks or manufactured jack-stands on a hard
level surface to relieve the constant pressure on one area of the tires. Partially deflate the
tires. Cover to protect against sunlight with burlap, plywood or specially designed tire
covers which are available at RV dealerships.
Countertops and Cabinets – Wash with mild soap and water.
Curtains and Blinds – Close all the drapes and curtains, and protect the curtains from sun
fading by placing foil or paper between the windows and the curtains/blinds.
Windows – Close and lock. Inspect and reseal if necessary.
Holding Tanks – Drain and rinse. Close valves. Add a small amount of RV antifreeze to
keep valves and gaskets lubricated.
Drain Traps – Pour a cup of RV antifreeze down all drains. Wipe all fixtures clean.
Refrigerator – Clean. Leave both doors propped open. Cover exterior panels and roof
vents. Leave an opened box of baking soda inside the refrigerator to prevent any musty
odors from accumulating.
Ice Maker – Refer to your refrigerator owner’s manual for proper winterization
procedures.
Air Conditioner – Remove air filters and clean or replace. Cover shroud.
Roof – Must be kept clear of significant snow accumulation or damage may occur. Inspect
and reseal if necessary.
Vents – Check all furnace, refrigerator, range hood, A/C, etc. vents and close securely.
Cover or tape up to prevent mice or insects from building nests that can disturb the air
flow and keep the appliances from functioning properly.
Sinks and Showers – Clean and then pour one cup of nontoxic RV antifreeze into the
drains to prevent freezing. Wipe all fixtures clean.
Batteries – Add distilled water and recharge if necessary. If possible, remove batteries and
store them in a cool dry place (approximately 50 – 60° F). Check them periodically and
recharge as needed. Be sure that both the chassis and auxiliary (house) batteries have
70
Chapter 11 - Winter Use and Storage
the proper electrolyte level and that they are fully charged. A discharged battery will
freeze and may crack the case, causing severe damage to the battery and surrounding
area. In storage, a battery will lose charge gradually over a 30 to 45 day period, even
when disconnected by the use of the Battery Disconnect Switch. We recommend that the
batteries be checked for charge at least monthly. You may wish to remove the batteries
from the motorhome and store them in a heated area. However, even when warm, the
battery charge level must still be maintained. A warm battery accepts charge much more
readily than a cold one.
Keep the battery vent caps in place during storage and prohibit smoking, welding, and other work involving the use of flames in the area.
Fuel – Store with the tank full to prevent condensation buildup.
Dash Air Conditioner – Run for a short period of time to assure the compressor seal is
lubricated.
Interior – Check the interior of the motorhome monthly while in storage to make sure leaks
have not developed, or condensation has not formed that can cause damage to interior
components. Condensation can most readily be observed as moisture accumulation
on windows and mirrors. To reduce condensation, make sure to air out the motorhome
occasionally during storage.
71
Chapter 11 - Winter Use and Storage
72
PRIOR TO
STORAGE
AS REQUIRED
EVERY YEAR
EVERY 6
MONTHS
EVERY 3
MONTHS
EVERY
MONTH
EVERY TRIP
Maintenance Schedule
PROCEDURE TO BE PREFORMED: Maintenance
x
x
Inspect & reseal roof & exterior attachment areas.
ITEM
Roof & Components
x
x
Clean roof.
x
Fiberglass Exterior
x
x
Wax w/ liquid or nonabrasive wax.
x
Seals & Adhesives
Check vinyl seals when washing exterior.
x
Check seals for damage & repair as needed.
x
Lubricate door hinges & step components w/spray grease.
x
Adjust & lube w/ graphite or light oil.
x
Lubricate door locks & strike pockets, exterior components.
x
Inspect and reseal if necessary.
Propane System
x
x
x
Water System
x
Check hoses, fittings & connections for leaks.
Check drainage system for leaks.
x
x
x
x
Safety Equipment
Carpet
Check for leaks and damage.
Check line pressure; should be checked by technician.
x
Electrical System
Lubricate roof vent mechanism w/ light oil. Clean as
needed.
Wash w/ warm water & mild detergent.
x
Windows & Doors
schedules are minimum requirements. Heavy use, unusual
temperatures or humidity, or other extreme conditions may
require more frequent maintenance.
Sanitize & flush system.
Winterize system if necessary.
x
Check GFCI circuits.
x
Perform maintenance procedures per generator manual.
x
Check & service batteries.
x
Add distilled water to batteries if necessary.
x
Test propane, smoke, CO detectors.
x
Test & check fire extinguisher.
x
Vacuum after every trip.
x
Shampoo as needed.
Front Wheel Alignment
x
Inspect and align as needed.
Seats
x
Lubricate mechanisms & inspect for proper operation.
x
Check all seat belt buckles, webbing & releases.
x
Per chassis manufacturer manual.
Chassis & Components
x
Power Step
Weight & Distribution
x
Appliances
Clean & lubricate with spray lithium grease.
x
Fabrics & Upholstery
Tires
Check fluid levels including: oil, brake, washer, engine
coolant, transmission, battery water, etc.
Check for proper weight distribution per specifications.
x
Clean per manufacturer’s specifications.
x
Inspect for wear & proper inflation.
x
Check all wheel lug nuts and tighten per chassis
specifications
x
As required by appliance manufacturer.
73
Travel Preparation Checklist
CLOTHING
SLEEPING GEAR
MISCELLANEOUS
Dresses
Blankets
Alarm Clock
Gloves
Pillows, Pillow Cases
Batteries
Hat or Cap
Sheets
Bucket
Jackets, Coats
Sleeping Bags
Clothes Hangers
Jeans, Dress Pants
Clothes Line, Clothes Pins
Pajamas
Electronics Chargers
Shirts, Blouses
PERSONAL COMFORT
Fresh Water Hose
Shoes, Sandals
Anti-Bacterial Wet Wipes
Fuses
Shorts
Ash Tray
Ground Extension Wire
Socks
Personal Medications
Umbrella
Sweaters
Personal Toiletries
Wheel Chocks
Swimsuits
Sewing Kit, Scissors
Y-Type Water Hose Fitting
Undergarments
Soap
Sunscreen
Toilet Paper
CAMPFIRE COMFORT
Toothbrush, Toothpaste
Bug Repellent
TOOL CHEST
Towels, Wash Cloths
Bug Zapper
Electrical Tape
Charcoal
Step Ladder
Enclosed Screen Tent
Furnace Duct Tape
Firewood
Hatchet
MEAL PREPARATION
Grill
Masking Tape
Baking Pans
Matches
Saw
Bottle Opener, Can Opener
Picnic Table Cloth w/ Clips
Shovel, Rake
Coffee Maker
Yard Chairs
Small Level
Foil, Plastic Wrap
Tire Pressure Gauge
Glasses, Cups
Various Tools
Plastic Containers
PET COMFORT
Plates, Bowls
Food & Water Dish
Portable Grill
Leash
Pots, Pans, Skillets
Litter
HOUSEKEEPING
Salt & Pepper
Litter Box
Dish Cloths, Dish Towels
Seasonings, Spices
Pet Food
Dish washing Soap
Silverware, Spatulas, etc.
Portable Cages
Disposable Gloves
Toaster
Scoop w/ bags
Garbage/ Trash Bag
Screw Stake for tie out
Mop, Broom, Dust Pan
Tick Repellent
Paper Towels
ENTERTAINMENT
Tie Out Cable
Surface Cleaner, De-greaser
Binoculars
Toys
Throw Rug
Books, Magazines
Trash Cans
Camcorder
Vacuum Cleaner
Camera, Film, Memory Card
OTHER
Movies
______________________________
Music/Cd’s
______________________________
Toys, Games, Playing Cards
______________________________
SAFETY
VHS Player, DVD Player
______________________________
Compass
Yard Games
______________________________
First-Aid Kit
______________________________
Flares
______________________________
Flashlights
______________________________
Reflectors
______________________________
74
Maintenance Schedule
Date
Service Preformed
Mileage
Date
Service Preformed
Mileage
75
Maintenance Schedule
Date
76
Service Preformed
Mileage
Date
Service Preformed
Mileage
Fuel / Oil Record
Date
Mileage
Fuel
Oil
(Gallon) (Quarts)
MPG
Date
Mileage
Fuel
Oil
(Gallon) (Quarts)
MPG
77
Fuel / Oil Record
Date
78
Mileage
Fuel
Oil
(Gallon) (Quarts)
MPG
Date
Mileage
Fuel
Oil
(Gallon) (Quarts)
MPG
Notes
79
Notes
80
Troubleshooting
Checking the fuses.
•
The Battery Control Center is built in two layers, the printed circuit board and the
relays. The box has been designed so that nearly all troubleshooting can be done
without the removal of the printed circuit board. Have a Damon dealer remove the
circuit board if necessary.
•
Check fuses visually or with an electrical tester.
•
Check for power on both sides of the fuse.
•
Replace the fuse with a new one of the same ampere.
BATTERY CONTROL
CENTER
Battery boiling.
•
Water low in battery. Refill water to correct level in battery, using distilled water.
•
Bad battery. Replace the battery with new.
•
Defective converter. Have converter checked by a qualified RV technician.
Continuous use of converter can cause evaporation of electrolyte in battery.
No AC power to unit.
•
Check circuit breakers at power center. The 120 Volt circuit breaker may be off or
tripped.
•
Have a dealer check that there is power to the shoreline receptacle.
Electric step does not operate.
•
Verify that step switch is in OFF position.
•
Check battery voltage. Recharge or replace as needed.
•
Check door switch alignment. Realign or repair if necessary.
•
Check 25 Amp fuse in the battery control center.
•
Check step frame for damage or misalignment. Replace if necessary.
•
Lubricate step assembly with a lithium spray grease if necessary.
ELECTRICAL POWER
ELECTRICAL STEP
Step operates intermittently.
•
•
Check door switch alignment. Realign if necessary.
Check step frame for damage or insufficient lubrication. Replace or lubricate if
necessary.
Furnace does not ignite and/or cycles frequently.
•
Check that propane tank is full.
•
Remove any obstruction over furnace exhaust.
•
Inspect exhaust tube for any obstructions.
•
Check fuse in fuse panel and replace if necessary.
•
Make sure that return air grill is unobstructed.
•
Remove anything that is stored in furnace compartment that could block air flow.
•
Check that heat outlet registers are open and that register openings are
unobstructed.
•
Contact a Damon dealer if the problem persists.
•
Make sure that 12 Volt power is present.
•
Point the remote at the air conditioner to ignite the furnace.
FURNACE
81
Troubleshooting
•
Furnace does not light and fan does not run.
•
Replace fuse with one of the same ampere rating.
GENERATOR
Turn thermostat and furnace gas control valve off and contact
your dealer or an authorized service center. DO NOT attempt to repair or adjust the furnace yourself.
Starter engages while holding the start button down, but generator does
not start.
•
Generator may be out of fuel. Check the chassis fuel level. (Generator will not operate
when the chassis fuel tank is less than 1/4 full).
•
Generator may be low on oil. Check the oil level.
Nothing happens when the generator start button is pushed.
•
Check that the battery disconnect switch is in the USE position.
•
Check 12 Volt fuse on generator.
•
Reset circuit breaker if necessary.
•
Contact a Damon dealer or qualified RV technician if problem is not resolved.
Generator starts, but lacks electrical power.
•
Breaker switches may be off or tripped at generator. Reset breaker if necessary.
•
Breaker may be off or tripped inside power center. Reset main breaker If necessary.
Generator makes clicking sound when trying to start.
INTERIOR LIGHTS
•
Battery condition may be low. Recharge if necessary.
•
Check for poor ground or battery connection.
Lights flicker.
•
Loose or defective bulb. Tighten or replace as needed.
•
Converter is overheating. Open the cover to cool down and reduce the load by turning off some 12 Volt lights.
Lights dim or are half bright.
LEVELING JACKS
•
Low battery condition. Check battery condition and recharge if necessary.
•
Possible converter malfunction. Have converter checked by an authorized service
center.
•
Possible loss of ground. Check for loose wire connection.
Jack retracts after coach is level.
•
Check tank reservoir for the proper fluid levels.
•
Hose or jack may have an external leak.
•
Fluid is leaking back to reservoir through the control valve.
Jacks will not retract completely.
82
•
Jack may be clogged with ice or mud.
•
Main rod is bent or scored. Have replaced or repaired if necessary.
•
Valve plunger is not completely depressed by the valve handle.
•
Spring is weak or broken.
•
Hydraulic line is pinched.
Troubleshooting
Ignition switch is on, but no power to pump and/or control panel.
•
Parking brake is not set.
•
12 Volt from power source is not available. Check the in-line fuse under the dash by
the O.E.M. fuse panel.
•
Faulty wire or electrical connection. Have checked by a qualified service technician.
Pump will not activate.
•
Grounding switch on valve is not working.
•
Pump relay not functioning.
•
Pump not grounded.
Hydraulic pump activates without use of control valve pad.
•
Grounding switch at valve may have shorted.
•
Pump relay may be stuck.
•
Relay control wire shorted to ground.
•
Oil supply is low in reservoir.
•
Store levers not in the operate position.
•
Pump is not developing pressure.
•
Broken hydraulic line.
Yellow leveling lights are not functioning properly.
•
Yellow lights will not go out when vehicle is level. Adjust the sensing unit located
under the main body floor in a center storage compartment. See your manufacturers
manual.
Red warning lights are not functioning properly.
•
Lights will not come on: check for broken wire at warning switch on the jack.
•
Lights will not go out: faulty warning switch or wires are shorted to the ground.
Smell gas in or around unit.
•
Propane tanks may be overfilled.
PROPANE GAS
Working with propane can be dangerous.
Follow these instructions:
•
Extinguish any open flames, pilot lights and all smoking material.
•
Do not touch electrical switches.
•
Shut off gas supply at the tank valve or gas supply connection.
•
Open doors and other non-powered venting openings.
•
Leave the area until odors clear.
•
Have the gas system checked immediately and leakage source corrected by a Damon
dealer or qualified service center before using again.
Will not operate.
MICROWAVE
No lights on panel when switch is pressed.
MONITOR PANEL
•
•
Door open or timer OFF. Close door and turn timer ON.
No power to oven. Check power supply and circuit breaker.
•
Check battery voltage and condition.
•
Check fuse in the Battery Control Center labeled BD RELAY; if fuse is good have a
Damon dealer or a qualified RV technician check the condition of panel.
83
Troubleshooting
Holding tank lights deliver false readings (i.e., 1/3 or 2/3 indication).
•
Verify tank is empty.
•
Debris may be built up across probes. Clean and flush tank using four parts vinegar
mixed to two parts water.
Propane indicator display indicates E or F all the time.
OUTSIDE RECEPTACLE
OVEN
•
Ensure propane gas tank is full.
•
If display is F, check the wiring or sending unit for malfunction.
•
Have it inspected by a certified technician.
No power to outside receptacle.
•
Make sure you have power to the shoreline.
•
Check breaker on generator.
•
GFCI receptacle switch may be off or tripped. Reset GFCI at receptacle in bathroom
or kitchen.
•
Check the breaker in the power center or panel box.
•
Contact a Damon dealer or a qualified RV technician if problem is not resolved.
Oven slow to heat up.
Poor baking.
Poor ignition of burners.
Pilots won’t stay lit.
Popping sound from top burners.
Carbon on pilot shield.
Burner flame too low or too high.
•
A defective gas pressure regulator may cause these conditions. Have the regulator
tested by your gas dealer or a certified RV technician.
Top burner or oven burner won’t light or won’t stay lit.
•
Check position of top burners and flash tubing.
•
Clean clogged burner ports with a toothpick.
•
See Oven Owner’s Manual for proper care and maintenance.
Gas smell.
•
Check all connections with leak detector solution.
Never Use a match or flame to check for leaks.
All propane connections should be checked periodically as vibrations from travel may cause them to loosen.
Food burns on the bottom.
•
POWER INVERTER
REFRIGERATOR
84
Oven too full for proper circulation. Use smaller pans or put less food in the oven.
Inverter does not work.
•
Be sure the batteries are properly charged. If the batteries are low, they will trip the
breakers on the inverter or force the inverter into low voltage drop out.
•
Reset the breakers on the inverter or reset inverter control.
The control panel lights are not illuminated.
•
Check coach circuit breakers and GFCI receptacle.
•
Verify that refrigerator is plugged into the 120 Volt outlet.
•
If using propane gas, verify house batteries have adequate charge.
Troubleshooting
Lights are illuminating, but no cooling.
•
Use a proper power source that is available and cooling operation to specification.
•
Make sure the refrigerator unit is level.
•
Allow sufficient time for proper cool down and try to load with precooled food.
•
Have a qualified RV technician check that the vents and chimney at the rear of the
refrigerator are clear and unobstructed.
•
Have a qualified RV technician make sure the burner jets or burners are not dirty or
damaged.
•
Have a qualified RV technician check the fuses in the black electrical box on the rear
of the refrigerator.
Extinguish all flames. Never use a match or flame to check for leaks.
Heavy frost build up on evaporator fins.
•
Defrost the freezer and refrigerator.
•
Have the refrigerator checked by your Damon dealer or a qualified RV technician.
Will not operate.
•
Make sure unit is turned on.
•
Check circuit breakers in coach.
•
Have a Damon dealer check to see if there is proper voltage from shoreline or generator.
ROOF AIR CONDITIONER
Unit runs, but coil freezes and compressor cycles too soon.
•
Control setting may be too low, cycles too soon.
•
Make sure the filter is clean and unobstructed.
•
Have the coolant level checked by a qualified service facility.
Does not get cold enough.
•
Start unit before the day gets too hot.
•
To offset heat gain:
•
Close all windows and blinds.
•
Keep entrance doors closed.
•
Use awnings
•
Avoid using heat-producing appliances.
•
Make sure the outside coil is not blocked or damaged.
•
Have a Damon dealer check to make sure you have the proper voltage.
•
Should your A/C still not work after the above checks have been made, contact a
qualified service facility to perform more extensive testing.
Working with electrical appliances can be extremely dangerous.
Running lights not working.
•
Blown fuse. Replace fuse with one of the same ampere rating.
•
Bad bulbs. Replace the bulbs with new.
RUNNING LIGHTS
85
Troubleshooting
SATELLITE DISH
Dish does not rotate or is hard to rotate.
•
Check antenna on roof, make sure that the mount has not been damaged.
•
Check for caulking between gear housing and base plate.
•
Be sure cables are not binding.
Dish does not raise or is hard to rise.
•
Check antenna on roof, make sure that the mount has not been damaged.
•
Check for caulking on elevating shaft.
Poor Reception.
SLIDEOUT
•
Have you entered your correct current location zip code?
•
Do you have the TV tuned to channel 3 or 4? (Same channel as the output of the
receiver)
•
Be sure there are no trees, buildings, mountains, etc. in the line of sight to the
satellite.
•
Check connections at the receiver, TV and antenna.
•
Fine tune reception by slowly moving the antenna left, then right until you find
the position that gives the highest signal strength. It is important that you turn the
antenna slowly. The signal is digital and it takes a few seconds to lock on.
Room moves in and out very slowly, binds or squeaks.
•
Grease the slide-out tubes and rollers.
Grease marks appear on the carpet where the rollers are located.
•
The rollers are not a true sealed roller, so this may happen over time. Take precautions
when lubricating.
Water is getting in at the bottom corners of the room.
•
Verify the exterior seals are against the room at the top corners and not turned in
when room is out. Also, check for voids in the seal on the roof.
Room will not move in or out.
•
Ensure ignition switch is in the OFF position.
•
Check the auto-resetting fuse located by the slide out motor. (See the manufacturers
manual)
•
Check battery condition and state of charge. Recharge if necessary.
Rollers leave tracks in the carpet as the room extends.
•
TERMINATION VALVE
TV ANTENNA
86
This is normal. There are many pounds of weight pressing these rollers down on
the carpet and rollers will compress the nap of the carpet down. Raking the nap or
vacuuming will solve the problem.
Termination valve leaks.
•
Debris keeps valve from seating. Clear debris from and around valve O-ring set.
•
Bad gasket. Have a Damon dealer or a qualified RV technician replace gasket with
new.
Poor TV reception.
•
Power jack is not turned on. Turn power jack switch to ON.
•
Bad connections at TV or wall plate. Make sure the connections are good at both TV and wall plate.
•
Antenna not pointed in direction of sending station. Point antenna in proper
direction.
Troubleshooting
•
Cut or torn cable. Have a Damon dealer or a qualified RV technician replace bad cable
where needed at TV and antenna.
Elevation handle turns, but antenna does not raise or lower.
•
Handle may be loose. Tighten screws.
•
Gears may be stripped. Have a Damon dealer or a qualified RV technician replace the
gears.
Antenna will not rotate.
•
The rotate handle is engaged to the ceiling plate. Pull down on handle to disengage
from the ceiling plate.
•
Possible obstruction (tree branch, etc.). Remove obstruction.
•
Friction adjustment. Adjust center lock nut.
•
Design of antenna limits rotation to 350°. Adjust as necessary.
Waste tank (black) will not drain.
•
Buildup or debris in tank. Check for buildup in tank at stool.
•
Always use a minimum amount of biodegradable toilet paper.
•
Always use plenty of water when flushing.
•
Check termination valve for proper operation.
Temperature-pressure relief valve weeping.
•
Weeping or dripping of relief valve while water heater is running does NOT mean it is faulty.
WASTE TANK
WATER HEATER
There is an odor that smells like rotten eggs.
•
If your fresh water source has a rotten egg odor, you will need to find another source
of fresh water before flushing and refilling the entire RV water storage system. To
remove the hydrogen sulfide (rotten egg) odor:
•
Turn off your main water supply; that is your pump or your water hookup source.
•
Drain your water heater tank by removing the drain plug. Approximately two quarts
of water will remain in the bottom of the tank. If you notice during the draining that
the water is flowing sporadically or slowly, instead of flowing freely, you should open
your relief valve to allow air into the tank.
•
If the water does not flow freely, take a small gauge wire or coat hanger and push
through the drain opening to eliminate any obstructions.
•
After thoroughly draining the tank, flush the entire system from the water inlet all the
way to the holding tank. To flush, use four parts of vinegar mixed with two parts of
water. If you decide to use air pressure ( 55 PSI max.), it may be applied either through
the inlet or outlet on the rear of the tank. It may also be applied through the relief
valve port. In this case, it will be necessary to first remove the relief valve. You may
then insert your air pressure through the relief valve support flange. In either case,
with the drain valve open, the air pressure will force the remaining water out of the
tank. If air pressure is unavailable, you may flush your tank with fresh water. Fresh
water should be pumped into the tank with the assistance of the on board water
pump or with the assistance of external water pressure. Once again, external pressure
may be pumped into the unit either through the inlet or outlet found on the rear of
the water tank, or using the relief valve inlet located on the front of the unit.
•
Continue this flushing process for approximately five (5) minutes allowing ample
time for the fresh water to agitate the stagnant water on the bottom of the tank and
force the deposits through the drain opening.
•
Upon completion of the steps above, close the drain plug as well as the relief valve.
87
Troubleshooting
Refill with fresh water, circulate and rinse.
•
WATER PUMP
If you use your vehicle frequently or for long periods of time, flushing the water heater
several times a year will prolong the life of the water heater storage tank.
Pump will not start.
•
Check that house battery disconnect switch is on.
•
Check pump switch at monitor panel.
•
Check fuse in power center.
•
Check to see if water is frozen.
Will not prime, sputters. (No discharge, but the motor runs.).
•
Check to see if there is water in the tank, or if air collected in the hot water heater.
•
Check for frozen water lines or water tank.
Pump will not shut off. Runs when faucet is closed.
WATER SYSTEM
88
•
Turn off pump or city water supply.
•
Check for damp areas around plumbing appliances.
•
Check plumbing for leaks and inspect for leaky valves on toilet.
•
Have the pump checked by your Damon dealer or a qualified RV technician.
Wet areas near water connections, pump runs while the faucets are closed,
and no other fresh water fixtures are being used.
•
There is a possible leak.
•
Close all low point water drains and tank drains.
•
Turn off all fixtures.
•
Check all fixtures and connections for tightness. Do not over tighten fittings as this
may cause additional leakage.
Electrical Diagrams
89
Electrical Diagrams
90
Electrical Diagrams
Avanti
91
Electrical Diagrams
92
Electrical Diagrams
93
Electrical Diagrams
94
Electrical Diagrams
95
Electrical Diagrams
96
Electrical Diagrams
97
Electrical Diagrams
98
Electrical Diagrams
99
Electrical Diagrams
100
Index
120 Volt Outlet
A/C & Furnace Thermostat
ABS Plastic Parts
Air Pressure
Alignment
Appliances
Assist Handle
Automotive Dash
Automotive Fuse Block
Awning
Backup Monitor
Bath Fixtures
Bath Vent
Bathtub Seal
Batteries
Battery Control Center (BCC)
Bedroom Door Latch
Bedspread & Drapes
Cabinets & Drawers
Capacity
Carbon Monoxide Precautions
Carpet
Changing Tires
Chassis
Chassis Electrical
Chemical Sensitivity
City Water Hook-up
CO Detector
Coach Electrical
Compartment Doors
Condensation
Controlling the Motorhome
Converter/Inverter
Countertops
Damon Limited Warranty
Dash Board Controls Dinette Doors & Door Locks
Dumping Holding Tanks
Electrical System
Electric Entry Step
ELECTRICAL DIAGRAMS
Electrical Power
Emergency Exit
Extending the Slideroom
Exterior TV Hook-up
Fantastic Vent
Faucet
Federal Certification Label
Federal Weight Label
Fiberglass
56
53
59
27,32
33,59
64
55
49
56
55, 59
56
64
54
64
43,58
44,81
53
64
53,66
21
29
64
26
59
43
35
39
29
43
55
67
17
43,84
65
9
49
53
60
40
58
55
90
881
30
52
56
56
53
20
20
60
Fire Extinguisher
Food Storage
Formaldehyde
Fresh Water Fill / Fresh Water Tank
Fresh Water System
FUEL / OIL RECORD
Fuel System
Furnace
Gear Selector
Generator
GFCI
Graphics
Hardware
Heated Holding Tanks
Heating
Home Theater Operation
Home Theater Troubleshooting Tips
How to use this manual
Hydraulic Fluid
INDEX
Inspect and Maintain
Introduction
Kitchen Fixtures
Leveling Jacks
License and Insurance
Living Room Television
Loading and Weight
Low Point Drains
Main Entrance
MAINTENANCE RECORD
MAINTENANCE SCHEDULE
Major Equipment Suppliers
Medical Advice
Microwave
Mini Blinds & Shades
Mold
Monitor Panel
NOTES
Opening Checklist
Outside Receptacle
Owner Responsibility Checklist
Parking
Parking Brake
Power Cord
Pre-travel Checklist
Preventing Holding Tank Blockage
Prolonged Occupancy
Propane Gas
Propane Regulator
Propane Safety
Propane System
29
67
35
39
58
77
25
56,81
49
30,45,56,58,82
44
61
64
40
67
47
48
8
64
101
17
7
64
50,82
17
51
17
39
55
75
73
15
35
53,83
65
36
45,83
79
18
84
13
26
50
56
17
41
36
29,83
47
30
46,47,58,67
101
Index
Range
Rear Ladder
Refrigerator
Refrigerator Panel
Reporting Safety Defects
Retracting the Slideroom
Roof
Roof Air Conditioner
Safety Belts
Sanitizing the Fresh Water System
Seals & Adhesives
Shower Head and Hose
Sidewalls
Sink
Slideout
Smoke Detector
Smoking
Solid Surface Countertop
Steering Wheel
Temperature Control
Termination Compartment Components
Tips to Control Condensation
Tire Care
Tires
Toilet
Towing and GCWR
Trailer Hitches and Towing
TRAVEL PREPARATION CHECKLIST
TV Antenna
Underbody
Upholstery & Fabrics
Ventilation
Wall Coverings
Waste Tank
Waste Water System
Water Heater
Water Pump
Water System
Wax
Weighing Your Motorhome
Weight Abbreviations
Weight Ratings
Windows
Winterization Checklist
Winterization Procedure
102
53
55
53,84
56
8
52
61,62
45,85
25
39
62
54
60
53,65
62,86
29
35
65
50
50
42,86
35
27
31,32,33,63
54
23
22
74
63,86
63
65
35
65
87
58
53,56,69,87
39,88
67,88
60
21
22
20,21
63,66
70
67
Damon Motor Coach
P.O. Box 2888
Elkhart, IN. USA 46515-2888
(574) 264-2900
Revised 12/08