1
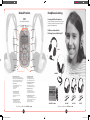
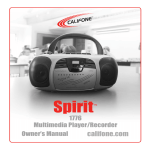
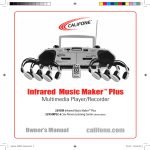
Note about
Safe Listening Practices
Califone is proud to collaborate with the American Speech-Language-Hearing
Association (ASHA) to promote the safe use of personal audio products in the classroom.
These two guidelines will help students use audio technology responsibly:
• Lower the volume
• Limit listening time
Califone also recommends upgrading to ambient noise-reducing headphones
For more information, visit www.listentoyourbuds.org
Califone® International Inc. • 1145 Arroyo Avenue, # A • San Fernando, CA 91340 USA
Toll Free 800.722.0500 | Toll Free Fax 877.402.2248
International Customers call 818.407.2400 or Fax 818.407.2405 califone.com
califone_1776_manual.indd 2-3
Spirit
™
1776
Multimedia Player/Recorder
Owner’s Manual
califone.com
10/2/08 3:51:13 PM
Spirit™Multimedia
Player/Recorder
Thank you for choosing the Spirit™ Multimedia Player/Recorder. It is designed to provide outstanding stereo sound in a portable
system for educators and students. Your 1776 is ideal for individual and group listening centers in classrooms and libraries, music & story
time activities, literacy groups, ELD and ESL language learning applications.
I encourage you to visit our website to register your 1776 for its warranty coverage, and while there please learn more about the
complete line of Califone audio visual products including: Portable and installed wireless PA systems, multi-media players & recorders,
headphones and headsets, computer peripheral equipment, visual presentation products and language learning materials.
Sincerely,
All Damage Claims Must Be Made With The Freight Carrier
Notify the freight carrier immediately if you observe any
damage the shipping carton or product. Repack the unit
in the carton and await inspection by the carrier’s claim
agent. Notify your dealer of the pending freight claim.
Roscoe Anthony
President, Califone® International, Inc.
Returning your unit for service or repairs
Should your unit require service, contact your dealer or
Califone directly (Customer Service Department) at
(800) 722-0500 to first obtain a Return Authorization
(RA) number.
Damage Requiring Service
The Spirit™ should be serviced by qualified service
personnel when:
• The power supply cord or the plug has been damaged
• Objects have fallen or liquid has been spilled into the Spirit™
• The Spirit™ has been exposed to rain
• It does not appear to be operating normally or exhibits
a marked change in performance
• The Spirit™ has been dropped or the enclosure damaged
Warranty Registration
The warranty for the 1776 Player/Recorder specifically covers
use in schools, churches and early childhood daycare centers,
unlike consumer electronic products. This is critical to help
avoid lost class time due to “down” equipment and helps
stretch budgets.
It is built to the same standards as the rest of our products
which teachers and other presenters rely on day in and day
out. Califone warrants this product to be free from defective
material and workmanship for one year from the purchase
date. Our “Project Intercept” Customer Satisfaction program
will replace defective parts and repair malfunctioning
products under this warranty when the defect occurs under
normal use, provided the unit is returned to our factory via
prepaid transportation only after the factory issues an RA
(Return Authorization) number which must be clearly written
on the outside of the box.
All shipments to Califone must include the RA
number clearly marked on the exterior of the shipping
carton and must shipped prepaid. C.O.D. shipments will
be refused and returned at your cost.
Servicing
The user should not attempt to service the Spirit™
beyond that described in these operating instructions. For
all other servicing, refer to qualified service personnel.
Unpacking your Spirit™ Player/Recorder
Check unit carefully for damage that may have occurred
during transit. Each 1776 is carefully inspected at the factory
and packed in a special carton for safe transport.
Contents
a) 1776
b) This Instruction Manual
1
califone_1776_manual.indd 4-5
Location of Controls and Indicators
1. Pause Button
2. Stop / Eject Button
3. Tape - Fast Forward Button
4. Tape - Fast Rewind Button
5. Play Button
6. Record Button
7. CD Door Open 13
8. Band Selector 14
9. Tuning Dial Pointer
10. CD - Forward Skip
15Button
11. CD - Backward Skip
16Button
12. FM Stereo Indicator
17LED
13. Volume Knob
18
14. Function Switch
24
15. DBB Button
16. Play / Pause Button
17. Stop Button
18. LCD Display
19. Telescopic Antenna
20. Tuning Knob
21. Battery Door
22. AC Main
20
23. 3.5mm Headphone/Jackbox jack
24. Speakers (Front)
25
25. Speakers (Rear)
26. Built-in microphone
1 2 3
4 5 6
7
8
26
9
10
11
12
24
19
22
25
23
LCD Display
21
27. Pause Indicator
28. Track Number Indicator
27
28
Visit us online at califone.com
2
10/2/08 3:51:13 PM
Power Supply
Compact Disc Operation
Inserting a CD
Battery Supply
•
•
•
•
Open the battery compartment and insert 8 “C” cell batteries.
Remove the batteries if exhausted or if the unit will not be used for a long period.
The battery supply is switched off when the set is connected to the main.
To change over to battery supply, pull the plug out from the AC socket.
Note on Environmental Protection
Do not throw exhausted batteries in the garbage. Hand them over instead to a recycling center or public collection point.
Go to pages 14 & 15 to read about safe listening with headphones.
Radio Operation
Radio Reception
• Set the Function switch to RADIO.
• Turn the tuning button until a radio station with sufficient signal strength is found. Repeat this procedure
until the desired station is reached.
• To tune into a weak station turn the tuning button until the display shows the desired frequency or when the best
reception has been obtained.
• Extend the telescope antenna and adjust for best reception.
• Adjust the sound using the VOLUME and DBBS controls.
• You can connect a stereo headphone with a 3.5mm plug to the jack. Note that inserting the plug automatically
disconnects the speakers.
• Select the wave band using the BAND SELECT selector.
• Tune to a desired radio station using the TUNING control.
• The set is switched off when the Function switch is in the TAPE position and no button is pressed.
Recording from the Radio
•
•
•
•
•
Insert a blank or pre-recorded tape into the cassette compartment.
Set the Function selector to RADIO.
Select the wave band using the BAND SELECT switch.
Tune to desired radio station using the TUNING control.
Start recording by pressing record of cassette deck.
•
•
•
•
•
Set the Function switch to CD.
To open the CD compartment, lift the CD door on the edge marked OPEN/CLOSE.
Insert the AUDIO CD, printed side facing up.
Close the cover.
The CD-player scans the contents list of the CD, then the total number of tracks appears on the display.
Playing a CD
• Press PLAY/PAUSE to start playback.
• The display shows the track number.
• Adjust the sound using the VOLUME and DBBS controls.
• For brief interruptions, press PLAY/PAUSE – the “ ll “ appears on the display.
• To resume playback, press PLAY/PAUSE again.
• To stop playback, press STOP.
– The total number of tracks will then appear on the display.
The CD player also goes to STOP position when:
• If the CD door is opened
• When the end of the CD is reached
• If the Function selector is changed
• If the batteries run down or if the power supply is interrupted.
• To take out the CD, open the CD door by lifting the edge marked OPEN/CLOSE.
• Open the CD door only if the CD-player is in position STOP.
Selecting another track during play
• Press PREVIOUS or NEXT until the desired track number appears in the display.
• The selected track begins to play after PLAY/PAUSE is pressed.
Starting with a particular track
• Press PREVIOUS or NEXT until the required track number appears in the display.
• Press PLAY/PAUSE.
• Play starts from the selected track.
Searching for a passage during a play
• Hold PREVIOUS down to search backwards to the beginning.
• Hold NEXT down to search forwards to the end.
Note:
This function can be described as “audibly” searching for a title. During the search, volume is reduced and returns to its
adjusted level as soon as the button is released.
Visit us online at califone.com
3
califone_1776_manual.indd 6-7
4
10/2/08 3:51:14 PM
Handling Compact Discs
Inserting a CD
Cassette Deck Operation
INSERT WITH
THE LABEL
INSERT
WITH
FACING
UP.
THE LABEL
FACING UP.
This unit is designed to play only compact discs bearing the
identification logo below. Other discs may not conform to
the CD standard and may not play properly.
INSERT WITH
THE LABEL
FACING UP.
PRESS THE CLAWS
AT THE CENTER OF
PRESS
THE
CLAWS
THE DISC
CASE.
AT THE CENTER OF
THE DISC CASE.
PRESS THE CLAWS
AT THE CENTER OF
THE DISC CASE.
PRESS THE
DISC GENTLY
THE
TOPRESS
INSERT
IT.
DISC GENTLY
TO INSERT IT.
• Dirty, scratched or warped disc may cause skipping or noise.
PRESS
THE
• Handle the disc only by the edges. To keep
clean,
do not
LIFT OUT WITHOUT
DISC GENTLY
TOUCHING THE
touch its surface.
TO INSERT IT.
RECORDED SURFACE.
• Discs should be stored in their cases after use to avoid
serious scratches.
• Do not expose disc to direct sunlight, high humidity, high
temperatures or dust etc. Prolonged exposure to extreme
temperatures can warp the disc.
INCORRECT
• Do not stick or write anything on either side of disc. Sharp
CORRECT
writing instruments, or the inks used in some felt tip pens,
CORRECT
may damage its surface.
CORRECT
LIFT OUT WITHOUT
TOUCHING THE
LIFT
OUT WITHOUT
RECORDED
SURFACE.
TOUCHING THE
RECORDED SURFACE.
INCORRECT
INCORRECT
INCORRECT
FROM THE CENTER TO THE EDGE
FROM THE CENTER TO THE EDGE
FROM THE CENTER TO THE EDGE
Cleaning Disc
Califone recommends the use of C-60 tapes. Tapes longer than this are thinner and are
more prone to breakage or jamming the internal mechanisms.
Cassette Playback
•
•
•
•
•
•
•
•
•
•
•
Cassette Recording from the built-in mic
INCORRECT
INCORRECT
Cassette recordings are ideal for creating permanent records of a group project or student progress with the built-in microphone.
• Set the function switch to “Tape”
• Press STOP/EJECT to open the cassette holder.
• Insert a blank cassette.
• Start recording by pressing RECORD (the PLAY button is automatically pressed).
• When the end of the tape is reached, the recorder buttons are released.
• To interrupt recording, press PAUSE.
• To continue recording, press PAUSE again.
• Press STOP/EJECT if you want to stop recording before the end of the tape. When pressed again, the cassette holder will open.
• The set is switched off if the Function switch is in position TAPE and no buttons are pressed.
Recording from the CD-player
• Finger prints should be carefully wiped from the surface of
disc with a soft cloth. Unlike conventional records, compact discs
have no grooves to collect dust and microscopic debris, so gently
wiping them with a soft cloth should remove most particles.
Wipe in a straight motion from the center to the edge.
• Never use thinner, benzine, record cleaner or anti-static spray
on a compact disc as they can damage its plastic surface.
•
•
•
•
•
Visit us online at califone.com
5
Insert a blank or pre-recorded tape into the cassette compartment.
Set the Function switch to CD.
Start recording by pressing RECORD of the cassette deck (the PLAY button is automatically also pressed).
Press PLAY/PAUSE of CD control to desired play track or from the beginning of the programmed selection.
As soon as the desired passage is reached, pause the CD and then start recording by pressing RECORD.
Recording from the Radio
•
•
•
•
•
califone_1776_manual.indd 8-9
Set the Function switch to TAPE.
Press STOP/EJECT to open the cassette holder.
Insert a recorded cassette.
Adjust the sound using the VOLUME and DBBS controls.
Press PLAY and playback will start.
Playback stops when the tape in the deck reaches the end.
For brief interruptions, press PAUSE.
To restart playback, press this button once more.
To stop, press STOP/EJECT.
When the end of the tape is reached the PLAY button is released.
The set will be switched off if the Function switch is in TAPE position and no buttons are pressed.
Insert a blank or pre-recorded tape into the cassette compartment.
Set the Function selector to RADIO.
Select the wave band using the BAND SELECT switch.
Tune to desired radio station using the TUNING control.
Start recording by pressing record of cassette deck.
Visit us online at califone.com
6
10/2/08 3:51:14 PM
Tips on Cassettes
Periodic Maintenance
Winding & Rewinding the tape
• Press FAST REWIND to search backward to the beginning of the tape.
• Press FAST FORWARD to search forward to the end of the tape.
The accumulation of dust particles on the laser pickup lens may cause skipping or track
jump. Use a camera lens brush/blower to blow clean. Do not touch the pickup lens.
Fingerprints will also cause the player to malfunction.
Lens
Make sure that the cassette tape has no slack prior to inserting it into the
recorder. Unless the tape is taut, it may wind around the head mechanism
and trouble may result. Use a pencil to wind the reels as necessary to
take up any tape slack.
Care and Maintenance
Play/Record
Head
Capstan
Care and Handling of Compact Discs
Erase
Head
Cassette Tape Selection
The quality condition of cassette tapes used will have a direct effect on
the performance of this unit. Califone recommends using tapes no longer
than 60 minutes since longer tapes are more prone to stretching, breaking
and can easily become entangled in the drive mechanism causing
major damage. Use only NORMAL “tape A” or “type 1” cassette tape.
BREAK OUT
TAB TO
PROTECT
SIDE A
Safeguard Against Accidental Erasing
BREAK OUT
TAB TO
BREAK OUT
TAB TOPROTECT
PROTECT
SIDE BSIDE A
ADHESIVE TAPE
Blower
TAB
TO
PROTECT
SIDE A
Lens
Cassette Maintenance & Service Cleaning
ADHESIVE TAPE
Periodically wipe the cabinet with a soft cloth damped in diluted soapy solution, then wipe with a dry cloth. Do not use harsh
cleansing chemicals, they may damager or discolor the cabinet finish. Do not allow liquids or foreign objects to enter the CD
compartment.
Cassette Deck
This unit has been permanently lubricated at the factory, no further lubrication
is necessary. If a loss in brilliance (high frequency response) is noticed, the
tape head probably needs cleaning. This may be done by playing a special
head cleaning cassette, available at most dealers. As an alternative, the surface of
the head may be cleaned with a cotton swab moistened in alcohol or special
head-cleaning fluid. Carefully rub the face of the head, being careful not to
scratch its polished surface. Make sure to also clean the surface of the capstan
and pinch roller.
Erase
Head
Visit us online at califone.com
7
1. Handle the disc by its edges or center hole. To keep the disc clean, avoid touching the data surface.
2. Data is embedded directly beneath the label, protected only by a thin lacquer layer and is more vulnerable to damage than
the bottom. A scratch that penetrates the label will certainly destroy data, whereas a scratch on the bottom can often be
BREAKoverlooked
OUT or corrected by the laser pickup.
TAB TO
3. Do not write on the label surface. A ballpoint will damage data; marking pens have solvents that may penetrate the top layer.
PROTECT
4. Do not stick paper or tape on the label surface; this probably won’t hurt the disc but might jam the disc drive.
SIDE 5.BDo not expose a disc to high temperature or humidity for an extended period of time. The disc material will soften at around 200
degrees Fahrenheit. Allow the disc to reach room temperature before playing if it has been subjected to extreme cold.
6. Preventive cleaning is unnecessary and potentially harmful. Clean only when required.
7. Clean a disc with a soft moistened cloth. Pat dry. Wipe the disc from the center out like spokes of a wheel. Never wipe across
a disc as you would an LP record.
8. Never use solvents, commercial cleaners or sprays designed for LP’s. Plain lukewarm water is recommended.
9. Keep discs protected at all times.
TAB TO
PROTECT
SIDE B
Periodic Maintenance
External Care
Pinch
Roller
BREAK
OUT BREAK OUT
ADHESIVE
TAPE
Note: Do not force the record button when the cassette record-protect
tab has been removed. This may result in damage to the unit. To record on a
cassette whose tab have been broken off, simply attach adhesive tape
over the tab opening.
califone_1776_manual.indd 10-11
Compact Disc Player
Blower
Play/Record
Head
Capstan
Pinch
Roller
The heads, capstan and pinch roller should be cleaned from time to time to prevent buildup of tape oxide,
which degrades performance.
1. Remove cassette tape before cleaning.
2. Clean the head of all visible, reddish-brown oxide with a cotton-tipped swab moistened with a methyl alcohol
or any solution specifically manufactured for this purpose.
Caution: DO NOT scrape the head surface with hard, sharp or abrasive objects. This will permanently damage the heads.
3. Clean the pinch roller by scrubbing the surface of the roller with the moistened swab. Rotate the roller by hand
until the entire surface is clean.
4. Clean external case surfaces with a moist, soft cloth. Use only a mild detergent water solution.
Tape Head Demagnetization
It is recommended that the tape heads be demagnetized from time to time. This eliminates residual magnetism
which degrades sound reproduction and the recording function.
1. After cleaning the heads and capstan, place the demagnetizer several feet away from the cassette unit and
plug it into an AC outlet.
2. Follow the manufacturer’s operating instructions supplied with the demagnetizer.
8
10/2/08 3:51:14 PM
Troubleshooting
PROBLEMS
ITEMS TO CHECK
General
The unit does not operate.
Cassette
Cassette cannot be loaded.
Is the AC power cord unplugged?
Are the batteries fully charged?
Is cassette being loaded properly?
Is the PLAY key depressed?
Specifications
Radio
Frequency range FM: 87 -108 MHz
AM: 530 - 1710 KHz
Antennas FM: Telescopic antenna with reinforced jointing point for increased strength
AM: Built-in ferrite bar
Frequency response 100-8,000Hz
The tape does not move.
Is the PAUSE key depressed?
Cassette
The tape gets caught in the tape transport mechanism.
Is the pinch roller or capstan dirty?
Is there excessive slack in the tape?
Tape speed is slow.
Is the tape too old or the quality bad?
Tape running is unstable.
Is there excessive slack in the tape?
FF/Rew Time 144 seconds (C60 recommended tape length)
Record Level Control Auto Level Control
Mechanism Auto Stop
Controls Volume, Dynamic Bass Boost System
Built-in mic to record to tape
There is excessive noise, the sound
quivers or there are breaks in the sound.
Are the tape heads dirty?
Recording
The RECORD key cannot be depressed.
Recording cannot be done.
The previous recording cannot be erased.
Is a cassette loaded? Is the cassette’s erasure
prevention tab broken off?
Are the heads dirty?
Is the erasure head dirty?
Is the tape type other than type 1 normal bias?
No sound output.
Is the master volume turned up?
CD
CD play does not begin.
The CD produces no sound
The CD sound jumps.
CD stops immediately.
CD takes too long to start
Is the AC power cord unplugged or loose?
Is the CD upside down?
Is the CD or lens excessively dirty?
Is the disc holder closed properly?
Is the PAUSE mode on?
Is the FUNCTION switch on CD mode?
Is there condensation inside the unit? If so, let stand
for 1-2 hours until dry.
Is the lens or CD excessively dirty?
Is the unit subjected to excessive vibration?
Are there any bad scratches on the CD?
Is CD loaded upside down?
Is CD not set properly in tray?
Is CD excessively dirty?
Press STOP and PLAY/PAUSE again, repeat if necessary.
AM/FM Radio
No sound or signal
Is FUNCTION Selector set to Radio?
Is Band Selector set properly?
Signal is unclear.
Is telescoping antenna fully extended and properly
positioned for best reception?
FM Stereo reception is unclear.
Tune Radio so FM Stereo LED is lit. Adjust antenna if necessary.
9
califone_1776_manual.indd 12-13
CD
CD 2 Digit LCD display,
Play, Pause, Stop, F Skip, B Skip
Frequency Range FM: 88 - 108 MHz
AM: 530 - 1710 kHz
Output Jack - single 3.5mm stereo headphone jack
Power Requirements AC: 110V, 60Hz, 14W
DC: 12VDC, UM2 (“C”) Batteries (8)
Power consumption 14W in AC operation with an accessory supplied AC power cord
Power Output 2 Watts RMS
Wow and Flutter 0.17%
S/N Ratio 30dB
Speakers 3” 8 ohms x 2; 2.2” 8 ohms x 2
Exterior Casing Rugged ABS plastic for durability and classroom safety
Dimensions 13.5”L x 9.75”W x 6.5”H
Weight 5.7 lbs., w/o batteries, shipping weight 8 lbs.
Safety Listings C-UL & CE approved.
Warranty - 1 year from date of purchase
DESIGN AND SPECIFICATION ARE SUBJECT TO CHANGE WITHOUT NOTICE.
10
10/2/08 3:51:15 PM
Expanded Uses for the Spirit™
CAUTION
RISK OF ELECTRIC SHOCK - DO NOT OPEN
CAUTION: TO REDUCE THE RISK OF ELECTRIC SHOCK,
DO NOT REMOVE COVER OR BACK. NO USER SERVICEABLE PARTS INSIDE.
REFER SERVICING TO QUALIFIED PERSONNEL.
The lightening flash with arrowhead
within a triangle is intended to tell the
user that parts inside the product are a
risk of electric shock to persons.
This product is not designed to
function normally in strong electromagnetic fields. Consequently, the
audio quality may degrade while the
product is exposed to strong electromagnetic fields.
Normal audio quality operation will be recovered
when the strong electromagnetic field is no
longer present.
!
WARNING:
TO REDUCE THE RISK OF
FIRE OR ELECTRIC SHOCK, SO
NOT EXPOSE THIS APPLIANCE
TO RAIN OR MOISTURE.
!
The exclamation point within a
triangle is intended to tell the user
that important operating and servicing
instructions are in the papers with
the appliance.
Ce produit n’est pas conçu pour
un fonctionnement dans de forts
champs électromagnétiques. Par
conséquent, la qualité sonore peut
diminuer si ce produit est exposé à
un fort champ életromagnétique. La qualité sonore
redeviendra normale après affaib-lissement du
champ électromagnétique.
IMPORTANT SAFETY INSTRUCTIONS
ATTENTION: ALL SAFETY AND OPERATING INSTRUCTIONS
SHOULD BE READ BEFORE OPERATING APPLIANCE. ALL
OPERATING AND USE INSTRUCTIONS SHOULD BE FOLLOWED
WHEN OPERATING THE APPLIANCE. HEED AND ADHERE
TO ALL WARNINGS ON THE APPLIANCE AND IN THE OPERATING
INSTRUCTIONS. RETAIN ALL SAFETY AND OPERATING
INSTRUCTIONS FOR FUTURE REFERENCE.
WATER & MOISTURE - DO NOT USE THE APPLIANCE NEAR
WATER; IE. BATHTUB, WASHBOWL, KITCHEN SINK, LAUNDRY
TUB, WET BASEMENT OR SWIMMING POOL.
VENTILATION - DO NOT SITUATE THE SPIRIT™ SO THAT
ITS LOCATION OR POSITION INTERFERES WITH ITS PROPER
VENTILATION. IT SHOULD NOT BE PLACED IN A BUILT-IN
INSTALLATION, SUCH AS A BOOKCASE OR CABINET WHICH MAY
IMPEDE THE FLOW OF AIR THROUGH ITS VENTILATION OPENINGS.
HEAT - SITUATE THE SPIRIT™ AWAY FROM HEAT SOURCES SUCH
AS RADIATORS, HEAT REGISTERS, AND STOVES THAT PRODUCE
HEAT.
POWER SOURCES - CONNECT THE APPLIANCE ONLY TO
A POWER SUPPLY TYPE DESCRIBED IN THE OPERATING
INSTRUCTIONS OR MARKED ON THE APPLIANCE.
GROUNDING OR POLARIZATION - PRECAUTIONS SHOULD BE
TAKEN SO THAT THE GROUNDING OR POLARIZATION MEANS OF
THE APPLIANCE ARE NOT DEFEATED.
POWER CORD PROTECTION - POWER SUPPLY CORDS
SHOULD BE ROUTED SO THAT THEY ARE NOT LIKELY TO BE WALKED
ON OR PINCHED BY ITEMS PLACED UPON OR AGAINST THEM, PAYING PARTICULAR ATTENTION TO CORDS AT PLUGS, CONVENIENCE
RECEPTACLES, AND THE POINT WHERE THEY
EXIT FROM THE APPLIANCE.
CLEANING - THE APPLIANCE SHOULD BE CLEANED ONLY AS
RECOMMENDED BY THE MANUFACTURER.
NON USE PERIODS - UNPLUG THE APPLIANCE POWER CORD
FROM THE OUTLET WHEN LEFT UNUSED FOR A LONG PERIOD
OF TIME.
OBJECT & LIQUID ENTRY - CARE SHOULD BE TAKEN SO THAT OBJECTS DO NOT FALL AND LIQUIDS ARE NOT SPILLED INTO
THE ENCLOSURE THROUGH OPENINGS.
DAMAGE REQUIRING SERVICE - THE APPLIANCE SHOULD BE
SERVICED BY QUALIFIED SERVICE PERSONNEL WHEN: (A) THE
POWER SUPPLY CORD OR THE PLUG HAS BEEN DAMAGED (B)
OBJECTS HAVE FALLEN OR LIQUID HAS BEEN SPILLED INTO THE
APPLIANCE (C) THE APPLIANCE HAS BEEN EXPOSED TO RAIN (D)
THE APPLIANCE DOES NOT APPEAR TO BE OPERATING NORMALLY
OR EXHIBITS A MARKED CHANGE IN PERFORMANCE (E) THE
APPLIANCE HAS BEEN DROPPED OR THE ENCLOSURE DAMAGED.
SERVICING - THE USER SHOULD NOT ATTEMPT TO SERVICE THE
APPLIANCE BEYOND THAT DESCRIBED IN THE OPERATING INSTRUCTIONS. ALL OTHER SERVICING REFER TO A QUALIFIED SERVICE
PERSONNEL.
Listening Center Use
Your Spirit™ can also be used as part of a classroom or library-based listening center. By
plugging a jackbox into the 3.5mm plug on the 1776, you can create a customized
activity for learners of similar abilities for differentiated classroom instruction.
Shown here is the 1776PLC-6, which includes a 10-person jackbox
(1210AVPS shown right) and six 3068 Mono/Stereo headphones
(3068AV shown right). Also available but not shown is a
4-person center (1776-PLC).
Classroom-wide Applications
Schools are confronted with multiple audio issues affecting their teachers and students. A 1995 study by the General Accounting
Office (GAO) found noise to be the single most prevalent problem in American schools. The Centers for Disease Control
estimates up to 15% of the school age population have permanent hearing loss. As administrators strive to meet NCLB goals,
they must also address groups with diverse needs such as ELL, ESL and
students with special needs. Teachers need to convey audio information to
students in all of these groups in a clear, concise manner. Given that children
have not yet cultivated listening skills like adults have such as blocking out
background noise, they require a better signal-to-noise ratio for enhanced
hearing and comprehension. However, if the subject matter is unfamiliar
or competing environmental noises are too distracting, students aren’t
going to be able to listen and focus on what is being said.
Our Classroom Infrared Audio System can help teachers teach and how
students learn through two key features. Califone has eliminated interference
and enhanced reception by doubling the amount of ceiling sensors found in
a traditionally sized classroom. Twice the number of sensors as other
systems means better audio coverage from the wireless mic. The second
enhancement is the introduction of “array” speaker technology to
classroom audio. Array speakers (such as what’s seen in concert halls)
produce a different sound pattern than traditional ceiling speakers.
Instead of their broad indiscriminate pattern, Califone array speakers
create a narrow band of sound that is focused directly at the students.
By not bouncing random and confusing sound off the walls and
windows, the array sound pattern improves the critical signal-to-noise
ratio with its more focused and concise message while only marginally
adding to already elevated background noise levels.
Visit us online at califone.com
11
califone_1776_manual.indd 14-15
12
10/2/08 3:51:24 PM
Related Products
Headphone Listening
8101
Listening with Wired Headphones
A single 3.5 mm headphone jack (23) is located on top of
the Spirit™. A jackbox instead could instead, could be
plugged in for multiple listeners.
Shown with addtional headphone
1. Headphone outputs
16. Hold switch
2. Microphone
Califone recommends the
following for use with the Spirit™.
3. Display
15. A-B Loop button
4. Menu button
14. Record button
3068
5. OK button
13. Volume Up
6. Next Track
12. Previous Track
11. DC In jack
7. USB Connector
10. Play/Pause
8. SD/MMC Card Slot
9. Volume Down
For younger students.
2924AVP
Playing back lessons or music
To play back music on your 8100, first power
the unit on by pressing and holding the Play/Pause
button (10). After initializing and scanning for
available tracks, the Main screen will appear.
To play all tracks:
• Press the Play/Pause button (10) once, or
• Press the Menu button (4)
• Scroll to Select All
• Press OK (5)
To play all tracks repeatedly:
• Press the Menu button (4)
• Scroll to Settings and press OK (5)
• Scroll to Repeat All and press OK (5)
To play all tracks in random order:
• Press the Menu button (5)
• Scroll to Settings and press OK (5)
• Scroll to Repeat All and press OK (5)
Playing back voice tracks
• Press the Menu button (4)
• Scroll to Play Voice and press OK (5)
• Select a voice file and press OK (5)
To view tracks by meta tags:
• Press the Menu button (4)
• Scroll to the desired meta tag
(Artist, Album, Songs, Genre, Year)
• Press OK (5)
Recording Podcasts & voice tracks
• Press the Record Button (14)
• To pause during recording, press the Record
button (14). Pressing the Record button
again resumes recording
• To stop recording, press OK (5)
To play a single track repeatedly:
• Press the Menu button (4)
• Scroll to Settings and press OK (5)
• Scroll to Repeat Track and press OK (5)
Visit us online at califone.com
13
califone_1776_manual.indd 16-17
1210AVPS Jackbox
2810-BE
2810-PA
2810-TI
Visit us online at califone.com
14
10/2/08 3:51:30 PM