1
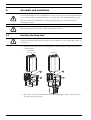
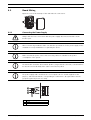
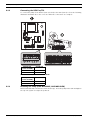
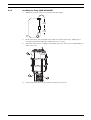
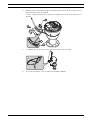
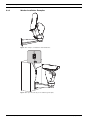
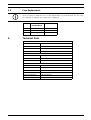
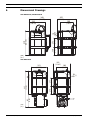
Washer Kit
HAC-WAS
en
Installation Manual
Washer Kit
Table of Contents | en
3
Table of Contents
1
Important Safety Instructions
4
2
Description
5
3
Preparing the Product for Use
5
3.1
Contents and Unpacking
5
3.2
Safely Disposing of Packaging Material
5
4
Assembly and Installation
6
4.1
Installing the Pump Tank
6
4.2
Board Wiring
7
4.2.1
Connecting the Power Supply
7
4.2.2
Connecting the UPH Pan/Tilt
8
4.2.3
Installing the Pump (HAC-WAS20-05, HAC-WAS20-50)
8
4.2.4
Installing the Pump (HAC-WAS30-50)
4.3
Installing the Washer to the UPH
10
4.3.1
Washer Installation Examples
12
4.4
Fuse Replacement
13
5
Technical Data
13
6
Dimensional Drawings
14
Bosch Security Systems, Inc.
9
Installation Manual
F.01U.206.249 | 2.0 | 2010.12
4
1
en | Important Safety Instructions
Washer Kit
Important Safety Instructions
DANGER!
High risk: This symbol indicates an imminently hazardous situation such as “Dangerous
Voltage” inside the product.
If not avoided, this will result in an electrical shock, serious bodily injury, or death.
WARNING!
Medium risk: Indicates a potentially hazardous situation.
If not avoided, this could result in minor or moderate bodily injury.
CAUTION!
Low risk: Indicates a potentially hazardous situation.
if not avoided, this could result in property damage or risk of damage to the unit.
Read, follow, and retain all of the following safety instructions. Heed all warnings on the unit
and in the operating instructions before operation.
1.
Clean only with a dry cloth. Do not use liquid cleaners or aerosol cleaners.
2.
Do not install unit near any heat sources such as radiators, heaters, stoves, or other
equipment (including amplifiers) that produce heat.
3.
Do not block any ventilation openings.
4.
Do not use the unit near water or expose to rain or moisture. Never spill liquid of any kind
on the unit.
5.
Unplug the unit during lightning storms or when unused for long periods.
6.
Adjust only those controls specified in the operating instructions.
7.
Do not overload outlets and extension cords, as this can cause fire or electrical shock.
8.
Protect the plug and power cord from foot traffic or pinching, at electrical outlets, and at
its exit from the unit.
9.
Operate the unit only from the type of power source indicated on the label.
10. Unless qualified, do not attempt to service a damaged unit yourself. Refer all servicing to
qualified service personnel.
11. Use only replacement parts specified by the manufacturer.
12. Install in accordance with the manufacturer's instructions in accordance with applicable
local codes. Use only attachments/accessories specified by the manufacturer. Equipment
change or modification could void the user's guarantee or authorization agreement.
Disposal - Your Bosch product was developed and manufactured with high-quality material
and components that can be recycled and reused. This symbol means that electronic and
electrical appliances, which have reached the end of their working life, must be collected and
disposed of separately from household waste material. Separate collecting systems are
usually in place for disused electronic and electrical products. Please dispose of these units
at an environmentally compatible recycling facility, per European Directive 2002/96/EC.
This user guide is the intellectual property of Bosch Security Systems; protected by copyright.
Contact: www.boschsecurity.com
F.01U.206.249 | 2.0 | 2010.12
Installation Manual
Bosch Security Systems, Inc.
Washer Kit
2
Description | en
5
Description
A washer kit for the UPH Series High-speed Positioning System. Available in 230 VAC (HACWAS05-50 and HAC-WAS30-50) or 24 VAC (HAC-WAS05-20). The standard pump guarantees a
delivery up to a maximum of 5 m (16.4 ft), while the high delivery version (HAC-WAS30-50)
delivers up to 30 m (98 ft). It is possible to adjust the articulated nozzle of the pump
associating it to a preset in order to obtain the desired position of the wiper and sprinkle
functions. The pumps, equipped with relay, allow the direct connection to the UPH. Further,
in the high delivery version, the lack of liquid in the reservoir is signalled to the operator with
the stop of the pump itself.
3
Preparing the Product for Use
CAUTION!
Any change that is not expressly approved by the manufacturer will invalidate the guarantee.
3.1
Contents and Unpacking
When the product is delivered, make sure that the package is intact and that there are no
signs that it has been dropped or scratched. If there are obvious signs of damage, contact the
supplier immediately. Keep the packaging in case you need to send the product for repairs.
Check the contents to make sure they correspond with the list of materials as below:
–
3.2
Washer kit for UPH Series High-speed Positioning System
–
Washer pipe support
–
Locking bracket for pipe support
–
Screws and washers
–
Washer pipe with nozzle
–
Pipe connector
–
Clamp
–
Housing equipment
–
Installation manual
Safely Disposing of Packaging Material
The packaging material can all be recycled. The installer technician will be responsible for
separating the material for disposal, and in any case for compliance with the legislation in
force where the device is to be used.
Bear in mind that if the material has to be returned due to a fault, using the original packaging
for its transport is strongly recommended.
Bosch Security Systems, Inc.
Installation Manual
F.01U.206.249 | 2.0 | 2010.12
6
4
en | Assembly and Installation
Washer Kit
Assembly and Installation
DANGER!
In the 115/230 VAC powered configuration it is necessary to insert a 1 0 unipolar main switch
(open contact distance d>3 mm) upstream on the power line. This switch should be used to
disconnect the power supply before carrying out any maintenance operation or before
opening the housing.
CAUTION!
Only qualified personnel should assemble and install the device.
4.1
Installing the Pump Tank
CAUTION!
If using the pump at temperatures below 3°C (37.4°F) add some motor vehicle-type antifreeze
to the water.
1.
Attach the metal cage (item 1, below) firmly to a wall using the four (4) holes provided
for this (item 2).
HAC-WAS05-20
HAC-WAS05-50
2.
HAC-WAS30-50
Remove the cap from the tank with the corresponding pump or level controller. Remove
the tank from the metal cage.
F.01U.206.249 | 2.0 | 2010.12
Installation Manual
Bosch Security Systems, Inc.
Washer Kit
4.2
Assembly and Installation | en
7
Board Wiring
Open the cover of the waterproof box and make the connections.
4.2.1
Connecting the Power Supply
DANGER!
Always make the base connections with the power supply disconnected and the circuitbreaker open.
NOTICE!
When commencing installation make sure that the specifications for the power supply for the
installation correspond with those required by the device.
NOTICE!
Make sure that the power source and connecting cables are suitable for the power
consumption of the system.
NOTICE!
The Earth cable should be about 10 mm (0.39 in.) longer than the other two, so that it will not
be disconnected accidentally if the cable is stretched or pulled.
T
NOTICE!
The power supply cable should also be covered by the silicone sheath supplied for this
purpose, and fastened with the corresponding tie. Furthermore, all signal cables must be
grouped together by means of a strap.
L
N
1
2
3
Bosch Security Systems, Inc.
Line
Earth
Neutral
Installation Manual
F.01U.206.249 | 2.0 | 2010.12
8
en | Assembly and Installation
4.2.2
Washer Kit
Connecting the UPH Pan/Tilt
To connect the pump of the washer (item 1, below) to the UPH (item 2) refer to the following
L
N
illustration and table. Close the cover door when the connections are complete.
Pump board
UPH Board
(connector CN4)
CMD
GND
01
C1
Additional Connections for HAC-WAS30-50
4.2.3
Pump board
UPH Board
(connector CN4)
ALM
ALM/G
AL1
COM
Installing the Pump (HAC-WAS20-05, HAC-WAS20-50)
Fill the tank with water and insert it in the metal cage. Insert the pump in the tank and tighten
the cap. The system is ready to be powered.
F.01U.206.249 | 2.0 | 2010.12
Installation Manual
Bosch Security Systems, Inc.
Washer Kit
4.2.4
Assembly and Installation | en
9
Installing the Pump (HAC-WAS30-50)
1.
Adjust the position of the level controller and the weight.
220
(8.66)
120
(4.72)
mm
(in.)
2.
Fill the tank (item 1, below) with water and insert it in the metal cage, taking care to
insert the male/female hydraulic coupling (item 2) correctly.
3.
Check the delivery hose coupling for the pump (item 3) to make sure a small quantity of
water comes out.
4.
Bosch Security Systems, Inc.
Connect the delivery hose. The system is ready to be powered.
Installation Manual
F.01U.206.249 | 2.0 | 2010.12
10
4.3
en | Assembly and Installation
Washer Kit
Installing the Washer to the UPH
NOTICE!
To attach the base to the support use the new screws provided (item 5, below) and make sure
the washers (item 6) are present, as well as the screw seals (item 7) and the gasket (item 8).
1.
After attaching the support (item 1, bracket or column support), position the washer
pipe support (item 3) in the desired position. Insert the cables inside the support so that
they protrude by about 50 cm (19.68 in.).
2.
Insert the cable in the cable glands (item 2) and, keeping the base (item 4) at about
20 cm (7.87 in.) from the support, lock the cable glands.
3.
Set the base on the support, aiding the cables to achieve the correct position inside.
Attach the base to the support using the new screws supplied (item 5).
4.
Cut the cables to size and either restore or make the connections to the positioning unit.
When you have attached the base to the support, shorten the washer pipe (item 1,
below) as required and attach it to the coupling as follows: undo the nut (item 2) from
the coupling, insert it into the pipe and insert the end of the pipe on the nosecap (item
3).
5.
F.01U.206.249 | 2.0 | 2010.12
Lock the nut to the coupling.
Installation Manual
Bosch Security Systems, Inc.
Washer Kit
Assembly and Installation | en
6.
11
Attach the pipe to the washer support using the bracket (item 1), the screws (item 2)
and the washers (item 3) supplied.
Lock the coupling using the hose clip (item 4) supplied and connect the delivery hose
(item 5).
7.
To calibrate the jet direct the nozzle towards the glass of the housing.
8.
To operate the washer, refer to UPH Series Installation Manual.
Bosch Security Systems, Inc.
Installation Manual
F.01U.206.249 | 2.0 | 2010.12
12
en | Assembly and Installation
4.3.1
Washer Kit
Washer Installation Examples
Figure 4.1 Example of installation with wall bracket
Figure 4.2 Pipe fixed directly to the wall through the plate
F.01U.206.249 | 2.0 | 2010.12
Installation Manual
Bosch Security Systems, Inc.
Washer Kit
4.4
Technical Data | en
13
Fuse Replacement
NOTICE!
If it is necessary to change the fuse, see the diagram where it is marked FUSE. The size of the
fuse will vary according to the voltage of the equipment.
HAC-WAS05-20
HAC-WAS30-50
HAC-WAS05-50
5
24 VAC
2AT
n/a
120 VAC
0.5AT
n/a
230 VAC
250mAT
4AT
Technical Data
HAC-WAS05-20, HAC-WAS05-50
Dimensions (W x H x L)
301 x 410 x 347.5 mm (11.8 x 16.0 x 13.7 in.)
Reservoir Capacity
23 l (6 gal)
Delivery Head
Maximum 5 m (16 ft)
Tube Length
4 m (13 ft)
Power Consumption
–
HAC-WAS05-20
12 W maximum
–
HAC-WAS05-50
12 W maximum
Waterproofing
IP56
HAC-WAS30-50
Dimensions (W x H x L)
301 x 635 x 269 mm (11.8 x 25.0 x 10.6 in.)
Reservoir Capacity
23 l (6 gal)
Delivery Head
Maximum 30 m (98 ft)
Tube Length
30 m (98 ft)
Power Consumption
600 W maximum
Waterproofing
IP45
Bosch Security Systems, Inc.
Installation Manual
F.01U.206.249 | 2.0 | 2010.12
14
6
en | Dimensional Drawings
Washer Kit
Dimensional Drawings
HAC-WAS05-20, HAC-WAS05-50
269
(10.59)
348
(13.70)
301
(11.85)
200
(7.87)
136
(5.35)
410
(16.14)
152
(5.98)
Ø
(0. 8
31
)
mm
(in.)
HAC-WAS30-50
301
(11.85)
200
(7.87)
136
(5.35)
152
(5.98)
Ø8
)
(0.31
225
(8.86)
635
(25.0)
410
(16.14)
269
(10.59)
mm
(in.)
F.01U.206.249 | 2.0 | 2010.12
Installation Manual
Bosch Security Systems, Inc.
Bosch Security Systems, Inc.
850 Greenfield Road
Lancaster, PA 17601
U.S.A.
www.boschsecurity.com
© Bosch Security Systems, Inc., 2010