1
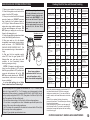
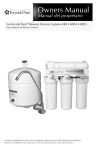
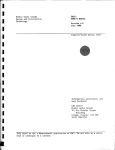
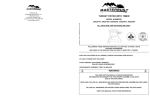
Free Video Offer
MASTERBUILT
“Outdoor Cooking
Made Simple”
Monarch™ and Master Barbecue™ OWNER’S MANUAL
ASSEMBLY AND OPERATING INSTRUCTIONS
WARNING AND SAFETY INFORMATION
From
European
and
Southern style cooking to
Louisiana Cajun and Midwest
flavors, hosts Don and John
McLemore guide viewers, step
by step, through the world of
smoking, grilling, frying and
boiling. Let more than 20
recipes, tempt your taste buds
and open up a world of rich
flavor and awesome eating.
M7
SMM7
M7P Sold with Pot and Basket
SMM7P Sold with Pot and Basket
Some units are sold under a private label program therefore the model
number may not be listed. You will need to follow all assembly and warning
instructions. The model number will be listed on the packaging.
Viewing Time..............................................Approximately 48 minutes
Shipping
Within continental United States.........................................................$5.95
In Alaska, Hawaii and Canada.........Call (706) 327-5622 EXT. 101 for rates
Yes, I would like the free video and have included my
payment for shipping and handling charges.
Call (706) 327-5622 EXT.101 for Visa or Mastercard orders, or send
check or money order to: MASTERBUILT Mfg. (See address below.)
Units are sold with and without Pot & Basket
Gas cylinder not included with any unit.
We Can Help....
If you have any questions about your unit ( or a part is missing )
give us a call FIRST before returning it to the retailer.
Ask For The Customer Service Department:
(800) - 489 - 1581
Fax (706) - 327 - 5632
www.masterbuilt.com
Send in an envelope to:
Masterbuilt Mfg. Inc.,
Attn: Warranty Dept.
450 Brown Ave., Columbus, GA 31906
Cooking Tips and Recipes Inside Manual
Save This Manual For Future Reference
All Models are for OUTDOOR USE ONLY!
For Models: M7 - M7P - SMM7 - SMM7P
Assembly Instructions for Models:
For Models: M7 - M7P - SMM7 - SMM7P
11-19-98
Read and follow ALL WARNINGS and INFORMATION carefully before operating this appliance.
1
For your SAFETY
1. DO NOT store or use gasoline or other flammable vapors
and liquids in the vicinity of this
or any other appliance.
2. When cooking with oil or
grease, do not exceed 350° F
(177° Celsius). In the event you
exceed 350°F, DO NOT add
food, oil or grease. Shut off the
appliance, allow to cool below
350°F.
Repeat the lighting
process. DO NOT store or use
extra cooking oil in the vicinity of
this or any other appliance.
3. An LP cylinder not connected
for use shall not be stored in the
vicinity of this or any other
appliance.
3. Dealer’s Name______________________________________________
4. Dealer’s Location____________________________________________
5. Date of Purchase____________________________________________
6. What brand of outdoor cookers have you previously owned?__________
_____________________________________________________________
1. Shut off gas to the appliance.
2. Extinguish any open flame.
3. Open lid.
4. If odor continues, call your
gas supplier or your fire
department immediately.
18”
Wind Flow
OUTDOOR USE ONLY / NEVER LEAVE UNATTENDED
2. Address____________________________________________________
State________________________________ Zip___________________
If you smell gas:
Before you start to
cook, check wind
direction & place
cylinder UP - WIND
and 18” away from
cooker stand.
1. Name_____________________________________________________
City_______________________________________________________
Cut Line
• These MASTERBUILT units are for
OUTDOOR use only. DO NOT use inside
an enclosed area or overhang of a house
or building.
• NEVER use your appliance near or ON
combustible surfaces and materials such
as wood, dry grass, shrubs, etc. A
minimum distance away from these
materials is 10’
• This appliance is not intended for
commercial use; it is not intended as, nor
should it be used as a heater.
• DO NOT leave appliance unattended.
Keep children and pets away from the
appliance at all times. Constant supervision is necessary when this product is in
use and until appliance has cooled.
• DO NOT move the appliance when it is in
use. Allow the appliance to cool before
moving or storing it.
• When in use, the appliance must be on a
level, stable surface in an area clear of
combustible materials. An asphalt surface
(black top) might not be acceptable for this
purpose.
• ALWAYS wear shoes during operation.
• ALWAYS wear cooking gloves during
operation. Avoid touching hot surfaces.
• Accessory attachments NOT manufactured
by MASTERBUILT Mfg. for this particular
product are NOT recommended.
• This appliance is not intended to be
installed in or on recreational vehicles or
boats.
• In the event of rain, while frying with oil,
cover cooking vessel immediately. Turn
the regulator to OFF position, then turn the
gas cylinder to OFF position. DO NOT
move cooker stand or pot.
• When cooking with oil or grease, make
fire-extinguishing materials readily
accessible.
• In the event of an oil or grease fire, DO
NOT attempt to extinguish with water. Use
Type BC dry chemical fire extinguisher or
smother fire with dirt, sand or baking soda.
Cut Line
WARNINGS
M7 - M7P - SMM7 - SMM7P WARRANTY INFORMATION
To validate your warranty, please fill out and return this portion
within 30 days of the date of purchase.
Send to: MASTERBUILT Mfg., Inc., Attn: Warranty Dept.
450 Brown Avenue, Columbus, GA 31906
7. Model # on Package__________________________________________
8. Reasons for purchasing your Unit?
a. Durability
f. MASTERBUILT Reputation
b. Warranty
g. Value for Price
c. Special Offer
h. Previous Experience with
d. Special Features
MASTERBUILT Product.
e. Received as a Gift
i. Other
9. How many products of this type do you currently own?_________
10. Where have you read or heard about MASTERBUILT Products?
a. Store Display
e. Personal Recommendation
b. Magazine Advertisement
f. Salesperson’s Recommendation
c. Newspaper Advertisement
g. Other
d. Television Advertisement
11. Date of your birth____/____/____
12. Education: (check one)
a. High School____
c. Completed College____
b. Some College____
d. Graduate School____
13. Which best describes your family income? (check one)
a. Under $15,000_____
d. $50,000-$74,999____
b. $15,000-$24,999____
e. $75,000-$100,000____
c. $25,000-49,999____
f. Over $100,000____
Please include a favorite recipe of yours along with your name and address.
MASTERBUILT Mfg., Inc. thanks you for filling out this questionnaire.
18
WARRANTY INFORMATION
MASTERBUILT Mfg., Inc. warrants the Monarch™ Grill - Smoker and Cooker with a Limited Lifetime
warranty on all parts except the regulator, hose and burner watch has a three year warranty. The Master
Barbecue™ Grill - Smoker and Cooker has a full three year warranty on the complete unit. All private
label units are covered under a three year warranty. MASTERBUILT, Mfg., Inc. warranty does not cover
rust on either units. The Master Barbecue™ paint finish may burn off under normal use and therefore it
carries no warranty. MASTERBUILT Mfg., Inc. warrants all components to be free from defects in
materials and workmanship. Within this period, MASTERBUILT Mfg., Inc. shall correct any defect by
repairing or replacing defective parts of the equipment or making available the parts thereof, F.O.B.
Columbus, GA. Registration of warranty card is required.
MASTERBUILT Mfg., Inc. requires reasonable proof of purchase and suggests that you keep your
receipt. Upon the expiration of such warranty, all such liability shall terminate.
This warranty does not include the cost of property damage due to the failure of the product and does
not cover damage due to the misuse, abuse, accident, damage arising out of transportation, or damage
incurred through commercial use of this product. THIS EXPRESS WARRANTY IS THE SOLE
WARRANTY GIVEN BY THE MANUFACTURER AND IS IN LIEU OF ALL OTHER WARRANTIES,
EXPRESSED OR IMPLIED, INCLUDING IMPLIED WARRANTY OR MERCHANTABILITY OR FITNESS
FOR A PARTICULAR PURPOSE. Neither MASTERBUILT nor the retail establishment selling this
product has authority to make any warranties or to promise remedies in addition to or inconsistent with
those stated above. MASTERBUILT’s maximum liability, in any event, shall not exceed the purchase
price of the product paid by the original consumer/purchaser. Some states do not allow the exclusion or
limitation of incidental or consequential damages. In such a case, the above limitations or exclusions
may not be applicable.
Notwithstanding this limitation of warranty, the following specific restrictions apply for California
residents. If servicing, repairing or replacement of the product is not commercially practicable, the
retailer selling the product or MASTERBUILT will refund the purchase price paid for the product, less
the amount directly attributable to use by the original buyer prior to the discovery of the nonconformity.
In the state of California only, you may take the product to the retail establishment selling this product, in
order to obtain performance under warranty.
This expressed warranty gives you specific legal rights, and you may also have other rights which
vary from state to state.
SAFE STORAGE & MAINTENANCE
• ALWAYS disconnect your gas cylinder after using your appliance.
• Indoor storage of appliance is permissible only if the cylinder is disconnected and removed.
• Cylinders must be stored outdoors out of the reach of children and must not be stored in a
building, garage or any other enclosed area.
• Always store gas cylinder upright and in areas where temperatures won’t exceed 125° F,
and never store a spare cylinder on or near your cooker stand.
• ALWAYS allow your appliance to cool completely before handling.
• Before storing your appliance, dispose of remaining coals and ashes into a noncombustible
container.
• Clean appliance, including special surfaces such as grill racks and water bowls, with
cleaning agents. Wipe outside of smoker with a damp rag.
• If any rusting occurs, use steel wool to clean or buff the affected area.
• NEVER paint the interior of your appliance. The exterior of your appliance may be touched
up by using a high temperature-resistant paint.
• ALWAYS cover and store your appliance in a protected area.
• DO NOT obstruct flow of combustion and ventilation. Keep the ventilation opening(s) of the
cylinder enclosure clear of debris. The cylinder supply system must be arranged for vapor
withdrawal.
• Coat cooker stand with cooking oil after unit has cooled.
• Check the regulator hose and burner parts, air shutter and venturi/valve section carefully.
ALWAYS turn gas OFF at the gas cylinder valve prior to inspecting parts.
• When appliance is not in use, the gas must be turned off at the supply cylinder.
17
OUTDOOR USE ONLY / NEVER LEAVE UNATTENDED
WARNINGS
(continued)
1. When cooking with oil or grease, do not exceed 350° F (177° Celsius). One gallon of oil can reach 350° in 7 to 10 minutes, use a thermometer to check
temperature. When cooker is in operation NEVER LEAVE UNATTENDED, oil will heat
up quickly and ignite at 550° to 700°. (One gallon of oil Max in 10qt to 12qt pots,
Two gallons of oil Max in 26qt pots)
2. Do not store extra cooking oil in the vicinity of this cooking appliance.
3. Do not store or use gasoline or other flammable vapors and liquids in the vicinity of this or any other cooking appliances.
4. An LP cylinder not connected for use shall not be stored within 10 feet (6m) of
this or any other cooking appliance.
5. Keep LP gas cylinder up wind when in use.
• DO NOT use this product for other than its intended purposes.
• ALWAYS perform the soapy water test before using your appliance.
• Before each use, inspect and clean burner/venturi tubes for insects and insect
nests. A clogged tube can lead to a fire beneath the unit. The venturi might be
clogged if burner burns yellow.
• NEVER transport your gas cylinder inside your automobile or trunk. ALWAYS
transport it in the back of a pickup truck.
• Keep your hands, hair and face away from the burner. DO NOT lean over the
appliance when lighting. Be careful of loose hair and clothing during operation.
• NEVER detach a gas cylinder, move or alter fittings when the appliance is in use.
• NEVER place connected gas cylinder under cooker stand. Keep cylinder 18”
away.
• NEVER use a gas cylinder if it shows signs of: dents, gouges, bulges, fire
damage, corrosion, leakage, excessive rust or other forms of visual external
damage. The cylinder might be hazardous and should be checked by a liquid
propane dealer.
• When lighting your burner, remove dome lid from smoker to prevent an explosion
from gas build up.
• If burner does not ignite, turn off the gas and wait 5 minutes before trying to
relight. If the burner goes out during operation, first turn regulator OFF, then the
gas cylinder.
• DO NOT allow anyone to conduct activities around your appliance during or
following its use and until it has cooled. The appliance is hot during operation and
remains hot for a period of time following its use.
• NEVER allow the gas hose to touch any hot surface on the appliance.
• To avoid the possibility of severe burns, ALWAYS allow the hot water or oil in pot
to cool completely before moving.
• Be careful when removing food from the appliance or cookware.
• NEVER use glassware, plastic or ceramic cookware on or in your appliance.
• When using your boiler/fryer, use caution when removing the basket from the pot
to avoid pulling the pot off your appliance.
• The use of alcohol and prescription or nonprescription drugs may impair the
consumer’s ability to properly assemble or safely operate the appliance.
• In a low heat setting, DO NOT allow flame to burn less than 5 inches high.
2
WARNINGS
•
•
•
•
•
•
•
•
•
•
•
•
•
•
•
•
•
•
Grill Smoker Cooker Cover Special
(continued)
THIS UNIT IS FOR OUTDOOR USE ONLY!
DO NOT leave appliance unattended while in use or until it cools completely.
Keep children and pets away from your appliance when in use and until unit cools.
DO NOT leave hot coals or ashes unattended until appliance cools completely.
NEVER add lighter fluid to existing hot or warm coals.
NEVER use gasoline or other highly volatile fluids as a starter. They can explode.
If you use charcoal lighting fluid, allow charcoal to burn until it is covered with a
light ash. Then place upper smoker body on lower body and cover with
dome lid. Following this procedure protects the finish of the unit and keeps fumes
from being trapped in the appliance which could result in a flash fire or explosion.
Lighter fluid should be capped immediately and placed a safe distance from your
appliance before lighting coals.
As an alternative to lighter fluid, use an electric charcoal starter, solid fire starter,
or metal chimney starter.
After unplugging a hot electric starter, remove it carefully and be careful where
you put it. Allow starter to cool completely before storing it.
NEVER use an electric starter in the rain or when standing on wet ground.
Once your charcoal is lit, do not touch the charcoal to see if it is hot.
Use extreme caution when removing smoker dome lid, keeping hands, face
and body safe from possible flare-ups or hot steam.
In the event of a grease fire from meat drippings, cover your smoker with the
dome lid to suffocate the flame.
Allow coals to burn out completely and let the ashes cool for at least 48 hours
before disposing of them.
Dispose of cold ashes by wrapping them in heavy duty aluminum foil and putting
them in a noncombustible container. Be sure there are no other combustible
materials in or near the container.
If you must dispose of the ashes in less time than it takes for them to completely
cool, remove ashes from the appliance, keeping them in heavy duty foil, and soak
them completely with water before disposing of them in a noncombustible
container.
NEVER use charcoal as a heating fuel or for other than cooking outdoors. Using
charcoal indoors can kill you. Read and follow all warnings and instructions on
your charcoal package.
Failure to follow these warnings and instructions properly could
result in fire or explosion, which could cause property damage, personal injury or death.
3
The installation of this cooker must conform with local codes or, in the absence of local codes, with the
National Fuel Gas Code, ANSI Z223.1, Storage and Handling of Liquefied Petroleum Gas,
NFPA/ANSI58, or CAN/CGA-B149.1, Natural Gas Installation Code or CAN/CGA-B149.2, Propane
Installation Code.
Model - MC30
30” Smoker
Cooker Cover
$6.95
Model
MC53 - 53” Patio
Cart and Grill Cover
$8.95
To Order Call 800-489-1581
Yes we are the manufacturer of
The Original HITCH-HAUL®
Wheel Free Carrier
Model - HP2 Black
$89.95
Model - H2A Aluminum
$119.95
Turk N’ Surf™ Turkey Fryer & Seafood Kettle
Model - 26TSB
26qt WIDE BODY pot,
low profile bailing basket with
extra long handle, grab hook, lid,
and Long stem thermometer
$79.95
Aluminum Fry Pot & Basket
Model - 10PB
10.5qt Aluminum Pot & Basket
$29.95
Double Cookers in
Stainless Steel and Black Steel
Model - SMDCL Double Stainless Steel
$199.95
Model - MDCL Double Black
$109.95
Large Stock Pots up to 120 Quarts
Available Call For Pricing or visit
our WEB Site at www.masterbuilt.com
SMDCL Double
Stainless Steel Shown
16
MASTERBUILT Accessory Shop
Visit us on the WEB at www.masterbuilt.com or Call 800-489-1581
* Prices may vary from this catalog.
Thermometers
Model - DFTH
6” Thermometer
$9.95
Model - DF10
10” Thermometer
$14.95
Auto Ignitor
Model - GSIGN
Add an Auto Push Button Ignitor to your
Master Barbecue Grill Smoker Cooker
$9.95
MASTERBUILT Seasonings
PLEASE CHECK CONTENTS OF BOX FOR ALL PARTS.
PARTS LIST:
1. 1 Air Damper
2. 1 Round Handle
3. Heat Indicator
4. Dome Lid
5. 2 Grill Racks
6. 2 “U” Shaped Handles
7. Smoker Body
8. 6 Grill Rack Brackets
(Not Shown)
9. 3 Legs
10. 1 Water Bowl
11. Smoker Access Door
( Not Shown)
12. Base Pan
13. Flame Disk
14. Gas Cooker with
cast burner and regulator
control valve
Gas Cylinder Not Included
1
Model - MSOCO1 - Cajun
7oz Bottle $4.95
Model - MSOSO1 - Steak
7.5oz Bottle $4.95
Model - MSOBO1 - BBQ
6.5oz Bottle $4.95
Model - IS35 - Injecting Syringe
$5.95
Model - MBCV2 - Cooking Video
$9.95
2
3
4
6
7
5
12
9
10
Additional Part For:
Monarch Smoker Only
1 Push Button Auto Ignitor
Private Label Units May Have Added or
Different Parts Packaged.
Model # May Be Different also.
Our #1 Selling Seasoning
is Cajun...From Deep Fried
Turkey to Grilling and
Smoking.
15
Grill - Smoker - Cooker ASSEMBLY INSTRUCTIONS
PART PLACEMENT
1. Place base pan (12) on top of cooker stand (14) and
a line base pan legs with cooker legs.
2. Place flame disk (13) in base pan covering large
center hole in base pan.
3. Place water bowl (10) on brackets in base pan.
Place a grill rack (5) directly on top of water bowl.
4. Place smoker body (7) on top of base pan.
5. Place the other grill rack on top brackets in
smoker body.
6. Place dome lid (4) on of smoker body.
13
14
Extend Cylinder 18” Away
From Cooker While In Use
Tip:
If your burner does not burn blue you need to
check the burner venturi for any obstructions. Dirt
Dobbers, Spiders and other insects will build nest
blocking air and gas flow.
KEEP AIR SHUTTER CLOSED AFTER EACH USE.
4
Grill Smoker Cooker Assembly
Models M7 - M7P - SMM7 and SMM7P
DOME
1. Attach Round handle to top of dome lid using
screw located in handle.
NOTE: BE CERTAIN TO SECURELY TIGHTEN
HANDLE WITH A SCREWDRIVER.
DO NOT TURN HANDLE TO TIGHTEN.
Air damper is Pre-mounted.
FRYING AND BOILING
Round Handle
Heat
Indicator
Air Damper
HEAT INDICATOR
2. Install heat indicator in dome by aligning
the notches on back of indicator with
grooves in hole on dome lid. Rotate
indicator until “Indirect grilling” is top center.
Brackets
SMOKER BODY
3 Mount 2 handles to smoker body using
1/4 x 1 inch bolts and nuts.
Mount 3 brackets into upper smoker body
Handle
using 3/16 x 1/ 2 inch long bolts and nuts.
Tighten bolts securely with brackets in
place and nuts on inside of smoker body.
Note: STAINLESS STEEL brackets are different. Mount
larger brackets in body and smaller ones in base pan.
BASE PAN
4. Mount the legs and brackets into the base
pan using the same 3/16 x 1/2 inch bolt and
nut, through top hole of leg.
5. Secure bottom two holes in leg using
3/16 x 2 inch bolts and nuts. Two per leg.
These bolts are longer so that it will secure your water
bowl in place when charcoal grilling or smoking.
Note:
One leg has a round knock out Plug in it.
Mount it to the back side of the base pan
directly behind the smoker door.
This hole is only used when assembling an
electric smoker or if you would like to convert
your Gas smoker to electric.
SMOKER DOOR
1. Mount door hinge to opening in the side of the
base pan. Hinge can be secured to the inside or
the outside of opening using the two #10 nuts and
bolts supplied.
Push Button Ignitor Assembly
Knock
Out Plug
HOT
706-327-5622
CHAUD
5
CAJUN-COATED FISH
4 fresh or frozen catfish, red snapper
or fillets, 1/2- to 3/4-inch thick
(1 to 1 1/4 lbs.)
1/4 cup all-purpose flour
1/4 cup yellow cornmeal
1 teaspoon dried basil, crushed
1 teaspoon onion powder
1/2 to 1 teaspoon ground red pepper
1/2 teaspoon garlic salt
1/2 teaspoon ground white pepper
1/2 teaspoon dried thyme, crushed
1/3 teaspoon ground black pepper
1/4 teaspoon ground sage
1/4 cup margarine or butter
Thaw fish, if frozen. In a shallow mixing
bowl, combine flour, cornmeal, basil, onion powder, red pepper, garlic salt, white pepper, thyme,
black pepper and sage. Coat both sides of the
fish with the flour mixture. Cook in 1 gallon of oil
at 350°F for 3 to 4 minutes.
HOT
CHAUD
Wire to Burner
Port
*The MONARCH (SMM7 & SMM7P) units are sold with
and ignitors. This is an optional item for the
Master Barbecue unit (M7 & M7P).
1. Bolt ignitor to the outside of cooker using enclosed
hardware. The stainless rod should be placed through
one of the lighting holes.
2. Bend stainless wire in a way that the very end of
the wire is 1/8” above one of the burner port holes.
3. Push red button looking for a blue spark at burner.
Adjust wire until spark is achieved.
SCREAMING BUFFALO WINGS
1 gallon vegetable oil
24 chicken wings
1 small bottle of hot sauce (your choice)
1/2 teaspoon of salt
1/4 teaspoon of pepper
1/4 cup butter or margarine, melted
1 teaspoon white vinegar
Pinch of garlic salt
Celery sticks
Blue cheese dressing
Thaw wings (if frozen) and place into basket.
Pour 1 gallon of oil into 10 1/2-quart pot and
bring temperature to 350°F. Slowly place basket
of wings into oil and cook 8 to 12 minutes.
Remove and drain wings and pour into bowl.
Mix hot sauce with melted margarine and garlic
salt. Pour over wings, mix well and serve.
DEEP FRIED STEAK
2 Ribeye steaks, 1-inch thick
Steak rub
Wash steaks thoroughly. Cover each
side thoroughly with steak rub and
shake off excess.
Submerge steak completely in oil and
fry at 350°F for 4 minutes each.
CREOLE GUMBO
1 can okra, or 2 cups cooked diced okra
1/2 tbsp. flour
1 tsp. salt
1 large onion, chopped
2 cloves garlic
1/2 tsp. pepper
3 tbsp. of bacon drippings
1/2 tsp. cayenne pepper
1 green pepper, chopped
1 tsp. thyme
6 oz. can tomato paste
2 bay leaves
1 1/2 cups cooked rice
1 tsp. parsley, minced
1/2 cup cooked ham, diced
4 quarts water
1/2 pt. oysters with liquid
1/2 cup crab meat or cooked shrimp
In a skillet, sauté okra, onion and
garlic in bacon drippings until browned.
In a large stockpot, bring the water to a
boil over high heat. Meanwhile, add the
ham to the skillet. Add the skillet sauté
mixture and the remaining ingredients to
the stockpot; cover and simmer over
medium heat for 1 hour. Reduce heat to
very low, add shrimp, and simmer slowly
for 10 minutes. Serve the gumbo in soup
bowls over rice.
COOKING TIPS
CHARCOAL
Ignitor
• Always wear cooking gloves when removing smoker dome lid and use
long cooking tongs when adding charcoal or wood, being careful not to
stir up ashes.
NOTE: NEVER ADD LIGHTER FLUID TO HOT OR WARM COALS!
NEVER USE CHARCOAL AS AN INDOOR HEATING FUEL!
14
REGULATOR CONTROL VALVE OPERATIONS
GAS CYLINDER VALVE CONNECTION
GRILLING RECIPES
CARIBBEAN FLAVOR CHICKEN
1 teaspoon salt
1 clove garlic, peeled, plus 2 cloves, minced
1 1/2 teaspoons dried leaf oregano
1/4 teaspoon paprika
1 tablespoon lemon or lime juice
8 chicken pieces (breasts, thighs, drum
sticks)
3 tablespoons oil
1 small onion, minced
1/3 catsup
1/3 cup cider vinegar
With a mortar and pestle or with back of
spoon against bowl, mash salt with peeled
garlic to make a paste. Work in 1/2 teaspoon
oregano, paprika and lemon juice. Rub this
mixture over the chicken. Brush with 1 tablespoon. Place chicken over hot coals and grill,
turning every 7 to 8 minutes, until done.
Meanwhile, sauté a few seconds. Stir in catsup, vinegar and remaining oregano, and simmer 15 minutes. When chicken is done, brush
with sauce and grill 5 minutes longer. Pile
onto a warm platter and serve remaining
sauce at table. Fried plantain or grill-baked
bananas or saffron rice go well with this.
FILLET WITH MUSHROOM SAUCE
Beef fillet, about 4 1/2 pounds
1 1/2 cups red wine
1/4 cup oil
1/4 cup minced onion
1 tbsp. herbs deProvence or other herbs
Mushroom sauce
Buy prime-grade fillet, if possible, and
trim well. Fold and tie the tail to the meat
to form a roast of uniform thickness (or
have butcher do it for you). Place meat in
a plastic bag. Mix wine, oil, onion and
herbs. Pour over the meat; close bag tightly and turn it to coat meat with marinade.
Place bag in dish and marinate meat 2
hours at room temperature or overnight in
refrigerator. Drain meat, reserving marinade. Grill meat 4 inches above hot coals,
turning to brown all sides. This takes about
10 minutes of undivided attention so you
can put out any flash fires. Add damp hickory chips or small hickory sticks. Move
meat to edge of grill or cover grill and cook
15 to 20 minutes longer for rare, 20 to 25
minutes for medium rare. Slice and serve
with mushroom sauce.
ORANGE-GLAZED LEG OF LAMB
1 butter-fly leg of lamb (4-7 lbs.)
3 tablespoons of teriyaki sauce
1/4 cup of orange juice
1 clove garlic, finely minced
1/4 cup orange marmalade
Pour mixture of teriyaki juice, and garlic
over the lamb; cover and refrigerate for 4 to 6
hours, basting occasionally. Grill the lamb 4 to
6 inches from the heat for 20 to 25 minutes on
each side, turning often. Baste with teriyaki
mixture, adding marmalade during the last
half hour of cooking.
GRILLED FLANK STEAK
1 1/2 lbs. flank steak
Marinate in:
1/4 cup Worcestershire sauce
1/3 soy sauce
1tsp. dried, ground ginger or freshly
chopped ginger and the juice of 1 lemon
Place steak in shallow glass casserole
dish and pour marinade over top. Let
marinate at least 3 hours, turning every
hour or so. Remove from smoker and
place on grill for 3 to 4 minutes on each
side. Slice diagonally and serve.
CLOCKWISE
COUNTER
CLOCKWISE
OFF
ON
Before use, turn gas cylinder ON first, then the regulator control
valve ON and light. After use, turn regulator control valve OFF
first, then the gas cylinder OFF.
OFF
ON
CLOCKWISE
COUNTER
CLOCKWISE
REGULATOR CONTROL
FLAME ADJUSTMENT
AIR SHUTTER TO
ADJUST AIR FLOW
TO BURNER
POL CONNECTION
TO GAS CYLINDER
USE A 7/8” WRENCH TO
TIGHTEN. DO NOT HAND
TIGHTEN OR USE PLIERS
NOTE:
If unit is supplied with a type 1
connection hand tighten ONLY
BURNER / HOSE CONNECTION
QUICK TIPS
• Please use extreme caution when adding or
removing food from the smoker unit.
• For the taste of charcoal and the convenience of
gas, add four to five briquettes to your flame disk.
DO NOT use Quick Start or any charcoal saturated
with lighter fluid at any time during the smoking
process.
Gas Cylinder Transporting
and Safety Tip:
Never transport a gas cylinder
inside your car or
trunk of car.Use an
open vehicle such
as a pickup truck.
When having your
gas cylinder filled,
TELL the person filling
cylinder:
DO NOT OVER FILL.
COOKING TIPS
CHARCOAL
• You may need to add additional charcoal during cooking to increase the
temperature. Follow the instructions and warnings in the charcoal
smoking and grilling section.
• Dry, hard woods will burn hotter than charcoal so you may want to
increase the ratio of wood to charcoal.
13
In a low heat setting, DO
NOT allow flame to
burn less than 5
inches high.
USE ONLY A GAS
CYLINDER 18 INCHES IN
HEIGHT OR SMALLER.
A STANDARD 20 POUND
CYLINDER IS BEST
SUITED.
6
SOAPY WATER TEST PROCEDURES
• The soapy water test must be performed each time the tank is connected to
your appliance.
• The soapy water test must be performed outdoors in a well ventilated area.
• When performing the Soapy Water Test always keep appliance away from open
flames, sparks or lit cigarettes.
• This appliance is designed to operate on propane gas only. This product will
not operate on natural gas.
• NEVER use an open flame to test for gas leaks.
PROCEDURE:
1. Remove complete smoker and any cookware from
your cooker stand.
2. Turn regulator to OFF position; turn gas cylinder
valve to OFF position.
3. Prepare your soapy water solution by combining 1
part dish washing liquid with 3 parts water to test for
the possibility of any gas leaks in the hose or
connections. Apply soapy water solution to gas
cylinder fitting.
4. Turn gas cylinder valve on (regulator valve is in OFF
position) and observe cylinder fitting for bubbles. Do
not leave gas on for more than 12 seconds. If
bubbles appear, stop, turn gas cylinder OFF and
retighten the fitting connecting to the cylinder by
turning counter clockwise. Repeat test.
5. With the regulator control valve in the “OFF” position,
turn ON the gas cylinder valve. Open the regulator
control valve 1 full turn and check for bubbles at
control valve, along the entire length of hose and at
the connection to the burner. Do not leave gas on for
more than 12 seconds. If soapy mixture starts
bubbling, gas is leaking through the connection or
hose. Turn the regulator valve OFF and then the gas
cylinder OFF and retighten the connection that is
leaking gas.
6. After test is complete, and there are no leaks, wait a
minimum of 5 minutes for gas fumes to dissipate
before lighting.
STOP
7
GAS CYLINDER VALVE
AND REGULATOR POL
REGULATOR VALVE
SOAPY WATER BUBBLES
SMOKING RECIPES (continued)
SMOKED SHRIMP KEBAB
with GARLIC COCKTAIL SAUCE
36 large shrimp, peeled and deveined (tails left
intact)
2 large red bell peppers, cut into 1-inch pieces
Commercial Italian dressing
Garlic cocktail sauce
Alternately thread shrimp and red pepper
pieces onto 12 wooden skewers. Place in a shallow container and drizzle with Italian dressing.
Cover and refrigerate at least 2 hours. Drain salad
dressing from kabobs. Place shrimp kebab on top
cooking grate. Cover with smoker dome and cook
15 minutes or until shrimp are pink and firm to the
touch. Serve warm with garlic cocktail sauce.
BAKED POTATOES & CORN ON THE COB
Corn can be wrapped in foil or soaked in salt
water and smoked right in the husk. Potatoes can
be wrapped in foil or cooking nails may be used.
SAUSAGE
The Kolbase (Polish sausage), Italian Sausage
or any smoked sausage cooks great! Requires
about 5 lbs. of hardwood briquette, hickory, 1/2
pan of water. Let smoke for about 1 or 1 1/2 hrs.
Sausage makes excellent kebabs.
MUSHROOMS, CAULIFLOWER or SQUASH
Your favorite vegetables can be smoked for that
cook-out flavor. By smoking your vegetables, you
also seal in the nutrients and vitamins which can get
lost through average cooking. After wrapping loose
vegetables in foil add Italian dressing, salt, pepper,
bell peppers and onions.
SMOKING RECIPES
SMOKED FISH FILLETS
3 lbs. fish fillets
1 stick butter
Juice from 1 lemon
1/2 tsp. Worcestershire sauce
5 to 6 dashes Tabasco sauce
1/4 cup parsley, chopped
Fashion a tray with 2 inch sides of
heavy aluminum foil. Place filets in a
single layer. Combine butter, lemon
juice, sauces and parsley, and pour
over fish. Place on grill in smoker,
cover with top and cook for one to two
hours.
SMOKED BEEF BRISKET
5-6 lb.beef brisket (season with spices
to your taste) red pepper, garlic salt,
paprika.
Trim excess fat off brisket. Pound
meat strongly on either side with fist.
On each side sprinkle lightly with red
pepper, fairly heavily with garlic salt,
then cover with paprika. Meat is even
better if seasoned the night before
cooking or early in the day. Smoke 6-8
hours. Slice thin and serve.
BARBECUE RIBS
Sprinkle lemon juice and seasoned
pepper on the ribs and let sit overnight
or at least several hours. When ready
to cook, rub with cooking oil. Paint
with barbecue sauce as desired, either
before, or after, cooking. Smoke or grill
for 4 1/2 to 5 hours.
COOKING TIPS
BURNER/HOSE CONNECTION
DURING ANY PORTION OF THE SOAPY WATER TEST BUBBLES
CONTINUE TO APPEAR, STOP, DO NOT USE AND CONTACT
MASTERBUILT HOTLINE AT (800) 489-1581. WE WILL CORRECT
THE PROBLEM.
WATER BOWL
• Line water bowl with aluminum foil before each use. This will make it easy
to clean and help your water bowl last longer.
• If your water level is low, add more water to the bowl. Move your food
aside and pour water slowly through cooking racks, being careful not to
splash or overfill water.
12
How To Use Your Unit...
SMOKING RECIPES
Use Air Damper to Controls Heat
GAS SMOKING
SMOKE ROASTED ASPARAGUS
IN GARLIC
1 small onion, thinly sliced
1 1/2 pounds fresh asparagus, trimmed
2 tablespoons of butter or margarine
4 cloves garlic, thinly sliced
2 tablespoons lemon juice
1/4 teaspoon of pepper
Line the bottom of a shallow 1-quart gratin
dish with onion slices; arrange asparagus over
onion slices; set aside.
Melt butter in a small skillet over low heat;
add garlic and cook until tender. Remove from
heat and stir in lemon juice, salt and pepper.
Drizzle garlic mixture evenly over asparagus.
(Do not cover dish). Place dish in top cooking
grate of smoker. Cover with smoker lid and
cook 1 hour or until crisp and tender.
BARBECUE SAUCE
3 8-oz. cans tomato sauce
1 small bottle Worcestershire sauce
1/4 tsp. garlic powder
1/2 lb. butter
1/2 cup brown sugar
1tsp. dry mustard
2 tbsps. vinegar
2 tbsps. lemon juice
1/8 tsp. red pepper
1/2 tsp. salt
1/2 tsp. seasoned pepper
Simmer all ingredients for 30 minutes.
For some recipes, you may add some of the
ingredients (juices) to the water bowl;
additional cooking time will need to be added.
See cooking chart.
SMOKED HAM
to the top of flame disk.
1 10-lb. precooked ham
1/4 cup crushed pineapple
1/2 cup honey
2 tablespoons soy sauce (Dale sauce
may be substituted, if available)
Remove fat from ham. Score top of
ham about 1/4” deep. Put water bowl
under middle grill rack. Do not add any
liquid to water bowl (dry smoke). Place
ham on middle grill rack with scored side
up. Place 2-3 wood chunks on charcoal,
or bottom of base pan. Baste top of ham
every hour with mixture. Cook 4 hours or
until 140°F inside ham.
2. Fill water bowl with your favorite marinade or
water. Do not overfill the water bowl. (Line your
water bowl with aluminum foil for easier clean up.)
3. Place grill rack on top of water bowl and add
Place Wood Here
For Smoking
food. Place upper body on base pan. Add grill rack,
food. For dry smoking Do Not use water or marinade.
4. To light gas cooker use
Lighting Hole
a long match or
striker through lighting hole on the side of cook.
Turn red knob on regulator slowly until burner lights.
Adjust burner flame to desired temperature and
cover with dome lid.
(Smoker will Heat Up Quickly)
5. Open the smoker access door carefully when
adding charcoal or wood chips to flame disk. Use
Regulator
Control Valve
extreme caution because the door is hot.
*Never move your smoker while it is in use and
SMOKED TURKEY
6 to 8 lb. turkey
2 cups of hickory or apple chips
Soak the chips in water for at least one
hour. This will create smoke, smoldering
instead of burning them. Rinse the turkey
and dry well. Fold the wings close to the
body and tie or skewer. Close both openings with skewers and tie the legs together tightly.
Secure with holding forks. Place on
the rack over low, indirect heat with the
water pan underneath. Throw half of the
drained wood chips on the hot coals.
Cook for approximately 2 1/2 hours. Be
sure to keep the lid down and the smoke
in. Let rest 10 minutes before carving.
COOKING TIPS
WOOD
• A variety of wood chunks may be used. For example: mesquite, hickory,
pecan, apple or cherry. Do not use resinous woods such as pine.
• Use chunks around 3” to 4” long and approximately 1/2” or 1” thick. Soak
wood in water, wrap in foil and pierce holes in foil. You
will need approximately 3 chunks or sticks.
11
Gas Smoking
1. For gas smoking add desired amount of wood
allow it to cool completely before moving or handling.
Water Bowl is Used Here When
Dry Smoking With Charcoal
SMOKE IS ONLY GENERATED
WHEN WOOD IS PLACED ON
FLAME DISK.
Charcoal Dry
Smoking
To Charcoal Wet Smoke an Extra Water
Bowl Will Need To Be Purchased.
Gas Grilling
Charcoal
Grilling
GAS GRILLING
1. Remove water bowl and
smoker body from unit.
2. Use the same lighting
instructions as smoking.
Water Bowl is Used Here When
Grilling With Charcoal
CHARCOAL Dry SMOKING & GRILLING
SEASONING YOUR
Grill / Smoker & Cooker
To season your unit, light the burner.
Bring the temperature up and maintain 200º .
Place two or three wood chunks on the
flame disk and operate the smoker with no
food or water for two to four hours before
using it.
This allows the unit to settle and removes
that new smell.
******IMPORTANT******
1. Remove flame disk from unit.
2. Place the water bowl in the bottom of the base
pan and ad the desired amount of charcoal.
(For easy clean up line bowl with aluminum foil.)
3. Follow product placement in above steps for
grilling and smoking.
4. To generate smoke add wood chips or chunks in
charcoal bowl.
5. To water smoke an extra water bowl will need to
be purchased from Masterbuilt or dealer.
6. Follow all lighting and warning instructions on
charcoal bag.
OUTDOOR USE ONLY / NEVER LEAVE UNATTENDED
8
GAS BOILING AND FRYING INSTRUCTIONS
1. Remove your smoker from cooker stand.
2. Check the regulator control valve to be
certain it is in the OFF position.
3. Place pot on stand and fill with desired
amount of water or oil. DO NOT use more
than 1 gallon of oil or 2 gallons of water in
a 10.5 qt. pot. Reduce the amount of oil or
water when using smaller cookware. This
will help avoid dangerous boil overs. DO
NOT place your empty pot over the open
flame; it will damage the pot.
4. Follow the gas lighting instructions listed
under Gas Smoking Instructions on
5. Bring your water or oil to the desired
temperature; lower basket into pot slowly to
avoid boil overs. OIL TEMPERATURE
SHOULD NEVER EXCEED 350°F! We
also recommend using a thermometer for
frying.
6. After use, first turn regulator control
valve OFF, then the gas cylinder OFF.
Always allow your gas stove, pot and
contents to cool completely before
touching, moving or storing.
NOTE: If it begins to rain while you are
frying, turn the regulator to OFF position,
then the gas cylinder to OFF position and
cover pot with aluminum foil or lid. DO
NOT move cooker stand or pot. DO NOT
move indoors, under cover or overhang of
house or building!
In a low heat setting, do not allow
flame to burn less than 5 inches high.
Cooking Chart for Gas and Charcoal Smoking
DO NOT use pots larger than 14 and
1/2 inches in diameter on the cooker stand. If you are using pots purchased from MASTERBUILT, it is
safe to use the 24- and 37-qt. pots.
Pot extension arms must be used
on the cooker stand if you plan to
use the 55-, 80-, 100- and 120-qt.
pots.
Smokers are sold
with and without
pot and basket.
Frying/Boiling
Never leave appliance
unattended while it is in use
and until appliance, oil or
water have cooled completely.
1. When cooking with oil or grease, do not exceed 350° F (177° Celsius). One
gallon of oil can reach 350° in 7 to 10 minutes, use a thermometer to check
temperature. When cooker is in operation NEVER LEAVE UNATTENDED, oil will
heat up quickly and ignite at 550° to 700°. (One gallon of oil Max in 10qt to 12qt
pots, Two gallons of oil Max in 26qt pots)
2. Do not store extra cooking oil in the vicinity of this cooking appliance.
3. Do not store or use gasoline or other flammable vapors and liquids in the
vicinity of this or any other cooking appliances.
4. An LP cylinder not connected for use shall not be stored within 10 feet (6m)
of this or any other cooking appliance.
5. Keep LP gas cylinder up wind when in use.
9
BEEF
Quantity
Heat
Setting
Charcoal
(Amount)
Water
(Quart)
Wood
Chips
(cups)
Cooking
Time (hrs.)
Meat Thermometer
Internal Temp. or
Test for Doneness
Whole rump roast
Pot roast (arm, chuck,
blade,top, bottom round)
3 - 4 lbs.
200º
5 - 7 lbs.
3
2
4 - 5 lbs.
200º
7 - 8 lbs.
3 -4
2-3
Short ribs
3 - 4 lbs.
4 - 6 lbs.
200º
200º
5 - 7 lbs.
7 - 8 lbs.
3
4
2
3
Well done may
1 1/2-2 1/2 require longer
3-4
cooking times.
Brisket
Steak
3 - 4 lbs.
5 - 7 lbs.
200º
200º
7 - 8 lbs.
8 - 10 lbs.
4
5-6
3
3
3-4 1/2
4-6 1/2
PORK
Loin roast,
bone in
3 - 4 lbs.
5 - 7 lbs.
200º
200º
8 lbs.
8 lbs.
4
6
2
3
3 1/2 -4 1/2 170°F Well Done
5-7
Loin roast, boneless
3 - 5 lbs.
200º
10 lbs.
4-5
3
3 1/2 -5 1/2
Spareribs
4 - 6 lbs.
7 - 10 lbs.
200º
8 - 10 lbs.
10 lbs.
4
5-6
3
3
Country Style
back ribs
4 - 6 lbs.
200º
7 - 10 lbs.
5
3
2 1/2 -3 1/2
Well done Meat pulls
3 1/2 - 5
away from bone
4-5
Pork Chops 1-inch thick
6 - 10 chops
200º
5 - 7 lbs.
3-4
3
2-3
HAMS
Fully-cooked
Pre-cooked
Fresh
5 - 7 lbs.
8 - 10 lbs.
16 - 18 lbs.
200º
7 - 8 lbs.
10 lbs.
10 lbs.
4
5
6
3-4
3
5
POULTRY
Chicken(2 whole)
(4 whole)
Hen (one)
2-3 lbs. each
2-3 lbs. each
5 lbs.
200º
5 - 7 lbs.
8 - 10 lbs.
10-12 lbs.
3-4
4
3
2
3
2
Turkey
8 - 10 lbs.
11 - 13 lbs.
14 - 16 lbs.
200º
8 lbs.
8 - 10 lbs.
10-12 lbs.
5
6
6
3
3
4
4-6
6 - 7 1/2
6-8
LEG OF LAMB
5 - 7 lbs.
200º
8 lbs.
4-5
3
3 1/2 - 5
VEAL RUMP ROAST
3 - 5 lbs.
200º
5 - 7 lbs.
4
2
140°F Rare
160°F Medium
1/12 - 3 1/2 170°F Well Done
FISH & SEAFOOD
Whole fish
Fillets
Whole salmon
4 - 6 lbs.
Full grid
6 - 7 lbs.
200º
7 lbs.
5 lbs.
10 lbs.
4
3
5-6
2-3
1-2
3
Flesh white, flakes
2-3
1/12 - 2 1/2 when forked
4 - 6 1/2
Shrimp, crab legs,
lobster, clams
Full grid
200º
5 lbs.
3
1-2
1-2
Shrimp pink
Shells open
WILD GAME
cornish hens
Small game birds
(Quail, dove, etc.)
4 hens
12 - 16 birds
200º
5 - 7 lbs.
7 - 10 lbs.
3
4
2
2-3
2-3
2-4
Leg moves easily in
joint
5 - 7 lbs.
200º
8 - 10 lbs.
4-5
2-3
4-5
Large game bird
(Pheasant, duck, goose,
etc.)
2 1/2 -3 1/2 140°F Rare
160°F Medium
170°F Well done
3-4
170°F Well Done
2 1/2 - 3 1/2 140°F Well Done
4-6
160-170°F Well Done
6-8
185°F Well Done
2 1/2 - 3 1/2
3-4
180°F Leg moves
3 - 31/2
easily in joint
185°F Leg moves
easily in joint.
180-185°F Well Done
•When the outside temperature is cooler than 65°F
and the altitude is above 3,500 feet, we suggest
adding more cooking time. (If you are not sure the
meal is cooked, use a meat thermometer to test the
meat.)
•Do not lift your smoker lid during the smoking
process to check food. This will extend your cooking
time due to heat escape.
•If you are using only 1 grill rack, use the upper grill
rack for better results. If you need to use both grill
racks place the meat that requires the least cooking
time on the top grill.
OUTDOOR USE ONLY / NEVER LEAVE UNATTENDED
10