1
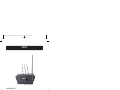
P74390-A_F1UP0001_man.qxd
11/25/03
4:06 PM
Page 2
Wireless USB Print Server
Share your USB printers wirelessly with
your networked computers
User Manual
F1UP0001
P74390-A_F1UP0001_man.qxd
11/25/03
4:06 PM
Page 3
TABLE OF CONTENTS
Introduction . . . . . . . . . . . . . . . . . . . . . . . . . . . . . . . . . . . . . . . . . . . . . . .1
System Requirements . . . . . . . . . . . . . . . . . . . . . . . . . . . . . . . . . . . . . .1
Package Contents . . . . . . . . . . . . . . . . . . . . . . . . . . . . . . . . . . . . . . . . .1
Overview . . . . . . . . . . . . . . . . . . . . . . . . . . . . . . . . . . . . . . . . . . . . . . . . . .2
Features . . . . . . . . . . . . . . . . . . . . . . . . . . . . . . . . . . . . . . . . . . . . . . .2
Applications and Advantages . . . . . . . . . . . . . . . . . . . . . . . . . . . . . . . . .2
Product Specifications . . . . . . . . . . . . . . . . . . . . . . . . . . . . . . . . . . . . . .3
Knowing your Print Server . . . . . . . . . . . . . . . . . . . . . . . . . . . . . . . . . . .4
Connecting the Print Server Using the Setup Wizard . . . . . . . . . . . . . . . . . . . .6
Setup for Advanced Users . . . . . . . . . . . . . . . . . . . . . . . . . . . . . . . . . . . . . .8
Web Configuration . . . . . . . . . . . . . . . . . . . . . . . . . . . . . . . . . . . . . . . . . .12
Accessing Web Configuration Menus . . . . . . . . . . . . . . . . . . . . . . . . . . . .12
Home Page . . . . . . . . . . . . . . . . . . . . . . . . . . . . . . . . . . . . . . . . . . . .13
Login Screen . . . . . . . . . . . . . . . . . . . . . . . . . . . . . . . . . . . . . . . . . . .13
IP Address . . . . . . . . . . . . . . . . . . . . . . . . . . . . . . . . . . . . . . . . . . . . .14
Channel and SSID . . . . . . . . . . . . . . . . . . . . . . . . . . . . . . . . . . . . . . . .15
Encryption . . . . . . . . . . . . . . . . . . . . . . . . . . . . . . . . . . . . . . . . . . . . .16
Site Survey . . . . . . . . . . . . . . . . . . . . . . . . . . . . . . . . . . . . . . . . . . . .21
Print Server Configuration . . . . . . . . . . . . . . . . . . . . . . . . . . . . . . . . . . .22
Upgrade Firmware . . . . . . . . . . . . . . . . . . . . . . . . . . . . . . . . . . . . . . . .23
System Settings (Changing Password) . . . . . . . . . . . . . . . . . . . . . . . . . . .24
Printing to Multiple Print Servers . . . . . . . . . . . . . . . . . . . . . . . . . . . . . . . .25
Adding a Belkin Port Monitor and Configuring It for a Specific Print Server . . . . . .25
Belkin Port Monitor Advanced Menu . . . . . . . . . . . . . . . . . . . . . . . . . . . . . .28
Opening the Belkin Port Monitor Advanced Menu . . . . . . . . . . . . . . . . . . .28
Adding a Second Belkin Port Monitor and Configuring It for a Specific
Print Server . . . . . . . . . . . . . . . . . . . . . . . . . . . . . . . . . . . . . . . .29
Using the Print Server for FTP Printing . . . . . . . . . . . . . . . . . . . . . . . . . . . .32
Sending Print Jobs to Printers Connected to the Print Server Using FTP . . . . .32
Troubleshooting . . . . . . . . . . . . . . . . . . . . . . . . . . . . . . . . . . . . . . . . . . . .35
Technical Support . . . . . . . . . . . . . . . . . . . . . . . . . . . . . . . . . . . . . . . . . . .38
Information . . . . . . . . . . . . . . . . . . . . . . . . . . . . . . . . . . . . . . . . . . . . . . .39
P74390-A_F1UP0001_man.qxd
11/25/03
4:06 PM
Page 1
INTRODUCTION
Thank you for purchasing the Belkin Wireless USB Print Server. Now you can
share your USB-equipped printers around the home or office—without using
cables. This product adds the convenience of wireless connection to conventional
print-server functionality. It offers an easy installation and setup to have you
sharing printers wirelessly in minutes. Please read through this manual
completely to be sure that you are getting the most from your Print Server.
System Requirements
• Printer compatible with USB 1.1
• USB cable for each printer
• 802.11g or 802.11b wireless network
• PC with Windows® 98SE, Me, 2000, XP
Package Contents
• Belkin 802.11g Wireless USB Print Server
• Ethernet cable (not needed for wireless operation)
• Installation Software CD
• User Manual
• Quick Installation Guide
• Registration Card
1
P74390-A_F1UP0001_man.qxd
11/25/03
4:06 PM
Page 2
OVERVIEW
Features
This device complies with the IEEE 802.11g standard in order to communicate
with other 802.11b- and 802.11g-compliant wireless devices at 11Mbps and
54Mbps. 802.11g products run at speeds of up to 54Mbps and operate on the
same 2.4GHz frequency band as 802.11b Wi-Fi products.
• Integrated, easy-to-use Print Server Setup Wizard
• Wireless interface compliance with the IEEE 802.11g standard products
• Ethernet interface, for operation in virtually all Ethernet networks
• 64- or 128-bit wireless encryption (WEP)
• Support for both Infrastructure and Ad-Hoc (peer-to-peer) networking modes
• Data rate of up to 54Mbps
• Easy installation and use
• External antenna
• LEDs: Power, Ethernet link, Wireless, Status, and Error
Applications and Advantages
• Wireless printing around the home or office
Offers the freedom of printing from networked PCs without cables.
• Connection rates of up to 54Mbps (802.11g)
Provides immediate, higher-speed wireless connectivity at home and work,
without compromising the use of existing 802.11b products.
• Compatibility with 802.11b products
802.11g wireless LAN solutions are backward-compatible with existing Wi-Fi
(IEEE 802.11b) products and with other IEEE 802.11g products.
• Difficult-to-wire environments
Enables printer sharing in buildings with solid or finished walls, or open
areas where wiring is difficult to install.
• Frequently changing environments
Adapts easily in offices or environments that frequently rearrange or
change locations.
• Temporary LANs for special projects or peak time
Sets up temporary networks such as at trade shows, exhibitions, and
construction sites, which need networks on a short-term basis; also
2
P74390-A_F1UP0001_man.qxd
11/25/03
4:06 PM
Page 3
OVERVIEW
companies that need additional printers for a peak activity period.
• SOHO (Small Office/Home Office) networking needs
Provides easy and quick small network installations that SOHO users need.
Product Specifications
Standards:
IEEE
IEEE
IEEE
IEEE
802.3
802.3u
802.11g
802.11b
Wireless:
Radio Technology
Data Rate
Direct Sequence Spread Spectrum (DSSS)
802.11b: 11, 5.5, 2, 1Mbps
802.11g: 54, 48, 36, 24, 18, 12, 9, 6Mbps
Modulation
802.11b: CCK, DQPSK, DBPSK
802.11g: OFDM
Operating Frequency
2.412–2.497GHz ISM band
Operating Channels
802.11b: 11 for North America, 13 for Europe
802.11g: 11 for North America, 13 for Europe
Security
64-bit WEP/128-bit encryption
Protocol Supported:
CSMA/CD, TCP, IP, UDP
Management:
Software & Browser-based
Ports:
1 10/100Base-T RJ45 port
2 USB ports
1 power jack
1 reset button
3
P74390-A_F1UP0001_man.qxd
11/25/03
4:06 PM
Page 4
OVERVIEW
Knowing your Print Server
a
b
c
a. Power LED
Solid:
Off:
Server is ON
Server is OFF
d
e
b. LAN LED
Solid:
Off:
Blinking:
Green:
Amber:
Connected to Ethernet
Ethernet disconnected
Transferring data
10Mbps device connected
100Mbps device connected
c. WLAN Link LED
Solid:
Blinking:
Off:
Print Server is LINKED to a wireless network
Transferring data wirelessly
Print Server is NOT linked
d. Status LED
Solid:
Blinking:
OK
Attempting to obtain IP address while booting, or printing in progress
e. Error
Solid (Red):
Off:
Printer missing or printer error
OK
4
P74390-A_F1UP0001_man.qxd
11/25/03
4:06 PM
Page 5
OVERVIEW
a
b
c
a. Printer 1/Printer 2
These ports are used to connect one or two USB printers.
Note: These ports cannot be expanded using a USB hub.
b. Ethernet Port
This port is used to connect the Print Server to an Ethernet network via CAT5 cable.
Note: Using this port will automatically disable wireless functionality in the Print Server.
c. Reset/Test Button (3 functions)
Print Page: For most printers, this function results in a test page to be printed. The
test page will include Print Server settings including the IP address and other
information that might be handy for troubleshooting the Print Server. To print test
page, depress the Reset/Test button momentarily.
WARNING: Some printers do not support this function.
Reset: To reset or reboot the Print Server to existing settings, depress the Reset/Test
button for five or more seconds.
Restore Factory Defaults: To restore the Print Server to factory defaults, depress the
Reset/Test button for 10 seconds while powering up the Print Server.
5
P74390-A_F1UP0001_man.qxd
11/25/03
4:06 PM
Page 6
CONNECTING THE PRINT SERVER USING THE SETUP WIZARD
Make sure that each computer can print to the USB printer before
installing the Wireless USB Print Server.
1. Connect your printer directly to each computer on the network and install
USB printer drivers (see your printer documentation for detailed
instructions). The Print Server requires that the correct drivers are loaded
and working (printing) before the Print Server is installed.
When installing printer drivers, install as:
• Local printer, not network printer
• USB port
• Not to be shared
• Default printer for all printing (if desired)
Note: Verify functionality on each computer by printing a test page prior to
moving to the next installation step.
2. Insert the Print Server Setup Wizard CD into your CD-ROM drive on the first PC.
Note: If the Print Server Setup Wizard does not start up automatically, select
your CD-ROM drive from “My Computer” and double-click on the file
named “Setup” on the CD-ROM.
3. The Wizard will start.
Note: The Wizard will remind installer that step 1 needs to be done before
continuing. If step 1 is complete, click “Next” to proceed. If not,
please stop Wizard and complete step 1 for all computers.
6
P74390-A_F1UP0001_man.qxd
11/25/03
4:06 PM
Page 7
CONNECTING THE PRINT SERVER USING THE SETUP WIZARD
4. Follow instructions from each screen of the Print Server Setup Wizard.
5. When you see the following screen, installation is complete for that PC. Click
“Quit” and remove the CD from your computer.
Important: Repeat Steps 2-5 for each additional PC you would like to
print from.
7. Enjoy your Print Server!
7
P74390-A_F1UP0001_man.qxd
11/25/03
4:06 PM
Page 8
SETUP FOR ADVANCED USERS
Install Print Drivers
Be sure to install the necessary print drivers on each computer that will be
accessing the Print Server.
Set Up Print Server
1. Plug your printer (power on) into the Print Server.
2. Power up the Print Server within wireless range of your 802.11g or 802.11b
wireless network.
3. Allow approximately one minute for the Print Server to boot.
4. Verify that the Status light is illuminated and that the Error light is
not illuminated.
5. Determine the Print Server’s IP address, using one of the following
methods:
a) New Print Servers are configured to receive IP addresses dynamically. If
your network has a DHCP server, the Print Server will obtain an IP
address from your network. If the DHCP server supports a client list, the
client list will list the IP address assigned to the Print Server. If a DHCP
server is not available, after 1.5 minutes the Print Server will revert to
to 192.168.2.253.
b) If the Print Server has been configured previously, then it will have
been set to a static IP address that could be different for
every network.
Note: Restoring factory defaults on the Print Server by holding in the
reset button for 10 seconds while repowering the Print Server will
restore the IP address to dynamic.
c) Run the program “PSF.exe” from the Installation CD. This will find
the IP address and link automatically to the web-based
management interface.
d) Go to the last step of the Print Server Installation Wizard, which has an
Advanced button that finds the IP address and links automatically to
the web-based management interface.
8
P74390-A_F1UP0001_man.qxd
11/25/03
4:06 PM
Page 9
SETUP FOR ADVANCED USERS
6. Verify that the computer is in the same subnet as the Print Server (The
first three octets of the IP addresses are the same).
7. Type the Print Server’s IP address into your Internet browser from any
computer. For example, if your IP address is 192.168.2.225, type
“192.168.2.225” (do not type in anything else such as “http://” or
“www”). Then press the “Enter” key.
8. Clicking the “Login” button or clicking on any one of the links on the home
page will take you to the login screen. The Print Server ships with no
password entered. In the login screen, leave the password blank and click
“Submit” to log in.
9. Set the SSID of your wireless network by clicking “Channel and SSID” (see
“Web Interface – Channel and SSID” for more info).
10. Set the IP address for the Print Server by clicking “IP Address” (see “Web
Interface – IP Address” for more info).
11. Set encryption for the Print Server (if desired) by clicking “Encryption”.
12. Cycle power on the Print Server to reboot it to the new configurations.
9
P74390-A_F1UP0001_man.qxd
11/25/03
4:06 PM
Page 10
SETUP FOR ADVANCED USERS
Configure Computers to Print to the Print Server
1. Install Port Monitor software on each computer by running “instport.exe” from
the CD.
2. Configure the Belkin Port Monitor on each computer printer driver to point to
the correct Print Server as follows:
a) In Windows, select the printer’s properties for the printer connected to
the Print Server and select the “Port” tab, select the Belkin port, and
click “Configure Port...”.
b) On the “Belkin Port: Properties” window, click “Locate Servers”.
c) On the “Available Servers” window, select the Print Server you want to
print to.
10
P74390-A_F1UP0001_man.qxd
11/25/03
4:06 PM
Page 11
SETUP FOR ADVANCED USERS
d) Click “OK” to close. On the “Belkin Port: Properties” window, the name
of the Print Server you selected will appear. Click “OK” to close.
e) On the Ports tab, disable bidirectional support if currently enabled.
Click “Apply”.
f) Click “OK” to close.
g) If there is a second printer connected to the Print Server, select the
properties for that printer and click the “Ports” tab; select the Belkin
port that was just configured.
Note: If more than one Print Server is available on your network, refer to the
section “Printing to Multiple Print Servers”.
11
P74390-A_F1UP0001_man.qxd
11/25/03
4:06 PM
Page 12
WEB CONFIGURATION
Accessing the Web Configuration Menus
1. Power up the Print Server that is within wireless range of your wireless
network or is connected to your network using an Ethernet cable.
2. Allow approximately one minute for the Print Server to boot and obtain an
IP address.
3. Determine the Print Server’s IP address, using one of the
following methods:
a) New Print Servers are configured to receive IP addresses dynamically.
If your network has a DHCP server, the Print Server will obtain an IP
address from your network. If the DHCP server supports a client list,
the client list will list the IP address assigned to the Print Server. If a
DHCP server is not available, after 1.5 minutes the Print Server will
revert to 192.168.2.253.
b) If the Print Server has been configured previously, then it will have
been set to a static IP address that could be different for every
network.
Note: Restoring factory defaults on the Print Server by holding in the
reset button for 10 seconds while repowering the Print Server will
restore the IP address to dynamic.
c) Run the program “PSF.exe” from the Installation CD. This will find
the IP address and link automatically to the web-based
management interface.
d) Go to the last step of the Print Server Installation Wizard, which has
an Advanced button that finds the IP address and links automatically
to the web-based management interface.
4. Type the Print Server’s IP address into your Internet browser from any
computer. For example, if your IP address is 192.168.2.225, type
“192.168.2.225” (do not type in anything else such as “http://” or
“www”). Then press the “Enter” key.
12
P74390-A_F1UP0001_man.qxd
11/25/03
4:06 PM
Page 13
WEB CONFIGURATION
Web Interface – Home Page
After entering the IP address of the Print Server, you will see the screen
illustrated below. This page shows most critical configuration information for
the Print Server. To modify settings, choose a topic from the menu on the left
of the screen.
Web Interface – Login Screen
Clicking on any menu item will cause a login prompt to appear. If a password
has been set previously, enter it here. New Print Servers ship without
passwords; if this is the case, click “Submit” to continue.
13
P74390-A_F1UP0001_man.qxd
11/25/03
4:06 PM
Page 14
WEB CONFIGURATION
Web Interface – IP Address
This menu allows the user to set a Static IP address, or to set the Print Server
to obtain an IP address automatically as a DHCP client. Although Belkin
designs the Print Server to obtain an IP address automatically, running the
Wizard will change the IP address to static. Static is the recommended method
of operation, since the computer will be configured to print to a specific IP
address which, if changed, would make the Print Server inoperable.
Note: When choosing an IP address manually, be sure to choose a unique IP
address in the same domain (first three sets of digits the same) as the
gateway of your network.
14
P74390-A_F1UP0001_man.qxd
11/25/03
4:06 PM
Page 15
WEB CONFIGURATION
Web Interface – Channel and SSID
This menu allows the user to program the wireless settings.
• “Enable Wireless Networking” is on by default. Connecting the Print Server
via an Ethernet cable to the network will automatically disable wireless
networking.
• “SSID” is the wireless name of your network. The default setting is “ANY”.
This allows the Print Server to connect to the first wireless network it sees.
Running the Wizard automatically changes “ANY” to the network SSID found
during the setup procedure.
• “Network Type” refers to either an Infrastructure or Ad-Hoc network. Any
network with a wireless router or access point is considered an
Infrastructure network (default).
• “Channel” is only applicable for Ad-Hoc installations. In infrastructure
networks, the wireless router or access point sets the channel
automatically.
• To see wireless networks in your area and choose the one you wish to
connect to, see “Web Interface – Site Survey” on the next page.
15
P74390-A_F1UP0001_man.qxd
11/25/03
4:06 PM
Page 16
WEB CONFIGURATION
Web Interface – Encryption
IMPORTANT: Use the following encryption information only if your network
is encrypted. If it is not, leave the encryption mode (“WEP
Mode” in the dialog box illustrated below) set to its
default, “Disabled”.
This menu allows you to activate your Print Server’s encryption feature, which
is determined by your existing LAN encryption setting.
To set encryption for your Print Server choose the matching setting in the
dialog box above. The following briefly explains the various settings your
software makes available:
• 64-bit manually: Selecting this setting will allow you to enter your
64-bit keys, if your wireless network uses 64-bit encryption (see dialog
box on the next page).
• 64-bit automatically: Selecting this setting will allow you to enter a pass
phrase to automatically generate encryption keys for your Print Server.
(Caution: This choice can generate new keys that will not function with an
existing network. If your network keys [in your router] are already set, use
manually instead.)
• 128-bit manually: Selecting this setting will allow you to enter your
128-bit keys, if your existing wireless network is encrypted using
128-bit encryption.
16
P74390-A_F1UP0001_man.qxd
11/25/03
4:06 PM
Page 17
WEB CONFIGURATION
• 128-bit automatically: Selecting this setting will allow you to enter a pass
phrase and the Print Server will determine the keys automatically. (Warning:
Choosing “automatically” will generate new keys that may not function with
an existing network. If your network keys [in your router] are already set,
use “manually” instead.)
WEB Interface – Encryption (64-bit manually)
This menu allows the user to enter keys for 64-bit encryption.
To set encryption for your Print Server:
• WEP Mode: Select encryption mode from the drop-down menu.
• WEP Key: Select the appropriate Key number and enter hex digits into all 20
fields consistent with your existing wireless network settings.
(Warning: Any inconsistencies with your network’s settings will cause the
Print Server not to connect to your wireless network).
• Authentication Mode: Default is “open + shared”, which operates with all
64-bit networks.
• Apply Changes: Click this button to complete your settings.
NOTE: After changing encryption settings, the Print Server must be restarted
(power-cycled) to reestablish communication with the network.
17
P74390-A_F1UP0001_man.qxd
11/25/03
4:06 PM
Page 18
WEB CONFIGURATION
WEB Interface – Encryption (64-bit automatically)
This menu allows the user to enter keys for 64-bit encryption.
This mode is exactly like 64-bit manually, (above) except:
• Pass Phrase: Entering a phrase here, for example “Jack and Jill went up the
hill” will result in automatic generation of hex keys. (Note: Write these
down for reference as they must be typed into other network devices [your
router] manually for all to interoperate.)
• Apply Changes: Click this button to complete your settings.
NOTE: After changing encryption settings, the Print Server must be restarted
(power-cycled) to reestablish communication with the network.
18
P74390-A_F1UP0001_man.qxd
11/25/03
4:06 PM
Page 19
WEB CONFIGURATION
WEB Interface – Encryption (128-bit manually)
This menu allows the user to enter keys for 128-bit encryption.
To set 128-bit encryption for your Print Server:
• WEP Mode: Select encryption mode from the drop-down menu.
• WEP Key: Enter hex digits into all 13 fields consistent with your existing
wireless network settings. (Warning: Any inconsistencies with your
network’s settings will cause the Print Server not to connect to your
existing wireless network).
• Authentication Mode: Default is “open + shared”, which operates with all
128-bit networks.
• Apply Changes: Click this button to complete your settings.
NOTE: After changing encryption settings, the Print Server must be restarted
(power-cycled) to reestablish communication with the network.
19
P74390-A_F1UP0001_man.qxd
11/25/03
4:06 PM
Page 20
WEB CONFIGURATION
WEB Interface – Encryption (128-bit automatically)
This menu allows the user to enter keys for 128-bit encryption.
This mode is exactly like 128-bit manually, except:
• Pass Phrase: Entering a phrase here, for example “Jack and Jill went up the
hill” will result in automatic generation of hex keys. (Note: Write these down
for reference as they must be typed into other network devices [your router]
manually for all to interoperate.)
• Apply Changes: Click this button to complete your settings.
NOTE: After changing encryption settings, the Print Server must be restarted
(power-cycled) to reestablish communication with the network.
20
P74390-A_F1UP0001_man.qxd
11/25/03
4:06 PM
Page 21
WEB CONFIGURATION
Web Interface – Site Survey
This menu allows the user to see all wireless networks in the area and connect to one.
21
P74390-A_F1UP0001_man.qxd
11/25/03
4:06 PM
Page 22
WEB CONFIGURATION
Web Interface – Print Server Configuration
This menu allows the user to modify the following parameters:
• Print Server Name: This field identifies the Print Server by name, and each
Print Server has a unique name. Unique names are critical in a network
with more than one Print Server. If the user wishes to change the name,
make sure to use unique names.
• Raw Printing: This feature allows clients to print to the Print Server using
the standard TCP/IP printer port built into Windows XP and 2000 instead of
the Belkin Port Monitor. Using Raw Printing requires the user to configure
all port parameters manually and is not recommended for users unfamiliar
with TCP/IP printing.
• FTP Printing: This feature enables the printer to receive print jobs sent by
FTP (see FTP Printing for detailed instructions). Disabling this feature will
prevent FTP jobs.
22
P74390-A_F1UP0001_man.qxd
11/25/03
4:06 PM
Page 23
WEB CONFIGURATION
Web Interface – Upgrade Firmware
This menu allows the user to upgrade the Print Server’s firmware. Before
running this application, download the new firmware from the Belkin website
at www.belkin.com. Be careful to take note of the location of the downloaded
file on your computer’s hard disk. After downloading, click “Browse” on the
screen shown below, select the file name of the downloaded firmware, then
click “Apply Changes”. The firmware upgrade will take a few minutes.
NOTE: Do not interrupt the process by removing power from the Print
Server or you could cause permanent damage to the device.
23
P74390-A_F1UP0001_man.qxd
11/25/03
4:06 PM
Page 24
WEB CONFIGURATION
Web Interface – System Settings (Changing Password)
The Print Server ships with NO preset password. If you wish to set a password
for greater security, be sure to choose a password that you will remember, and
make a note of it. This utility will require you to enter the new password
twice. If you are entering a password for the first time, leave the “current”
password field blank. Press “Apply Changes” when done.
The Web page auto-refresh interval setting can be changed in this menu. If
you want a slower or faster interval, choose a number in the range and press
“Apply Changes”.
24
P74390-A_F1UP0001_man.qxd
11/25/03
4:06 PM
Page 25
PRINTING TO MULTIPLE PRINT SERVERS
If more than one Print Server is available on your network, and some
computers need to be able to print to more than one Print Server, you will
need to install the included Belkin Port Monitor (a virtual printer port)
software on your PC. The Belkin Port Monitor can then be configured to select
different Print Servers on your network to handle specific print jobs.
Adding a Belkin Port Monitor and Configuring It for a Specific Print Server
1. In Windows, select the printer’s properties and select the “Ports” tab.
2. Click “Add Port”.
A window showing the printer ports installed on the PC will open. Select
“Belkin Port” and, in the “Printer Ports” window, click “New Port”.
25
P74390-A_F1UP0001_man.qxd
11/25/03
4:06 PM
Page 26
PRINTING TO MULTIPLE PRINT SERVERS
3. In the “Enter New Port” window, enter a unique name for the port and click “OK”.
4. Click “Close” on the “Printer Ports” window.
5. On the “Ports” tab, select the newly created port; click “Configure Port”.
6. On the next window (Belkin Port 2: Properties), click the “Locate
Servers” button.
26
P74390-A_F1UP0001_man.qxd
11/25/03
4:06 PM
Page 27
PRINTING TO MULTIPLE PRINT SERVERS
7. On the “Available Servers” window, select the Print Server to which you
want to print.
8. Click “OK” to close. In the “Belkin Port 2: Properties” window, the name of
the Print Server you selected will appear in the window.
9. Click “OK” to close.
10. Repeat these steps for each additional Print Server on your network.
Warning: When configuring the Port Monitor to send jobs to a specific Print
Server, make sure that the correct port is selected for the printer driver
in Windows and that the corresponding printer is actually connected to
the Print Server that the port is indicating. Mismatching printer
drivers, ports, and Print Servers will result in failed print jobs or error
prints of multiple pages of indiscernible characters.
27
P74390-A_F1UP0001_man.qxd
11/25/03
4:06 PM
Page 28
BELKIN PORT MONITOR ADVANCED MENU
In most cases, the Belkin Port Monitor (a virtual printer port) software will be
automatically installed and configured by the Print Server Setup Wizard. Some
advanced users may choose to manually configure the Belkin Port Monitor
software. This can be achieved by using the Belkin Port Monitor’s Advanced
Menu, which allows the user to enter a specific Print Server’s IP address and
to designate a specific printer or “queue” for print jobs connected to that
Print Server. The Advanced Menu features help when there is more than one
Print Server available on your network, and when print jobs fail because the
Port Monitor cannot determine the name of the printer.
Opening the Belkin Port Monitor Advanced Menu
1. In Windows, select the printer’s properties and select the “Ports” tab,
select the Belkin Port, and click “Configure Port”.
2. In the “Belkin Port: Properties” window, click the “Advanced” tab.
28
P74390-A_F1UP0001_man.qxd
11/25/03
4:06 PM
Page 29
BELKIN PORT MONITOR ADVANCED MENU
3. The Advanced Menu has fields to enter the Print Server’s IP address and the
queue name and the port number.
Note: The port number field by default is 515. In most cases, the port number
should not be changed.
Adding a Second Belkin Port Monitor and Configuring It for a Specific Print Server
1. In Windows, select the printer’s properties and select the “Ports” tab.
29
P74390-A_F1UP0001_man.qxd
11/25/03
4:06 PM
Page 30
BELKIN PORT MONITOR ADVANCED MENU
2. Click “Add Port”. A window showing the printer ports installed on the PC
will open. Select “Belkin Port” and click “New Port”.
3. On the “New Port” window, enter a unique name for the port and click “OK”.
4. Click “Close” on the “Printer Ports” window.
5. On the ‘Ports” tab, select the newly created port and click “Configure Port”.
6. Click the “Advanced” tab.
30
P74390-A_F1UP0001_man.qxd
11/25/03
4:06 PM
Page 31
BELKIN PORT MONITOR ADVANCED MENU
7. Add the Print Server’s IP address and the queue name of the printer you
want to select for the port. The queue name “lp1” will point the port to
the printer connected to the printer 1 USB port on the Print Server. The
queue name “lp2” will point the port to the printer connected to the
printer 2 USB port on the Print Server.
8. Click “OK” to close.
Warning: When manually configuring the Port Monitor to send jobs to a specific
printer, make sure that the correct printer driver is selected and that
the Port Monitor’s queue name corresponds to the USB port that the
printer is connected to on the Print Server. Mismatching the drivers or
queue names will result in failed print jobs or error prints of multiple
pages of indiscernible characters.
31
P74390-A_F1UP0001_man.qxd
11/25/03
4:06 PM
Page 32
USING THE PRINT SERVER FOR FTP PRINTING
Sending Print Jobs to Printers Connected to the Print Server Using FTP
1. In Windows, select the printer’s properties.
2. Set the printer port to “File”, click “Apply”.
32
P74390-A_F1UP0001_man.qxd
11/25/03
4:06 PM
Page 33
USING THE PRINT SERVER FOR FTP PRINTING
3. Print the document using the printer that you configured. A dialogue box
will open prompting you to name the print file. After naming the file, click
“OK”. A file will be saved to the user’s default Windows directory (typically
“C:\” or “C:\Documents and Settings\<user’s name>”).
4. On the Windows desktop, click “Start>Run” and type in “cmd” for Windows
XP and 2000 or “command” for Windows 98SE and Me; click “OK” to open a
“Command/MS-DOS Prompt” window.
33
P74390-A_F1UP0001_man.qxd
11/25/03
4:06 PM
Page 34
USING THE PRINT SERVER FOR FTP PRINTING
5. At the prompt, type “ftp” followed by the IP address of the Print Server;
press the “Enter” key to create an FTP connection with the Print Server.
6. When the connection is made, the user will be prompted to enter a user
name and a password. The user name for the Print Server is “anonymous”;
the password should be left blank. After a successful login, a list of the
printers connected to the Print Server will appear, followed by simple usage
instructions for how to print the file.
7. At the prompt, type “put”, followed by the file path and file name,
followed by the printer number (for example, put c:\example printer1).
8. The file will be sent to the Print Server. When the transfer is complete,
another prompt will appear. If finished, type “quit” and press “Enter” to
end the FTP session. Then, close the “Command Prompt” window.
Note: FTP Printing by default is enabled in the Print Server. It can be disabled
using the Print Server’s Web-Based Setup Interface.
34
P74390-A_F1UP0001_man.qxd
11/25/03
4:06 PM
Page 35
TROUBLESHOOTING
Cannot find Print Server
If the Wizard cannot find your Print Server even though it appears to be
functioning properly, the problem may be that there is another wireless
network in the area and the Print Server has associated with it.
In this case, you can:
• Try repowering the Print Server. This might allow it to connect to the
correct wireless network.
—or—
• Connect the Print Server to the network (to the router) using an Ethernet cable.
Other possible reasons that the Wizard might fail to find the Print Server are:
•
security settings on the existing wireless network—such
as Encryption;
•
the wireless network not broadcasting an SSID; or
•
MAC address filtering settings on the network.
Encryption and SSID settings can be entered on the Print Server to overcome
the first two problems; however, if the network is blocking new devices by
MAC address, your router will need to be configured to allow the Print Server
to associate (see your router’s documentation).
Print job not going to correct printer, or not printing at all
• It could be that the computer is set to print to the wrong printer.
Verify that the printer connected to the Print Server is set as the
“default printer”.
• When troubleshooting a printing problem, try to determine whether any of
the computers on the network can access the Print Server. If some
computers can print, and some cannot, then the problem is most likely not
the Print Server or the printer, but the printer driver settings on the
specific computer. In this case, run the Print Server Setup Wizard again to
reconfigure the computer. If this still doesn’t correct the problem, delete
the printer driver from your computer. Reinstall it using the manufacturer’s
CD that came with your printer (it should direct you to check the
manufacturer’s website for updated drivers); then run the Setup Wizard
again. In some cases, drivers from a printer manufacturer might support
35
P74390-A_F1UP0001_man.qxd
11/25/03
4:06 PM
Page 36
TROUBLESHOOTING
Print Servers in Windows XP or 2000, but not Windows 98. Check the Belkin
website for compatibility issues at:
http://web.belkin.com/support/F1UP0001.
• If none of the computers can access the Print Server, then either:
1. The Print Server has not been configured correctly (in this case, rerun
the Setup Wizard);
2. Or, the printer you have connected to the Print Server does not support
a print-server connection. Check the Belkin website for printer
compatibility issues at: http://web.belkin.com/support/F1UP0001.
“Subnet warning” error screen appears during setup
The subnet warning is generally associated with the existence of more than
one network in the area. Subnet warnings occur when the Print Server has an
IP address from one network domain, and the computer is on another network
domain. The best solution in this case is to connect the Print Server to the
network using an Ethernet cable and to configure it using the Setup Wizard.
Then, after it has been configured into the correct subnet, disconnect the
cable, and then reattempt the wireless setup using the Wizard.
If the Print Server has been configured before, and the IP address has already
been set to another subnet, the best solution is to restore factory defaults on
the Print Server. Do this by holding down the reset button while repowering
the Print Server. After a reset, the Print Server will generally receive an IP
address in the correct subnet.
“No printer” error screen appears during setup
In most cases, this error occurs when the printer is not powered on, or it is
not enabled (or online). After you have checked this, make sure that it is not
out of paper or jammed. Some printers “sleep” after periods of inactivity. In
any of these cases, restore the printer to functionality, then, if necessary,
reboot the Print Server.
Some USB printers are not compatible with Print Servers. To check the Belkin
website for compatibility information, go to:
http://web.belkin.com/support/F1UP0001.
36
P74390-A_F1UP0001_man.qxd
11/25/03
4:06 PM
Page 37
TROUBLESHOOTING
“Cannot communicate with printer” or “printer not found” error message
appears in Printer Driver Status Monitor
Again, this may result from the printer being powered off or from any of the
issues mentioned above. Check that the printer is online, and make sure that
it is not out of paper or jammed. Some printers “sleep” after periods of
inactivity. In any of these cases, restore the printer to functionality, then, if
necessary, reboot the Print Server.
If those issues are addressed and the problem still exists, Belkin recommends
that the user disable the Printer Driver Status Monitor on the computer. The
status monitor, a convenient checkpoint for the user, usually requires a direct
connection between the computer and the printer. It may not communicate
with the printer when connected to a print server on a network.
Instead, use the Windows “Printer Status” window to check printing status.
37
P74390-A_F1UP0001_man.qxd
11/25/03
4:06 PM
Page 38
TECHNICAL SUPPORT
Find technical support information at support.belkin.com or www.belkin.com
through the tech support link. For updated information on troubleshooting
tips or for printer compatibility, use:
http://web.belkin.com/support/F1UP0001.
Contact Belkin Technical Support by phone at 877-736-5771.
38
P74390-A_F1UP0001_man.qxd
11/25/03
4:06 PM
Page 39
INFORMATION
FCC Statement
DECLARATION OF CONFORMITY WITH FCC RULES FOR
ELECTROMAGNETIC COMPATIBILITY
We, Belkin Corporation, of 501 West Walnut Street, Compton, CA 90220, declare under our sole
responsibility that the product,
F1UP0001
to which this declaration relates,
complies with Part 15 of the FCC Rules. Operation is subject to the following two conditions: (1) this
device may not cause harmful interference, and (2) this device must accept any interference received,
including interference that may cause undesired operation.
Caution: Exposure to Radio Frequency Radiation.
The radiated output power of this device is far below the FCC radio frequency exposure limits.
Nevertheless, the device shall be used in such manner that the potential for human contact
normal operation is minimized.
When connecting an external antenna to the device, the antenna shall be placed in such a
manner to minimize the potential for human contact during normal operation. In order to avoid
the possibility of exceeding the FCC radio frequency exposure limits, human proximity to the
antenna shall not be less than 20cm (8 inches) during normal operation.
Federal Communications Commission Notice
This equipment has been tested and found to comply with the limits for a Class B digital device,
pursuant to Part 15 of the FCC Rules. These limits are designed to provide reasonable protection
against harmful interference in a residential installation.
This equipment generates, uses, and can radiate radio frequency energy. If not installed and used
in accordance with the instructions, it may cause harmful interference to radio or television
reception, which can be determined by turning the equipment off and on, the user is encouraged
to try and correct the interference by one or more of the following measures:
• Reorient or relocate the receiving antenna.
• Increase the distance between the equipment and the receiver.
• Connect the equipment to an outlet on a circuit different from that to which the receiver
is connected.
• Consult the dealer or an experienced radio/TV technician for help.
Modifications
The FCC requires the user to be notified that any changes or modifications to this device that
are not expressly approved by Belkin Corporation may void the users authority to operate
the equipment.
39
P74390-A_F1UP0001_man.qxd
11/25/03
4:06 PM
Page 40
INFORMATION
Canada-Industry Canada (IC)
The wireless radio of this device complies with RSS 139 & RSS 210 Industry Canada. This Class B
digital complies with Canadian ICES-003.
Cet appareil numérique de la classe B conforme á la norme NMB-003 du Canada.
Europe-European Union Notice
Radio products with the CE 0682 or CE alert marking comply
with the R&TTE Directive (1995/5/EC) issued by the Commission of the
European Community.
0470
Compliance with this directive implies conformity to the following European Norms (in brackets
are the equivalent international standards).
• EN 60950 (IEC60950) – Product Safety
• EN 300 328 Technical requirement for radio equipment
• ETS 300 826 General EMC requirements for radio equipment.
To determine the type of transmitter, check the identification label on your Belkin product.
Products with the CE marking comply with the EMC Directive (89/336/EEC) and the Low Voltage
Directive (72/23/EEC) issued by the Commission of the European Community. Compliance with
these directives implies conformity to the following European Norms (in brackets are the
equivalent international standards).
• EN 55022 (CISPR 22) – Electromagnetic Interference
• EN 55024 (IEC61000-4-2,3,4,5,6,8,11)- Electromagnetic Immunity
• EN 61000-3-2 (IEC610000-3-2) - Power Line Harmonics
• EN 61000-3-3 (IEC610000) – Power Line Flicker
• EN 60950 (IEC60950) – Product Safety
Products that contain the radio transmitter are labeled with CE 0682 or CE alert marking and may
also carry the CE logo.
40
P74390-A_F1UP0001_man.qxd
11/25/03
4:06 PM
Page 41
INFORMATION
Belkin Corporation Limited Lifetime Product Warranty
Belkin Corporation warrants this product against defects in materials and workmanship for its
lifetime. If a defect is discovered, Belkin will, at its option, repair or replace the product at no
charge provided it is returned during the warranty period, with transportation charges prepaid, to
the authorized Belkin dealer from whom you purchased the product. Proof of purchase may be
required.
This warranty does not apply if the product has been damaged by accident, abuse, misuse, or
misapplication; if the product has been modified without the written permission of Belkin; or if
any Belkin serial number has been removed or defaced.
THE WARRANTY AND REMEDIES SET FORTH ABOVE ARE EXCLUSIVE IN LIEU OF ALL OTHERS,
WHETHER ORAL OR WRITTEN, EXPRESSED OR IMPLIED. BELKIN SPECIFICALLY DISCLAIMS ANY AND
ALL IMPLIED WARRANTIES, INCLUDING, WITHOUT LIMITATION, WARRANTIES OF MERCHANTABILITY
AND FITNESS FOR A PARTICULAR PURPOSE.
No Belkin dealer, agent, or employee is authorized to make any modification, extension, or
addition to this warranty.
BELKIN IS NOT RESPONSIBLE FOR SPECIAL, INCIDENTAL, OR CONSEQUENTIAL DAMAGES RESULTING
FROM ANY BREACH OF WARRANTY, OR UNDER ANY OTHER LEGAL THEORY, INCLUDING BUT NOT
LIMITED TO, LOST PROFITS, DOWNTIME, GOODWILL, DAMAGE TO OR REPROGRAMMING OR
REPRODUCING ANY PROGRAM OR DATA STORED IN, OR USED WITH, BELKIN PRODUCTS.
Some states do not allow the exclusion or limitation of incidental or consequential damages or
exclusions of implied warranties, so the above limitations of exclusions may not apply to you.
This warranty gives you specific legal rights, and you may also have other rights that vary from
state to state.
41
P74390-A_F1UP0001_man.qxd
11/25/03
4:06 PM
Page 1
belkin.com
Belkin Tech Support
US: 877.736.5771
310.898.1100 ext. 2263
Europe: 00 800 223 55 460
Australia: 1800 666 040
Belkin Corporation
501 West Walnut Street
Compton • CA • 90220 • USA
Tel: 310.898.1100
Fax: 310.898.1111
Belkin Components, Ltd.
Express Business Park • Shipton Way
Rushden • NN10 6GL • United Kingdom
Tel: +44 (0) 1933 35 2000
Fax: +44 (0) 1933 31 2000
Belkin Components B.V.
Starparc Building • Boeing Avenue 333
1119 PH Schiphol-Rijk • The Netherlands
Tel: +31 (0) 20 654 7300
Fax: +31 (0) 20 654 7349
Belkin, Ltd.
7 Bowen Crescent • West Gosford
NSW 2250 • Australia
Tel: +61 (0) 2 4372 8600
Fax: +61 (0) 2 4372 8603
P74390-A
© 2003 Belkin Corporation. All rights reserved. All trade names are
registered trademarks of respective manufacturers listed. The 54g logo is a trademark of Broadcom Corporation in the
United States and/or other countries.