1
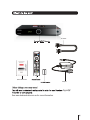
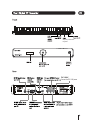
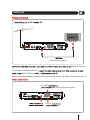
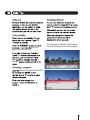
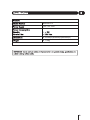
Freeview 500GB High Definition
Digital Video Recorder
Toll Free Waranty and Service Support Line: 1800 509 394
The Gold Technical Support Line:1902 215 259
(Charges will apply at $2.95 per minute)
BVR501FV
Introduction
Thank you for buying this Bush product, which
Warranty
is designed to give you many years of trouble-
In the unlikely event that your product fails to work
free service.
normally, please call the below toll free phone number
to discuss the problem with one of our qualified
You may already be familiar with using a similar
service engineers.
unit, but please take time to read these instructions.
They are designed to familiarise you with the unit’s
many features and to ensure you get the very best
from your purchase.
Safety is important
Your safety and the safety of others is important.
Please therefore, ensure you read the “Safety
Instructions” before you operate this unit.
Australia.
Bush Warranty: 1800 509 394
New Zealand
Bush Warranty: 0800 450 259
Welcome
BUSH
High Definition
You will be able to receive all Freeview, High Definition and
Standard Definition digital TV Channels, as well as detailed
Freeview program information with the Freeview Electronic
Program Guide. You can record two channels simultaneously,
pause live TV and watch it back at a time which suits you.
For more information about Freeview visit www.freeview.com.au
A Freeview Digital TV Recorder gives you access to
up to 16 free-to-air channels, with no fees or
subscriptions. For more information on Freeview
please visit, www.freeview.com.au
Australia
AV Cable
Quick Start Guide
Adaptor
Digital
See www.bushaustralia.com.au for more information.
Settings Menu
19
23
System Information Menu
Setting Up
24
25
Use
Electronic Program Guide
29
9
13
17
Safety
30
Warranty
31
Stop Play of Recorded
Programs
DC 12.0V
Connect the DC 12.0V power
HELP Provides you with information
about how to use this unit
Electronic
Used to begin play and
pause recorded clips or
live TV
Adjust volume
level up and
down
Opens Favourite
channels list
Rewind live TV or the recorded
clip you are watching
Fast forward live TV or the recorded
clip you are watching
Stops play in playback
mode
Scroll through channels up and down
viewed
SKIP BACKWARDS
Allows you to skip backwards when
playing recorded clips
SKIP FORWARDS
Allows you to skip forwards when
playing recorded clips
Setting Up
(HDMI cable not supplied)
Digital TV Recorder.
For the highest definition connection,
Digital TV Recorder
the
Below are the other standard connections that can be used to connect your Digital TV Recorder to your TV.
R,L,CVBS
Y,Pb,Pr
(Composite/AV cable supplied)
1
Connect the AC plug to the wall outlet.
connection source.
Digital TV Recorder
U
D
R
display the current time
D
R
minutes
R
LED will
D
This displays the details of the program
currently showing and the next program.
6
Electronic Program Guide (EPG)
9
U
through
options or to turn them on or off.
Press i key to show the program
information.
to change the
program information being displayed.
10
16:9 Full screen,
wide screen, letter box; 4:3 Center
cut out,wide screen and letter box.
U
L
Digital TV Recorder
Please go to setting menu to set the
skip pace.
Use the colour keys for slow motion:
Blue: slow forward,
options are: 1/2,1/4,1/8
Red: slow backward,
options are: 1/2,1/4,1/8
11
U
Digital TV Recorder.
or setting.
viewed
17
Digital TV Recorder.
19
Digital TV Recorder.
21
12
Electronic Program Guide
When the reminder has been
set, the reminder icon will
appear next to the program
name.
7
The RED button can be used
to schdule EPG recording. The
Green button can be used to
schedule reminder.
The YELLOW button will move
backwards 24 hours and the BLUE
will move forwards 24 hours.
GREEN
13
Electronic Program Guide
can press the
button to view the
program which you've set as a reminder
or press the EXIT button to continue
watching the current program.
Recorder.
Digital
Select the program you want to record and
press the RED button. If the program is part
of a series, a pop-up will appear asking you to
press the RED button to record only the
program you selected, or to press the BLUE
button to record the series. When a recording
has been set the record icon will appear next
to the program name.
One-touch recording
If you want to record the program
you're watching, instead of choosing
it from the EPG, you can also press
the RECORD button to begin recording.
You can choose in your library the
program you'd like to watch by pressing the
LIB button to enter the Recording list.
14
If you try to record more than two
programs at the same time, you will
see a warning screen which will indicate
for you to check the other recordings.
RED button to cancel the
recording.
List
list
This channel list allows you to lock
channels.
15
visit www.grundig.net.au for
assistance.
The lock code window
will appear again, use the NUMBER
buttons to enter the parental PIN and
then press OK button, the icon will
no longer be displayed.
16
YELLOW
When you have finished, move the
focus to ENTER and press the OK
button to confirm and go back to the
Library window.
17
GREY
BLUE
GREEN
The Lock icon will
be displayed at the right hand side of the
Program Name column.
and number
GREEN
buttons
visit www.grundig.net.au
GREEN
18
Settings Menu
HDMI Output
Use
and
buttons to select a
main setting category.
Auto
Audio Output
language
19
Settings Menu
EXIT
Menu Transparency
This allows you to set the menu
transparency.
20
visit
www.grundig.net.au for assistance.
Time Shifting
This setting allows you to set the Time
Shift pause options for pause and
rewinding live TV. You can select:15min,
30min, 60min, 120min, 180min.
Settings Menu
Erase Hard Disk
IP Settings
This settings allows you to choose the
connecting type and set the IP to
connect to the internet.
Software Upgrade
Quick Skip Delay
Digital TV Recorder
Recorder
Digital TV
This provides the time duration option
for Quick Skip when you are watching
or pausing live TV in timeshift mode.
You can choose between 10s, 30s, 40s
or 60s.
21
Settings Menu
Digital TV Recorder
TV Recorder
Digital
Digital TV Recorder
After upgrade,press the ok button
and the Digital TV Recorder will be restarted.
Factory Reset
8.
grundig.net.au
22
Recorder
Digital
23
System Information Menu
Digital TV Recorder.
24
Digital TV Recorder
Digital TV Recorder
Is the LED display showing the time?
, or press the Power
button on the front panel.
If the LED display is not showing the
time:
Digital TV Recorder.
Recorder
Recorder
21
Digital
Digital
com.au
26
com.au
21.
Digital Video Recorder Recorder.
Digital Video
21.
1902 215 259
7
Digital TV Recorder
Digital TV Recorder
Digital TV Recorder
1902 215 259
If the power is unexpectedly cut to your Digital Video Recorder, it may affect the HDD ability to
work normally. We recommend that if this happen you need to format the HDD.
www.bushaustralia.com.au
www.freeview.com.au
1902 215 259
BVR501FV
DC 12V 2.5A
300mm(W)x55mm(H)x260mm(D)
1.75kg
29
Safety
Digital TV Recorder
Digital TV Recorder
the Australian
retailer.
Digital TV Recorder.
Recorder
Digital TV
Digital TV Recorder.
Digital TV Recorder,
retailer
Recorder.
Digital TV
Digital TV Recorder
Digital TV Recorder.
3
15
Warranty
Please keep your receipt as proof of purchase. This product is
warranted for any defect in materials or workmanship for one year
after the original date of purchase. This product is for normal
domestic and office use only. This warranty does not cover damage
from misuse or neglect, accidental damage, vermin infestation,
excessive voltages such us lightning or power surges or any
alternation that affects the performance or reliability of the product.
Our goods come with guarantees that cannot be excluded under the
Australian Consumer Law. You are entitled to a replacement or refund
for a major failure and for compensation for any other reasonably
foreseeable loss or damage. You are also entitled to have the goods
repaired or replaced if the goods fail to be of acceptable quality and
the failure does not amount to a major failure.
In the unlikely event that your product fails to work normally, please
contact the Bush Warranty on 1800 509 394 (Australia) or
0800 450 259 (New Zealand) and have your receipt of purchase
on hand.
This warranty is subject to the following provisions:
It is only valid within boundaries of the country of purchase;
The product must be correctly assembled and operated in
accordance with the instructions contained in the manual;
This product must be used solely for domestic purposes;
The warranty does not cover accidental damage;
The warranty will be rendered invalid if the product is resold or has
been damaged by inexpert repair;
The manufacturer disclaims any liability for incidental or
consequential damaged.
This warranty is in addition to, and does not diminish, your
statutory or legal rights.
PO BOX 6287
Silverwater NSW 1811
www.bushaustralia.com.au
Bush Warranty: 1800 509 394 Australia
Bush Warranty: 0800 450 259 New Zealand
31
PO BOX 6287
Silverwater NSW 1811
www.bushaustralia.com.au