1
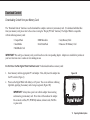
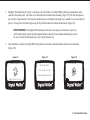
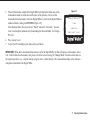
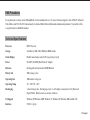
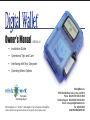
R
Owner’s Manual
VERSION 2.0
Installation Guide
Operational Tips and Care
Interfacing with Your Computer
Operating Menu Options
R
The Portable
Smart Storage People™
©2002 Minds@Work, LLC. MindStor™ and Minds@Work™ are both trademarks of Minds@Work.
All other trademarks and registered trademarks are the property of their respective owners.
Minds@Work LLC
15550 Rockfield Blvd, Suite C, Irvine, CA 92618
Phone: 800-459-5799, 949-707-0600
Technical Support: 866-269-0655, 949-330-3453
E-mail: [email protected]
Fax: 949-609-2880
www.mindsatwork.net
T A B LE O F CO N TENTS
Introduction
1
Diagrams
3
Installation Guide
System Requirements
Installation Precautions
Charging the Battery Pack
Installing the Digital Wallet Drivers
4
4
5
6
Updating the Digital Wallet Firmware
7
7
7
8
8
Technical Support
After Sales and Replacement Parts
RMA Procedures
Technical Specifications
Physical and Environmental Specs
One Year Limited Warranty
License Agreements
FCC Statement
Caring for the Digital Wallet
Operating Environment
Powering the Unit
Care for the LCD Screen
Transfer Process
Care for Hard Disk
Powering the Digital Wallet
Battery Powered
AC Adapter Powered
10
10
Digital Wallet and Your Computer
Connecting the Digital Wallet to Your Computer
Disconnecting the Digital Wallet from Your Computer
Using the Digital Wallet as a Card Reader
Operating the Menu Options
Download Content (from your Memory Card)
Display Hard Disk
Display PC Card
Manage Media
Cutomize
11
12
13
14
15
18
20
22
23
28
Support
29
29
30
30
32
33
34
35
I N T RO D UCT IO N
Digital Wallet -- Smart Storage on the Go!
Now you can enjoy all the advantages of a high capacity hard drive anywhere you go, any time you want. Powered
by Motorola’s ColdFire microprocessor, its own operating system, a 3GB, 6GB, 10GB or 20GB 2.5” hard drive, and
rechargeable NiMH batteries, the Digital Wallet can download, upload and transport files without using a computer or any
external power source.
Folders and files can be downloaded from memory media to the Digital Wallet via a PC card (PCMCIA) adapter.
As an “electronic bridge,” the Digital Wallet acts as an interface between your computer and your camera’s memory media.
Digital camera image folders can be downloaded to the Digital Wallet, freeing up the FLASH memory card so new pictures
can be taken.
Just plug the memory media into the appropriate memory media/PC card (PCMCIA) adapter and then insert the card
adapter into the PC card slot (PCMCIA) on the Digital Wallet to download or upload data to the memory card.
Please note that the Digital Wallet comes supplied with a CompactFlash Type I PC card adapter. If you want to use another
type of memory media, you will need to purchase the appropriate PC card adapter. These PC card adapters can be
purchased at local retail stores or through MindsGear, located at www.mindsgear.com.
You can also upload Digital Wallet folders and files to the memory media. When uploading from the Digital Wallet to the
memory media, only entire files or folders will be uploaded – if the file or folder is too large for the media’s memory capacity,
a display will notify you that “There Isn’t Enough Memory,” and none of the files will be uploaded.
From the Digital Wallet, folders and files can then be downloaded to laptop and desktop computers via a USB connection.
The Digital Wallet’s hard drive will appear as a removable disk icon on the computer, either on the desktop or in the main
directory (usually accessed by Microsoft Explorer on PC platform). After double clicking and opening this removable disk
icon, files and folders can be easily dragged-and-dropped back and forth between the computer and the Digital Wallet.
1
Introduction
Download, upload, and transport all your files, including business files, PowerPoint presentations, Excel and Word
documents, plus computer games, video, movie, MP3, music files and all other high-volume or graphic-intensive files.
With this operation, the Digital Wallet acts as a second or back-up hard drive. The Digital Wallet can also be used as a
portable storage device for easily transporting large files.
Unlike most external hard drives, the Digital Wallet is a true plug-and-play solution; its operating system comes preinstalled. Plus, the Digital Wallet can store data from any PC, Macintosh or Linux computer.
Small, lightweight and easy to use, the Digital Wallet is indispensable as a laptop mass storage accessory.
Able to function as a self-powered portable mass storage device, the Digital Wallet can also be powered using an AC
adapter.
Recharging the batteries takes place while the Digital Wallet is connected to the AC adapter. The recharging process is
self-regulating, so there is no need to worry about overcharging the batteries.
Batteries deliver up to 120 minutes of use and can be recharged approximately 500 times in their lifetime, with each
recharge taking approximately three hours. Additional battery packs can be purchased for extended independent use.
The Digital Wallet automatically turns itself off after a preset time of inactivity, helping extend battery life. You have the
option of adjusting the automatic shut-off delay from disable (always ON) to 20 minutes.
The Digital Wallet comes with a CD containing installation drivers and many useful software applications.
The Digital Wallet is also preloaded with files you can use to practice downloading, uploading and viewing from your PC or
Mac. All the files can be deleted from the unit.
High capacity, platform, power and computer independent. The Digital Wallet is the ultimate Portable Smart Storage
(PSS)TM device when you’re on the go.
Designed to be easy to use, the Digital Wallet has three simple function buttons that allow you to navigate and select options
from several easy-to-follow menus.
2 Introduction
D I A GR AM
L
Figure 1
A
B
C
D
E
K
A.
B.
C.
D.
E.
F.
F
G.
H.
I.
J.
K.
L.
G
H
I
N
J
O
M
M.
N.
O.
Power button
Scroll Up button
Select button
Scroll Down button
PC card (PCMCIA) adapter eject
button
CompactFlash PC card
(PCMCIA) adapter
Carry Dock port
Carry Dock
USB port
AC adapter jack
LCD screen
NiMH rechargeable battery pack
(removable)
AC Adapter / Battery Recharger
USB Cable / Connector
Installation Drivers/Software
Applications CD
3
Diagram
I N S TALLAT IO N G UIDE
This section explains how to get your Digital Wallet up and running.
System Requirements
Operating System:
Windows XP / Windows 2000 / Windows 98 SE & ME / Mac OS 9.0 and higher
Computer Requirements:
200 MHz / 32MB RAM / CD-ROM
Input / Output Interface:
USB Version 1.1 (4-pin) / Memory media/PC card (PCMCIA) adapter / PC card slot (PCMCIA)
Compatible Media:
Compact Flash™ / SmartMedia™ / IBM® Microdrive™ / Intel® StrataFlash™ /
Sony® Memory Stick® / Panasonic® SD Memory Card / MultiMedia Card™
(with appropriate adapter)
Installation Precautions
-
Do not drop, jar, bump, shock the unit, or expose to sources of excessive vibration. Keep in mind that Digital Wallet uses a 2.5”
hard drive, similar to those used in laptops. Gently handle and carry your Digital Wallet, especially during data transfers.
-
The batteries included are not charged. We recommend charging them fully for at least three hours before using your
Digital Wallet prior to its first self-powered use.
-
Please close all applications on your computer, prior to installing the Digital Wallet drivers.
-
Do not use force when connecting the USB cable. The design of the cable connectors and the Digital Wallet USB port prevent
misconnection.
-
Do not disconnect Digital Wallet from your computer while the light bulb icon is flashing on the Digital Wallet LCD screen.
4 Installation Guide
First Time Charge of the Battery Pack
1.
Open the battery compartment and slide the battery pack in with arrow pointing downwards. (Figure 1)
2.
Attach the power lead from the unit to the battery.
NOTE: The power lead connector fits the Digital Wallet connector only one way. Do not force-fit. If the
connectors do not fit together easily, be sure they are positioned properly.
3.
Close the battery compartment door.
5.
Connect the AC Adapter to a power outlet and then to the Carry Dock.
6.
Connect the Carry Dock to the Digital Wallet. (Figure 1)
7.
Digital Wallet should automatically power on.
8.
You will notice the battery level status icon, in the lower left corner of the screen, will be empty. Charge the battery fully for
3 hours prior to first self-powered use.
NOTE: The battery pack cannot be fully charged when it is cold. Charge the battery pack in a temperate
zone between 32º and 104º F (0º and 40º C). If recharged above 104º F (40º C), the battery pack could
permanently lose its ability to recharge.
5
Installation Guide
Installing the Digital Wallet Drivers
USB CONNECTION FOR WINDOWS XP/2000/ME/98SE
1.
Review Installation Precautions. Do not connect or turn on MindStor until instructed!
IMPORTANT! Windows 98 SE users must install the most current version of Internet Explorer prior
to inserting the MindStor Installation CD.
2.
Open your web browser to http://www.mindsatwork.net/dwdownloads.htm. Click on the link for the Digital Wallet drivers.
3.
Click on the “Install Your Driver” button. The drivers will automatically be installed.
4.
When installation is complete, click on “OK”.
CONNECTING TO A MAC VIA USB
1.
Review Installation Precautions and turn your Mac personal computer on.
2.
Insert AC Adapter into a power outlet and then to the Carry Dock.
3.
Connect the USB cable to your Mac and then to the Carry Dock.
4.
Connect the Carry Dock to the Digital Wallet.
The Digital Wallet does not need any drivers for Mac. In most instances, the Mac will recognize the Digital Wallet as an “Untitled”
drive on the desktop. You may double click on the “Untitled” drive to view the files that we have saved on the Digital Wallet for your
enjoyment and viewing. All pre-installed files may be dragged to the Trash for removal.
If you are unable to connect the Digital Wallet to your Mac, in most instances the problem may be solved by updating your USB driver
via www.apple.com. For further assistance, refer to Customer Support at: www.mindsatwork.net/systemrequirements.htm.
6 Installation Guide
CA R IN G F O R T HE DIG ITAL WALLET
This section will cover important tips for everyday use.
Operating Environment
-
Place the Digital Wallet in a cool, dry, clean place; away from cold, moisture, dust, windows and heat sources. Do not expose the
Digital Wallet to rain or water, to prevent fire or electrical shock.
-
If the Digital Wallet has been exposed to extreme temperatures, allow the unit to reach room temperature before use.
-
Keep the unit away from sources of moisture or liquids. Do not attempt to clean the drive with chemical solvents, as this might
damage the finish. Only use a clean, dry cloth on the outside of the unit.
-
Do not drop, jar, bump, shock the unit, or expose to sources of excessive vibration. Keep in mind that the Digital Wallet uses a
2.5” hard drive, similar to those used in laptops. Gently handle and carry your Digital Wallet, especially during data transfers.
Powering the Unit
-
Do not subject unit to severe vibration while powering up.
-
If unit does not turn on when Power button is depressed, check these suggested solutions:
• Check power source.
• Carry Dock is not inserted properly.
• Battery is not connected.
• Battery is not fully charged–then recharge.
• AC adapter is not fully plugged in or is connected to an inoperable outlet.
Care for LCD Screen
-
Do not put pressure on the LCD screen.
-
Do not worry that the LCD screen backlight is always on; it draws little power.
-
Keep the LCD screen from prolonged exposure to sunlight.
7 Caring for the Digital Wallet
Transfer Process
-
The countdown status meter displayed during memory card downloads is an estimated amount of the time needed to complete the
transfer. File size, manufacture make and fragmentation of the hard disk and memory card can cause transfer time to vary.
-
Make sure the memory card is inserted right-side up into the adapter, especially when handling SmartMedia cards.
-
Always carefully insert and remove the memory card from the PC card adapter.
-
A flashing light bulb designates that data is in the transfer process. Until the light bulb has ceased to flash, do not:
1. Disconnect the Digital Wallet from the computer
2. Remove the PC card adapter from the PC card slot
If these procedures are not followed, there may be a chance of lost or corrupt data.
-
Do not use force when connecting the USB cable. The design of the cable connectors and the Digital Wallet USB port prevents
misconnection.
Care for Hard Disk
-
If the unit or buttons become inoperable, depress the reset button located on the back of the unit.
-
You will find the file “M$A$W$.S$N” on the Digital Wallet hard disk. This file can be deleted at any time and will not
be harmed during reformatting. Being that it is a related operating file, it will always be regenerated once the Digital Wallet
is powered on again.
-
Check the Minds@Work website periodically for free firmware updates.
-
To keep your hard drive in peak operating performance, you are advised to periodically run ScanDisk and Disk Defragmenter
(PC users) or reformat the hard drive (Mac & PC users). Without regular maintenance, transfer times will be considerably slower.
8 Caring for the Digital Wallet
PC Users
1.
Connect the Digital Wallet to your computer via USB and power the unit.
2.
Open Windows Explorer. Right-click once on the “Removable Drive” icon and select “Properties”.
3.
Under the “Tools tab”, use the “Error Checking” and “Defragmentation” sections to run ScanDisk and Disk
Defragmenter. Please refer to your Windows Owner’s Manual for more detailed information. You are also advised
to periodically reformat the Digital Wallet hard drive. When reformatting Digital Wallet, please choose the FAT32
file system.
Mac Users
1.
IMPORTANT! Back up all your files stored on the Digital Wallet hard disk before reformatting. Reformatting
involves erasing the hard disk contents.
2.
Connect the Digital Wallet to your computer via USB and power the unit.
3.
Highlight the Digital Wallet drive (“Untitled” icon) and click on the “Special” menu at the top of the screen. Select
“Erase Disk”.
4.
Select “DOS” from the “Menu” drop box. Type in a name for the drive that is no more than eight characters long.
5.
Click on “Erase”. Your drive will now be formatted.
IMPORTANT:
1. If “HFS Standard” or “HFS Extended” is chosen, Digital Wallet will be rendered unusable until a DOS format is
placed on the drive. You will see the following message on your LCD screen, “Format Disk (14), Press
A Key to Exit”.
2. In the case your Mac ever prompts you to “Intialize Disk” and you choose “Continue”, your Digital Wallet
hard disk will be reformatted instantly, which involves erasing the hard disk contents and reformatting to HFS
Format. TO PROTECT YOUR FILES, DO NOT CHOOSE “YES” OR “CONTINUE”.
9 Caring for the Digital Wallet
P O W E R IN G T HE DIG ITA L WALLET
Power up either through the AC adapter or battery pack.
Battery Powered
1.
Depress the Power button to turn the Digital Wallet on. (Figure 1) The screen will show a Minds@Work logo, the Digital
Wallet logo and then the Main Menu.
2.
To turn off the Digital Wallet depress the Select button while in the Main Menu, and hold down until the units shuts off.
The battery pack will provide up to 100 minutes of use with approximately 500 recharge cycles.
IMPORTANT! Use of any other batteries, battery pack or charging device can cause malfunctions and permanent damage to the
Digital Wallet. For additional battery packs, visit www.mindsatwork.net to locate a local or online reseller.
To recharge the battery pack, connect the Digital Wallet to AC power. Each full recharge takes approximately 3 hours.
NOTE: The battery pack cannot be fully charged when it is cold. Charge the battery pack in a temperate zone between 32˚ and 104˚F
(0˚ and 40˚C). If recharged above 104˚ F (40˚ C), the battery pack could permanently lose its ability to recharge.
To help preserve energy while the Digital Wallet is battery operated, you can customize a preset automatic shut-off timeframe. Please
refer to “Shut-off Delay” in the Customize Menu section.
AC Adapter Powered
1.
Connect the Carry Dock to the Digital Wallet.
2.
Plug the AC adapter to an outlet and then to the Carry Dock. The unit will automatically turn on. While running the unit on AC
power, the battery pack will concurrently be charged.
3.
To turn off the Digital Wallet, disconnect the AC adapter. Depress the Select button while in the Main Menu, and hold down
until the units shuts off.
IMPORTANT! Only use the supplied AC adapter. Use of a non-approved adapter will degrade charge performance and may cause
permanent damage to battery and/or unit.
10 Powering the Digital Wallet
T H E D IGIT AL W ALLET A ND YOUR C OM PUTER
Connecting the Digital Wallet to Your Computer
Figure 2.A
In order for your computer to recognize the Digital Wallet, the proper drivers
must first be installed. After installation is complete, you can connect to your
computer anytime in a few simple steps.
1.
Connect the Carry Dock to the Digital Wallet.
2.
Connect the USB cable to the computer and then to the Carry Dock.
3.
Power on the Digital Wallet, with either battery or AC power.
4. The LCD screen will show a blinking lightbulb to signify the unit is in the process of
being recognized by the computer. (Figure 2.A) When the process is complete, the screen will
show “USB Connected”. (Figure 2.B) The Digital Wallet will be recognized on Windows as
a “Removable Drive” and on Mac as “Untitled”. Double click the icon to view the Digital
Wallet directory.
USB CONNECTED
Digital Wallet
R
Figure 2.B
USB CONNECTED
TIP You can perform basic functions such as drag and drop, deleting, copying, cutting and
pasting files/folders between the Digital Wallet and the computer. You can also rename any file
or folder in the Digital Wallet while it is connected to the computer.
TIP You can easily connect the Digital Wallet to any computer away from home or the office.
Digital Wallet
R
Visit http://www.mindsatwork.net/downloads.htm to download drivers to any computer.
11
The Digital Wallet and Your Computer
Disconnecting the Digital Wallet from Your Computer
DISCONNECTING FROM A PC
Windows 2000/XP:
Left-click once on the “Eject Hardware” icon found in the Windows task bar. (Figure 2.C) Highlight and
select “Stop Minds@Work Digital Wallet”. Click “OK” on the “Safe to Remove Hardware” window.
Windows 98/ME:
Double-click on My Computer. Then right click once on the “Removable Drive” icon and select eject.
After disconnecting, the Main Menu will automatically be displayed on the LCD screen.
IMPORTANT! On Windows platform, especially when running
Windows XP, you must be sure to disconnect Digital Wallet
properly, otherwise when you reconnect Digital Wallet your PC
will not recognize the drive. In such an event, rebooting the
computer may be necessary.
Figure 2.C
DISCONNECTING FROM A MAC
Drag and drop the “Untitled” hard drive icon into the Trash. The
Main Menu should automatically appear on the LCD screen.
12 The Digital Wallet and Your Computer
Using the Digital Wallet as a Card Reader Via USB
When the Digital Wallet is connected to your computer via USB, you can insert an adapter with memory card
at any time to use the Digital Wallet as a card reader.
1.
Connect the Carry Dock to the Digital Wallet.
2.
Connect the USB cable to the computer and then to the Carry Dock.
3.
Power on the Digital Wallet, with either battery or AC power.
4.
When the LCD screen displays “USB Connected” without the blinking light bulb, insert a PC card adapter with apporpriate
memory card within, into the Digital Wallet PC card slot.
5.
To recognize the media change, use your mouse to double-click the “Removable Drive” or “Untitled” drive icon on your desktop.
Only the memory card contents will now be displayed.
6.
When the PC card adapter is ejected, double-click the “Removable Drive” or “Untitled” drive icon to refresh the screen again.
Only the Digital Wallet hard disk contents will now be displayed.
NOTE: On Mac OS 10 or higher, the PC card needs to be inserted into the unit prior to USB connection.
13
The Digital Wallet and Your Computer
O P E R AT IN G T HE MENU OPTIONS
The three buttons on the side of the Digital Wallet are used to navigate and execute the various functions of the Digital
Wallet. (Figure 1.A)
The middle button is used to select an option.
TIP If you hold down the Select button, in any menu or directory, you will be redirected one menu or directory level
up in the hierarchy.
The top and bottom buttons are for scrolling up and down through the menu.
The menu options and operation status are displayed on the LCD screen. Beginning with the top-level Main Menu, this
section will walk you through the menu operations.
Figure 3.A
NOTE: These operations cannot be used if the Digital Wallet is connected to USB.
The Main Menu is the first list of options that appears when you turn on the Digital
Wallet, as shown right. (Figure 3.A)
DOWNLOAD CONTENT
D I S P L AY H A R D D I S K
D I S P L AY P C C A R D
MANAGE MEDIA
CUSTOMIZE
Digital Wallet
R
14 Operating the Menu Options
Download Content
Downloading Content from your Memory Card
The “Download Content” function is used to download the complete contents of your memory card. (To download individual files
from your memory card, please refer to the section covering the “Display PC Card” function.) The Digital Wallet is compatible
with the following memory cards:
• CompactFlash
• SmartMedia
• MultiMedia Card
• IBM Microdrive
• Intel StrataFlash
• Sony Memory Stick
• Panasonic SD Memory Card
IMPORTANT! For each type of memory card, you will need to use the corresponding adapter. Adapters are available for purchase at
your local electonics store or online at www.mindsgear.com.
Do Not Power On The Digital Wallet Until Instructed! To download from these memory cards:
1.
Insert memory card into appropriate PC card adapter. Then, fully insert the adapter into
the PC card slot. (Figure 1)
2.
Power on the Digital Wallet with battery or AC power. The screen will show a flashing
light bulb, signifying the memory card is being recognized. (Figure 3.B)
Figure 3.B
PC CARD INSERTED
IMPORTANT! Always take special care with the adapter when inserting
and removing your memory card. Never force-fit the media or the adapter.
Do not insert card bus, PC (PCMCIA) modems, ethernet cards, FireWire
or game cards.
Digital Wallet
15
R
Operating the Menu Options
3.
Highlight “Download Content” (Figure 3.A) and press the Select button. The Digital Wallet will begin to download the entire
contents of the memory card. The status screen will indicate the download time remaining. (Figure 3.C) You have the option to
press any key to stop download. If you stop the download process, the display will prompt you to confirm if you want to abort the
process. Pressing Select will abort and pressing the Up or Down button will continue the download. (Figure 3.D)
ERROR READING! If the Digital Wallet determines that a file on the memory card cannot be copied, you
will be notified of the specific file and prompted whether to skip the file and continue download (press Select
for yes) or to abort the download process (press Up or Down for no).
4.
Once download is complete, the Digital Wallet will perform an automatic verification that the files have been transferred.
(Figure 3.E)
Figure 3.C
Figure 3.D
Figure 3.E
DOWNLOADING...
VERIFYING...
ABORT PROCESS ?
PUSH SELECT FOR YES
18
PUSH UP/DOWN FOR NO
PRESS A KEY TO STOP
Digital Wallet
R
Digital Wallet
R
Digital Wallet
R
16 Operating the Menu Options
5.
When verification has completed, the Digital Wallet will display the folder name of the
downloaded content, the folder size and the status of the operation. All sets of files
downloaded from the memory card to the Digital Wallet are stored on the Digital Wallet as
numbered folders, starting with DW000001.(Figure 3.F)
If the download failed, the screen will say “Failed!” instead of “Successful”. You may
want to re-attempt the download or try downloading the files individually. See Display
PC Card.
6.
Press any key to exit.
7.
To eject the PC card adapter, push down on the eject button.
Figure 3.F
Folder C:\MS000003
18 MB
SUCCESSFUL
PRESS A KEY TO EXIT
Digital Wallet
R
IMPORTANT! When data is downloaded from memory card to the Digital Wallet, the data still remains on the memory card as
well. To delete data from the memory card, please refer to the section covering the “Manage Media” function or delete data via
the orginal input device (e.g., a digital camera), using the device’s delete function. We recommend formatting of the card upon
completion of download to the Digital Wallet.
17
Operating the Menu Options
Display Hard Disk
The “Display Hard Disk” function lets you explore the contents of the hard drive, using the up and down
navigation buttons.
Figure 3.G
Highlight and select “Display Hard Disk”. (Figure 3.A) A directory of folders and files will
be displayed (Figure 3.G) in the following sorting order: 1. ”DW######” folders listed in
descending order, 2. Remaining folders alphabetically listed, 3. Files alphabetically listed.
When a folder or file is highlighted, the selection begins to scroll left. A highlighted folder will
show the complete folder name, a folder icon and the date created. The date of the folder is
created based on the date of the most current file it contains. A highlighted file will show the
complete file name, the file size and the date of the file.
WORKING WITH FOLDERS
When you select a folder, the following option menu
will appear. (Figure 3.H)
Open Folder—Selecting this option will display the
contents of the folder. To navigate back up a level in the
directory, select the Up Arrow icon K.
Show Information—When this option is selected, then
Digital Wallet will display the folder properties: name
of the folder, number of folders contained within,
number of files contained within, and the folder size. (Figure 4.I)
K
MS000003
MS000002
MS000001
Vacation
Phone List.doc
Pu p p y. j p g
Sunshine.mp3
330KB
4MB
8MB
Digital Wallet
Figure 3.H
Figure 3.I
OPEN FOLDER
S H O W I N F O R M AT I O N
UPLOAD TO CARD
DELETE
EXIT
C:\MS000001
R
2 Folders
72 Files
244 MB
PRESS A KEY TO EXIT
Digital Wallet
R
Digital Wallet
R
18 Operating the Menu Options
Upload to Card—Uploads entire contents of folder to memory card. If a PC card adapter with
memory card is already inserted into the Digital Wallet, the screen will verify that sufficient
storage space is available and then prompt you to confirm the upload process or cancel. (Figure
3.J) If there is no PC card adapter inserted, the screen will prompt you to do so first.
When a folder of the same name exists on the memory card, the Digital Wallet will prompt
you to confirm “Override” or not. Push select to “Override” the existing folder, or Up/Down
for no.
Delete—Deletes entire folder and contents.
Figure 3.J
U p l o a d C : \ VA C AT I O N ?
PUSH SELECT FOR YES
PUSH UP/DOWN FOR NO
Digital Wallet
R
Exit—Takes you back to the previous file directory.
WORKING WITH FILES
Figure 3.K
When you select a file from the directory, the following option menu will appear. (Figure 3.K)
Open File—Select this option to open text files for viewing. All other files will display a
blank screen.
Upload to Card—Uploads file to memory card. If a PC card adapter with memory card is
already inserted into the Digital Wallet, the screen will verify that sufficient storage space is
available and then prompt you to confirm the upload process or cancel. If there is no PC card
adapter inserted, the screen will prompt you to do so first.
OPEN FILE
UPLOAD TO CARD
DELETE
EXIT
Digital Wallet
R
When a file of the same name exists on the memory card, the Digital Wallet will prompt you to
confirm “Override” or not. Push select to “Override” the existing file, or Up/Down for no.
Delete—Deletes file.
Exit—Takes you back to the previous file directory.
19
Operating the Menu Options
Display PC Card
The “Display PC Card” function lets you explore the contents of an inserted
memory card, using the up and down navigation buttons.
Highlight and select “Display PC Card”. (Figure 3.A) A directory of folders and files will
be displayed (Figure 3.L) in the following sorting order: 1. ”DW######” folders listed in
descending order, 2. Remaining folders alphabetically listed, 3. Files alphabetically listed.
When a folder or file is highlighted, the selection begins to scroll. A highlighted folder will
show the complete folder name, a folder icon and the date created. A highlighted file will show
the complete file name, file size and file date.
Figure 3.L
K
DCIM
CAMERA001.DSC
1KB
Digital Wallet
R
WORKING WITH FOLDERS
Figure 3.M
When you select a folder, the following option menu will appear. (Figure 3.M)
Open Folder—Selecting this option will display the contents of the folder. To navigate back
up a level in the directory, select the Up Arrow icon K.
Show Information—When this option is selected, the Digital Wallet will display the folder
properties: name of the folder, number of folders contained within, number of files contained
within, and the folder size.
OPEN FOLDER
S H O W I N F O R M AT I O N
DOWNLOAD TO DISK
DELETE
EXIT
Digital Wallet
R
Download to Disk—Uploads entire contents of folder to hard drive. The screen will prompt
you to confirm download process or cancel.
When a folder of the same name exists on the memory card, the Digital Wallet will prompt you to confirm “Override” or not. Push
select to “Override” the existing folder, or Up/Down for no.
20 Operating the Menu Options
Delete—Deletes entire folder and contents.
Exit—Takes you back to the Main Menu.
WORKING WITH FILES
When you select a file, the following option menu will appear. (Figure 3.N)
Open File—Select this option to open text files for viewing. All other files will display a
blank screen.
Download to Disk—Uploads file to hard drive. The screen will prompt you to
confirm download process or cancel.
When a file of the same name exists on the memory card, the Digital Wallet will prompt you to
confirm “Override” or not. Push select to “Override” the existing file, or Up/Down for no.
Figure 3.N
OPEN FILE
DOWNLOAD TO DISK
DELETE
EXIT
Digital Wallet
R
Delete—Deletes file.
NOTE: Some digital cameras use index files to keep track of the number of pictures contained in the
memory card (Example: Figure 3.L, “CAMERA001.DSC”). If you have deleted any image files on
the memory card, delete the index file before reinserting the memory card into your digital camera.
Please refer to your digital camera owner’s manual for more information on the index file.
Exit—Takes you back to the Main Menu.
21
Operating the Menu Options
Manage Media
The Digital Wallet is capable of determining free space available on your hard drive and memory media.
You can also delete the entire contents of your memory media from this menu.
Highlight and select “Manage Media”. (Figure 3.A) The following option menu will appear.
(Figure 3.O)
Check Disk Space—After selecting this option, your Digital Wallet will check the amount
of free space available on the hard drive. (Figure 3.P) The results will show as a percentage
available and as MB available. (Figure 3.Q)
Check PC Card Space—After selecting this option, the Digital Wallet will check the amount
of free space available on the memory media inserted. If there is no memory media inserted,
the screen will prompt you to do so. The results will show as a percentage available and
as MB available.
Erase PC Card—This option will delete the entire contents of the memory card that is
currently inserted. The screen will prompt you to
Figure 3.P
confirm the delete process or cancel. Once the files
are deleted, they cannot be recovered at a later date.
CHECKING...
Figure 3.O
C H E C K D I S K S PA C E
C H E C K P C C A R D S PA C E
ERASE PC CARD
EXIT
Digital Wallet
R
Figure 3.Q
88% FREE
Exit—Takes you back to the Main Menu.
8506 MB
PRESS A KEY TO EXIT
Digital Wallet
R
Digital Wallet
R
22 Operating the Menu Options
Customize Menu
The “Customize” Menu gives you added versatility, security and status
information about your Digital Wallet.
Highlight and select “Customize”. (Figure 3.A) The following option menu will appear.
(Figure 3.R)
SET CONTRAST
Figure 3.R
SET CONTRAST
S H U T O F F D E L AY
CHOOSE LANGUAGE
S E T / C L E A R PA S S W O R D
VERSION
EXIT
Digital Wallet
R
Sets the contrast of the backlit LCD screen.
1.
Highlight and select “Set Contrast”.
2.
A new option menu will be displayed. Using the Up/Down and Select buttons, increase or
decrease the contrast until you are satisfied with the display. (Figure 3.S)
3.
Highlight and select “Exit” to return to the “Customize” Menu.
Figure 3.S
INCREASE CONTRAST
DECREASE CONTRAST
EXIT
Digital Wallet
23
R
Operating the Menu Options
SHUTOFF DELAY
You may designate your preferred auto shutoff delay time with this menu option. The
factory default shutoff delay is set at 3 minutes. This means that after 3 minutes of
inactivity, your Digital Wallet will automatically shut off. This feature helps to preserve
your battery life.
Figure 3.T
AUTO SHUTOFF
3 minutes
IMPORTANT! The auto shutoff delay feature is not activated when the Digital Wallet is
connected to AC power.
1.
Highlight and select “Shutoff Delay”.
2.
The display will read “Auto Shutoff, 3 minutes”. (Figure 3.T) Using the Up/Down buttons,
select your preferred auto shutoff delay time. You may also select to disable the auto
shutoff delay by decreasing the value below “30 seconds” to read “Disabled”.
Digital Wallet
R
NOTE: When auto shutoff delay is disabled, the Digital Wallet will remain on until the unit is manually turned off or the
battery is dead. If the battery is dead, it will then need to be recharged.
3.
To exit, press the Select button and you will be returned to the “Customize” Menu.
24 Operating the Menu Options
CHOOSE LANGUAGE
Figure 3.U
You may choose to have the LCD display text of another language. Currently,
English, German, Italian, Spanish and French are available. Periodically check
www.mindsatwork.net for additional language updates.
1.
Highlight and select “Choose Language”.
2.
Scroll up and down to highlight your desired language. (Figure 3.U)
3.
Press the Select button and you will be returned to the “Customize” Menu.
** ENGLISH **
DEUTSCH
I TA L I A N O
E S PA N O L
FRANCAIS
EXIT
Digital Wallet
R
NOTE: If the unit is set to a language other than your preferred language:
1. Shut the unit off and then Power it on again.
2. When the Main Menu appears, press the up button once to reach the “Customize” option. Press the Select button.
3. Use the Up/Down buttons to highlight your preferred language and then press Select.
25
Operating the Menu Options
SET/CLEAR PASSWORD
When set, this security feature keeps your data safe from others.
IMPORTANT! When set, the password is active immediately. The next time you power
on the Digital Wallet, you will be required to enter the new password. You may clear and
change your password at any time, once you gain access to the Digital Wallet with the
password. DO NOT FORGET YOUR PASSWORD.
Setting Initial Password
1.
Highlight and select “Set/Clear Password”.
2.
In the next screen, you will be prompted to enter four digits. (Figure 3.V)
Using the Up/Down buttons, choose the first number desired in your password. Then
press the Select button.
3.
Repeat Step 2 for the next three digits. After the last digit is selected, you will be returned
to the “Customize” Menu.
Figure 3.V
E N T E R PA S S W O R D
0___
Digital Wallet
R
Figure 3.W
C L E A R PA S S W O R D
C H A N G E PA S S W O R D
EXIT
NOTE: When password has been set, upon powering on the Digital Wallet you will be
prompted to enter the password. Without the password, the functions, menus and file directory
cannot be accessed.
Clear Password—To clear a password that has been set:
Digital Wallet
1.
Highlight and select “Set/Clear Password”. You will be prompted with the
Password Menu. (Figure 3.W)
2.
Highlight and select “Clear Password”. The password will be cleared and you will be returned to the “Customize” Menu.
R
26 Operating the Menu Options
Change Password—To change a password that has been set:
1.
Highlight and select “Set/Clear Password”.
2.
Highlight and select “Change Password”. (Figure 3.W)
3.
In the next screen, you will be prompted to enter four digits. Using the Up/Down buttons, choose the first number desired in
your password. Then press the Select button.
4.
Repeat Step 2 for the next three digits. After the last digit is selected, you will be returned to the “Customize” Menu.
FORGOTTEN PASSWORD If you have forgotten your password and are locked out from accessing your data, call Minds@Work
technical support to obtain a solution password to unlock your Digital Wallet. Please have your Digital Wallet serial number handy
before calling.
VERSION
Upon selecting Version from the “Customize” Menu, the display will show you what version
of firmware your Digital Wallet is running. (Figure 3.X) Please check www.mindsatwork.net
for new firmware upgrades that can be easily downloaded to the Digital Wallet.
Figure 3.X
MINDS@WORK
COPYRIGHT 2002
VERSION 2.11
ENGLISH 1.00
PRESS A KEY TO EXIT
Digital Wallet
27
R
Operating the Menu Options
U P DATIN G T HE DIG ITA L WALLET FIRM WAR E
We are always adding new features and enhancements to the Digital Wallet. Check www.mindsatwork.net
periodically for new firmware updates.
1.
Connect Digital Wallet to your computer and power on with AC Adapter.
2.
Visit http://www.mindsatwork.net/msdownloads.htm.
3.
Download the firmware update to your Digital Wallet hard disk. The file name will be M$A$W.M$S. Do not place this file in
any folder. If your computer prompts you to confirm whether or not to replace the existing file, select “Yes”.
4.
Eject the Digital Wallet drive and disconnect the USB cable. In the Main Menu, select “Check Hard Disk” to check that
the file “M$A$W.M$S” is in the directory.
5.
Disconnect the AC Adapter and completely Power off the unit. This order of operations must be followed exactly in order
for the update to take effect.
6.
Plug the AC Adapter back in. (This operation must be done under AC Power.) Be sure the USB cable is not
connected to the Carry Dock. The Minds@Work Logo will appear, followed by the Digital Wallet logo. The unit will show these
two screens twice, signifying the update is taking place.
7.
When the Main Menu appears, scroll down to “CUSTOMIZE” and press Select. (Figure 3.A)
8.
In the next menu, scroll down to “VERSION” and press Select. (Figure 3.X) Check the version number to verify that your
firmware was updated with the latest version. You have completed the update.
NOTE: If the update was successful, your hard disk directory will no longer show the file M$A$W.M$S.
28 Updating the Digital Wallet Firmware
S U P PO R T
Technical Support
Digital Wallet technical support is available:
Monday - Friday
8:00 a.m. - 5:00 p.m. PST
Service is not available on Saturdays, Sundays and six legally observed United States holidays:
New Year’s Day
Memorial Day
Independence Day
Labor Day
Thanksgiving Day
Christmas Day
For toll free technical support within the United States, call: 866-269-0655
For technical support outside of the United States, call: 949-330-3453
Or e-mail us at: [email protected]
After Sale and Replacement Parts
The Digital Wallet provides easy sourcing for several after sale products and replacement parts. Contact Minds@Work at
800-459-5799 or visit our Web site, www.mindsatwork.net. You may write us at 15550 Rockfield Boulevard, Suite C, Irvine, CA
92618. Also go to www.mindsgear.com to purchase after market products, replacement parts and accessories. Contact us today
for pricing and availability on:
Camera Memory Media / PCMCIA Card Adapter
Carry Dock / Charger
Digital Wallet Carrying Case
USB Cable / Connector
NiMH Rechargeable Battery Pack
AC Adapter / Battery Recharger
29
Support
RMA Procedures
For replacement or return, contact Minds@Work at www.mindsatwork.net. Or contact technical support at 866-269-0655 within the
United States and 949-330-3453 internationally to obtain a RMA (Return Merchandise Authorization) number. No product will be
accepted without a valid RMA number.
Technical Specifications
Processor
RISC Processor
Storage
Available in 3GB, 6GB, 10GB and 20GB models
Status Display
Backlit monochrome matrix LCD (no picture preview)
Power
90-240V (50-60Hz) Worldwide AC Adapter
Batteries
Rechargeable and replaceable NiMH Batteries
Battery Life
500 recharge cycles
Operating Life
100 minutes average use
Operating Temp
30˚ - 104˚F, 0˚ - 40˚C
Recharging
3-hour recharge time. Recharging occurs via AC adapter connection to Carry Dock and
Digital Wallet. Batteries have no memory retention.
OS Support
Windows XP, Windows 2000, Windows 98, Windows SE, Windows ME and Mac 9.0+
Interface
USB 1.1 (4 pin)
30 Support
Data Transfer
Average 600-800 KB/sec. (USB)
Rotational Speed
4200rpm
Seek Time
Track-to-track 3ms, Average 13ms, Maximum 25ms
Average Latency
7.14ms
Buffer
512KB
MTTF (Power on Hours)
300,000
Operating Voltage
5V low self discharge rate
Worldwide AC Adapter
Input:
90-240V~50-60Hz
Output:
9.6V 1100mA Class II Transformer UL Approved
Camera Memory Card
Compatibility
CompactFlash
SmartMedia
Sony Memory Stick
Panasonic SD Memory Card
IBM Microdrive
Intel StrataFlash
MultiMedia Card
31
Support
Physical and Environmental Specs
Dimensions
5.6” x 3.0” x 1.2”
142.2mm x 76.2mm x 30.5mm
Weight
11.5 oz. (345 gms.) with batteries
Ambient Temperature
Operating:
Non-operating:
Humidity
80% RH Noncondensing
Vibration and Shock
Operating Vibration:
Operating Shock:
Non-operating Shock:
Altitude
10,000 feet (3,048 meters)
32° - 120°F, 0° - 50°C
15° - 140°F, -10° - 60°C
1.0G
150G
700G
FCC and CE approved for home and office use.
All software and hardware products and specifications are subject to change without notice. For current availability, contact
www.mindsatwork.net.
32 Support
Limited One Year Warranty
Limited Warranty. Minds@Work warranties the software and hardware products furnished herewith to be free from defects in
materials and workmanship under normal use for the period of one year from the date of delivery to you, as evidenced by your receipt.
This warranty is imited to the original purchaser and is not transferable.
Extended Warranty. To acquire an extended warranty, contact Minds@Work regarding fees, terms and conditions at
www.mindsatwork.net. Or write to Minds@Work at 15550 Rockfield Boulevard Suite C, Irvine, CA, 92618.
Customer Remedies. Minds@Work’s entire liability and your exclusive remedy shall be, at Minds@Work’s options, either (a) return
of the price paid, or (b) repair or replacement of the software or hardware that does not meet Minds@Work’s Limited Warranty, and
which is returned to Minds@Work with your original receipt. This Limited Warranty is void if failure of the software or hardware
has resulted from accident, abuse or misapplication. Any replacement software or hardware will be warranted for the remainder of the
original warranty period or 30 days, whichever is longer.
No Other Warranty. Minds@Work disclaims all other warranties, either expressed or implied, including, but not limited to: implied
warranties or merchantability and fitness for a particular purpose, with respect to the software, hardware and any accompanying
written materials.
No Liability or Consequential Damages. In no event shall Minds@Work or its suppliers be liable for any damages whatsoever
(including, without limitation, damages for loss of business profits, business interruption or other data loss) arising out of, or through
an inability to use this Minds@Work product, even if Minds@Work has been advised of the possibility of damage.
This agreement is governed by the laws of the United States of America.
Contact our Technical Support Hotline at: Toll-free in the United States 866-269-0655; International calls 949-330-3453.
For more information about this License Agreement, contact: Minds@Work’s Web site at www.mindsatwork.net or write to
Minds@Work at 15550 Rockfield Boulevard, Suite C, Irvine, CA 92618 to locate the Digital Wallet dealer nearest you. Warranty
coverage requires proof of purchase documentation evidencing the identity of the original purchaser and the purchase price (sales
receipt or invoice).
33 Support
License Agreements
Minds@Work Software License Agreements
PROOF OF LICENSE
Single User License
This is a legal agreement between you (either an individual or an entity), the User, and Minds@Work. Please review the following
terms and conditions carefully before opening the disk packaging. By opening this disk package, you are agreeing to be bound by the
terms of this agreement. If you do not agree to the terms of this agreement, promptly return the disk package and the accompanying
items to the place from which you obtained them for a full refund.
1. Grant Of License. Minds@Work grants you the right to one copy of the enclosed Minds@Work software program(s) (the
“SOFTWARE”) on a single computer, provided the SOFTWARE is in use on only one computer at any time. The SOFTWARE is
“in use” on a computer when it is loaded into the temporary memory or is installed into the permanent memory of that computer.
In the case that the SOFTWARE is installed on a computer which is connected to other computers (e.g., with a network), you must
have a reasonable mechanism or process in place to assure that the number of persons using the SOFTWARE concurrently does not
exceed the number of licenses you own.
2. Copyright. The SOFTWARE is owned by Minds@Work and is protected by copyright laws and international treaty provisions.
Therefore, you must treat the SOFTWARE like any other copyrighted material (e.g., book or musical recording), except that you
may either (a) make a single copy of the SOFTWARE solely for backup for archival purposes, or (b) transfer the SOFTWARE to
a permanentmemory (e.g., hard disk) provided that only one copy of the SOFTWARE is used at any time. You may not copy the
written materials accompanying the SOFTWARE.
3. Other Restrictions. This Minds@Work Software License Agreement is your proof of license to exercise the rights granted herein
and must be retained by you. You must not rent or lease this SOFTWARE. You may transfer the SOFTWARE and accompanying
written materials on a permanent basis, provided you retain no copies and the recipient agrees to the terms and conditions of this
agreement. Any transfer of the SOFTWARE must include the most recent update and all prior versions.
34 Support
FCC Statement
Instructions to the User. This equipment has been tested and found to comply with the limits for a class B digital device, pursuant
to part 15 of the FCC Rules. These limits are designed to provide reasonable protection against harmful interference in a residential
installation. This equipment generates, uses and can radiate radio frequency energy and if not installed and used in accordance
with the instructions, may cause harmful interference to radio communications. However, there is no guarantee that interference
will not occur in a particular installation. If this equipment does cause harmful interference to radio or television reception, which
can be determined by turning the equipment off and on, the user is encouraged to try to correct the interference by one or more
of the following measures:
- Reorient or relocate the receiving antenna.
- Increase the separation between the equipment and receiver.
- Connect the equipment into an outlet on a circuit different from that to which the receiver is connected.
- Consult the dealer or an experienced radio/TV technician for help.
In order to maintain compliance with FCC regulations, shielded cables must be used with this equipment. Operation with nonapproved equipment or unshielded cables is likely to result in interference to radio and TV reception. The user is cautioned that
changes and modifications made to the equipment without the approval of manufacturer could void the user’s authority to operate
this equipment.
35
Support