1
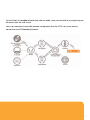
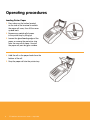
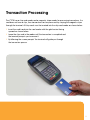
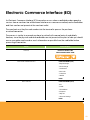
BWA Merchant Services V x 570 EFTPOS Terminal User Guide April 2012 Contents Introduction2 Terminal Location and PIN Privacy 2 Terminal Ownership 3 Settlement3 Communications Setup 4 Dial-up4 IP/Broadband4 Operating procedures 6 Loading Printer Paper To Switch the Terminal On Terminal Initialisation 6 8 8 Transaction Processing 9 Card errors and fallback 10 Purchase Transactions 12 Debit Card Transaction Credit Card Transaction Cash Out Transactions Refund Transaction Reprint Receipt Cancel Transaction 12 15 18 21 24 25 Administration Functions 26 Settlements26 Tipping29 Adding TIP to a credit card transaction 29 Pre-Authorisation33 Part One: Pre-Auth Part Two: Completion Processing a Pre-Authorisation Transaction Example Transaction Record Processing a Completion Transaction Example Transaction Record V X570 EFTPOS Terminal User Guide // April 2012 33 33 34 36 37 39 Mail Order/Telephone Order (MOTO) 40 Electronic Commerce Interface (ECI) 43 VOID47 Performing a VOID 48 Reports51 Shift Report Settlement Report Daily Report Transaction Report TIP Report Entering the Reports menu 51 51 52 52 52 53 Other Terminal Functionality 55 Training Mode 55 Activating Training Mode 55 Surcharging57 Customer Receipt Marketing Message 58 Offline Transaction Processing 59 Card Rules Electronic Fallback 59 59 Multi Merchant Capability 60 Hot Keys 60 Hot Key assignment options Assigning Hot Keys 61 62 User Management 64 Add new user Delete User Shift Change Example Transaction Record User Security Password Change 64 67 69 71 72 74 Notes76 1 Introduction Your BWA Merchant Services EFTPOS terminal enables you to accept credit, debit and charge card transactions electronically as a means of payment. Customers can access their cheque, savings or credit accounts for purchases and refunds. Cash out can also be requested from cheque or savings accounts. Terminal Location and PIN Privacy The physical location of an EFTPOS terminal is important in protecting a customer’s PIN privacy. When your new terminal is installed or relocated within the premises, you must take care to ensure the following: ›› The EFTPOS terminal is located in a position, which allows the customer to ensure their PIN entry cannot be observed, by employees or other customers. ›› The EFTPOS PIN pad has an adequate length of terminal connection cord and is positioned to allow customers to enter their PIN privately. ›› If in a fixed position, the EFTPOS PIN pad should not be placed at an angle or height which prevents customers from shielding their PIN entry (The provision of a hood over fixed PIN pads might be the appropriate means of ensuring PIN entry privacy). ›› The placement of mirrors and other reflective material do not allow the customer’s PIN entry to be observed through reflection. ›› The placement of security cameras and/or the EFTPOS terminal do not allow a visual record to be made of a customer’s PIN entry. ›› Customers should never be asked to disclose a PIN. These guidelines should be communicated to any staff that process EFTPOS transactions using the BWA Merchant Services terminal. 2 Vx570 EFTPOS Terminal User Guide // April 2012 Terminal Ownership All physical equipment provided to the Merchant remains the property of BWA Merchant Services. This includes EFTPOS Terminals, PIN Pads, Power Packs, Phone Line cables and any additional hardware provided at the time of installation. Settlement Settlement can be initiated manually via the terminal menu any time before 18:00 local time. Your EFTPOS terminal can also be configured to automatically settle any time between 00:01 and 18:00 local time. To set up an auto-settlement time, please contact BWA Merchant Services on 1800 243 444. If you do not complete settlement via one of these methods your EFTPOS terminal will prompt you to manually settle when processing the first transaction after 18:00 local time. The settlement function can be performed multiple times a day at any time, but the first settlement of the day (after 12:01 and before 18:00) is the only settlement that will be processed to your bank account. Totals for transactions processed after this settlement can be obtained through the reports function on the terminal menu. 3 Communications Set Up The VeriFone Vx570 terminal is capable of processing transactions through a broadband Internet connection as well as a standard phone line. Dial-up To enable your VeriFone Vx570 to process transactions using a standard phone line, simply connect a telephone cord to the communication port on the terminal, then route it directly to a telephone wall jack. IP/Broadband To activate your VeriFone Vx570 to process transactions using your broadband connection please contact the BWA Merchant Services helpdesk on 1800 243 444. You will need to have Internet access through a router that has at least 1 spare Ethernet port per terminal. You router will need to have DHCP turned on and have the following outbound ports opened if a firewall is in place: Ports 4108 and 443. If your router does not support DHCP, please contact the terminal helpdesk to configure your terminal to use a static IP address. Ethernet cabling must be available where the terminal is going to be installed and the cable must be plugged into the Ethernet port on the back of the terminal. Once the Ethernet cable is plugged into the Vx570 and to your router, the lights on the back of the terminal next to the Ethernet port should flash to indicate a connection. If the lights fail to turn on then there is no connection between the Vx570 and your router. Please check your cable and router to restore connectivity. A telephone line to the same location is required too if dial back-up is required. If the broadband connection fails, the Vx570 will switch to dial-up mode if it is configured for dial back-up and a phone line is plugged into the terminal. 4 Vx570 EFTPOS Terminal User Guide // April 2012 To switch back to broadband mode from dial-up mode, reset your terminal by turning the power off and on from the wall socket. Here is an example of a possible network configuration that the Vx570 can use to process transactions over IP/Broadband Internet. 5 Operating procedures Loading Printer Paper 1. Press down on the button located on the side of the terminal to unlatch the paper roll cover, then lift the cover up and back. 2. Remove any partial roll of paper in the printer tray by lifting up. 3. Loosen the glued leading edge of the paper or remove the protective strip from the new roll of paper. Unwind the paper roll past any glue residue. 4. Hold the roll so the paper feeds from the bottom of the roll. 5. Drop the paper roll into the printer tray. 6 Vx570 EFTPOS Terminal User Guide // April 2012 6. Pull paper up past the glue residue from printer tray. 7. Close the paper roll cover by gently pressing directly on the cover until it clicks shut, allowing a small amount of paper past the glue residue to extend outside the printer door. 8. Tear the paper off against the serrated metal strip in the printer. IMPORTANT: Always store thermal paper for your terminal in a dry, dark area. Handle thermal paper carefully: impact, friction, temperature, humidity, and oils affect the colour and storage characteristics of the paper. Never load a roll of paper with folds, wrinkles, tears, or holes at the edges in the print area. 7 Operating Procedures To Switch the Terminal On ›› Connect the power supply cable into power pack, and plug into the terminal. ›› Connect the telephone cable or Ethernet cable and switch power on at the wall. Your terminal will display several self test screens. ›› When powered on, your terminal will display the application software version and beep before returning to the idle state. Do not disconnect your terminal’s power supply or communication line unless instructed to do so by the Help Desk. The terminal is now ready for operation. Terminal Initialisation At least once per day your terminal will automatically contact the BWA Merchant Services system to maintain appropriate security. This process is a security feature and allows BWA Merchant Services to maintain and change security keys. During the process you will see “Terminal Initialisation” appear on the screen of your terminal. 8 Vx570 EFTPOS Terminal User Guide // April 2012 Transaction Processing The VX570 has a chip card reader and a magnetic stripe reader for processing transactions. If a card does not have a chip, then transactions can be processed by swiping the magnetic stripe through the terminal. All chip cards must be inserted into the chip card reader as shown below. ›› Insert the credit card into the card reader with the gold contact facing upward as shown below ›› Leave the chip card in the reader until the transaction is completed and the terminal prompts you to remove it ›› By following the screen prompts’ the terminal will guide you through the transaction process 9 Transaction Processing Card errors and fallback You may receive credit card errors if: ›› The chip on credit card is damaged ›› You have swiped a chip enabled credit card instead of inserting in the card reader ›› You remove the chip card before the transaction has been completed ›› Chip card is blocked Please find listed below some screen prompts that may appear on your terminal: 10 Vx570 EFTPOS Terminal User Guide // April 2012 Terminal Display Insert/Swipe card Please remove and re-insert card Please insert card Action This is the idle screen prompt If the terminal fails to read the chip credit card it will instruct you to remove it and insert the card the correct way. Terminal will beep twice every 3 seconds if card is not removed in the first 10 seconds This message will be prompted in 2 scenarios: 1. After the card is removed from “Please Remove and Re-insert Card”, terminal prompt you to insert the card. 2. If the chip card is swiped rather than inserted, terminal will beep twice and prompt you to insert the card instead Card error please swipe card Card error please swipe card Card removed Re-insert and try again Card blocked Please contact card issuer Please remove card If the terminal fails to read the chip card successfully on the second attempt, it will prompt you to “swipe” the card instead. Terminal will also beep twice If the terminal fails to read the chip card successfully on the second attempt, it will prompt you to “swipe” the card instead. Terminal will also beep twice The following message will appear if the card is removed from chip reader prior to transaction being completed The card has been blocked by the issuing institution, Do not process the transaction and seek an alternative payment option. Get customer to contact issuer The terminal will indicate whether the transaction has been approved and request that the card be removed from chip reader. 11 Purchase Transaction Follow the steps below to perform a purchase transaction for debit or credit cards. Debit Card Transaction Action Insert/Swipe card Screen Display Date/Time 01/08 16:00 PLEASE INSERT/SWIPE CARD Select purchase TRANSACTION ENTRY Please select operation BACK PUR REFUND CASH Key in purchase amount and press ENTER PURCHASE ENTRY Please enter purchase amount [ $0.00 ] BACK TRANSACTION ENTRY Key in cash out amount (if required)and press ENTER Please enter cash amount [ $0.00 ] BACK TRANSACTION ENTRY Key in TIP out amount (if required) and press ENTER PUR/CASH: $100.00 Enter TIP amount [ $0.00 ] 12 Vx570 EFTPOS Terminal User Guide // April 2012 Select CHQ for cheque account or SAV for savings account XXXX MERCHANT Purchase: $80.00 Cash: $20.00 Total: $100.00 Please select account BACK CHQ SAV Ask the customer to key in their PIN and press ENTER TRANSACTION ENTRY Enter PIN and ENTER [ ] BACK The terminal is attempting to process the transaction EFTPOS REQUEST In progress please wait *** PROCESSING *** EFTPOS REQUEST The transaction has been approved APPROVED If the customer requires a copy of the receipt, press YES If a copy of the receipt is not required, press NO If the transaction was processed using a chip card, the chip card can now be removed RECEIPT PRINTING Print customer receipt? YES NO PLEASE REMOVE CARD 13 Purchase Transaction IMPORTANT: Please ensure that you check for approval of the transaction before completing the sale. Hand the customer their copy of the transaction record, their card and any cash out requested. If the transaction is rejected, the terminal will display an error message giving the reason. Tell the customer the reason, advise the customer to contact their Bank if required and seek an alternative form of payment. Example Transaction Record BWA Merchant Services XXXX Merchant 123 Sydney Street North Sydney N SW 2060 Merchant Copy 01 AUG 2007 16:00:22 MERCHAN T ID TERMINAL ID INV N O STAN ACCOU NT TYPE ……..4221(s) 10/12 PURCHASE CASH -OU T TOTAL $80.00 $20.00 AUD $100.00 AUTH ID RRN APPROVED 14 4229851 2345678 12345678 000012 000034 SAVING S 00321 1234560 00034 00 Vx570 EFTPOS Terminal User Guide // April 2012 Credit Card Transaction Action Insert/Swipe card Screen Display Date/Time 01/08 16:00 PLEASE INSERT/SWIPE CARD Select purchase TRANSACTION ENTRY Please select operation BACK PUR REFUND CASH Key in purchase amount and press ENTER PURCHASE ENTRY Please enter purchase amount [ $0.00 ] BACK TRANSACTION ENTRY Key in TIP amount (if required) and press ENTER PURCHASE: $100.00 Enter TIP amount [ $0.00 ] XXXX MERCHANT Purchase: $80.00 Select CR for credit account Total: $100.00 Please select account BACK CHQ SAV CR TRANSACTION ENTRY Ask the customer to press ENTER or to key in their PIN and press ENTER Enter PIN and/or ENTER [ ] BACK 15 Purchase Transaction Ask the customer to press ENTER or to key in their PIN and press ENTER TRANSACTION ENTRY Enter PIN and/or ENTER [ ] BACK The terminal is attempting to process the transaction EFTPOS REQUEST In progress please wait *** PROCESSING *** The transaction has been approved. Ask the customer to sign the receipt and check to see the signature on the card matches the signature on the receipt EFTPOS REQUEST Press YES to print a copy of the receipt for your customer Print customer receipt? APPROVED RECEIPT PRINTING YES If the transaction was processed using a chip card, the chip card can now be removed 16 Vx570 EFTPOS Terminal User Guide // April 2012 NO PLEASE REMOVE CARD Example Transaction Record BWA Merchant Services XXXX Merchant 123 Sydney Street North Sydney N SW 2060 Merchant Copy 01 AUG 2007 16:00:22 M ERCH AN T ID TERM INAL ID INV N O STAN ACCOU NT TY PE 4229851 2345678 12345678 000012 000034 CRE D IT VISA ……..4221(s) 10/12 PURCHA SE $55.00 TIP TOTAL x SIGN ATU R E RRN APPROV ED ACCO U NT TY PE 50488 7…221(s) 1234560 00034 00 SAVING S 10/12 17 Purchase Transaction Cash Out Transaction Customers may request cash out with or without making a purchase, by debiting their cheque or savings account. Cash out is not allowed on a credit card account. A business owner may choose whether or not to provide this additional facility to customers. Cash Out Transaction with a Purchase To process a Cash Out Transaction when the customer is also making a purchase, simply follow the steps outlined on page 12 of this guide under the heading “Debit Card Transaction”. Cash Out Transaction without an Original Purchase You may process a Cash Out Transaction without an original purchase by following these steps: Action Insert/Swipe card Screen Display Date/Time 01/08 16:00 PLEASE INSERT/SWIPE CARD Select CASH TRANSACTION ENTRY Please select operation BACK PUR REFUND CASH Key in cash-out amount and press ENTER CASH-OUT ENTRY Please enter CASH amount [ $0.00 ] BACK 18 Vx570 EFTPOS Terminal User Guide // April 2012 Select CHQ for cheque account or SAV for savings account XXXX MERCHANT Cash: $20.00 Please select account CHQ Ask the customer to key in their PIN and press ENTER SAV TRANSACTION ENTRY Enter PIN and/or ENTER [ ] BACK The transaction has been approved EFTPOS REQUEST APPROVED PRINTING RECEIPT Press YES to print a copy of the receipt for your customer Print customer receipt? YES If the transaction was processed using a chip card, the chip card can now be removed NO PLEASE REMOVE CARD IMPORTANT: Please ensure that you check for approval of the transaction before completing the sale. Hand the customer their copy of the transaction record and their card. If the transaction is rejected, the terminal will display an error message giving the reason. Tell the customer the reason why the transaction was declined. 19 Purchase Transaction Example Transaction Record BWA Merchant Services XXXX Merchant 123 Sydney Street North Sydney N SW 2060 Merchant Copy 01 AUG 2007 16:00:22 MERCH AN T ID TERMINAL ID INV N O STAN ACCOU NT TY PE 4229851 2345678 12345678 000012 000034 SAVING S DEBIT ……..4221(s) CASH -OU T TO TAL AUT H ID APPR OV ED 20 10/12 AU D $80.00 $8 0.00 123456 00 Vx570 EFTPOS Terminal User Guide // April 2012 Refund Transaction In addition to customers returning goods, this transaction may also be performed to correct a keying error made by an operator while processing a purchase. IMPORTANT: If you are reversing an error, ensure the full amount of the transaction is refunded before the purchase is re-processed with the correct amount. Action Insert/Swipe card Screen Display Date/Time 01/08 16:00 PLEASE INSERT/SWIPE CARD Select REFUND TRANSACTION ENTRY Please select operation BACK PUR REFUND CASH Key in refund amount and press ENTER REFUND ENTRY Please enter cash amount [ $0.00 ] BACK USER ID Key in your user ID and press ENTER Enter user ID [ 1] BACK 21 Purchase Transaction Key in your password and press ENTER PASSWORD CHECK Enter password [ 1] BACK Select the account used in original transaction XXXX MERCHANT Refund: $80.00 Please select account BACK CHQ SAV CR Ask the customer to press ENTER or key in their PIN and press ENTER TRANSACTION ENTRY Enter PIN and/or ENTER [ ] BACK The terminal is attempting to process the transaction EFTPOS REQUEST In progress please wait *** PROCESSING *** EFTPOS REQUEST The transaction has been approved APPROVED PRINTING RECEIPT Press YES to print a copy of the receipt for your customer Print customer receipt? YES If the transaction was processed using a chip card, the chip card can now be removed 22 Vx570 EFTPOS Terminal User Guide // April 2012 NO PLEASE REMOVE CARD Example Transaction Record BWA Merchant Services XXXX Merchant 123 Sydney Street North Sydney N SW 2060 Merchant Copy 01 AUG 2007 16:00:22 M ERCH AN T ID TERM INAL ID INV N O STAN ACCOU NT TY PE 4229851 2345678 12345678 000012 000034 SAVING S DEBIT ……..4221(s) REFUN D TO TAL AUTH ID APPR OV ED 10/12 AU D $80.00 $8 0.00 123456 00 23 Purchase Transaction Reprint Receipt Action Press F2 Screen Display Date/Time 01/08 16:00 PLEASE INSERT/SWIPE CARD Press 1 for Reprint Receipt FUNCTION MENU (1/4) 1 Reprint Receipt 2 Shift Change 3 Settlement 4 Pre-Auth 5 Checkout 6 MOTO BACK Press ENTER to reprint the last receipt or press VIEW to view the receipt and to see and print receipts from previous transactions REPRINT RECEIPT Enter invoice number [ 123456 ] BACK VIEW 24 Vx570 EFTPOS Terminal User Guide // April 2012 Example Transaction Record BWA Merchant Services XXXX Merchant 123 Sydney Street North Sydney N SW 2060 *** DUPLICATE *** Custome r C opy 01 AU G 200 7 16:00:22 M ERCH AN T ID TERM INAL ID INV N O STAN ACCOU NT TY PE 4229851 2345678 12345678 000012 000034 SAVING S DEBIT ……..4221(s) CASH -OU T TO TAL AUT H ID APPR OV ED 10/12 AU D $80.00 $8 0.00 123456 00 Retain this copy for statement verification Cancel Transaction A transaction may be cancelled at any time before the customer presses ENTER or OK for the PIN entry. Pressing the red CANCEL key will cancel the transaction and return the terminal to the idle state. Once a customer has entered their PIN and pressed ENTER the transaction has been completed and you will need to perform a refund or void transaction. 25 Administration Functions Settlements The settlement function provides a “Settlement Summary” receipt, which summarises EFTPOS transactions taken as at the current settlement date. The net total amount on the receipt is the amount which will be credited to the nominated bank account you have provided to BWA Merchant Services. IMPORTANT: It is recommended that you perform a settlement each day. If you do not, a settlement will automatically be “forced” by BWA Merchant Services between 17.45 and 18.15 local time. The following steps show how to perform a settlement: 26 Vx570 EFTPOS Terminal User Guide // April 2012 Action Press F2 Screen Display Date/Time 01/08 16:00 PLEASE INSERT/SWIPE CARD Press 3 for Settlement FUNCTION MENU (1/4) 1 Reprint Receipt 2 Shift Change 3 Settlement 4 Pre-Auth 5 Checkout 6 MOTO BACK Key in your user ID number and press ENTER USER ID Enter user ID [ 1] BACK Key in your password and press ENTER PASSWORD CHECK Enter password [ 1] BACK SETTLEMENT Select YES Do you want to settle? YES NO 27 Administration Functions Example Transaction Record B W A Merch ant Se rvices MERCHA N T ID TER M IN A L ID SHIFT USER BANK TO TALS 42298512345678 12345678 01 BANK TO TALS (AUD) BA TCH: 000002 SE TL: 21/08/07 SALE S 28 REFUNDS 1 TO TAL 29 CASH OU T 2 ADJUS TS 12 $174 .57 -$7 .1 4 $167 .43 8.32 $15.70 B W A Merch ant Se rvices XXXX Merchant 123 Sydney Street N orth S ydney N SW 2060 B W A Merch ant Se rvices S E TTL EM EN T 01 AUG 2007 0 6:00:00 TO 01 AUG 2007 1 7:30:22 MERCHA N T MERCHA N T ID TERM IN A L ID XXXX Merchant 42298512345678 12345678 DEBI T PUR 005 CSH 002 REF 00 1 TO TAL $37.25 $8 .32 ($7 .1 4) AUD $38 .4 3 MASTERCARD PUR 007 TO TAL $47.88 AUD $47 .8 8 VISA PUR 008 TO TAL $32.17 AUD $32 .1 7 TO TAL DEB IT/CREDI T PUR 020 CSH 002 REF 00 1 TO TAL $117 .30 $8 .32 ($7 .1 4) AUD $118.48 AME X PUR 002 TO TAL 28 $14.30 AUD $14 .3 0 Vx570 EFTPOS Terminal User Guide // April 2012 Tipping Your BWA Merchant Services terminal allows you to add a TIP amount to a transaction via the ‘TIP’ function. A TIP can only be added to a credit card purchase transaction and is limited to 25% of the transaction amount. Adding TIP to a credit card transaction Action Press F2 Screen Display Date/Time 01/08 16:00 PLEASE INSERT/SWIPE CARD Press F4 to view the second function menu FUNCTION MENU (1/4) 1 Reprint Receipt 2 Shift Change 3 Settlement 4 Pre-Auth 5 Checkout 6 MOTO BACK FUNCTION MENU (2/4) 1 ECI 2 VOID Press 3 for TIP Addition 3 TIP Addition 4 Payment 5 Reports 6 Terminal Settings BACK 29 Administration Functions Key in your user ID number and press ENTER USER ID Enter user ID [ $0.00 ] BACK Key in your password and press ENTER PASSWORD CHECK Enter password [ 1] BACK Press NEXT to view next transaction or SELECT to add TIP to current transaction SELECT TRANSACTION 1 Auth ID 413415 2 INV 159357 3 Card# ……..4221(s) 4 Amt $36.00 5 Date 28/08/07 BACK NEXT SELECT TIP ENTRY Confirm purchase amount and press ENTER Please verify Purchase amount [ $136.00 ] BACK TIP ENTRY Key in TIP amount and press ENTER Purchase: $36.00 Enter TIP amount [ $0.00 ] BACK 30 Vx570 EFTPOS Terminal User Guide // April 2012 XXXX MERCHANT Purchase: $136.00 Press YES to continue, NO to cancel, NO to cancel or YES to edit TIP amount Cash: $10.00 Total: $146.00 Is this correct? BACK YES NO EFTPOS REQUEST The terminal is attempting to process the transaction In progress please wait *** PROCESSING *** EFTPOS REQUEST The transaction has been approved In progress please wait Press YES to print a copy of the receipt for your customer Print customer receipt? APPROVED RECEIPT PRINTING YES NO 31 Administration Functions Example Transaction Record BWA Merchant Services XXXX Merchant 123 Sydne y Stre et North Syd ney N SW 2060 Merchan t Copy 01 AU G 200 7 16:00:22 MERCH AN T ID TERM INAL ID INV N O ACCOU NT TY PE VISA ……..4221(s) 10/12 PURC HA SE TIP TO TAL $136. 00 $10.00 AU D $14 6.00 AUT H ID APPROV ED 32 4229851 2345678 12345678 000012 SAVING S 159876 00 Vx570 EFTPOS Terminal User Guide // April 2012 Pre-Authorisation The pre-authorisation function allows you to authorise and hold funds on a customer’s credit card for a period of up to 30 days. A pre-authorisation will not debit a customer’s account until a completion transaction is processed at a later date. This facility is only available for use by certain Industry types e.g. Hotels/Lodgings. Each ‘transaction’ consists of two parts, the pre-auth and the completion. Part One: Pre-Authorisation A pre-auth transaction requests verification from a customer’s card issuing bank for the full value of the purchase. A successful pre-auth request will issue a 6-digit authorisation number. IMPORTANT: It is at the discretion of the card issuer how long the pre-auth value is ‘held’ against the cardholders account for typically 3-5 days. After this, the authorisation request will expire from the system and a new pre-auth request is required. Part Two: Completion When the completion request is processed, the following data can be used to retrieve the pre-auth transaction for completion: ›› the 6-digit authorisation number, ›› the Invoice number, amount, ›› card number or date. The amount of the completion request may not exceed the pre-auth request by more than 15%. If it does the transaction will be declined. A successful completion transaction will result in value for that transaction being included in the end of day settlement to your merchant account. 33 Pre-Authorisation Processing a Pre-Authorisation Transaction Action Press F2 Screen Display Date/Time 01/08 16:00 PLEASE INSERT/SWIPE CARD Select 4 for Pre-Auth FUNCTION MENU (1/4) 1 Reprint Receipt 2 Shift Change 3 Settlement 4 Pre-Auth 5 Checkout 6 MOTO BACK Insert/Swipe the card PRE-AUTHORISATION Insert/Swipe Card BACK PRE-AUTH ENTRY Key in the pre-authorisation amount required and press ENTER Please enter authorisation amount [ $0.00 ] BACK XXXX MERCHANT Select YES if the pre-auth amount is correct or NO if you wish to change the amount Pre-Auth: $335.00 Is this correct? BACK YES NO 34 Vx570 EFTPOS Terminal User Guide // April 2012 Key in your PIN and press ENTER or press ENTER The transaction has been approved TRANSACTION ENTRY Enter PIN and/or ENTER BACK EFTPOS REQUEST APPROVED RECEIPT PRINTING Press YES to print a copy of the receipt for your customer Print customer receipt? YES If the transaction was processed using a chip card, the chip card can now be removed NO PLEASE REMOVE CARD 35 Pre-Authorisation Example Transaction Record BWA Merchant Services XXXX Merchant 123 Sydney Stre et North Syd ney N SW 2060 Merchan t Copy 01 AU G 200 7 16:00:22 MERCH AN T ID TERMINAL ID USER INV N O STAN ACCOU NT TY PE 4229851 2345678 1234 5678 NE IL (02) 000055 000034 CRE D IT VISA ……..4221(s) 10/12 PR E-AU TH TOTAL x SIGN ATUR E AUT H ID APPR OV ED 36 $355. 00 AU D $355.00 123655 00 Vx570 EFTPOS Terminal User Guide // April 2012 Processing a Completion Transaction Action Press F2 Screen Display Date/Time 01/08 16:00 PLEASE INSERT/SWIPE CARD Select 5 for Checkout FUNCTION MENU (1/4) 1 Reprint Receipt 2 Shift Change 3 Settlement 4 Pre-Auth 5 Checkout 6 MOTO BACK Insert/Swipe the card CHECKOUT Insert/Swipe credit card OR Enter to retrieve Pre-auth transaction BACK CHECKOUT ENTRY Key in the Auth ID from the pre-authorisation amount required and press ENTER Please enter Auth ID [ ] BACK 37 Pre-Authorisation CHECKOUT ENTRY Key in TIP amount if required and press ENTER Purchase: $400.00 Enter TIP amount [ $0.00] XXXX MERCHANT Select YES to confirm amount, NO to cancel completion or BACK to edit amount. Checkout: $400.00 Is this correct? BACK YES NO This transaction has been approved Press YES to print a copy of the receipt for your customer and ask the customer to sign the merchant copy of the receipt 38 Vx570 EFTPOS Terminal User Guide // April 2012 EFTPOS REQUEST APPROVED RECEIPT PRINTING Print customer receipt? YES NO Example Transaction Record BWA Merchant Services XXXX Merchant 123 Sydney Stre et North Syd ney N SW 2060 Merchan t Copy 01 AU G 200 7 16:00:22 MERCH AN T ID TERMINAL ID USER INV N O STAN ACCOU NT TY PE 4229851 2345678 1234 5678 NE IL (02) 000055 000034 CRE D IT VISA ……..4221(s) 10/12 PR E-AU TH TOTAL x AUT H ID APPR OV ED $400.00 AU D $400.00 SIGN ATUR E 123655 00 39 Mail Order/Telephone Order (MOTO) Mail Order and Telephone Order merchants are authorised to manually key credit card transactions. The terminal will automatically default to “Credit” as the account type whenever manual entry of card number is used. Should you attempt to manually key a Debit card number, the terminal will reject the transaction. The process is similar to a normal purchase (or refund) with manual entry of card details; however, since the physical card and cardholder are not present at the point of sale you should ensure you gather and record as much information as possible from the cardholder before processing a transaction. Action Press F2 Screen Display Date/Time 01/08 16:00 PLEASE INSERT/SWIPE CARD Press 6 for MOTO FUNCTION MENU (1/4) 1 Reprint Receipt 2 Shift Change 3 Settlement 4 Pre-Auth 5 Checkout 6 MOTO BACK Key in the card number and press ENTER TRANSACTION ENTRY Please enter card number [ ] BACK 40 Vx570 EFTPOS Terminal User Guide // April 2012 TRANSACTION ENTRY Key in the expiry date on the card and press ENTER Please enter card expiry date MMYY [ ] BACK TRANSACTION ENTRY Key in the CCV number on the back of the card and/or press ENTER Please enter CCV and/or press OK [ ] BACK TRANSACTION ENTRY Select Purchase Please select operation BACK PUR REFUND PURCHASE ENTRY Key in purchase amount and press ENTER Please enter Purchase amount [ $0.00 ] BACK PUR REFUND CASH XXXX MERCHANT Press YES to confirm amount, NO to cancel and BACK to edit amount Purchase: $80.00 Is this correct BACK YES NO The terminal is attempting to process the transaction EFTPOS REQUEST In progress please wait *** PROCESSING *** EFTPOS REQUEST The transaction has been approved APPROVED 41 Mail Order/Telephone Order (MOTO) Press YES to print a copy of the receipt for your customer Example Transaction Record BWA Merchant Services XXXX Merchant 123 Sydney Stre et North Syd ney N SW 2060 Merchan t Copy 01 AU G 2007 16:00:22 M ERCH AN T ID TERM INAL ID INV N O STAN ACCOU NT TY PE 4229851 2345678 12345678 000 012 000034 CRED IT VISA ……..4221(s) 10/12 MO TO PURCHASE TOTAL $99.00 AUD $99.00 x SIGN ATU R E AUTH ID APPROVED WITH SIGNATURE 42 159357 08 Vx570 EFTPOS Terminal User Guide // April 2012 RECEIPT PRINTING Print customer receipt? YES NO Electronic Commerce Interface (ECI) An Electronic Commerce Interface (ECI) transaction occurs when a cardholder orders goods or services from a merchant via a Web based interface or e-commerce method, and a cardholder and their card are not present at the merchant outlet. The merchant must key the card number into the terminal to process the purchase or refund transaction. The process is similar to a normal purchase (or refund) with manual entry of card details; however, since the physical card and cardholder are not present at the point of sale you should ensure you gather and record as much information as possible from the cardholder before processing a transaction. Action Press F2 Screen Display Date/Time 01/08 16:00 PLEASE INSERT/SWIPE CARD Press F4 for function menu 2 FUNCTION MENU (1/4) 1 Reprint Receipt 2 Shift Change 3 Settlement 4 Pre-Auth 5 Checkout 6 MOTO BACK Press 1 for ECI FUNCTION MENU (2/4) 1 ECI 2 VOID 3 TIP Addition 4 Payment 5 Reports 6 Terminal Settings BACK 43 Electronic Commerce Interface (ECI) TRANSACTION ENTRY Key in the card number and press ENTER Please enter card number [ ] BACK TRANSACTION ENTRY Key in the expiry date on the card and press ENTER Please enter card expiry date MMYY [ ] BACK TRANSACTION ENTRY Key in the CCV number on the back of the card and/ or press ENTER Please enter CCV and/or press OK [ ] BACK TRANSACTION ENTRY Select Purchase Please select operation BACK PUR REFUND PURCHASE ENTRY Key in purchase amount and press ENTER Please enter Purchase amount [ $0.00 ] BACK PUR REFUND CASH XXXX MERCHANT Press YES to confirm amount, NO to cancel and BACK to edit amount Purchase: $80.00 Is this correct? BACK YES NO EFTPOS REQUEST The terminal is attempting to process the transaction In progress please wait *** PROCESSING *** 44 Vx570 EFTPOS Terminal User Guide // April 2012 EFTPOS REQUEST The transaction has been approved APPROVED Press YES to print a copy of the receipt for your customer RECEIPT PRINTING Print customer receipt? YES NO 45 Electronic Commerce Interface (ECI) Example Transaction Record BWA Merchant Services XXXX Merchant 123 Sydney Stre et North Sydney N SW 2060 Merchan t Copy 01 AU G 2007 16:00:22 M ERCH AN T ID TERM INAL ID INV N O STAN ACCOU NT TY PE VISA ……..4221(s) 10/12 ECI PURCHASE TOTAL $99.00 AU D $9 9.00 x SIGN ATU R E AUTH ID APPR OV ED 46 4229851 2345678 12345678 000 012 000034 CRED IT 159357 00 Vx570 EFTPOS Terminal User Guide // April 2012 VOID There are some cases where either a merchant or the customer make a mistake during the payment process and don’t realise until the transaction has completed. At this stage it is too late to cancel or reverse the transaction and the transaction must be voided instead. Some examples where the void function may need to be used are: ›› customer uses an incorrect card, ›› merchant enters an incorrect amount ›› merchant TIPs an incorrect transaction. When this occurs, the merchant needs to “VOID” the incorrect transaction and then process a new one where the mistake is rectified. IMPORTANT: You can only void a transaction prior to performing a settlement on your terminal (this includes forced settlement). There will be no record of the transaction and its void on your customers bank account. This is because the transaction has been deleted before the Bank can complete the transaction and no funds have been removed from your customer’s account. The transaction and void will also not appear on your terminal settlement summary for the same reason. A record of the voided transaction will only appear on your transaction list report. If settlement has already been performed on your terminal, the incorrect transaction must be refunded and re-processed, refer to the Refund process in this guide. 47 VOID Performing a VOID Action Press F2 Screen Display Date/Time 01/08 16:00 PLEASE INSERT/SWIPE CARD Press F4 for function menu 2 FUNCTION MENU (1/4) 1 Reprint Receipt 2 Shift Change 3 Settlement 4 Pre-Auth 5 Checkout 6 MOTO BACK Press 2 for VOID FUNCTION MENU (2/4) 1 ECI 2 VOID 3 TIP Addition 4 Payment 5 Reports 6 Terminal Settings BACK USER ID Key in your user ID and press ENTER Enter user ID [ 1] BACK 48 Vx570 EFTPOS Terminal User Guide // April 2012 PASSWORD CHECK Enter password Key in your password and press ENTER [ 1] BACK SELECT TRANSACTION Press NEXT to view next transaction or SELECT to void current transaction 1 Auth ID 413415 2 INV 159357 3 Card# ……..4221(s) 4 Amt $36.00 5 Date 28/08/07 BACK NEXT SELECT VOID TRANSACTION 1 Auth ID Select YES to confirm void, back to select another transaction or NO to cancel 413415 2 INV 159357 3 Card# ……..4221(s) 4 Amt $36.00 5 Date 28/08/07 BACK YES SELECT EFTPOS REQUEST The terminal is attempting to process the transaction In progress please wait *** PROCESSING *** EFTPOS REQUEST The transaction has been approved APPROVED RECEIPT PRINTING Press YES to print a copy of the receipt for your customer Print customer receipt? YES NO 49 VOID Example Transaction Record BWA Merchant Services XXXX Merchant 123 Sydney Stre et North Sydney N SW 2060 Merchan t Copy 01 AU G 200 7 16:00:22 MERCH AN T ID TERM INAL ID INV N O STAN ACCOU NT TY PE VISA ……..4221(s) 4229851 2345678 12345678 000 012 000034 CRED IT 10/12 VOID PURCHASE TIP TO TAL AUTH ID APPROVED 50 $55.00 $10.00 AU D $6 5.00 456987 00 Vx570 EFTPOS Terminal User Guide // April 2012 Reports The following reports can be generated from the reports menu. Shift Report ›› A shift report is printed showing a number of sections — one per merchant accessible to the user initiating the shift report function. ›› The SHIFT USER from the start date to the end date is printed along with its ID or NAME. ›› The NEW SHIFT USER from the end date is printed with its ID or NAME. ›› The EFTPOS totals are shown first showing a summary of all purchases (including TIPs), cashouts and refunds per user. The summary shows the number of occurrences and the subtotal amounts. ›› A Pre-authorisation summary is shown next per user. The summary shows the number of occurrences and the sub-total amount. This includes all pre-auth transactions regardless if checked out or not. ›› TIP summary is shown last per user. The summary shows the number of occurrences and the sub-total amount. ›› If the user is attached or selects to multiple merchants, the report will include all merchants in the same printout. Only the first merchant will include the report header. Settlement Report ›› The Settlement Report – Subtotal report will show the subtotals for purchases, cash-outs and refunds for each card type (non-charge cards ), purchases, TIPs, cash-outs and refunds for charge cards, a summary of Pre-authorisation transactions and a summary of Electronic Fall Back transactions in the current period (ie. since last settlement). ›› The Settlement Report – Last Settlement report will show the totals for purchases, cash-outs and refunds for each card type (non-charge cards), purchases, TIPs, cash-outs and refunds for charge cards, a summary of Pre-authorisation transactions during the last settlement period. 51 Reports ›› The Settlement Report – Previous Settlement report will show the totals for purchases, cashouts and refunds for each card type (non-charge cards ), purchases, TIPs, cash-outs and refunds for charge cards, a summary of Pre-authorisation transactions and a summary of Electronic Fall Back transactions during the previous settlement period. ›› Where the report is printed for all merchants, this report will contain one section for each merchant accessible to the user who initiates the TIP report function. Daily Report The Daily Report will show: Debit totals for all card types. Per card type totals (non charge cards) – a summary of all purchases, cash-outs and refunds with the number of occurrences and the sub-total amounts for each transaction type. Charge card type totals- a summary of all purchases, TIPs, cash-outs and refunds with the number of occurrences and the sub-total amounts for each transaction type. Pre-authorisation summary is shown next for all card types. Transaction Report The Transaction report prints details for selected approved transactions stored in the terminal. Online transactions are stored until settlement except for pre-auth transactions, which are kept for 7 calendar days. TIP Report ›› The TIP Report – Subtotal type report will show the subtotal of TIPs in the current period (ie. since last settlement). ›› The TIP Report – Last Settlement type report will show the TIP totals during the last settlement period. ›› The TIP Report – Previous Settlement type report will show the TIP totals during the previous settlement period. 52 Vx570 EFTPOS Terminal User Guide // April 2012 Entering the reports menu Action Press F2 Screen Display Date/Time 01/08 16:00 PLEASE INSERT/SWIPE CARD Press F4 for function menu 2 FUNCTION MENU (1/4) 1 Reprint Receipt 2 Shift Change 3 Settlement 4 Pre-Auth 5 Checkout 6 MOTO BACK Press 5 for Reports FUNCTION MENU (2/4) 1 ECI 2 VOID 3 TIP Addition 4 Payment 5 Reports 6 Terminal Settings BACK USER ID Key in your user ID and press ENTER Enter user ID [ 1] BACK 53 Reports PASSWORD CHECK Key in your password and press ENTER Enter password [ 1] BACK REPORTS 1 Shift Report 2 Settlement Reports Select required report 3 Daily Reports 4 Transaction Report 5 TIP Reports 6 Host Message BACK 54 Vx570 EFTPOS Terminal User Guide // April 2012 Other Terminal Functionality Training Mode The BWA Merchant Services terminal can be placed in Training mode. When in this mode, transactions can be performed using any card and will not be submitted for processing and will not be added to the terminal amount totals. When the terminal is placed in training mode, a time will immediately start counting down from 5 minutes. Every time a card is swiped to initiate a new training transaction the counter will reset to 5 minutes and begin the countdown again. When the timer has counted down to zero the terminal will exit the Training mode and will automatically return to normal processing mode. This is a security feature to ensure that if the terminal is left idle then it reverts to normal processing mode. There is a separate reporting option for training mode to allow you to view any training transaction. You will not be able to view actual terminal transaction reports while in training mode. Activating Training Mode Action Press F2 Screen Display Date/Time 01/08 16:00 PLEASE INSERT/SWIPE CARD Press F4 for function menu 2 FUNCTION MENU (1/4) 1 Reprint Receipt 2 Shift Change 3 Settlement 4 Pre-Auth 5 Checkout 6 MOTO BACK 55 Activation Training Mode FUNCTION MENU (2/4) 1 ECI 2 VOID Press 6 for Terminal Settings 3 TIP Addition 4 Payment 5 Reports 6 Terminal Settings BACK TERM SETTINGS (1/2) 1 Timeouts 2 Training Mode OFF Select 2 to turn on training mode 3 Profile Maintenance 4 1st Hot Key AUTH 5 2nd Hot Key C/O 6 3rd Hot Key TIP BACK 56 Vx570 EFTPOS Terminal User Guide // April 2012 Surcharging The VX570 terminal has the ability to add a surcharge to every transaction processed. The surcharge can be either a fixed dollar amount e.g. $1.00 per transaction or it can be a percentage of the total transaction e.g. 2%. To enable your terminal for surcharging, please contact BWA Merchant Services on 1800 243 444. If required, the method of calculation and the surcharge amount can be different. For example, you could set all debit cards to be charged a set amount per transaction e.g. $1.00 surcharge and all credit cards could incur a 2% surcharge. As shown below, the surcharge amount is always shown on the customer and merchant receipt. Your terminal can be configured to automatically calculate the GST on surcharge amount. BWA Merchant Services XXXX Merchant 123 Sydney Street North Sydney N SW 2060 Merchant Copy 01 AUG 2007 16:00:22 M ERCH AN T ID TERM INAL ID INV N O STAN ACCOU NT TY PE 4229851 2345678 12345678 000012 000034 CRE D IT VISA ……..4221(s) 10/12 PURC HA SE SURCHARGE SURCHARGE GST $200.00 $4.00 $0.40 TIP TOTAL x RRN APPROV ED SIGN ATU R E 160049000075 08 57 Customer Receipt Marketing Message The Vx570 has the ability to add a marketing message to the bottom of every customer receipt. Merchants can use this to make their customers aware of any special deals or offer discounts in exchange for the bottom portion of the customer receipt. An example of a marketing message is shown in the receipt below. Marketing messages can be up to 124 characters long. Please contact BWA Merchant Services on 1800 243 444 to add a marketing message to your customer receipts. BWA Merchant Services XXXX Merchant 123 Sydney Street North Sydney N SW 2060 Merchant Copy 01 AUG 2007 16:00:22 M ERCH AN T ID TERM INAL ID INV N O STAN ACCOU NT TY PE 4229851 2345678 12345678 000012 000034 CRE D IT VISA ……..4221(s) 10/12 PURC HA SE SURCHARGE SURCHARGE GST $200.00 $4.00 $0.40 TIP TOTAL x SIGN ATU R E RRN APPROV ED 160049000075 08 APPROVED WITH SIGNATURE GET 15% OFF ON ALL BAR FOOD AND SNACK PURCHASES ON MONDAYS, TUESDAYS AND WEDNESDAYS. OPENING HOURS: 6AM-10PM 7DAYS 58 Vx570 EFTPOS Terminal User Guide // April 2012 Offline Transaction Processing Offline transactions are transactions which are approved by your terminal without contacting the card issuer. The approved transactions are forwarded to the issuer at a later stage. There are a number of reasons why offline transactions are allowed: Card Rules Certain transactions are considered low risk and do not need to be authorised online. Transactions in this category are known as off-host transactions. Please see below for off-host transaction responses: Y1 = offline approved Z1 = offline declined Y3 = Unable to go on-line and approved offline Z3 = Unable to go on-line and declined offline Electronic Fallback If approved by BWA Merchant Services, the VX570 can be configured for electronic fallback mode. The VX570 will enter electronic fallback mode if there is a problem with getting the transaction to the card issuer. This could be due to a communications error or due to the issuer being unavailable. These transactions are known as electronic fallback (EFB) transactions. All EFB transactions require signature confirmation, except for tipping transactions and will be approved with a response code of “08 Approved with signature”. Transactions above the floor limit will prompt for an authorisation number to be entered. Authorisations can be obtained by contacting the BWA Merchant Services helpdesk 1800 243 444. When in EFB mode, your terminal will display the words “OFFLINE TRANSACTIONS” and “SWIPE/ INSERT CARD on the main screen. Please note that in EFB mode, the terminal may prompt the cardholder to enter their PIN and provide their signature. In all cases, please follow the prompts on your terminal. 59 Multi Merchant Capability The BWA Merchant Services terminal has the ability to manage up to 5 merchant accounts on a single terminal. This functionality is particularly useful on premises where there are multiple businesses sharing space and each has their own merchant facility. Multi merchant capability allows: ›› Users to be attached to one or all merchant accounts enabled on the terminal ›› Different configuration for each merchant account on the terminal for settings such as security, reporting and screen layout. Multi merchant capability is not a standard feature enabled on the BWA Merchant Services terminal. If you would like more information on this functionality please contact BWA Merchant Services on 1800 655 204. Hot Keys There are three programmable hot keys that can be set to execute certain functions from the terminal idle screen. Hot keys provide faster access to frequently used functionality. Pressing an enabled hot key invokes the functionality for that key as defined in the application. Programmable Hot Keys 60 Vx570 EFTPOS Terminal User Guide // April 2012 Hot Keys Hot Key assignment options Label Action None The soft key has no assignment. Terminal emits a single beep, but there is no other action. AUTH A Pre-Auth transaction. (Equivalent to selecting Pre-Auth from the Function menu). C/O Starts a Checkout transaction. Equivalent to selecting Checkout from the Function menu. MOTO Starts a MOTO transaction. Equivalent to selecting MOTO from the Function menu. ECI Starts an ECI transaction. Equivalent to selecting ECI from the Function menu. TIP Starts a TIP Addition transaction. Equivalent to selecting TIP Addition from the Function menu. VOID Starts a Void transaction. Equivalent to selecting Void from the Function menu 61 Hot Keys Assigning Hot Keys Action Press F2 Screen Display Date/Time 01/08 16:00 PLEASE INSERT/SWIPE CARD Press F4 for function menu 2 FUNCTION MENU (1/4) 1 Reprint Receipt 2 Shift Change 3 Settlement 4 Pre-Auth 5 Checkout 6 MOTO BACK Press 6 for Terminal Settings FUNCTION MENU (2/4) 1 ECI 2 VOID 3 TIP Addition 4 Payment 5 Reports 6 Terminal Settings BACK 62 Vx570 EFTPOS Terminal User Guide // April 2012 TERM SETTINGS (1/2) 1 Timeouts 2 Training Mode OFF Select 4 to assign first hot key 3 Profile Maintenance 4 1st Hot Key AUTH 5 2nd Hot Key C/O 6 3rd Hot Key TIP BACK TERM SETTINGS (1/2) 1 NONE 2 AUTH Select the desired function to be assigned to hot key by pressing the corresponding number, press F4 for more functions or BACK to cancel 3 C/O 4 MOTO 5 ECI 6 TIP BACK 63 User Management Up to 48 Users can be set up in the terminal and assigned a user privilege level of SUPERVISOR or USER. Transactions and functions are then assigned a user privilege level so that only those users with that privilege level or above can execute the transaction or function. Add New User Action Press F2 Screen Display Date/Time 01/08 16:00 PLEASE INSERT/SWIPE CARD Press F4 for function menu 2 FUNCTION MENU (1/4) 1 Reprint Receipt 2 Shift Change 3 Settlement 4 Pre-Auth 5 Checkout 6 MOTO BACK Press 4 for function menu 3 FUNCTION MENU (2/4) 1 ECI 2 VOID 3 TIP Addition 4 Payment 5 Reports 6 Terminal Settings BACK 64 Vx570 EFTPOS Terminal User Guide // April 2012 TERM SETTINGS (1/2) 1 Timeouts 2 Training Mode OFF Select 2 for User Management 3 Profile Maintenance 4 1st Hot Key AUTH 5 2nd Hot Key C/O 6 3rd Hot Key TIP BACK USER ID Key in your user ID and press ENTER Enter user ID [ 1] BACK PASSWORD CHECK Key in your password and press ENTER Enter password [ 1] BACK 65 User Management USER ID #1 Select 2 to add user 1 Name TEST 2 Level Supervisor 3 Reset Password 4 User Refund Limit 5 Merchant List BACK USER ID #1 Select ADD 1 Name TEST 2 Level Supervisor 3 Reset Password 4 User Refund Limit 5 Merchant List BACK ADD DEL USER ID #2 New user has been added. Select 1 to 5 to edit corresponding value. eg: select 1 to change the name 1 Name User 02 2 Level Supervisor 3 Reset Password 4 User Refund Limit 5 Merchant List BACK ADD DEL 66 Vx570 EFTPOS Terminal User Guide // April 2012 Delete User Action Press F2 Screen Display Date/Time 01/08 16:00 PLEASE INSERT/SWIPE CARD Press F4 for function menu 2 FUNCTION MENU (1/4) 1 Reprint Receipt 2 Shift Change 3 Settlement 4 Pre-Auth 5 Checkout 6 MOTO BACK Press 4 for function menu 3 FUNCTION MENU (2/4) 1 ECI 2 VOID 3 TIP Addition 4 Payment 5 Reports 6 Terminal Settings BACK 67 User Management FUNCTION MENU (3/4) 1 Password Change 2 User Management Select 2 for User Management 3 Stationery Request 4 Send Message 5 Send Stored Trans 6 Force Logon BACK Key in your user ID and press ENTER USER ID Enter user ID [ 1] BACK Key in your password and press ENTER PASSWORD CHECK Enter password [ 1] BACK USER MENU Select 2 to edit users (F4 to scroll down & F1 to scroll up to find user), select delete. 1 User Security 2 Edit Users BACK USER ID #1 Select DEL 1 Name TEST 2 Level Supervisor 3 Reset Password 4 User Refund Limit 5 Merchant List BACK DELETE MENU Select YES to delete user Are you sure? YES 68 Vx570 EFTPOS Terminal User Guide // April 2012 NO Shift Change Users can manage shifts by the shift change function so that totals can be obtained through the shift reporting for each shift. The user who changes the shift becomes the default user for transactions or operations which do not require user authentication before proceeding. Action Press F2 Screen Display Date/Time 01/08 16:00 PLEASE INSERT/SWIPE CARD Press 2 for Shift Change FUNCTION MENU (1/4) 1 Reprint Receipt 2 Shift Change 3 Settlement 4 Pre-Auth 5 Checkout 6 MOTO BACK Key in your user ID and press ENTER USER ID Enter user ID [ 1] BACK 69 User Management Key in your password and press ENTER PASSWORD CHECK Enter password [ 1] BACK Select YES SHIFT CHANGE Do you want to start a new shift? YES Select 1 to print shift totals by user Select 2 to print totals by Card type NO SHIFT CHANGE 1 User 2 Card BACK 70 Vx570 EFTPOS Terminal User Guide // April 2012 Example Transaction Record BWA Merchant Services BWA Merchant Services XXXX Merchant 123 Sydney Street North Sydney N SW 2060 XXXX Merchant 123 Sydney Street North Sydney N SW 2060 SH IFT SUB TOTA L REPORT (BY USER) SH IFT SUB TOT A L R EPO RT (BY C ARD) 01 AU G 200 7 09:00:00 TO 01 AU G 200 7 16:00:22 01 AU G 200 7 09:00:00 TO 01 AU G 200 7 16:00:22 MERCH ANT MERCH AN T ID TERM INAL ID SH IFT USER NE W SH IFT USER XXXX Merchant 4229851 2345678 12345678 01 03 PU R 01 227 CS H 01 023 RE F 01 043 TO TAL $11,448.48 $425. 36 ($6,072.13) AU D $5 ,801.71 PR E-AU THORIS ATION AUD 01 05 5AU TH ID $562. 36 AUD TIP 01 057 $631. 71 *** TOTALS RES ET *** M ERCHANT MERCHANT ID TERM INAL ID SH IFT US ER XXXX Merchant 4229851 2345678 12345678 01 DEBIT PUR 004 CSH 001 REF 00 1 $6.00 $10.00 ($1.00) TOTAL AU D $1 5.00 M ASTERCARD PUR 006 RE F 001 TOTAL $6.00 ($5.00) AUD$ 1.00 VISA PUR 007 REF 001 $7.20 ($2.00) TOTAL PUR 017 CSH 001 REF 003 TOTAL $5.20 TO TAL D EBIT/CR ED IT $19.20 $10.00 ($8.00) $21.20 71 User Management User Security Your BWA Merchant Services terminal allows you to set user security restrictions for functions such as purchases, TIPs, refunds, voids and pre-authorisations. The following steps show how to set user security restrictions. Action Press F2 Screen Display Date/Time 01/08 16:00 PLEASE INSERT/SWIPE CARD Press F4 for function menu 2 FUNCTION MENU (1/4) 1 Reprint Receipt 2 Shift Change 3 Settlement 4 Pre-Auth 5 Checkout 6 MOTO BACK Press 4 for function menu 3 FUNCTION MENU (2/4) 1 ECI 2 VOID 3 TIP Addition 4 Payment 5 Reports 6 Terminal Settings BACK 72 Vx570 EFTPOS Terminal User Guide // April 2012 FUNCTION MENU (3/4) 1 Password Change 2 User Management Select 2 for User Management 3 Stationery Request 4 Send Message 5 Send Stored Trans 6 Force Logon BACK USER ID Key in your user ID and press ENTER Enter user ID [ 1] BACK PASSWORD CHECK Key in your password and press ENTER Enter password [ 1] BACK USER MENU Select 1 to edit security restrictions for functions 1 User Security 2 Edit Users BACK FUNCTION MENU (1/4) Press the numeric key for the selected function to toggle available security settings for each function until the required setting is displayed. Options are USER, SUPERVISOR or NONE. Not all options are available for all functions. Press F4 to see more functions. Press BACK to cancel. 1 Purchase NONE 2 Refund SUP 3 Void SUP 4 MOTO NONE 5 ECI NONE 6 Pre-Auth NONE BACK 73 User Management Password Change The password change function allows users to change their current password. Follow the steps below to change passwords. Action Press F2 Screen Display Date/Time 01/08 16:00 PLEASE INSERT/SWIPE CARD Press F4 for function menu 2 FUNCTION MENU (1/4) 1 Reprint Receipt 2 Shift Change 3 Settlement 4 Pre-Auth 5 Checkout 6 MOTO BACK Press 4 for function menu 3 FUNCTION MENU (2/4) 1 ECI 2 VOID 3 TIP Addition 4 Payment 5 Reports 6 Terminal Settings BACK 74 Vx570 EFTPOS Terminal User Guide // April 2012 FUNCTION MENU (3/4) 1 Password Change 2 User Management Select 2 for User Management 3 Stationery Request 4 Send Message 5 Send Stored Trans 6 Force Logon BACK USER ID Key in your user ID and press ENTER Enter user ID [ 1] BACK PASSWORD CHECK Key in your password and press ENTER Enter password [ 1] BACK NEW PASSWORD Key in your new password and press ENTER Please enter new password [ ] BACK NEW PASSWORD Re-enter your new password to confirm Please enter new password [ ] BACK 75 Notes 76 Vx570 EFTPOS Terminal User Guide // April 2012 Important Information Your Merchant Number: ........................................ Transaction Queries 1800 243 444 Hardware Faults 1300 364 164 Stationery Orders 1300 664 660 ©2012 BWA Merchant Services Pty Limited ABN 51 115 245 531 (BWA Merchant Services). The ampersand flourish logo is a registered trade mark of Bankwest, a division of Commonwealth Bank of Australia ABN 48 123 123 124, used under licence by BWA Merchant Services Pty Ltd. BWA Merchant Services: π 1800 243 444 µ www.bwams.com.au