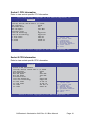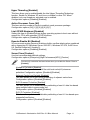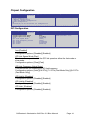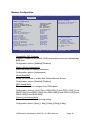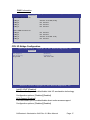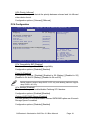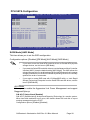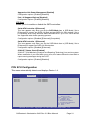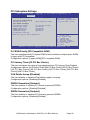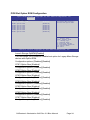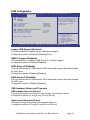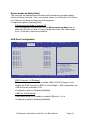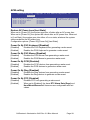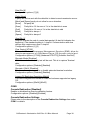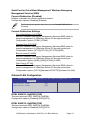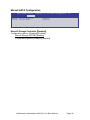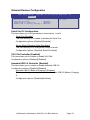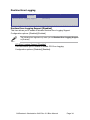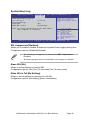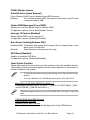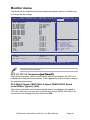
1
BIOS setup program
This motherboard supports a programmable firmware chip that you can update
using the provided utility described in section Managing and updating your
BIOS.
Use the BIOS Setup program when you are installing a motherboard, reconfiguring
your system, or prompted to “Run Setup.” This section explains how to configure
your system using this utility.
Even if you are not prompted to use the Setup program, you can change the
configuration of your computer in the future. For example, you can enable the
security password feature or change the power management settings. This
requires you to reconfigure your system using the BIOS Setup program so that the
computer can recognize these changes and record them in the CMOS RAM of the
firmware chip.
The firmware chip on the motherboard stores the Setup utility. When you start up
the computer, the system provides you with the opportunity to run this program.
Press <Del> during the Power-On Self-Test (POST) to enter the Setup utility;
otherwise, POST continues with its test routines.
If you wish to enter Setup after POST, restart the system by pressing
<Ctrl+Alt+Delete>, or by pressing the reset button on the system chassis. You can
also restart by turning the system off and then back on. Do this last option only if
the first two failed.
The Setup program is designed to make it as easy to use as possible. Being a
menu-driven program, it lets you scroll through the various sub-menus and make
your selections from the available options using the navigation keys.
•
The default BIOS settings for this motherboard apply for most conditions
to ensure optimum performance. If the system becomes unstable after
changing any BIOS settings, load the default settings to ensure system
compatibility and stability. Press <F5> and select Yes to load the BIOS
default settings.
•
The BIOS setup screens shown in this section are for reference purposes
only, and may not exactly match what you see on your screen.
CADnetwork Workstation W60 Rev 3.0 Bios Manual
Page 1
BIOS menu screen
Menu items
Main
Menu bar
Configuration fields
General help
Aptio Setup Utility - Copyright (C) 2011 American Megatrends, Inc.
Ai Tweaker Advanced Server Mgmt Event Logs Boot Monitor Security Tool
BIOS Information
BIOS Vendor
Core Version
Compliancy
BIOS Version
Build Date
American Megatrends
4.6.4.1
UEFI 2.1; PI 0.9
0208 x64
12/14/2011
System Date
System Time
[Wed 10/19/2011]
[15:07:28]
Access Level
Administrator
Memory Information
Total Memory
1024 MB (DDR3)
Processor
CPU Speed
Count:
2000 MHz
2
Exit
Set the Date, Use Tab to
switch between Data elements.
→←: Select Screen
↑↓: Select Item
Enter: Select Item
+/-: Change Opt.
F1: General Help
F2: Previous Values
F5: Optimized Defaults
F10: Save & Exit
ESC: Exit
Version 2.14.1219. Copyright (C) 2011 American Megatrends, Inc.
Navigation keys
Menu bar
The menu bar on top of the screen has the following main items:
Main
Ai Tweaker
Advanced
For changing the basic system configuration
For changing the Ai Tweaker settings
For changing the advanced system settings
Server Mgmt
For changing the server management settings
Boot
For changing the system boot configuration
Event Logs
For changing the event log settings
MonitorFor displaying the system temperature, power status, and
changing the fan settings
Security
For changing the security settings
Exit
For selecting the exit options
Tool
For configuring options for special functions
To select an item on the menu bar, press the right or left arrow key on the keyboard
until the desired item is highlighted.
CADnetwork Workstation W60 Rev 3.0 Bios Manual
Page 2
Menu items
The highlighted item on the menu bar displays the specific items for that menu. For
example, selecting Main shows the Main menu items.
The other items (Event Logs, Advanced, Monitor, Boot, Tool, and Exit) on the menu
bar have their respective menu items.
Submenu items
A solid triangle before each item on any menu screen means that the item has a
submenu. To display the submenu, select the item and press <Enter>.
Navigation keys
At the bottom right corner of a menu screen are the navigation keys for the BIOS
setup program. Use the navigation keys to select items in the menu and change
the settings.
General help
At the top right corner of the menu screen is a brief description of the selected item.
Configuration fields
These fields show the values for the menu items. If an item is user-configurable,
you can change the value of the field opposite the item. You cannot select an item
that is not user-configurable.
A configurable field is enclosed in brackets, and is highlighted when selected. To
change the value of a field, select it and press <Enter> to display a list of options.
Pop-up window
Select a menu item and press <Enter> to display a pop-up window with the
configuration options for that item.
Scroll bar
A scroll bar appears on the right side of a menu screen when there are items that
do not fit on the screen. Press the Up/Down arrow keys or <Page Up> /<Page
Down> keys to display the other items on the screen.
CADnetwork Workstation W60 Rev 3.0 Bios Manual
Page 3
Main menu
When you enter the BIOS Setup program, the Main menu screen appears. The
Main menu provides you an overview of the basic system information, and allows
you to set the system date, time, language, and security settings.
The Server Management tab and menu appear only when you install ASMB card
on the motherboard.
Main
Aptio Setup Utility - Copyright (C) 2011 American Megatrends, Inc.
Ai Tweaker Advanced Server Mgmt Event Logs Boot Monitor Security Tool Exit
BIOS Information
BIOS Vendor
Core Version
Compliancy
BIOS Version
Build Date
American Megatrends
4.6.4.1
UEFI 2.1; PI 0.9
0208 x64
12/14/2011
System Date
System Time
[Wed 10/19/2011]
[15:07:28]
Access Level
Administrator
Memory Information
Total Memory
1024 MB (DDR3)
Processor
CPU Speed
Count:
2000 MHz
2
Set the Date, Use Tab to
switch between Data elements.
→←: Select Screen
↑↓: Select Item
Enter: Select Item
+/-: Change Opt.
F1: General Help
F2: Previous Values
F5: Optimized Defaults
F10: Save & Exit
ESC: Exit
Version 2.14.1219. Copyright (C) 2011 American Megatrends, Inc.
System Date [Day xx/xx/xxxx]
Allows you to set the system date.
System Time [xx:xx:xx]
Allows you to set the system time.
CADnetwork Workstation W60 Rev 3.0 Bios Manual
Page 4
Ai Tweaker menu
The Ai Tweaker menu items allow you to configure overclocking-related items.
Be cautious when changing the settings of the Ai Tweaker menu items. Incorrect
field values can cause the system to malfunction.
The configuration options for this section vary depending on the CPU and DIMM
model you installed on the motherboard.
Main
Aptio Setup Utility - Copyright (C) 2011 American Megatrends, Inc.
Ai Tweaker Advanced Server Mgmt Event Logs Boot Monitor Security Tool Exit
Target CPU Turbo-Mode Speed : 2500MHz
Ai Overclock Tuner
CPU Ratio
[Auto]
[Auto]
DRAM Timing Control
CPU1 Voltage
VCORE_CPU1
CPU1 VSA Voltage
VSA_CPU1
CPU2 Voltage
VCORE_CPU2
CPU2 VSA Voltage
VSA_CPU2
DRAM Voltage (CHA, CHB)
+VDDQ_AB_CPU1
DRAM Voltage (CHC, CHD)
+VDDQ_CD_CPU1
DRAM Voltage (CHE, CHF)
+VDDQ_EF_CPU2
DRAM Voltage (CHG, CHH)
+VDDQ_GH_CPU2
Clock Spread Spectrum
[Auto]
+0.930 V
[Auto]
+0.896 V
[Auto]
+0.928 V
[Auto]
+0.884 V
[Auto]
+1.474 V
[Auto]
+1.476 V
[Auto]
+1.474 V
[Auto]
+1.476 V
[Disabled]
Min=0.800V
Max=1.520V
Standard=By CPU
Increment=0.005V
=/-:Raise/Reduce
→←: Select Screen
↑↓: Select Item
Enter: Select Item
+/-: Change Opt.
F1: General Help
F2: Previous Values
F5: Optimized Defaults
F10: Save & Exit
ESC: Exit
Version 2.14.1219. Copyright (C) 2011 American Megatrends, Inc.
Ai Overclock Tuner [Auto]
Allows you to select the CPU overclocking options to achieve the desired CPU
internal frequency. Select any of these preset overclocking configuration options:
[Auto]
[Manual]
Loads the optimal settings for the system.
Allows you to individually set overclocking parameters.
BCLK Frequency [XXX]
Allows you to adjust the CPU and VGA frequency to enhance the system
performance. Set Ai Overclock Tuner to [Manual] to show BCLK Frequency. Use
the <+> and <-> keys to adjust the value. You can also key in the desired value
using the numeric keypad. The values range from 80.0MHz to 300.0MHz.
CADnetwork Workstation W60 Rev 3.0 Bios Manual
Page 5
CPU Ratio [Auto]
This item allows users adjust the maximum non-turbo CPU ratio. Use the <+> and
<-> keys to adjust the value. The
�����������������������������������������������
values range from 12 to 57 with 1 interval.
CPU1 Voltage [Auto]
Use the <+> and <-> keys to adjust the value. The
��������������������������������
values range from 0.800V to
1.520V with 0.005V interval.
CPU1 VSA Voltage [Auto]
Use the <+> and <-> keys to adjust the value. The
��������������������������������
values range from 0.800V to
1.520V with 0.005V interval.
CPU2 Voltage [Auto]
Use the <+> and <-> keys to adjust the value. The
��������������������������������
values range from 0.800V to
1.520V with 0.005V interval.
CPU2 VSA Voltage [Auto]
Use the <+> and <-> keys to adjust the value. The
��������������������������������
values range from 0.800V to
1.520V with 0.005V interval.
DRAM Voltage (CHA, CHB) [Auto]
Use the <+> and <-> keys to adjust the value. The
�������������������������������
values range from 1.20V to
1.52V with 0.005V interval.
DRAM Voltage (CHC, CHD) [Auto]
Use the <+> and <-> keys to adjust the value. The
�������������������������������
values range from 1.20V to
1.52V with 0.005V interval.
DRAM Voltage (CHE, CHF) [Auto]
Use the <+> and <-> keys to adjust the value. The
�������������������������������
values range from 1.20V to
1.52V with 0.005V interval.
DRAM Voltage (CHG, CHH) [Auto]
Use the <+> and <-> keys to adjust the value. The
�������������������������������
values range from 1.20V to
1.52V with 0.005V interval.
Clock Spread Spectrum [Disabled]
[Disabled]Enhances BCLK overclocking ability.
[Enabled] For [EMI] control.
CADnetwork Workstation W60 Rev 3.0 Bios Manual
Page 6
DRAM Timing Control
Aptio Setup Utility - Copyright (C) 2011 American Megatrends, Inc.
Ai Tweaker
Primary Timings
DRAM CAS# Latency
DRAM CAS# Latency
DRAM RAS# to CAS# Delay
DRAM RAS# to CAS# Delay
DRAM RAS# PRE Time
DRAM RAS# PRE Time
DRAM RAS# ACT Time
DRAM RAS# ACT Time
DRAM COMMAND Mode
DRAM COMMAND Mode
[Auto]
9
9
9
24
1
Secondary Timings
DRAM RAS# to RAS# Delay
DRAM RAS# to RAS# Delay 4
DRAM REF Cycle Time
DRAM REF Cycle Time
74
DRAM WRITE Recovery Time
DRAM WRITE Recovery Time 10
DRAM READ to PRE Time
DRAM READ to PRE Time
5
DRAM FOUR ACT WIN Time
DRAM FOUR ACT WIN Time
20
DRAM WRITE to READ Delay
DRAM WRITE to READ Delay 5
DRAM Write Latency
DRAM Write Latency
7
[Auto]
[Auto]
Min=0.800V
Max=1.520V
Standard=By CPU
Increment=0.005V
=/-:Raise/Reduce
[Auto]
[Auto]
[Auto]
[Auto]
[Auto]
[Auto]
[Auto]
→←: S e l e c t S c r e e n
↑↓:
Select Item
Enter: Select Item
+/-: Change Opt.
F1: General Help
F2: Previous Values
F5: Optimized Defaults
F10: Save & Exit
ESC: Exit
[Auto]
[Auto]
Version 2.14.1219. Copyright (C) 2011 American Megatrends, Inc.
Use the scroll to view items.
Primary Timings
DRAM CAS# Latency [Auto]
Use the <+> and <-> keys to adjust the value. The
������������������������������
values range from 3 to 15
with 1 interval.
DRAM RAS# to CAS# Delay [Auto]
Use the <+> and <-> keys to adjust the value. The
������������������������������
values range from 4 to 15
with 1 interval.
DRAM RAS# PRE Time [Auto]
Use the <+> and <-> keys to adjust the value. The
������������������������������
values range from 4 to 15
with 1 interval.
CADnetwork Workstation W60 Rev 3.0 Bios Manual
Page 7
DRAM RAS# ACT Time [Auto]
Use the <+> and <-> keys to adjust the value. The
������������������������������
values range from 4 to 40
with 1 interval.
DRAM COMMAND Mode [Auto]
Use the <+> and <-> keys to adjust the value. The
�����������������������������
values range from 1 to 3
with 1 interval.
Secondary Timings
DRAM RAS# to RAS# Delay [Auto]
Use the <+> and <-> keys to adjust the value. The
�����������������������������
values range from 4 to 7
with 1 interval.
DRAM REF Cycle Time [Auto]
Use the <+> and <-> keys to adjust the value. The
����������������������������
values range from 48 to
511 with 1 interval.
DRAM WRITE Recovery Time [Auto]
Use the <+> and <-> keys to adjust the value. The
������������������������������
values range from 5 to 31
with 1 interval.
DRAM READ to PRE Time [Auto]
Use the <+> and <-> keys to adjust the value. The
������������������������������
values range from 4 to 15
with 1 interval.
DRAM FOUR ACT WIN Time [Auto]
Use the <+> and <-> keys to adjust the value. The
����������������������������
values range from 16 to
63 with 1 interval.
DRAM WRITE to READ Delay [Auto]
Use the <+> and <-> keys to adjust the value. The
������������������������������
values range from 4 to 15
with 1 interval.
DRAM WRITE Latency [Auto]
Use the <+> and <-> keys to adjust the value. The
������������������������������
values range from 1 to 15
with 1 interval.
CADnetwork Workstation W60 Rev 3.0 Bios Manual
Page 8
Advanced menu
The Advanced menu items allow you to change the settings for the CPU and other
system devices.
Take caution when changing the settings of the Advanced menu items. Incorrect
field values can cause the system to malfunction.
Aptio Setup Utility - Copyright (C) 2011 American Megatrends, Inc.
Main Ai Tweaker Advanced Server Mgmt Event Logs Boot Monitor Security Tool Exit
CPU Configuration Parameters
CPU Configuration
CPU Power Management Configuration
Chipset Configuration
PCH SATA Configuration
PCH SCU SAS Configuration
PCI Subsystem Setting
USB Configuration
ACPI Settings
WHEA Configuration
APM
Serial Port Console Redirection
Onboard LAN Configuration
ME Subsystem
Marvell SATA Configuration
Legacy Devices Configuration
Runtime Error Logging
→←: Select Screen
↑↓: Select Item
Enter: Select Item
+/-: Change Opt.
F1: General Help
F2: Previous Values
F5: Optimized Defaults
F10: Save & Exit
ESC: Exit
Version 2.14.1219. Copyright (C) 2011 American Megatrends, Inc.
4.5.1
CPU Configuration
Aptio Setup Utility - Copyright (C) 2011 American Megatrends, Inc.
Advanced
CPU Confguration
Socket specific CPU Information
Socket 1 CPU Information
Socket 2 CPU Information
CPU Speed
2000 MHz
64-bit
Supported
Hyper Threading
Active Processor Cores
Limit CPUID Maximum
Execute Disable Bit
Server Class
Hardware Prefetcher
Adjacent Cache Line Prefetch
DCU Streamer Prefetcher
DCU IP Pretetcher
Intel Virtualization Technology
Local APIC Mode
[Enabled]
[All]
[Disabled]
[Enabled]
[Custom]
[Enabled]
[Enabled]
[Enabled]
[Enabled]
[Enabled]
[Auto]
→←: Select Screen
↑↓: Select Item
Enter: Select Item
+/-: Change Opt.
F1: General Help
F2: Previous Values
F5: Optimized Defaults
F10: Save & Exit
ESC: Exit
Version 2.14.1219. Copyright (C) 2011 American Megatrends, Inc.
CADnetwork Workstation W60 Rev 3.0 Bios Manual
Page 9
Socket 1 CPU Information
Enter to view socket specific CPU Information.
Aptio Setup Utility - Copyright (C) 2011 American Megatrends, Inc.
Advanced
Socket 1 CPU Information
Intel(R) Xeon(R) CPU E5-2660 0 @ 2.20GHz
CPU Signature
Microcode Patch
Max CPU Speed
Min CPU Speed
Processor Cores
Intel HT Technology
Intel VT-X Technology
206d6
613
2200 MHz
1200 MHz
6
Supported
Supported
L1
L1
L2
L3
32kB x8
32kB x8
256kB x8
20480 kB
Data Cache
Code Cache
Cache
Cache
→←: Select Screen
↑↓: Select Item
Enter: Select Item
+/-: Change Opt.
F1: General Help
F2: Previous Values
F5: Optimized Defaults
F10: Save & Exit
ESC: Exit
Version 2.14.1219. Copyright (C) 2011 American Megatrends, Inc.
Socket 2 CPU Information
Enter to view socket specific CPU Information.
Aptio Setup Utility - Copyright (C) 2011 American Megatrends, Inc.
Advanced
Socket 2 CPU Information
Intel(R) Xeon(R) CPU E5-2660 0 @ 2.20GHz
CPU Signature
Microcode Patch
Max CPU Speed
Min CPU Speed
Processor Cores
Intel HT Technology
Intel VT-X Technology
206d6
613
2200 MHz
1200 MHz
8
Supported
Supported
L1
L1
L2
L3
32 kB x 8
32 kB x 8
256 kB x 8
20480 kB
Data Cache
Code Cache
Cache
Cache
→←: Select Screen
↑↓: Select Item
Enter: Select Item
+/-: Change Opt.
F1: General Help
F2: Previous Values
F5: Optimized Defaults
F10: Save & Exit
ESC: Exit
Version 2.14.1219. Copyright (C) 2011 American Megatrends, Inc.
CADnetwork Workstation W60 Rev 3.0 Bios Manual
Page 10
Hyper Threading [Enabled]
This item allows you to enable/disable the Intel Hyper-Threading Technology
function. Enable for Windows XP and Linux or disable for other OS. When
disabled, only one thread per activated core is enabled.
Configuration options: [Disabled] [Enabled]
Active Processor Cores [All]
This item sets the number of cores to enable in each processor package.
Configuration options: [All] [1] [2] [3] [4] [5] [6] [7]
Limit CPUID Maximum [Disabled]
Setting this item to [Enabled] allows legacy operating system to boot even without
support for CPUs with extended CPUID functions.
Configuration options: [Disabled] [Enabled]
Execute Disable Bit [Enabled]
XP can prevent certain classes of malicious buffer overflow attacks when combined
with a supporting OS (Windows Server 2003 SP1, Windows XP SP2, SuSE Linux
9.2, Redhat Enterprise 3 Update 3).
Configuration options: [Disabled] [Enabled]
Server Class [Custom]
Use Intel recommended prefetch settings.
Configuration options: [Enterprise] [High Performance(HPC)] [Custom]
You can only customize the items below when you enable the Server Class to
[Custom].
Hardware Prefetcher [Enabled]
This item allows you to turn on/off the mid level cache(L2) streamer
prefetcher.Configuration options: [Disabled] [Enabled]
Adjacent Cache Line Prefetch [Enabled]
This item allows you to turn on/off prefetching of adjacent cache lines.
Configuration options: [Disabled] [Enabled]
DCU Streamer Prefetcher [Enabled]
This item allows you to enable/disable prefetching of next L1 data line based
upon multiple loads in same cache line.
Configuration options: [Disabled] [Enabled]
DCU IP Prefetcher [Enabled]
This item allows you to enable/disable prefetching of next L1 line based upon
sequential load history.
Configuration options: [Disabled] [Enabled]
CADnetwork Workstation W60 Rev 3.0 Bios Manual
Page 11
Intel Virtualization Technology [Enabled]
When this item is enabled, VMM can utilize the additional hardware capabilities
provided by Vanderpool Technology.
Configuration options: [Disabled] [Enabled]
Local APIC Mode [Auto]
Allows you to enable one or both the Advanced Programmable Interrupt Controllers
(APIC) with APIC ID values greater than 254.
Configuration options: [Auto] [xAPIC] []x2APIC]
CPU Power Management Configuration
Aptio Setup Utility - Copyright (C) 2011 American Megatrends, Inc.
Advanced
CPU Power Management Confguration
Power Technology
[Custom]
Enhanced Intel SpeedStep Technolog
[Enabled]
Turbo Mode
[Enabled]
P-STATE Coordination
[HW_ALL]
CPU C3 Report
[Disabled]
CPU C6 Report
[Enabled]
CPU C7 Report
[Disabled]
Package C State limit
[C6]
Energy Performance
[Balanced Performance]
Factory long duration power limit
95 Watts
Long Duration Power Limit
0
Factory long duration maintained
1000 ms
Long Duration Maintained
0
Recommended short duration power1 1.2 * Long Duration
Short Duration Power Limit
0
Enable the power
management features
→←: Select Screen
↑↓: Select Item
Enter: Select Item
+/-: Change Opt.
F1: General Help
F2: Previous Values
F5: Optimized Defaults
F10: Save & Exit
ESC: Exit
Version 2.14.1219. Copyright (C) 2011 American Megatrends, Inc.
Power Technology [Custom]
This item allows you to enable power management features.
Configuration options: [Disable] [Energy Efficient] [Custom]
You can only customize the items below when you enable the Power Technology
to [Custom].
Enhanced Intel SpeedStep Technology [Enabled]
Enable Intel SpeedStep for allowing the system operation system to
dynamically adjust processor voltage and cores frequency to result in
decreased average power consumption and decreased average heat
production.
Configuration options: [Disabled] [Enabled]
CADnetwork Workstation W60 Rev 3.0 Bios Manual
Page 12
Turbo Mode [Enabled]
This item automatically allows processor cores to run faster than the base
operating frequency if it’s operating below power, current, and temperature
specification limit.
Configuration options: [Disabled] [Enabled]
P-STATE Coordination [HW_ALL]
This item allows you to change P-STATE Coordination type.
Configuration options: [HW_ALL] [SW_ALL] [SW_ANY]
CPU C3 Report [Disabled]
This item allows you to enable/disable CPU C3(ACPI C2) report.
Configuration options: [Disabled] [Enabled]
CPU C6 Report [Enabled]
This item allows you to enable/disable CPU C6(ACPI C3) report.
Configuration options: [Disabled] [Enabled]
CPU C7 Report [Disabled]
This item allows you to enable/disable CPU C7(ACPI C3) report.
Configuration options: [Disabled] [Enabled]
Package C State limit [C6]
This item allows you to set package C State limit.
Configuration options: [C0] [C2] [C6] [C7] [No Limit]
Energy Performance [Balanced Performance]
This item allows you to optimize between performance and power savings.
Configuration options: [Performance] [Balanced Performance] [Balanced Energy]
[Energy Efficient]
Factory long duration power limit
Long Duration Power Limit
95Watts
0
Factory long duration maintained
Long Duration Maintained
1000 ms
0
Allows you to set long duration power limit in watts. Use the <+> and <-> keys to
adjust the value.
Allows you to set time window which the long duration power is maintained. Use the
<+> and <-> keys to adjust the value.
Recommended short duration power1 1.2 * Long Duration
Short Duration Power Limit
0
Allows you to set short duration power limit in watts. Use the <+> and <-> keys to
adjust the value.
CADnetwork Workstation W60 Rev 3.0 Bios Manual
Page 13
Chipset Configuration
Aptio Setup Utility - Copyright (C) 2011 American Megatrends, Inc.
Advanced
QPI Configuration
Memory Configuration
CPU II0 Bridge Configuration
PCH Configuration
Intel(R) VT for Directed I/O Configuration
QPI Configuration Page
QPI Configuration
Aptio Setup Utility - Copyright (C) 2011 American Megatrends, Inc.
Advanced
Current QPI Link Speed
Current QPI Link Freq
Isoc
QPI Link Speed Mode
QPI Link Frequency Select
QPI Link0s
QPI Link0p
QPI Link1 Fast
7.2 GT/s
[Enabled]
[Fast]
[Auto]
[Disabled]
[Disabled]
[Enabled]
Enable/Disable Isoc
Isoc [Enabled]
Configuration options: [Disabled] [Enabled]
QPI Link Speed Mode [Fast]
This item allows you to select the QPI link speed as either the fast mode or
slow mode.
Configuration options: [Slow] [Fast]
QPI Link Frequency Select [Auto]
This item allows for selecting the QPI link frequency
Configuration options: [Auto] [6.4 GT/s] [7.2 GT/s (Fast Mode Only)] [8.0 GT/s
(Fast Mode Only)]
QPI Link0s [Disabled]
Configuration options: [Disabled] [Enabled]
QPI Link0p [Disabled]
Configuration options: [Disabled] [Enabled]
QPI Link1 [Enabled]
Configuration options: [Disabled] [Enabled]
CADnetwork Workstation W60 Rev 3.0 Bios Manual
Page 14
Memory Configuration
Aptio Setup Utility - Copyright (C) 2011 American Megatrends, Inc.
Advanced
Compatibility RID
Memory Configuration
[Enabled]
Total Memory
Current Memory Mode
Currently Memory Speed
Mirroring
Sparing
Memory Mode
Numa
DDR Speed
Channel Interleaving
Rank Interleaving
Patrol Scrub
Demand Scrub
Data Scrambling
Device Tagging
Thermal Throttling
Enable High Temp.
Allow 2x Refresh
Altitude
Memory HOT sensor support
DIMM Information
16384 MB (DDR3)
Independent
1333 MHz
Not Possible
Not Possible
[Independent]
[Enabled]
[Auto]
[Auto]
[Auto]
[Disabled]
[Enabled]
[Enabled]
[Disabled]
[CLTT]
[Disabled]
[Enabled]
[300 M]
[Enabled]
Support for Compatibility
Revision ID(CRID)
Functionality mentioned in
Sandybridge bios spec
→←: Select Screen
↑↓: Select Item
Enter: Select Item
+/-: Change Opt.
F1: General Help
F2: Previous Values
F5: Optimized Defaults
F10: Save & Exit
ESC: Exit
Version 2.14.1219. Copyright (C) 2011 American Megatrends, Inc.
Compatibility RID [Enabled]
Supports compatibility revision ID (CRID) functionality mentioned in Sandybridge
BIOS spec.
Configuration options: [Enabled] [Disabled]
Memory Mode [Independent]
Select the mode for memory initializaton.
Configuration options: [Independent]
Numa [Enalbled]
Allows you to disable or enable Non Uniform Memory Access.
Configuration options: [Enabled] [Disabled]
DDR Speed [Auto]
This item allows you to configure force DDR speed.
Configuration options: [Auto] [Force DDR3 800] [Force DDR3 1066] [Force
DDR3 1333] [Force DDR3 1600] [Force DDR3 1866] [Force DDR3 2133] [Force
DDR3 2400] [Force DDR3 2666]
Channel Interleaving [Auto]
Select different channel interleaving setting.
Configuration options: [Auto] [1 Way] [2 Way] [3 Way] [4 Way]
CADnetwork Workstation W60 Rev 3.0 Bios Manual
Page 15
Rank Interleaving [Auto]
Select different rank interleaving setting.
Configuration options: [Auto] [1 Way] [2 Way] [4 Way] [8 Way]
Patrol Scrub [Disabled]
This item allows you to enable/disable Patrol Scrub.
Configuration options: [Disabled] [Enabled]
Demand Scrub [Enabled]
This item allows you to enable/disable Demand Scrubbing Feature.
Configuration options: [Enabled] [Disabled]
Data Scrambling [Enabled]
This item allows you to enable/disable Data Scrambling.
Configuration options: [Enabled] [Disabled]
Device Tagging [Disabled]
This item allows you to enable/disable Device Tagging.
Configuration options: [Enabled] [Disabled]
Thermal Throttling [CLTT]
Configuration options: [Disabled] [OLTT] [CLTT]
Enable High Temp. [Disabled]
This item allows you to enable/disable high temperature mode.
Configuration options: [Disabled] [Enabled]
Allow 2x Refresh [Enabled]
This item allows you to enable/disable refreshing function.
Configuration options: [Disabled] [Enabled]
Altitude [300 M]
Shows system altitude above the sea level in meters.
Configuration options: [Auto] [300 M] [900 M] [1500 M] [3000 M]
Memory Hot sensor support [Enabled]
Configuration options: [Disabled] [Enabled]
CADnetwork Workstation W60 Rev 3.0 Bios Manual
Page 16
DIMM Information
Aptio Setup Utility - Copyright (C) 2011 American Megatrends, Inc.
Advanced
CPU1 DIMM Information
DIMM_A1
Present 8192 MB(Indep
DIMM_B1
Not Present
DIMM_C1
Not Present
DIMM_D1
Not Present
CPU2 DIMM Information
DIMM_E1
Not Present
DIMM_F1
Not Present
DIMM_G1
Present 8192 MB Inde[
DIMM_H1
Not Present
CPU IIO Bridge Configuration
Aptio Setup Utility - Copyright (C) 2011 American Megatrends, Inc.
Advanced
Intel(R) I/OAT
DCA Support
VGA Priority
TargetVGA
[Disabled]
[Enabled]
[Offboard]
VGA From CPU
Version 2.14.1219. Copyright (C) 2011 American Megatrends, Inc.
Intel(R) I/OAT [Disabled]
This item allows you to enable/disable Intel I/O accelaration technology.
Configuration options: [Disabled] [Enabled]
DCA Support [Enabled]
This item allows you to enable/disable direct cache access support.
Configuration options: [Disabled] [Enabled]
CADnetwork Workstation W60 Rev 3.0 Bios Manual
Page 17
VGA Priority [offboard]
This item allows you to decide the priority between onboard and 1st offboard
video device found.
Configuration options: [Onboard] [Offboard]
PCH Configuration
Aptio Setup Utility - Copyright (C) 2011 American Megatrends, Inc.
Advanced
Name
Stepping
SB Chipset Configuration
PCH Compatibility RID Support for PCH Compatibility
Patsburg
06 (C1 Stepping) Revision ID(CRID)
Functionality.
[Disabled]
Deep Sx SCU devices Onboard SATA RAID Oprom
[Disabled]
[Enabled]
[Enabled]
Audio Configuration
Azalia HD Audio [Enabled]
High Precision Event Timer Configuration
High Precision Timer
[Enabled]
→←: Select Screen
↑↓: Select Item
Enter: Select Item
+/-: Change Opt.
F1: General Help
F2: Previous Values
F5: Optimized Defaults
F10: Save & Exit
ESC: Exit
Version 2.14.1219. Copyright (C) 2011 American Megatrends, Inc.
PCH Compatibility RID [Disabled]
This item allows support for PCH compatibility.
Configuration options: [Disabled] [Enabled]
Deep Sx [Disabled]
Configuration options: [Disabled] [Enabled in S5 (Battery)] [Enabled in S5]
[Enabled in S4 and S5 (Battery)] [Enabled in S4 and S5]
Mobile platforms support deep S4/S5 in DC only and desktop platforms support
deep S4/S5 in AC only.
SCU devices [Enabled]
This item allows you to enable/disable Patsburg SCU devices.
Configuration options: [Enabled] [Disabled]
Onboard SATA RAID Oprom [Enabled]
This item allows you to enable/disable onboard SATA RAID option rom if Launch
Storage Oprom is enabled.
Configuration options: [Disabled] [Enabled]
CADnetwork Workstation W60 Rev 3.0 Bios Manual
Page 18
Audio Configuration
Azalia HD Audio [Enabled]
This item allows you to enable/disable Azalia HD Audio.
Configuration options: [Disabled] [Enabled]
High Precision Event Timer Configuration
High Precision Timer [Enabled]
This item allows you to enable/disable High Precision Event Timer.
Configuration options: [Disabled] [Enabled]
Intel(R) VT for Directed I/O Configuration
Aptio Setup Utility - Copyright (C) 2011 American Megatrends, Inc.
Advanced
Intel(R) VT-d
[Enabled]
Enables or Disables BIOS ACPI
Auto Configuration.
Intel(R) VT-d [Disabled]
This item allows you to enable or disable Intel VT-d.
Configuration options: [Enabled] [Disabled]
The following item appears only when you set Intel(R) VT-d to [Enabled].
Coherency Support [Disabled]
This item allows you to enable/disable VT-d Engine Coherency support.
Configuration options: [Disabled] [Enabled]
ATS Support [Disabled]
This item allows you to enable/disable VT-d Engine address translation services (ATS)
support.
Configuration options: [Disabled] [Enabled]
CADnetwork Workstation W60 Rev 3.0 Bios Manual
Page 19
PCH SATA Configuration
Aptio Setup Utility - Copyright (C) 2011 American Megatrends, Inc.
Advanced
SATA
SATA
SATA
SATA
SATA
SATA
Port1
Port2
Port3
Port4
Port5
Port6
ST3500320AS(500GB)
Not Present
Not Present
Not Present
DRW ATAPI
Not Present
SATA Mode S.M.A.R.T. Status Check
(1)IDE Mode. (2)AHCI Mode.
(3)RAID Mode.
[AHCI Mode]
[Enabled]
Aggressive Link Power Management[Enabled]
Port1
Port2
Port3
Port4
Port5
Port6
Staggered
Staggered
Staggered
Staggered
Staggered
Staggered
Spin-up
Spin-up
Spin-up
Spin-up
Spin-up
Spin-up
[Disabled]
[Disabled]
[Disabled]
[Disabled]
[Disabled]
[Disabled]
→←: Select Screen
↑↓: Select Item
Enter: Select Item
+/-: Change Opt.
F1: General Help
F2: Previous Values
F5: Optimized Defaults
F10: Save & Exit
ESC: Exit
Version 2.14.1219. Copyright (C) 2011 American Megatrends, Inc.
SATA Mode [AHCI Mode]
This item allows you to set the SATA configuration.
Configuration options: [Disabled] [IDE Mode] [AHCI Mode] [RAID Mode]
•
If you want to use the Serial ATA hard disk drives as Parallel ATA physical
storage devices, set this item to [IDE Mode].
•
If you want the Serial ATA hard disk drives to use the Advanced Host Controller
Interface (AHCI), keep the default setting [AHCI Mode]. The AHCI allows the
onboard storage driver to enable advanced Serial ATA features that increases
storage performance on random workloads by allowing the drive to internally
optimize the order of commands.
•
If you want to create RAID sets with LSI MegaRAID utility, or Intel® Rapid
Storage Technology Enterprise from the Serial ATA hard disk drives, set this
item to [RAID Mode].
AHCI Mode
Allows you to enable the Aggressive Link Power Management and support
Staggered Spin-up.
S.M.A.R.T. Status Check [Enabled]
S.M.A.R.T. (Self-Monitoring, Analysis and Reporting Technology) is a monitor system.
When hard disk read/write errors occur, this feature allows the hard disk to report
warning messages during the POST.
Configuration options: [Enabled] [Disabled]
CADnetwork Workstation W60 Rev 3.0 Bios Manual
Page 20
Aggressive Link Power Management [Enabled]
Configuration options: [Enabled] [Disabled]
Port 1-6 Staggered Spin-up [Disabled]
Configuration options: [Enabled] [Disabled]
IDE Mode
Allows you to to enable or disable the SATA controllers.
Serial-ATA Controller 0 [Enhanced]
This item appears only when you set the SATA Mode item to [IDE Mode]. Set to
[Enhanced] to support two SATA 6.0 Gb/s and two SATA 3.0 Gb/s devices. Set to
[Compatible] when using Windows 98/NT/2000/MS-DOS. Up to four SATA devices
are supported under these operating systems.
Configuration options: [Disabled] [Enhanced] [Compatible]
Serial-ATA Controller 1 [Enhanced]
This item appears only when you set the SATA Mode item to [IDE Mode]. Set to
[Enhanced] to support two SATA 3.0 Gb/s devices.
Configuration options: [Disabled] [Enhanced]
S.M.A.R.T. Status Check [Enabled]
S.M.A.R.T. (Self-Monitoring, Analysis and Reporting Technology) is a monitor system.
When read/write of your hard disk errors occur, this feature allows the hard disk to
report warning messages during the POST.
Configuration options: [Enabled] [Disabled]
PCH SCU Configuration
This menu automatically detects and displays Device 1-4.
Aptio Setup Utility - Copyright (C) 2011 American Megatrends, Inc.
Advanced
Device1
Device2
Device3
Device4
Not
Not
Not
Not
Present
Present
Present
Present
→←: Select Screen
↑↓: Select Item
Enter: Select Item
+/-: Change Opt.
F1: General Help
F2: Previous Values
F5: Optimized Defaults
F10: Save & Exit
ESC: Exit
Version 2.14.1219. Copyright (C) 2011 American Megatrends, Inc.
CADnetwork Workstation W60 Rev 3.0 Bios Manual
Page 21
PCI Subsystem Settings
Aptio Setup Utility - Copyright (C) 2011 American Megatrends, Inc.
Advanced
PCI Bus Driver Version
PCI Option ROM Handling
PCI ROM Priority V 2.05.00
[EFI Compatible ROM]
In case of multiple Option
ROMs (Legacy and EFI
Compatible), specifies what
PCI option ROM to lanuch.
PCI Common Settings
PCI Latency Timer
VGA Palette Snoop
PERR# Generation SERR# Generation Load RT32 Image
[32 PCI Bus Clocks]
[Disabled]
[Disabled]
[Disabled]
[Enabled]
PCI Express Settings
PCIE Slot Option Rom Configuration
→←: Select Screen
↑↓: Select Item
Enter: Select Item
+/-: Change Opt.
F1: General Help
F2: Previous Values
F5: Optimized Defaults
F10: Save & Exit
ESC: Exit
Version 2.14.1219. Copyright (C) 2011 American Megatrends, Inc.
PCI ROM Priority [EFI Compatible ROM]
This item specifies which PCI option ROM to launch between multiple option ROMs
(Legacy and EFI Compatible).
Configuration options: [Legacy ROM] [EFI Compatible ROM]
PCI Latency Timer [32 PCI Bus Clocks]
This item configures the value to be programmed into PCI Latency Timer Register.
Configuration options: [32 PCI Bus Clocks] [64 PCI Bus Clocks] [96 PCI Bus Clocks]
[128 PCI Bus Clocks] [160 PCI Bus Clocks] [192 PCI Bus Clocks] [224 PCI Bus
Clocks] [248 PCI Bus Clocks]
VGA Palette Snoop [Disabled]
This item enables or disables VGA pallette register snooping.
Configuration options: [Disabled] [Enabled]
PERR# Generation [Disabled]
This item enables or disables PCI device to generate PERR#.
Configuration options: [Disabled] [Enabled]
SERR# Generation [Disabled]
This item enables or disables PCI device to generate SERR#.
Configuration options: [Disabled] [Enabled]
CADnetwork Workstation W60 Rev 3.0 Bios Manual
Page 22
PCI Express Settings
Aptio Setup Utility - Copyright (C) 2011 American Megatrends, Inc.
Advanced
PCI Express Link Register Settings
ASPM Support [Disabled]
WARNING: Enabling ASPM may cause some
PCI-E device to fail
Enables or Disables PCI
Express Device Relaxed
Ordering.
→←: Select Screen
↑↓: Select Item
Enter: Select Item
+/-: Change Opt.
F1: General Help
F2: Previous Values
F5: Optimized Defaults
F10: Save & Exit
ESC: Exit
Version 2.14.1219. Copyright (C) 2011 American Megatrends, Inc.
ASPM Support [Disabled]
This item allows you to set the ASPM level.
Configuration options: [Disabled] [Auto] [Force L0s]
[Force L0s]
[Auto]
[Disabled]
Force all links to L0s state.
BIOS auto configure.
Disabled ASPM.
CADnetwork Workstation W60 Rev 3.0 Bios Manual
Page 23
PCIE Slot Option ROM Configuration
Aptio Setup Utility - Copyright (C) 2011 American Megatrends, Inc.
Advanced
Legacy OpROM Support
Launch Storage OpROM
[Enabled]
PCIE1
PCIE2
PCIE3
PCIE4
PCIE5
PCIE6
PCIE7
[Enabled]
[Enabled]
[Enabled]
[Enabled]
[Enabled]
[Enabled]
[Enabled]
Option
Option
Option
Option
Option
Option
Option
Rom
Rom
Rom
Rom
Rom
Rom
Rom
Enable or Disable Boot Option
for Legacy Mass Storage
Devices with Option ROM.
→←: Select Screen
↑↓: Select Item
Enter: Select Item
+/-: Change Opt.
F1: General Help
F2: Previous Values
F5: Optimized Defaults
F10: Save & Exit
ESC: Exit
Version 2.14.1219. Copyright (C) 2011 American Megatrends, Inc.
Launch Storage OpROM [Enabled]
This item allows you to enable or disable boot option for Legacy Mass Storage
devices with Option ROM.
Configuration options: [Disabled] [Enabled]
PCIE1 Option Rom [Enabled]
Configuration options: [Disabled] [Enabled]
PCIE2 Option Rom [Enabled]
Configuration options: [Disabled] [Enabled]
PCIE3 Option Rom [Enabled]
Configuration options: [Disabled] [Enabled]
PCIE4 Option Rom [Enabled]
Configuration options: [Disabled] [Enabled]
PCIE5 Option Rom [Enabled]
Configuration options: [Disabled] [Enabled]
PCIE6 Option Rom [Enabled]
Configuration options: [Disabled] [Enabled]
PCIE7 Option Rom [Enabled]
Configuration options: [Disabled] [Enabled]
CADnetwork Workstation W60 Rev 3.0 Bios Manual
Page 24
USB Configuration
Aptio Setup Utility - Copyright (C) 2011 American Megatrends, Inc.
Advanced
USB Configuration
USB Devices:
2 Hubs
Legacy USB Support
USB3.0 Support
XHCI Hand-off
EHCI Hand-off [Enabled]
[Enabled]
[Enabled]
[Disabled]
USB Hardware Delays and Time-outs
USB transfer time-out
Device reset time-out
Device power-up delay
[20 sec]
[20 sec]
[Auto]
USB Ports Configuration
Enabled Legacy USB support.
AUTO option disables legacy
support if no USB devices
are connected. DISABLE
option will keep USB devices
available only for EFI
applications.
→←: Select Screen
↑↓: Select Item
Enter: Select Item
+/-: Change Opt.
F1: General Help
F2: Previous Values
F5: Optimized Defaults
F10: Save & Exit
ESC: Exit
Version 2.14.1219. Copyright (C) 2011 American Megatrends, Inc.
Legacy USB Support [Enabled]
This item enables or disables Legacy USB device support.
Configuration options: [Enabled] [Disabled] [Auto]
USB3.0 Support [Enabled]
This item enables or disables USB3.0 (XHCI) Controller support.
Configuration options: [Disabled] [Enabled]
XHCI Hand-off [Enabled]
This is a workaround for OSes without XHCI ownership change should be claimed
by XHCI driver.
Configuration options: [Disabled] [Enabled]
EHCI Hand-off [Disabled]
This is a workaround for OSes without EHCI ownership change should be claimed
by EHCI driver.
Configuration options: [Disabled] [Enabled]
USB Hardware Delays and Time-outs
USB transfer time-out [20 sec]
This item sets the time-out value for control, bulk, and interrupt transfer.
Configuration options: [1 sec] [5 sec] [10 sec] [20 sec]
Device reset time-out [20 sec]
USB mass storage device Start Unit command time-out.
Configuration options: [10 sec] [20 sec] [30 sec] [40 sec]
CADnetwork Workstation W60 Rev 3.0 Bios Manual
Page 25
Device power-up delay [Auto]
This item sets the maximum time the device will take before it properly reports
itself to the Host Controller. ‘Auto’ uses default values: for a Root port, it is 100ms;
for a Hub port, the delay is taken from Hub descriptor.
Configuration options: [Manual] [Auto]
Device power-up delay in seconds [X]
This item appears only when you set the Device power-up delay item to
[Manual]. Use the <+> and <-> keys to adjust the value. The values range
from 1 to 40 with a one-second interval.
USB Ports Configuration
Aptio Setup Utility - Copyright (C) 2011 American Megatrends, Inc.
Advanced
EHCI Controller 1
EHCI Controller 2
[Enabled]
[Enabled]
USB
USB
USB
USB
USB
USB
USB
USB
USB
USB
USB
USB
USB
USB
[Enabled]
[Enabled]
[Enabled]
[Enabled]
[Enabled]
[Enabled]
[Enabled]
[Enabled]
[Enabled]
[Enabled]
[Enabled]
[Enabled]
[Enabled]
[Enabled]
Port
Port
Port
Port
Port
Port
Port
Port
Port
Port
Port
Port
Port
Port
1
2
3
4
5
6
7
8
9
10
11
12
13
14
Enable/Disable USB 2.0 (EHCI)
Support.
→←: Select Screen
↑↓: Select Item
Enter: Select Item
+/-: Change Opt.
F1: General Help
F2: Previous Values
F5: Optimized Defaults
F10: Save & Exit
ESC: Exit
Version 2.14.1219. Copyright (C) 2011 American Megatrends, Inc.
EHCI Controller 1/2 [Enabled]
This item allows you to enable or disable USB 2.0 (EHCI) Support. If we
disable the EHCI Controller in BIOS > South Bridge > USB configuration, the
USB device will all disable in OS.
Configuration options: [Disabled] [Enabled]
USB Port 1/14 [Enabled]
These items allow you to enable or disable USB ports 1 to 14.
Configuration options: [Disabled] [Enabled]
CADnetwork Workstation W60 Rev 3.0 Bios Manual
Page 26
ACPI Settings
Aptio Setup Utility - Copyright (C) 2011 American Megatrends, Inc.
Advanced
ACPI Settings
Enable ACPI Auto Configuration
Enable Hibernation
ACPI Sleep State
Lock Legacy Resources
[Disabled]
Enables or Disables BIOS ACPI
Auto Configuration.
[Enabled]
[S3 (Suspend to RAM)]
[Disabled]
Enable ACPI Auto Configuration [Disabled]
Allows you to enable or disable BIOS ACPI Auto Configuration.
Configuration options: [Disabled] [Enabled]
The following item appears only when you set Enabled ACPI Auto Configuration
to [Disabled].
Enable Hibernation [Enabled]
Enables or disables system ability to Hibernate (0S/S4 sleep state). This option
may be not effective with some OS.
Configuration options: [Disabled] [Enabled]
ACPI Sleep State [S3 (Suspend to RAM)]
Allows you to set the ACPI Sleep State.
Configuration options: [Suspend Disabled] [S1 (CPU Stop Clock)] [S3 (Suspend
to RAM)]
Lock Legacy Resources [Disabled]
Allows to enable or disable Lock Legacy Resources.
Configuration options: [Disabled] [Enabled]
4.5.9
WHEA Configuration
Aptio Setup Utility - Copyright (C) 2011 American Megatrends, Inc.
Advanced
WHEA Support
[Enabled]
Enable or disable Windows
Hardware Error Architecture.
WHEA Support [Enabled]
Allows you to enable or disable the Windows Hardware Error Architecture support.
Configuration options: [Disabled] [Enabled]
CADnetwork Workstation W60 Rev 3.0 Bios Manual
Page 27
APM setting
Aptio Setup Utility - Copyright (C) 2011 American Megatrends, Inc.
Advanced
Restrore
Power On
Power On
Power On
Power On
Power On
AC
By
By
By
By
By
Power Loss
PS/2 Keyboard
PS/2 Mouse
PCIE
Ring
RTC
[Last State]
[Disabled]
[Disabled]
[Disabled]
[Disabled]
[Disabled]
Specify what state to go to
when power is re-applied after
a power failure (G3 state).
Restore AC Power Loss [Last State]
When set to [Power Off], the system goes into off state after an AC power loss.
When set to [Power On], the system will reboot after an AC power loss. When set
to [Last State], the system goes into either off or on state, whatever the system
state was before the AC power loss.
Configuration options: [Power Off] [Power On] [Last State]
Power On By PS/2 Keyboard [Disabled]
[Disabled]Disables the PS/2 Keyboard from generating a wake event.
[Enabled]Enables the PS/2 Keyboard to generate a wake event.
Power On By PS/2 Mouse [Disabled]
[Disabled]Disables the PS/2 Mouse from generating a wake event.
[Enabled]Enables the PS/2 Mouse to generate a wake event.
Power On By PCIE [Disabled]
[Disabled]Disables the PCIE devices from generating a wake event.
[Enabled]Enables the PCIE devices to generate a wake event.
Power On By Ring [Disabled]
[Disabled]Disables the Ring devices from generating a wake event.
[Enabled]Enables the Ring devices to generate a wake event.
Power On By RTC [Disabled]
[Disabled]Disables RTC from generating a wake event.
[Enabled]When set to [Enabled], the items RTC Alarm Date (Days) and
Hour/Minute/Second will become user-configurable with set
values.
CADnetwork Workstation W60 Rev 3.0 Bios Manual
Page 28
Serial Port Console Redirection
Aptio Setup Utility - Copyright (C) 2011 American Megatrends, Inc.
Advanced
COM1
Console Redirection
Console Redirection Settings
[Disabled]
COM2
Console Redirection
Console Redirection Settings
[Enabled]
Serial Port for Out-of-Band Management/
Windows Emergency Management Services (EMS)
Console Redirection
[Disabled]
Console Redirection Settings
Console Redirection Enable
or Disable.
→←: Select Screen
↑↓: Select Item
Enter: Select Item
+/-: Change Opt.
F1: General Help
F2: Previous Values
F5: Optimized Defaults
F10: Save & Exit
ESC: Exit
Version 2.14.1219. Copyright (C) 2011 American Megatrends, Inc.
COM1
Console Redirection [Disabled]
This item enables or disables the console redirection feature.
Configuration options: [Disabled] [Enabled]
The following item appears only when you set Console Redirection to
[Enabled].
Console Redirection Settings
This item becomes configurable only when you enable the Console Redirection
item. The settings specify how the host computer and the remote computer (which
the user is using) will exchange data. Both computers should have the same or
compatible settings.
Terminal Type [VT-UTF8]
Allows you to set the terminal type.
[VT100] ASCII char set
[VT100+] Extends VT100 to support color, function keys, etc.
[VT-UTF8]Uses UTF8 encoding to map Unicode chars onto 1 or more bytes
[ANSI] Extended ASCII char set
Bits per second [57600]
Selects serial port transmission speed. The speed must be matched on the
other side. Long or noisy lines may require lower speeds.
Configuration options: [9600] [19200] [38400] [57600] [115200]
CADnetwork Workstation W60 Rev 3.0 Bios Manual
Page 29
Data Bits [8]
Configuration options: [7] [8]
Parity [None]
A parity bit can be sent with the data bits to detect some transmission errors.
[Mark] and [Space] parity do not allow for error detection.
[None] No parity bit
[Even]
Parity bit is 0 if the num of 1’s in the data bits is even
[Odd]
Parity bit is 0 if num of 1’s in the data bits is odd
[Mark]
Parity bit is always 1
[Space] Parity bit is always 0
Stop Bits [1]
Stop bits indicate the end of a serial data packet. (A start bit indicates the
beginning.) The standard setting is 1 stop bit. Communication with slow
devices may require more than 1 stop bit.
Configuration options: [1] [2]
Flow Control [VT100]
Microsoft Windows Emergency Management Services (EMS) allow for
remote management of a Windows Server OS through a serial port.
Configuration options: [VT100] [Hardware RTS/CTS] [Software Xon/Xoff]
Recorder Mode [Disabled]
With this mode enabled, only text will be sent. This is to capture Terminal
data.
Configuration options: [Disabled] [Enabled]
Recorder 100x31 [Disabled]
This item allows you to enable or disable extended terminal resolution.
Configuration options: [Disabled] [Enabled]
Legacy OS Redirction Resolution [80x24]
This item configures the number of rows and columns supported on legacy
OS.
Configuration options: [80x24] [80x25]
COM2
Console Redirection [Disabled]
Enables or disables the console redirection feature.
Configuration options: [Disabled] [Enabled]
Console Redirection Settings
Please refer to the description of the Console Redirection Settings item under
COM1 for details.
CADnetwork Workstation W60 Rev 3.0 Bios Manual
Page 30
Serial Port for Out-of-Band Management/ Windows Emergency
Management Services (EMS)
Console Redirection [Disabled]
Enables or disables the console redirection feature.
Configuration options: [Disabled] [Enabled]
The following item appears only when you set Console Redirection to
[Enabled].
Console Redirection Settings
Out-of-Band Mgmt Port [COM1]
Microsoft Windows Emergency Management Services (EMS) allow for
remote management of a Windows Server OS through a serial port.
Configuration options: [COM1] [COM2]
Terminal Type [VT-UTF8]
Microsoft Windows Emergency Management Services (EMS) allow for
remote management of a Windows Server OS through a serial port.
Configuration options: [VT100] [VT100+] [VT-UTF8] [ANSI]
Bits per second [115200]
Microsoft Windows Emergency Management Services (EMS) allow for
remote management of a Windows Server OS through a serial port.
Configuration options: [9600] [19200] [57600] [115200]
Flow Control [VT100]
Microsoft Windows Emergency Management Services (EMS) allow for
remote management of a Windows Server OS through a serial port.
Configuration options: [VT100] [Hardware RTS/CTS] [Software Xon/Xoff]
Onboard LAN Configuration
Aptio Setup Utility - Copyright (C) 2011 American Megatrends, Inc.
Advanced
Onboard LAN Configuration
INTEL W82574L OpROM1
INTEL W82574L OpROM2
[PXE]
[PXE]
Launch INTEL W82574L OpROM
INTEL W82574L OpROM1 [PXE]
This item launched INTEL W82574L OpROM1.
Configuration options: [Disabled] [PXE] [iSCSI]
INTEL W82574L OpROM2 [PXE]
This item launched INTEL W82574L OpROM2.
Configuration options: [Disabled] [PXE] [iSCSI]
CADnetwork Workstation W60 Rev 3.0 Bios Manual
Page 31
Mar�ell SATA Configuration
Aptio Setup Utility - Copyright (C) 2011 American Megatrends, Inc.
Advanced
Marvell SATA Configuration
Marvell Storage Controller
Marvell Storage OPROM
[Enabled]
[Enabled]
Marvell Storage Controller [Enabled]
Configuration options: [Disabled] [Enabled]
Marvell Storage OPROM [Enabled]
Configuration options: [Disabled] [Enabled]
CADnetwork Workstation W60 Rev 3.0 Bios Manual
Page 32
Onboard De�ices Configuration
Aptio Setup Utility - Copyright (C) 2011 American Megatrends, Inc.
Advanced
Serial Port 1 Configuration
Serial Port 2 Configuration
VIA 1394 Controller
[Enabled]
Asmedia USB 3.0 Controller
[Enabled]
Asmedia USB 3.0 Battery Charging S [Enabled]
Set Parameters of serial
Port 1(COM1).
Serial Port1/2 Configuration
This item allows you to set parameters of serial ports 1 and 2.
Serial Port [Enabled]
This item allows you to enable or disable the Serial Port.
Configuration options: [Disabled] [Enabled]
Device Mode [Standard Serial Port Mode]
This item allows you to change the serial port mode.
Configuration options: [Standard Serial Port Mode]
VIA 1394 Controller [Enabled]
This item allows you to enable or disable VIA 1394.
Configuration options: [Disabled] [Enabled]
Asmedia USB 3.0 Controller [Enabled]
This item allows you to enable or disable Asmedia USB 3.0.
Configuration options: [Disabled] [Enabled]
Asmedia USB 3.0 Battery Charging S [Enabled]
This item allows you to enable or disable Asmedia USB 3.0 Battery Charging
S.
Configuration options: [Disabled] [Enabled]
CADnetwork Workstation W60 Rev 3.0 Bios Manual
Page 33
Runtime Error Logging
Aptio Setup Utility - Copyright (C) 2011 American Megatrends, Inc.
Advanced
Runtime Error Logging Support
[Disabled]
Runtime Error Logging Support [Disabled]
This item allows you to enable or disable Runtime Error Logging Support.
Configuration options: [Disabled] [Enabled]
The following item appears only when you set Runtime Error Logging Support
to [Enabled].
PCI Error Logging Support [Disabled]
This item allows you to enable or disable PCI Error Logging.
Configuration options: [Disabled] [Enabled].
CADnetwork Workstation W60 Rev 3.0 Bios Manual
Page 34
Server Management menu
The Server Management menu displays the server management status, and
allows you to change the settings.
The Server Management menu appears only when you install ASMB card on the
motherboard.
Aptio Setup Utility - Copyright (C) 2011 American Megatrends, Inc.
Main Ai Tweaker Advanced Server Mgmt Event Logs Boot Monitor Security Tool
BMC Firmware Version:
-
O/S Watchdog Timer
O/S Wtd Timer Timeout
O/S Wtd Timer Policy
[Disabled]
[10 minutes]
[Reset]
System Event Log
BMC network configuration
Exit
If enabled, starts a BIOS
timer which can only be shut
off by Intel Management
Software after the OS loads.
Helps determine that the
OS successfully loaded
or follows the O/S Boot
Watchdog Timer policy.
→←: Select Screen
↑↓: Select Item
Enter: Select Item
+/-: Change Opt.
F1: General Help
F2: Previous Values
F5: Optimized Defaults
F10: Save & Exit
ESC: Exit
Version 2.14.1219. Copyright (C) 2011 American Megatrends, Inc.
O/S Watchdog Timer [Disabled]
If enabled, starts a BIOS timer which can only be shut off by Intel Management
Software after the OS loads. Helps determine that the OS sucessfully loaded or
follows the O/S Boot Watchdog TImer Policy.
Configuration options: [Enabled] [Disabled]
O/S Wtd Timer Timeout [10 minutes]
Allows to configure the length of the O/S Boot Watchdog Timer. Not available if O/S
Boot Watchdog Timer is disabled.
Configuration options: [5 minutes] [10 minutes] [15 minutes] [20 minutes]
O/S Wtd Timer Policy [Reset]
Allows to configure how the system should respond if the OS Boot Watchdog
Timer expires. Not available if O/S Boot Watchdog Timer is disabled.
Configuration options: [Do Nothing] [Reset] [Power Down]
CADnetwork Workstation W60 Rev 3.0 Bios Manual
Page 35
System Event Log
Aptio Setup Utility - Copyright (C) 2011 American Megatrends, Inc.
Server Mgmt
Enabling/Disabling Options
SEL Components
[Disabled]
Erasing Settings
Erase SEL
When SEL is Full
[No]
[Do Nothing]
Note: All values changed here do not take effect
until computer is restarted.
Change this to enable or
disable all features of
system Event Logging during
boot.
→←: Select Screen
↑↓: Select Item
Enter: Select Item
+/-: Change Opt.
F1: General Help
F2: Previous Values
F5: Optimized Defaults
F10: Save & Exit
ESC: Exit
Version 2.14.1219. Copyright (C) 2011 American Megatrends, Inc.
SEL Components [Disabled]
Allows you to enable or disable all features of system Event Logging during boot.
Configuration options: [Disabled] [Enabled]
•
The following items appears only when you set SEL Components to
[Enabled].
•
All values changed here do not take effect until computer is restarted.
Erase SEL [No]
Allows to choose options for erasing SEL.
Configuration options: [No] [Yes, On next reset] [Yes, On every reset]
When SEL is Full [Do Nothing]
Allows to choose options for reactions to a full SEL.
Configuration options: [Do Nothing] [Erase Immediately]
CADnetwork Workstation W60 Rev 3.0 Bios Manual
Page 36
BMC network configuration
Aptio Setup Utility - Copyright (C) 2011 American Megatrends, Inc.
Server Mgmt
BMC network configuration
Lan1
Lan1
Lan1
Lan1
Lan1
Lan1
IP Address in BMC:
Subnet Mask in BMC:
Gateway Address in BMC:
MAC Address in BMC:
Address Source in BMC:
Configuration Address source
000.000.000.000
000.000.000.000
000.000.000.000
00.00.00.00.00.00
DHCP Mode
Select to configure LAN
channel parameters
statically or dynamically(by
BIOS or BMC). Unspecified
option will not modify any
BMC network parameters
during BIOS phase
[Previous State]
→←: Select Screen
↑↓: Select Item
Enter: Select Item
+/-: Change Opt.
F1: General Help
F2: Previous Values
F5: Optimized Defaults
F10: Save & Exit
ESC: Exit
Version 2.14.1219. Copyright (C) 2011 American Megatrends, Inc.
Configuration Address source [Previous State]
Select to configure LAN channel parameters statically or dynamically(by BIOS or BMC).
Unspecified option will not modify any BMC network parameters during BIOS phase.
Configuration options: [Previous State] [Static Mode] [DHCP Mode]
The following items appears only when you set Configuration Address source
to [Static Mode].
Station IP address [0.0.0.0]
Allows to input Station IP address.
Subnet mask [0.0.0.0]
Allows to input Subnet mask.
Gateway IP address [0.0.0.0]
Allows to input Gateway IP address.
CADnetwork Workstation W60 Rev 3.0 Bios Manual
Page 37
Event Logs menu
The Event Logs allows you to change or view the event log settings.
The Event Logs menu appears when the ASMB card is not installed on the
motherboard.
Aptio Setup Utility - Copyright (C) 2011 American Megatrends, Inc.
Event Logs
Change Smbios Event Log Settings
View System Event Log
View System Event Log
Press <Enter> to change the
Smbios Log configuration.
→←: Select Screen
↑↓: Select Item
Enter: Select Item
+/-: Change Opt.
F1: General Help
F2: Previous Values
F5: Optimized Defaults
F10: Save & Exit
ESC: Exit
Version 2.14.1219. Copyright (C) 2011 American Megatrends, Inc.
All values changed here do not take effect until computer is restarted.
Change Smbios Event Log Settings
Press <Enter> to change the Smbios Event Log configuration.
For more information on this configuration, refer to 4.7.1 Change Smbios Event
Log Settings.
View Smbios Event Log
Press <Enter> to view all smbios event logs.
View System Event Log
Press <Enter> to view all system event logs.
CADnetwork Workstation W60 Rev 3.0 Bios Manual
Page 38
Change Smbios Event Log Settings
Aptio Setup Utility - Copyright (C) 2011 American Megatrends, Inc.
Event Logs
Enabling/Disabling Options
Smbios Event Log
[Enabled]
Erasing Settings
Erase Event Log
When Log is Full
[No]
[Do Nothing]
Smbios Event Log Standard Settings
Log System Boot Event
[Disabled]
MECI
1
METW
60
Custom Option
Log OEM Codes
[Enabled]
Convert OEM Codes
[Disabled]
Note: All values changed here do not take effect
until computer is restarted.
Change this to enable or
disable all features of
Smbios Event Logging during
boot.
→←: Select Screen
↑↓: Select Item
Enter: Select Item
+/-: Change Opt.
F1: General Help
F2: Previous Values
F5: Optimized Defaults
F10: Save & Exit
ESC: Exit
Version 2.14.1219. Copyright (C) 2011 American Megatrends, Inc.
All values changed here do not take effect until computer is restarted.
Enabling/Disabling Options
Smbios Event Log [Enabled]
Change this to enable or disable all features of Smbios Event Logging during
boot.
Configuration options: [Disabled] [Enabled]
Erasing Settings
Erase Event Log [No]
Choose options for erasing Smbios Event Log. Erasing is done prior to any
logging activation during reset.
Configuration options: [No] [Yes, Next reset] [Yes, Every reset]
When Log is Full [Do Nothing]
This item allows you to choose options for reactions to a full Smbios Event
Log.
Configuration options: [Do Nothing] [Erase Immediately]
Smbios Event Log Standard Settings
Log System Boot Event [Disabled]
This item allows you to choose options to enable/disable logging of System
boot event.
Configuration options: [Enabled] [Disabled]
CADnetwork Workstation W60 Rev 3.0 Bios Manual
Page 39
MECI [1]
This item allows you to set Mutiple Event Count Increment (MECI). The number
of occurrences of a duplicate event that must pass before the multiplt-event
counter associated with the log entry is updated, specified as a numeric value
in the range 1 to 255.
METW [60]
This item allows you to set Mutiple Event Time Windows (METW). The number of
minutes which must pass between duplicate log entries which utilize a multipleevent counter. The value ranges from 0 to 99 minutes.
Custom Options
Log OEM Codes [Enabled]
This item allows you to enable or disable the logging of EFI Status Codes as
OEM Codes (if not already converted to legacy).
Configuration options: [Disabled] [Enabled]
Convert OEM Codes [Disabled]
This item allows you to enable or disable the converting of EFI Status Codes
to Standard Smbios Types (Not all may be translated).
Configuration options: [Disabled] [Enabled]
CADnetwork Workstation W60 Rev 3.0 Bios Manual
Page 40
Boot menu
The Boot menu items allow you to change the system boot options.
Aptio Setup Utility - Copyright (C) 2011 American Megatrends, Inc.
Main Ai Tweaker Advanced Server Mgmt Event Logs Boot Monitor Security Tool
Boot Configuration
Setup Prompt Timeout
Bootup NumLock State
1
[On]
Full Screen Logo
[Enabled]
CSM16 Module Version
07.67
GateA20 Active
Option ROM Messages
Interrupt 19 Capture
Boot Device Seeking
UEFI Boot
[Upon Request]
[Force BIOS]
[Enabled]
[Endless PXE]
[Disabled]
Boot Option Priorities
Boot Option #1
Boot Option #2
[AMI Virtual CDROMO...]
[IBA GE Slot 0600 v...]
CD/DVD ROM Drive BBS Priorities
Hard Drive BBS Priorities
Network Device BBS Priorities
Exit
Number of seconds to wait for
setup activation key.
65535(0xFFFF) means indefinite
waiting.
→←: Select Screen
↑↓: Select Item
Enter: Select Item
+/-: Change Opt.
F1: General Help
F2: Previous Values
F5: Optimized Defaults
F10: Save & Exit
ESC: Exit
Version 2.14.1219. Copyright (C) 2011 American Megatrends, Inc.
Setup Prompt Timeout [xx]
Use the <+> and <-> keys to adjust the number of seconds to wait for setup
activation key.
Bootup NumLock State [On]
This item allows you to select the power-on state for the NumLock.
Configuration options: [Off] [On]
Full Screen Logo [Enabled]
This item allows you to enable or disable the full screen logo display feature.
Configuration options: [Disabled] [Enabled]
2.
Set Full Screen Logo to [Disabled] to select the desired Post Report waiting
time from 1~10 sec.
Post Report [5 sec]
Allows you to select a desired post report waiting time. This item only appears
when you set the Full Screen Logo to [Disabled].
Configuration options: [1 sec] - [10 sec] [Until Press ESC
CADnetwork Workstation W60 Rev 3.0 Bios Manual
Page 41
CSM16 Module Version
GateA20 Active [Upon Request]
[Upon Request] GA20 can be disabled using BIOS services.
[Always]
Do not allow disable GA20; this optionis useful when any RT code
is executed above 1MB.
Option ROM Messages [Force BIOS]
Allows you to set the display mode for Options ROM.
Configuration options: [Force BIOS] [Keep Current]
Interrupt 19 Capture [Enabled]
Allows Option ROMs to trap interrupt 19.
Configuration options: [Disabled] [Enabled]
Boot Device Seeking [Endless PXE]
[Endless PXE] Continuous seek remote boot image until boot image found or user
abort (press Ctrl+Alt+Del).
[Normal]
Seek remote boot image once then stop.
UEFI Boot [Disabled]
Enables or disables UEFI Boot.
Configuration options: [Disabled] [Enabled]
Boot Option Priorities
These items specify the boot device priority sequence from the available devices.
The number of device items that appears on the screen depends on the number of
devices installed in the system.
•
To select the boot device during system startup, press <F8> when Boot Logo
appears.
•
To access Windows OS in Safe Mode, please press <F8> after POST.
Boot Option #1/#2/#3/#4 [IBAGE Slot 0600 v...]
Configuration options: [SATA P2: DVD ...] [SATA P3: WDC WD80...] [AMI
Virtual CDROM...] [IBA GE Slot 0600 v...]
These items appear only when you connect SATA ODD or hard drive to the SATA
ports.
CD/DVD ROM Drive BBS Priorities
Hard Drive BBS Priorities
Network Device BBS Priorities
These settings allow you to set the booting order of the SATA devices.
CADnetwork Workstation W60 Rev 3.0 Bios Manual
Page 42
Setup Mode [EZ Mode]
[Advanced Mode]
Sets Advanced Mode as the default screen for entering the
BIOS setup program.
[EZ Mode]
Sets EZ Mode as the default screen for entering the BIOS setup
program.
Boot Option Priorities
These items specify the boot device priority sequence from the available devices.
The number of device items that appears on the screen depends on the number of
devices installed in the system. Select [Disabled] to disallow this function.
•
•
To select the boot device during system startup, press <F8> when Boot Logo
appears.
To access Windows OS in Safe Mode, press <F8> after POST.
Boot Override
These items displays the available devices. The number of device items that appears
on the screen depends on the number of devices installed in the system. Click an
item to start booting from the selected device.
CADnetwork Workstation W60 Rev 3.0 Bios Manual
Page 43
Monitor menu
The Monitor menu displays the system temperature/power status, and allows you
to change the fan settings.
Aptio Setup Utility - Copyright (C) 2011 American Megatrends, Inc.
Main Ai Tweaker Advanced Server Mgmt Event Logs Boot Monitor Security Tool Exit
CPU1 Temperature
CPU2 Temperature
TR1 Temperature
TR2 Temperature
CPU FAN1 Speed
CPU FAN2 Speed
FRNT FAN1 Speed
FRNT FAN2 Speed
FRNT FAN3 Speed
FRNT FAN4 Speed
REAR FAN1 Speed
REAR FAN2 Speed
+VTT_CPU
VCORE_CPU1
VCORE_CPU2
VSA_CPU1
VSA_CPU2
+VDDQ_AB_CPU1
+VDDQ_CD_CPU1
+VDDQ_EF_CPU2
+VDDQ_GH_CPU2
+5VSB
+5V
+12V
+3.3V
90.0ºC/194.0ºF
90.0ºC/194.0ºF
18.0ºC/64.4ºF
6.0ºC/42.8ºF
3658 RPM
3678 RPM
N/A
N/A
N/A
N/A
N/A
N/A
+1.026 V
+0.996 V
+0.996 V
+0.898 V
+0.912 V
+1.510 V
+1.526 V
+1.474 V
+1.474 V
+4.921 V
+4.966 V
+11.592 V
+3.264 V
VBAT
+3.3VSB
+3.168 V
+3.234 V
FAN Speed Control
→←: Select Screen
↑↓: Select Item
Enter: Select Item
+/-: Change Opt.
F1: General Help
F2: Previous Values
F5: Optimized Defaults
F10: Save & Exit
ESC: Exit
[Generic Mode]
Version 2.14.1219. Copyright (C) 2011 American Megatrends, Inc.
Use the scroll to view items.
CPU 1/2; TR1 1/2 Temperature �������������
[xxxºC/xxxºF]
The onboard hardware monitor automatically detects and displays the CPU and
motherboard component temperatures. Select Ignore if you do not wish to display
the detected temperatures.
CPU FAN1/2 Speed; FRNT FAN1–4 Speed; REAR FAN1/2 Speed
[xxxx RPM] or [Ignore] / [N/A]
The onboard hardware monitor automatically detects and displays the speed of
CPU fans, front fans, and rear fan in rotations per minute (RPM). If the fan is not
connected to the motherboard, the field shows N/A.
CADnetwork Workstation W60 Rev 3.0 Bios Manual
Page 44
+VTT_CPU Voltage, VCORE1/2 Voltage, VSA_CPU1/2 +VDDQ_AB_
CPU1 Voltage, +VDDQ_CD_CPU1 Voltage, +VDDQ_EF_CPU2 Voltage,
+VDDQ_GH_CPU2 Voltage, +5VSB Voltage, +5V Voltage, +12V
Voltage, +3.3V Voltage, VBAT Voltage, +3.3VSB Voltage
The onboard hardware monitor automatically detects the voltage output through
the onboard voltage regulators.
FAN Speed Control [Generic Mode]
This item allows you to configure the Smart Fan feature that smartly adjusts the
fan speeds for more efficient system operation.
Configuration options: [Generic Mode] [High Speed Mode] [Full Speed Mode]
CADnetwork Workstation W60 Rev 3.0 Bios Manual
Page 45
Security menu
The Security menu items allow you to change the system security settings.
Aptio Setup Utility - Copyright (C) 2011 American Megatrends, Inc.
Main Ai Tweaker Advanced Server Mgmt Event Logs Boot Monitor Security Tool Exit
Password Description
If ONLY the Administrator's password is set,
then this only limits access to Setup and is
only asked for when entering Setup
If ONLY the User's password is set, then this
is a power on password and must be entered to
boot or enter Setup. In Setup the User will
have Administrator rights
The password length must br in the following range:
Minimum length
3
Maximum length
20
Set Setup Administrator
Password
Administrator Password
User Password
If you have forgotten your BIOS password, erase the CMOS Real Time
Clock (RTC) RAM to clear the BIOS password. See section 2.6 Jumpers for
information on how to erase the RTC RAM.
Administrator Password
If you have set an administrator password, we recommend that you enter the
administrator password for accessing the system. Otherwise, you might be able to
see or change only selected fields in the BIOS setup program.
To set an administrator password:
1.
2.
3.
Select the Administrator Password item and press <Enter>.
From the Create New Password box, key in a password, then press
<Enter>.
Confirm the password when prompted.
To change an administrator password:
1.
2.
3.
4.
Select the Administrator Password item and press <Enter>.
From the Enter Current Password box, key in the current password, then
press <Enter>.
From the Create New Password box, key in a new password, then press
<Enter>.
Confirm the password when prompted.
To clear the administrator password, follow the same steps as in changing an
administrator password, but press <Enter> when prompted to create/confirm the
password.
CADnetwork Workstation W60 Rev 3.0 Bios Manual
Page 46
User Password
If you have set a user password, you must enter the user password for accessing
the system.
To set a user password:
1.
2.
3.
Select the User Password item and press <Enter>.
From the Create New Password box, key in a password, then press
<Enter>.
Confirm the password when prompted.
To change a user password:
1.
2.
3.
4.
Select the User Password item and press <Enter>.
From the Enter Current Password box, key in the current password, then
press <Enter>.
From the Create New Password box, key in a new password, then press
<Enter>.
Confirm the password when prompted.
To clear the user password, follow the same steps as in changing a user password,
but press <Enter> when prompted to create/confirm the password.
Tool menu
The Tool menu items allow you to configure options for special functions. Select an
item then press <Enter> to display the submenu.
Aptio Setup Utility - Copyright (C) 2011 American Megatrends, Inc.
Main Ai Tweaker Advanced Server Mgmt Event Logs Boot Monitor Security Tool Exit
EZ Flash 2 Utility
Be used to update BIOS
EZ Flash 2 Utility
This item allows you to run EZ Flash BIOS ROM Utility when you press
<Enter>.
CADnetwork Workstation W60 Rev 3.0 Bios Manual
Page 47
Exit menu
The Exit menu items allow you to save or discard your changes to the BIOS items.
Aptio Setup Utility - Copyright (C) 2011 American Megatrends, Inc.
Main Ai Tweaker Advanced Server Mgmt Event Logs Boot Monitor Security Tool Exit
Discard Changes & Exit
Save Changes & Reset
Discard Changes & Reset
Exit system setup without
saving any changes.
Restore Defaults
Boot Override
IBA GE Slot 0600 v1376
IBA GE Slot 0700 v1376
AMI Virtual CDROM0 1.00
Launch EFI Shell from filesystem device
→←: Select Screen
↑↓: Select Item
Enter: Select Item
+/-: Change Opt.
F1: General Help
F2: Previous Values
F5: Optimized Defaults
F10: Save & Exit
ESC: Exit
Version 2.14.1219. Copyright (C) 2011 American Megatrends, Inc.
Pressing <Esc> does not immediately exit this menu. Select one of the options
from this menu or <F10> from the legend bar to exit.
Discard Changes & Exit
This option allows you to exit the Setup program without saving your changes.
When you select this option or if you press <Esc>, a confirmation window appears.
Select Yes to discard changes and exit.
Save Changes & Reset
Once you are finished making your selections, choose this option from the Exit
menu to ensure the values you selected are saved. When you select this option or
if you press <F10>, a confirmation window appears. Select Yes to save changes
and exit.
Discard Changes & Reset
This option allows you to reset the Setup program without saving your changes.
When you select this option, a confirmation window appears. Select Yes to discard
changes and reset.
Restore Defaults
This option allows you to restore/load defaults values for all the setup options.
When you select this option, a confirmation window appears. Select Yes to load
optimized defaults.
Boot Override
These items displays the available devices. The device items that appears on the
screen depends on the number of devices installed in the system. Click an item to
start booting from the selected device.
CADnetwork Workstation W60 Rev 3.0 Bios Manual
Page 48