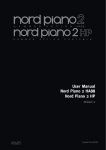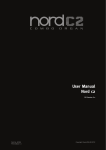
1
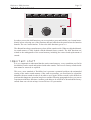
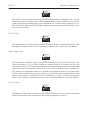
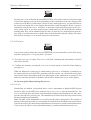
OWNER´S MANUAL
version 1.x
© Clavia DMI AB
1997
CAUTION AVIS
RISK OF ELECTRIC SHOCK
DO NOT OPEN
RISQUE DE SHOCK ELECTRIQUE
NE PAS OUVRIR
CAUTION: TO REDUCE THE RISK OF ELECTRIC
SHOCK DO NOT REMOVE COVER (OR BACK).
NO USER SERVICEABLE PARTS INSIDE.
REFER SERVICING TO QUALIFIED PERSONNEL.
ATTENTION:POUR EVITER LES RISQUES DE CHOC
ELECTRIQUE, NE PAS ENLEVER LE COUVERCLE.
AUCUN ENTRETIEN DE PIECES INTERIEURES PAR L´USAGER.
CONFIER L´ENTRETIEN AU PERSONNEL QUALIFE.
AVIS: POUR EVITER LES RISQUES D´INCIDENTE OU
D´ELECTROCUTION, N´EXPOSEZ PAS CET ARTICLE A LA PLUIE
OU L´HUMIDITET.
The lightning flash with the arrowhead
symbol within an equilateral triangle is
intended to alert the user to the presence of
uninsulated voltage within the products
enclosure that may be of sufficient
magnitude to constitute a risk of electric
shock to persons.
Le symbole éclair avec le point de flèche à l´intérieur
d´un triangle équilatéral est utilisé pour alerter
l´utilisateur de la presence à l´intérieur du coffret de
”voltage dangereux” non isolé d´ampleur suffisante
pour constituer un risque d`éléctrocution.
The exclamation mark within an equilateral
triangle is intended to alert the user to the
presence of important operating and
maintenance (servicing) instructions in the
literature accompanying the product.
Le point d´exclamation à l´intérieur d´un triangle
équilatéral est employé pour alerter l´utilisateur de la
présence d´instructions importantes pour le
fonctionnement et l´entretien (service) dans le livret
d´instructions accompagnant l´appareil.
Instructions pertaining to a risk of fire, electric shock or injury to persons.
IMPORTANT SAFETY INSTRUCTIONS
SAVE THESE INSTRUCTIONS
Warning - When using electric products,
basic precautions should always be
followed, including the following:
1.
Read all the instructions and observe
the graphic symbols above before using
the product.
2.
Do not use this product near water for example near a bathtub, washbowl,
kitchen sink, in a wet basement, near or in
a swimming pool, a swamp or the like.
3.
This product should be used only
with a cart or a stand that is recommended
by the manufacturer.
4.
This product, either alone or in
combination with an amplifier and
headphones or speakers may be perfectly
capable of producing sound levels that
could cause permanent hearing loss. Do
not operate for a long period of time at a
high volume level or at a level that is
uncomfortable. If you experience any
hearing loss or ringing in the ears, you
should consult an audiologist.
5.
The product should be located so
that its location or position does not
interfere with or obstruct its normal flow
of ventilation.
6.
The product should be located away
from heat sources such as radiators, heat
registers or other products that produce
heat.
7.
The product should be connected to
a power supply only of the type described
in these operation instructions or as marked on the product.
8.
The power supply cord of the
product should be unplugged from the
outlet when the product is left unused for
a long period of time.
9.
Care should be taken so that objects
do not fall, or liquids are not spilled into
the enclosure through openings.
10. The product should be serviced by
qualified service personnel when:
A. The power supply cord has
been damaged; or
B. Objects have fallen or liquids
have been spilled onto the
product; or
C. The product has been exposed
to rain; or
D. The product does not appear to
operate normally or exhibits a
marked change in performance;
or
E. The product has been dropped
or the enclosure has been
damaged.
11. Do not attempt to service the product
beyond those means described in this
operating manual. All other servicing
should be referred to qualified service
personnel.
Page 3
Table Of Contents
1. Introduction........................................................................... 5
Welcome! .................................................................................................................. 5
About this manual and about the ddrum4 system ..................................................... 5
The pads .................................................................................................................... 5
Expand your sound library ....................................................................................... 5
2. Overview ................................................................................ 6
Front panel ................................................................................................................ 6
Rear panel ................................................................................................................. 8
3. Connections ........................................................................... 9
Setting up .................................................................................................................. 9
Selecting the trigger input type ............................................................................... 10
Adjusting the input sensitivity ................................................................................ 11
Setting the trigger threshold ................................................................................... 12
4. Selecting kits & sounds....................................................... 13
Palette mode ........................................................................................................... 13
Important stuff! ....................................................................................................... 13
Kit mode ................................................................................................................. 13
How to store your edits ........................................................................................... 14
5. Good drum sounds.............................................................. 15
About your sound system ....................................................................................... 15
Headphones ............................................................................................................ 15
Mixer ...................................................................................................................... 15
6. Reference ............................................................................. 16
System functions..................................................................................................... 16
Trig input ................................................................................................................................. 16
Thres ........................................................................................................................................ 17
Dyn ........................................................................................................................................... 17
Out A ........................................................................................................................................ 18
Out B ........................................................................................................................................ 18
Note # ....................................................................................................................................... 18
Note P ...................................................................................................................................... 19
Opt ........................................................................................................................................... 19
Button ....................................................................................................................................... 19
MIDI ........................................................................................................................................ 20
Sound functions ...................................................................................................... 21
Sound ....................................................................................................................................... 21
Variation ................................................................................................................................... 22
Pitch ......................................................................................................................................... 22
Decay ....................................................................................................................................... 22
Level A ..................................................................................................................................... 22
Level B ..................................................................................................................................... 22
Page 4
Shift functions......................................................................................................... 23
Important stuff ........................................................................................................ 23
Shift-Sound .............................................................................................................................. 24
Shift-Size ................................................................................................................................. 24
Shift-Mem.Left ........................................................................................................................ 24
Shift-Listen .............................................................................................................................. 24
Shift-Mark ................................................................................................................................ 25
Shift-Delete .............................................................................................................................. 25
Shift-Exit .................................................................................................................................. 25
Sounds, sound formats ............................................................................................ 26
ddrum4 sounds ......................................................................................................................... 26
Go see our web site and get free sounds .................................................................................. 26
MIDI Sample Dumps ............................................................................................................... 26
Check the size .......................................................................................................................... 27
How to load new sounds into the ddrum4 ............................................................................... 27
Error codes when loading ........................................................................................................ 27
7. Appendix .............................................................................. 28
MIDI Program Change messages ........................................................................... 28
Output assignment .................................................................................................. 29
Dynamic curves ...................................................................................................... 29
8. Index .................................................................................... 30
Introduction
Page 5
1. Introduction
Welcome!
We would first like to congratulate you on your purchase of the ddrum4. The ddrum4 is a new
type of electronic drum system with several innovative features.
About this manual
Please read it. It contains a lot of useful information. The first section contains the necessary
information for connecting your system parts. The reference section contains information
regarding all the functions of the ddrum4. Every time this manual refers to a physical object
on the ddrum4, a button on the panel, an indicator LED etc, it will be printed LIKE THIS, e.g.
”press the SYSTEM button once”.
About the ddrum4 system
The ddrum4 system is a 10 channel percussion system. One channel contains one sound, e.g.
channel 1 can be the kick drum, channel 2 the snare etc. The sounds are digitally reproduced
with the proprietary ddrum sound engine. The sounds have been carefully selected for you by
the Clavia crew. All the sounds in the ddrum4 have been edited and stored with an unique
method. The intelligent playback engine eliminates machine-gun effects during rolls and other
unwanted experiences that are typical in other electronic drum systems.
Many of the ddrum4 sounds are constructed with more than just one sample (multisamples),
in order to make a more realistic simulation of how an acoustic drum sounds when it is struck
with different velocities or when you vary the striking point. ”Dynamics” is one of the keywords,
describing the functionality of the ddrum4. It is designed to make every acoustic nuance available to you. The dynamic sound possibilities of the ddrum4 are one of its major features not
available in any sampler or ROM based playback machine.
The pads
The Cast Precision Pads as well as the Cast Acoustic Pads, feature a real drumhead. They are
assembled in conjunction with a cast aluminium shell. The feel of the pads is as important to
the overall function of the ddrum4 as the sounds themselves are. The Cast Precision Pads
detect downward pressure on the head and position (where on the pad you strike). They are
also dampened for those of you who need a quiet performance. The Cast Acoustic Pads give
you the best of two worlds, perfect triggering and acoustic feedback from the pad itself.
Expand your sound library
At our web site (http://www.clavia.se/), you will find brand new sounds to download (free of
charge) and load into your ddrum. This is done via MIDI which means that the computer that
will be transmitting the sounds to the ddrum4 needs to be equipped with a MIDI interface.
Overview
Page 6
2. Overview
Front panel
Out A2
Out B3
Out B4
Out B5
Out B6
Midi Out
Midi In
Kick
Snare
Toms
Percussion
INPUT SENS
INPUT SENS
INPUT SENS
INPUT SENS
PALETTE
PALETTE
PALETTE
5
5
4
4
SNARE
3
2
1
KICK
4
3
2
2
1
5
4
3
3
PALETTE
5
2
1
RIM
HIGH
1
MID
LOW
PERC
CYMBAL 1
CYMBAL 2
HI HAT
The front panel is divided in two sections. To the left side you see the channel slots with the
CHANNEL buttons, the PALETTE select buttons and the INPUT SENSITIVITY knobs.
You can play the sounds with the CHANNEL buttons. They are not velocity sensitive but you can
program the velocity amount that they use to play the sounds.
The CHANNEL buttons are also used for selecting channels when you wish to edit the sounds or
the functions of the channels. The indicator above the CHANNEL buttons flashes when a channel
receives a trigger and it will be continuously lit when a channel is selected for editing. You can
only select one channel for editing purposes at a time.
Overview
Page 7
System
SYSTEM
Master
level
Sound
MIDI
BUTTON
OPT
NOTE P
NOTE #
OUT B
OUT A
DYN
THRES
TRIG INPUT
DUMP
ASSORTED
EFFECT
HI HAT
CYMBAL
PERCUSSION
TOM
RIM
SNARE
KICK
SOUND
SOUND
EXIT
VARIATION
SIZE
PITCH
DECAY
MEM. LEFT
LISTEN
LEVEL A
MARK
LEVEL B
DELETE
SHIFT
KIT STORE
To the right you have the edit section with the EDIT buttons, the ROTARY dial, the SYSTEM INDICATOR
bar, the DISPLAY and the MASTER LEVEL control.
The SYSTEM BAR will show activity when you are playing. This is an indication that the ddrum4
is not subject to any editing and it displays an approximation of the volume of the sounds. If
you trigger a channel that has no sound, the SYSTEM BAR will not indicate anything. The SYSTEM
BAR will also under certain circumstances help you to set the proper input sensitivity level.
If the display shows a P. followed by a number, then the ddrum4 is in the Kit mode. If the
display shows PAL then the ddrum4 is in the Palette mode. You can always press the PALETTE
buttons repeatedly to select different sounds from the four main channel groups, kick, snare,
toms and percussion, no matter if the ddrum4 is in the Kit or Palette mode.
The MASTER LEVEL control affects the line level outputs A1, A2 and the PHONES output.
Rear panel
Page 8
Rear panel
The rear panel contains the INPUT and OUTPUT jacks, the MIDI connectors and the POWER switch.
The outputs are configured according to this illustration.
10
9
8
OUT
7
6
Trigger inputs
IN
5
4
3
2
1
Out B6
Out B5
Out B4
Out B3
Out A2
Out A1
Phones
The ten TRIGGER inputs for the pads or external triggers correspond to each sound channel.
They are identical in function except for the following: inputs 1, 2, 8 and 9 are pressure sensitive. If you have pads that can transmit pressure, connect them to these inputs. Input 10 is also
pressure sensitive but only with the special ddrum Hi-Hat Controller. This input has a special
stereo jack connector, but it may be used with any other pad or trigger source for ordinary
triggering.
• Pressure can be very useful if, for instance you want to play a tabla sound and change the
pitch with your hands or to choke a cymbal.
Connections
Page 9
3. Connections
1. Make all the connections before turning on the ddrum4. Start with the main volume at 0.
2. Connect the pads to the ddrum4 according to the illustration below.
Kick
Out A2
Snare
Out B3
Rim
Out B4
Tom-high Tom-mid Tom-low
Out B5
Out B6
Midi In
Perc
Cymbal
Cymbal Hi hat
Midi Out
Kick
Snare
Toms
Percussion
INPUT SENS
INPUT SENS
INPUT SENS
INPUT SENS
3. Connect the main outputs, marked A1 and A2 on the ddrum4 rear panel, to a suitable sound
system. If you’d rather use a pair of headphones, a headphone jack has been provided. The
MASTER LEVEL control lets you adjust the output volume of the headphone output and of the line
level outputs A1 and A2. The line level outputs B3 to B6 are not affected by the MASTER LEVEL
control.
4. Connect the mains cable and power-up your system in the following order;
ddrum4 -mixer - amplifier.
The very first thing that will appear in the ddrum4 DISPLAY is the software version number.
After a brief moment, PAL will appear in the DISPLAY. This indicates that the ddrum4 is in the
Palette mode.
Setting up
The ddrum4 can be used with a variety of pads. After you have connected the pads of your
choice, please proceed with the following procedure. When shipped from the factory the ddrum4
is by default set to kick (bAS) trigger on the kick channel, rim (rin) trigger on the rim channel
and pad (PAd) triggers on all the other channels. If your ddrum4 has been delivered with ddrum
pads, you do not have to change this.
Selecting trigger input type
Page 10
Selecting the trigger input type
1. Press the
light up.
SYSTEM
button once, to the left of the SYSTEM INDICATOR bar. The first segment will
System
SYSTEM
Sound
DUMP
ASSORTED
EFFECT
HI HAT
CYMBAL
PERCUSSION
TOM
RIM
SNARE
KICK
MIDI
BUTTON
OPT
NOTE P
NOTE #
OUT B
OUT A
DYN
THRES
TRIG INPUT
(If not, press the SYSTEM button repeatedly until the TRIG INPUT LED lights up or hold the SHIFT
button while pressing SYSTEM to scroll downwards).
2. Press one of the CHANNEL buttons, e.g. the KICK button. This will trigger a sound and it will
also select the channel for editing. This is indicated with a steady light from the TRIGGER
indicator.You can also select a channel by hitting a pad, however once you select a channel by
pressing a CHANNEL button, the pad select is disabled. To enable it again, press EXIT and go back
to edit mode.
PALETTE
4
2
KICK
3. The DISPLAY will indicate the trigger source of the selected channel. If you turn the ROTARY
dial, you will scroll through the possible trigger sources that have been implemented in the
ddrum4. These trigger sources have their respective characteristics and by selecting the most
appropriate for each channel, the ddrum4 will perform at its best. Please turn to page 14 for
more details regarding the trigger options.
4. To select another channel for editing, just press any other CHANNEL button. The steady TRIGGER light will indicate which channel is selected for editing.
5. To leave the System mode, press the EXIT button. You will find EXIT to the left of the ROTARY
dial.
EXIT
KIT STORE
Adjusting the input sensitivity
Page 11
Adjusting the input sensitivity
1. Choose the TRIG INPUT option from the SYSTEM menu by pressing the SYSTEM button until the
TRIG INPUT indicator lights up in the INDICATOR bar and select the channel you want to adjust. Hit
the pad (not the channel button) and look at the TRIGGER LED, located above (the selected)
channel button. It will dim briefly when the channel receives a trigger. In this System mode,
the SYSTEM INDICATOR bar will indicate the trigger level.
KICK
2. Adjust the trigger level with the
trigger input more sensitive.
INPUT SENSITIVITY
knobs. Turning clockwise will make the
Kick
INPUT SENS
3. You should adjust the INPUT SENSITIVITY knob so that the top LED on the SYSTEM INDICATOR bar
lights up only during the hardest hits.
The sensitivity settings are crucial to the general feel and sound of your ddrum4 system.
Dynamics is what it’s all about. Take your time and adjust the sensitivity to your playing style.
Do this on a good sound system if you can, in order to really hear what’s going on. Do not use
the INPUT SENSITIVITY knobs as a volume control. Controlling the dynamic range and controlling
the volume of the ddrum4 is two completely different things. The INPUT SENSITIVITY knob settings are not stored in the ddrum4s memory.
Setting the threshold
Page 12
Setting the trigger threshold
This feature becomes helpful if you find that, e.g. one of your tom pads triggers the other toms
as well or that the kick triggers the snare. You then need to adjust the trigger threshold.
1. Press SYSTEM twice or repeatedly to select the THRES indicator on the SYSTEM INDICATOR bar.
System
SYSTEM
Sound
DUMP
ASSORTED
EFFECT
HI HAT
CYMBAL
PERCUSSION
TOM
RIM
SNARE
KICK
MIDI
BUTTON
OPT
NOTE P
NOTE #
OUT B
OUT A
DYN
THRES
TRIG INPUT
2. Let‘s say that your toms are triggering your snare. You would need to raise the trigger threshold of the snare channel. Select the snare channel for editing by pressing the SNARE CHANNEL
button.
PALETTE
5
4
3
2
1
SNARE
RIM
3. Adjust the threshold value of the snare with the ROTARY dial while playing the tom pads.
Adjust the value upward until the tom sounds no longer trigger the snare. The higher the
threshold value, the less chance of a weak trigger pulse triggering the channel. The default
value is 15.
The three things that we have done here, input setting, input sensitivity and trigger threshold
are very important to get the right feel when playing on the ddrum4. You might want to go
back and adjust these later but there is no need for doing this every time you want to play. The
system selections that you have made (trigger input selection and threshold) are automatically
stored in ddrum4 until you decide to change them.
There is another parameter called DYN, which sets a dynamics curve to each input. Please go to
page 15 for more details on the dynamic response curves.
Select kits and sounds
Page 13
4. Selecting kits
& sounds
Palette mode
When you turn on the ddrum4, it will set itself to the Palette mode, indicated by PAL in the
display. Each one of the four main instrument groups, kick, snare, toms and percussion has a
PALETTE button with which you can quickly choose one of five sound setups. You can program
your own selection of sounds in the Palette. See the reference section, from page 19 and
onwards, for more details regarding programming.
PALETTE
PALETTE
PALETTE
5
5
5
4
4
4
3
3
3
2
2
2
1
1
KICK
SNARE
1
RIM
HIGH
MID
LOW
• Press the PALETTE buttons repeatedly to scroll through the five selections that are available for
the different instrument groups.
Important stuff!
All editing is automatically stored in the Palette. Please be careful when you start to explore
the different possibilities and parameters in ddrum4. If you do this while being in Palette
mode, ddrum4 will store each and every one of your edit procedures. Until you are familiar
with the ddrum4 parameters, do your exploring in one of the kits instead. The kits, will not
retain any edits unless you store them with a special procedure. See below.
Kit mode
If you turn the ROTARY dial clockwise from the Palette mode, the DISPLAY will change from PAL
to a P. or an F. followed by a number. This is the Kit mode. The number identifies the 99
different drum kits that are available as an addition to the Palette, in the ddrum4. Keep turning
the ROTARY dial to scroll through the kits. You can program your own selection of sounds in the
P. kits, numbered from 1 to 26. The kits that are in the positions from 27 to 99 are the factory
kits, indicated with an F. and a number in the display. The factory kits can be edited but you
can only store any edits or sound selections in the P. kits.
A quick way to select sounds in the different instrument groups is to use the Palette buttons.
Any such change will be regarded as an edit and must be stored in a P. kit if you like to keep
that particular selection.
How to store your edits
Page 14
How to store your edits
As previously mentioned, all editing that you do, while the ddrum4 is in the Palette mode is
automatically stored. In the Kit mode however, ddrum4 needs to be told when to store any
edits. You can only store edits in the first 26 kits, the P. kits. When you have edited anything in
a kit, a dot appears after the kit number, e.g. P. 17. This is to alert you about an edit that has not
been stored. If you were to select another kit, this edit would be lost and the edited kit would
return to the way it was. Storing is easy:
1. Press and hold the SHIFT button and press the KIT STORE button. In the DISPLAY the P. will begin
flashing and you will be able to choose a kit location (a number) to store your edited kit to.
EXIT
SHIFT
KIT STORE
2. Choose a kit number for your edited selection with the
the edited kit, go straight to step 3.
ROTARY
dial. If you like to overwrite
3. Confirm your intent by pressing SHIFT and KIT STORE again. If you change your mind, abort by
pressing EXIT (stay away from the SHIFT button this time).
Storing an edit to any kit will overwrite the kit that was in that location before. If you run out
of kits to store to, you might want to dump the entire system setup, all the kits, settings etc. to
an external MIDI device (a sequencer or a computer) using the dump function, see page 18.
Good drum sounds
Page 15
5. Good drum sounds
About your sound system
The ddrum4 is an electronic drum kit and is totally dependent on a good sound system. Since
all of the ddrum4’s sounds have been recorded in the best studios, you will obtain the best
results using a good quality amplification. The sounds coming from your ddrum4 will only
sound as good as the sound system you are playing them through.
We recommend a full-range sound system that is capable of reproducing all sounds as clear,
strong and as uncolored as possible. PA-systems, studio monitors with good amplifiers and
systems specifically designed for electronic drums belong in this category. The attack portion
of drums and percussion sounds are very rich in transients, thus requiring a powerful and fast
power amplifier to sound good (not the same thing as loud). Do not underestimate the effect
and speed requirements of the power amplifier of your ddrum4 sound system.
A hi-fi system can be used and will probably sound quite good at low volume levels. There is
however a chance that the ddrum4 could cause serious damage to a hi-fi system, so we can not
recommend you using one.
Guitar and bass amplifiers are optimized to reproduce guitar and bass sounds and typically do
not work well with percussion sounds.
Headphones
Choose a headphone with high sensitivity. Your ddrum supplier can probably help you to
select a good headphone. The digital range of Sony headphones have proven to be an excellent
choice for ddrum products.
Mixer
The ddrum4 outputs are line level. Please connect these only to the appropriate inputs on a
mixer. Avoid microphone inputs. To much amplification in the inputs (as in microphone inputs) may lead to a distorted sound.
Reference: System
Page 16
6. Reference
System functions
System
SYSTEM
MIDI
BUTTON
OPT
NOTE P
NOTE #
OUT B
OUT A
DYN
THRES
TRIG INPUT
Sound
DUMP
ASSORTED
EFFECT
HI HAT
CYMBAL
PERCUSSION
TOM
RIM
SNARE
KICK
These functions are active for editing when the SYSTEM LED is lit.
1. Select a system function by pressing the SYSTEM button repeatedly, until the desired function
is shown in the SYSTEM INDICATOR bar. Press the SHIFT button together with the SYSTEM button to
scroll backwards.
2. Select the channel that you wish to edit by pressing one of the CHANNEL buttons.
3. Edit the parameter with the ROTARY dial. The current value or function will be indicated in the
DISPLAY.
4. Choose another system function if desired, with the
one of the CHANNEL buttons.
SYSTEM
button or another channel with
5. To leave the system functions, press EXIT.
There is no need to save or store the parameters of the system functions. Every change you
make is automatically stored. Except for the MIDI and button functions, these settings are
stored per channel. They do not change when you choose another Kit or Palette.
Trig input
System
SYSTEM
MIDI
BUTTON
OPT
NOTE P
NOTE #
OUT B
OUT A
DYN
THRES
TRIG INPUT
Sound
DUMP
ASSORTED
EFFECT
HI HAT
CYMBAL
PERCUSSION
TOM
RIM
SNARE
KICK
This selects the trigger type for each channel.
bAS Used with the ddrum Kick or the kick-pad.
PAd This is the one for the channels that are connected to the ddrum Precision pads or the
Cast Precision pads, that will be played with sticks.
r i n The ddrum snare pad has a special rim sensor. Use this trigger type if a channel is to
be triggered from the rim sensor.
A c P Use this with the ddrum Cast Acoustic pads.
H n d Select this if you want to play on the pads with your hands.
A c 1 Use this one if you are triggering a ddrum4 channel with an acoustic snaredrum and a
Reference: System
Page 17
ddrum trigger microphone. If you get multiple triggers, try to raise the threshold on the
ddrum4 channel or select Ac2.
A c2 This one is slightly less trigger sensitive than Ac1. Try this one if you are triggering
ddrum4 with a ddrum trigger microphone mounted on acoustic toms or kick drums.
A c 3 This is the least trigger sensitive selection. It is designed for triggering ddrum4 with
long, sustained acoustic drum sounds.
CYb Use this one if you are triggering with a ddrum cymbal controller pad.
HHt This is used if you have the ddrum Hi-Hat controller. This controller should be connected
to input number 10 on the ddrum 4.
• When you connect a hi-hat pedal for the first time, and select this trigger type, the ddrum4
needs to be calibrated to the hi-hat pedal. While you are in trig input mode for channel 10,
close the pedal (don’t press too hard) and press SHIFT-EXIT. The display will confirm the
calibration by showing CAL. If you connect another hi-hat pedal or change the clutch, you will
have to calibrate again.
Thres
System
SYSTEM
MIDI
BUTTON
OPT
NOTE P
NOTE #
OUT B
OUT A
DYN
THRES
TRIG INPUT
Sound
DUMP
ASSORTED
EFFECT
HI HAT
CYMBAL
PERCUSSION
TOM
RIM
SNARE
KICK
The threshold can prohibit weak or stray trigger signals from triggering a channel. If e.g. your
toms trigger the snare as well or if your monitor speakers are loud enough to actually trigger
sounds, increase the threshold on the channel that receives external triggering. The higher you
set the threshold value, the less sensitive the channel becomes.
Values: 1 ~ 100, the default value is 15.
Dyn
System
SYSTEM
MIDI
BUTTON
OPT
NOTE P
NOTE #
OUT B
OUT A
DYN
THRES
TRIG INPUT
Sound
DUMP
ASSORTED
EFFECT
HI HAT
CYMBAL
PERCUSSION
TOM
RIM
SNARE
KICK
This function can adjust the dynamics response of each channel. The number indicates one of
the dynamic response curves. The default value is 0, which is a linear type of curve. By turning the ROTARY dial counter-clockwise, a negative number appears, indicating that mediumsoft to medium-hard hits will be less pronounced. Turning clockwise will select the positive
curves, where those hits will be more pronounced. See the figure in the appendix section.
Values: -15 ~ 0 ~ 15.
Reference: System
Page 18
Out A
System
SYSTEM
MIDI
BUTTON
OPT
NOTE P
NOTE #
OUT B
OUT A
DYN
THRES
TRIG INPUT
Sound
DUMP
ASSORTED
EFFECT
HI HAT
CYMBAL
PERCUSSION
TOM
RIM
SNARE
KICK
This is where you position a channel in the stereo image at the outputs A1 and A2, like a panpot on a mixer. You can pan each channel individually. The stereo image stretches from 1.00
(full left) via 1.50 (center) to 2.00 (full right). There are 25 steps to either side of the center
position. By turning all the way counter clockwise you may switch off a channel from the A
outputs, by selecting OFF. See the figure in the appendix section.
Values: OFF, 1.00 ~ 2.00.
Out B
System
SYSTEM
MIDI
BUTTON
OPT
NOTE P
NOTE #
OUT B
OUT A
DYN
THRES
TRIG INPUT
Sound
DUMP
ASSORTED
EFFECT
HI HAT
CYMBAL
PERCUSSION
TOM
RIM
SNARE
KICK
This sets the positioning of the channels that have been assigned to the output pairs B3, B4, B5
and B6. If e.g. you would like to send one channel to an input on a mixer, set Out A of that
channel to OFF, raise the Level B parameter to anything above 0 and set the Out B parameter to
any integer. A value of 3.00 corresponds to output B3, a value of 3.50 makes the channel
present in both of the B3 and B4 outputs, a value of 4.00 is only the output B4 etc. See the
figure in the appendix section.
Values: OFF, 3.00 ~ 4.00 ~ 5.00 ~ 6.00.
Note #
System
SYSTEM
MIDI
BUTTON
OPT
NOTE P
NOTE #
OUT B
OUT A
DYN
THRES
TRIG INPUT
Sound
DUMP
ASSORTED
EFFECT
HI HAT
CYMBAL
PERCUSSION
TOM
RIM
SNARE
KICK
This sets the MIDI note number that each channel is transmitting and responding to. MIDI
note number 60 (middle C) is equivalent to C3 in the ddrum4. If you press the SHIFT button,
you will get a numerical read-out in the DISPLAY instead of the ”musical” default one. The sharp
notes (F#, C# etc) are indicated by a dot in the DISPLAY.
Values: C-2 ~ G8 or 0 ~ 127.
Reference: System
Page 19
Note P
System
SYSTEM
MIDI
BUTTON
OPT
NOTE P
NOTE #
OUT B
OUT A
DYN
THRES
TRIG INPUT
Sound
DUMP
ASSORTED
EFFECT
HI HAT
CYMBAL
PERCUSSION
TOM
RIM
SNARE
KICK
This sets the channel to a ”note position” mode. The sounds that are triggered utilizing the
position feature will transmit the note number chosen with the Note # function at its center
position. Depending on the note position function, the range from the center to the edge on the
pad, will be transmitted as 1, 2, 4 or 8 consecutive MIDI note numbers. A snare that is sounding different according to where on the pad you play, will also transmit that particular information as MIDI note numbers. This means that when you play multi sampled sounds across
the head, the playing information is recordable into a MIDI sequencer.
Values: 1, 2, 4, 8.
Opt
System
SYSTEM
MIDI
BUTTON
OPT
NOTE P
NOTE #
OUT B
OUT A
DYN
THRES
TRIG INPUT
Sound
DUMP
ASSORTED
EFFECT
HI HAT
CYMBAL
PERCUSSION
TOM
RIM
SNARE
KICK
This is for future expansion.
Button
System
SYSTEM
MIDI
BUTTON
OPT
NOTE P
NOTE #
OUT B
OUT A
DYN
THRES
TRIG INPUT
Sound
DUMP
ASSORTED
EFFECT
HI HAT
CYMBAL
PERCUSSION
TOM
RIM
SNARE
KICK
This sets the velocity that the non-velocity sensitive CHANNEL buttons use to trigger the sounds
with. This is helpful for checking sounds at different velocities without pads. Remember that
the ddrum4 sounds are extremely velocity sensitive and to judge the quality and playability of
a single sound, you need to hear it triggered with various velocities.
Values: 1 ~ 127.
Page 20
MIDI
Reference: System
System
SYSTEM
MIDI
BUTTON
OPT
NOTE P
NOTE #
OUT B
OUT A
DYN
THRES
TRIG INPUT
Sound
DUMP
ASSORTED
EFFECT
HI HAT
CYMBAL
PERCUSSION
TOM
RIM
SNARE
KICK
The MIDI function has several modes. You cycle through these modes by pressing the SYSTEM
button repeatedly.
C. 1-16 This selects the MIDI channel that the ddrum4 is using. The selected channel will be
used for transmitting and receiving MIDI data.
P. On-OF This allows you to choose whether the ddrum4 shall receive and transmit Program
Change messages and Control Change messages or not. Please read the appendix regarding
how the ddrum4 interprets these messages on page 26.
L. On-OF This is the MIDI Local Control function. It is used if you are transmitting your playing
via MIDI to a sequencer, an external sound source or a computer. If local is switched off, it
prevents the pads (trigger inputs) from playing the internal sounds directly. Your playing,
however, will be transmitted through the MIDI output as MIDI note numbers. To hear yourself
playing, make sure that the sequencer or computer is echoing the MIDI notes back to the
MIDI input on the ddrum4. This creates a MIDI loop. If local is left on, this could cause
double triggers and flamming when the MIDI notes arrive back at the MIDI input and trigger
the sounds again.
A. On-OF This toggles if the ddrum4 shall receive and transmit After Touch messages or not. This
will only be transmitted from those inputs/channels that are connected to appropriate pads that
are able to transmit aftertouch to the ddrum4. Those inputs are number 1, 2, 8, 9 and 10.
d. AL, SY, PA, 1 ~ 26
This is where you can initiate a MIDI System Exclusive dump, to be able to store the
settings in the ddrum4 to a sequencer or a computer. The first option is all the system settings
(AL). SY is the system functions, PA dumps the Palette settings and by choosing a number, you
can transmit any individual Kit setting. You initiate the transmission procedure by pressing
SHIFT-EXIT . While transmitting the data, the DISPLAY will show a t for the short moment it takes,
to perform the transmission.
F. --, AL, SY, PA, 1 ~ 26
This allows you to initialize different settings in the ddrum4 to the factory settings. The
several possibilities are the same as described above for the MIDI System Exclusive dump.
Press SHIFT-EXIT to initialize desired option to the factory settings. The DISPLAY will show an L.
during the initialization. The -- option acts as a safeguard to prevent accidental initialization.
Reference: Sound functions
Page 21
Sound functions
SOUND
VARIATION
PITCH
DECAY
LEVEL A
LEVEL B
The sound functions select how the different sounds, that are assigned to the channels in the
ddrum4, behave when triggered and how they sound. One particular sound can be used in
several Kits and in the Palette. The sounds can also have different sets of sound parameters in
each and everyone of those kits.
1. Select the channel that you wish to edit by pressing one of the CHANNEL buttons.
2. Press one of the SOUND FUNCTION buttons. They are situated in the horizontal row, below the
DISPLAY.
3. Edit the selected parameter with the ROTARY dial.
4. To leave the sound functions, press the EXIT button.
Sound
SOUND
SOUND
No matter if the ddrum4 is in Palette mode or in Kit mode, this is where and how you select a
sound to a particular channel. Any sound in the ddrum4 can be assigned to any of the ten
sound channels. The sounds are indicated with a number in the DISPLAY and the group that the
sound belongs to, on the SYSTEM INDICATOR bar.
1. Press the SOUND button.
2. Select a channel by pressing a CHANNEL button.
3. Select a sound with the ROTARY dial.
4. To quickly jump from one group to another, hold the SOUND button while turning the ROTARY
dial.
5. If you want a channel to be silent, turn the ROTARY dial counter clockwise until --- is indicated in the display. This could be useful if you would like to trigger any external sounds with
MIDI, without having the ddrum4 making any sound at all.
6. You can quickly select consecutive sounds to adjacent channels. This can be very useful for
the tom channels. If you e.g. select a sound for the high tom, hold down the SOUND button and
press the MID and LOW TOM buttons. The sounds that are next in order to the first selected one,
will be assigned to the other two channels.
7. If a channel in a kit is silent, the sound assigned to that channel may have been deleted from
the sound memory. If you select that channel in the sound function mode, the display will
flash. You can then reload the sound or select another sound to the channel. See page 25 for
details on how to load sounds to the ddrum4.
Reference: Sound functions
Page 22
Variation
VARIATION
SIZE
Usually there are several variations to each and everyone of the ddrum4 sounds. A variation
uses the same sound sample or multi sample, but with some additional programming or tweaking. This could be different equalization, different velocity selections etc. Try them.
Values: 1 ~ 10, may differ from sound to sound.
Pitch
PITCH
MEM. LEFT
The sounds can be tuned with this function. The range is between +12.0 and -48.0 semitones.
If you hold the PITCH button, you are able to fine-tune the sounds in 0.1 increments.
Values: -48.0 ~ +12.0.
Decay
DECAY
LISTEN
This sets the decay of the sound. You can shorten any sound by setting this parameter to
anything below the default value, 100, which is the maximum, original length. The smaller the
value, the shorter the sound. This is very useful if you e.g. have detuned a sound downwards.
The lower the tuning, the longer the sound gets. Shorten it if needed, with the decay function.
Values: 0 ~ 100.
Level A
LEVEL A
MARK
This sets the level of the selected sound(s) in the two main outputs A1-A2.
Values: 0 ~ 100.
Level B
LEVEL B
DELETE
This sets the level of the selected sound(s) in the four alternate outputs B3-B6. A sound can be
present at both the A and the B outputs at the same time.
Values: 0 ~ 100.
Reference: Shift functions
Page 23
Shift functions
SOUND
SIZE
EXIT
MEM. LEFT
LISTEN
MARK
DELETE
SHIFT
KIT STORE
In order to access the shift functions you are required to press and hold the SHIFT button immediately before selecting one of the functions that are labeled on the panel below the function
buttons. The SHIFT button latches. To leave the shift functions, press EXIT.
The ddrum4 has a huge sound memory where all the sounds reside. When we ship the ddrum4,
its sound memory is fully loaded with the ddrum4 factory sounds. The shift functions are
related to the management of the sound memory including the removal and replacement of
sounds.
Important stuff
It is very important to understand that the entire sound memory, every sound that you find in
the ddrum4, can be erased and replaced with other sounds. There are no factory sounds inside
that cannot be removed or replaced.
This sets a new standard of flexibility but it presents a potential problem, the unintended
erasing of the entire sound memory. After such an operation, you would need to reload the
ddrum4 with new sounds in order to be able to use it again. We have made it a bit difficult to
perform this dangerous operation but please read the following paragraphs before you start to
experiment with these functions. Another good thing to do would be to download the factory
sounds from our web site at http://www.clavia.se/ as a precaution.
Reference: Shift functions
Page 24
Shift-Sound
SOUND
SOUND
This selects a single sound for removal from the sound memory. It defaults to the very last
sound that you have triggered with a channel button. Select a sound with the ROTARY dial. To
quickly jump between sound groups, press and hold the SOUND button while turning the ROTARY
dial. A dot in the right corner of the display indicates that the sound is used in the Palette or in
one or more of the Kits.
Shift-Size
VARIATION
SIZE
This indicates the size of the sound you have selected in the above mentioned function. This
information could be useful if you are planning to load any new sounds into your ddrum4.
Shift-Mem.Left
PITCH
MEM. LEFT
This indicates the available, empty space in the sound memory in blocks. One block is very
close to a kilobyte. If, e.g. you have a sound in a computer that is 34,2 kilobytes in size, you
will need 35 blocks of free space in the ddrum4. Please note that the memory left indication
also includes any sounds that are marked for removal. This is indicated with a flashing display. In that case, the number in the DISPLAY indicates the memory that will be free, but not until
you have performed the delete procedure. There are 8128 blocks in the original ddrum4 sound
memory. Any number of blocks above 999 is indicated by a digit, a period and two more
digits. If e.g. 6240 blocks would become free, this would be indicated as 6.24 in the display.
Shift-Listen
DECAY
LISTEN
Pressing this will play the sound that you have selected with the SHIFT-SOUND button, described
earlier in this section. The sound will be played through outputs A1 and A2.
Reference: Shift functions
Shift-Mark
Page 25
LEVEL A
MARK
Pressing SHIFT-MARK will mark the sound that you have selected for removal. A dot in the right
corner of the display warns you if the sound that you have marked for removal is being used in
at least one of the Kits or in the Palette. The dot is just a warning however, you can still remove
the sound, leaving the Kit or the Palette that used the sound incomplete. When a sound is
marked for removal, the DISPLAY will flash. To un-mark a selected sound, just press the SHIFTMARK button again. If you have marked some sounds and leave the shift functions without
deleting them, they will be unmarked and you have to start all over, marking them again at a
later stage. If you become unsure whether these sounds should be deleted, simply leave these
functions by pressing EXIT to un-mark your previous selection.
Shift-Delete
LEVEL B
DELETE
You are now ready to delete the selected sounds that you have marked for removal. Be aware
that this is going to be a ”no-going-back” operation.
1. Press the SHIFT-DELETE button. The
that will be deleted.
DISPLAY
2. Confirm the intent by pressing the
pressing EXIT.
will flash, indicating the total number of blocks
SHIFT-DELETE
button again or abort the whole thing by
While the ddrum4 is clearing up its sound memory, the DISPLAY will display a countdown as
the memory blocks are deleted. This operation will take a while, one can not tell exactly how
long because this is depending on the size and location of the sounds that are removed. You
must wait until this operation is finished, which will be indicated by a zero in the display.
Do not turn off the ddrum4 during this process!
Shift-Exit
Sounds that are marked, as described above, can be transmitted as ddrum4 MIDI System
Exclusive data via the MIDI Out connector. Press SHIFT-EXIT to start the transmission. The
DISPLAY will count down the blocks of the individual sounds being transmitted. You may interrupt the procedure by pressing exit. The transmission will then stop after any current sound
has been completely transmitted.
Note: The data will be transmitted as several System Exclusive data packets. The number of
packets will depend upon the size and number of sounds that are included in the transmission.
You can not restore any individual sounds that have been a part of a multi-sound transmission.
If you want to be able to restore individual sounds, you must transmit them one by one.
Page 26
Reference: Sound formats
Sounds, sound formats
The sounds in the ddrum4 reside in a memory that is technically called a flash-ROM. This
means that besides storing sounds, you can delete sounds that you do not want and replace
them with new ones. The flash-ROM also retains its content when the power is switched off.
You can load sounds into the ddrum4, loading them via MIDI in two different formats, the
ddrum4 format and the MIDI Sample Dump format. Sounds in the ddrum4 format can be
accessed from our web site, free of charge. Point your browser to http://www.clavia.se/ for
more information.
ddrum4 sounds
A ddrum4 sound contains one or more samples that have been converted to a proprietary
format. It has been carefully compressed (by a factor of 3-6 times) and edited by the Clavia
crew. The compression technology allows the sounds to take up less memory so that we can
put more of them into the ddrum4. Each ddrum4 sound has a unique name, which assigns the
sound to its appropriate sound group. The sound numbers does not have to be consecutive. A
ddrum4 sound can also contain a couple of variations, which are different sets of functions
that affect the way the sound sounds and how it behaves when played upon. This is a set of
special parameters, not the ones that you can adjust yourself on the ddrum4 panel. One type of
variation function would be the crossfade information for multi samples or dynamic filter
settings.
Go see our web site and get free sounds
At our web site you will find all sounds as zipped MIDI files. Take them home with your web
browser and unzip them. Then you can load the MIDI files in to your favorite sequencer, and
download them to your ddrum4. Do not forget to download a copy of the factory sounds. This
could be very handy to have around, if you delete sounds and then change your mind.
MIDI Sample Dumps
A MIDI Sample Dump sound is a sample in another format that also can be transmitted via
MIDI. There are many devices that can transmit and/or load MIDI Sample Dumps. All you
need is access to a sampler with this capability. If you would like to have your own personally
sampled sounds, and have access to a sampler that can transmit sample dumps, you can exchange every single sound in the ddrum4!
These samples will not be compressed as much as the ddrum4 sounds (only by a factor of 2),
making them bigger than a corresponding ddrum4 version of the same sound, making the
transfer process slower. A MIDI Sample Dump has not the sound group identification data as
the ddrum4 sounds have, so the MIDI Sample Dump sounds are placed in the Dump group in
the ddrum4 sound memory. They are numbered according to the MIDI Sample Dump standard. Check your sampler for information regarding how it is numbering its samples. The ddrum4
will truncate these numbers to fit within the range of 1 to 999. A MIDI Sample Dump lacks the
special variations that the ddrum4 sound format has. But we have made it possible for MIDI
Sample Dumps to benefit from the variation functions. They are not as advanced as the ones
connected to the ddrum4 format sounds. Still, there are cool variations to check out on the
sample dump sounds.
If you start to make new drum sounds in a sampler, please remember that you have to edit
them in the sampler before you transmit them to your ddrum4. Make sure that the starting
Reference: Load new sounds
Page 27
point is correct (no air before the actual sound) etc. Please note that the ddrum4 playback
sample rate is 44.1 kHz. If you load a MIDI sample from a source that is sampled with a lower
sample rate, the ddrum 4 will automatically adjust them. Sounds with a higher sample rate,
will be played back with a lower pitch. Adjust this with the Pitch function, see page 20 for
details.
Check the size
When you have the sounds on your hard drive, you need to check their size to see if they fit in
the ddrum4 sound memory. If you have a PC, just look in the directory to see the size of each
sound file. If you have a Mac-OS computer you will have to check the size of the MIDI file
with the ”get info” command (command-I). Look for the value ”bytes used:”. Divide that
value by 1100 to get the equivalent block value in the ddrum4. The Mac-OS will not tell you
the exact size of a file if you just look in the directory of the finder or in a folder. You can check
the available space in the ddrum4 with the Shift-Mem. Left function. If the space isn’t enough
you will need to delete sounds from the ddrum4 sound memory in order to make space for new
sounds.
How to load new sounds into the ddrum4
This is extremely easy. You do not need to do anything to the ddrum4 in order to receive
sounds via MIDI. Just make sure that the connections are correct and start the transmission in
the software, the sequencer or the sampler.
1. Connect the MIDI Out from your computer or sampler (if you are transmitting a MIDI Sample Dump sound) to the MIDI In on the ddrum4. If the other device needs a closed loop
connection, also connect the MIDI Out from the ddrum4 to the MIDI In of the other device.
2. Start the transmission on the transmitting device.
The ddrum4 will automatically recognize the format of the incoming data. During this transmission, the ddrum4 display will indicate the amount of blocks to load from each sound in the
transfer. The transmission of these sounds to the ddrum4 can take a while, especially if you
want to load lots of sounds or very long ones.
Error codes when loading
FuL
If you try to load a sound to the ddrum4 that does not fit in its memory, the display will
alert you by showing you this error code. If this happens, please stop the transmission and wait
a little while until the ddrum4 reverts to the normal condition, as shown by the display returning
to a normal appearance.
duP
If you try to load a ddrum4 sound to the ddrum4 that already exists in the memory, the
display will alert you by showing you the duplicate error code and the data of that particular
sound will be ignored. This error code may also occur if you try to load two, identically
numbered MIDI Sample Dumps into the ddrum4. Please consult your Sample Dump sources
manual for information regarding the numbering of the samples in a sample dump.
Err
This message will appear if anything goes wrong with the transmission itself. If this
message appears, please abort the operation on the transmitting device. The ddrum4 will return
to its normal state of operation after a short while. The file being transferred when this error
message appeared, will not be stored in the ddrum4 memory.
Page 28
Appendix
7. Appendix
MIDI Program Change messages
The ddrum4 has a special way of interpreting MIDI Program Change (MPC) messages.
The kits, P. 1 ~ 26 are selected by sending MPC 0 to 25 to the ddrum4. The factory kits, F.27 ~
99 use MPC 26 to 98.
MPC 99 is used to turn the ddrum4 to the default Palette mode, the same as appears after you
turn the ddrum4 on.
To select one of the sounds in the kick palette, send one of the MPC numbers 100 to 104, for
the snare palette, use one of the MPC 106 to 110. The other two instrument groups use the
MPC number groups 112 to 116 and 118 to 122.
To deselect a Palette in, e.g. the kick group, send the MPC message 105 (to revert to the kit
selection for that particular instrument group). Use the MPC 111, 117 and 123 for the other
groups.
This means that in order to set the ddrum4 to a certain sound combination by sending MPC
messages to it, you may have to use a combination of several MPC messages. You may select
a kit by one MPC (0 ~ 98), change the kick in that particular kit by another MPC, etc.
As well as receiving MPCs, the ddrum4 transmits them, whenever you select a kit or palette
on the ddrum4 itself.
Appendix
Page 29
Output assignment
This figure shows the path that the sound from each channel follows to the outputs.
Outputs
Sound
Master
level
Level A
Out A
A1
Headphones
Level B
A2
B3
B4
B5
B6
Out B
Dynamic curves
This figure shows the relationship between the striking force and the trigger level, with three
different dynamic curves.
trigger level
max
pos. dyn curve (+15)
linear dyn curve
(preset)
neg. dyn curve (-15)
max
min
striking
force
Page 30
8. Index
A
N
After Touch 20
Note # 18
Note P 19
B
Button 19
C
Channel button 10, 19
Connections 9
Control Change messages 20
D
ddrum4 sounds 26
Decay 22
Delete 25
DuP 27
Dyn 17
E
Err 27
Error codes 27
Exit 16
F
FuL 27
H
Headphones 15
I
Important stuff 13, 23
Input jacks 8
K
Kit mode 13
Kit store 14
L
Level A 22
Level B 22
Listen 24
M
Mac-OS 27
Main outputs 22
Mark 25
Mem. Left 24
MIDI 20
MIDI channel 20
MIDI Program Change 28
MIDI sample dumps 26
MIDI Sys-ex 20
O
Opt 19
Out A 18
Out B 18
Output jacks 8
P
PAL 9
Palette 13
Pitch 22
Pressure 8
Program Change messages 20
S
Sample rate 27
Sensitivity 11
Size 24
Sound 21
Shift-Sound 24
Sound formats 26
Sound functions 21
Sound library 5
Store 14
System button 10
System indicator bar 16
System parameters 16
T
Thres 17
Thres indicator 12
Threshold 12
Trig Input 10
Trig input 16
Trigger inputs 8
V
Variation 22
W
Web site 5
Page 31
MIDI IMPLEMENTATION CHART
Model: Clavia ddrum4
FUNCTION
TRANSMITTED
RECOGNIZED
Basic
Channel
Default
Changed
1
1-16
1
1-16
Mode
Default
Messages
Mode 3
X
Mode 3
X
0-127
0-127
Note
Number
Velocity
Note ON
Note OFF
O v=0-127
X
O v=1-127
X
After
Touch
Key’s
Ch’s
O 0-127
X
O 0-127
X
X
X
X
X
O
X
X
X
X
X
X
X
X
X
X
X
O
X
X
X
X
X
O
X
X
X
X
X
X
X
X
X
X
X
O
X
X
X
O 0-127
O 0-127
O 1
O 1, 2
Common
: Song Pos
: Song Sel
: Tune
X
X
X
X
X
X
System
Real Time
: Clock
: Commands
X
X
X
X
Aux
:
:
:
:
X
X
X
X
X
X
X
X
Pitch Bender
0,32
1
4
6,38
7
10
11
64
65
66
67
84
91
93
96,97
98,99
100,101
120
Control
Change
Prog
Change
System Exclusive
System
Messages
Local ON/OFF
All Notes OFF
Active Sense
Reset
Notes
Mode 1: OMNI ON, POLY
Mode 3: OMNI OFF, POLY
*
Date: Feb 1997
Version: 1.0
REMARKS
Memorized
Bank select
Modulation
Foot controller
Data entry
Volume
Panpot
Expression
Hold 1
Portamento
Sostenuto
Soft
Portamento control
Effect 1 depth
Effect 3 depth
Data incr, decr
NRPN LSB, MSB
RPN LSB, MSB
All sound off
*
setup
*12 System
* Sample Dump Standard
Mode 2: OMNI ON, MONO
Mode 4: OMNI OFF, MONO
O: YES
X: NO