1
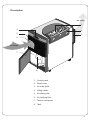
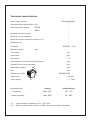
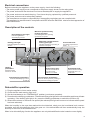
COMBINED DEHUMIDIFIER
DESHUMIDIFICATEUR COMBINE
KOMBI-ENTFEUCHTER
DEUMIDIFICATORE COMBINATO
COMBI ONTVOCHTIGINGSAPPARAAT
DESHUMEDECEDOR COMBINADO
DESUMIDIFICADOR COMBINADO
AFUGRANTHRAS DUO LEITOURGIWN
User manual
Instructions pour l'emploi
Gebrauchsanleitungen
Istruzioni per l’uso
Gebruiksaanwijzingen
Instrucciones para el uso
Instruções para o uso
Odhgive" crhvsh"
1
GB
CONTENTS
BRIEF NOTES ON HUMIDITY ......................
INTRODUCTION ...........................................
DESCRIPTION ..............................................
TECHNICAL CHARACTERISTICS ................
ACCESSORIES .............................................
ELECTRICAL CONNECTION (U.K. ONLY) ...
INSTALLATION .............................................
ELECTRICAL CONNECTION ........................
DESCRIPTION OF THE CONTROLS ...........
DEHUMIDIFIER OPERATION .......................
HEATING OPERATION .................................
COMBI DRYER OPERATION .......................
HOW TO GET THE MOST OUT OF YOUR
COMBINED DEHUMIDIFIER .........................
MAINTENANCE .............................................
IMPORTANT ..................................................
TROUBLESHOOTING ...................................
PAG.
PAG.
PAG.
PAG.
PAG.
PAG.
PAG.
PAG.
PAG.
PAG.
PAG.
PAG.
3
4
5
6
7
7
8
9
9
9
10
10
PAG.
PAG.
PAG.
PAG.
10
11
11
12
FR
SOMMAIRE
QUELQUES NOTIONS SUR L'HUMIDITE ....
PRESENTATION ...........................................
DESCRIPTION ..............................................
CARACTERISTIQUES TECHNIQUES ..........
ACCESSORIES .............................................
INSTRUCTIONS POUR L'INSTALLATION ...
BRANCHEMENT ELECTRIQUE ...................
DESCRIPTION DES COMMANDES .............
COMMENT DESHUMIDIFIER .......................
COMMENT CHAUFFER ................................
FONCTIONNEMENT COMBI DRYER ...........
CONSEILS D'UTILISATION ..........................
ENTRETIEN ...................................................
AVERTISSEMENTS ......................................
SI QUELQUES CHOSE NE FONCTIONNE PAS
PAG.
PAG.
PAG.
PAG.
PAG.
PAG.
PAG.
PAG.
PAG.
PAG.
PAG.
PAG.
PAG.
PAG.
PAG.
D
INHALT
EINIGE ANMERKUNGEN ZUR LUFTFEUCHTIGKEIT
PRÄSENTATION ...........................................
BESCHREIBUNG ..........................................
TECHNISCHE MERKMALE ..........................
ZUBEHÖR .....................................................
ANWEISUNGEN ZUR AUFSTELLUNG ........
ELEKTRISCHER ANSCHLUSS .......................
BESCHREIBUNG DER BEDIENUNGSELEMENTE
ENTFEUCHTUNGSBETRIEB .......................
HEIZBETRIEB ...............................................
KOMBIBETRIEB ............................................
RATSCHLÄGE FÜR DEN GEBRAUCH ........
WARTUNG ....................................................
SICHERHEITSHINWEISE .............................
FEHLERSUCHE ............................................
S.
S.
S.
S.
S.
S.
S.
S.
S.
S.
S.
S.
S.
S.
S.
2
PAG.
PAG.
PAG.
PAG.
PAG.
PAG.
PAG.
PAG.
PAG.
PAG.
PAG.
PAG.
PAG.
PAG.
PAG.
ENKELE OPMERKINGEN OVER VOCHTIGHEID
PRESENTATIE ..............................................
ONDERDEELBENAMING .............................
TECHNISCHE GEGEVENS ..........................
ACCESSOIRES .............................................
AANWIJZINGEN VOOR HET INSTALLEREN
ELECTRISCHE AANSLUITING .....................
BESCHRIJVING VAN DE KNOPPEN ...........
ONTVOCHTIGEN ..........................................
VERVARMEN ................................................
COMBI DRYER ..............................................
RAADGEVINGEN VOOR HET GEBRUIK .....
ONDERHOUD ...............................................
WAARSCHUWINGEN ...................................
ALS ER IETS NIET FUNCTIONEERT ...........
PAG.
PAG.
PAG.
PAG.
PAG.
PAG.
PAG.
PAG.
PAG.
PAG.
PAG.
PAG.
PAG.
PAG.
PAG.
ALGUNAS NOCIONES SOBRE LA HUMEDAD
PRESENTACION ...........................................
DESCRIPCION ..............................................
CARACTERISTICAS TECNICAS ..................
ACCESORIOS ...............................................
INSTRUCCIONES PARA LA INSTALACION
CONEXION ELECTRICA ...............................
DESCRIPCION DE LOS MANDOS ...............
COMO DESHUMEDECER ............................
COMO CALENTAR ........................................
FUNCIONAMIENTO COMBI DRYER ............
CONSEJOS PARA EL USO ..........................
MANTENIMIENTO .........................................
ADVERTENCIAS ...........................................
SI ALGO NO FUNCIONASE ..........................
23
24
25
26
27
28
29
29
29
30
30
30
31
31
32
ALGUMAS NOÇÕES SOBRE A HUMIDADE ...
APRESENTAÇÃO ...........................................
DESCRIÇAO ...................................................
CARACTERISTICAS TECNICAS .....................
ACESSORIOS ................................................
INSTRUÇÕES PARA A INSTALAÇÃO .............
LIGAÇÃO ELECTRICA ....................................
DESCRIÇÃO DOS COMANDOS .....................
COMO DESUMIDIFICAR ................................
COMO AQUECER ..........................................
FUNCIONAMENTO COMBI DRYER ................
CONSELHOS PARA A UTILIZAÇAO ...............
MANUTENÇÃO ..............................................
ADVERTENCIAS ............................................
SE ALGUM COISA NÃO FUNCIONA ...............
PERIECOMENA
33
34
35
36
37
38
39
39
39
40
40
40
41
41
42
Merkev" plhroforive" pavnw sthn ugrasiva ......
Paronsivash .......................................................
Perinrafhv .........................................................
Prodiagrafev" ...................................................
E
v xarthvmata ......................................................
Odhgive" egkatavstash" ....................................
Hlektrikh sundesh ...........................................
Perigrafh twn leitourgiwn ............................
Pw" na afugravnete .........................................
Pws na qermavnete ...........................................
Leitourgiva COMBI DRYER ............................
Sumboulev" crhvsh" ............................................
Sunthvrhsh .........................................................
Preidopoihvsei" .................................................
An kavti de leitourgeiv .....................................
43
44
45
46
47
48
49
49
49
50
50
50
51
51
52
E
SUMARIO
PAG.
PAG.
PAG.
PAG.
PAG.
PAG.
PAG.
PAG.
PAG.
PAG.
PAG.
PAG.
PAG.
PAG.
PAG.
53
54
55
56
57
58
59
59
59
60
60
60
61
61
62
P
SUMARIO
I
SOMMARIO
ALCUNE NOZIONI SULL'UMIDITA' ..............
PRESENTAZIONE .........................................
DESCRIZIONE ..............................................
CARATTERISTICHE TECNICHE ..................
ACCESSORI ..................................................
ISTRUZIONI PER L'INSTALLAZIONE ..........
COLLEGAMENTO ELETTRICO ....................
DESCRIZIONE DEI COMANDI .....................
COME DEUMIDIFICARE ...............................
COME RISCALDARE ....................................
FUNZIONAMENTO COMBI DRYER .............
CONSIGLI D'UTILIZZO ..................................
MANUTENZIONE ..........................................
AVVERTENZE ...............................................
SE QUALCOSA NON FUNZIONA .................
13
14
15
16
17
18
19
19
19
20
20
20
21
21
22
NL
INHOUD
PAG.
PAG.
PAG.
PAG.
PAG.
PAG.
PAG.
PAG.
PAG.
PAG.
PAG.
PAG.
PAG.
PAG.
PAG.
63
64
65
66
67
68
69
69
69
70
70
70
71
71
72
GR
sevlida"
sevlida"
sevlida"
sevlida"
sevlida"
sevlida"
sevlida"
sevlida"
sevlida"
sevlida"
sevmoda"
sevmoda"
sevmoda"
sevmoda"
sevmoda"
73
74
75
76
77
78
79
79
79
80
80
80
81
81
82
ENGLISH
Brief notes on humidity
Air naturally contains a given quantity of water in the form of water vapour which determines its humidity level.
The capacity of air to hold water vapour is, however, limited and depends on its temperature: the higher the
temperature, the greater the quantity of water vapour which can be held in the air. The absolute humidity (A.H.)
value indicates the quantity of water contained in 1 kg of air and is expressed in grammes. The relative
humidity (R.H.) value is the percentage ratio of the quantity of water contained in 1 kg of air and the maximum
quantity which can be contained under the same environmental conditions.
In other words, we can imagine the air in a room at a certain temperature as a container with a given capacity,
let us say 10 litres, for example. Supposing we fill it half way with water, we would then say that the container
is 50% full (relative humidity) and that 5 litres of water are contained in it (absolute humidity). When the
container is completely full, we would describe it as “saturated” or say that we have 100% relative humidity.
Increasing the temperature is like increasing the capacity of the container. When the air is at 20˚C it is therefore
as if we had a 10 litre container, whereas when the air is at 30˚C it is as if we had a 20 litre container.
There are consequently two ways of reducing the relative humidity:
-
removing water
20°C
20°C
R.H. = 50%
A.H. = 5 l
5l
-
R.H. = 25%
A.H. = 2.5 l
2.5 l water
removed
R.H. = 25%
A.H. = 5 l
no water removed
2,5 l
raising the temperature of the air
20°C
30°C
R.H. = 50%
A.H. = 5 l
5l
5l
The new dehumidifier makes it possible to carry out both operations simultaneously, bringing you exceptional
dehumidifying speed and power.
Experts have established that optimal atmospheric conditions, both for our physical health and the
preservation of furniture and other items, vary between 45% and 60% relative humidity. It is therefore
advisable to keep rooms within these values.
3
Read this instruction booklet carefully before installing and using the appliance. In this
way, you will obtain the best possible results and maximum operating safety
Introduction
This new dehumidifier is a combined function appliance (dehumidifying and heating) which allows the relative
humidity in a room to be quickly and effectively reduced. It is a compact design with handles, making it easily
portable. It is recommended for use in all rooms with excess humidity problems, such as kitchens, bathrooms,
laundries, rooms below ground level and cellars, etc. Its combined function is particularly suitable for drying
clothes (COMBI DRYER function).
yyyyyyy
@@@@@@@
;;;;;;;
;;;;;;;
@@@@@@@
;;;;;;;
yyyyyyy
;;;;;;;
@@@@@@@
;;;;;;;
yyyyyyy
;;;;;;;
@@@@@@@
;;;;;;;
yyyyyyy
;;;;;;;
Advantages:
COMBINED OPERATION
HIGH SPEED
HEATING POWER
ECON
yyyyy
@@@@@
;;;;;
@@@@@
;;;;;
yyyyy
@@@@@
;;;;;
yyyyy
@@@@@
;;;;;
yyyyy
@@@@@
;;;;;
yyyyy
MAX
800W
TOTAL CONTROL
PURIFIES AIR
1.600W
COMFORT
ECOLOGICAL
HUMIDOSTAT
TANICA
THERMOSTAT
ELIMINATES CONDENSATION
TANK
DRAIN HOSE
4
ECOLOGICAL
2
SPEEDS
SILENT
OPERATION
;@;@;@;@;@;@;@;@;@;@;@;@;@;@;@;@
;@;@ ;@;@ ;@ ;@
EASILY PORTABLE
ERGONOMIC HANDLES
4 WHEELS
LIQUID REFRIGERANT
HIGH SAFETY
OVERHEATING PROTECTION
FUNCTIONAL PROTECTION
Description
Air outlet
1
4
2
5
3
6
Air intake
7
8
1. Control panel
2. Panel cover
3. Air outlet grille
4. Lifting handle
5. Air intake grille
6. Air purifying filter
7. Tank access panel
8. Tank
5
Technical characteristics
See rating label
Power supply voltage
"
Absorbed power dehumidifying only
Absorbed power heating
ECON:
"
MAX:
"
Maximum absorbed power
"
Maximum current absorbed
"
Maximum moisture removed in 24 hours (*1)
"
Refrigerant (*2)
"
210/300
Air treated
yes
Defrosting device
Thermostat
yes
Humidostat
yes
Fan speeds
2
Thermal cutouts for electric heating element
yes
Protection device on compressor
yes
Water tank control
yes
P
D
yes
Filter
H
Dimensions LxHxD
435x580x325
29 Kg.
Weight (net)
L
Tank capacity
Operating limits:
6 litres
Heating
Dehumidifying
* Temperature
Max. 27°C
12° - 32°
* Relative humidity
Max. 95%
30 - 95%
(*1)
(*2)
6
m3/h
Under standard conditions of 27˚C - 60% R.H.
R22is a coolant which conforms to EEC environmental safety regulations.
Accessories
Description
Quantity
condensation discharge tube
rubber cap
1 (2 m.)
1
Electrical connection (U.K. only)
A) If your appliance comes fitted with a plug, it will incorporate a 13 Amp fuse. If it does not fit your socket, the plug should be cut off
from the mains lead, and an appropriate plug fitted, as below.
WARNING: Very carefully dispose of the cut off plug after removing the fuse: do not insert in a 13 Amp socket elsewhere in the house
as this could cause a shock hazard.
With alternative plugs not incorporating a fuse, the circuit must be protected by a 15 Amp fuse.
If the plug is a moulded-on typer, the fuse cover must be re-fitted when changing the fuse using a 13 Amp Asta approved fuse to
BS 1362. In the event of losing the fuse cover, the plug must NOT be based until a replacement fuse cover can be obtained from
your nearest electrical dealer. The colour of the correct replacement fuse cover is that as marked on the base of the plug.
B) If your appliance is not fitted with a plug, please follow the instructions provided below:
WARNING - THIS APPLIANCE MUST BE EARTHED
IMPORTANT
The wires in the mains lead are coloured in accordance
with the following code:
E
Green and yellow:
Blue:
Brown:
Earth
Neutral
Live
L
N
As the colours of the wires in the mains lead may not
correspond with the coloured markings identifying the
terminals in your plug, proceed as follows:
The green and yellow wire must be connected to the
terminal in the plug marked with the letter E or the earth
symbol
or coloured green or green and yellow.
The blue wire must be connected to the terminal marked
with the letter N or coloured black.
The brown wire must be connected to the terminal
marked with the letter L or coloured red.
7
Installation
Place the appliance in the room that you wish to dehumidify.
It is essential to leave a space of at least 50 cm. around the appliance in order to ensure adequate ventilation.
The condensation can be discharged in one of two ways:
A) Discharge into the canister
The condensation generated by the dehumidifier can be discharged directly into the canister which is
located inside the appliance (fig. 1).
The canister is easy to extract when it needs to be emptied. It has an ergonomic form and is equipped
with a handle which makes it easy to carry and to empty.
Fig. 1
B) Continuous External Discharge
If you need to have the appliance working for a long period of time but are unable to empty the canister
repeatedly, it is possible to use the continuous discharge.
It is extremely easy to set the canister up for continuous discharge.
1) Remove the rubber stopper from the spout.
2) Make a hole on the inside of the canister spout using a drill with a fine bit. Fig. 2.
3) Attach the rubber hose to the spout.
4) There is a special pre-marked hole on the panel door of the appliance to allow the hose to pass through
(fig. 3). Before passing the hose through this hole, it is necessary to remove the central disk from the hole. Be
careful to make sure the hose does not have to go “uphill”, or the water will be left inside the canister.
N.B.
Keep hold of the rubber stopper: it can be used both for blocking the hose and for plugging the
spout if the canister is used for discharging in the future (see point A).
Fig. 2
Fig. 3
Canister Control System
This dehumidifier is equipped with a special intelligent device which checks that it is working properly.
A warning lamp placed on the control panel comes on to warn the user when:
1. the canister is full ➛ empty the canister
2. the canister is missing ➛ put the canister back into position
3. the canister is badly positioned ➛ position it correctly
4. you are using the continuous discharge and there is a blockage in the hose or the hose goes “uphill” ➛
remove the blockage.
Once the cause has been removed, the warning lamp goes off and the appliance starts working again.
8
Electrical connections
Before connecting the appliance to the power supply, check the following:
• The mains power supply must correspond to the power supply shown on the rating plate.
• The power socket and the electrical circuit must be adequate to supply the appliance.
• The power socket must match the plug. If not, have the plug replaced by qualified personnel.
• The power socket must be adequately earthed.
The manufacturer accepts no responsibility if these safety regulations are not complied with.
This appliance is manufactured in compliance with EEC directive EN 55014 relative to the suppression of
radio interference.
Description of the controls
Dehumidifying pilot light:
Indicates appliance in
dehumidifying function
Minimum speed/economy
heating pilot light:
Indicates appliance is operating
at minimum fan speed
Heating pilot light:
Maximum speed/maximum
heating pilot light:
Thermostat knob:
Indicates appliance in heating
function
Indicates appliance is operating at
maximum fan speed
For setting temperature to
levels 1 - 5
Heating
pushbutton:
Tank warning light:
Humidostat knob:
Switches heating
function on and off
Indicates the tank is full,
not in the correct
position or not fitted
Selects relative humidity
percentage from 1 to
continuous.
Dehumidifying pushbutton:
Switches dehumidifying function
on and off
Speed selection pushbutton:
Selects the ECON (economy heating) or
MAX (maximum heating) fan speed.
Dehumidifier operation
1)
2)
3)
4)
Plug the appliance into a mains socket.
Check that the tank warning light is off.
Set the humidostat to its “CONTINUOUS” position (continuous operation).
Press the dehumidifying pushbutton. (The dehumidifying pilot light will come on and the appliance will start
operating. If the heating pilot light is on, press the heating pushbutton to switch the function off).
5) Select the maximum or minimum fan speed (the relevant pilot light will come on to indicate which speed
has been selected).
When the humidity in the room has reached the level desired, slowly turn the humidostat knob counterclockwise until the dehumidifying pilot light goes out. Your dehumidifier will then automatically keep the
humidity in the room at the selected level.
When in its dehumidifying function the appliance not only dehumidifies but also heats the room slightly.
9
Heating operation
1) Plug the appliance into a mains socket.
2) Set the thermostat to position 5.
3) Press the heating pushbutton. (The heating pilot light will come on and the appliance will start operating.
If the dehumidifying pilot light is on, press the dehumidifying pushbutton to switch the function off).
4) Select the maximum (MAX. = 1,600 W) or economy (ECON. = 800 W) heating power (the relevant pilot light
will come on to indicate which power has been selected).
When the temperature in the room has reached the level desired, slowly turn the thermostat knob counterclockwise until the heating pilot light goes out. The thermostat will then automatically keep the temperature
in the room at the selected level.
Combi dryer operation (dehumidifying + heating)
1)
2)
3)
4)
5)
6)
7)
Plug the appliance into a mains socket.
Check that the tank warning light is off.
Turn the humidostat knob to its “CONTINUOUS” position.
Turn the thermostat knob to position 5.
Press the dehumidifying pushbutton (the dehumidifying pilot light will come on).
Press the heating pushbutton (the heating pilot light will come on).
Select the maximum or minimum fan speed and consequently the related heating power. The total
electrical power will thus be 1,990 W or 1.190 W. (The relevant pilot light will come on to indicate which
speed has been selected).
When the temperature or humidity in the room has reached the level desired, slowly turn the thermostat knob
and humidostat knob counter-clockwise until the dehumidifying or heating pilot light goes out.
How to get the most out of your combined dehumidifier
The dehumidifying and heating functions can operate individually or together as required.
When the desired relative humidity and temperature have been reached, the appliance switches off and will
later switch back on again as required.
This combined dehumidifier is thus an extremely versatile appliance which offers the following options:
DEHUMIDIFYING
HEATING
COMBI DRYER
Functions
Dry effect
- dehumidifying only min speed
Super dry effect
- dehumidifying only max speed
Hot effect
- heating only ECON power
Super hot effect
- heating only MAX power
Combi dryer effect
- dehumidifying + ECON power heating
Super combi dryer effect
- dehumidifying + MAX power heating
Rooms not lived in
such as cellars
HEATING
Set to from
(pink knob in position)
DEHUMIDIFYING
(green knob in position)
COMBI DRYER
(pink + green knob in position)
Rooms lived in
Laundries
1 to 5 as required
2
3
4
3
4
5
Note: the dehumidifier operates continuously when the dehumidifying knob is set to its CONTINUOUS position.
It is, however, always best to set knobs to maximum when switching the appliance on. Once the relative
humidity or temperature desired has been reached, turn the related control knob counter-clockwise until the
dehumidifying or heating pilot light goes out. This programs the appliance to automatically maintain the
temperature and humidity levels desired.
New setting positions will have to be found to obtain the same relative humidity desired if you change
functions, especially where the humidostat - a very sensitive instrument, is concerned.
10
Maintenance
Always remove the plug from the power socket before performing any cleaning or maintenance operations.
For safety, never use a jet of water to wash the appliance.
Cleaning the cabinet
• Clean the appliance using a damp cloth and dry using a dry cloth.
• Never use petrol, methylated spirits or solvents to clean the appliance.
• Never spray the appliance with insecticides or similar products. These may cause the paint to flake or the
pastic parts to become mis-shapen.
Cleaning the air filter
Air circulation is impeded and the efficiency of the dehumidifying and air purifying functions decreases when
the filter is dirty. It is therefore good practice to clean the filter at regular intervals. The precise intervals depend
on the room in which the appliance operates and on how frequently it is used. Appliances in constant/regular
use should have their filters cleaned once a week.
• The filter should be cleaned weekly.
• To remove the filter, open the tank access panel, remove the tank and
remove the filter by pulling downwards (fig. 4).
• Use a vacuum cleaner to remove the dust that builds up on the filter.
If the filter is very dirty, wash it in warm water and rinse several times.
The temperature of the water should not exceed 40°C.
After washing the filter, allow it to dry completely before replacing it in
the appliance.
If the appliance is not used for long periods
• Disconnect the plug from the power socket and empty the tank.
• Clean and replace the filter.
• Protect the appliance from dust by covering with a large plastic bag.
Fig. 4
Important
• This appliance is designed to dehumidify domestic living areas, and must not be used for other
purposes.
• The appliance must not be modified in any way, as any modifications may be extremely dangerous.
• If the appliance requires repair, always contact a Service Centre authorized by the manufacturer.
Always insist on original spare parts. Repairs carried out by non-qualified personnel may be
dangerous and render the warranty null and void.
• This appliance must be used by adults only. Do not allow children to play with the appliance.
• The appliance must be adequately earthed. Have your electrical circuit checked by a qualified
electrician.
• Do not use extension power cables.
• Always remove the plug from the socket before performing cleaning or maintenance operations.
• Do not move the appliance by pulling the power cable.
• Do not install the appliance in areas containing gas, oil or sulphur. Do not install the appliance near
sources of heat.
• After switching off the appliance, always wait at least three minutes before switching it on again.
• Do not place heavy or hot objects on the top of the appliance.
• Clean the air filter at least once weekly.
• The appliance must always remain upright or laid on one side during transportation. Remember to
drain the tank before transporting the appliance.
After transporting the appliance, wait at least one hour before using it.
11
Troubleshooting
Check the following before calling your local authorized Service Centre.
Problem
The appliance does not
operate in its dehumidifying
function (pilot light out)
Cause
• not plugged in
• no power
• humidostat set to minimum
• tank is full of water
• tank not in position
The appliance operates in its
dehumidifying function (pilot
light on) but does not reduce
the humidity
• filter clogged
• temperature or humidity in
room too low
• room too large
• too many sources of
humidity in room (boiling
pots etc.)
• the compressor is off
because the defrosting
device has been tripped
• the compressor is off
because the defrosting
device has been tripped
The appliance does not
operate in its heating function
(pilot light out)
• not plugged in
• no power
• thermostat set to minimum
The appliance operates in its
heating function (pilot light on)
but does not heat the room.
• room too large
• windows open
• thermal cutout protecting
electric heating element
tripped
12
Solution
• plug into socket
• check power supply
• set humidostat to position
desired
• empty tank
• position tank correctly
• clean the filter
• it is normal for the
appliance not to reduce the
humidity under certain
conditions (see section on
"specifications and
features")
• switch off the appliance,
wait 30 minutes and then
switch it back on again. Call
your local Service Centre if
the problem continues.
• the temperature in the room
is below 8°C.
• plug into socket
• check power supply
• set thermostat to position
desired
• close windows
• to reset for operation, switch
the appliance off for a few
minutes, eliminate the cause
of the overheating and then
switch the appliance back on
again
Printed on Recycled Paper
5748000400/10.98