1
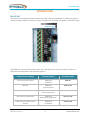
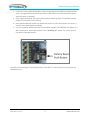
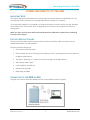
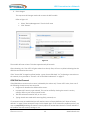
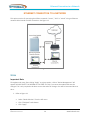
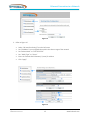
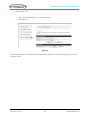
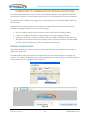
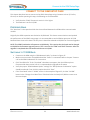
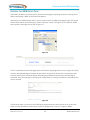
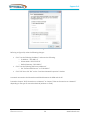
Commands GreenEye Monitor GEM Setup WiFi/Ethernet Combination For GEM model: GEM-WE Document Code: GEM-SET-WE Ver 3.4 2013-05-22 ©Copyright Brultech Research Inc. 2013 TABLE OF CONTENTS Introduction .......................................................................................................................... 3 Important ...................................................................................................................................................... 3 Mission .......................................................................................................................................................... 4 Steps.............................................................................................................................................................. 4 Requirement ................................................................................................................................................. 4 The Communication Module ........................................................................................................................ 4 Start-up Sequence......................................................................................................................................... 5 Communication Status LED ........................................................................................................................... 5 Reset to factory defaults........................................................................................................ 5 Connecting Directly to the GEM ............................................................................................. 7 Important Note ............................................................................................................................................. 7 Factory Default Values .................................................................................................................................. 7 Connecting to the GEM via WiFi ................................................................................................................... 7 Steps ..................................................................................................................................................... 8 Network Connection Options ....................................................................................................................... 8 WiFi Connection ................................................................................................................................... 8 Ethernet Connection ............................................................................................................................ 8 WiFi Connection to a Network ............................................................................................... 9 Connecting the GEM to a Network ............................................................................................................... 9 Steps............................................................................................................................................................ 10 Important Note .................................................................................................................................. 10 GEM Did Not Connect ........................................................................................................................ 13 Ethernet Connection to a Network ...................................................................................... 14 Steps............................................................................................................................................................ 14 Important Note .................................................................................................................................. 14 Connect a PC to the GEM via Network ................................................................................. 17 Discovering the GEM’s IP Address .............................................................................................................. 17 Discovery Using GEM Network Utility ................................................................................................ 17 Steps ................................................................................................................................................... 18 Connecting to Communication Module Setup Page .............................................................. 21 Opening the Setup Page ............................................................................................................................. 21 Connect to the GEM Setup Page .......................................................................................... 22 Preferred Baud ............................................................................................................................................ 22 Switching to 115200 Baud .......................................................................................................................... 22 Opening the GEM Setup Page ..................................................................................................................... 23 Upgrading GEM Firmware (Optional) ................................................................................... 24 Firmware ..................................................................................................................................................... 24 COM Firmware ................................................................................................................................... 24 ENG Firmware .................................................................................................................................... 24 Required Baud............................................................................................................................................. 24 Changing to 19200 Baud .................................................................................................................... 24 ENG Firmware Upgrade .............................................................................................................................. 25 COM Firmware Upgrade ............................................................................................................................. 26 © Brultech Research Inc. 1 www.brultech.com Recovery From Failed COM Firmware Upgrade ......................................................................................... 26 Recovery From Failed ENG Firmware Upgrade .......................................................................................... 27 Appendix A.......................................................................................................................... 28 GEM to PC Direct Ethernet Connection ...................................................................................................... 28 Set PC with Static IP Address ...................................................................................................................... 28 © Brultech Research Inc. 2 www.brultech.com Introduction INTRODUCTION IMPORTANT This manual is for GreenEye Monitors models with “WiFi / Ethernet Combination” module only (with or without an XBee module). The picture in Figure 1 displays the “WiFi/Ethernet Module” (outlined in blue). Figure 1 If the GEM has a communication option other than “WiFi/Ethernet Combo” then refer to Table 1 to determine the appropriate setup document required. Communication Option Document Name Document Code No communication module GEM Setup No Module GEM-SET WiFi Only GEM Setup WiFi Only Option GEM-SET-W Ethernet Only GEM Setup Ethernet Only Option GEM-SET-E WiFi / Ethernet Combination GEM Setup WiFi/Ethernet Combination GEM-SET-WE Indirect Communication via the DashBox GEM Setup Via DashBox GEM-SET-DB © Brultech Research Inc. 3 www.brultech.com Introduction Table 1 MISSION The objective of this document is to establish a connection between a PC and the GEM allowing the GEM firmware to be upgraded if needed and gaining access to the GEM Setup page. Tasks covered in this manual are listed below. Setting Communication Module to Factory Defaults. This provides a known IP address for initial connection Connecting a PC directly to the GEM for configuration purposes. Establish a direct connection between a PC and the GEM. This enables the user to enter local network information such as SSID, Password, etc., allowing the GEM to connect to a network Connecting the GEM to a Network. Once the GEM is connected to a local network, the PC can then connect to the same network Connecting to the GEM’s Setup Interface. The setup interface is browser based. Once a PC connects to the GEM via network, all GE settings may then be configured Upgrading the GEM’s Firmware. A guide is provided to perform firmware upgrades to the GEM STEPS A typical setup procedure would consist of the following order of steps, although some scenarios may differ. 1. Set communication module to factory default 2. Establish a WiFi connection between a PC and the GEM 3. Configure the ”SSID”, “Password”, etc. to create a WiFi connection between the GEM and a local network 4. Connect the PC to the same network and establish a TCP/IP connection to the GEM over the network 5. Upgrade the firmware if needed 6. Open the GEM Setup page with a browser Once the GEM Setup page has been opened, then refer to the “GEM Configuration Manual” (Document code: GEM-CFG) to proceed with setting up the GEM REQUIREMENT The “GEM Network Utility” version 4.2 or higher for Windows based PCs For “Mac” or “Linux” users, a “Java” application is available for firmware upgrades, however different instructions are required THE COMMUNICATION MODULE The WiFi/Ethernet module option for the GEM incorporates two methods of communication providing the choice of a WiFi or Ethernet connection. Both options are integrated on a single module. © Brultech Research Inc. 4 www.brultech.com Reset to factory defaults Typically, a connection to a local network is established allowing data to be sent to a local server or remote host via internet. START-UP SEQUENCE When the GEM is powered up, the “Communication Status LED” (see Figure 2 on page 5) will remain dark (off) for approximately 30 seconds. This is the time required for the communication module to boot up and create or join a network. Once the module is booted the LED will turn to amber. COMMUNICATION STATUS LED The communication status LED is a dual color “amber” and “green” type. When both LED are on, the resulting color is yellow. The three LED states are: Dark: The communication module is booting up. Amber: The communication module is active but there is no connection. Yellow (green +amber): The module is connected. Figure 2 The picture in Figure 3 shows the “Communication Status LED” which consists of an amber LED and a green LED together in the same package. The combined color is yellow when the amber LED and the green LED are both lit. Figure 3 RESET TO FACTORY DEFAULTS The communication module factory reset provides a means of setting the GEM to a known IP address and port. This allows a PC to connect to it in order to re-direct it to a local or remote network. Factory reset can only be done with the communication module fully booted up which occurs roughly 30 seconds after the GEM is powered. This is apparent when the “communication status LED” comes “on”. 1. Make sure the “Comm Status LED” is “on”! © Brultech Research Inc. 5 www.brultech.com Reset to factory defaults 2. Locate the ”Factory Reset Push Button” switch on the edge of the module (see Figure 4) then press it for approximately 6 seconds and release. (There will be no immediate LED response when the switch is released). 3. After roughly 10 seconds, the communication status LED will go dark. This indicates that the module is in the process of re-booting. 4. After approximately 30 seconds, the amber LED comes on. A few seconds after this occurs, a wireless access point becomes available. 5. Use a PC with WiFi capability and search for wireless networks. The GEM will now appear as a WiFi “Access Point” with a WiFi network name: “GreenEye_xx”, where “xx” are the two last characters of the MAC address. Figure 4 Proceed to the next chapter “Connecting Directly to the GEM” for instructions on connecting to the GEM with the PC. © Brultech Research Inc. 6 www.brultech.com Connecting Directly to the GEM CONNECTING DIRECTLY TO THE GEM IMPORTANT NOTE This chapter describes the procedure for creating a WiFi connection between the GEM and a PC. The main purpose of this connection is to configure the GEM to connect it to a network. If a PC with WiFi capability is not available, an Ethernet connection may be used for this step, although this method is a bit more tedious. Refer to Appendix A for instructions on using Ethernet for initial configuration. Make sure there is no Ethernet cable connected between the GEM and a network when conducting the steps in this chapter. FACTORY DEFAULT VALUES Once the communication module has been reset to its factory defaults, a WiFi connection may be established between a PC and the GEM. The factory default settings are: Set to Access Point (AP) mode DHCP enabled. The server will assign an IP address to the PC, providing the PC is set to obtain an IP address automatically The SSID is “GreenEye_xx”, where xx is the last two digits of the MAC address WiFi security mode “Open” Local IP address: 192.168.2.2 Network setup port 80 GEM setup port 8000 CONNECTING TO THE GEM VIA WIFI The goal is to create a connection between the PC and the GEM as shown in Figure 5. Figure 5 © Brultech Research Inc. 7 www.brultech.com Connecting Directly to the GEM Steps 1. Search for WiFi networks and click on “GreenEye_xx” to connect. 2. Open a browser and set the address to 192.168.2.2 and press “Enter”. A “Sign In” box should come up prompting for a “User” and “Password”. If so, then skip to step 4. 3. If the browser did not connect to IP address “192.168.2.2” in the previous step, the PC may not be set to “obtain an IP address automatically”. Modify the PC’s network settings to do so then repeat the steps in this section. If you don’t know how to change this network setting, then search “how to obtain an IP address automatically” on the internet for instructions for your operating system. 4. A “sign in” box will prompt for a user name and password. Use “admin” for both. A web page as displayed in Figure 6 will open. This is the interface used to setup the communication module to connect to the Network. Figure 6 NETWORK CONNECTION OPTIONS Two options are available to connect the GEM to a network, “WiFi” or “Ethernet”. WiFi Connection This option consists of connecting to the network wirelessly. This method is usually preferred as long as the GEM is within acceptable RF range of the WiFi Router it will be connected to. Ethernet Connection An Ethernet connection consists of connecting a network cable between the GEM and a network router or hub. This method is preferred when a WiFi connection is impractical due to signal range or if a dependable connection is desired. © Brultech Research Inc. 8 www.brultech.com WiFi Connection to a Network WIFI CONNECTION TO A NETWORK This chapter describes how to create a WiFi connection between the GEM and a local network. See Figure 7. CONNECTING THE GEM TO A NETWORK The GEM can connect to a WiFi router or access point. This requires changing the GEM’s communication module from its default access point mode (AP mode) to station mode (STA mode). As most WiFi networks are security enabled, the SSID security type and passphrase will be required for the network that we wish to connect to. Before starting the configuration, you should determine the following information with regards to the network you will be connecting to: The WiFi router’s SSID and Pass Phrase (WiFi password) The gateway IP address An available static IP address The IP address or domain name of the data host. Figure 7 © Brultech Research Inc. 9 www.brultech.com WiFi Connection to a Network STEPS Important Note Throughout each step, after clicking “Apply” to a given option, a link to “Device Management” will appear. DO NOT SELECT THIS OPTION AT THIS TIME. This link is used to restart the module and save the changes. This is only required to be done once at the end of all changes. You will be instructed when to do so. 1. Refer to Figure 8 Select “Mode Selection” from the left menu Click “STA Mode” radio button Click “Apply” Figure 8 2. Refer to Figure 9 Select “AP Interface Setting” from the left menu Set “IP Address” to “1.2.3.4” Set “Subnet Mask” to “255.255.255.0” Set “DHCP Type” to “Disable” Click “Apply” © Brultech Research Inc. 10 www.brultech.com WiFi Connection to a Network Figure 9 3. Refer to Figure 10 Select “STA Interface Setting” from the left menu Enter your network’s WiFi name (SSID) in the “AP’s SSID” box Set the “Security Mode” to match that of your wireless network Set the “Encryption Type” to match that of your wireless network Enter your WiFi network’s security “Pass Phrase” Click “Apply” Figure 10 4. OPTIONAL: You can assign a name to the GEM so that it is readily identifiable when viewing all of the network connected devices on a router’s setup page. This is done by entering this user assigned name in the “Hostname” box in Figure 10, then clicking “Apply”. © Brultech Research Inc. 11 www.brultech.com WiFi Connection to a Network 5. Optional steps to assign a static IP. This step is required ONLY if you wish to assign a static IP to the GEM. If a static IP is used, the following conditions must be met: The static IP must be on the same subnet as that of the network. For example, if the network’s router is “192.168.0.1” then the static IP must begin with “192.168.0.” and the last number must be between 2 and 254. The IP address assigned must not be used by another device on the network. This can be verified by accessing the router’s setup interface. Further explanation of static IP is beyond the scope of this document. Further information can be found using an internet search. Refer to Figure 11 Select “STA Interface Setting” from the left menu Click the “DHCP/STATIC” drop down box and select “STATIC (fixed IP)” Enter the IP address you wish to assign to the GEM Enter the subnet mask (typically “255.255.255.0”) Enter the IP address of your gateway (router) Click “Apply” Figure 11 © Brultech Research Inc. 12 www.brultech.com WiFi Connection to a Network 6. Save changes. This step saves all changes made and re-starts the WiFi module. Refer to Figure 12 Select “Device Management” from the left menu Click “Restart” Figure 12 The module will now re-boot. This takes approximately 30 seconds. After rebooting, the “Com LED” will glow amber then shortly after, will turn to yellow indicating that the GEM has connected to the router. If the “Comm LED” changed to yellow (amber + green Comm LEDs both “on”) indicating a connection to the network, then proceed to “Connect a PC to the GEM via Network” on page 17. GEM Did Not Connect If the GEM did not connect to the router, indicated by the amber only “Comm LED” active, then one of the following situations may have occurred: Range too far between the GEM and the router. Improper WiFi security type selected. This can be verified by viewing the router’s security settings. Refer to your router manual for this TKIP was selected instead of AES, or vice versa Typing mistake was made while entering SSID, password, etc. If a connection was not established you will need to return to factory defaults (see” Reset to factory defaults” on page 5) then attempt the step in this chapter again. If the connection problem persists, you may try temporarily disabling the router’s security option to narrow down the issue. This will indicate if the problem lies with security settings or not. © Brultech Research Inc. 13 www.brultech.com Ethernet Connection to a Network ETHERNET CONNECTION TO A NETWORK This option consists of connecting the GEM to a network “router”, “hub” or “switch” using an Ethernet network cable instead of a WiFi connection. See Figure 13. Figure 13 STEPS Important Note Throughout each step, after clicking “Apply” to a given option, a link to “Device Management” will appear. DO NOT SELECT THIS OPTION AT THIS TIME. This link is to restart the module and save the changes. This is only required to be done once at the end of all changes. You will be instructed when to do so. 1. Refer to Figure 14 Select “Mode Selection” from the left menu Click “STA Mode” radio button Click “Apply” © Brultech Research Inc. 14 www.brultech.com Ethernet Connection to a Network Figure 14 2. Refer to Figure 15 Select “AP Interface Setting” from the left menu Set “IP Address” to an assigned value within the subnet range of the network Set “Subnet Mask” to “255.255.255.0” Set “DHCP Type” to “Server” Enter the “Default DHCP Gateway” (router) IP address Click “Apply” Figure 15 © Brultech Research Inc. 15 www.brultech.com Ethernet Connection to a Network 3. Refer to Figure 16 Select “Device Management” from the left menu Click “Restart” Figure 16 The module will now re-boot which takes approximately 30 seconds. After rebooting, the “Com LED” will glow amber. © Brultech Research Inc. 16 www.brultech.com Connect a PC to the GEM via Network CONNECT A PC TO THE GEM VIA NETWORK Now that the GEM is connected to the local network, a PC may now connect to the same network and access the GEM to perform one or more of the following: Upgrade the GEM firmware (if required) Configure or modify the GEM settings Change the communication module’s settings DISCOVERING THE GEM’S IP ADDRESS If a “Static” IP address was assigned to the GEM, then this will be the GEM’s IP address and this section may be skipped. The simplest method of determining the GEM’s IP address on the network is to use the “GEM Network Utility” software (version 4.2 or higher). Other methods may be used such as: Accessing the router’s configuration page and reviewing all connected device IP addresses Using software utility such as “Netscan” (free downloadable) Discovery Using GEM Network Utility If you have not already downloaded and installed the “GEM Network Utility” software, do so now. This application is downloadable from http://brultech.com/software/ Figure 17 © Brultech Research Inc. 17 www.brultech.com Connect a PC to the GEM via Network Steps 1. Run the “GEM Network Utility” software (as administrator) and click the “WiFi / Ethernet” tab. See Figure 17 2. Click “Lookup IP”. This will discover the PC’s IP address as well as that of the gateway. See Figure 18 3. Make sure only port “8000” is selected and click “Search”. See Figure 18. After searching, the IP address will be discovered as shown in Figure 19 Figure 18 Figure 19 4. Highlight the IP address that was found then right click it. Select “Connect”. This will transfer the IP address and port to corresponding boxes and a connection will be established indicated by the “green” status box (Figure 20) © Brultech Research Inc. 18 www.brultech.com Connect a PC to the GEM via Network Figure 20 5. NOTE: the results of this next step may vary depending on the firmware version currently residing on the GEM. If the status box is still green, then click “Get GEM Info” button. If the box is no longer green, then click “Open” first and the status should change to “Connected” shortly after. See Figure 21 (newer firmware) and Figure 22 (older firmware) for the possible results. Figure 21 © Brultech Research Inc. 19 www.brultech.com Connect a PC to the GEM via Network Figure 22 A GEM with “COM” firmware version older than “ver 2.18” will only display partial information after clicking “Get GEM Info” as shown in Figure 22. Notice in this example that the older version is COM ver 1.81. It does not display hardware information and baud rate. Furthermore the displayed ENG firmware version is improper. This is normal and proper results will be obtained once the firmware is upgraded. If the firmware requires upgrading, refer to chapter “Upgrading GEM Firmware (Optional)” on page 24. © Brultech Research Inc. 20 www.brultech.com Connecting to Communication Module Setup Page CONNECTING TO COMMUNICATION MODULE SETUP PAGE This chapter describes how to connect to the communication module’s setup page once it has been connected to a network. This also assumes that the user’s PC is connected to the same local network. The communication module’s setup page can be accessed anytime, even while the GEM is reporting data to a host. When the GEM is already connected to a network it may be desired to access the communication module’s setup page to perform one of the following tasks: 1. Set the IP address and port of the remote host which will receive the GEM’s packets 2. Connect to a different network or make changes to the current network settings 3. Change the “baud rate” manually in situation where the GEM’s baud differs from that of the WiFi/Ethernet module and cannot automatically recover from the mismatch. (The latest GEM firmware version should recover from this situation automatically) OPENING THE SETUP PAGE If the GEM’s IP address is known, simply open the browser and enter the IP address in the browser’s address bar. (Figure 24) The GEM Network Utility has provisions to automatically open the communication setup page and browser. This is done by highlighting the IP address that was found, right clicking it, then selecting “Open Communication Setup”. See Figure 23 and Figure 24 Figure 23 Figure 24 © Brultech Research Inc. 21 www.brultech.com Connect to the GEM Setup Page CONNECT TO THE GEM SETUP PAGE This chapter describes how to connect to the GEM’s Setup Page using a browser such as IE, FireFox, Chrome, etc. Before pursuing this step, the following are recommended: 1. Verify that the “COM” firmware is version 2.22 or higher 2. The baud rate is set for 115,200 PREFERRED BAUD The “baud rate” is the speed at which data is transferred between the GEM and the communication module. Originally the GEM’s operation was limited to 19,200 baud. This slower communication rate impaired the performance of the GEM’s setup page. It is recommended to set the GEM to operate at 115,200 baud and leave it set to this baud. The only time it should be reduced to 19,200 is for firmware upgrades. NOTE: The GEM’s bootloader still operates at 19,200 only. This requires that the baud rate be changed to 19,200 for the firmware upgrade process. This is true for the “COM” and “ENG” firmware. After the upgrade is completed then the baud should be set to 115,200. SWITCHING TO 115200 BAUD Connect to the GEM using the “GEM Network Utility” as shown in Figure 25 Make sure a connection is established and the “Status” is connected. Refer to chapter “Connect a PC to the GEM via Network” for instructions Click “Get GEM Info”. If the “Port Baud” value does not appear, then the GEM may have firmware older than version 2.00. It is recommended to upgrade the firmware Verify the proper “GEM Hardware Option” setting! The “WiFi/Ethernet Combination” option should be selected. If not, click this option then click “Save” If the “Port Baud” value is “19200” such as in the example of Figure 25, click the “115200” button in the “Change Com1 Baud” box. If the baud value is already 115,200 then move on to the next chapter Figure 25 © Brultech Research Inc. 22 www.brultech.com Connect to the GEM Setup Page OPENING THE GEM SETUP PAGE If the GEM’s IP address is known, you can access the setup page by opening a browser, entering the IP address and adding “:8000” at the end of the address. Alternately, the “GEM Network Utility” may be used to access the GEM setup page by right-clicking the discovered IP address and selecting the “Open in Browser” option. See Figure 26. The browser should open up with a web page such as that of Figure 27. Figure 26 Figure 27 There is a possibility that the web page opens with a bunch of garbage such as seen in Figure 28. Simply close the opened web page and repeat the procedure. This generally occurs when accessing the web interface initially and is caused by packet data being transmitted at the same time the web page is requested. Once the web page is accessed and “Setup Mode” is entered, packet data is paused and this issue is resolved. Figure 28 If the browser does not connect to the GEM setup page whatsoever and a timeout error occurs then make sure that the GEM communication module is configured as a “Server” using port “8000”. © Brultech Research Inc. 23 www.brultech.com Upgrading GEM Firmware (Optional) UPGRADING GEM FIRMWARE (OPTIONAL) FIRMWARE The “firmware” is the software program that runs inside the GEM’s processor. The concept of upgrading firmware is like that of upgrading software on a PC. Typically when a company releases a new version of software, improvements have been made and new features added. The same applies to firmware. The GEM has two processors and therefore two firmware types: “COM” and “ENG”. The “COM” firmware is the principal operating system of the GEM and commonly upgraded. COM Firmware This firmware handles most of the GEM functions such as packet communication, all settings and system functions. Most upgrades will involve this firmware. ENG Firmware The engine (ENG) firmware does all of the energy processing for channels 1 to 32. This firmware rarely requires upgrading. It is strongly recommended to upgrade the GEM’s firmware if the “COM” firmware version is older (less) than ver 2.20. The ENG firmware should also be upgraded. REQUIRED BAUD The “baud rate” is the speed at which data is transferred between the GEM and the communication module. The GEM requires a baud rate of 19,200 for “COM” and “ENG” firmware upgrades. Older GEMs used this baud rate exclusively however newer firmware versions allow the GEM to be switched between 19,200 baud and 115,200 baud. The 19,200 baud rate is mandatory for firmware upgrades. Under normal operating conditions, it is advised to set the GEM for the faster 115,200 rate to greatly improve its performance. If clicking the “Get GEM Info” results in a response similar to that of Figure 22, then the baud rate is not detected and no baud rate change is required since this older version used 19,200 baud only. If the response resembles that of Figure 21, then the baud rate is selectable and in this case MUST be changed from 115,200 to 19,200 before proceeding with the firmware upgrade. Changing to 19200 Baud Figure 29 below shows the result of the “Get GEM Info” function of newer firmware. In this example the GEM is set for 115,200 baud and needs to be changed before proceeding with firmware upgrade. Click the “19200” button in the “Change Com1 Baud” section (Figure 29). The entire procedure will take approximately 32 seconds. © Brultech Research Inc. 24 www.brultech.com Upgrading GEM Firmware (Optional) Figure 29 ENG FIRMWARE UPGRADE 1. Download the most recent “ENG” firmware version from “Brultech.com/software” and save it on the PC 2. Establish a connection with the “GEM Network Utility” software 3. Click “Get GEM Info” 4. Determine if the baud rate needs to be changed. See “Required Baud” on page 24 5. Select the “ENG Firmware” button and make sure “Bootload Cmd” is checked 6. If the status is not currently “Connected” (box is green), then click “Open” to connect 7. Click the “Start” button in the firmware selection section. 8. Select the firmware file. The filename for the “ENG” firmware will be “GEM_E Firmware x.xx.fmw” where “x.xx” is the firmware version. Firmware upgrade will then begin. See Figure 30 © Brultech Research Inc. 25 www.brultech.com Upgrading GEM Firmware (Optional) Figure 30 COM FIRMWARE UPGRADE 1. Download the most recent “COM” firmware version from “Brultech.com/software” and save it on the PC 2. Establish a connection with the “GEM Network Utility” software 3. Click “Get GEM Info” 4. Select the “COM Firmware” button and make sure the “Bootload Cmd” box is checked. 5. If the status is not currently “Connected” (box is green), then click “Open” to connect 6. Click the “Start” button in the firmware selection section 7. Select the firmware file. The filename for the “COM” firmware will be “GEM_C Firmware x.xx.fmw” where “x.xx” is the firmware version. Firmware upgrade will then begin. See Figure 31 Figure 31 RECOVERY FROM FAILED COM FIRMWARE UPGRADE It is possible that communication is lost during the firmware upgrade procedure or something happens to prevent the firmware upgrade from completing. When this occurs, the GEM may become unresponsive to any command and inoperable. The method used to recover from a non-responsive state depends on which firmware upgrade failed. 1. Make sure that the communication module is set for 19200 baud. Open the communication module’s setup page and select “Application Setting” from the left menu. If the baud rate is not set to “19200” then select “19200” from the “Baudrate” menu. See Figure 32. © Brultech Research Inc. 26 www.brultech.com Upgrading GEM Firmware (Optional) Figure 32 If no change was required to the baud rate, proceed to the next step, otherwise select “Device Management” from the left menu then click “Restart”. 2. Unplug the 5VDC supply from the GEM. Press the recessed push button switch located at the very bottom of the GEM unit. While holding down the push button, apply power to the GEM. Once the GEM powers up, then release the button. The “System LED” should turn a solid red. If not, try again. If it fails to turn red a second time, the GEM’s battery will need removal and the above step repeated. 3. With the GEM’s “System LED” now glowing red, run the “GEM Network Utility” software and establish a connection. The connection will be obvious by a green “Status” box. 4. Select the “Firmware” tab of the “GEM Network Utility” and make sure the “Bootload Cmd” box is NOT checked. 5. Click “Start” and select the “COM” firmware which will look like this: “GEM_C Firmware x.xx.fmw”, where “x.xx” is the firmware version. The firmware upgrade process should now begin. RECOVERY FROM FAILED ENG FIRMWARE UPGRADE If the “ENG” firmware upgrade fails, recovery is simply a matter of briefly pressing the recessed push button at the very bottom of the GEM device. This should cause the “System LED” to change from yellow to green. Repeat the procedure for upgrading the “ENG” firmware described on section “ENG Firmware Upgrade”. © Brultech Research Inc. 27 www.brultech.com Appendix A APPENDIX A GEM TO PC DIRECT ETHERNET CONNECTION If a PC with WiFi is not available for setting up the GEM access to a network, it is possible to use a direct connection between a PC’s Ethernet jack and the GEM. This requires setting up a “Static IP Address” on the PC. SET PC WITH STATIC IP ADDRESS Open Network Connections by clicking the “Start” button then clicking Control Panel In the search box, type adapter, and then, under Network and Sharing Center, click “View Network Connections” Right-click the connection that you want to change, and then click “Properties”. If you're prompted for an administrator password or confirmation, type the password or provide confirmation Click the Networking tab. Under “This connection uses the following items”, click Internet Protocol Version 4 (TCP/IPv4) then click “Properties”. See Figure 33 Figure 33 © Brultech Research Inc. 28 www.brultech.com Appendix A Figure 34 Referring to Figure 34, make the following changes: Click “Use the following IP address” and enter the following: o IP Address: “192.168.2.1” o Subnet Mask: 255.255.255.0” o Default Gateway: “192.168.2.1” Click “Use the following DNS server addresses” o Set “Preferred DNS server” to “192.168.2.1” Click “OK” then click “OK” on the “Local Area Network Properties” window A network connection should now be established between the GEM and the PC. Proceed to chapter “WiFi Connection to a Network” or chapter “Ethernet Connection to a Network” depending on the type of connection desired (wireless or wired). © Brultech Research Inc. 29 www.brultech.com