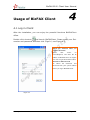
1
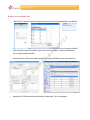
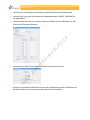
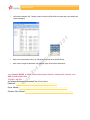
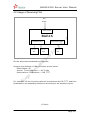
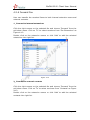
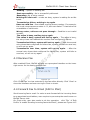
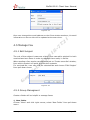
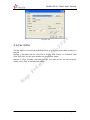
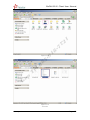
YEALINK BIZ-FAX BizFAX Business Standalone FAX Server BizFAX เปนอุปกรณเครื่อง FAX Server ที่มีฟง กชั่นการทํางานอัน หลากหลายและมีราคาที่ประหบัด ทําใหลดคาใชจา ย ลดการใชกระดาษ และเพิ่มประสิทธภาพในการทํางานในองคกรขึน ้ ไดเปนอยางดี โดย BizFAX ทุกรุน มีคุณสมบัติเดนเชน ลดคาใชจาย, ในการใชงาน Fax Server, ผูใ ชงานแฟกซไมจาํ เปนตองพิมพเอกสารกอนทีจ ่ ะสงงาน โดยระบบ BizFAX สามารถทีจ ่ ะสงเอกสารโดยตรงจากเครื่องคอมพิวเตอรทันที, อีกทั้งยังลดอุปกรณสน ิ้ เปลืองตางๆของ ระบบแฟกซมาตรฐาน และ ลดงานตางๆที่ตอ งทําลงได ลดเวลาการทํางาน, โดย BizFAX สามารถลดเวลาที่จะใชในการสงเอกสารลงในแตละครั้ง เพิ่มประสิทธภาพใน การทํางานในภาพรวมไดเปนอยางดี ความปลอดภัยของเอกสาร, โดยการสงเอกสารผานระบบ BizFAX ทําโดยผานระบบเครือขายทั้งหมดจึงลดความ เสี่ยงในกรณีทม ี่ ีเอกสารทีส ่ ําคัญที่ตองสงไปยังลูกคา ั ิการ (OS) ที่มค ี วามเสถียรสูง, อีก ความนาเชื่อถือ และ ความสะดวกในการรับสงเอกสาร, BizFAX ใชระบบปฏิบต ทั้งการทํางานบนระบบ electronic ทั้งระบบจึงลดปญหาที่เกิดกับเครื่อง Fax เชน กระดาษติด, กระดาษหมด, และปญหาตางๆ อีกทั้ง BizFAX ยังรองรับการสงและรับ Fax ผานทางระบบ Internet จึงทําใหสามารถที่จะสง และรับ เอกสารจากที่ไดก็ได โดยไมจําเปนทีจ ่ ะตองอยูท ี่ Office เพิ่มความรวดเร็วและความสะดวกสบายในการ ทํางาน BizFAX มีใหเลือกใชในองคกรทุกขนาดโดย เริ่มตนที่ 1 สายนอกไปจนถึง 30 สายนอก G ap T el .0 85 -9 18 -7 72 1 YEALINK BIZ-FAX ฟงกชั่นการทํางานโดยละเอียด ั้ ทํางานเปนเครื่อง “BizFAX Client” โดยการลง software บนเครื่องคอมพิวเตอรจะทําให เครืองคอมพิวเตอรนน -7 72 1 • มีชองตอแบบ FXS ทําใหสามารถที่จะตอเขากับเครื่อง FAX มาตรฐานเพื่อใชในการ scan เอกสารหรือทําการ G ap T el .0 • 85 -9 18 Fax ไดทันที (Virtual Fax Machine) โดย สามารถที่จะ รับแฟกซ สงแฟกซ หรือ ทําการ forward แฟกซไปยัง ผูใชงานอื่นๆทัว้ ในและนอกระบบไดทันที โดยหากมี fax สงมายัง extension, ระบบจะทําการเตือนโดยการ pop-up ขอมูลมาใหผูใชงานไดทันที พิมพ fax ออกไดโดยตรง • มีพอรทแบบ FXO ใชในการตอเขากับสายโทรศัพทได โดยมีรุนตงแต 1 ถึง 30 ชองสัญญาณ YEALINK BIZ-FAX รองรับการสง Fax แบบ Broadcast โดยสามารถที่จะสงแฟกซไปยังเบอรปลายทางเปนชุดพรอมกันได • รองรับการใสหนา cover page ได อีกทั้งยังรองรับการใสสญ ั ลักษณพิเศษเชน URGENT, CONFIDENTIAL หรือ สัญลักษณอื่นๆไ • รองรับระบบ IVR สําหรับการรับ fax จากสายนอกทําใหสามารถที่ใหผส ู ง fax สามารถเลือกที่จะสง fax ใหกับ ผูใชงานภายในไดในแตละคนโดยงายดาย • รองรับระบบ FAX to Email โดยทําการสงไฟลแฟกซไปยัง email ของแตละผูใ ชงานได • มีหนวยความจําภายในเครื่องขนาด500MB สามารถเก็บเอกสารแฟกซไดประมาณ15000 หนาอีกทั้งยังสามารถ ที่จะเพิ่มหนวยเก็บความจําภายนอกผานระบบเครือขายNet Disk โดยไมจํากัดอีกดวย G ap T el .0 85 -9 18 -7 72 1 • YEALINK BIZ-FAX รองรับการสง message (IM), โทรศัพท, email หากันระหวางผูใชงานในระบบ (make calls; send emails and instant messages) • Auto convert documents as doc, xls and pdf to fax format tiff by BizFAX Printer • Auto create a single fax document with multiple pages from multiple documents T el .0 85 -9 18 -7 72 1 • G ap ราคา Yeastar BizFAX รุน E100, พรอมพอรทสายนอก 1ชองและ พอรทสายใน 1 ชองตอ ราคา SRP พิเศษชวงเปดตัวเพียง 17,610 + vat 7% สําหรับขอมูลเพิ่มเติมสามารถ download ไดจาก link ดานลาง Datasheet: http://www.yeastar.com/download/BizFAX(E)Datasheet_en.pdf Server Manual: http://www.yeastar.com/download/BizFAXServerUserManual_E100_en.pdf Software Client Manual: http://www.yeastar.com/download/BizFAXClientUserManual_E100_en.pdf 1 85 -9 18 -7 72 E100 User Manual G ap T el .0 Version 1.0.0.1 Yeastar Technology Co., Ltd BizFAX-E100 Server User Manual 0 Table of Contents 1. Introduction ..........................................................................................4 1.1 Product Introduction ..........................................................................4 1.2 Functions..........................................................................................4 1.2 Hardware Specification .......................................................................6 1.2.1 Exterior Appearance .....................................................................6 1 1.3 Package Contents ..............................................................................8 72 2. System set up........................................................................................9 2.1 Connection Drawing ...........................................................................9 -7 2.2 Connecting Ethernet Line .................................................................. 10 2.3 Connecting Power ............................................................................ 10 18 3. Manage BizFAX .................................................................................... 11 3.1 Manager Log in................................................................................ 11 85 -9 3.2 Basic.............................................................................................. 12 3.2.1 Extension.................................................................................. 12 3.2.1.1 Physical Fax Machine Extension.......................................................... 12 3.2.1.2 Virtual FAX Extension ....................................................................... 13 .0 3.2.2 Trunks...................................................................................... 15 T el 3.2.3 Outbound Routes ....................................................................... 16 3.2.3.1 Create Outbound Route .................................................................... 17 3.2.3.2 Delete Outbuond Route..................................................................... 19 3.3 Inbound Call Control ........................................................................ 20 ap 3.3.1 IVR .......................................................................................... 20 3.3.1.1 Auto Attendant ................................................................................ 20 G 3.3.1.2 Delete IVR ...................................................................................... 22 3.3.2 Inbound Routes ......................................................................... 22 3.3.2.1 Create Inbound Route....................................................................... 23 3.3.2.2 Delete Routes.................................................................................. 24 3.3.3 Blacklist.................................................................................... 24 3.3.3.1 Create Blacklist................................................................................ 25 3.4 System Settings .............................................................................. 26 3.4.1 General Settings ........................................................................ 26 3.4.2 System Prompts ........................................................................ 27 3.4.3 E-Mail Settings .......................................................................... 27 3.4.4 Network Setting ......................................................................... 28 3.4.5 File Sweep ................................................................................ 29 3.4.6 Backup and Restore.................................................................... 29 www.yeastar.com Page 2 BizFAX-E100 Server User Manual 3.4.7 Firmware Update........................................................................ 30 3.4.8 Reset and Reboot....................................................................... 31 3.4.9 Password Settings ...................................................................... 32 3.5 Reports .......................................................................................... 33 3.5.1 FAX Logs .................................................................................. 33 3.5.2 System Infomation ..................................................................... 34 4. Use BizFAX .......................................................................................... 36 4.1 Usage of Sending FAX ...................................................................... 37 G ap T el .0 85 -9 18 -7 72 1 4.2 Usage of Receiving FAX .................................................................... 38 www.yeastar.com Page 3 BizFAX-E100 Server User Manual 1 Introduction You may skip section 1- Introduction and directly move to section 2- Before you Proceed. However, we recommend reading through the introduction to familiarize yourself with the features and functions of BizFAX and help improve its operation. Thank you for purchasing BizFAX! 18 -7 BizFAX — Paperless Fax Server 72 1 1.1 Product Introduction G ap T el .0 85 -9 BizFAX paperless fax system is an intelligent fax server that combines the traditional fax technology and network technology. After connected the PSTN telephone line and built up the connetion with the LAN or internet, by using the BizFAX Client software on their computers, users can easily to create a safe, efficient and affordable fax system for enterprise. Through BizFAX Client software or BizFAX Web Client, every user is able to get the auto-receive, auto-fax and management features. When sending a fax, users only need to submit file to BizFAX server, and then system will auto fax the files in order. Administrator has the authority to configure the system parameters and manage the users’ information. 1.2 Functions 1. Auto Receive & Send Fax To receive and send faxes automatically on computer that dispense with additional fax machine, BizFAX delivers a significant reduction in document delivery costs by eliminating the need for paper-based print, stand-alone fax machines and associated maintaenance, supply and labor costs. All the operations of traditional fax like print, dial, fax, re-dail when busy, postpone delivery or send in groups can be easily done within few seconds. 2.Electronic Signature www.yeastar.com Page 4 BizFAX-E100 Server User Manual BizFAX system help users to make their own signature and company stamp on a electronic document directly. All the signatures and stamps are safely protected and managed through high-end cryptography technology. 3.Remote Receive & Send Fax Users are allowed to check and send faxes remotely by using BizFAX Client software at any time any places as long as they can access into internet. 4. Intelligent Voice Operating System When receiving a fax, BizFAX will auto play the voice prompts. User can customize the voice files according to their own demands. -7 72 1 5. System Shareable Users will be glad to get rid of an uninteresting task that must run around in order to make a fax. They can send or receive a fax on any of the computers in LAN. Moreover, BizFAX will auto send a document to corresponding extension after received a fax. 85 -9 18 6. Multiple-Line Support If there is quantity of documents waiting to receive or send, system will find an idle line automatically and balance the load among lines. .0 7. Auto converting format BizFAX can auto convert documents in any format (word, excel, pdf, jpg and gif) to required TIFF format before sending out. ap T el 8. Listing of task All of the submitted fax tasks will form a fax queue automatically before sending out by BizFAX. G 9. Send Group Faxes Simple organize the different users to a group for sending faxes to they at the same time. All the success and failure fax information are recorded on history for reference. 10. Retry of failed fax We will try the best to ensure each fax can be sent successfully to the destination in time. When the other party is busy, unanswered or something else that result in the failure, system will auto resend fax. Here user can set the time (when) and number of retry times. 11. Auto Distributing BizFAX can auto distribute the received faxes to corresponding users by user’s extension number. If system is uncertain of the receiver, fax www.yeastar.com Page 5 BizFAX-E100 Server User Manual administrator will get the faxes and mange them together. 12. Internally Transferring It supports the free fax and document transfer internally among all virtual fax extension users. 13. FAX Notifier BizFAX will send a notifier to sender whether it successfully finishes the fax task or not. Either of the computers in LAN receives a fax, system auto will notify users in time to view and back up all the received and sent faxes. 72 1 14. Fax to E-mail When system is auto distributing the received faxes, and meanwhile it is sending faxes to a pre-set Email address once users enable the Fax to Email function. T el .0 85 -9 18 -7 15. Caller ID BizFAX support the international FSK CID format and recognize the fax source correctly for block spam faxes directly. ap 1.2 Hardware Specification 1) G 1.2.1 Exterior Appearance Front Side www.yeastar.com Page 6 ① ② ③ -7 72 1 BizFAX-E100 Server User Manual ④ ⑤ ⑥ ⑦ ⑧ T el .0 85 -9 Identifying Green Light: Indicates the power connection is normal. Green Light blink: Indicates the server system is in working. Green Light: Indicates the system is ready. Green Light blink: Indicates the internet interface in use Green Light: Indicates the PSTN lines connect successfully. Green Light blink: Indicates the PSTN line in use. Green Light: Indicates the port is work well. Green Light blink: Indicates the FAX machine in use. ap No. ① ② ③ ④ ⑤ ⑥ ⑦ ⑧ 18 Figure 1-1 BizFAX Front Panel Picture G 2) Back Side Figure 1-2 MyPBX Back Side Picture www.yeastar.com Page 7 BizFAX-E100 Server User Manual 1.3 Package Contents ▲ ▲ ▲ ▲ 1 unit of BizFAX server 1 power supply 1 Internet line Few telephone cables [RJ-11] G ap T el .0 85 -9 18 -7 72 1 Note: If any of the above items is damaged or missing, contact your reseller. www.yeastar.com Page 8 BizFAX-E100 Server User Manual 2 System set up 2.1 Connection Drawing 1 PSTN -7 18 Virtual FAX Extension G ap T el .0 FAX Machine LAN 85 -9 1 FXS Lines 72 1 FXO Lines www.yeastar.com Page 9 BizFAX-E100 Server User Manual 2.2 Connecting Ethernet Line BizFAX provides two 10/100M Ethernet ports with RJ45 interface and LED. Besides transporting voice, Ethernet port can also send information of managing, maintaining and operating. Plug Ethernet line into BizFAX’s Ethernet port, and then connect the other head of Ethernet line with hub, switch, router, LAN or WAN. Check the status of LED after connection, yellow light indicates port is in connecting process, green light indicates the port is in working. 1 2.3 Connecting Power 18 -7 72 BizFAX utilizes the high-performance switch power, which supply the enough voltage and electrical energy that required by BizFAX system. AC Input: 100~240V DC Output: 12V,1A 85 -9 Note: Prior to connect power, it’s better to use the three-phrase power outlet of neutral-point joint or multi-function computer power outlet. Please follow the below steps to connect power socket: G ap T el .0 1. Push the switch on ‘OFF’ on power outlet. 2. Connect one head of the accessory power cable with the power input port on BizFAX’s back panel, and plug the other head of power cable into 220V power socket. 3. Push the switch on ‘ON’ on power outlet. 4. After wired up power, please check the Power LED on front panel whether it lighted or not. Lighted LED indicates the correct operation of power; if unlighted, please repeat the step 1 to 3 again. www.yeastar.com Page 10 BizFAX-E100 Server User Manual 3 Manage BizFAX 3.1 Manager Log in Double click icon to open the IE browser, and input the IP address of 72 1 BizFAX server. If user is first time to configure BizFAX by web, please use the BizFAX default IP address to log in: http://192.168.5.150 G ap T el .0 85 -9 18 -7 The default Username is admin and password is password. Figure 3-1 www.yeastar.com Page 11 BizFAX-E100 Server User Manual 3.2 Basic 3.2.1 Extension Fax extension has two kinds: physical fax machine extension(FXS)and virtual Figure 3-2 G ap T el .0 85 -9 18 -7 72 1 fax extension. 3.2.1.1 Physical Fax Machine Extension Edit Physical Fax Machine Extension On the administration page of FXS extensions, click ‘Edit’ on the extension that you want to edit, and modify the following information on prompt window: 1) Authentication ·Extension The numbered extension, i.e. 1234, that will be associated with this particular User / Phone. 2) Profile ·Name A character-based name for this user, i.e. ‘Bob Jones’ www.yeastar.com Page 12 BizFAX-E100 Server User Manual 1 ·Group Extension’s Group. 72 Figure 3-3 T el .0 85 -9 18 -7 3.2.1.2 Virtual FAX Extension Virtual Fax Extension is an Account allows BizFAX Client or BizFAX web Client to Login. 1. Add Virtual FAX Extension Go to Extensions Virtual FAX Extensions Create New Extension 1) Authentication ·Extension The numbered extension, i.e. 1234, that will be associated with this particular User / Phone. ·Password The password for the BizFAX Client, Ex: ‘12t3f6’ G ap 2) Profile ·Name A character-based name for this user, i.e. ‘Bob Jones’ ·Group Extension’s Group. ·Mobile Phone User’s mobile phone number. ·Send FAX to E-mail This option defines whether or not FAX are sent to the Email Address as attachments. Note: You need to have an smtp server configured for this functionality. www.yeastar.com Page 13 1 BizFAX-E100 Server User Manual 72 Figure 3-4 G ap T el .0 85 -9 18 -7 2. Edit SIP Extension Click ‘Edit’ on SIP Extension administration page or click ‘Modify Selected Extensions’ to edit. www.yeastar.com Page 14 BizFAX-E100 Server User Manual T el .0 85 -9 18 -7 72 1 3.2.2 Trunks Figure 3-5 Edit PSTN Trunk(FXO Port) ap On PSTN Trunk administration page, click ‘Edit’ on selected trunk and modify information on prompt window: 1)General G ·Trunk Name A unique label to help you identify this trunk when listed in outbound rules, incoming rules etc. Ex: 'Port 5' ·Audio Setting Normally you should not have to adjust your analog ports beyond the initial calibration. Should you still need to fine tune your audio settings, please use the adjustments. 2)Advanced Options ·Busy Detection Busy Detection is used to detect far end hang up or for detecting busy signal. Enable to turn this feature on. ·Busy Count If Busy Detection is enabled, it is also possible to specify how many busy tones www.yeastar.com Page 15 BizFAX-E100 Server User Manual G ap T el .0 85 -9 18 -7 72 1 to wait for before hanging up. The default is 4, but better results can be achieved if set to 6 or even 8. Mind that the higher the number, the more time that will be needed to hangup a channel, but lowers the probability that you will get random hangups. ·Busy Pattern If Busy Detection is enabled, it is also possible to specify the cadence of your busy signal. In many countries, it is 500msec on, 500msec off. Without Busy Pattern specified, BizFAX will accept any regular sound-silence pattern that repeats <Busy Count> times as a busy signal. If you specify Busy Pattern, then BizFAX will further check the length of the sound (tone) and silence, which will further reduce the chance of a false positive. ·Caller ID Start This option allows one to define the start of a Caller ID signal: Ring, to start when a ring is received (Caller ID Signaling: Bell_USA, DTMF). Polarity, to start when a polarity reversal is started (Caller ID Signaling: V23_UK, V23_JP, DTMF). Before Ring, to start before a ring is received (Caller ID Signaling: DTMF). ·Caller ID Signaling This option defines the type of Caller ID signaling to use: bell (bell202 as used in the United States), v23_UK (as used in the UK), v23_JP (as used in Japan), or dtmf (as used in Denmark, Sweden, and Holland). Figure 3-6 3.2.3 Outbound Routes Outbound routing mainly works for guides outgoing calls to go through trunks. www.yeastar.com Page 16 85 -9 18 -7 72 1 BizFAX-E100 Server User Manual .0 Figure 3-7 T el 3.2.3.1 Create Outbound Route Click ‘New Outbound Route’ and fill in the responding information on prompt window. 1)General G ap ·Route Name Name of this Outbound Route. Ex: 'Local' or 'LongDistance' etc. ·Dial Pattern In dial patterns, some characters have special meanings: X ... Any Digit from 0-9 Z ... Any Digit from 1-9 N ... Any Digit from 2-9 [12345-9] ... Any Digit in the brackets (in this example, 1,2,3,4,5,6,7,8,9) . ... Wildcard, Matches Anything Remaining; i.e. 9011. Matches anything starting with 9011 (excluding 9011 itself) ! ... Wildcard, causes the matching process to complete as soon as it can unambiguously determine that no other matches are possible. For example, NXXXXXX would match normal 7 digit dialings, while 1NXXNXXXXX would represent a three digit area code plus phone number, www.yeastar.com Page 17 BizFAX-E100 Server User Manual proceeded by a one. G ap T el .0 85 -9 18 -7 72 1 ·Strip Allows the user to specify the number of digits that will be stripped from the front of the dialing string before the call is placed via the trunk selected in ‘Use Trunk’ One might; for example, want users to dial 9 before their long distance calls; however one does not dial 9 before those calls are placed onto analog lines and the PSTN, so one should strip 1 digit from the front before the call is placed. ·Prepend digits before dialing Allows the user to specify digits that are prepend before the call is placed via the trunk. If a user's trunk required 10 digit dialing, but users were more comfortable performing 7 digit dialing, this field could be used to prepend a 3 digit area code to all 7 digit strings before they are placed to the trunk. User may also prepend a 'w' character for analog trunks to provide a slight delay before dialing ·Calls From Extensions Defines the Extension that calls, matching the specified pattern, will be placed through. ·Make Outbound Calls on Trunk Defines the Trunk that calls, matching the specified pattern, will be placed through. www.yeastar.com Page 18 Figure 3-8 T el .0 85 -9 18 -7 72 1 BizFAX-E100 Server User Manual G ap 3.2.3.2 Delete Outbuond Route Click ‘Delete’ on selected trunk to remove the trunk. www.yeastar.com Page 19 BizFAX-E100 Server User Manual 3.3 Inbound Call Control 3.3.1 IVR G ap T el .0 85 -9 18 -7 72 1 When there’s an incoming call aims at Auto Attendant, BizFAX will play the IVR and guide the caller to the required extensions (such as ‘Welcome to XX company, for sales press 1, for technical support press 2, for operation press 0, or dial ext. number directly. System will transfer the call to corresponding extension according to DTMF). Figure 3-9 3.3.1.1 Auto Attendant Click ‘Create New IVR’ as shown on Figure 3-10. 1)General ·Number My PBX treats IVR as an extension; you can dial this number access the IVR. ·Name A name for the IVR ·Prompt A Prompt file for the IVR. www.yeastar.com Page 20 BizFAX-E100 Server User Manual ·Custom IVR Prompt If you want to use your prompts, please click this link, and upload the sound file. ·Play Times The times of the selected IVR prompt file will be played. ·WaitExten Wait for the user to enter a new extension for a specified number of seconds. ·Allow Dialing Other Extensions Check this option if the user want to dial extensions directly. 2)Key Press Events G ap T el .0 85 -9 18 -7 72 1 Allow key press events will cause the system to listen for DTMF input from the caller and define the actions that occur when a user presses the corresponding digit. ·Time Out Defines the timeout action. Timeout occurs when no DTMF entry is detected for 3 times after the IVR has finished playing its prompts. ·Invalid Defines the invalid action. The invalid action is triggered if the user enters a DTMF that is not otherwise defined for the IVR. ·Detect FAX Tone The detect fax tone action is triggered if it receive the fax tone and user not input the extension number. www.yeastar.com Page 21 G ap T el .0 85 -9 18 -7 72 1 BizFAX-E100 Server User Manual Figure 3-10 3.3.1.2 Delete IVR Select the item you’d like to remove and click ‘Delete’ key. 3.3.2 Inbound Routes Inbound routing mainly works for guides incoming calls to reach destination extension within the working hours. www.yeastar.com Page 22 85 -9 18 -7 72 1 BizFAX-E100 Server User Manual Figure 3-11 T el .0 3.3.2.1 Create Inbound Route Click ‘New Inbound Route’ to enter to the page. 1)General G ap ·Route Name Name of this Inbound Route. Ex: 'pstncallin' etc. ·Pattern Define the Caller ID Number to be matched on incoming calls. Leave this field blank to match any or no CID info. In patterns, some characters have special meanings: X ... Any Digit from 0-9 Z ... Any Digit from 1-9 N ... Any Digit from 2-9 [12345-9] ... Any Digit in the brackets (in this example, 1,2,3,4,5,6,7,8,9) . ... Wildcard, Matches Anything Remaining; i.e. 9011. Matches anything starting with 9011 (excluding 9011 itself) ! ... Wildcard, causes the matching process to complete as soon as it can unambiguously determine that no other matches are possible. For example, NXXXXXX would match normal 7 digit dialings, while 1NXXNXXXXX would represent a three digit area code plus phone number, proceeded by a one. www.yeastar.com Page 23 BizFAX-E100 Server User Manual 2)Trunk Sequence This selection shows all Trunks. Checking Trunk here makes them a member of the Inbound Route. 3)Destination G ap T el .0 85 -9 18 -7 72 1 You can choose the options for receive the incoming fax. Figure 3-12 3.3.2.2 Delete Routes Select the item you’d like to remove and click ‘Delete’ key. 3.3.3 Blacklist Blacklist is an easy to use function which used to block an incoming call; it will refuse any incoming call which you don’t want to answer. www.yeastar.com Page 24 BizFAX-E100 Server User Manual T el .0 85 -9 18 -7 72 1 If the incoming call number in the blacklist, system will prompt “The number you have dialed is not in service. Please check the number and try again”, and then system hang up the call. Figure 3-13 G ap 3.3.3.1 Create Blacklist Click ‘New Blacklist’ to enter to the page. Figure 3-14 ·Blacklist number Enter the number you want to block. www.yeastar.com Page 25 BizFAX-E100 Server User Manual 3.4 System Settings 3.4.1 General Settings 1) FAX Settings ·The fax left page header:this value will be showed on the fax left page 1 header when sending out. ·The fax right page header:this value will be showed on the fax right page header when sending out. ·The retry times for failed faxes: When system failed to send fax, it will try X times as configured. ·The retry times if called is busy: The callee is busy when system send fax, it will try X times as configured. 18 -7 72 2) Prompt callee send FAX signal ·Prompt callee send FAX signal Sometimes customers use the Two-in-One machine that sends fax and receives telephone call by the same equipment. When you want to send fax to those customers, please remind them to send a fax single. 85 -9 .Prompt The prompt tone asks for a fax signal from callee. .0 ·Play times The times of the selected prompt file will be played. T el ·WaitExten Wait for the user to enter a new extension for a specified number of seconds. G ap 3) Date & Time Set the date and time for BizFAX Appliance. www.yeastar.com Page 26 T el .0 85 -9 18 -7 72 1 BizFAX-E100 Server User Manual Figure 3-15 3.4.2 System Prompts G ap Admin can upload prompt as follow: 1) Click ‘Upload a system Prompt’. 2) Click ‘Browse’ to choose the file to upload. 3) Click ‘Upload’ to upload the selected Prompt. Note: The sound file format: GSM 6.10, 8.000kHz, Mono, 1kb/sec Figure 3-16 3.4.3 E-Mail Settings www.yeastar.com Page 27 BizFAX-E100 Server User Manual ·E-mail Address The E-mail Address that BizFAX will use to send voicemail to users’ email. ·Password The E-mail password. ·SMTP Server The IP address or hostname of an SMTP server that the BizFAX may connect to, in order to send e-mail notifications of your voicemails; i.e. mail.yourcompany.com 1 ·Port The SMTP Port -7 72 ·Use SSL/TLS to send secure message to server This functions, must be selected for gmail and exchange server. 18 3.4.4 Network Setting 85 -9 ·DHCP If this option is set, BizFAX will use DHCP to get an available IP address from your local network. .0 ·Hostname Set the host name for BizFAX Appliance. T el ·IP Address Set the IP Address for BizFAX Appliance. G ap ·Subnet Mask Set the Subnet Mask for BizFAX Appliance. ·Gateway Set the Gateway for BizFAX Appliance. ·Primary DNS Set the primary DNS for BizFAX Appliance. ·Secondary DNS Set the secondary DNS for BizFAX Appliance. www.yeastar.com Page 28 85 -9 18 -7 72 1 BizFAX-E100 Server User Manual 3.4.5 File Sweep .0 Figure 3-17 G ap T el ·File Sweep when available space is less than: The default value is 30M. ·Delete If the space less than the setting value, it will delete 50 faxs (50 is the default value). 3.4.6 Backup and Restore Backup / Restore BizFAX’s Configuration. www.yeastar.com Page 29 85 -9 18 -7 72 1 BizFAX-E100 Server User Manual .0 Figure 3-18 T el 3.4.7 Firmware Update G ap With new version, we can upgrade the firmware in GUI through a TFTP Server or HTTP URL. Enter your TFTP Server ip address and firmware name, just click ‘start’, you will update your firmware easily. www.yeastar.com Page 30 85 -9 18 -7 72 1 BizFAX-E100 Server User Manual .0 Figure 3-19 T el 3.4.8 Reset and Reboot ap ·Reboot Appliance Warning: Rebooting the appliance will terminate all active calls. G ·Reset to Factory Defaults Warning: By resetting your System to factory defaults, you will lose all your configurations! You can't cut off the electricity during restarting till the RUN state light blink, otherwise it will cause the failure performance. www.yeastar.com Page 31 85 -9 18 -7 72 1 BizFAX-E100 Server User Manual .0 Figure 3-20 T el 3.4.9 Password Settings G ap The default password is ‘password’, we need change that first. Enter new password and click update, then the system will prompt you re-login using your new password. www.yeastar.com Page 32 85 -9 18 -7 72 1 BizFAX-E100 Server User Manual T el 3.5 Reports .0 Figure 3-21 3.5.1 FAX Logs G ap FAX Log captures all fax details: Date, caller number, callee number, Subject, type, Status and so on. For administrator’s convenience, admin can search information by time, type, subject and Status, and export them into CSV file. www.yeastar.com Page 33 85 -9 18 -7 72 1 BizFAX-E100 Server User Manual Figure 3-22 .0 3.5.2 System Infomation T el State: Information about Server State and FAX State. G ap Version: Information about Hardware version, Firmware version. Network: Information about Hostname, MAC, IP Address, Mask, Gateway and DNS. Disk Usage: Disk usage information. www.yeastar.com Page 34 Figure 3-23 G ap T el .0 85 -9 18 -7 72 1 BizFAX-E100 Server User Manual www.yeastar.com Page 35 BizFAX-E100 Server User Manual 4 Use BizFAX Make two examples for the below typical applications: Usage of sending fax Usage of receiving fax -7 72 1 For example, BizFAX has virtual fax Extensions 501 and 502 and physical fax Extensions 601; PSTN Trunk OutPSTN1. Out 85 -9 18 PSTN 1 .0 PSTN Trunk T el BizFAX ap Virtual Fax Ext Physical Fax Ext. Ext. No. Ext. No. 501 502 601 G Ext. No. www.yeastar.com Page 36 BizFAX-E100 Server User Manual 4.1 Usage of Sending Fax Out PSTN Trunk Access Code“9” PSTN1 Port PSTN Trunk 1 BizFAX Physical Fax Ext. Ext. No. 501 502 Ext. No. 601 85 -9 18 Ext. No. -7 72 Virtual Fax Ext ap T el .0 On the above demonstrated environment: Suppose the settings of outbound routes are as below: Route Name:9 Apply this rule to: fax from extension(s)——All Extensions Make outbound calls on: Trunk Sequence—— All PSTN trunks Other: Deleted Prefix Count——1 G Send fax through physical fax machine If the extension 501 wants to send a fax to 0123-1234123, he can dial: 9+0123-1234123 www.yeastar.com Page 37 BizFAX-E100 Server User Manual 4.2 Usage of Receiving FAX Out PSTN1 PSTN Trunk 1 BizFAX 502 -7 501 Ext. No. 18 Ext. No. 601 85 -9 Ext. No. Physical Fax Ext. 72 Virtual Fax Ext .0 On the above demonstrated environment: G ap T el Suppose the settings of inbound routes are as below: Route Name: All Source: Trunk Sequence——All Trunks Route calls to: Destination——IVR 7777 For example: All the incoming calls will be answered by IVR 7777 and then forwarded to corresponding extension according to the transferring list. <Finish> www.yeastar.com Page 38 1 72 E100 G ap T el .0 85 -9 18 -7 Client User Manual (English) Yeastar Technology Co., Ltd. BizFAX-E100 Client User Manual 0 Table of Contacts G ap T el .0 85 -9 18 -7 72 1 1. Introduction····················································································· 4 2. Operating Environment ····································································· 5 2.1 Hardware Environment······························································· 5 2.2 Software Environment································································ 5 3. Install BizFAX Client·········································································· 6 4. Usage of BizFAX Client ·····································································11 4.1 Log in Client ············································································11 4.2 Send FAX ················································································12 4.2.1 Sending fax from application programs ·······························12 4.2.2 Sending fax from Client software········································14 4.2.3 Description of ‘Create a New Fax’ Menu ·······························15 4.2.3.1 Receiver (Fax number) ·············································15 4.2.3.2 FAX Subject ····························································16 4.2.3.3 Fax Content ····························································16 4.2.4 Delay to Send FAX····························································16 4.2.5 FAX Broadcast ·································································17 4.2.6 Forward Fax ····································································19 4.2.7 Reply FAX ·······································································20 4.2.8 Check Results ··································································20 4.3 Receive Fax ·············································································21 4.4 Forward Fax to Email (FAX to Mail) ·············································21 4.5 Manage Fax·············································································22 4.5.1 Edit Subject ····································································22 4.5.2 Group Managment····························································22 4.5.3 Delete Fax·······································································23 4.5.4 Print Fax ·········································································23 4.6 Fax Editor ···············································································24 4.6.1 Veiw FAX ········································································25 4.6.2 Remark FAX ····································································25 4.6.3 Seal & Signature ······························································27 4.6.3.1 Get seal and signature··············································27 4.6.3.2 Set Stamp Image·····················································29 4.6.3.3 Set Password ··························································29 4.6.3.4 Application of Stamp ················································30 4.7 Fax Extension Management ·······················································31 4.8 Contacts Management·······························································32 4.8.1 Contacts Group Management ·············································32 4.8.2 Add New Contact ·····························································33 www.yeastar.com Page 2 BizFAX-E100 Client User Manual G ap T el .0 85 -9 18 -7 72 1 4.8.3 Edit & Delete Contact························································34 4.8.4 Send Contact···································································34 4.8.5 Import Contact ································································35 4.9 Internal Communications among extensions·································37 4.9.1 Voice Talk ·······································································37 4.9.2 Text Chat ········································································37 4.10 Personal Profile ······································································38 4.11 Change Password ···································································39 4.12 Change Language ···································································39 4.13 Audio Settings········································································39 4.14 Sign out & Exit ·······································································40 Appendix A How to make fax file in TIFF format? ·····································41 www.yeastar.com Page 3 BizFAX-E100 Client User Manual 1 Introduction G ap T el .0 85 -9 18 -7 72 1 BizFAX paperless fax system is an intelligent fax server that combines the traditional fax technology and network technology. After connected the PSTN telephone line and built up the connetion with the LAN or internet, by using the BizFAX Client software on their computers, users can easily to create a safe, efficient and affordable fax system for enterprise. Moreover, all of these are electronic processing on computer without a piece of paper. Through BizFAX Client software, every user is able to get the auto-receive, auto-fax and management features. When sending a fax, users only need to submit file to BizFAX server, and then system will auto fax the files in order. Back up the faxes automatically and allow users to easily manage them. It’s helpful to improve the progress of company internal approval, add personal signature, make company seal, and Mail to FAX and FAX to Mail. The advanced integration of BizFAX with internet, email and SMS help users to send and receive faxes at any time any where. www.yeastar.com Page 4 BizFAX-E100 Client User Manual 2 Operating Environment 2.1 Hardware Environment 1 CPU:Recommend to use more a CPU that power than INTELPIII500 Memory:Recommend to use more than 128MB RAM Hard Disk:At least 1 G -7 72 2.2 Software Environment Operating system:Windows XP, Windows 2000, Windows 2003, Windows Vista, G ap T el .0 85 -9 18 Widows 2008, Windows 7. www.yeastar.com Page 5 BizFAX-E100 Client User Manual 3 Install BizFAX Client G ap T el .0 85 -9 18 -7 72 1 This section shows how to install BizFAX Client software on the PC. 1. Download Client software from http://www.yeastar.com/download/BizFAXClientSetup.exe 2. Doube-click the ‘BizFAXClientSetup.exe’, Welcome to the BizFAXClient Installation screen will come up. Figure 3-1 3. Click Next to continue. www.yeastar.com Page 6 18 -7 72 1 BizFAX-E100 Client User Manual 85 -9 Figure 3-2 G ap T el .0 4. Read through the software License Agreement, select ‘I agree with the above terms and conditions’, and then click Next to continue. See Figure3-3. Figure 3-3 www.yeastar.com Page 7 BizFAX-E100 Client User Manual 18 -7 72 1 5. Click ‘Next’ after going over the provisions 85 -9 Figure 3-4 G ap T el .0 6. The Destination folder screen will offer you the option where you would like BizFAXClient to be stored on your computer. Click Next to continue. Figure 3-5 www.yeastar.com Page 8 BizFAX-E100 Client User Manual 7. A screen pop-up to notify you that: (1)Launch BizFAXClient after installation. (2)Create desktop shortcut; (3)Start BizFAXClient when I start Windows .0 85 -9 18 -7 72 1 Enable the options by your own demands, and then click Next. Figure 3-6 G ap last for a while. T el 8. Enter into the Installing Files,system begin to installation step, which will www.yeastar.com Page 9 18 -7 72 1 BizFAX-E100 Client User Manual Figure 3-7 G ap T el .0 85 -9 9. When the installation is complete, a screen pop-up to notify you that the software is installed successfully. Click Finish. Figure 3-8 www.yeastar.com Page 10 BizFAX-E100 Client User Manual 4 Usage of BizFAX Client 4.1 Log in Client After the installation, you can enjoy the powerful functions BizFAXClient offers. -7 72 1 and launch BizFAXClient. Please enter your Ext. Double-click shortcut number and password and then click ‘Sign In’, see Figure 4-1. G ap T el .0 85 -9 18 Please pay attention when you login at first time: Please click ‘Tools’ on menuOptions, and enter the IP address of BizFAX Server on Figure 4-2. You can get this IP from Admin. About Ext. and Password To obtain the Extension and Password from your system Admin before you log in BizFAXClient. Figue 4-1 www.yeastar.com Page 11 72 1 BizFAX-E100 Client User Manual 18 -7 Figure 4-2 85 -9 4.2 Send FAX After installed the BizFAXClient software, system will create a virtual fax .0 printer that named as ‘BizFAX ’ in printer folder in the control panel. T el 4.2.1 Sending fax from application programs G ap Application programs adopt the ‘Virtual Print’ way to realize the fax function. All the programs are able to send fax by BizFAX Fax Printer as long as they support print function. Open any type of document that supports print, select ‘Print’ and see a prompt dialog box as Figure 4-3: www.yeastar.com Page 12 -7 72 1 BizFAX-E100 Client User Manual Figure 4-3 G ap T el .0 85 -9 18 Select ‘BizFAX’ on printer list and click ‘OK’. System will generate a ‘Create new fax’ window and the file would be printed as TIFF to add into task list. Figure 4-4 www.yeastar.com Page 13 BizFAX-E100 Client User Manual 4.2.2 Sending fax from Client software (1) Enter into FAX tag, click ‘Create’ to create a new fax. (2) Click ‘add file’ to select the file you want to fax from computer. Note: Only the file in *.bmp、*.dib、*.jpg、*.jpeg、*.png、*.doc、*.docx、*.xls、 *.xlsx、*.pdf、*.tif、*.tiff、*.txt or *.rtf format can be added in this way. The Figure 4-5 G ap T el .0 85 -9 18 -7 72 1 files in other formats could be opened by the application programs and sent out through ‘Prinit’. Merge multiple files to fax once If user wants to fax multiple files at the same time, he can click the ‘Add file’ button again to add other files into task list, or he can use the application programs to open the files at first and choose ‘Print’to send them into fax list. Beside the adding option, user is also able to delete the unnecessary files from list after clicked ‘Delete File’button. www.yeastar.com Page 14 18 -7 72 1 BizFAX-E100 Client User Manual 85 -9 Figure 4-6 .0 4.2.3 Description of ‘Create a New Fax’ Menu G ap T el 4.2.3.1 Receiver (Fax number) There are two ways to enter receiver (fax number): 1. Enter the numbers directly as Figure 4-7 The right way of entering fax number: for example here a company in Xiamen city of China, city area code is 0592 and country code is 0086 : (1)local fax number in this company:5503307 (2)doemstic long distance fax number:05925503307 (3)international long distance fax number: 00865925503307 Note: 9+5503307 or 0+5503307 When an ext. user sends a fax, he needs to plus a prefix number 0 or 9 that usually required by the PBX phone system before dialing the receiver’s fax number. Figure 4-7 2. Click on ‘Receiver’ and select contacts from address book. www.yeastar.com Page 15 18 Figure 4-8 -7 72 1 BizFAX-E100 Client User Manual 85 -9 Select contacts’ fax number and click ‘Add’, it shows the selected number on right box, click ‘OK’ to finish. T el 4.2.3.3 Fax Content .0 4.2.3.2 FAX Subject Mark the faxes for easy manageable and searchable. ap Fax File List 1)Add Fax:Select one or multiple files from computer to fax out once 2)Delete Fax: Delete file(s) from fax file list G Preview: User is able to view and check the selected fax file through ‘Preview’. Edite: User is able to add signature or make notes on selected file. Click ‘Edit Fax’ to amend contents, seal and add signature directly. 4.2.4 Delay to Send FAX BizFAX is able to send fax in specific time that set up by users. User can set up an idle time or the most cheapest call rate period to delivery fax and this function is specially useful to send the international fax because of the time difference. www.yeastar.com Page 16 18 Figure 4-9 -7 72 1 BizFAX-E100 Client User Manual 85 -9 4.2.5 FAX Broadcast G ap T el .0 System allows user to fax a same file to different numbers at the same time, which means fax broadcast. There are two ways to get fax broadcast service: 1.Enter fax numbers directly and separate them by semi-colon. See Figure 4-10 www.yeastar.com Page 17 18 -7 72 1 BizFAX-E100 Client User Manual Figure 4-10 G ap T el .0 85 -9 2.Click ‘Receiver’ and select multiple contacts from address book to add into right box as Figure 4-11. Figure 4-11 www.yeastar.com Page 18 BizFAX-E100 Client User Manual 4.2.6 Forward Fax User can transfer the received faxes to both internal extension users and external contacts. 1.Forward to internal extensions Figure 4-12 G ap T el .0 85 -9 18 -7 72 1 Click the right mouse on the selected fax and choose ‘Forward’ from the pull-down menu. Click on ‘To’ to select receivers from ‘Fax Extensions’ as Figure 4-12. Double click on the extension names or click ‘Add’ to add the selected extensions into right list. 2.Forward to external contacts Click the right mouse on the selected fax and choose ‘Forward’ from the pull-down menu. Click on ‘To’ to select receivers from ‘Contacts’ as Figure 4-13. Double click on the extension names or click ‘Add’ to add the selected contacts into right list. www.yeastar.com Page 19 18 Figure 4-13 -7 72 1 BizFAX-E100 Client User Manual 85 -9 4.2.7 Reply FAX T el .0 User can reply to the sender directly for the received fax. Click on the right mouse on the selected fax, choose ‘Reply’ on pull-down menu, system will pop up a window where user can edit the fax for remark, seal and signature. After the above edition, user can reply the modified fax file to sender. ap 4.2.8 Check Results G Once sent out from Client, the fax task sumbmitted to Server side. If the fax file is waiting in line for processing or is sending fax, the file will be saved in the ‘Outbox’. If fax sent successfully, the file file will forward to the ‘Sent Items’. User can check the recipients, subject, created time and status in this window. If user fails to send, the fax file will be saved on ‘Outbox’. System shows the failure reason on the ‘Statu’ of Client, such as busy, no answer, and dead number. If user wants to resend the failure fax, just click on selected file; choose ‘Send’ on menu, submit failure number to server side again. Status: Waiting process – file is waiting in line for faxing www.yeastar.com Page 20 BizFAX-E100 Client User Manual 4.3 Receive Fax 85 -9 18 -7 72 1 Sending – system is sending fax Sent successfully - fax is successfully delivered. Resending- fax is being resend. Waiting for idle trunk – trunks are busy, system is waiting for an idle trunk. Transmission failure, waiting to try again Have no valid line - User dialed a wrong access number. For example, the trunk correct access number is ‘9’, but user dialed ‘7’ that led to the unavailable of valid trunk. Wrong router, calls can not pass through – Send fax to an invalid number. The callee is busy, waiting to try again. The callee is busy, system will not try again. – The callee is busy, the retry times has reached the number that configured in server. Transmission failure, system will not try again. – After the several retry times that configured for failure fax, system still fails to send out, so will not try again. Transmission over time, system will not try again. – After the several retry times that configured for failure fax, system still fails to send out, so will not try again. Figure 4-14 G ap T el .0 After enabled Client, BizFAX will pop up a prompted interface on the lower right corner for the newly received fax. Click ‘Check Fax’ to view contents by the fax editor directly. Click ‘Close’ to close the interface and user can login Client to check. 4.4 Forward Fax to Email (FAX to Mail) Send incoming fax to email. In order to auto forward all the incoming faxes to an appointed email addrss, user requires to pre-setup the email server on BizFAX Server side. On Client side, user also needs to do the operation: click ‘File’ ‘Edit Profile’ enable ‘Sending incoming fax to the Email’, please see Figure 4-15 www.yeastar.com Page 21 BizFAX-E100 Client User Manual Figure 4-15 72 1 Once user changed the email address on the Client window as above, his email information on Server side will be updated at the same time. -7 4.5 Manage Fax 85 -9 18 4.5.1 Edit Subject G ap T el .0 The role of the subject is same as a label. User can add a subject for both received and sent faxes in order to manage them easily in future. When sending a fax, sender can add a subject on ‘Create a new fax’ window, from which receiver will quick to know the contents. For received fax, user can click on selected fax and choose ‘Edit Subject’ from pull-down menu. Figure 4-16 4.5.2 Group Managment Create a folder will be helpful to manage faxes. 1.New Folder Choose ‘Inbox’ and click right mouse, select ‘New Folder’ from pull-down menu. www.yeastar.com Page 22 BizFAX-E100 Client User Manual Figure 4-17 72 1 Create a name for this folder on the following box -7 Figure 4-18 18 2.Drag fax to folder 85 -9 Click on the selected fax file and hold down the mouse, drag it into required folder. .0 4.5.3 Delete Fax T el After clicked ‘Delete’ button, it will prompt a check window ‘Are you sure to move the fax(s) to deleted items folder’. G ap 1. Click ‘Yes’ The deleted items will be saved on trash folder temporary. Users can easily to restore the miss deleted file from trash folder to origital position. If need to permanently delete the fax, on trash folder, click ‘Delete’ on selected fax will be OK. 2. Click ‘No’ Will not to delete the fax. 4.5.4 Print Fax If user wants to print out the fax, only open it and click ‘Print’ button, system will prompt a window as Figure 4-18. www.yeastar.com Page 23 1 BizFAX-E100 Client User Manual 72 Figure 4-19 -7 4.6 Fax Editor G ap T el .0 85 -9 18 The fax editior co-works with BizFAXClient to view, edit and make remark on fax file. Option 1: Double click on a fax file in Client, click ‘Reply’ or ‘Forward’, and click ‘Edit Fax’ on the pop window to access fax editor. Option 2: Click ‘Create’, and add the file you want to fax on pop window, finally click ‘Edit’ to access fax editor. www.yeastar.com Page 24 BizFAX-E100 Client User Manual 85 -9 18 -7 72 1 4.6.1 Veiw FAX .0 Figure 4-20 T el :from left to right: fit width, fit height, fit visible, actual size :from left to right:Rotate Counterclockwise 90°, Rotate 180°, Rotate ap Clockwise 90° G 4.6.2 Remark FAX It helps user to modify the file contents. www.yeastar.com Page 25 85 -9 18 -7 72 1 BizFAX-E100 Client User Manual :Revocation ap :Move page T el :Reimplement .0 Figure 4-21 :View page G :Add text :Font Before making remark on fax, click ‘Font’ to change the size, style and font of characters. www.yeastar.com Page 26 72 1 BizFAX-E100 Client User Manual 85 -9 4.6.3 Seal & Signature 18 -7 Figure 4-22 4.6.3.1 Get seal and signature Step 1:Save a paper with a seal or a signature into computer. ap T el .0 Method 1: Send the paper from physical fax machine to virtual fax extension, and login this virtual fax extension and download the paper to computer. Method 2: Scan the paper by a scanner and save it on computer; Click right mouse on the newly scanned file and choose ‘Print’ to conver it into TIFF format file by ‘BizFAX’ virtual printer. The purpose of this step is to convert file into editable TIFF format. G Step 2: Use the FaxEditor to open the saved file. Click on the saved file, click right mouse and chose ‘Open’ ‘Program’, and click ‘View’ on pop-up window, select the FaxEditor.exe that under the BizFAXClient installation path, click ‘Open’ to edit file. www.yeastar.com Page 27 18 Figure 4-23 -7 72 1 BizFAX-E100 Client User Manual 85 -9 Step 3:On the opened FaxEditor, click ‘Remark’ ‘Get Stamp’, drag mouse to G ap T el .0 choose on stamp or signature, and then release mouse to extract the stamp or signature image from paper. Enter a name on the pop-up window as Figure 4-23 The stamp and sigunature images will be saved as BMP & TIFF format. Figure 4-24 www.yeastar.com Page 28 BizFAX-E100 Client User Manual Step 4:After clicked ‘Save’, the extracted images will be saved into manager as 18 -7 72 1 Figure 4-25 Figure 4-25 85 -9 Step 5:Click ‘OK’ to finish the operation of extracting stamp and signature. 1.Import Stamp .0 4.6.3.2 Set Stamp Image There are two methods to set stamp image: ap T el Click ‘Remark’ -> ‘Stamp Image’ -> ‘Set Stamp’; on the prompt ‘Set Stamp Image’ window -> click ‘Import Stamp’. User can import the BMP and TIF formart pictures that already saved in computer. The accuracy is better around 100dpi. G 2.Signature Click ‘Remark’ -> ‘Signature Image’ ->’Set Signature’; on the prompt ‘Set Signuature Image’ window click ‘Add Image’. 4.6.3.3 Set Password Cick ‘Remark’ ‘Set Stamp’, open the following figure: www.yeastar.com Page 29 Figure 4-26 -7 72 1 BizFAX-E100 Client User Manual Figure 4-27 G ap T el .0 85 -9 18 The lefe area is the list of all stamps and stamp image shows on the right area. For the safety of using stamps, users can set password on the following window. 4.6.3.4 Application of Stamp :Stamp All the imported stamps will be listed under pull-down menu of icon, just select a stamp to seal on fax file. Figure 4-28 If it has password protection, system will prompt the following box, user is www.yeastar.com Page 30 BizFAX-E100 Client User Manual asked to enter password. Figure 4-29 :Signature 1 All the added signature images will be listed under pull-down menu of 18 -7 72 icon, just select a signature to seal on fax file. 85 -9 Figure 4-30 .0 4.7 Fax Extension Management ap T el Fax extension refers to all users that using fax system. They are able to check each other’s information (ext. number, email address and mobile number) and forward faxes and send SMS among extensions. There are two types of fax extensions: physical fax extension and virtual fax extension. Physical fax extension means the real fax machine, and virtual fax ext. stands for the ext. registered by BizFAX Client to manage faxes. G Extension Status: It means the virtual fax extension is offline. It means the virtual fax extension is available. It stands for a physical fax machine. Extensions Group: Through clicking ‘View’ ‘Show Extensions Group’ to see all groups of extensions. www.yeastar.com Page 31 BizFAX-E100 Client User Manual All members in this 85 -9 Figure 4-31 18 -7 72 1 group .0 4.8 Contacts Management T el After signed in BizFAXClient, you can see Contacts tag. Here, you are possible to add, edit, delete, rename, send, import and export contacts. ap 4.8.1 Contacts Group Management G Before editing contact’s profile, you can classify it into group at first, which will be easier to manage and send fax by group at once. You can see contacts in group way thorugh ‘View’ ‘Show Contacts Group’ (see Figure 4-32) www.yeastar.com Page 32 85 -9 18 -7 72 1 BizFAX-E100 Client User Manual .0 Figure 4-32 T el 4.8.2 Add New Contact G ap You can add new contact through MenuAdd New Contact or click the mouse to open the adding screen. Please edit contact’s profile on following screen, such as name, office phone, and company name and so on. www.yeastar.com Page 33 85 -9 4.8.3 Edit & Delete Contact 18 Figure 4-33 -7 72 1 BizFAX-E100 Client User Manual .0 Select contact and click on mouse right to choose edit or delete from pop-up menu. T el 4.8.4 Send Contact ap Contacts information are shareable among extensions. Click on the selected contact, click on mouse right click ‘Send Contact’ on menu Open the window as Figure 4-34 to select the extension. G Note: You can select all through Ctrl+A or click on Ctrl or Shift to choose multiple contacts. www.yeastar.com Page 34 -7 18 Figure 4-34 72 1 BizFAX-E100 Client User Manual 85 -9 4.8.5 Import Contact User can import contacts in quantity from menu ‘Contacts’--> ‘Import Contact’. .0 Step: G ap T el 1. Select the file (.csv) you want to import and click ‘Open’button (figure 4-35) Figure 4-35 2. Double click the item to select corresponding address, see Figure 4-36 www.yeastar.com Page 35 72 1 BizFAX-E100 Client User Manual -7 Figure 4-36 85 -9 4.8.6 Export Contacts 18 3. Click ‘OK’ to finish this step. You can export contacts to save up on computer as well. .0 Step: G ap Figure 4-37 T el 1. Select the routing that you want to save, and then click ‘Save’ to finish as Figure 4-37 2. Enter the file name and click ‘Save’ button to export contacts into csv file. www.yeastar.com Page 36 BizFAX-E100 Client User Manual 4.9 Internal Communications among extensions For the convenience of communications among extensions, BizFAX embedded an instant talk system allow users to get voice calls or text chat with other members. 4.9.1 Voice Talk G ap T el .0 85 -9 18 -7 72 1 There are three ways to make a call between extensions: 1)Double click on the extension number that you want to call 2)Enter the ext.number directly on the box and click ‘Call’ button 3) Dial the ext. number on the small keyboard and click ‘Call’ or ‘Enter’ button. Figure 4-38 4.9.2 Text Chat BizFAXClient provides the internal instant message system for users to chat easily with other members on extensions listing. On extensions list, select the member you want to chat with, click ‘Start Chat’ button or click mouse right to open the chat screen. www.yeastar.com Page 37 1 BizFAX-E100 Client User Manual -7 18 4.10 Personal Profile 72 Figure 4-39 85 -9 For the convenience communication with your colleagues and friends, BizFAXClient provides personal information management, so that you can update profile at any time. G ap T el .0 After signed on BizFAXClient, click ‘File’ ‘Edit profile’ to open personal information screen. Figure 4-40 Here you are allowed to change name, mobile phone number and Email address. When receive a fax, auto forward to this email: After received a fax, system will auto transfer it to the pre-arranged Email addess. www.yeastar.com Page 38 BizFAX-E100 Client User Manual 4.11 Change Password 72 1 User can change password through ‘File’ ‘Change Password’ setting, open the chat box as Figure 4-42 to change password. 18 85 -9 4.12 Change Language -7 Figure 4-41 BizFAXClient has multiple language versions. You can change the Client language through ‘Tools’ ‘Change Language’. T el .0 4.13 Audio Settings G ap You can open the screen as Figure 4-42 to set up audio device and adjust audio volume. Click on menu ‘Tools’ - ‘Options’ ‘Audio Settings’. www.yeastar.com Page 39 85 -9 18 Figure 4-42 -7 72 1 BizFAX-E100 Client User Manual 4.14 Sign out & Exit .0 Sign Out: T el You can sign out BizFAXClient on menu ‘File’ ‘Sign Out’ Exit: G ap You can exit from BizFAXClient on menu ‘File’ ‘Exit’ or you can click on BizFAX icon on right tray and click ‘Exit’ to exit as Figure 4-43. Figure 4-43 www.yeastar.com Page 40 BizFAX-E100 Client User Manual Appendix A How to make fax file in TIFF format? Here, we take use of BizFAX’s virtual fax printer (BizFAX) to make .TIFF fax file. Take an example of a Word format file: Figure A-1 G ap T el .0 85 -9 18 -7 72 1 Step 1: Open the Word format file, click ‘File’ –‘Print’. Step 2: Select the ‘BizFAX’ on pop-up screen and click ‘OK’, BizFAX will transfer the word file into TIFF format file. Step 3: Open the installation routing of BizFAXClient, there is a FaxFile folder, where is the transferred TIFF files saved. For example, BizFAXClient was installed on D:\Program Files\Yeastar\BizFAXClient, as Figure A-2 www.yeastar.com Page 41 18 -7 72 1 BizFAX-E100 Client User Manual G ap T el .0 85 -9 Figure A-2 Figure A-3 <Finish> www.yeastar.com Page 42